manuals.online logo
Brands
  1. Home
  2. •
  3. Brands
  4. •
  5. ATEN
  6. •
  7. Remote Control
  8. •
  9. ATEN VPK104 User manual

ATEN VPK104 User manual

Popular Remote Control manuals by other brands

Bircher Reglomat RC Duo 2 user guide

Bircher Reglomat

Bircher Reglomat RC Duo 2 user guide

Emerson RCBT100 owner's manual

Emerson

Emerson RCBT100 owner's manual

BILDA Element-6 user manual

BILDA

BILDA Element-6 user manual

Absima CR7P manual

Absima

Absima CR7P manual

Mitsubishi Electric PAR-32MAAG Instruction book

Mitsubishi Electric

Mitsubishi Electric PAR-32MAAG Instruction book

RCA RCRTBL08BE1 quick start guide

RCA

RCA RCRTBL08BE1 quick start guide

US Electronics NOVARI user guide

US Electronics

US Electronics NOVARI user guide

Panasonic EUR7622KB0 Operation guide

Panasonic

Panasonic EUR7622KB0 Operation guide

Bang & Olufsen Beo4 user manual

Bang & Olufsen

Bang & Olufsen Beo4 user manual

Marantz RC101 user guide

Marantz

Marantz RC101 user guide

FUTABA 9ZAP - PART2 manual

FUTABA

FUTABA 9ZAP - PART2 manual

HR Matic HR MULTI 3 quick start guide

HR Matic

HR Matic HR MULTI 3 quick start guide

Anritsu MP1777A Operation manual

Anritsu

Anritsu MP1777A Operation manual

Niles WVC100 Installation & operating guide

Niles

Niles WVC100 Installation & operating guide

Bang & Olufsen BEO6 Getting started

Bang & Olufsen

Bang & Olufsen BEO6 Getting started

GE 94901 instruction manual

GE

GE 94901 instruction manual

FUTABA R7108SB Full manual

FUTABA

FUTABA R7108SB Full manual

Invacare G91S user manual

Invacare

Invacare G91S user manual

manuals.online logo
manuals.online logoBrands
  • About & Mission
  • Contact us
  • Privacy Policy
  • Terms and Conditions

Copyright 2025 Manuals.Online. All Rights Reserved.

VPK104
4-Key Contact Closure Remote Pad Quick Start Guide
Hardware Review
Front View
1Source Selection Buttons
2Status LEDs
Rear View
1LED In Port
2Contact Out Port
Side View
Hardware Installation
Before you start, prepare 2 screws, 1 wall box, and some core wires.
1(Optional) Prepare your installation site and install a Wall Box.
2Remove the faceplate from the Remote Pad.
3Ground the Remote Pad.
(a) Use core wires to serially connect the Remote Pad’s LED In (-) poles to the GND pole ( ) of the LED Out terminal
on the Presentation Switch.
(b) Use core wires to serially connect the Remote Pad’s Contact Out (-) poles to the GND pole ( ) of the Contact In
terminal on the Presentation Switch.
4Use a core wire to connect the Remote Pad’s LED In Port 1 (+) to the LED Out pole 1 on the Presentation Switch. Repeat
this step for other LED In Ports.
5Use a core wire to connect the Remote Pad’s Contact Out Port 1 (+) to the Contact In pole 1 on the Presentation Switch.
Repeat this step for other Contact Out Ports.
Package Contents
1 VPK104 4-Key Contact Closure Remote Pad
4 4-pole Terminal Blocks
1 User Instructions
1 2
48.5mm
69.4mm
21
37.3mm
3a
4
4
3
5
5
3b
Support and Documentation
Notice
All information, documentation,
firmware, software utilities, and
specifications contained in this
package are subject to change
without prior notification by
the manufacturer.
To reduce the environmental
impact of our products, ATEN
documentation and software can
be found online at
http://www.aten.com/
download/
Technical Support
www.aten.com/support
© Copyright 2019 ATEN®International Co., Ltd.
ATEN and the ATEN logo are trademarks of ATEN International Co., Ltd. All rights reserved. All other trademarks
are the property of their respective owners.
This product is RoHS compliant.
Software Configuration
Once connected to a supported ATEN Presentation Switch, the Remote Pad defaults to control the source
selection for Display A. To change this setting, go to the web interface of the Presentation Switch and configure
the Target of Contact Closure setting.
Operation
Press a button once to switch the display to the corresponding source. The button’s status LED lights green.
Scan for
more information
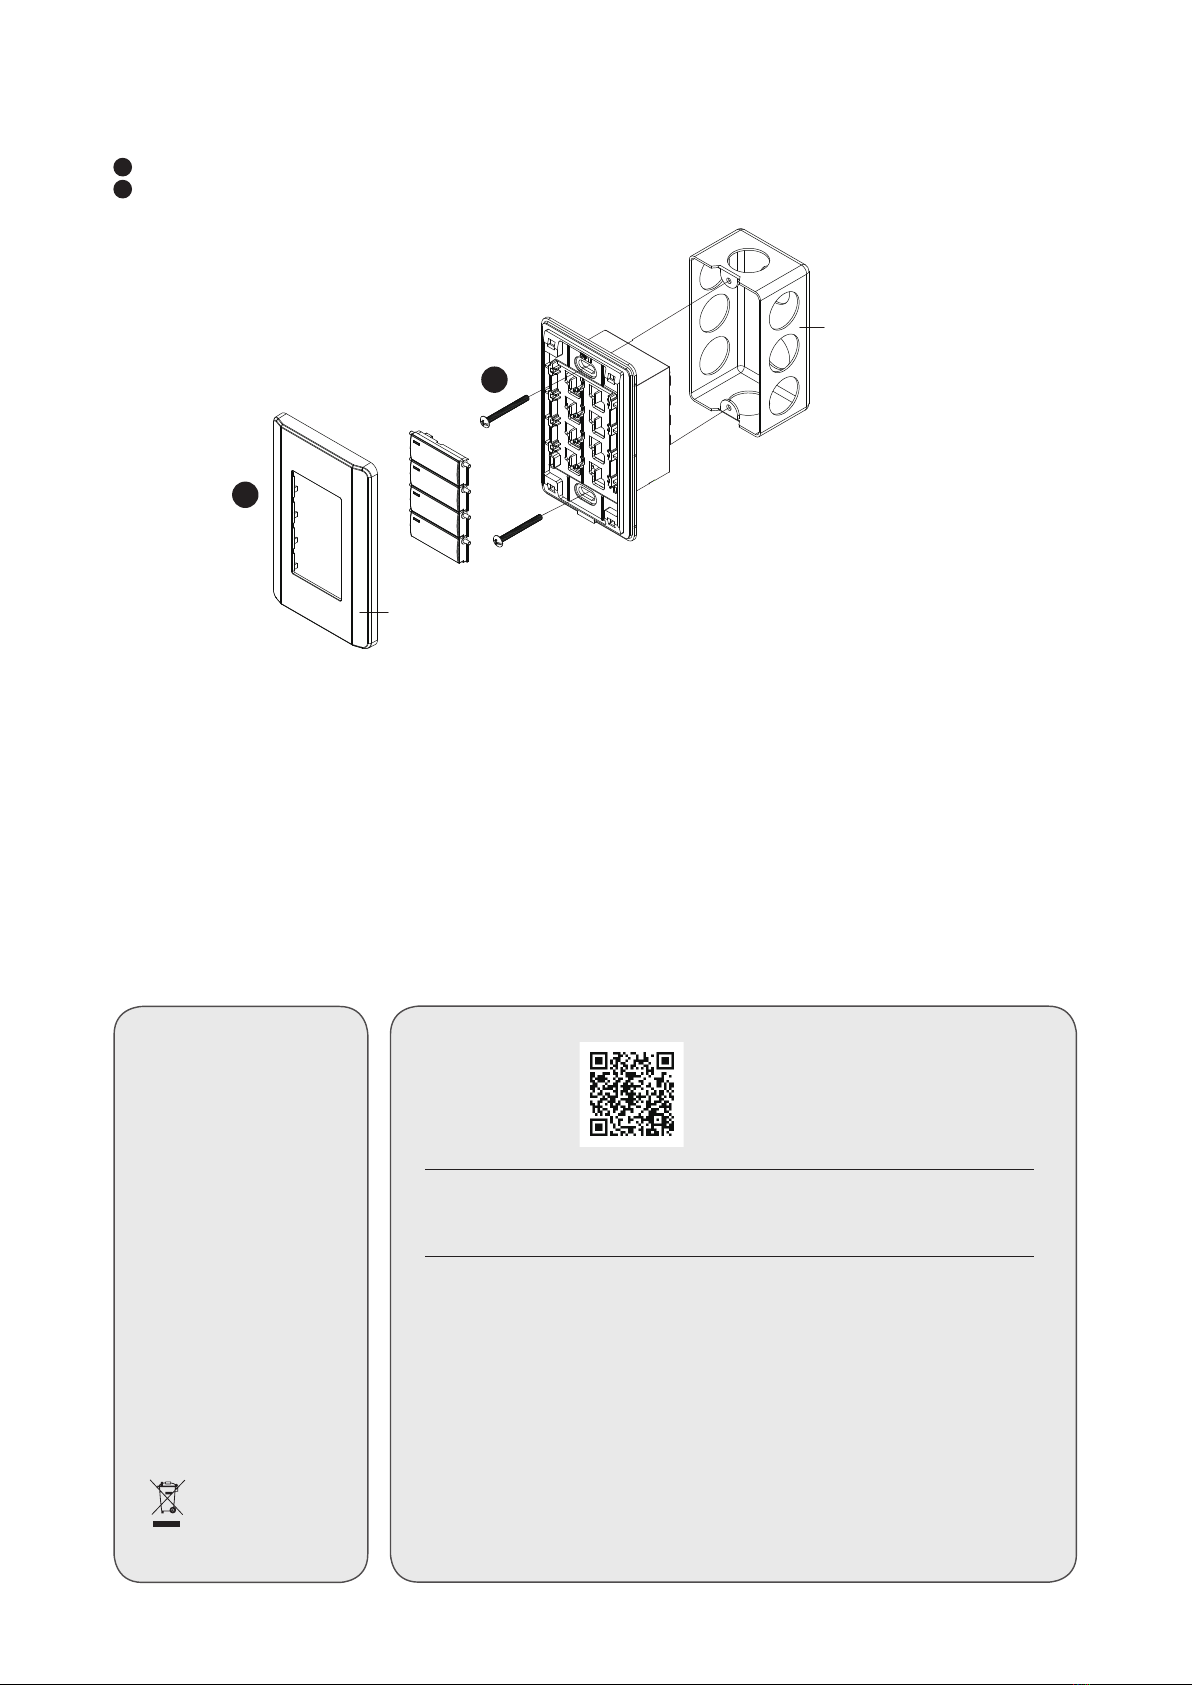
6Make sure the keys are installed to the VPK104 and then secure the unit to the wall box using two screws.
7Cover the unit with the faceplate.
7
6
Wall Box
(not included)
Faceplate
Important. Before proceeding, download the Installation and Operation Manual by visiting
the website, www.aten.com and navigating to the product page. The manual includes
important warnings, loading specifications and grounding instructions.