Action Fitness F1000 User manual

F000071
F1000 Treadmill
OWNER’S MANUAL
Call for service 1-800-465-070 www.actionsports.com.au

Exploded View
11
13
13
16
416
14
15
17
12
3
31
53
53
61
65
55
55
55
50 29
55
48
82
29
55
50
55 29
29
61 65
60 62 6260
1
49
59
49
59
30
30
56 56
56
18
83
71
70
70
84
3
59
82
59 48
28
62
62 71 58
79
46
60
978
62
76
77
47
10
7
2
29
55
55
60
60
25
54
24
54
23
54
54 25
58
55
55
96
81
97
99
Call for service 1-800-465-070 www.actionsports.com.au
2

Part List
No. Description Q'ty
1 Main Frame 1
2 Frame Base 1
3 Handle Bar 2
4 Incline Bracket 1
5 Console Support 1
7 Outer Slide (Lower) 1
8 Console 1
9 Inner Slide 1
10 Locking Knob Axle 1
11 Bottom Motor Cover 1
12 Top Motor Cover 1
13 Transportation Wheel 2
14 Rear Adjustment Base (L) 1
15 Rear Adjustment Base (R) 1
16 Fluctuation Wheel 2
17 Rear Roller 1
18 Front Roller W/Pulley 1
18~5 Magnet 1
19 Controller 1
20 Motor 1
21 Motor Bracket 1
22 Drive Belt 1
23 Running Deck 1
24 Running Belt 1
25 Foot Rail 2
26 Power Cord 1
27 Grommet 1
28 2200mm_Computer Cable 1
29 Foot Pad 5
30 ψ10xψ25x3T_Nylon Washer 2
31 Belt Guide 2
32 On/Off Switch 1
33 Breaker 1
34
15cm x764x764TH_Connecting Wires (White)
1
35 15cm x764x764TH_Connecting Wires (Black) 1
36 10cm x764x764TH_Connecting Wires (Black) 1
37 Sensor W/Cable 1
38 Sensor Rack 1
39 ψ38x400Lx3T_Handgrip Foam 2
40 25 x 50m/m_Square End Cap 2
41 Round End Cap 2
42 600mm_Handpulse Wire (Middle) 1
43 Handpulse Assembly 2
44 Safety Key 1
45 Motor Cover Anchor 4
46 □21.4×21.4_Square End Cap 1
47 □25.4×25.4_Square End Cap 1
48 3/8" x 4" _Hex Head Screw 2
49 3/8" x 2"_Button Head Socket Screw 2
No. Description Q'ty
50 3/8" x 2-1/2"_Button Head Socket Screw 50
51 M10 x 120L_Hex Head Screw 1
52 M10 x 120L_Hex Head Screw 1
53 5/16" x 1-1/2"_Button Head Socket Screw 2
54 3/16" x 1 1/2"_Tapping Screw 8
55 5 x 16m/m_Tapping Screw 21
56 5 x 16m/m_Tapping Screw 4
57 1/4" x 2"_Hex Head Screw 1
58 1/4" x 3" _Socket Head Cap Screw 2
59 ψ10x25x2T_Flat Washer 8
60 ψ10x19x1.5T_Flat Washer 7
61 ψ8x16x1.5T_Flat Washer 2
62 3/8" x 7T_Nyloc Nut 7
63 M10 x 10T_Nyloc Nut 2
64 M10 x 10T_Nut 1
65 5/16" x 7T_Nyloc Nut 2
66 1/4" x 6T_Nut 1
67 1/4" x 2"_Eye Bolt 1
68 M8 x 12m/m_Hex Head Screw 2
69 8 m/m_ Split Washer 2
70 4m/m x 12m/m_Self Tapping Screw 4
71 1/4" x 14m/m x 1T_Flat Washer 3
72 1/4" x 8T_Nyloc Nut 1
74 M5_Raised Washer 2
75 3×10m/m_Tapping Screw 5
76 ψ1/4"×22×1.0T_Flat Washer 1
77 M6×15m/m_Phillips Head Screw 1
78 ψ10×ψ23×8T_Nylon Washer 1
79 3/8"×1-3/4"_Hex Head Screw 1
80 4×38m/m_Self Tapping Screw 2
81 M5×10m/m_Phillips Head Screw 9
82 5/16" x 3/4"_Button Head Socket Screw 4
83 Combination M5 Allen Wrench & Phillips Head Screw Driver
1
84 Lubricant 1
85 3.5×16mm_Tapping Screw 1
86 Wire Tie Mount 1
87 30cm×764×764TH _Connecting Wires (White) 1
88 Connecting Cable Of Motor 1
90 M5×1.5T_Split Washer 6
91 Filter 1
92 Choke 1
93 4×10m/m_Tapping Screw 4
96 500×100×1.0T_Frame Cover 1
97 Controller Back Plate 1
98 Controller Gusset 1
99 M5×5T_Nyloc Nut 3
Call for service 1-800-465-070 www.actionsports.com.au
3

Table of Contents
Exploded View _____________________
Parts List __________________________
Included Hardware____________________
Important Safety Information _____________
Specifications_ _____________________
Assembly Instruction ___________________
Lubrication_________________________
Adjustment__________________________
Fold and Transport___________________
Console ___________________________
Warm Up___________________________
Monitoring Your Heart Rate ____________
Warranty / Service ___________________
Page
2
3
5
6
7
8
10
11
12
13
14
15
17
Call for service 1-800-465-070 www.actionsports.com.au
4
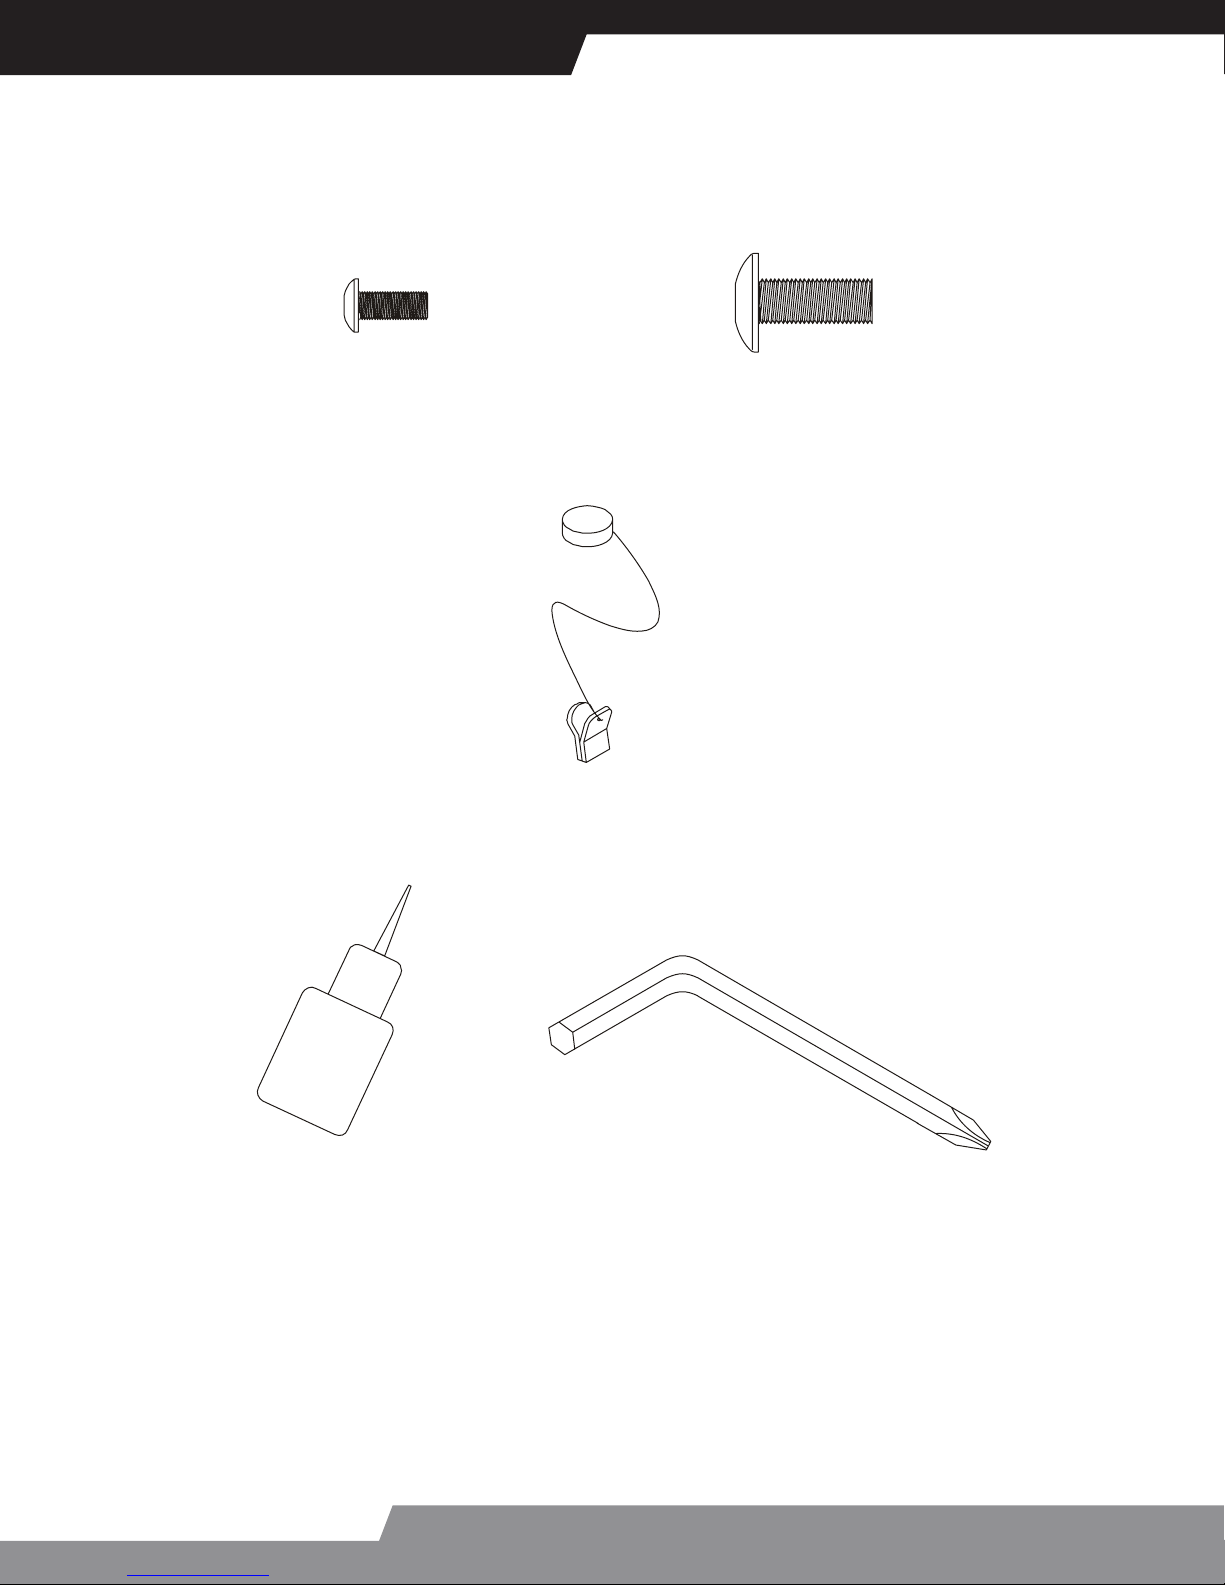
# 83. Combination M5 Allen Wrench
& Phillips Head Screw Driver (1pc)
# 84. Lubricant (1pc)
# 44. Safety Key (1pc)
# 82. 5/16"x 3/4"
Button Head Socket Screw (4 pcs)
# 81. M5 x 10m/m
Phillips Head Screw (4 pcs)
Included Hardware
Call for service 1-800-465-070 www.actionsports.com.au
5

Specifications
The treadmill has been designed and constructed to provide trouble free usage and enjoyable
exercise. You can greatly improve your understanding and benefits of exercising by carefully
reading the instructions given in this manual .Please familiarize yourself with the maintenance
advice provided for you.
SPECIFICATION
Horsepower Continuous / Peak: 1.0 / 2.0 hp
Speed Range: 1 – 10 Km/h
Striding Surface: 330 X 1020 mm
MAX.USER WEIGHT 100 KGS
Handgrip Tube
Running Belt
Incline Wheel Wheel
Locking
Knob
Console
Main Frame
Handpulse
Safety Key (should be in place
for the treadmill to work)
Call for service 1-800-465-070 www.actionsports.com.au
6

Important Safety Information
IMPORTANT: THIS UNIT IS INTENDED FOR HOUSEHOLD USE ONLY
Your treadmill was designed and built for optimum safety. However, certain precautions apply
whenever you use your treadmill. Be sure to read the manual before assembly and operation.
Also, please note the following safety precautions:
DANGER: To reduce the risk of electric shock, always unplug the treadmill from the electrical outlet
immediately after using and before cleaning.
1. Read OWNER’S MANUAL and all accompanying literature and follow it carefully
before using your treadmill.
2. If dizziness, nausea, chest pains, or any other abnormal symptoms are experienced while using this
equipment, STOP the workout and CONSULTA PHYSICIAN IMMEDIATELY.
3. Never leave the treadmill unattended when plugged in. Unplug from the outlet when not in use and
before removing or replacing parts.
4. Never operate the treadmill if it has a damaged cord or plug, if it is not working properly, if it has
been dropped, damaged, or exposed to water.
5. Do not pull the treadmill by the power supply cord or use cord as a handle. Keep cord away from
heated surfaces and open flames.
6. Fitness equipment must always be installed and used on a flat surface. Do not use outdoors or near
water.
7. Do not insert any objects into any openings.
8. Keep children and pets away from this equipment at all times while exercising.
9. Handicapped individuals should have medical approval and close supervision when using this
treadmill.
10.Do not place hands or feet under the treadmill. Always keep hands and legs off of the treadmill
when others are using it.
11.Never turn on treadmill while standing on treadbelt. Always return the treadmill to slow speed to
provide for safe dismount and low speed restart.
a-To disconnect, turn all controls to the off position, then remove plug from outlet.
b-Use the treadmill only for it is intended use as described in this manual.
c-Warm up 5 to 10 minutes before each workout and cool down 5 to 10 minutes afterward. This allows
your heart rate to gradually increase and decrease and will help prevent straining muscles.
d-Never hold your breath while exercising. Breathing should remain at a normal rate in conjunction w
ith the level of exercise being performed.
e-Start your program slowly and very gradually increase your speed and distance.
f-Always wear suitable clothing and footwear while exercising. Do not wear loose fitting clothing
that could become entangled with the moving parts of your treadmill.
g-Do not walk or jog barefoot, in stocking feet or loose fitting shoes or slippers.
h-Care must be taken when lifting or moving the equipment, so as not to injure your back. Always use
proper lifting techniques.
WARNING: Before beginning any exercise program consult your physician. This is especially
important for individuals over the age of 35 or persons with pre-existing health problems.
Read all instructions before using any fitness equipment. We assume no responsibility
from personal injury or property damage sustained by or through the use of this product.
CAUTION!! Please be careful when opening this unit.
Call for service 1-800-465-070 www.actionsports.com.au
7

Assembly Instruction
1. Take out the Treadmill from the carton and lay it aside
on the smooth ground.
2. Raised the Handrails (3) and combine it with the
Frame Base (2).
Secure the Handrails and Frame Base with the 2pcs of
5/16”x 3/4”Button Head Socket Screw (82) by using the
Combination M5 Allen Wrench & Phillips Head Screw
Driver (83).
3. Let the Computer Cable (28) go through the Console
Support (5)
Connect the Handpulse Wire (Middle) (42) and Hand-
pulse Assembly W/Wire (43).
Call for service 1-800-465-070 www.actionsports.com.au
8

Assembly Instruction
4. Install the Console Support (5) into the Handle Bar (3).
Secure the Console Support (5) and Handle Bar (3) with the 2pcs
of 5/16” x 3/4” Button Head Socket Screws (82) by using the
Combination M5 Allen Wrench & Phillips Head Screw Driver
(83).
5. Connect the Computer Cable (28) to Console (8).
Connect the Handpulse Wire (Middle) (42) to Console (8)
6. Install the Console Assembly (8) into the Console Support (5)
with the 4pcs of M5x10m/m Phillips Head Screws (81) by using the
Combination M5 Allen Wrench & Phillips Head Screw Driver (83).
Call for service 1-800-465-070 www.actionsports.com.au
9

TREADMILL LUBRICATION
Lubricating under the treadbelt will ensure superior performance and extend its life expectancy.
After the first 25 hours of use (2-3 months) apply one half bottle of lubricant.
Every 50 hours of use (5-8 months) apply one half bottle of lubricant.
HOW TO CHECK TREADBELT FOR PROPER LUBRICATION
Lift one side of the treadbelt and feel the top surface of the treadboard.
If the surface is slick to the touch, then no further lubrication is required.
If the surface is dry to the touch, apply one packet of lubricant or half of the bottle of lubricant.
HOW TO APPLY LUBRICANT
Lift one side of treadbelt.
Pour one half of the lubricant bottle under the center of the treadbelt on the top surface of the
treadboard.
Walk on the treadmill at a slow speed for 3 to 5 minutes to evenly distribute lubricant.
NOTE: DO NOT over lubricate treadboard. Any excess lubricant that comes out should be
wiped off.
IMPORTANT: ONLY USE HALF THE BOTTLE OF LUBRICANT PERAPPLICATION
LUBRICATION SCHEDULE.
Lubrication
Call for service 1-800-465-070 www.actionsports.com.au
10
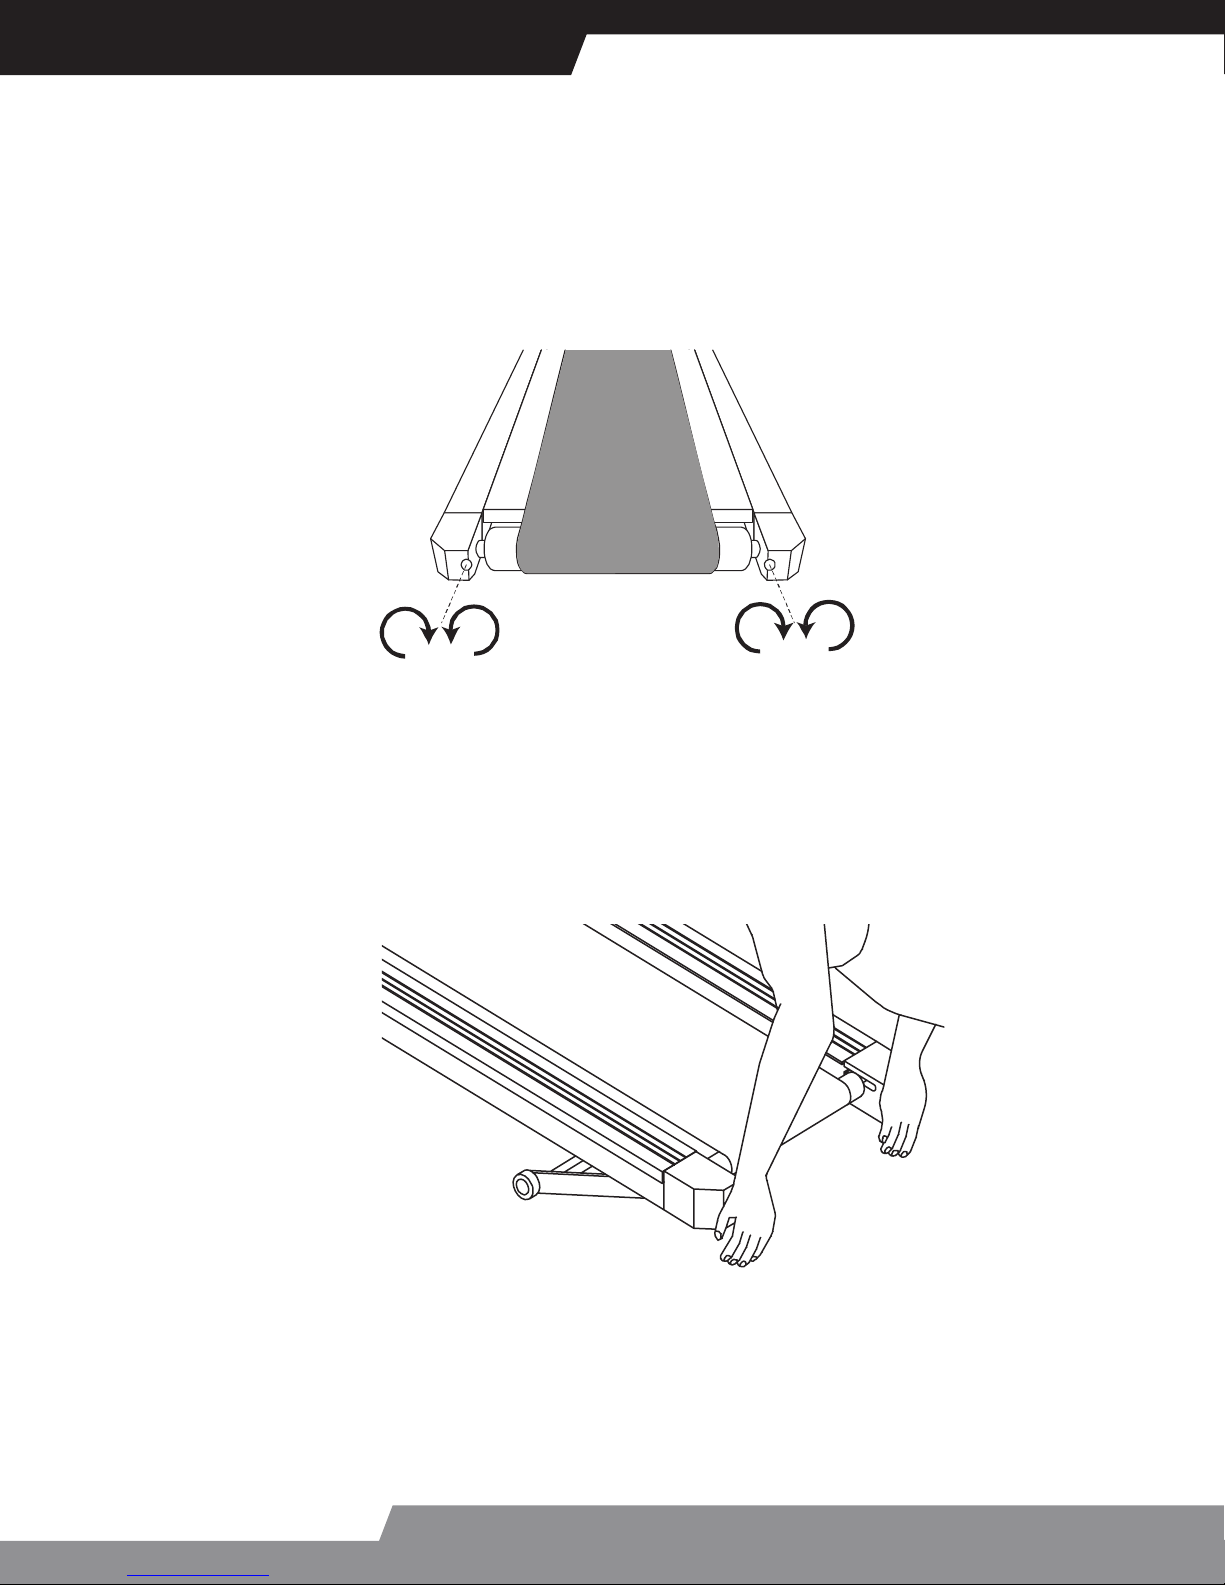
Adjustment
BELT ADJUSTMENT
If during use you notice that walking belt either shifts to the right or the left of center, first remove
"Safety Key" and unplug equipment from AC power source. Using M5 Allen wrench provided,
turn left rear roller adjustment as indicated below clockwise no more the 1/4" of a turn. Remove
M5 Allen wrench, insert "Safety Key" and insert AC power cord into AC outlet. Turn on your
treadmill and observe after running a few minutes to see if problem has been corrected. This
may take several adjustments, so repeat the above procedure.
INCLINE ADJUSTMENT
There are 2 incline positions. Using your hand to raise the rear roller, then position the incline at
desired position
Call for service 1-800-465-070 www.actionsports.com.au
11

Fold and Transport
FOLDING
Pull the locking knob with right hand, left hand lift the running deck up to 30cm then two hands lift it until it is locked by
the locking knob.
UNFOLDING
Pull locking knob and hold running deck and lower down to the floor.
TRANSPORT
Hold the upper ends of the handrails. Place one foot on the base.
Tilt the treadmill back until it rolls freely on the rear wheels. Carefully move the treadmill to the desired location. To
reduce the risk of injury, use extreme caution while moving the treading. Do not attempt to move the treadmill over an
uneven surface.
Place one foot on the base, and carefully lower the treadmill until it is resting in the folded position.
Call for service 1-800-465-070 www.actionsports.com.au
12

Console
INITIAL DISPLAY
When the power is turned on, display will show all parameter, then show the current software version,
how many hours and Kilometers the treadmill has been in use. The treadmill will then enter stand-by.
_________________
DISPLAY
SCAN: Displays each exercising data for 5 seconds
SPEED: Displays the current running speed from 1.0Kmh-10.0Kmh
TIME: Accumulates total workout time from 00:00 to 99:59
DISTANCE: Accumulates total workout distance from 0.00 to 99.99Kmh
CALORIES: Accumulates the user’s calorie consumption during exercise. Max. Value is 999.9 calories.
◄SYMBOL: Prompts to apply lubricant between running belt and running board. It disappears after
showing the third time.
♥SYMBOL: Displays your current heart rate in beats per minute during workout
►SYMBOL: When this symbol flashes, console is receiving pulse signal
__________________
QUICK START
Make sure Safety Key is in place.
Press QUICK START
Press SLOW or FAST to adjust speed
___________________
FUNCTIONS
After training, you can press Fast/Slow to display the accumulating data for speed, time, distance and
calories which the console memorizes during training.
In pause or stop mode, press MODE for 3 seconds that will clean all accumulating data
ERROR MESSAGE
1. LS: Treadmill doesn’t receive the speed signal for 8 seconds.
2. E1: Memory of console malfunction or CPU accessing problem.
3. E2: Incline position error
PROGRAM
Make sure Safety Key is in place.
Press MODE to enter counting down setting which include
setting count down Time , Distance or Calories.
Press Fast/Slow to adjust the value then press MODE to
enter next value.
Press START to start exercise
Safety Key (should be in place
for the treadmill to work.)
Call for service 1-800-465-070 www.actionsports.com.au
13

Quadriceps Stretch
With one hand against a wall for balance, reach behind you and pull
your right foot up. Bring your heel as close to your buttocks as
possible. Hold for 15 counts and repeat with left foot up.
Inner Thigh Stretch
Sit with the soles of your feet together with your knees
pointing outward. Pull your feet as close into your groin as possible.
Gently push your knees towards the floor. Hold for 10 counts
Toe Touches
Slowly bend forward from your waist, letting you back and shoulders
relax as you stretch toward your toes. Reach down as far as you
can and hold for 15 counts.
Hamstring Stretches
Sit with your right leg extended. Rest the sole of your left foot
against your right inner thigh. Stretch toward your toe as far as
possible. Hold for 15 counts Relax and then repeat with left leg
extended.
Warm Up
Call for service 1-800-465-070 www.actionsports.com.au
14

Monitoring Your Heart Rate
To obtain the greatest cardiovascular benefits from your exercise workout, it is important to work
within your target heart rate zone. TheAmerican Heart Association (AHA) defines this target as
60%-75% percent of your maximum heart rate.
Your maximum heart rate may be roughly calculated by subtracting your age from 220. Your maxi-
mum heart rate and aerobic capacity naturally decreases as you age. This may vary from one
person to another, but use this number to find your approximate effective target zone. For example,
the maximum heart rate for an average 40 year-old is 180 bpm. The target heart rate zone is 60%-
75% of 180 or 108-135 bpm.
See Fitness Safety on page 17
Before beginning your workout, check your normal resting heart rate. Place your fingers lightly
against your neck, or against your wrist over the main artery. After finding your pulse, count the
number of beats in 10 seconds. Multiply the number of beats by six to determine your pulse rate per
minute. We recommend taking your heart rate at these times; at rest, after warming up, during your
workout and two minutes into your cool down, to accurately track your progress as it relates to
better fitness.
During your first several months of exercising, the AHA recommends aiming for the lower part of the
target heart rate zone-60%, then gradually progressing up to 75%. According to the AHA, exercising
above 75% of your maximum heart rate may be too strenuous unless you are in top physical condi-
tion. Exercising below 60% of your maximum will result in minimal cardiovascular conditioning.
Check your pulse recovery rate – If your pulse is over 100 bpm five minutes after you stop exercis-
ing, or if it’s higher than normal the morning after exercising, your exertion may have been too
strenuous for your current fitness level. Rest and reduce the intensity next time.
Fitness Safety The target heart rate chart indicates average rate zones for different ages. A variety
of different factors (including medication, emotional state, temperature and other conditions) can
affect the target heart rate zone that is best for you. Your physician or health care professional can
help you determine the exercise intensity that is appropriate for your age and condition
(MHR) = Maximum Heart Rate
(THR) = Target Heart Rate
220 - age = maximum heart rate (MHZ)
MHZ x .60 = 60% of your maximum heart rate.
MHZ x .75 = 75% of your maximum heart rate.
For example, if you are 30 years old, your calculations will be as follows:
220 - 30 = 190
190 x .60 = 114 (low end or 60% of MHZ)
190 x .75 = 142 (high end or 75% of MHZ)
30 year-old (THR) Target Heart Rate would be 114-142
See Heart Rate Table (on next page) for additional calculations.
Call for service 1-800-465-070 www.actionsports.com.au
15

Monitoring Your Heart Rate
Call for service 1-800-465-070 www.actionsports.com.au
16

Warranty / Service
IMPORTANT
Please read and retain this manual as it will assist with identification for parts and service.
LIMITED WARRANTY
ACTION FITNESS warrants its F1000 Treadmill (F000071) to be free from defects in material and
workman-ship under normal use and service conditions for a period of 12 months for the parts and
2 years on the motor from the date of purchase of this article. Evidence of unfair usage or incorrect
adjustment by the owner will void this promise.
All warranty coverage extends only to the original retail purchaser from the date of purchase.ACTION
FITNESS obligation under this Warranty is limited to replacing or repairing the product, at the discretion
of our authorised service centre. Any enquiries relating to warranties or spare parts must first be directed
to our Freecall 1800 465 070 who will then assist you in the appropriate action to be taken. For efficient
processing of your enquiry please have proof of purchase, retailer name you purchased the item from
and the brand on the product.
This warranty does not extend to any damage to a product caused by abuse, improper or abnormal
usage, or repairs not provided by ACTION. Nor does this warranty extend to products used for commer-
cial or rental purposes.This warranty does not cover ordinary wear, tear and weathering, failure to follow
directions, improper installation, improper maintenance or acts of God (such as damage caused by
storms, lightning and by snow or ice). No other Warranty beyond that specifically set forth above is
authorised by ACTION.
Our sales and service centre has been set up to provide assembly assistance, replacement parts and
accessories, and to efficiently handle all warranty related matters.
Freecall 1800 465 070
Hours 9:00am – 4:30pm Monday to Friday (excluding Public Holidays)
9:00am – 3:00pm Saturday
Website: www.actionsports.com.au
Call for service 1-800-465-070 www.actionsports.com.au
17
Table of contents
Other Action Fitness Treadmill manuals


