Action Fitness PDG0001-T801 User manual

PDG0001
–T801 & PDG0004 – T802
T80X Series
Foldable Treadmill
Owner’s Manual
Retain this owner’s manual for future reference.
Read and follow all instructions in this owner’s manual.
Retain this owner’s manual for future reference.
Read and follow all instructionsin this owner’s manual.
Version
A

Owner’s Manual 1
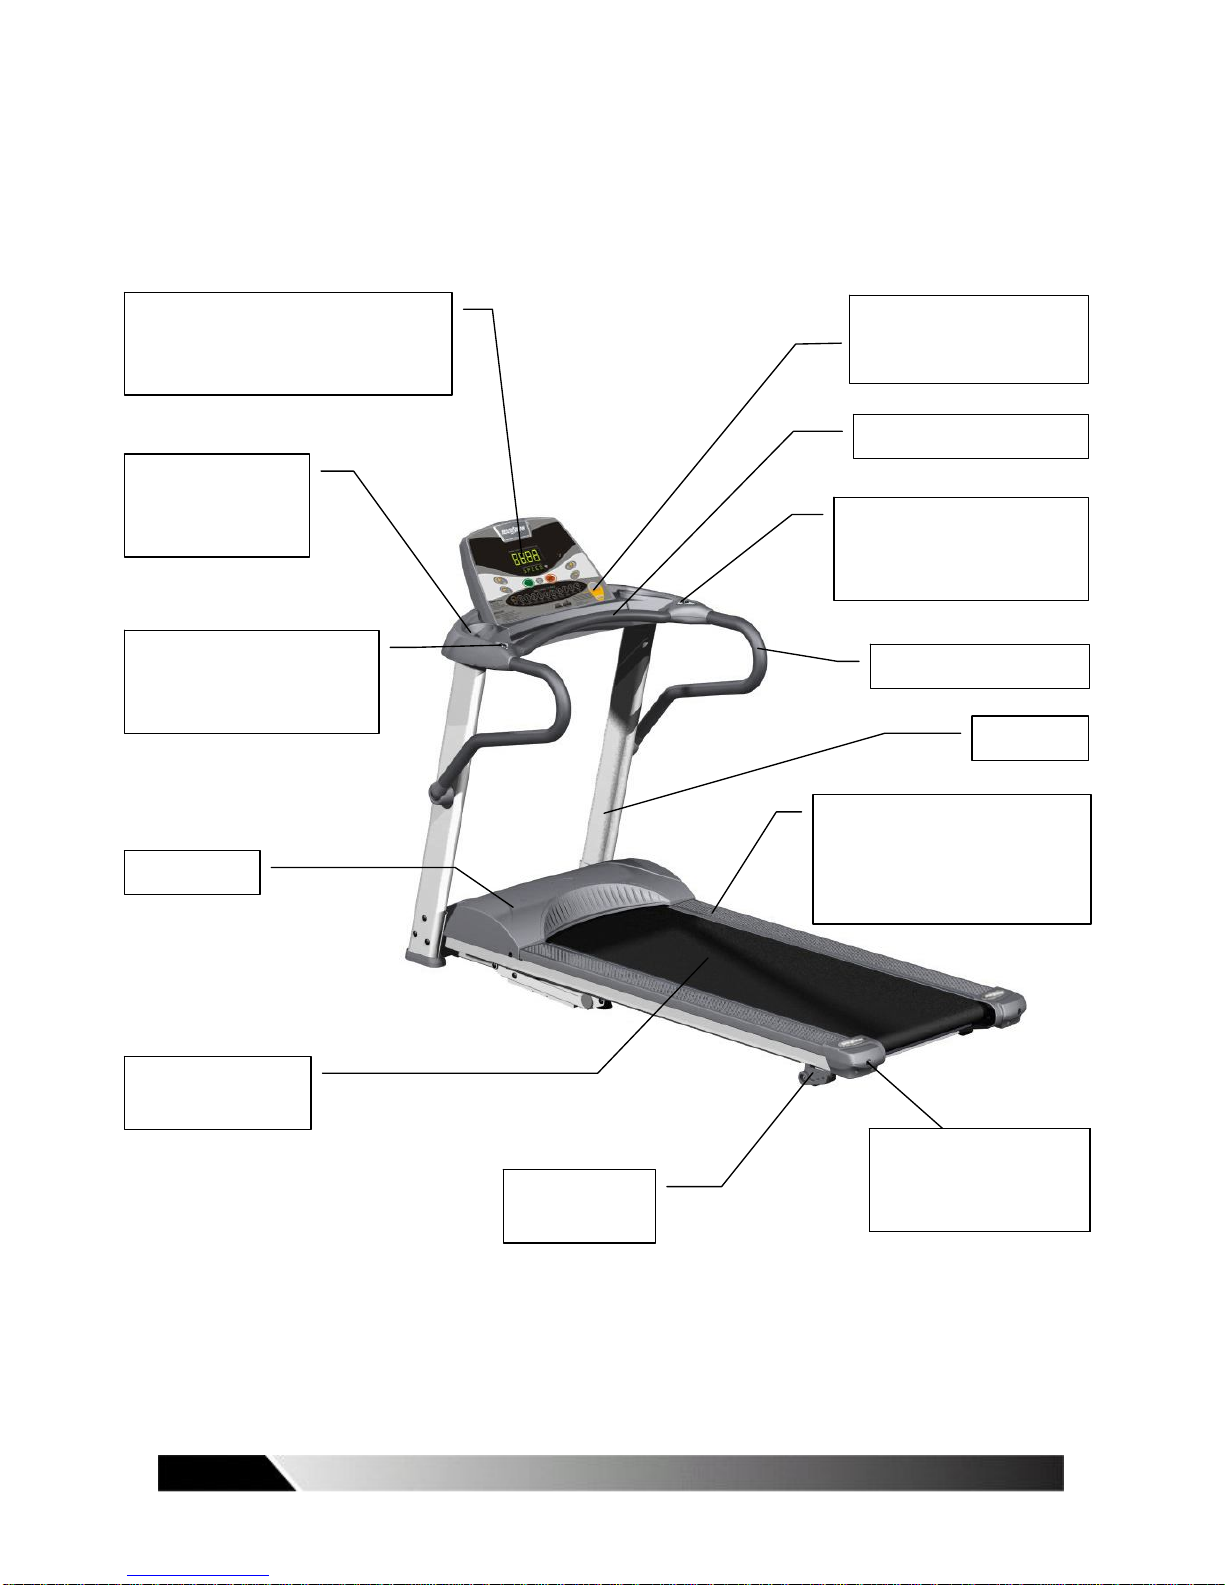
T801 INTRODUCTION
Console with 5 LED windows
Water bottle holder and
accessory holder built into
the console.
Wide side landing to place
your feet before and after
your workout, or anytime
you feel like a rest during
the workout.
Running belt always
aligned in the center.
Safety key
–
treadmill will not
activate unless the safety key
is secured in place.
Motor cover
Horizontal bar with
foam grip
Handle bar with
foam grip
Upright post
Patented folding
lock release
Running belt adjustment to
adjust belt tension or to
center the running belt
2Owner’s Manual
T802 INTRODUCTION
Console with extra large LEDwindows
and display messages will guide you
through the steps to setup yourworkout.
Water bottle holder
and accessory holder
built into the console.
Wide side landing to place your
feet before and after your workout,
or anytime you feel like a rest
during the workout.
Running belt always
aligned in the center.
Safety key
–
treadmill will not
activate unless the safety
key is secured in place.
Running belt adjustment
to adjust belt tension or to
center the running belt
Patented folding
lock release
Adjust the elevation easily with
your thumb while holding on to
the handlebar with your hands.
Motor cover
Adjust the speed easily with
your thumb while holding on to
the handlebar with your hands.
Handle bar with foam grip
Upright post
Horizontal bar with foam grip

Owner’s Manual 3
T803 INTRODUCTION
Back cover
Console with text messagesmakes
customizing your workout easily.
Big LED and dot matrix display
windows for real time feed back of
all workout stats.
Water bottle holder and
accessory holder built into
the console.
Wide side landing to place
your feet before and after your
workout, or anytime you feel
like a rest during the workout.
Running belt always
aligned in the center.
Safety key
–
treadmill will not
activate unless the safety key
is secured in place.
Running belt adjustment
to adjust belt tension or to
center the running belt
Built-in fan keeps user cool
and refreshed during workout. Adjust the speed easily with
your thumb while holding on to
the handlebar with your hands.
Motor cover
Patented folding
lock release
Adjust the elevation easily with
your thumb while holding on to
the handlebar with your hands.
Handle bar with foam grip
Upright post
Horizontal bar with foam grip

4Owner’s Manual
KEY FEATURES
Congratulations on choosing a state-of-the-art treadmill.
You have taken the first step to a healthier and more rewarding lifestyle.
This treadmill is especially designed to give you reliable performance and enjoyable
workout in the comforts of your home. Please find below the features and benefits of
this treadmill.
◇Compact frame to take up less space and 78-degree-fold design is better for space
saving.
◇The base frame is hidden below the main frame to maximize the running surface size.
◇Gas assisted lift makes folding and unfolding of the deck safe and easy.
◇The folding lock release mechanism is located at the end of the deck so that when
folded,only adults can access the release.
◇Wireless pulse receiver compatible with Polar and CardioSport chest straps to monitor
your heart rate during exercise.
◇Low impact design with cushions so that your joints are protected against injury.
◇Self-centering belt alignment so that the running belt is always tracked correctly in the
center.
SPECIAL FEATURES
Model # T801 T802 T803
Special
features
Basic model
Service notice
Message instructions
Direct speed control
Speed and elevation
adjust buttons at the
handlebar
Message instructions
Direct speed control
Speed and elevation
adjust buttons at the
handlebar
CAUTION!
Before beginning any
exercise program,
always consult your
physician. If you
experience chest pains,
nausea, dizziness or
shortness of breath,
STOPexercising and
consult your physician
before continuing.

Owner’s Manual 5
Service notice
Extended handlebar
Service notice
Extended handlebar
Back cover
TABLE OF CONTENTS
I. IMPORTANT SAFETY PRECAUTIONS……..……………………….……. 6
Grounding Instructions
ElectricalSafety
MechanicalSafety
AppropriateAttire
Children and Pets
II. SETTING UP YOUR TREADMILL ……………………………………….…. 8
Placementin Your Home
Leveling the Base
Use Dedicated Circuit
III. HANDLING YOUR TREADMILL……………………….……………………. 9
Folding and Unfolding the Treadmill
Moving the Treadmill
IV. OPERATING THE TREADMILL……………………………………………… 10
Turn Power on
SafetyTether Key and Clip
Getting on and off the Treadmill
V. OPERATING THE CONSOLE T801………………………………………… 11
OPERATING THE CONSOLE T802………………………………………… 18
OPERATING THE CONSOLE T803………………………………………… 26
VI. EXERCISE TIPSAND GUIDELINES……………………………………….. 34
Stretch
WarmUp
CoolDown
How Often
How Long
How Hard
Target Heart Rate
VII. MAINTENANCE…..………………………………………………………………. 36
Cleaning
Running Belt CenteringAdjustment
Running BeltTensionAdjustment
Lubricating the Deck
VIII. TROUBLE SHOOTING ………………………………………………………... 38
When to Call for Help
Error Codes

6Owner’s Manual
Trouble Shooting Guide
IX. WARRANTY………………………………………………………………………. 40

Owner’s Manual 7
I.IMPORTANT SAFETY PRECAUTIONS
When using an electrical product,basic precautions should always be followed. Read
all instructions before using this treadmill.
GROUNDING INSTRUCTIONS
This product must be grounded! If treadmill should malfunction or break down,
grounding provides a path of least resistance for electrical current to reduce the risk of
electrical shock. This product is equipped with a cord having an equipment-grounding
conductor and a grounding plug. This plug must be plugged into an appropriate outlet
that is properly installed and grounded in accordance with local codes and ordinances.
DANGER!
Improper connection of the equipment-grounding conductor can result in a risk of
electrical shock. Check with a qualified electrician or serviceman if you are in doubt as
towhether the productis properly grounded. Do notmodify theplug provided with the
product – if it will not fit the outlet, have a proper outlet installed by a qualified electrician.
ELECTRICAL SAFETY
To reduce the risk of burns, fire, electrical shock or injury to persons, take the following
precautions.
DO NOTleave the treadmillunattended at any time when plugged in. Unplug the
treadmill from the power source when it is not in use.
DO NOTuse the treadmill if the unit is wet or the plug or cable is damaged or the
treadmill is not working properly. DO NOT use damaged or defective equipment.
Keep equipmentout of use until unit is repaired by trained technician.
Keep the power cable and plug away from heated surfaces.
NEVER place the power cord under carpeting or have any object on top of the
power cord.
ONLY use the power cord provided with this treadmill.
To disconnect, turn the switch to the off position, then remove the plug from the
outlet.
WARNING!
Connect this unit to a
properly grounded
outlet only.

8Owner’s Manual
This exercise equipmentis designed and built for optimum safety for the home use.
However,certain precautions always apply whenever you operate any exercise
equipment. Be sure to read the entire manual before assembly and operation of this
machine. Also, please note the following safety precautions.
MECHANICAL SAFETY
Before you start exercise, make sure the unit functions correctly. To maintain the
safety levelof the exercise equipment, DO NOT use a faulty device.
Replace defective components immediately and/or keep the equipmentout of use
untilrepair.
Inspect the equipment prior to exercising to ensure that all nuts and bolts are fully
tightened before each use.
DO NOTuse attachments not recommended by the manufacturer.
NEVER drop or insert any object into any opening.
ONLY one person may use the treadmill at a time.
NEVER activate the speed when someone else is standing on the treadmill.
APPROPRIATEATTIRE
Always wear appropriate clothing. DO NOT wear clothing that might catch on any
part of the treadmill.
Always wear non-slippery shoes during workout with the treadmill. DO NOT wear
shoes with heels or leather soles. Check the soles of your shoes and remove any
dirt and embedded stones.
CHILDREN AND PETS
Most exercise equipments are not recommended for young children. Children
should not use the equipment unless they are under adult supervision. To ensure
safety, keep young children off the treadmill at all times.
■Exercise equipments have many moving parts. In the interest of safety, keep others
(especially children and pets) at a safe distance while you exercise.
CAUTION!
STOP your workout
immediately if you
feel any pain or
abnormal symptoms
and consult your
physician.
Read this manual
before operating this
treadmill.

Owner’s Manual 9
II. SETTING UP YOUR TREADMILL
PLACEMENT IN YOUR HOME
To make exercise a desirable daily activity for you, the treadmill should be placed in a
comfortable and convenient setting. This treadmill is designed to use minimal floor
space and to go nicely in your home.
DO NOT place the treadmill outdoors.
DO NOTplace the treadmillnear water or in high moisture content environment.
Make sure power cord is not in the path of heavy traffic.
If your room is carpeted, check the clearance to make sure there is enough space
between the carpet fiber and the treadmill deck. If you are uncertain, it is best to
place a mat beneath your treadmill.
Locate the treadmill at least 4 feet from walls or furniture.
Allowa safety area of 20m X 10m behind the treadmill so that you can easily get on
and off the treadmill without getting trapped during an emergency.
Occasionally after extended use you will find a fine black dust below your treadmill.
This is normal wear and DOES NOT mean there is anything wrong with your treadmill.
This dust can be easily removed with a vacuum cleaner. If you wish to prevent this
dust from gettingon your floor or carpet, place a mat beneath your treadmill.
LEVELING THE BASE
It is important that you place the treadmill on a firm level surface.
Check the treadmill to ensure the frame is level once you have moved the treadmill into
the position of your choice.
USE DEDICATED CIRCUIT
The outlet selected should be a dedicated circuit. It is particularly important thatNO
sensitive electrical equipments, such as computer or TV, share the same circuit.
CAUTION!
Make sure the
running deck is level
to the ground.
If the deck is
positioned on uneven
surface, it would
cause premature
damage to the
electronic system.

10 Owner’s Manual
III. HANDLING YOUR TREADMILL
FOLDING THE TREADMILL
Folding and unfolding of this treadmill is made easy with the assistance ofgas shock.
After the treadmill has come to a complete stop, make sure the elevation is lowered all
the way to the ground before folding the treadmill. With caution, fold up the deck slowly
with both hands. When you hear a click, the deck is locked in place.
UNFOLDING THE TREADMILL
Pullout the lock pin on theupright post (L) with your left hand. At the same time, press
the deck slowly with right hand. Use both hands to bring the deck slowly to the ground.
As the deck gets closer to the ground, it will drop at a faster rate and feel heavier.
Please handle with caution.
MOVING THE TREADMILL
This treadmill is easy to move around safely.
To move the treadmill:
1. Turn power switch off.
2. Unplug the power cord.
3. Make sure the deck is at 0% grade.
4. Fold the treadmill and make sure lock is engaged. You should hear a click to
indicate positive engagement.
5. Simply roll the treadmill on four wheels to the desired location.
STORING THE TREADMILL
For safety precaution,especially when you have children in the house, we recommend
that you follow these steps to keep the treadmill out of potential harm.
1. Turn off the power switch when you have finished workout.
2. Disconnect the plug from the wall socket.
3. Remove the safety tether key and store out of reach of children.

Owner’s Manual 11
IV. OPERATING THE TREADMILL
TURN POWER ON
The ON/OFF switch for the treadmill is located next to the power supply cord at the back
ofthe motor cover. Flip this switch to the “ON”position.
SAFETY TETHER KEY AND CLIP
The safety key is designed to cut the main power to the treadmill should you fall.
Therefore, the safety key is designed to bring the treadmill to an immediate stop. At
high speeds, it may be uncomfortable and somewhat dangerous to come to a complete
stop immediately. So, use the safety key as emergency stop only. To bring the
treadmill to a complete stop safely and comfortably, use the red stop button.
Your treadmillwill not start unless the safety key is properly inserted into the key holder
at the side of the console. The other end of the safety key should be securely clipped
to your clothing so that in case you fall, you will pull the safety key from the console,
which will stop the treadmill immediately to minimize injury. For your safety, never use
the treadmill without securing the safety key clipped to your clothing. Pull on the safety
key clip to make sure it will not come off your clothing.
GETTING ON AND OFF THE TREADMILL
Handle with care when getting on or off the treadmill. Try to use the handlebars while
getting on or off. While you are preparing to use the treadmill, do not stand on the
running belt. Straddle the running belt by placing your feet on both side rails of the
treadmill deck. Place your foot on the belt only after the belt has begun to move at a
consistent slow speed.
During exercise, keep your body and head facing forward at all times. Never attempt to
turn around on the treadmill when the running belt is still moving. When you have
finished exercising, stop the treadmill by pressing the red stop button. Waituntil the
treadmill comes to a complete stop before attempting to get off the treadmill.
If you feel uneasy with the speed and are not sure how to stop, hold the handlebars, lift
your feet off the running belt and place on both sides of the side landing. The side
landing is a non-moving platform and would be a good place to rest before resuming the
workout. Always remember to start at a lowspeed for your safety and comfort.
WARNING!
NEVER use this
treadmill without first
securing the safety
tether clip to your
clothing.
CAUTION!
For your safety, step
onto the belt when the
speed is no more
than 2 Km/H.
NEVER start the
treadmill at a running
speed and attempt to
get on while it is
moving fast.
NOTE!
The deck should NOT
be folded unless the
elevation is at 0%
grade.Attempts to
fold the deck while it
is elevated may
cause damage to the
frame.

12 Owner’s Manual
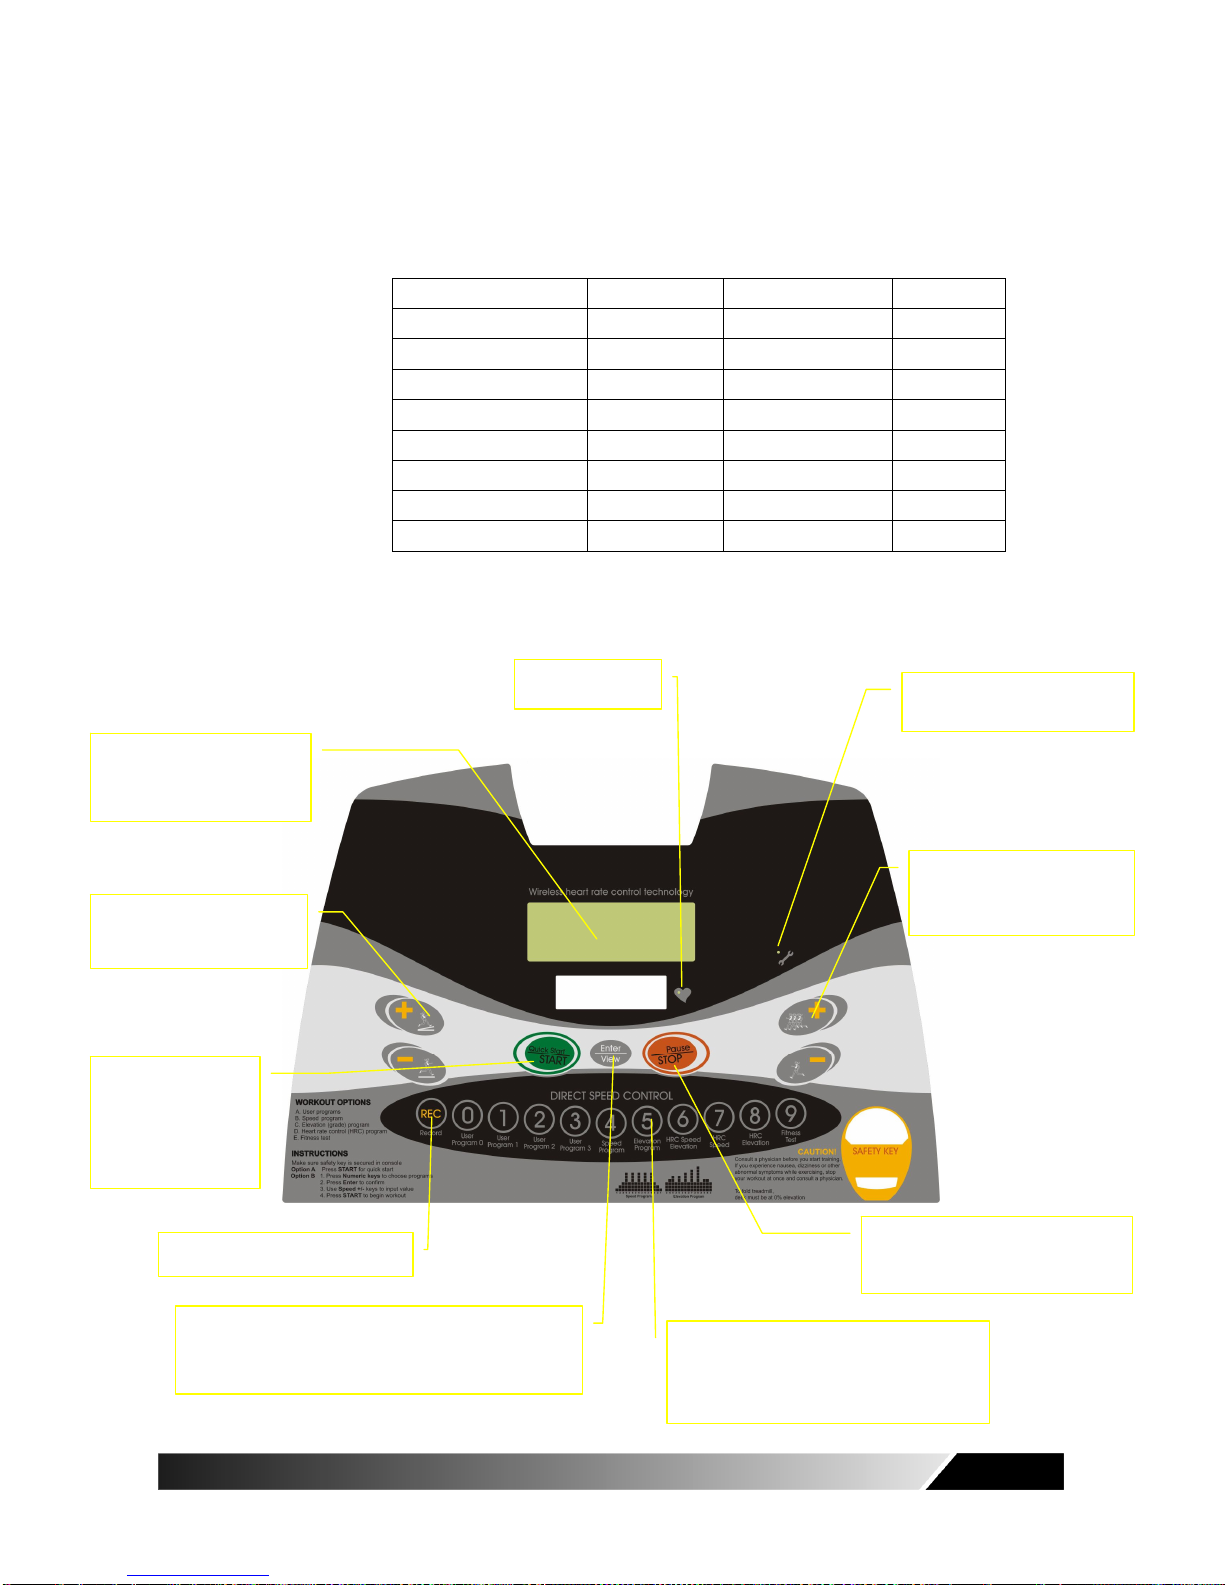
V. OPERATING THE CONSOLE
MODEL T801
DISPLAY VALUES
Display Resolution Range Increment
PULSE XXX 40-240 1
ELEVATION (%) XX 0-12 1%
DISTANCE (Miles) XX.X 00.1 – 99.0 0.1
DISTANCE (Km) XX.X 00.1 – 99.0 0.1
SPEED (Miles/H) XX.X 00.6 – 10.0 0.1
SPEED (Km/H) XX.X 01.0 – 16.0 0.1
TIME XX:XX 00:01 – 99:00 00.01
CALORIES XXX 1-999 1
QUICK START /
START / ENTER –
three different
functions
PAUSE – press once to pause
STOP – press twice to stop
FAST – increase speed
SLOW – decrease speed
UP – elevation up
DOWN – elevation down
Service required indicator
Pulse indicator LED display
window
s
HOLD – display pulse or calories
SCAN – display both interchangeably
COOLDOWN
PROGRAM – program selection
VIEW – pulse or calories display selection

Owner’s Manual 13
SPEED ADJUSTMENTS
FAST and SLOW will adjust speed by increments of 0.1Km/H during workout. Or you may
hold these buttons to ramp up ordown.
ELEVATION ADJUSTMENTS
For safety reasons, elevation isdesigned to be manually adjusted only. Atno time will
treadmill automatically adjust elevation except duringone ofthefollowing three programs:
P2 = elevation program, H-SE= HRC by speed and elevation, and H-E = HEC by elevation.
Elevation may be adjusted evenwhile the running beltis not moving. However, during the
program setup mode, elevationwill not be adjustable.
PULSE FUNCTION
This treadmill features wireless heart rate monitoring, the most advanced technology to date
for accurate read out of your heartbeat.
To use the wireless pulse monitoring system, you must wear theheart rate transmitter chest
strap (sold separately) so that the contact surface is next to yourskin directly under your
heart to pick up the pulse signals.
Please note that some fibers used in clothes (e.g. polyester, polyamide) create static
electricity, which may prevent reliable heart rate measurement. Also note that mobile
phone, television and other electrical appliances forman electro-magnetic field around them,
which may also cause problems in heart rate measurement.
PAUSE FUNCTION
When STOP button is pressed during workout,program is suspended. After the running
belt has come to a complete stop, display will count down from 03:00. During pause mode,
only STARTand STOPbuttons will function.
If STARTis pressed within three minutes during the pause mode, treadmill will bring the
running belt movement back to the speed at which the treadmillwas paused. Workout
values will resume counting and continue where it was left off.
If STOPis pressed during the pause mode, program will end. After three minutes if no
button is pressed, treadmill will automatically end the workout program.

14 Owner’s Manual
END OF WORKOUT STATS
When you have completed yourworkout or if you have ended your workout, the display
windows will report your workout stats for one minute. After the running belt has come to a
complete stop, the displays willshow total time, totaldistance, total calories and average
speed. Then the display will go to idle mode, readyfor the next workout setup. If you
wish to skip the workout stats report, simply press the STOP button, which will skip displayto
the idle mode.
UNIT CONVERSION
To change from metric to English or English to metric, you mustbe inthe idle mode. Follow
the steps below to make the unitconversion.
1. Simultaneously press both theSTOPand SLOW together.
2. The message center will displayunit.
3. Simply press STARTto confirm.
Notice that the LED lights next to both the speed and distance display windows on the upper
right corner will have changed the measurement unitaccordingly.
VIEW / PROGRAM
During workout setup – this button will select program.
During workout – this button will change PULSE toCALORIES or CALORIES to PULSE.
SCAN / HOLD
This button will allow user to view calories and pulse display values interchangeably (SCAN).
Or user may view calories orpulse only (HOLD).
COOL DOWN
Whenever youare ready to stop your workout,even ifyou are in the middle of a program,
be sure to use the COOLDOWN program. When the cool down button is pressed, it
will automatically interrupt the current workout and go directly into cool down routine,
which is programmed for four minutes. The first two minutes will reduce speed and
elevation by 50% ofyour last display values. The last two minutes will reduce speed by
another 50% and the elevation will reduce to 0%.

Owner’s Manual 15
PRESET PROGRAMS
QUICK START
Once the power is turned on and the safety key is secured in place, simply press the
QUICK START button. Treadmillwill activate at 1.0 Km/H after 3 seconds. You may
increase/decrease speed or elevation at any time during your workout. To end workout,
simply press the STOPbutton to stop the treadmill. During manual quick start workout,
time will count up. During other program workouts, time will count down.
1. Turn power on
2. Check safety key secured to treadmill and clip secured to user clothing
3. Press START to begin workout
SPEED PROGRAMS
Once the power is turned on and the safety key is secured in place, you may press the
PROGRAM button to choose the pre-set speed program P1, press STARTkey to
activate the treadmill. Where user may customize, the default value (or the previous
input value) will flash indicating that you may either confirm the value flashing or change
the value. Once you have made your data input, press START to activate the treadmill.
1. Turn power on
2. Check safety key secured to treadmill and clip secured to user clothing
3. Press the PROGRAM button once, PI (speed program) will be displayed
4. Press ENTER to confirm
5. Use FAST or SLOW buttons to input workout time
6. Press ENTER to confirm
7. Use FAST or SLOW buttons to input intensity level based on maximum speed
8. Press ENTER to confirm, program will begin workout
ELEVATION PROGRAMS
Once the power is turned on andthe safety key is secured in place, you may pressthe
PROGRAM button twice to choose the pre-set elevation program P2. Where user may
customize, the default value (or the previous input value) will flash indicating that you
may either confirm the value flashing or change the value. Once you have made your
data input, press START to activate the treadmill.
1. Turn power on
2. Check safety key secured to treadmill and clip secured to user clothing
3. Press the PROGRAM button twice, P2 (elevation program) will be displayed
4. Press ENTER to confirm
5. Use FAST or SLOW buttons to input workout time
6. Press ENTER to confirm
7. Use FAST or SLOW buttons to input intensity level based on maximum elevation
8. Press ENTER to confirm, program will begin workout
QUICK START
Once the power is on
and the safety tether
key is secured in
place, simply press
the START button,
and after three-
second count down
treadmill will activate
and maintain the
running belt at 1.0
Km/H.

16 Owner’s Manual
TARGET TRAINING PROGRAMS
Users have the option to customize workout based on setting training targets for time
and distance. Once the power is turned on and the safety key is secured in place, you
may press the PROGRAM button to choose one of the target program, P3 set training
target based on time and P4 set training target based on distance. Where user may
customize, the default value (or the previous input value) will flash indicating that you
may either confirm the value flashing or change the value. Once you have made your
data input, press START to activate the treadmill.
1. Turn power on
2. Check safety key secured to treadmill and clip secured to user clothing
3. Press the PROGRAM button three times for P3 = Target time,or press the program
button four times for P4 = Target distance
4. Press ENTER to confirm
5. Use FASTand SLOW buttons to input target time or distance
6. Press ENTER to confirm, program will begin workout
HEART RATE CONTROL PROGRAMS
Users have the option to customize their heart rate control programs based on their
target heart rate value. Once the power is turned on and the safety key is secured in
place, you may press the PROGRAM button to select H-SE program, H-S program or
H-E program. Where user may customize, the default value (or the previous input
value) will flash indicating that you may either confirm the value flashing or change the
value. Once you have made your data input, press START to activate the treadmill.
Treadmill will automatically adjust by elevation or speed or both (depending on which
program is chosen) to reach and maintain the user’s target heart rate. During workout,
users may still be able to adjust speed or elevation. During workout, time counts down
from total time, which is definedas time for workout andcool down.
At the end of the workout, treadmill will automatically go into cool down mode. Cool
down mode is pre-set up for 4 minutes. In the first two minutes, speed and elevation
will be reduced by 50%. The last two minutes, speed will be reduced by another 50%
and elevation will go to 0%.
To use the heart rate control programs, user must wear wireless transmitter chest strap.

Owner’s Manual 17
INSTRUCTION FOR TARGET HEART RATE CONTROL PROGRAMS
1. Turn power on
2. Check safety key secured to treadmill and clip secured to user clothing
3. Press PROGRAMbutton to select H-SE (HRC by speed and elevation adjustments),
H-S (HRC by speed adjustment only) or H-E (HRC by elevation adjustment only).
4. Press ENTER to confirm
5. Use FAST or SLOW buttons to input your age
6. Press ENTER to confirm
7. Use FAST or SLOW buttons to input workout time
8. Press ENTER to confirm
9. Use FAST or SLOW buttons to input target heart rate
10. Press START to begin workout

18 Owner’s Manual
NOTE
Owner’s Manual 19
V. OPERATING THE CONSOLE
MODEL T802
DISPLAY VALUES
Display Resolution Range Increment
PULSE XXX 40-240 1
ELEVATION (%) XX 0-12 1%
DISTANCE (Miles) XX.X 00.1 – 99.0 0.1
DISTANCE (Km) XX.X 00.1 – 99.0 0.1
SPEED (Miles/H) XX.X 00.6 – 10.0 0.1
SPEED (Km/H) XX.X 01.0 – 16.0 0.1
TIME XX:XX 00:01 – 99:00 00.01
CALORIES XXX 1-999 1
QUICK START /
START –
two different
functions
PAUSE – press once to pause
STOP – press twice to stop
FAST – increase speed
SLOW – decrease speed
UP – elevation up
DOWN – elevation down
ENTER – confirm selection or input
VIEW – viewing display selection during workout 0 ~ 9 buttons
– preset program selections
– direct speed control during workout
Service required indicator
Pulse indicator
Message center –-
extra large LED display
REC – save workout routine
This manual suits for next models
2
Table of contents
Other Action Fitness Treadmill manuals


