Active VE52 User manual

Model no.VE52
Version no. 00
Instruction Manual
1-844-777-4555
Contact us for assistance; we’re here to help.
Congratulations on the purchase of your new ACTIVE™ pressure washer. In
order to ensure you have the best possible experience, please read through
thefollowing instructions.Ifyou require anyhelp, please contact the customer
service department at:
1800 PSI Electric Pressure Washer

1. Important precautIons............................................................................................................................... 3
1.1 DefInItIons .......................................................................................................................................................... 3
1.2 safety WarnIngs .................................................................................................................................................. 3
1.3 IntenDeD applIcatIon ............................................................................................................................................. 5
2. safety features anD electrIcal InformatIon ................................................................................................... 5
2.1 extensIon corDs ................................................................................................................................................... 5
3. exploDeD VIeW ......................................................................................................................................... 6
4. parts lIst ............................................................................................................................................... 6
5. assembly InstructIons ............................................................................................................................... 7
5.1 surface preparatIon.............................................................................................................................................. 7
5.2 Water supply (colD Water only) ............................................................................................................................ 7
5.3 safety aDVIce ...................................................................................................................................................... 7
5.4 assembly steps .................................................................................................................................................... 7
6. operatIng InstructIons .............................................................................................................................11
6.1 WorkIng WIth foam blaster .................................................................................................................................. 11
6.2 shuttIng DoWn anD cleanIng up............................................................................................................................12
6.3 takIng breaks.....................................................................................................................................................12
6.4 WarnIngs ..........................................................................................................................................................12
7. WInterIzIng anD long-term storage............................................................................................................13
7.1 optImum WInterIzIng proceDure.............................................................................................................................13
7.2 QuIck WInterIzIng proceDure .................................................................................................................................13
8. cleanIng anD maIntenance ........................................................................................................................14
8.1 connectIons .......................................................................................................................................................14
8.2 cleanIng the nozzle ............................................................................................................................................14
8.3 Water fIlter screen ............................................................................................................................................14
9. technIcal specIfIcatIons.............................................................................................................................14
10. troubleshootIng ....................................................................................................................................15
11. Warranty ............................................................................................................................................17
Table of Contents

3
1. Important precautIons
IMPORTANT, RETAIN FOR FUTURE
REFERENCE AND READ CAREFULLY!
Do not attempt to install or operate this device until you have read
the safety instructions in this manual. Safety items throughout
this manual are labelled with Danger, Warning, or Caution
depending on the risk type.
Failure to follow or comply with the instruction manual in product
set-up, usage or storage will void the warranty.
1.1 Definitions
This is the safety alert symbol. It is used to alert you to
potential personal injury hazards. Obey all safety messages that
follow this symbol to avoid possible injury or death.
DANGER
Indicates an imminently hazardous situation which, if
not avoided, will result in death or serious injury.
WARNING
Indicates a potentially hazardous situation which, if
not avoided, could result in death or serious injury.
CAUTION
Indicates a potentially hazardous situation which, if
not avoided, could result in minor or moderate injury.
IMPORTANT
Installation, operation, or maintenance information
which is important but not hazard-related.
1.2 Safety Warnings
DANGER
To reduce the risk of re, electric shock, explosion or injury to
people, read the following:
•This product is intended for domestic outdoor use only.
•The water spray must never be directed
towards any electric wiring, devices, or
directly towards the pressure washer itself,
or fatal electric shock may occur.
•The pressure washer should not be used in areas where
gas vapours may be present. An electric spark could cause
an explosion or re.
• Risk of explosion. When a combustible liquid is sprayed,
there can be danger of re or explosion, especially in a
closed area.Therefore, do not spray ammable liquids. Do
not use acids and solvents with this product either. These
products can cause physical injuries to the operator and
irreversible damage to the device.
• Risk of electric shock. Inspect the cord before using the
device — do not use it if the cord is damaged.
•Risk of injury. Do not direct the water
ow at people. The high-pressure jet can be
dangerous if misused, and therefore must
not be directed at people, animals, electrical
devices or the unit itself.
• This device is capable of producing high pressure as rated
in the Technical Specications. To avoid rupture and
injury, do not operate this machine with components
rated less than the unit itself (including but not limited to
spray guns, hose, and hose connections).
Important Precautions

4
1. Important precautIons (cont.)
1.2 Safety Warnings (cont.)
WARNING — INJECTION HAZARD
• Equipment can cause serious injury if the spray penetrates
the skin. Do not point the gun at anyone or any part of the
body. In caseofpenetration,seek medicalaid immediately.
CAUTION — DETERGENTS
• This device has been designed for use with detergents
that are specically approved for pressure washer use. The
use of other cleaning detergents may aect the operation
of the device and void the warranty.
CAUTION — SPRAY GUN
• The spray gun kicks back, so hold it with both hands. The
trigger gun safety lock prevents the trigger from being
engaged accidentally. However, the safety feature DOES
NOT lock the trigger in the ON position.
CAUTION — WATER CONNECTIONS
• For use with fresh and clean water only. Do not use this
product with other liquids.
• The water supply system must be protected against
backow.
• Never use this product with water contaminated with
solvents (e.g. paint thinners, gasoline, oil, etc.).
• Always prevent debris from being drawn into the product
by using a clean water source and an additional water
lter, if required.
• If this device is connected to a potable water system, the
system must be protected against backow.
• Suitable water temperature: from 5 to 40 ºC (41 to 104 ºF).
CAUTION — USE
• Learn how to stop the device and release the pressure
quickly. Familiarize yourself with the controls.
• Keep all connections dry and o the ground.
• Avoid accidental starts.Shut powerOFF beforeconnecting
or disconnecting the power cord.
• Never carry the pressure washer by the cord.
• Do not pull on the cord to disconnect from the outlet.
• To allow for free air circulation, the pressure washer
should not be covered during operation.
• Do not operate the product when tired or under the
inuence of alcohol or drugs.
• Do not stand on unstable surfaces. Stand with both feet
balanced at all times.
• Keep the operating area clear of people and pets.
IMPORTANT — MAINTENANCE
• Any assembly, use or maintenance of the product must
be carried out by adults only.
• Follow the maintenance instructions specied in the
manual.
• If replacement of the power plug or cord is needed, use
only identical replacement parts.
• Repairing and replacing parts should be done by a
certied technician.
• Before servicing, cleaning or removal of any parts, shut
the power OFF and release the pressure.
IMPORTANT — GROUNDING
• In a double-insulated product, two systems of insulation are
provided insteadof grounding.No grounding isprovidedon a
double-insulated product, nor should a means for grounding
be added to the product. Servicing a double-insulated
product requires extreme care and knowledge of the system,
and should be done only by qualied service personnel.
Replacement parts of a double-insulated product must
be identical to the parts they replace. A double-insulated
product is marked with the words “DOUBLE INSULATION” or
“DOUBLE INSULATED”. The symbol may also be marked
on the product.
Important Precautions
5
1. Important precautIons (cont.)
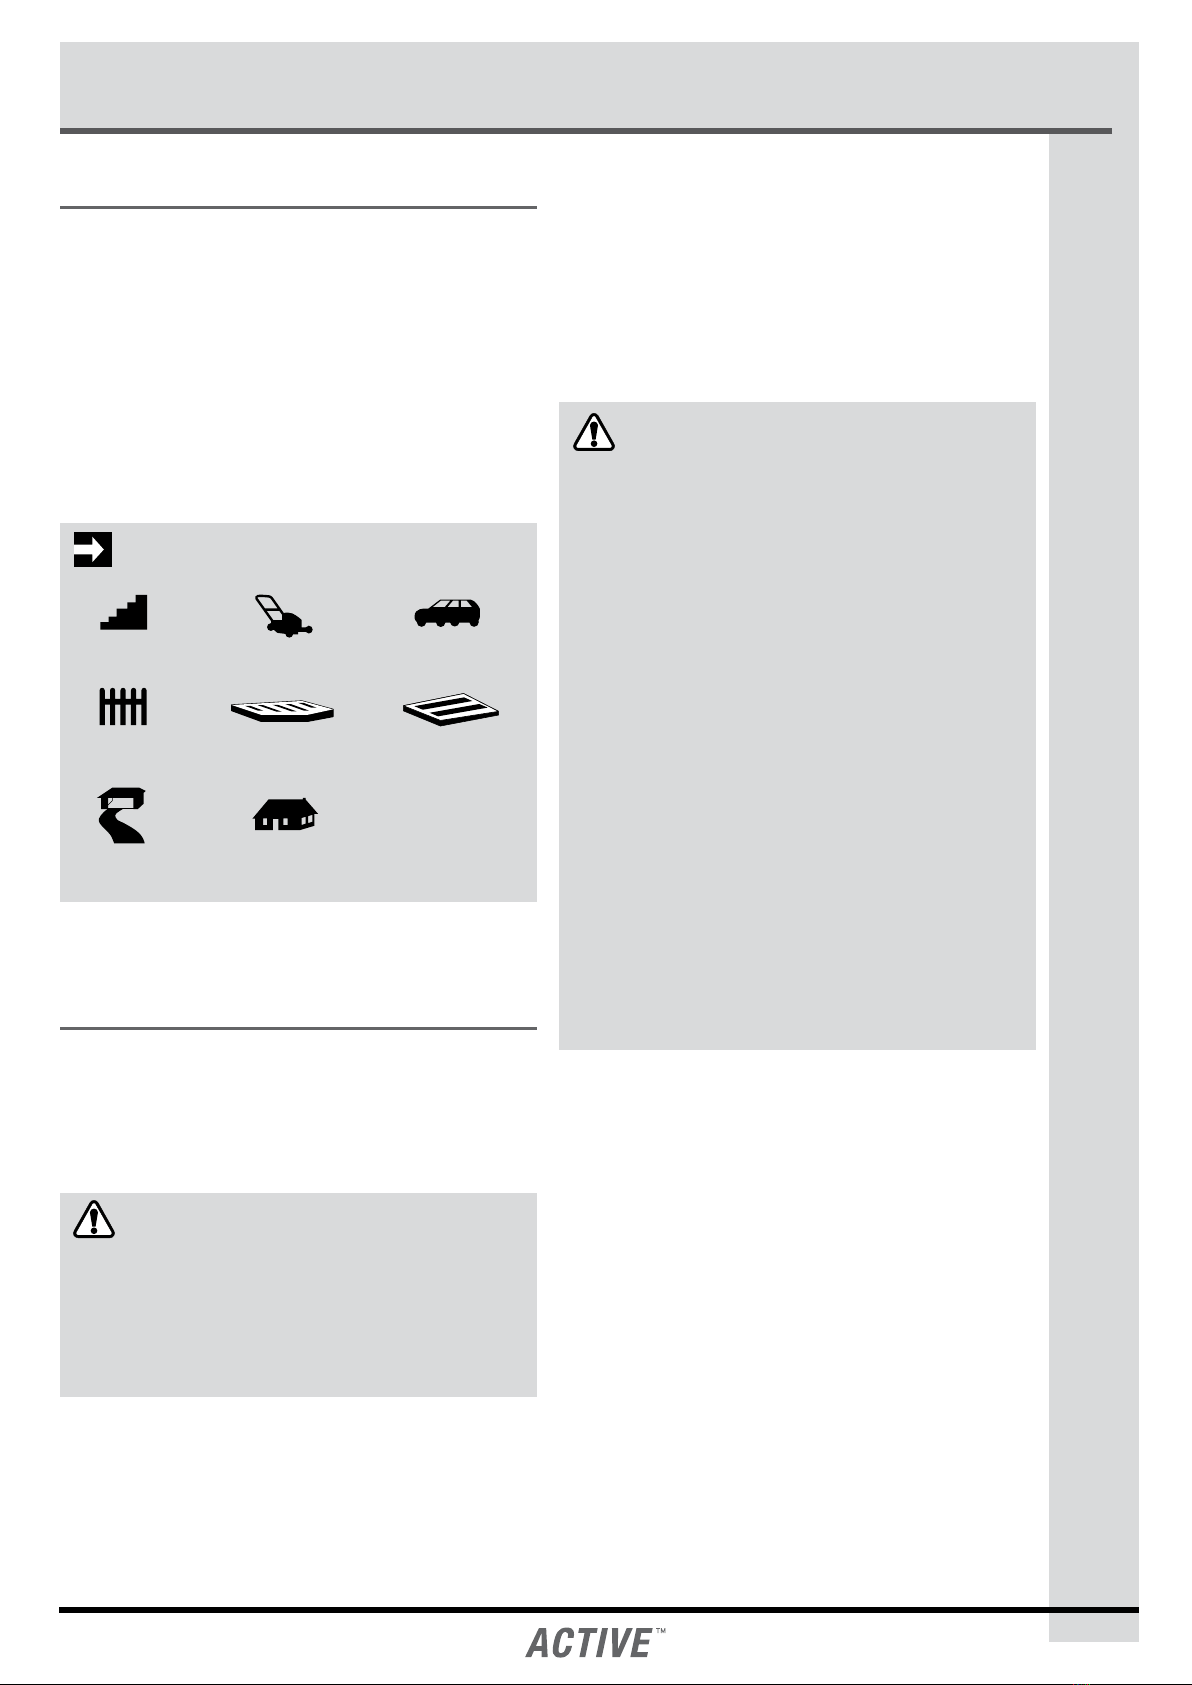
1.3 Intended Application
This product is designed for specic residential applications. Do
not modify or use this product for any application other than
the one it was designed for. This equipment was not designed
for industrial use. Please refer to the icons below for suggested
applications. For questions regarding other uses, please refer
to our website at www.active-jobsite.com or call us at
1-844-777-4555.
IMPORTANT — APPLICATIONS
STAIRS LAWN EQUIPMENT VEHICLE
FENCING DECK OR PATIO GARAGE FLOOR
DRIVEWAY SIDING
2. safety features and electrIcal InformatIon
The pressure washer is equipped with a stop device that senses
when the trigger on the spray gun is released. It will open the
power circuit to the motor and cause the pressure washer motor
to stop. The motor will start again when the trigger is pulled.
WARNING
• The pressure washer is also equipped with a main power
ON/OFF switch. It should always be moved to the OFF
position when the pressure washer is not being used to
prevent possible injury or damage.
2.1 Extension Cords
If possible, do not use extension cords with this product. However,
if you must use one, observe all warnings and instructions listed
below:
CAUTION — USE A SUFFICIENT GAUGE
• Maximum cable length: 50’ (15 m). Only use 14 AWG
rated extension cords.
• Only use extension cords that are intended for outdoor
use. These extension cords are identied by a marking
that reads “Acceptable for use with outdoor appliances;
store indoors while not in use.”
• Only use extension cords that have an electrical rating
not less than the rating of the product (15 A).
• Do not use damaged extension cords. Examine the
extension cord before using and replace it if damaged.
Do not abuse extension cords and do not pull on any cord
to disconnect the device.
• Keep cord away from heat and sharp edges.
• Always disconnect the extension cord from the power
outlet before disconnecting the extension cord from the
product.
• To reduce the risk of electric shock, keep all connections
dry and o the ground. Do not touch the plug with wet
hands.
Important Precautions / Safety Features and Electrical Information

6
3. exploded VIew
ExplodedView / Parts List
A
B
C
D
E
F
G
H
I
4. parts lIst
Item # Part Name Qty. Part #
AQuick-connect
wand 1XE16-020-0002
B Gun assembly 1 XE16-020-0003
CHigh-pressure
hose 1XE30-010-0005
D Tips kit (3 pcs) 1 VE20-020-0004
E Cord bracket 1 VE20-000-0003
F Foam blaster 1 VE20-060-1000
Item # Part Name Qty. Part #
GHose holder kit
(2 pcs) 1 set VE20-000-0004
H Bottle holder 1 VE10-000-0002
I Gun holder 1 VE20-000-0005
N/A Cleaning
needle 1Pre-attached on the manual
N/A Water lter 1 Pre-attached on the machine
*Water lter come pre-attached on the machine.

7
5. assembly InstructIons
5.1 Surface Preparation
Before beginning any cleaning task, it is important to inspect the
area for objects that could create a hazard. Remove any objects
from the work area that could be tripped over, such as toys or
outdoor furniture. Ensure that all doors and windows are closed
tightly.
5.2 Water Supply (Cold Water Only)
Only draw water through the unit. The device must be used with
cold water supply only. The water hose must be at least 1/2”
(13 mm) in diameter. The water ow rate must not fall below
2 GPM (9.1 LPM). The ow rate can be determined by running
water for one minute into an empty container. The water supply
temperature must not exceed 40 °C (104 °F).
5.3 Safety Advice
CAUTION
• Never use the pressure washer to draw in water
contaminated with solvents (e.g. paint thinners,
gasoline, oil, etc.).
• Dirt in the water inlet will damage the unit. To avoid this
risk, we recommend checking the water lter (located
inside the water inlet.To clean it out, refer to the Cleaning
and Maintenance section).
• Always prevent debris from being drawn into the unit by
using a clean water source and an additional accessory
water lter, if required.
• To prolong the life of the unit, let it rest for 5 minutes
after every 30 minutes of use.
• Check to make sure you have all the parts.
5.4 Assembly Steps
A
Assemble the hose holders.
S
Assemble the gun holder.
D
Assemble the cord bracket and bottle holder.
Assembly Instructions
8
5. assembly InstructIons (cont.)
5.4 Assembly Steps (cont.)
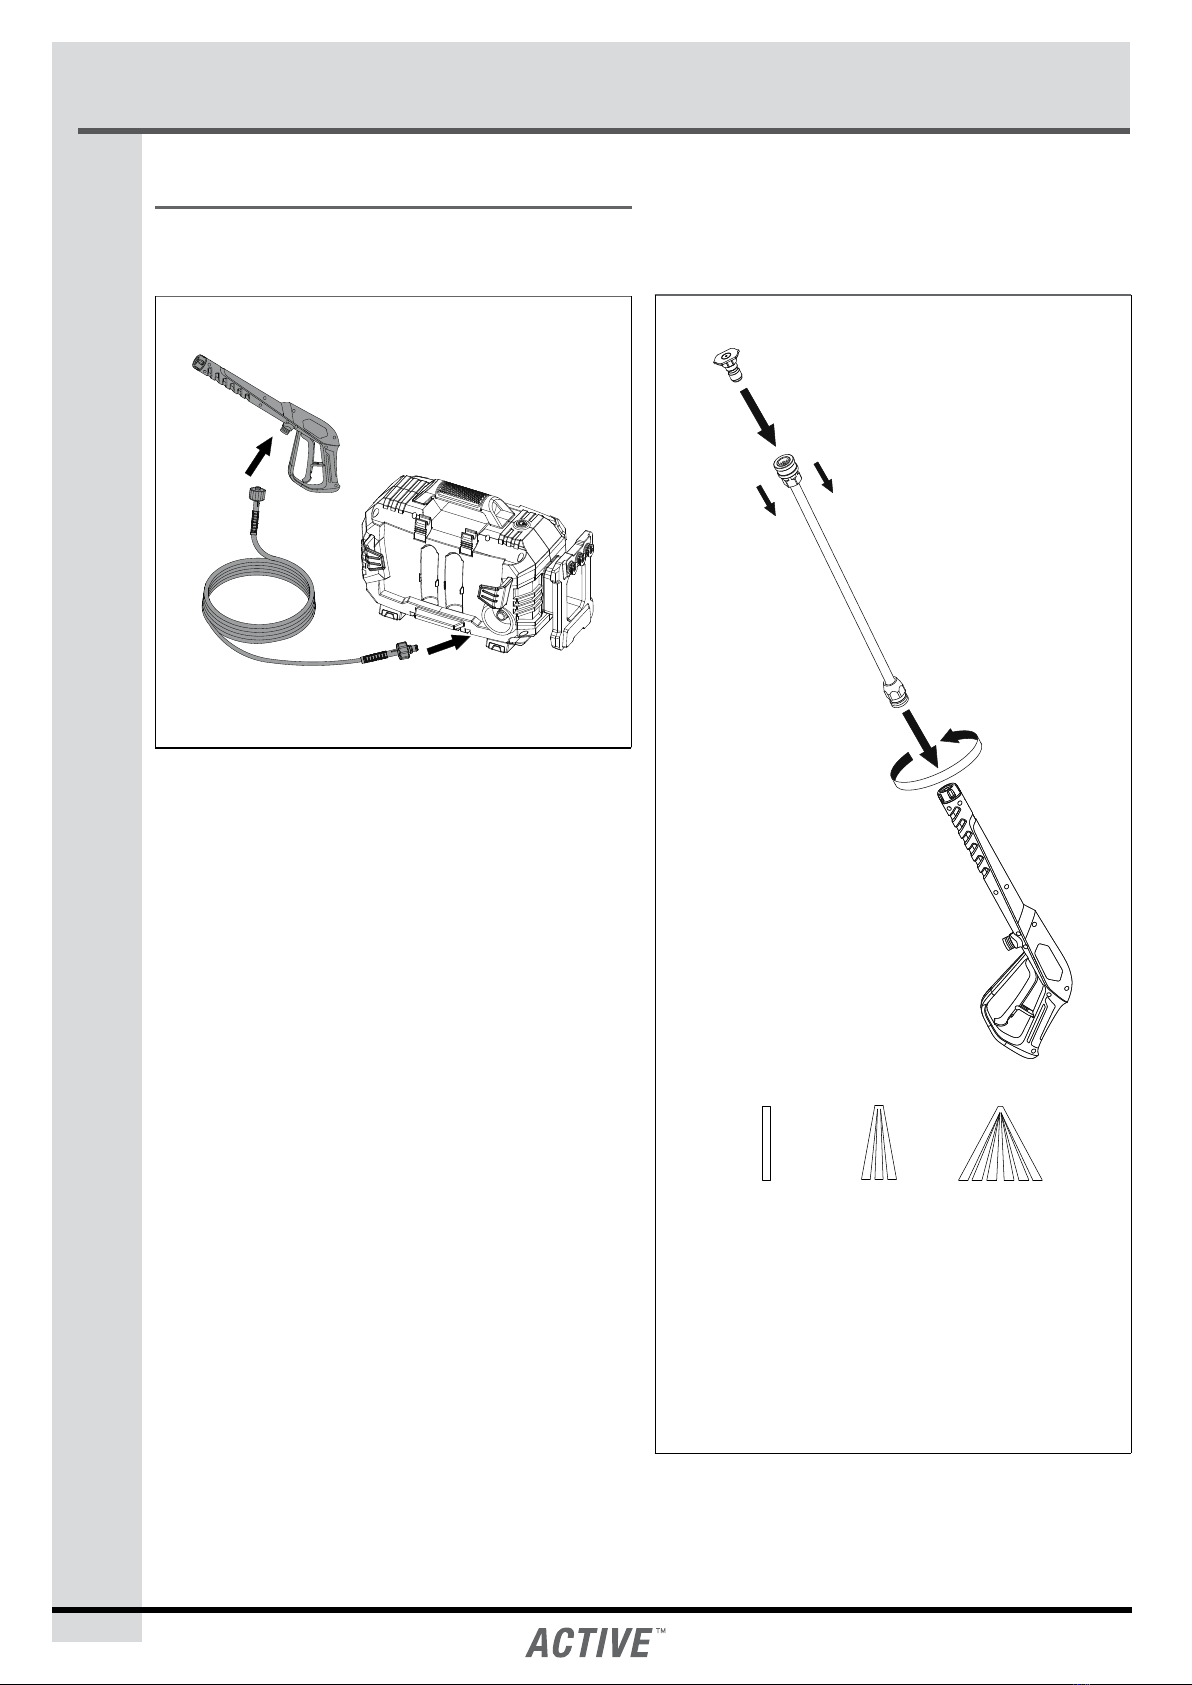
F
Attach high-pressure hose to the gun and the pump outlet
(hand tighten only).
G
0º15º40º
Attach the desired spray tip to the wand. The spray tips are for
the following purposes:
• 0º For tough spots and grimes (e.g., concrete surfaces).
• 15º For medium and heavy duty cleaning tasks
(e.g.driveway).
• 40º For light duty jobs and to apply detergent (e.g.,
stucco walls, glossy surfaces).
Assembly Instructions

9
5. assembly InstructIons (cont.)
5.4 Assembly Steps (cont.)
H
Connect garden hose to the inlet adaptor.
J
Attach garden hose to water supply and turn water on.
K
Plug the GFCI plug into an outlet. Firmly press and release the
TEST button, then press and release the RESET button.The light
on the GFCI should be illuminated.
WARNING
Make sure your hands are dry. Plug the unit into an outlet.
L
Release the safety trigger if it is locked.
Assembly Instructions
RESET
TEST
10
5. assembly InstructIons (cont.)
5.4 Assembly Steps (cont.)
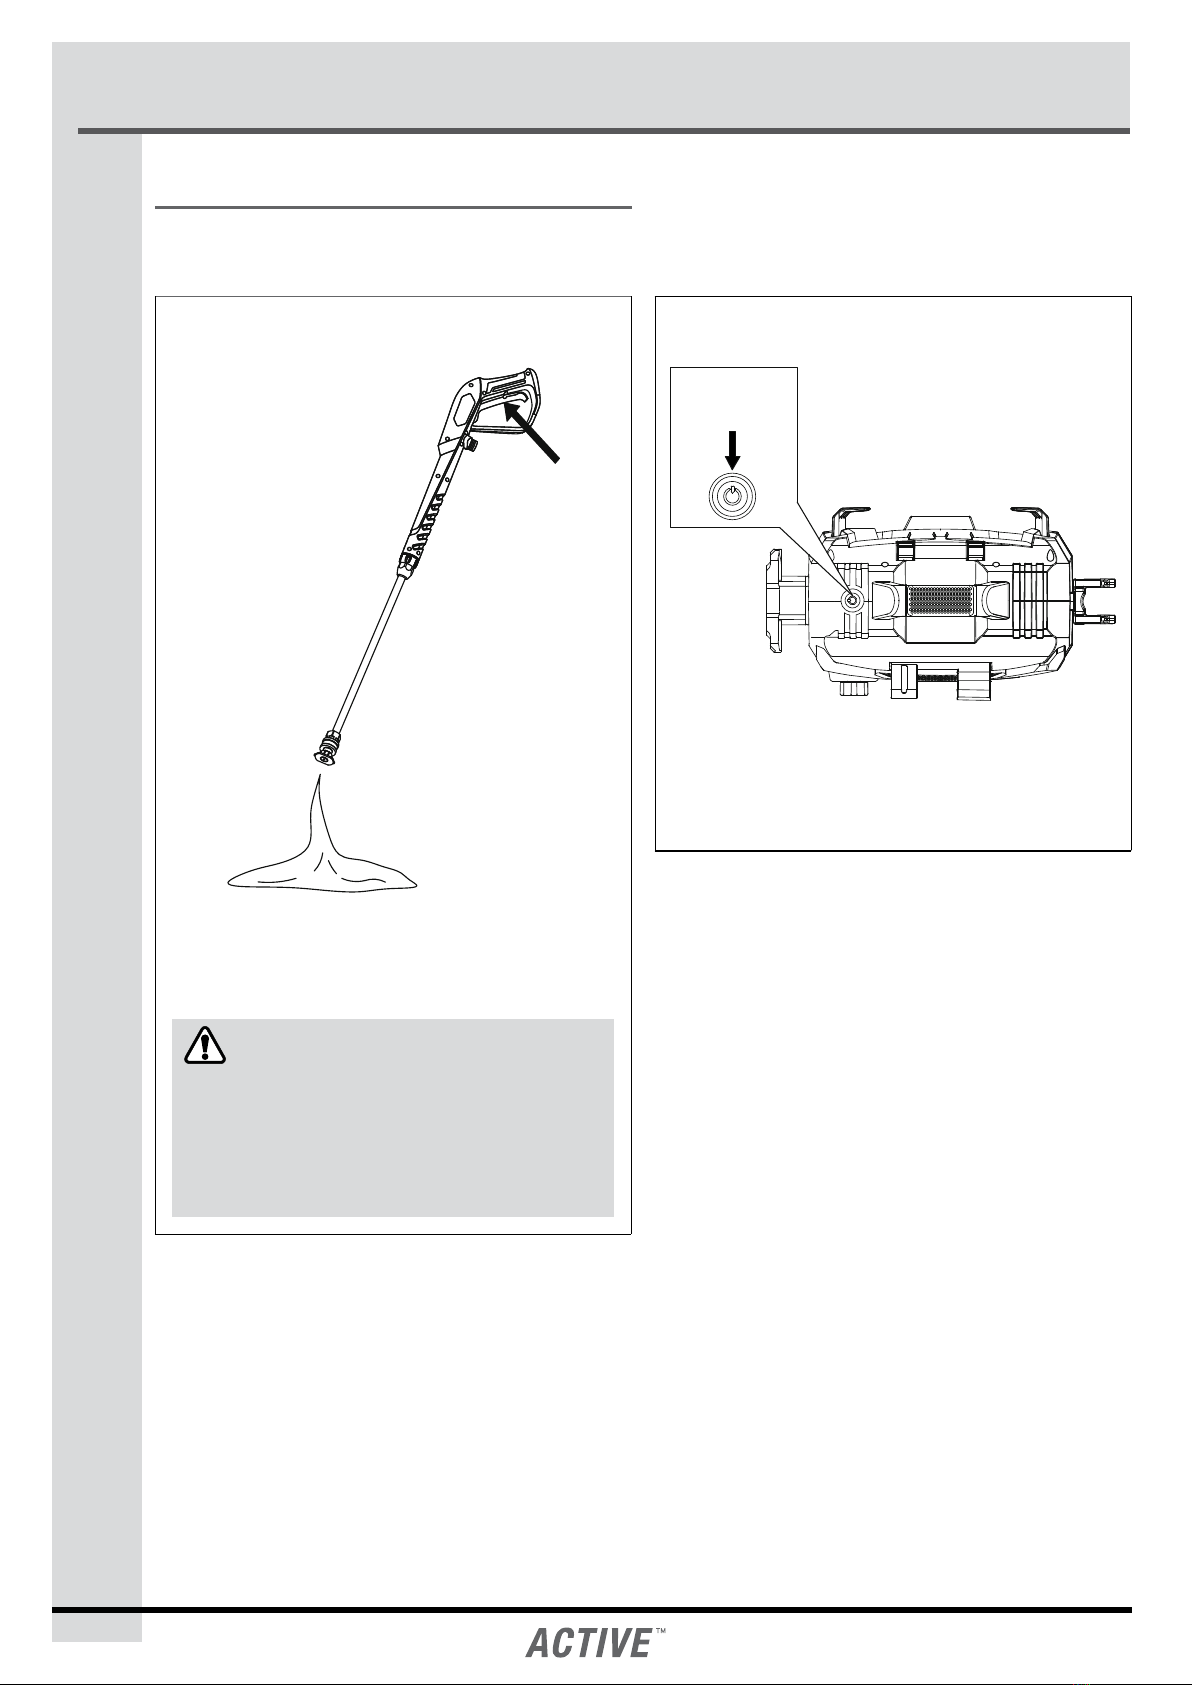
Ö PURGING
Purge air by squeezing the trigger on the gun until there is a
steady stream of water.
CAUTION
Drain unit after each use (for storage): remove water
connection, turn ON the machine for a few seconds and
press gun trigger to drain remaining water in the pump.
Turn OFF immediately.
Ä
Push the ON/OFF button, LED indicator turns red colour and the
machine is ready to operate. Push the ON/OFF button again to
set the machine in OFF mode.
Assembly Instructions
ON/OFF
button

11
6. operatIng InstructIons
6.1 Working with Foam Blaster
Working with a detergent ensures quick soaking of the dirt, and
allows the high-pressure water to penetrate and remove the dirt
more eectively. Always spray detergent on a dry surface, do not
pre-soak the area. Wetting the surface rst dilutes the detergent
and reduces its cleaning ability.
a
Engage the safety lock on the spray gun.
2
1
2
3
1. Detach spray head by turning detergent bottle 1/4 turn
counter-clockwise.
2. Fill the bottle with the detergent.
3. Reattach the spray head on to the bottle by turning 1/4
turn clockwise.
d
1. Attach the foam blaster onto the spray gun.
2. Apply the detergent to dry work surface from bottom
to top.
3. Allow detergent to remain on the surface for a short
time before rinsing. Do not allow detergent to dry on
the surface.
4. When you nish working with detergent, ll with clean
water in bottle and spray water for one minute in ON
position to rinse the Foam Blaster and remove any soap
residues that may clog it.
CAUTION
Damage may occur to painted surfaces if chemicals are
allowed to dry on them. Wash and rinse a small section
at a time.
Operating Instructions

12
6. operatIng InstructIons (cont.)
6.2 Shutting Down and Cleaning Up
aTurn o water supply and disconnect the garden hose
from the water inlet on the pressure washer.
sPull the trigger to release any remaining water pressure.
dSet the ON/OFF switch to the OFF position.
fUnplug the power cord from the outlet.
gEngage the safety lock on the spray gun.
WARNING
Turn o the water supply and pull the trigger to depressurize
the device. Failure to do so might result in personal injury due
to discharge of high-pressure water.
6.3 Taking Breaks
If taking a ve minute or longer break while using the pressure
washer:
aEngage the safety lock on the the spray gun.
sSet the ON/OFF switch to the OFF position.
dUnplug the power cord from the outlet.
6.4 Warnings
CAUTION
Failure to clean this product properly will cause the detergent
injection system to become clogged and inoperable.
WARNING
Never use:
• Bleach, chlorine products or other corrosive chemicals;
• Liquids containing solvents (i.e., paint thinners, gasoline,
oils, etc.);
• Tri-sodium phosphate products;
• Ammonia products; or
• Acid-based products.
These chemicals will harm the unit and will damage the
surface being cleaned.
Operating Instructions

13
7. wInterIzIng and long-term storage
7.1 Optimum Winterizing Procedure
Winterizing your pressure washer will help protect and prolong
its life.We strongly recommend you follow the below steps using
a Pressure Washer Antifreeze before storing for the winter. This
will keep the internal parts lubricated, protected from rust, and
prevents the pump from freezing.
1. Connect the Pump Saver to the inlet adaptor.
2. Depress button on top of the pump saver container.
3. Continue until uid exits the pressure hose.
4. Remove the hose from pump inlet.
WARNING
Flush the pressure washer unit out with clear water before
reusing. Anti-freeze can damage the paintwork and product,
so you must ensure there is no anti-freeze left in product
system before using it again.
7.2 Quick Winterizing Procedure
If you are unable to perform the Optimum Winterizing Procedure,
you can still protect your pressure washer from winter damage by
doing the following:
•Disconnect all water connections.
•Turn on the device for a few seconds, until the remaining
water ows out of the pump.Turn the device o immediately
after that.
•Do not allow the high-pressure hose to become kinked.
•Store the device and its accessories in a room that does
not reach freezing temperatures. Do not store them near
furnaces or other sources of heat, as that might dry out the
pump seals.
•Recommended: Pressure Washer Antifreeze.
•
•
CAUTION
Drain any remaining water from the gun assembly. Aim the
gun downwards and pull the trigger.
WARNING
Store the pressure washer unit in a location where
temperature does not fall below 32°F (0°C) at all times. The
pump in the machine is susceptible to damage if exposed to
cold temperatures. FREEZE DAMAGE IS NOT COVERED BY
THE WARRANTY.
Winterizing and Long-Term Storage

14
8. cleanIng and maIntenance
8.1 Connections
The connections on the pressure washer’s hoses, gun, and spray
wand should be cleaned and lubricated with non-water soluble
grease regularly.
8.2 Cleaning the Nozzles
Clogging of the nozzle causes the pump pressure to be too
high, making it necessary to clean the nozzle immediately.
You can clean the nozzle by carefully inserting the cleaning
needle or a thin, sharp instrument (i.e. paperclip) into the tip
to clean out any deposits.
8.3 Water Filter Screen
The pressure washer is equipped with a water inlet screen to
protect the pump. If the screen is not kept clean, the ow of
water to the pressure washer will be restricted, and the pump
may become damaged.
To clean the water inlet screen:
•Remove the lter screen from inside the inlet adaptor
(the inlet adaptor comes pre-assembled to the machine).
•Rinse the screen until it is free of debris and obstructions.
•Place the screen back to prevent foreign particles from
entering the pump.
9. technIcal specIfIcatIons
Peak pressure: 1800 PSI (12.4 MPa)
Rated pressure: 1100 PSI (7.6 MPa)
Power source requirement: 120 V / 60 Hz
Electric code with GFCI: 35’(10.7 m) 16 AWG
High-pressure hose: 20’(6 m)
US GPM: 2.0 GPM (7.6 LPM)
Current drawn: 13 A
Inlet water: Cold tap water
CU (cleaning units): 3600
Motor: Universal
Pump: Aluminum, indirect-drive
Cleaning and Maintenance / Technical Specications

15
10. troubleshootIng
Disconnect the device from the power source before making any
repairs.
Problem Cause Solution
The motor does
not start.
The device is in OFF
mode.
Push the ON/OFF
button once to turn
to the ON mode.
The power cord is
not plugged in.
Plug in the power
cord.
The extension cord is
too long.
The extension cord is
not the proper gauge.
The extension cord is
damaged.
Replace the
extension cord with
either a 25’(7.6 m)
14/3 gauge cord or
a 50’(15 m) 14/3
gauge cord.
The power outlet
does not supply
adequate power.
Try a dierent
outlet.
Tripped pressure
washer circuit
breaker.
Allow the device
to cool, and then
restart it.
The device does
not reach high
pressures.
The garden hose is
too small.
Replace it with a
1”(25 mm) or
5/8”(16 mm)
garden hose.
Water supply is
restricted.
Check the garden
hose for kinks, leaks
or blockage.
Not enough water
supply.
Open water source
fully.
The water inlet lter
is clogged.
Remove the lter
and rinse it with
warm water.
Problem Cause Solution
The device
does not reach
high pressures
(continued).
The pump is sucking
air.
Check if all hoses and
ttings are airtight.
Turn the device to
OFF mode, and
purge the pump by
pulling the trigger on
the spray gun until a
steady ow of water
emerges through the
nozzle.
Output pressure
uctuates high
and low.
Not enough inlet
water supply.
Turn faucet on fully.
Check garden hose
for kinks, leaks or
blockage.
The pump is sucking
air.
Check if all hoses and
ttings are airtight.
Turn the device OFF,
and purge the pump
by pulling the trigger
on the spray gun
until a steady ow
of water emerges
through the nozzle.
The water inlet lter
is clogged.
Remove the lter
and rinse it with
warm water.
The discharge nozzle
is obstructed.
Blow out or remove
debris with a ne
needle.
Calcied gun, hose,
or power nozzle.
Run distilled
vinegar through the
detergent container.
Foam blaster is
not working.
Detergent container
is empty.
Add more detergent.
Detergent bottle
or suction tube not
properly connected.
Check connections.
Detergent is too
thick.
Dilute detergent.
The lter on the
detergent suction
tube is clogged.
Run warm water
through the lter to
remove build-up.
Damaged or clogged
detergent suction
tube.
Remove obstruction
or replace the
detergent suction
tube.
Troubleshooting

16
10. troubleshootIng (cont.)
Problem Cause Solution
The garden hose
connection leaks.
Loose ttings. Tighten ttings.
Missing/worn
rubber washer.
Insert new washer.
Spray wand,
extension, or
nozzle leaks.
The spray nozzle
was not properly
attached.
Ensure the quick-
connect wand is
attached securely.
Ensure the project
tip is clicked in
securely.
Broken O-ring or
plastic insert.
Call the Toll-free
Hotline.
The pump is
noisy.
The pump is sucking
air.
Check if all hoses
and ttings are
airtight. Turn the
device to OFF mode
and purge the
pump by pulling
the trigger on the
spray gun until a
steady ow of water
emerges through
the nozzle.
The water lter is
clogged.
Remove the lter
and rinse it with
warm water.
Water leaks
from the pump
(up to 10 drops
per minute is
permissible).
Loose ttings. Check if all ttings
are tight.
Water seals are
damaged or worn.
Call the Toll-free
Hotline.
Oil is dripping. Oil seals are
damaged or worn.
Call the Toll-free
Hotline.
Problem Cause Solution
Motor hums but
fails to run.
Supply voltage
below minimum.
Verify that only the
pressure washer
is running on this
circuit.
System has residual
pressure.
Turn the device to
OFF mode, pull
the trigger on the
spray gun to release
pressure, and then
turn the device back
ON.
Voltage loss due to
the extension cord.
Unplug any
extension cords
attached and plug
the unit directly
into the outlet.
Residual friction
among components.
The device might
hum.
Disconnect water
supply and power
ON for 2 to 3
seconds. Repeat
this procedure a
few times, or until
the motor starts.
No water coming
out of the nozzle.
Water supply is OFF. Turn on the water
supply.
Kink in the garden
hose.
Remove the kink in
the garden hose.
Troubleshooting
IF YOU ENCOUNTER ANY ADDITIONAL DIFFICULTIES NOT LISTED, VISIT OUR WEBSITE AT
WWW.ACTIVE-JOBSITE.COM
OR CALL CUSTOMER SERVICE FOR HELP AT
1-844-777-4555.

17
11. warranty
Always keep your online receipt as proof of purchase.
We’re here to help! If you have any questions or comments, call our toll-free hotline 1-844-777-4555. Have your serial number ready.
The serial number can be found on the back plate, located on the side of the unit.
Two (2) Year Warranty
This product is guaranteed to be free from defects in material and workmanship for two years from the date of its original purchase.
Ifsuchadefectappearsduringthewarrantyperiod,uponpresentationofproofofpurchaseand damage,ActiveProductswill elect toeither
(1) replace the product or defective component at no charge and free shipping or (2) refund the full purchase price to the owner
(at its discretion).
What is Not Covered?
The warranty is void if the equipment is used for commercial, rental or industrial purposes.
This warranty does not cover accidental damage, unreasonable use, and normal wear and tear like belts, chains and tine, use of
improper detergents, freezing, neglect, or non-compliance with the operating Instructions. The warranty does not cover loss of use
or other consequential damages arising from any of the above, nor does it cover repairs made or attempted by unauthorized persons.
Note: Batteries are covered in full for 90 days from the date of purchase.
If you have further questions, please visit our website (www.active-jobsite.com) or call 1-844-777-4555.
Warranty
VE52 ENGLISH

NOTE

NOTE

Other manuals for VE52
1
This manual suits for next models
1
Table of contents
Other Active Pressure Washer manuals


