● Operating Instructions
1. Do not run the Pump dry.
2. The Pump must be grounded before it is used.
3. To prevent motor damage, do not turn on Power switch when the Pump is
under pressure.
4. Do not expose the Pump to water.
5. Fit(connect) the parts securely after making sure that all water ・ Proof
Packing have been fitted.
6. Do not drag or pull High-Pressure Hose.
7.
If the Pump does not suck water, pressure-feed city water to the inlet Connec-
tor. Start operation after making sure that the Pump has sucked water properly.
8. Do not use hot water more than 40℃
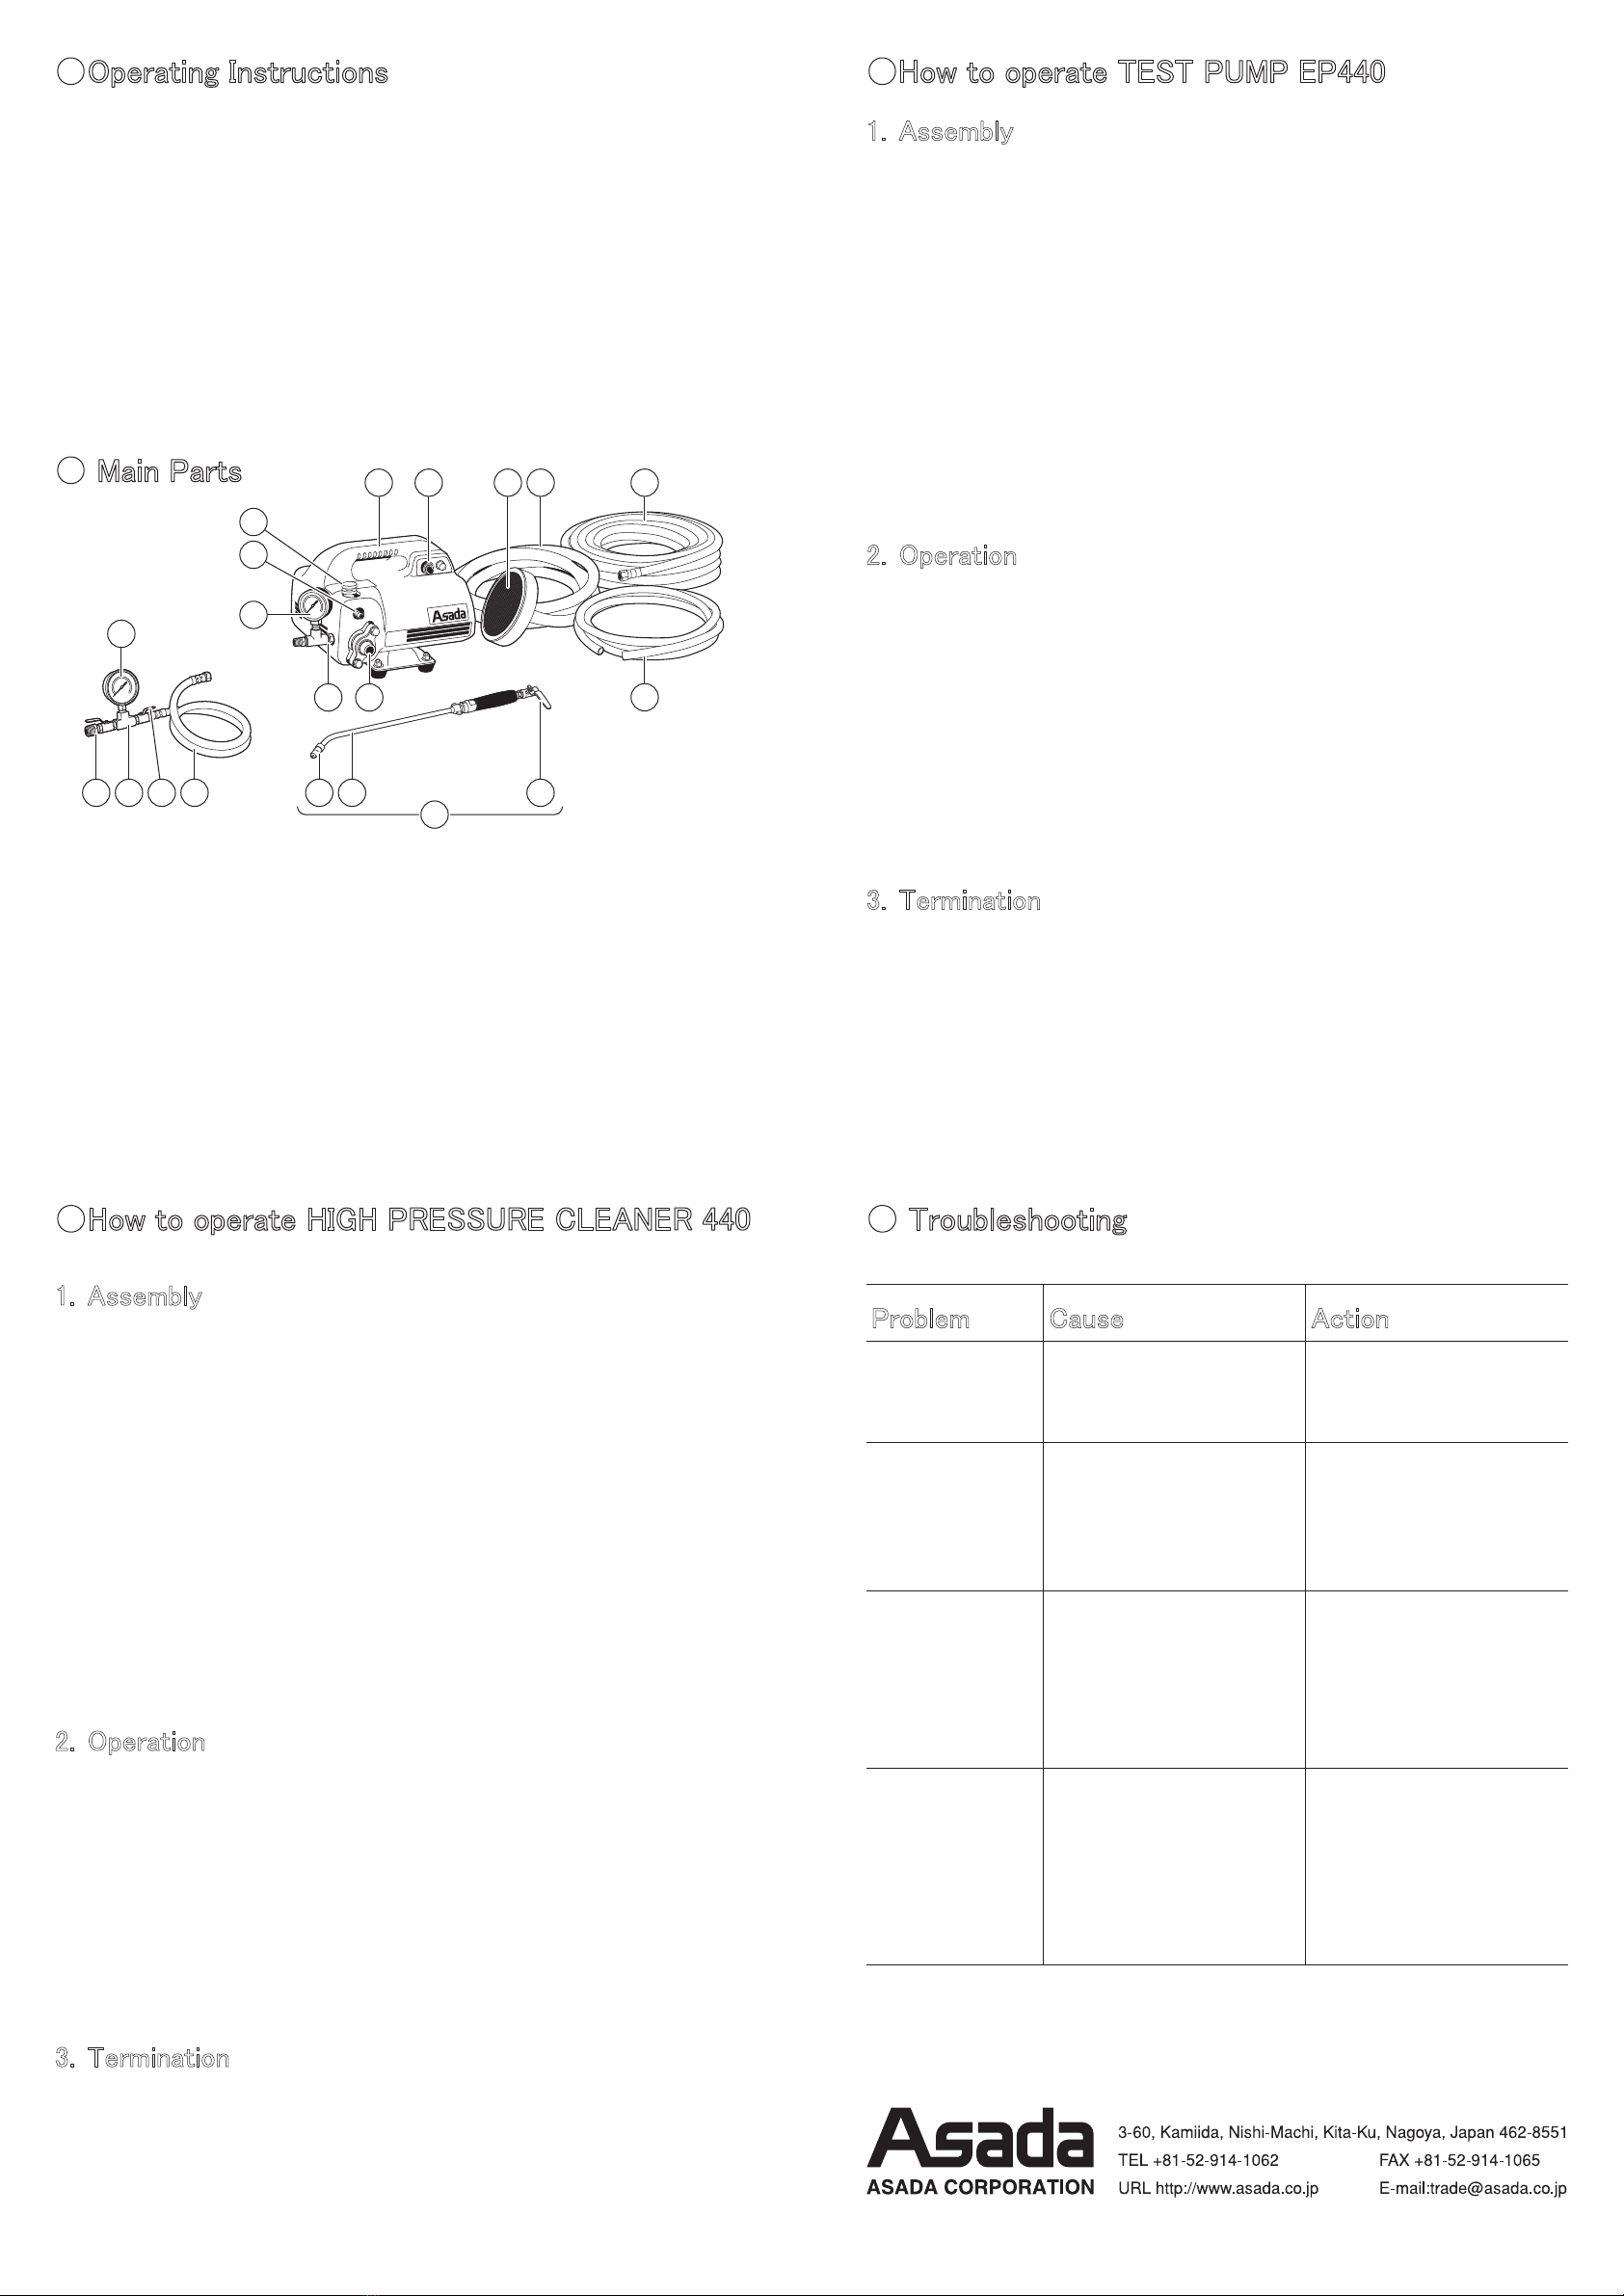
● Main Parts
1. Body
2. Pressure Adjusting Knob
3. Outlet Connector
4. Inlet Connector
5. Relief Outlet
6. Power Switch
7. High-pressure Hose 8m(440)
8. High-pressure Hose 1m(EP440)
9. Suction Hose 2.5m
10. Suction Filter
11. Relief Hose 2.5m
12. Pressure gauge unit(EP440)
13. Pressure gauge(EP440)
14. Stop Valve A(EP440)
15. Stop Valve B(EP440)
16. Spray Gun(440)
17. Valve(440)
18. Lance(440)
19. Nozzle(440)
20. Pressure gauge unit(440)
● How to operate TEST PUMP EP440
1. Assembly
① Screw the internally threaded metal fitting of the Suction Hose into the
Inlet Connector.
② Screw the Suction Filter into the externally threaded metal fitting of the
Suction Hose.
③ Insert the Relief Hose into the Relief Outlet.
④ Screw the internally threaded metal fitting of the High-Pressure Hose into
the Outlet Connector.
⑤ Install the Pressure Gauge Unit on the piping to be tested.
⑥ Screw the externally threaded metal fitting of the High-Pressure Hose into
the internal threads of the Pressure Gauge Unit.
⑦ Open the Stop Valve A and close the Stop Valve B.
⑧ Sink the Suction Filter and Relief Hose into the tank.
・ Make connections securely. Otherwise, water may not be sucked or may
leak.
2. Operation
① Make sure that the power is OFF and connect the Power Plug to the
Receptacle.
② Fully loosen the Pressure Adjusting Knob and turn the Power Switch ON.
③ After making sure that water flows from the Relief Outlet, turn the Power
Switch OFF.
④ Turn on the Power Switch and tighten the Pressure Adjusting Knob until
the Pressure Gauge indicates the predetermined test pressure.
⑤ Open the Stop Valve B and deliver water into the piping.
・ When the predetermined pressure is reached, close the Stop Valve A and
turn the Power Switch OFF.
・ If the piping leaks, the pressure does not reach the predetermined value.
3. Termination
① Before terminating the operation, run the Pump with fresh water for a few
seconds to wash the Pump and High-Pressure Hose.
② Remove the Suction Filter from the tank, and run the Pump to eliminate
the fresh form inside the Pump and High-Pressure Hose.
・ Clean the wire netting of the Suction Filter periodically.
●
How to operate HIGH PRESSURE CLEANER 440
1. Assembly
① Screw the internally threaded metal fitting of the Suction Hose into the
Inlet Connector.
② Screw the Suction Filter into the externally threaded metal fitting of the
Suction Hose.
③ Insert the Relief Hose into the Relief Outlet.
④ Screw the internally threaded metal fitting of the High-Pressure Hose into
the Outlet Connector.
⑤ Screw the externally threaded metal fitting of the High-Pressure Hose into
the internal threads of the grip on the Spray Gun.
⑥ Screw the externally threaded metal fitting of the Lance into the external
threads at the front end of the Spray Gun.
⑦ Screw the Nozzle into the external threads at the front end of the Lance.
⑧ Sink the Suction Filter and Relief Hose into the tank.
・ Make connections securely. Otherwise, water may not be sucked properly
or may leak, or water may spout from the connections.
2. Operation
① Make sure that the power is OFF and connect the Power Plug to the
Receptacle.
② Fully loosen the Pressure Adjusting Knob and turn the Power Switch ON.
③ After making sure that water flows from the Relief Outlet, turn the Power
Switch OFF, and fully tighten the Pressure Adjusting Knob.
④ After fully gripping the Valve of the Spray Gun, turn ON the Power Switch.
⑤ Valve of the Spray Gun to inject High-Pressure water and release it to
stop the injection immediately.
・ Adjust the metal fitting at the tip of the Nozzle to adjust the injection angle.
(Tighten the fitting to increase the angle and loosen to decrease.)
3. Termination
① Before terminating the operation, run the Pump with fresh water for a few
seconds to wash the Pump and High-Pressure Hose.
② Remove the Suction Filter from the tank, and run the Pump to eliminate
the fresh form inside the Pump and High-Pressure Hose.
・ Clean the wire netting of the Suction Filter periodically.
● Troubleshooting
Problem
Water not sucked
Pressure does not
increase
Pressure unstable
Unusual Noise
Hose Vibrating
Motor does not
run
Cause
・Any of Hose connected
・Valve stuck
・Filter clogged
・Relief Valve fault
・Valve worm
・Packing worm
・Nozzle hole worm
【HIGH PRESSRE CLEANER 440】
・Air trapped
・Valve clogged or worm
・Packing worm
・Nozzle hole worm
【HIGH PRESSRE CLEANER 440】
・No electricity
・Pressure inside High
Pressure Hose
・Pressure too high
Action
・Tighten securely
・Pressure-feed city water
・Remove dust, etc
・Clean or change
・Clean or change
・Clean or change
・Clean or change
・Tighten Suction Hose
securely
・Clean or change
・Clean or change
・Clean or change
・Clean or change Power
Supply, Plug, Cord and
Switch
・Release pressure from
Inside Hose
・Loosen Pressure Adjusting
Knob
15 12
13
14 8
3 4
19 18 17
9101 6
2
5
20
7
11
16
56
7 8
EP166
Ver.03 A


