Activia LUMINOUS QUAD DRONE User manual
ACTIVA LUMINOUS QUAD DRONE
USER MANUAL
PLEASE READ THIS MANUAL CAREFULLY BEFORE OPERATING THIS PRODUCT AND
KEEP FOR FUTURE REFERENCE.
WARNING
Mishandling due to failure to follow these instructions may result in damage or injury.
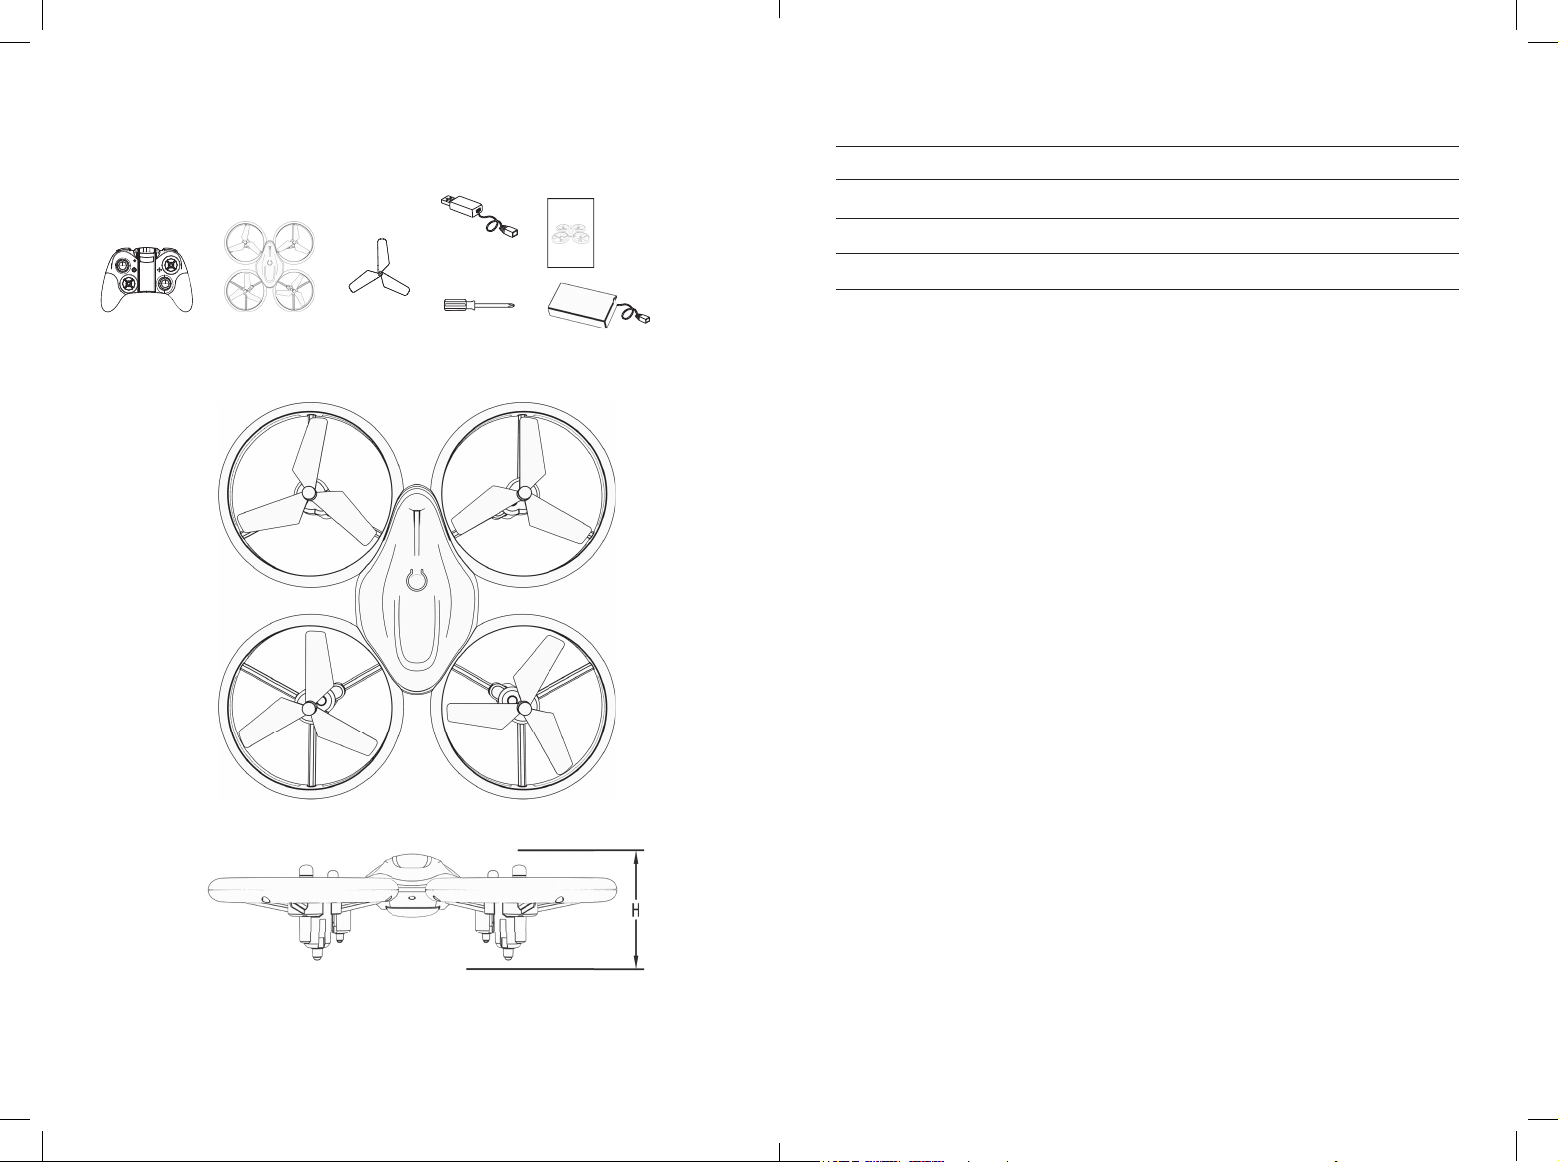
PRODUCT LIST
PRODUCT SPECIFICATIONS
Diagonal Length: 8” Inches (205mm)
Height: 2” Inches (45mm)
Battery Speci cation: 3.7V Li-Battery
Fight time: 6-8mins
IMPORTANT
This aircraft is not a toy. Use the device correctly as per instructions and safety guidelines in this
manual. Dismantling, modifying or improper use of the aircraft is dangerous and can result in injury
or damage.
This product is intended for use by age 14 years or older. Please ensure the product is operated
under safe environment.
It is recommended that you seek the assistance of an experienced pilot before attempting to y this
aircraft for the rst time. The advice of a local expert is the best way to properly assemble, set up,
and initially y your model. Any damage or dissatisfaction as a result of accidents or modi cations
are not covered by any warranty and cannot be returned for repair or replacement.
SAFETY & PRECAUTIONS
Always avoid crowds when operating. The pilot of the aircraft assumes all responsibilities and
liabilities related to accidents, failures, damage or injury, and radio interference during ight. Use
with care and caution.
This product is suitable for indoor and outdoor (the wind grade should not be on more than 4)
use. Always choose an obstacle-free location and avoid from crowds and pets at all times. Do not
operate near any heat source, wires, or electronic power sources in order avoid damage by collision
landing, entanglements that can lead to re, electric shock or cause loss of life and property.
Moisture Prevention
This is an electrical device so always keep the model and associated equipment away from moisture
and other contaminants. The introduction or exposure to water or moisture in any form can cause
the aircraft to malfunction or crash.
WARNING
Safety Information
Do not disassemble, modify, upgrade or repair the product. Use only the spare parts as provided to
maintain the integrity and safety of the craft’s structure.
Safety Note for Remote Control Batteries
Make sure the batteries are installed based on polarity indicated in the case and do not mix
batteries of different chemistry/speci cations. Always remove the batteries if unused over a
Remote control ×1 Drone×1 Blades×8 Screwdriver×1
USB Charger×1
Instruction manual×1
Battery×1
23
prolonged period avoid potential leakage which may damage the transmitter. Dispose depleted
batteries according to local laws and ordinances, do not dispose improperly.
Safety Note on Li-Polymer- Batteries
Li-Polymer batteries poses higher operational risks compared to other battery chemistry so it is
imperative to follow usage instructions. Manufacturer and dealer assume no liability for accidental
damages caused by improper use.
Only use the factory supplied unit to avoid potential re and explosion. Do not crush, disassemble,
burn, and reverse polarity. Avoid contact with metallic materials and never puncture the batteries to
avoid re hazards. Battery charging must be done under supervision at all times and in a location
out of reach by children.
If the battery is deteriorated after use, it is strictly prohibited to charge or the battery to expand,
deform, explode, or even result in re hazards. Dispose of depleted batteries according to local laws
and ordinances. Do not dispose improperly.
Climate Safety
The aircraft is made of various forms of plastic. Plastic is susceptible to damage or deformation due
to extreme temperature. Always store the model in a climate-controlled, dry area. Never store near
a heat source such as an oven or heater.
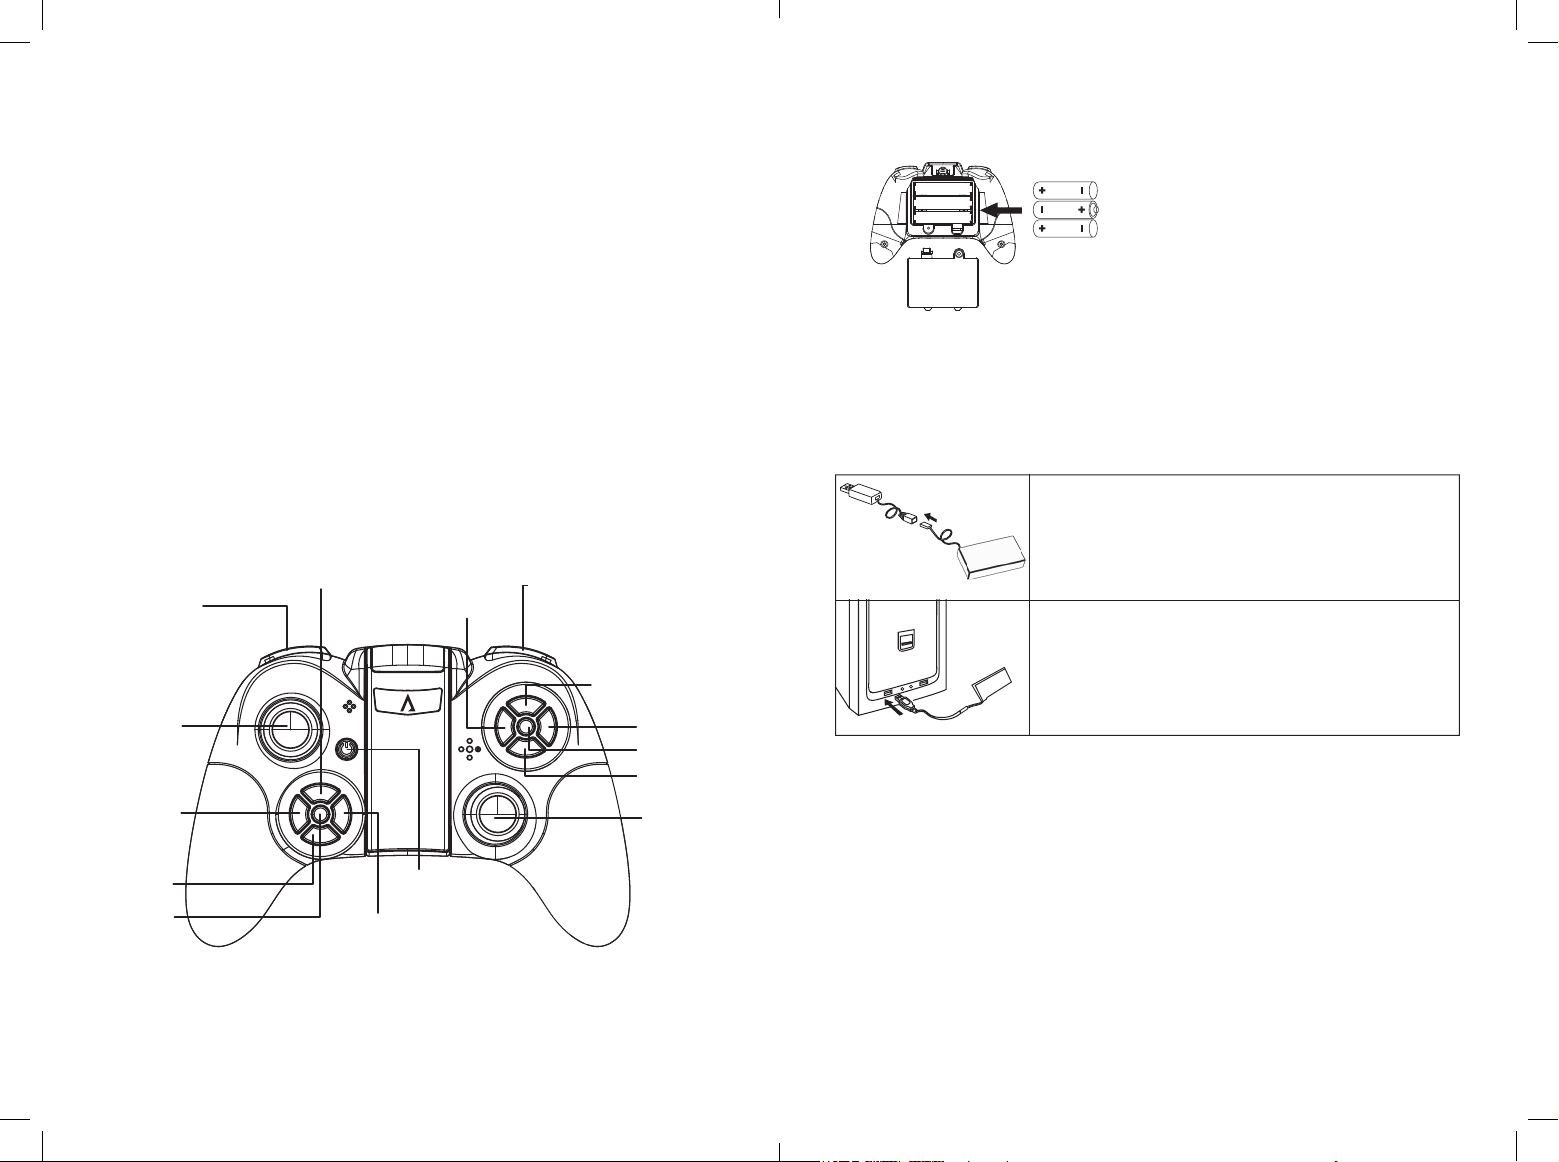
REMOTE CONTROL OVERVIEW
REMOTE CONTROL BATTERY INSTALLATION
1. Use the screwdriver to unsecure the battery cover and open it.
2. Install 3 AAA batteries.
3. Close the battery cover and secure by using the screwdriver.
AIRCRAFT BATTERY CHARGING
LED Indicator USB
Lights On: Charging
Lights Off: Charge Complete
For safety concerns, battery charging must be done under adult supervision at all times.
Speed Adjustment Key
Throttle
Control
Stick
One Key
Return
Light Key
Emergency
Stop Key
One Key Take-Off/Landing
Leftward Trimming Key
Right Rudder:
Short press: 360° Flip (This
feature is not available in the
aerial version)
Long press: One-click rotation
Forward
Trimming Key
Rightward
Trimming Key
Backward
Trimming Key
Direction
Control Stick
Power
Switch
Headless Mode Key
Calibration Key
Securely insert the USB charger into the battery power port
(smaller end).
Charging time: Approximately 100 minutes.
When complete, disconnect the USB charger from the port to
prolong charger life.
4 5
3*AAA batterie

PAIRING DEVICES
Step 1
Place the device on a at surface and insert
the battery into the craft. Do not move
until the blinking LED light switches from
fast to slow. Only when the light is slow-
ashing can the control can be connected
with drone.
Step 2
Turn on the remote control and push the
throttle stick to the top, then the bottom.
When the drone’s light stops ashing, they
have been successfully connected.
Press for 3 seconds to power off. The
indicator light will turn off when the device
is successfully powered off.
Step 3
Press Power Switch for 3 seconds and the
light will turn off, this indicates the drone
has powered off.
Warning: Failure to remove the battery
when the device is not in use for an
extended period may result in damage due
to leakage and may become a re hazard.
Step 4
Turn off the remote control. If not in use for
an extended period of time, remove the
batteries.
Warning: If batteries are left in the
transmitter, leakage could occur resulting
in damage and potential re hazard.
FLIGHT ADJUSTMENTS AND SETTINGS
Read and follow all instructions prior to rst use.
1. Place the drone in a clear open eld and point the tail of drone to yourself.
2. Practice operating the remote control and all functions prior to rst ight.
Forward and Backward Trimming
1. When the aircraft is starting to take off and it
drifts forward/backward, adjust the Trim button
in desired direction until balanced.
Left and Right Trimming
2. When the aircraft is starting to take off and it
drifts left/right, adjust Trim button in desired
direction until balanced.
Recalibration
If the trim buttons do not correct a ight issue,
place the drone on a at surface and recalibrate
as follows.
Simultaneously, press both control keys to the
lower left or to the lower right for 4 seconds
(pic) - the drone light will rapidly ash. When
successfully recalibrated, the light will stop
ashing.
Trim Adjustment
Slowly raise the throttle control stick to take off and if it moves to a different orientation, use the
Trim Button to correct.
3.7V Li-Po Batteries
Press once
and the light
turns on,
it means
power on.
Press for 3
seconds and
the light turns
off, it means
power off.
Power Switch
Up
Forward
Turn Left
Move
Left
Move
Right
Down
Backward
Turn Right
Forward
trimming
Right trimming
Left trimming
Backward
trimming
67
Place the device on a at surface and insert
Press Power Switch for 3 seconds and the
seconds and
Press Power Switch for 3 seconds and the
seconds and
Press Power Switch for 3 seconds and the
the light turns
off, it means

Headless Mode Instructions
When synching, the antenna of the remote control must be aligned with the tail of the drone. In
normal ight, when pressing headless button, a beep and ashing guide light signi es headless
mode. Press this button again to exit headless mode.
One Key Return
When the drone ies at a distance, the one key return button can recall the aircraft. Following device
connection, the antenna of the transmitter must be aligned with the tail of the craft in order to
takeoff. Press the one key return button to enter return mode, the light will ash. Press the button
again to exit return mode. When returning, the forward and backward movement of right lever can
interrupt this function.
High and Low Speed Switching
During ight, the ight speed can be adjusted by pressing this button while in any direction. The
craft’s default speed is low. Press this button once to switch to medium speed, the transmitter will
beep twice. Press the button again to switch to high speed, the transmitter will beep three times.
Press again to return to low speed.
360° Flip
Once familiar with basic operation, the aircraft can be own to a height of more than 3 meters, and
perform 360° Flip. To invert the craft, turn on the rear right side of the transmitter, then push the
right rudder (in any direction) to achieve a 360 degree ip.
OPERATION OF AUTOMATIC FUNCTIONS
Start the Drone
Method 1: Press One Key Takeoff Button once and the propeller will start spinning and the drone
will y up.
Method 2: Simultaneously push the left throttle control stick to the bottom left corner and the right
direction control stick to the bottom right corner for approximately 1 second and the propellers will
spin slowly.
Altitude Hover Function
Push the left throttle control stick upwards, then downwards and release. The craft will maintain that
height when released.
Turn Off the Drone
Method 1: Long press the emergency stop button, the propeller will stop working, locking the craft.
Method 2: Push the left throttle control stick down for 3 seconds, the blade will stop spinning.
One Key Take Off
Turn on drone, press the One Key Start the drone will propel upwards, and can be controlled to go
towards any desired direction once it is ying.
One Key Landing
When ying, press the One Key Landing the drone will descend, and can be controlled to land in a
desired location.
Emergency Stop
When the aircraft collides during the ight and cannot be controlled, the emergency stop button
can be pressed and the aircraft will descend
FAQ FOR THE DRONE
SITUATION THE REASON SOLUTION
1. Receiver LED blinks
continuously for more than 4
seconds once turned on with or
no response to control input .
Unable pair with the
transmitter.
Repeat pairing between
controller and receiver
2. No response after battery is
connected to airaft.
1. Check power supply of
transmitter and receiver.
2. Poor contact on battery
terminals.
3. Check if the power switch
has been turned on.
1. Turn on transmitter and
ensure aircraft battery is
inserted properly.
2. Use fully charged batteries.
3. Re-insert the battery and
ensure secure contact
between battery contacts.
4. Switch to the ON position.
3. Motor does not respond to
throttle stick, receiver LED
fl ashes.
Aircraft battery depleted. Fully charge the battery or
replace with a fully charged
battery.
4. Main blade spins but unable to
take off.
1. Blade deformation
2. Aircraft battery depleted.
1. Replace main blades.
2. Charge or replace with a
fully charged battery.
5. Strong vibration of aircraft. Blade deformation. Replace the blade.
6. Aircraft rotates after trimming
or different speeds between
left /right blades
1. Damaged blades.
2. Damaged motor.
1. Replace blade.
2. Replace motor.
7. Aircraft drifts backward or
forward
Gyroscope not at the
midpoint.
Switch aircraft off and on.
8. Aircraft fails to take off after a
crash or collision.
1. Motor has fallen out.
2. Gears are loose.
1. Install the motor again.
2. Tighten the gears.
8 9
360° Flip

LIMITED LIFETIME WARRANTY
Your Activa Luminous Quad Drone is backed by a limited lifetime manufacturer’s warranty. Activa will
repair or replace your device at any time should it fail due to a defect in material or workmanship,
subject to the certain limitations.
This limited warranty does not cover any damage that results from unauthorized or improper use,
service, or repair. Further, it does not cover damage caused by accident, impact, negligence, or
normal wear and tear. Should you discover your Activa Luminous Quad Drone is not functioning
properly, please send your device to our repair center for evaluation. If your product cannot be
repaired or serviced, we will reserve the right to change it for a similar or newer model.
Please note that a at rate of $30.00 will be charged to cover a service evaluation fee and return
shipping of your device. All warranty claims must be accompanied by a copy of your proof of
purchase from an authorized retailer. Please send your device, proof of purchase, and a check or
money order in the amount of $30.00 made out to Activa to:
Address:
Activa Service Center
3069 Taft Street
Hollywood, FL 33021
Contact:
warranty@activaofcial.com
Table of contents


