Acuity Brands NLIGHT nDTC User manual

NLIGHT®
DIGITAL TIME CLOCK
USER MANUAL
2.4

Acuity Brands | One Lithonia Way Conyers, GA 30012 | Phone: 800.535.2465 | www.nlightcontrols.com | © 2020 Acuity Brands Lighting, Inc. | All rights reserved. | Rev. 09/17/2020
Contents
Overview ................................................................................................................................................................................. 4
Interoperability ....................................................................................................................................................................... 5
nLight Gateway and Fresco................................................................................................................................................. 5
SensorView.......................................................................................................................................................................... 5
nIO BT and nConfig ............................................................................................................................................................. 5
Schedules ................................................................................................................................................................................ 5
Normal Schedules ............................................................................................................................................................... 5
Holiday Schedules ............................................................................................................................................................... 6
Schedule Execution Priority ................................................................................................................................................ 6
Getting Started........................................................................................................................................................................ 7
Initial Configuration ............................................................................................................................................................ 7
Logging in as Administrator ................................................................................................................................................ 8
Logging out of Administrator.............................................................................................................................................. 9
Dashboard Screens ................................................................................................................................................................. 9
Home Dashboard .................................................................................................................................................................. 10
Suspend/Resume Dashboard................................................................................................................................................ 11
Suspending Schedules....................................................................................................................................................... 12
Manually Resuming Schedules.......................................................................................................................................... 12
Schedule Configuration Dashboard ...................................................................................................................................... 12
Creating a Normal Schedule ............................................................................................................................................. 13
Creating a Holiday Schedule ............................................................................................................................................. 15
Configuring a Start Trigger ................................................................................................................................................ 16
Configuring an End Trigger................................................................................................................................................ 19
Blink Warning and Timed Override Delay......................................................................................................................... 21
Timed Override Delay and Blink Warning Example ...................................................................................................... 23
Reviewing a Schedule........................................................................................................................................................ 23
Editing a Schedule............................................................................................................................................................. 23
Duplicating a Schedule...................................................................................................................................................... 24
Deleting a Schedule........................................................................................................................................................... 24
Running a Schedule On-Demand ...................................................................................................................................... 24
Custom Holiday Events ......................................................................................................................................................... 25
Creating a Custom Holiday Event...................................................................................................................................... 26
Reviewing a Custom Holiday Event................................................................................................................................... 26
Editing a Custom Holiday Event ........................................................................................................................................ 27
Deleting a Custom Holiday Event...................................................................................................................................... 27
Light Control Dashboard ....................................................................................................................................................... 27

Acuity Brands | One Lithonia Way Conyers, GA 30012 | Phone: 800.535.2465 | www.nlightcontrols.com | © 2020 Acuity Brands Lighting, Inc. | All rights reserved. | Rev. 09/17/2020
Light Control Channel List ................................................................................................................................................. 28
Hamburger Menu.................................................................................................................................................................. 28
About..................................................................................................................................................................................... 29
Settings.................................................................................................................................................................................. 29
Screen Behavior ................................................................................................................................................................ 30
Date/Time/Location.......................................................................................................................................................... 30
Change Access PIN ............................................................................................................................................................ 31
Factory Reset .................................................................................................................................................................... 31
Technician Mode................................................................................................................................................................... 31
Channels............................................................................................................................................................................ 32
Inputs ................................................................................................................................................................................ 32
Outputs ............................................................................................................................................................................. 33
Online/Ofline Devices ....................................................................................................................................................... 34
Last Switch Pressed........................................................................................................................................................... 34
Firmware Updates................................................................................................................................................................. 35
Acuity Brands | One Lithonia Way Conyers, GA 30012 | Phone: 800.535.2465 | www.nlightcontrols.com | © 2020 Acuity Brands Lighting, Inc. | All rights reserved. | Rev. 09/17/2020
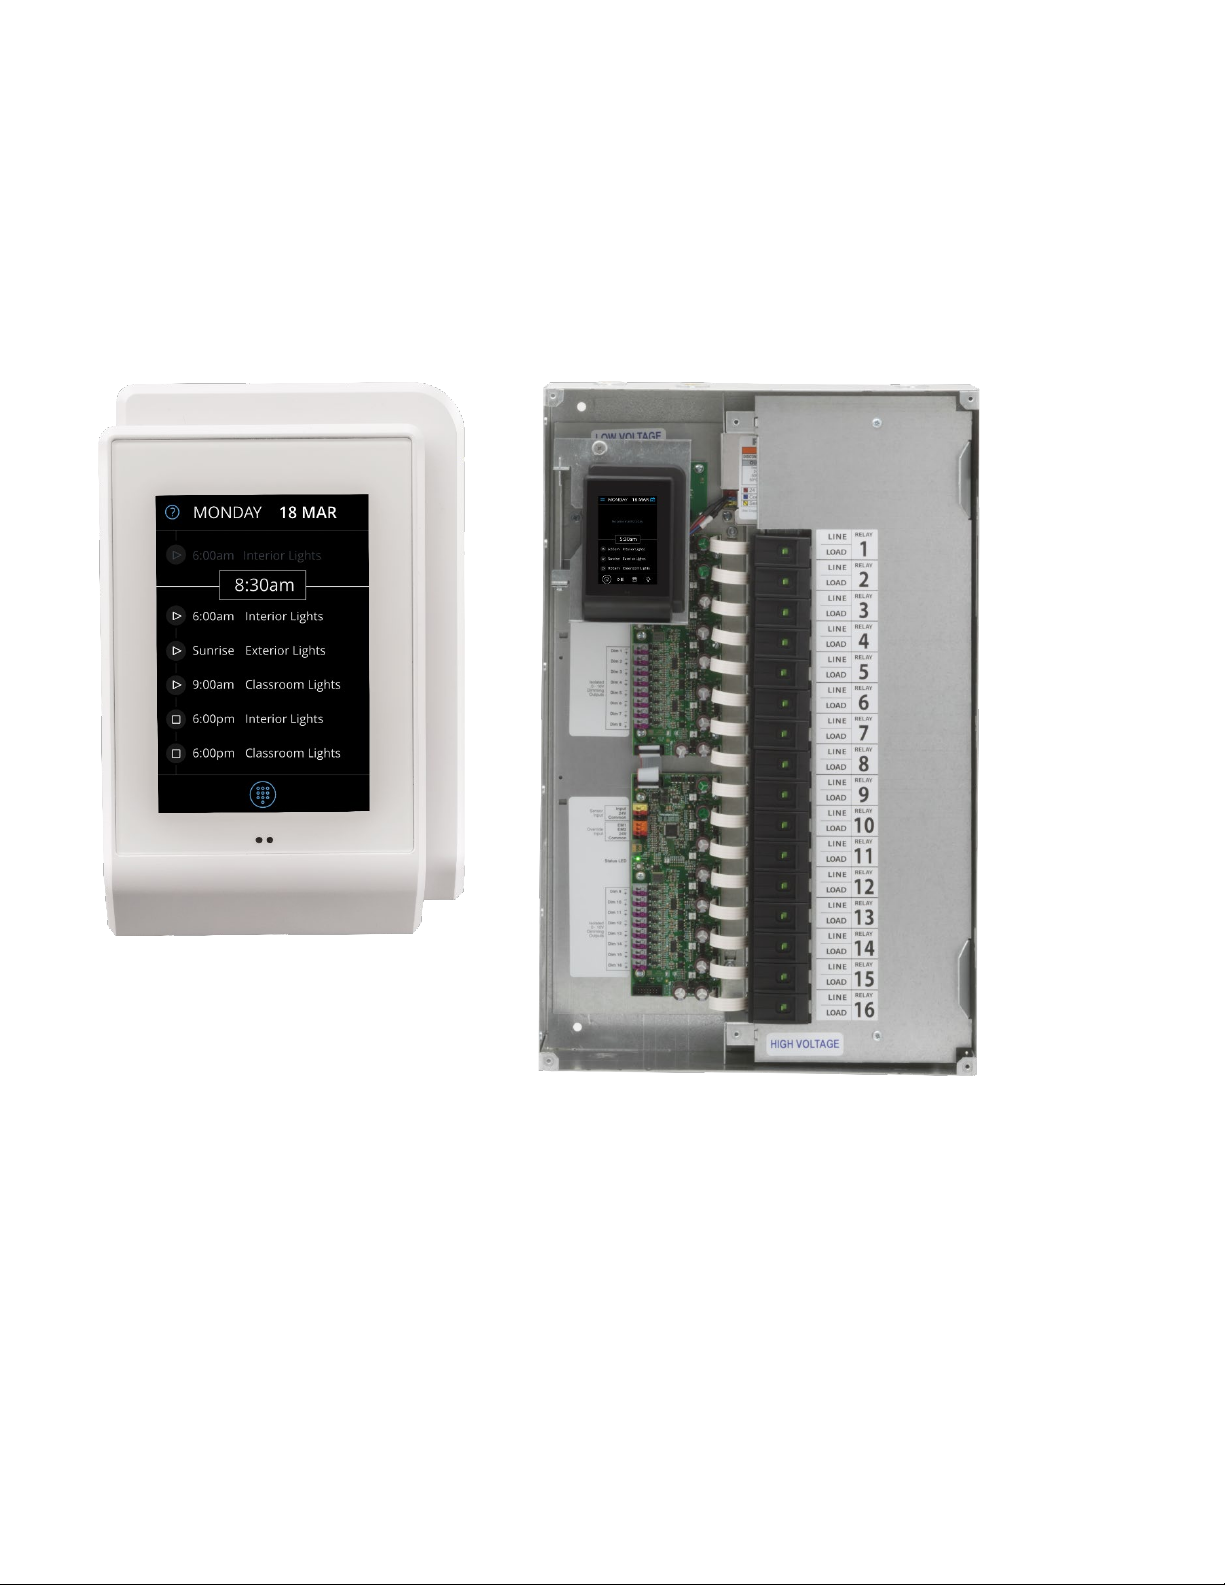
Overview
The nLight® Digital Time Clock (nDTC) is a low voltage capacitive touch screen digital time clock that delivers
smart, simple astronomical and time-based scheduling on-screen programming for small-to-medium projects requiring
minimal footprint and flexibility of configuring. Available as a standalone, or pre-assembled to an ARP panel, the device
communicates with an nLight Wired network and supports up to 127 digital devices in an nLight control zone.
This document covers common configuration and management tasks that arise when setting up and maintaining
the nLight® Digital Time Clock as well as step by step instructions for accomplishing various tasks.
Acuity Brands | One Lithonia Way Conyers, GA 30012 | Phone: 800.535.2465 | www.nlightcontrols.com | © 2020 Acuity Brands Lighting, Inc. | All rights reserved. | Rev. 09/17/2020
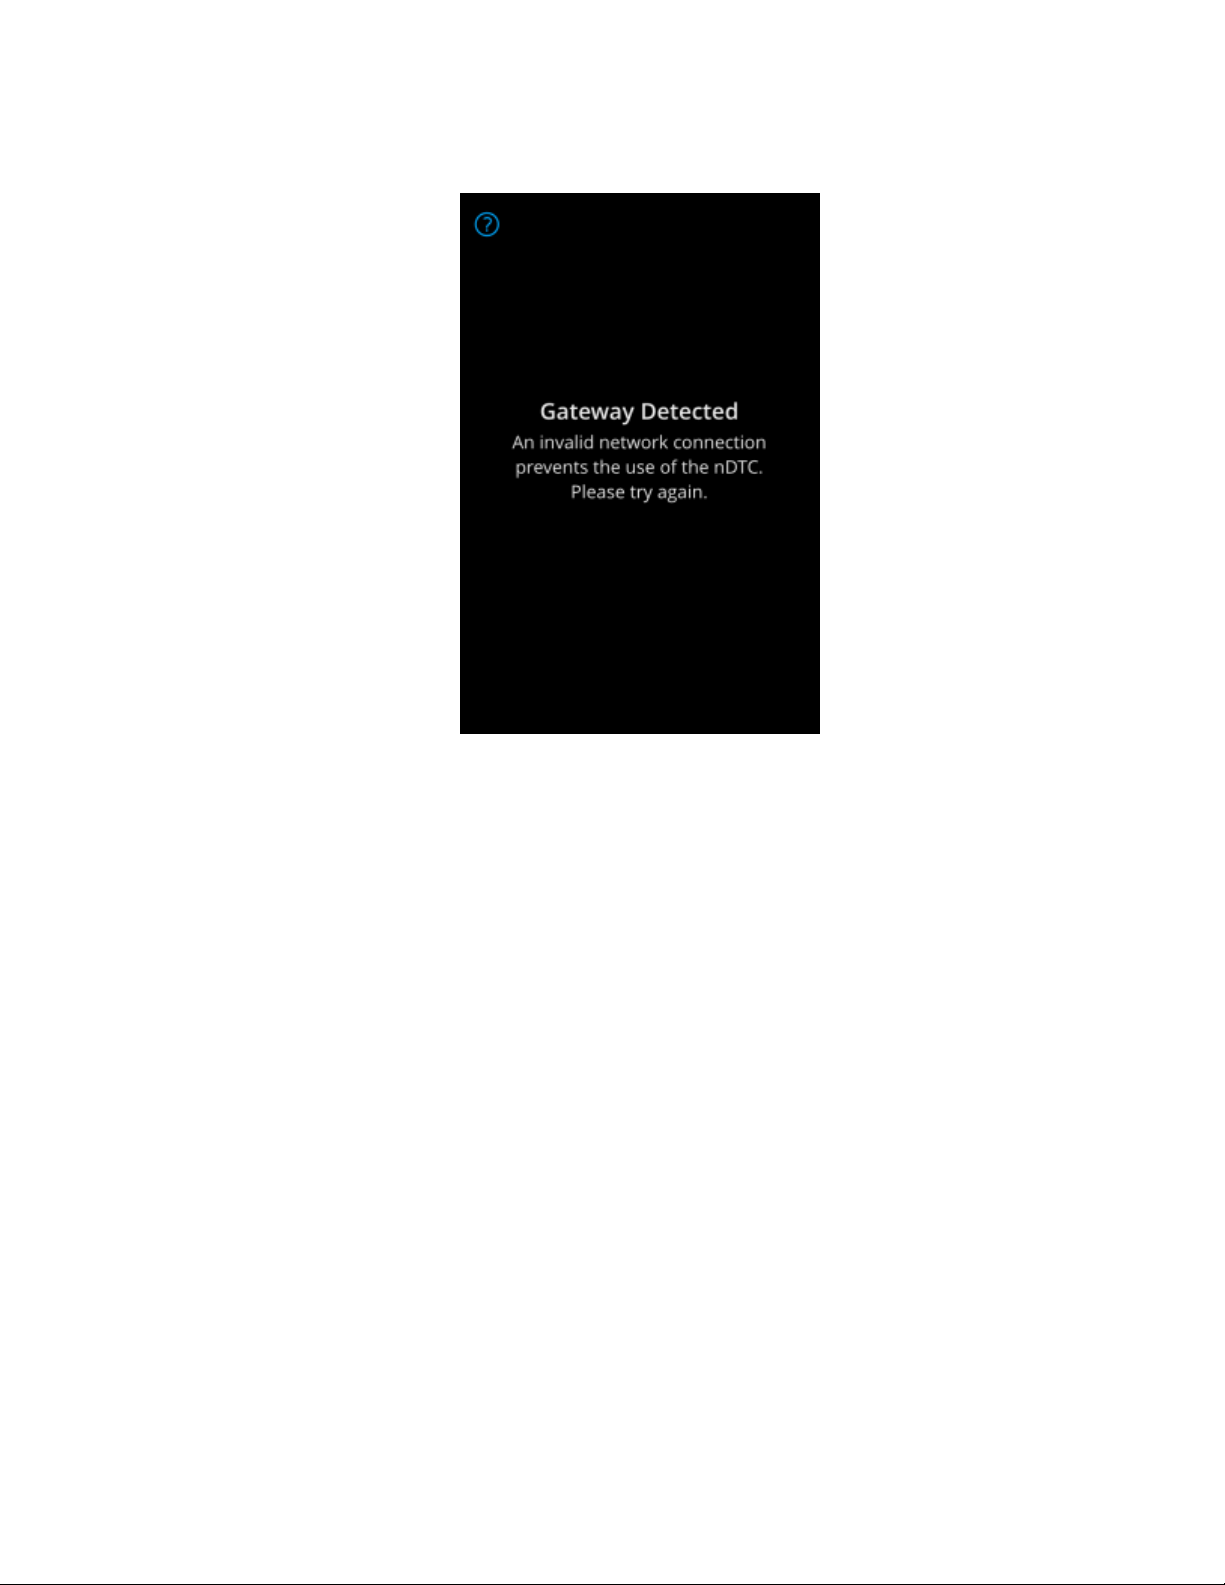
Interoperability
The nDTC operates uniquely as a scheduling device for stand-alone lighting control zone applications.
Figure 1 - Gateway detection message
nLight Gateway and Fresco
When connected to a network device, i.e. ECLYPSE control or FRESCO, the nDTC relinquishes all scheduling
functions and displays a message per Figure 1.
SensorView
When connected to SensorView via an nComm kit, users can view and edit device level settings, device health, as
well as update nDTC firmware. Users cannot create, review or modify the nDTC and its schedules through SensorView.
nIO BT and nConfig
Though the nConfig mobile app can be connected to the nLight network through a nIO BT to allow users the ability
to view and program all devices in the network, the nDTC is however not discoverable.
Schedules
Schedules in the nDTC operate using the event-based scheduling paradigm, where each schedule has Start and an
End Trigger. These events are time-based that can run by time of the day as well as astronomical time (sunrise/sunset).
All schedules are required to have a Start Trigger, with a start time and action. End Triggers are not required to be
entered, however, will automatically be interpreted as an End Trigger with an end time of 11:59 PM with a “Do Nothing”
action. When devices are controlled by an event, it holds the events state unless it is overridden by another event or a
manual action by a user.
The nDTC supports up to 32 schedules, and maintains two types of schedules, Normal and Holiday.
Normal Schedules

Acuity Brands | One Lithonia Way Conyers, GA 30012 | Phone: 800.535.2465 | www.nlightcontrols.com | © 2020 Acuity Brands Lighting, Inc. | All rights reserved. | Rev. 09/17/2020
Normal Schedules are standard schedules set to run based on a 7-day (Mon-Sun) week cycle. These schedules can
only be scheduled to recur on a weekly basis and run during the active start and end date range.
Holiday Schedules
Holiday Schedules are event-based schedules created to run during defined holiday periods (i.e. Thanksgiving Day,
Independence Day, …). Unlike Normal Schedules, these schedules can only be scheduled to recur on a yearly basis during
the holiday(s) selected.
The following are the pre-populated holidays available out-of-the-box:
•New Year’s Day
•MLK, Jr. Day
•Presidents’ Day
•Memorial Day
•Independence Day
•Labor Day
•Columbus Day
•Veterans Day
•Thanksgiving Day
•Christmas Day
•Boxing Day
•New Year’s Eve
•Canada Day
•Canadian Thanksgiving
•Victoria Day
•Quebec St. John the Baptist Day
The nDTC enables the use of user-generated holiday to drive periods in which the Holiday Schedules should execute, as
so known as Custom Holiday events. These Custom Holiday Events can run for single days, based on date range, or as a
relative day based on an offset (i.e. the 4th Thursday of November). The nDTC allows creation of up 20 Custom Holiday
Events.
Schedule Execution Priority
To minimize the chances of schedule conflicts, the nDTC has an implicit schedule prioritization that is determined
by the schedule type (Normal/Holiday), whether it is a one-time event or recurring event, and whether it is a single day
or date range.
The prioritization of the schedules below displays execution from highest priority to lowest priority. The higher implicit
priority level always takes precedence over schedules with a lower implicit priority level.
•Holiday – single day, single occurrence
oOne-time event, Halloween 2019
•Holiday – date range, single occurrence
oDecember 1 – December 15, 2019
•Holiday – single day, recurring annually
oChristmas, every year
•Holiday – date range, recurring annually
oDecember 1 – December 15, every year
•Normal
oMonday – Friday, recurring weekly
Acuity Brands | One Lithonia Way Conyers, GA 30012 | Phone: 800.535.2465 | www.nlightcontrols.com | © 2020 Acuity Brands Lighting, Inc. | All rights reserved. | Rev. 09/17/2020
Getting Started
Upon powering the device out of the factory, users are walked through initial configuration screens to set the
location of the device, date, time, and create the administrator PIN. While these settings are set during initial powering,
they are configurable through the settings menu as an administrator.
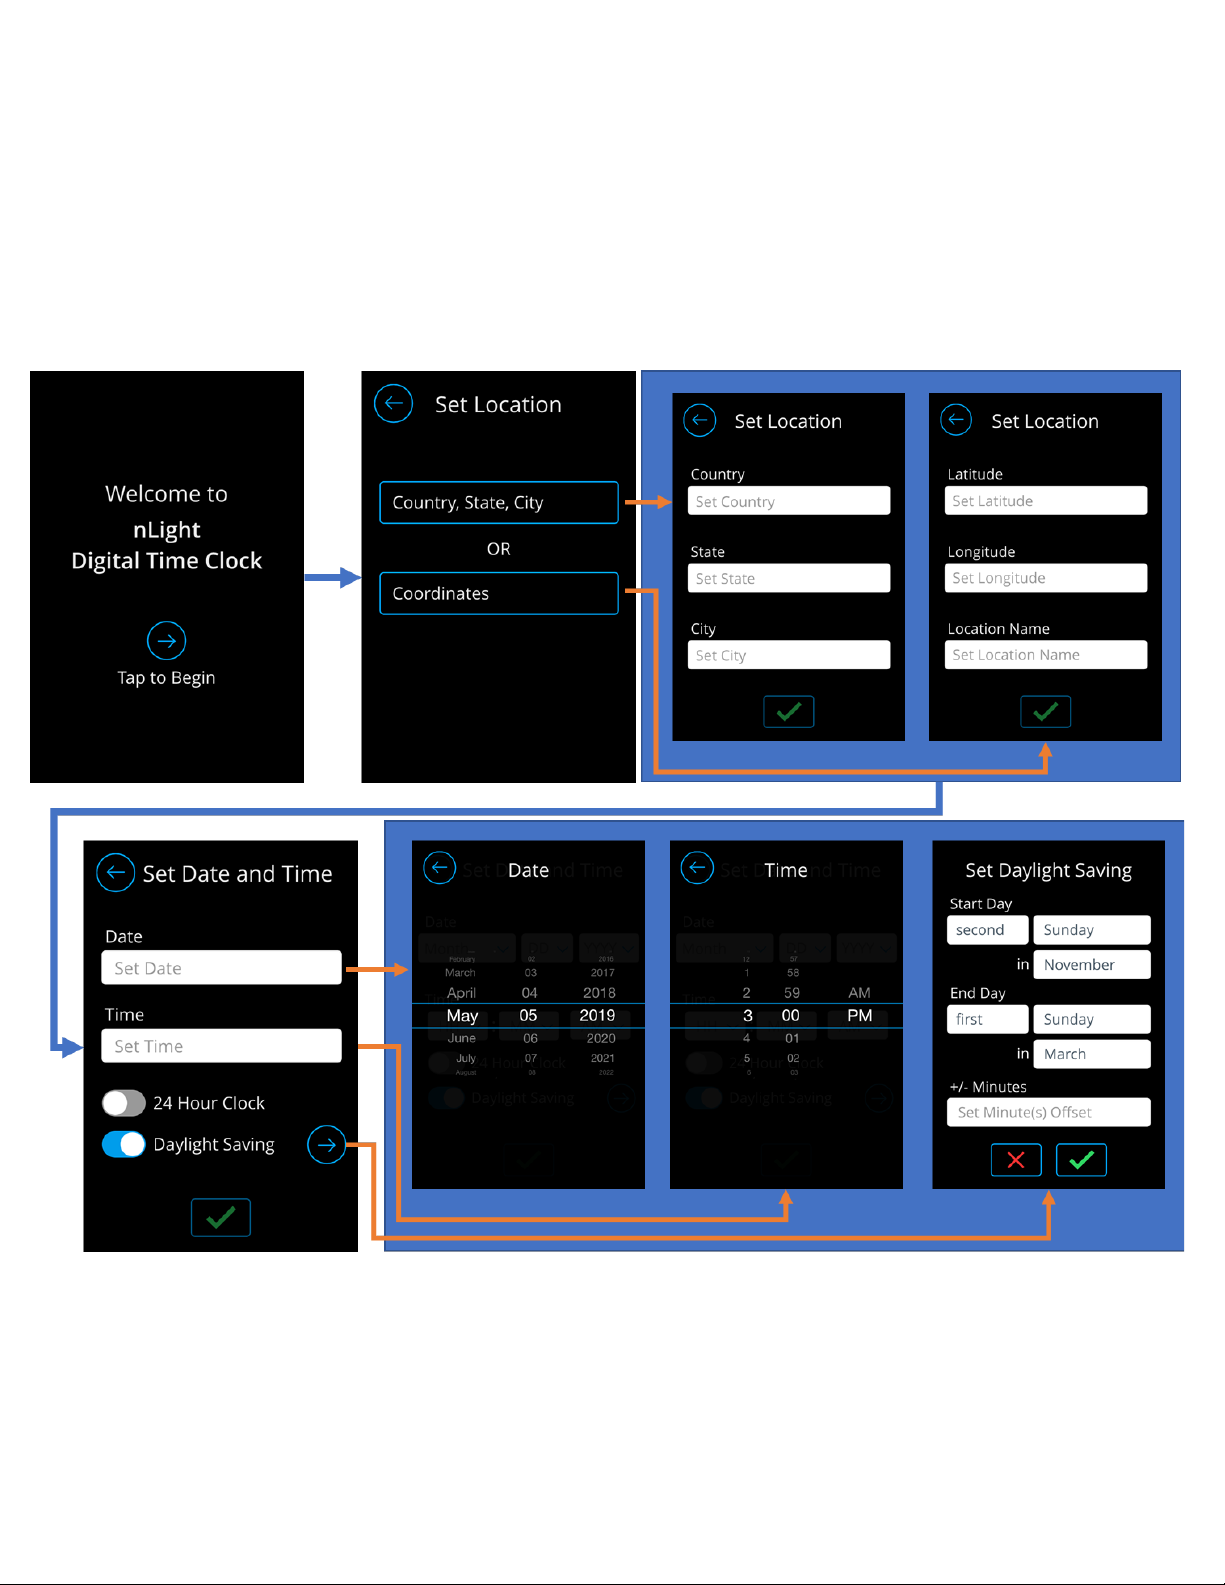
Initial Configuration
Users are walked through the initial screens set up the current time and location nDTC device. This process is
essential as it allows for proper time-based execution of schedules and events.
The nDTC does not allow for default, or back door, PINs, therefore, when completed with configuring the settings
needed to run schedules, users are walked-through the process of creating the administrator PIN. When initial
configuration is complete, users are redirected to the home dashboard, as a logged-out user, where executed and
upcoming events are listed.
Figure 2 - Initial configuration of location, date and time of the device

Acuity Brands | One Lithonia Way Conyers, GA 30012 | Phone: 800.535.2465 | www.nlightcontrols.com | © 2020 Acuity Brands Lighting, Inc. | All rights reserved. | Rev. 09/17/2020
Figure 3 - Initial Admin PIN creation process
Logging in as Administrator
The nDTC only maintains one user level – the Administrator. Logging in is available through tapping the PIN entry
button at the footer of the home dashboard.
NOTE: The administrator PIN is what was PIN initially created through the initial configuration.
Figure 4 - Logging in as administrator
After successful login, users should be able to notice the extended navigation options available on the footer and the
hamburger menu on the top left of the screen.

Acuity Brands | One Lithonia Way Conyers, GA 30012 | Phone: 800.535.2465 | www.nlightcontrols.com | © 2020 Acuity Brands Lighting, Inc. | All rights reserved. | Rev. 09/17/2020
Logging out of Administrator
Administrators can log out of the unit by tapping on the “Log out” button in the hamburger menu (See Figure 5).
Figure 5- Log out of Administrator mode
Administrators are also logged out when the unit times out the screen shuts off due to inactivity.
Dashboard Screens
With its ability to create, display, and modify schedules, as well as control lighting, the nDTC is equipped with four
(4) primary dashboards.
Home Dashboard
Suspend/Resume Dashboard
The Home Dashboard displays all the events that are toby
executed within the day.
The Suspend/Resume Dashboard allows users the ability
to suspend an individual schedule, or multiple schedules,
for a set period or indefinitely.

Acuity Brands | One Lithonia Way Conyers, GA 30012 | Phone: 800.535.2465 | www.nlightcontrols.com | © 2020 Acuity Brands Lighting, Inc. | All rights reserved. | Rev. 09/17/2020
Schedule Configuration Dashboard
Light Control Dashboard
The Schedule Configuration Dashboard is the primary
screen for creation and configuration of schedules.
Through this screen, administrations can program Normal
as well as Holiday schedules
The Light Control Dashboard allows administrators the
ability control lights directly from this screen.
Manipulating the control elements from this screen will
impact devices all channels.
Home Dashboard
The Home Dashboard enables the ability to view the start and End Triggers of schedules configured to run in the
current date. Events that have already executed are in the section above the time placer, events to be run are located
under. As time passes and events are executed, they will transition from the bottom section to the top section.
Home Dashboard Screen Description
The Home Dashboard enables the ability to view the start and End
Triggers of schedules configured to run in the current date. Events that
have already executed are in the section above the time placer, events to
be run are located under. As time passes and events are executed, they
will transition from the bottom section to the top section.
1. Prior events section – Section designated to hold the list of
events that have already run today.
2. Upcoming events section – Section designated for events that
are still to run today.
3. Hamburger Menu – Activates the sidebar menu to expose more
configuration functions.
4. Calendar button – Directs users to the calendar view, where they
can preview events/schedules to be run in other dates.
5. Dashboard navigation bar – Enables transition between different
dashboards.

Acuity Brands | One Lithonia Way Conyers, GA 30012 | Phone: 800.535.2465 | www.nlightcontrols.com | © 2020 Acuity Brands Lighting, Inc. | All rights reserved. | Rev. 09/17/2020
Suspend/Resume Dashboard
The Suspend/Resume Dashboard allows the ability to suspend schedules from running indefinitely, or for a set
period. When a schedule is suspended all events under that schedule will not execute until the suspension period is
passed, or users manually triggers to resume. Once a set of schedules have been suspended, no other schedules can be
suspended. To suspend more schedules, currently suspended schedules must be resumed first and then the list of
schedules to be scheduled must be amended to include the additional ones.
When a schedule is resumed, all its upcoming events (Start Trigger or End Trigger) will fire. The End Trigger will fire
regardless if the Start Trigger did not fire due to the schedule being suspended.
State
Screen
Description
Suspend
From this view, users can select from the list of
Normal and Holiday schedules the ones they are
interested in suspending.
1. Normal/Holiday Navigation Tab – Tab used to
transition between the list of Normal and
Holiday schedules available to suspend.
2. Schedules List – Container holding the list of
schedules available for suspension.
3. Suspension Button – Used to suspend selected
schedules.
4. Hamburger Menu – Activates the sidebar
menu to expose more configuration functions.
5. Calendar button – Directs users to the
calendar view, where they can preview
events/schedules to be run in other dates.
6. Dashboard navigation bar – Enables transition
between different dashboards.
Resume
From this view, users view the list of suspended
schedules, when they are set to resume and select to
manually resume them.
1. Schedules List – Container holding the list of
suspended schedules available to be
resumed.
2. Resume button – Used manually resume the
suspended schedules.
3. Hamburger control – Used to display the
hamburger menu.
4. Calendar button – Directs users to the
calendar view, where they can preview
events/schedules to be run in other dates.
5. Dashboard navigation bar – Enables transition
between different dashboards.

Acuity Brands | One Lithonia Way Conyers, GA 30012 | Phone: 800.535.2465 | www.nlightcontrols.com | © 2020 Acuity Brands Lighting, Inc. | All rights reserved. | Rev. 09/17/2020
Suspending Schedules
The following workflow shows how one can select from a list schedules the ones to suspend for a limited period:
Figure 6- Schedule suspension workflow
Manually Resuming Schedules
The workflow below displays how users can override suspended schedules that are set to resume later:
Figure 7 - Workflow to resume suspended schedules
Schedule Configuration Dashboard
The Schedule Configuration Dashboard the is the primary programing dashboard for creation and modification of
individual schedules. Through this section, one can create either Normal or Holiday Schedules, as well as Custom holiday
events. One also has the ability to edit, delete and run on-demand a schedule through this dashboard.
Acuity Brands | One Lithonia Way Conyers, GA 30012 | Phone: 800.535.2465 | www.nlightcontrols.com | © 2020 Acuity Brands Lighting, Inc. | All rights reserved. | Rev. 09/17/2020
Figure 8 - Normal Schedule Configuration Tab
Figure 9 - Holiday Schedule Configuration Tab
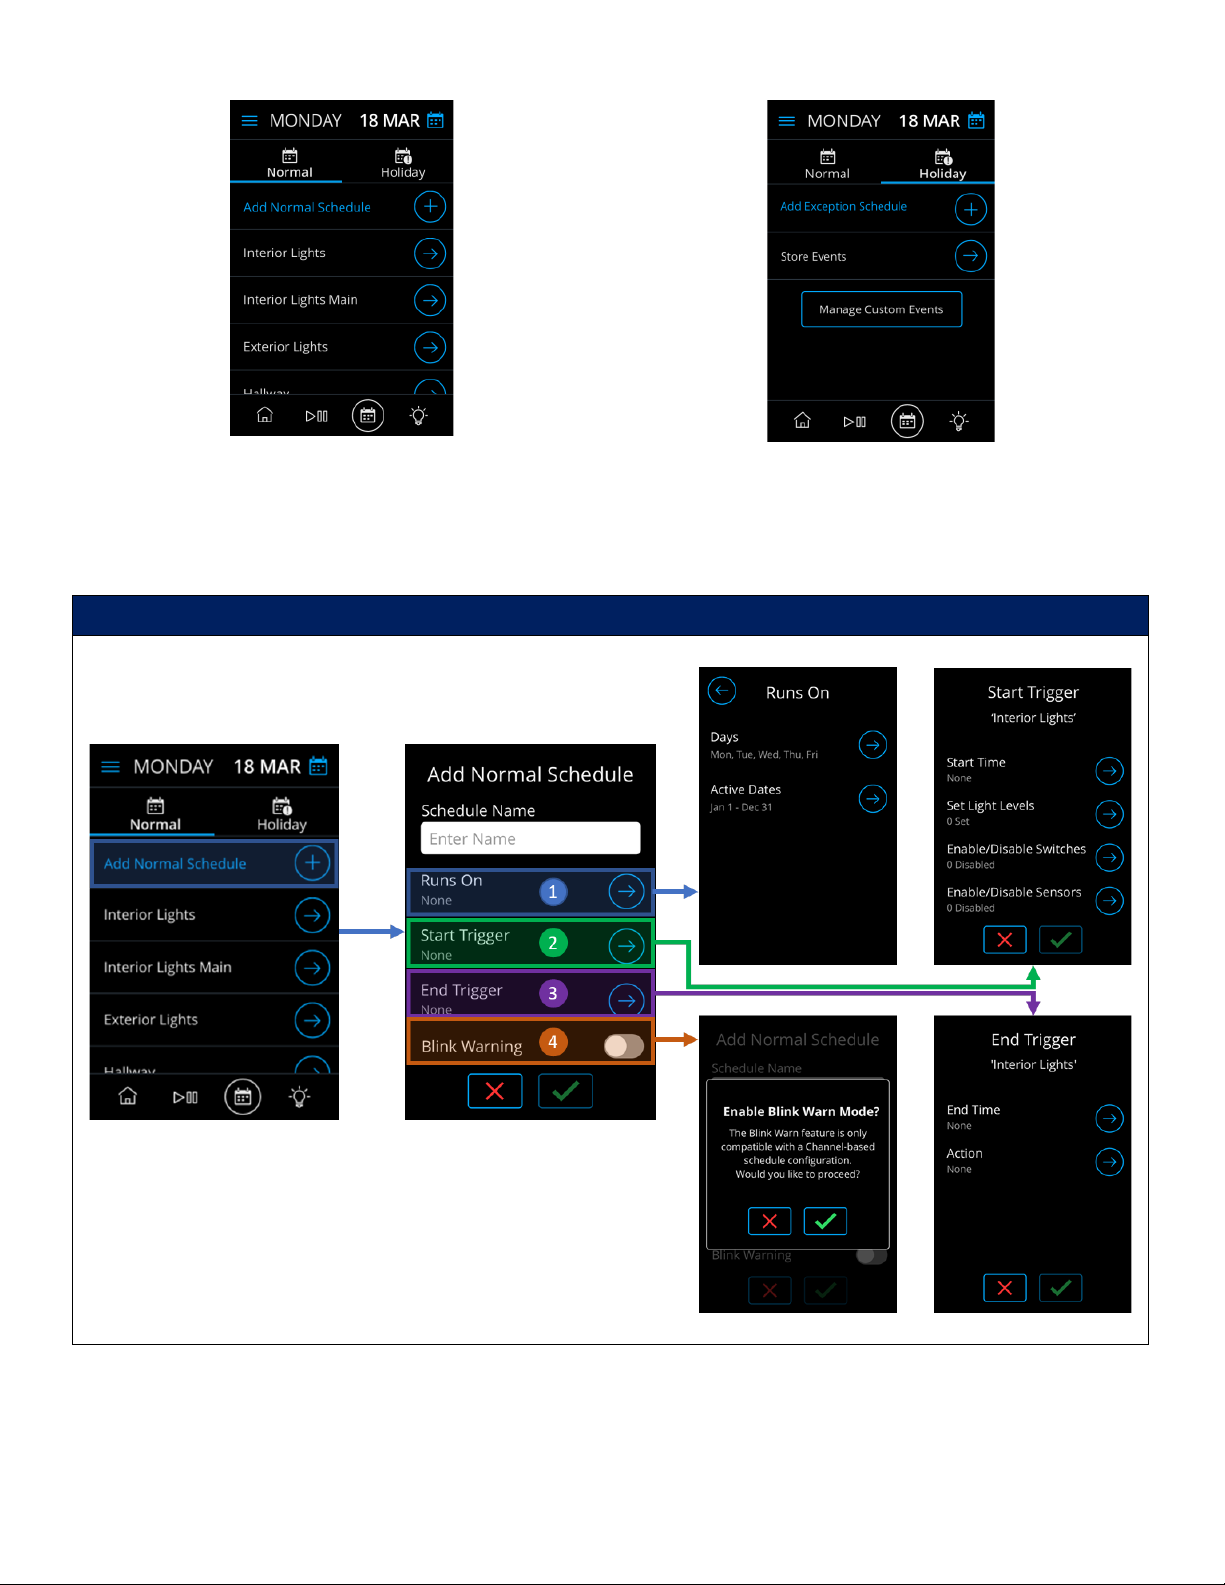
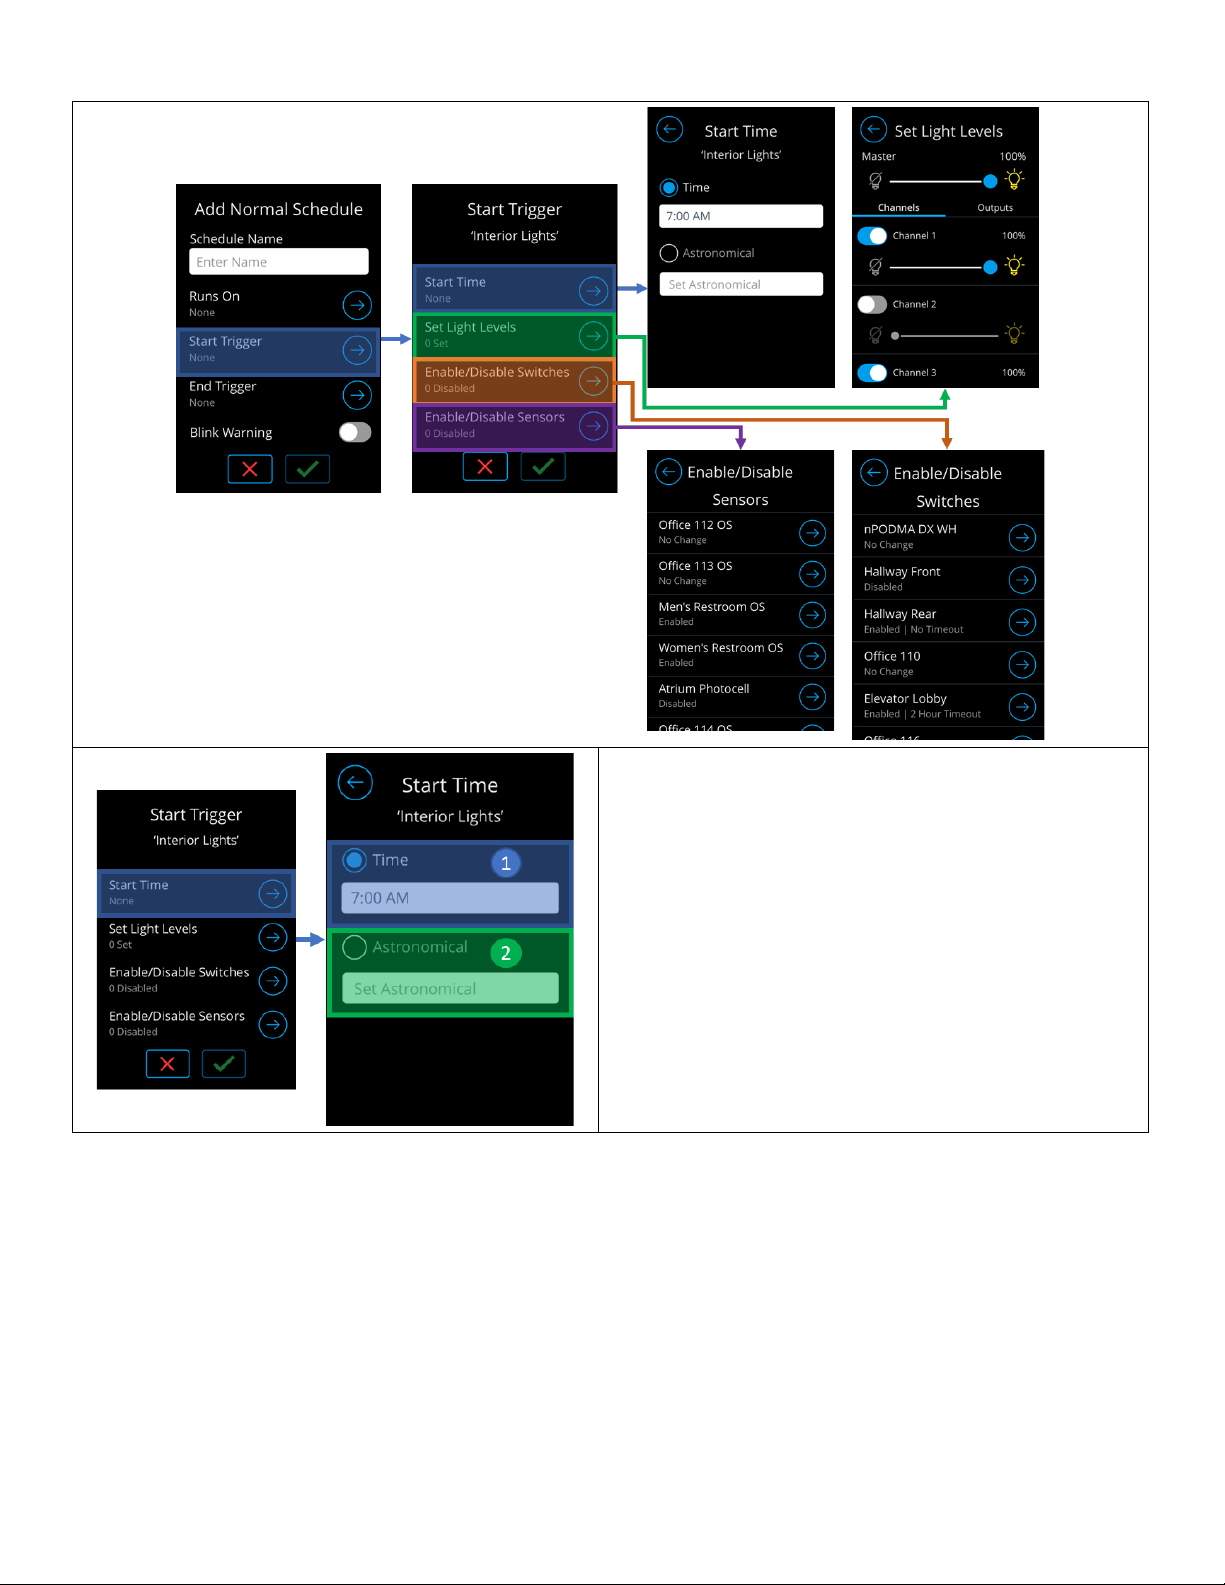
Creating a Normal Schedule
Normal Schedules are created in the “Normal” tab of the Schedules Configuration Dashboard.
Tapping the “Add Normal Schedule” section will initiate the schedule creation process

Acuity Brands | One Lithonia Way Conyers, GA 30012 | Phone: 800.535.2465 | www.nlightcontrols.com | © 2020 Acuity Brands Lighting, Inc. | All rights reserved. | Rev. 09/17/2020
1. “Runs On” Section – Holds a summary of
when the schedule is scheduled to run on.
Tapping this section will walk through
selecting execution dates.
2. Start Trigger Section – Holds a summary of
when and what the Start Trigger will be.
Tapping this section will walk through
selecting run time and actions.
3. End Trigger Section – Holds a summary of
when and what the End Trigger will be.
Tapping this section will walk through
selecting run time and actions.
4. Blink Warning – If enabled, a blink warning
to takes effect at the scheduled execution
of the End Trigger, and the End Trigger will
take effect 5 minutes after.
a. The End Trigger must be
controlling channels to go 0%.
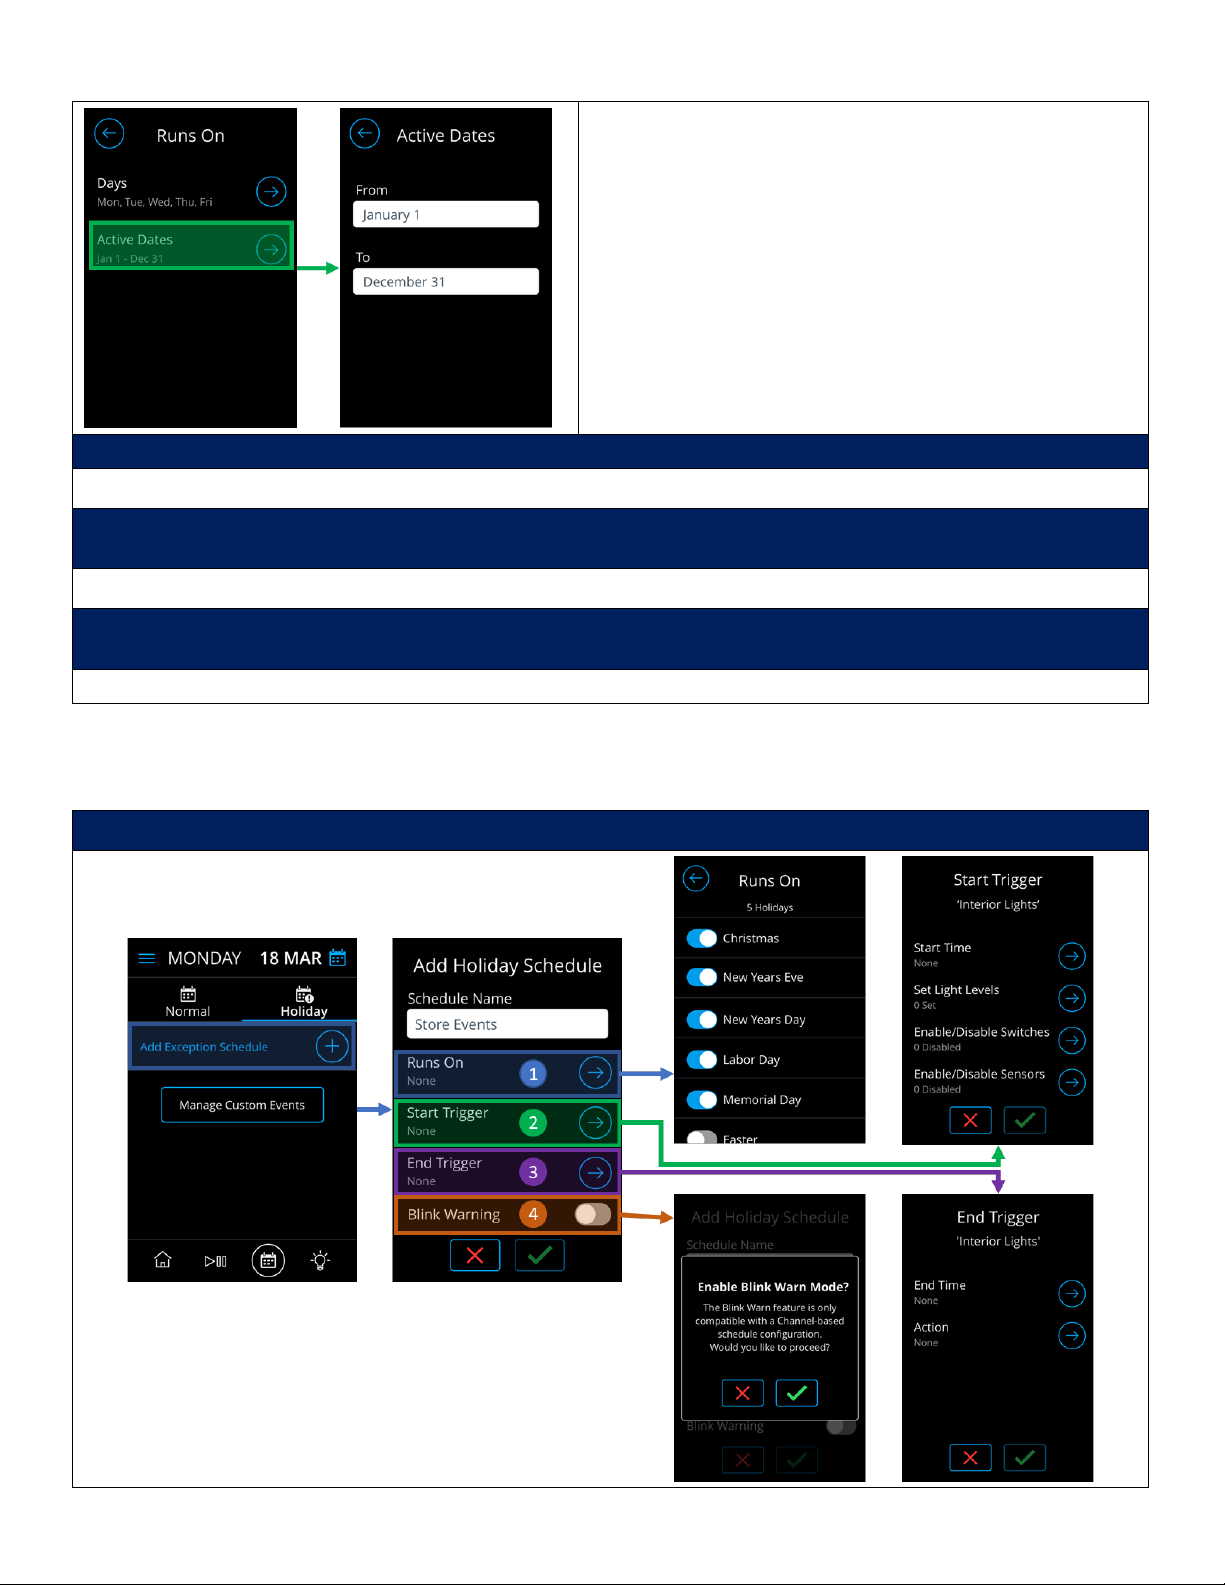
Tapping the “Runs On” allows the selection of dates and frequency the schedule should run
The “Runs On” screen allow the selection of days of the
week the schedule should execute.
•Options: Monday through Sunday
•Multiple days of the week can be selected
Schedule will run each year during the associated days of
week on the selected date range
Acuity Brands | One Lithonia Way Conyers, GA 30012 | Phone: 800.535.2465 | www.nlightcontrols.com | © 2020 Acuity Brands Lighting, Inc. | All rights reserved. | Rev. 09/17/2020
The “Runs On” screen allow the selection of the period of
the year the schedule should execute.
•Options: January 1st to December 31
Schedule will run each year during the associated days of
week on the selected date range
Configure the Start Trigger by setting the start time and actions that will execute during the run
Refer to section labeled “Configuring a Start Trigger” for details.
Configure the End Trigger by setting the end time and actions that will execute during the run. Note that
configuration of End Triggers is not required
Refer to section labeled “Configuring an End Trigger” for details.
If needed, enable “Blink Warning” to have the schedule display a blink at the End Trigger’s designated time and the
End Trigger will execute 5 minutes after.
Refer to section labeled “Blink Warning and Timed Override Delay” for details.
Creating a Holiday Schedule
Holiday Schedules are created in the “Holiday” tab of the Schedules Configuration Dashboard.
Tapping the “Add Holiday Schedule” section will initiate the schedule creation process

Acuity Brands | One Lithonia Way Conyers, GA 30012 | Phone: 800.535.2465 | www.nlightcontrols.com | © 2020 Acuity Brands Lighting, Inc. | All rights reserved. | Rev. 09/17/2020
1. “Runs On” Section – Holds a summary of when the
schedule is scheduled to run on. Tapping this section
will walk through selecting holidays in which schedule
will run.
2. Start Trigger Section – Holds a summary of when and
what the Start Trigger will be. Tapping this section will
walk through selecting run time and actions.
3. End Trigger Section – Holds a summary of when and
what the End Trigger will be. Tapping this section will
walk through selecting run time and actions.
4. Blink Warning – If enabled, a blink warning to takes
effect 5 minutes prior to the execution of the End
Trigger. The End Trigger must be controlling channels
to go 0%.
Tapping the “Runs On” allows the selection of Holiday event(s) to be associated with holiday schedule.
The “Runs On” screen of allow the selection of holiday
event for the schedule to execute on.
If the designated holiday is not available from the pre-
populated list of options. The flexibility to create Custom
Event(s) is available and will direct you through the
workflow of “Creating a Custom Event”.
Upon completion of creating the Custom Event, the
current “Runs On” list will refresh with the new list of
Holiday event options.
Configure the Start Trigger by setting the start time and actions that will execute during the run
Refer to section labeled “Configuring a Start Trigger” for details.
Configure the End Trigger by setting the end time and actions that will execute during the run. Note that
configuration of End Triggers is not required
Refer to section labeled “Configuring an End Trigger” for details.
If needed, enable “Blink Warning” to have the schedule display a blink 5 minutes before the End Trigger is executed.
Refer to section labeled “Blink Warning and Timed Override Delay” for details.
Configuring a Start Trigger
Start Triggers are the initial actions that take effect when a schedule is executing. Through the Start Trigger, users
specify the start time of the schedule as well as the action that the schedule will be driving across the devices connected
to the nDTC’s network.
Configuring a Start Trigger is required for all schedules and should include a start time, as well as an action(s).
Acuity Brands | One Lithonia Way Conyers, GA 30012 | Phone: 800.535.2465 | www.nlightcontrols.com | © 2020 Acuity Brands Lighting, Inc. | All rights reserved. | Rev. 09/17/2020
The Start time determines when the schedule’s Start
Trigger will execute. Start times can be either set times, or
astronomical.
1. Set Time – A defined time based on hours,
minutes and AM/PM
2. Astronomical Time – A defined time based on
Sunrise or Sunset with selected offset
Acuity Brands | One Lithonia Way Conyers, GA 30012 | Phone: 800.535.2465 | www.nlightcontrols.com | © 2020 Acuity Brands Lighting, Inc. | All rights reserved. | Rev. 09/17/2020
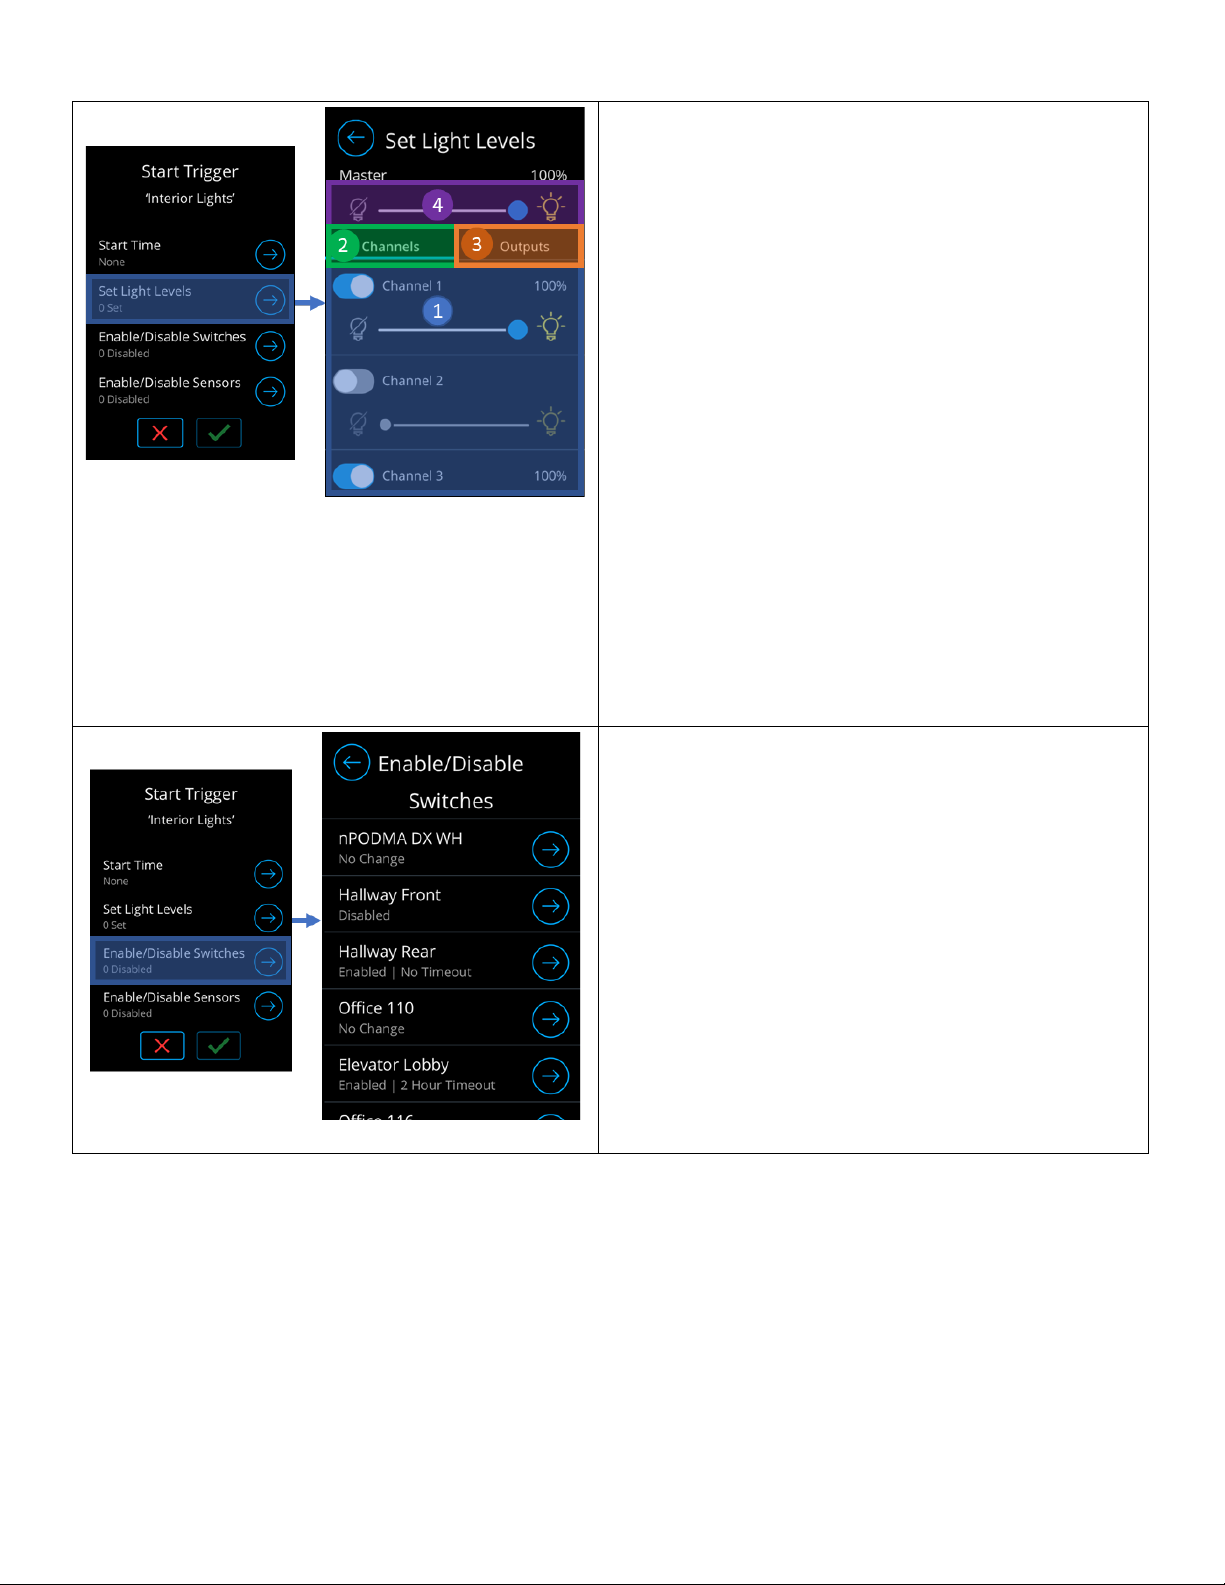
Screen enables configuration of channels, or output
devices, to be controlled by the Trigger. A Trigger can only
control either Channels or Outputs.
1. Channel/Device configuration section – Used to
enable the channels, or devices, to be controlled
by the Trigger.
oToggle button - Enabling will result
channel/device being controlled by this
Trigger.
oSlider – Used to set the light level of the
channel/device.
2. Channels Tab – Used to configure channels to be
associated to the Trigger.
oNavigating out of this tab will result in loss
of configuration.
3. Outputs Tab – Used to configure devices to be
associated with the Trigger.
oNavigating out of this tab will result in loss
of configuration.
4. Master Controller – Used to set light level of all
associated channels, or devices.
Screen introduces ability to enable, or disable, wall
switches from being used during execution of the
schedule.
•Available options:
oNo Change – Maintains current switch
state
oDisable – Disables switch from performing
local broadcast
oEnable – Enables switch to perform local
broadcast
Switch Timeout – Used to adjust
timed override upon switch press
from blink warning
•Default is 2-hours

Acuity Brands | One Lithonia Way Conyers, GA 30012 | Phone: 800.535.2465 | www.nlightcontrols.com | © 2020 Acuity Brands Lighting, Inc. | All rights reserved. | Rev. 09/17/2020
Screen introduces ability to enable, or disable, sensors
from adjusting lights during execution of the schedule.
•Available options:
oNo Change – Maintains current sensor
state
oDisable – Disables sensor from performing
local broadcast
oEnable – Enables sensor to perform local
broadcast
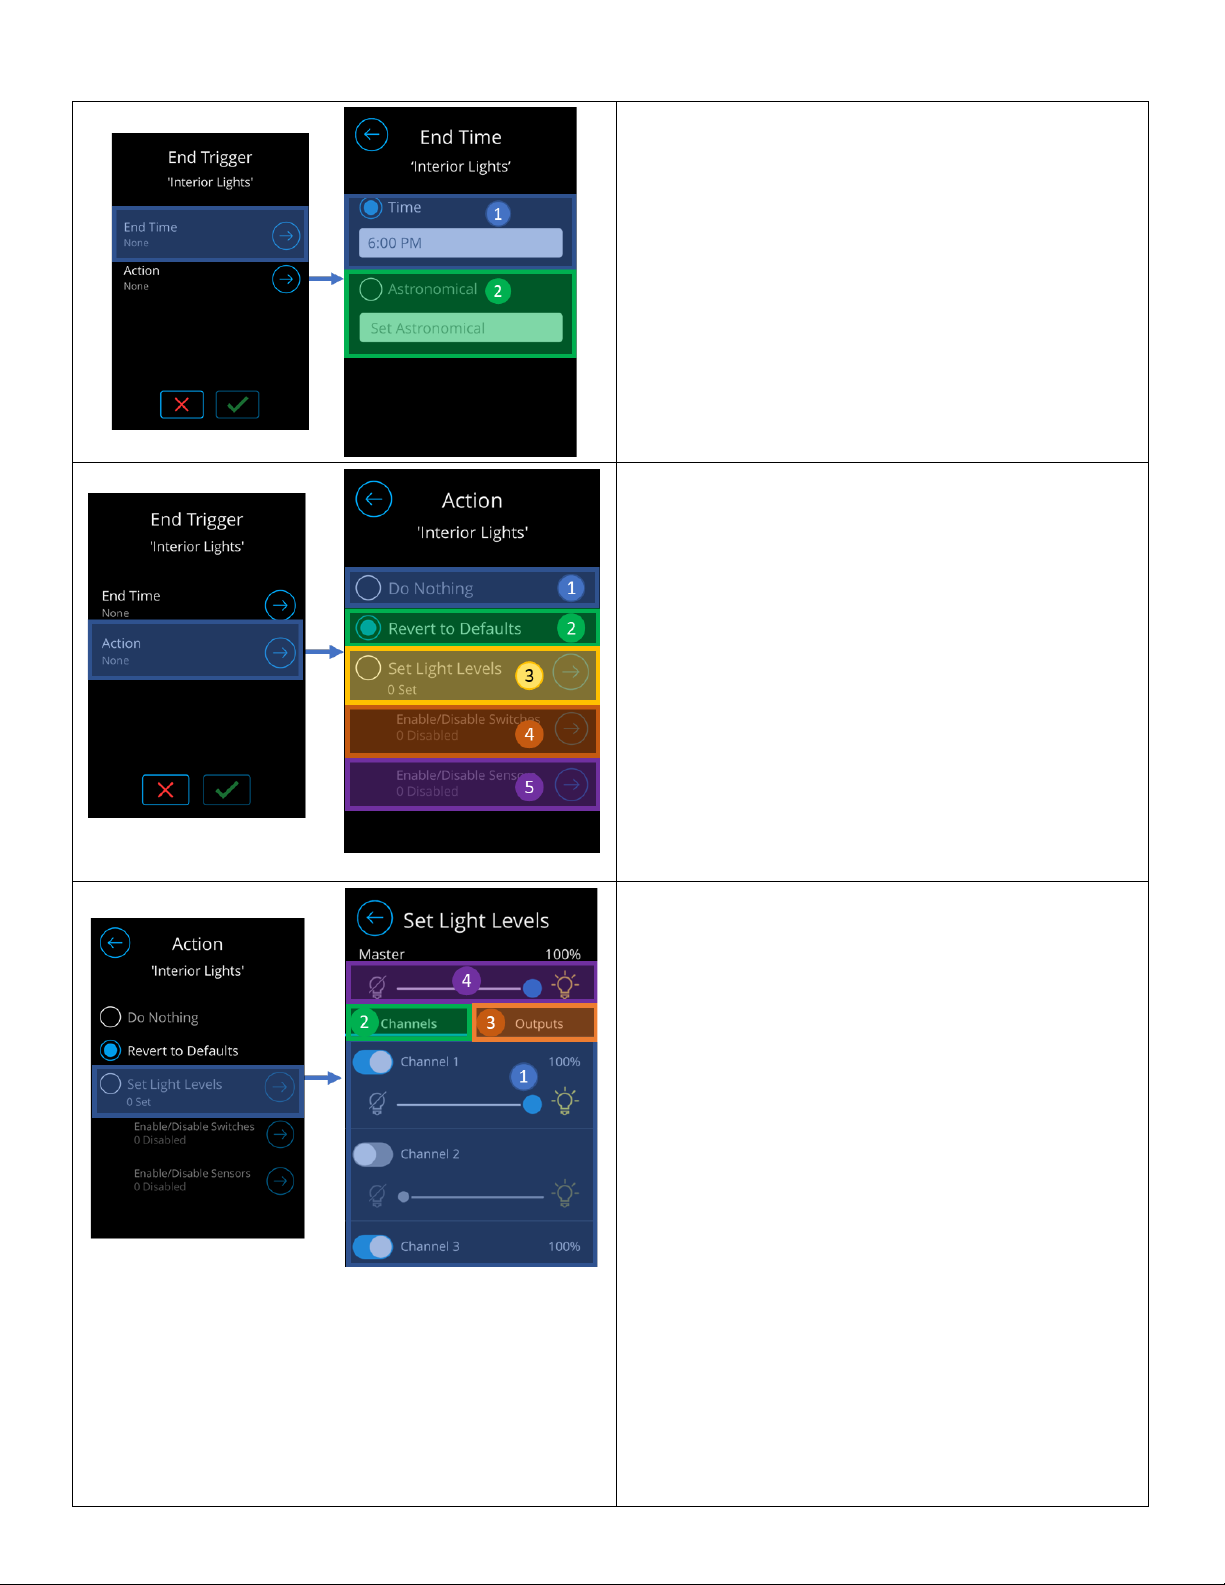
Configuring an End Trigger
End Triggers are the actions that run when a schedule is coming to close. Through the End Trigger, users specify the end
time of the schedule as well as the action that the schedule will be driving across the devices connected to the nDTC’s
network.
Configuration of End Triggers are not required, however, if not programmed will be automatically be set to “Do
Nothing” at 11:59 PM.
Acuity Brands | One Lithonia Way Conyers, GA 30012 | Phone: 800.535.2465 | www.nlightcontrols.com | © 2020 Acuity Brands Lighting, Inc. | All rights reserved. | Rev. 09/17/2020
The End time determines when the schedule’s End
Trigger will execute. End times can be either set times,
or astronomical.
1. Set Time – A defined time based on hours,
minutes and AM/PM
2. Astronomical Time – A defined time based on
Sunrise or Sunset with selected offset
Actions screen allow configuration of what will execute
as part of the End Trigger. Available actions include:
1. Do Nothing – Maintains current state of nLight
light devices in the spaces (inputs and outputs).
2. Revert to Defaults – Commands all nLight
devices in network to revert to their default
settings.
3. Set Light Levels - Enables configuration of
channels, or output devices, to be controlled by
the Trigger.
4. Enable/Disable Switches - Enables, or disables,
wall switches from being used.
5. Enable/Disable Sensors - Enables, or disables,
sensors from being used.
Screen enables configuration of channels, or output
devices, to be controlled by the Trigger. A Trigger can
only control either Channels or Outputs.
1. Channel/Device configuration section – Used to
enable the channels, or devices, to be controlled
by the Trigger.
oToggle button - Enabling will result
channel/device being controlled by this
Trigger.
oSlider – Used to set the light level of the
channel/device.
2. Channels Tab – Used to configure channels to be
associated to the Trigger.
oNavigating out of this tab will result in
loss of configuration.
3. Outputs Tab – Used to configure devices to be
associated with the Trigger.
oNavigating out of this tab will result in
loss of configuration.
4. Master Controller – Used to set light level of all
associated channels, or devices.
Table of contents
Popular Time Clock manuals by other brands


American Time
American Time SiteSync IQ SSQMSTR-00XSB Installation and operation manual

Perel
Perel CWC1 user manual

RETOX
RETOX 367524 instruction manual

IKEA
IKEA ART EVENT 2021 manual

Chore-Time
Chore-Time AGRI-TIME Installation and operator's manual

Lutron Electronics
Lutron Electronics RadioRA RA-SCI quick start guide
