ADA GASTROGAZ ADA SCE 12 User manual


2
Dear Sirs,
Thank you for the credit shown us by buying our product, electric pressure fryer. We
hope that the device which you own will satisfy all your expectations.
In this construction we tried to leave up to all expectations of the users. Electric
pressure fryer assures short time frying of meat product in hot oil without penetrating
the oil into product, what gives excellent taste and wholesome values.
Before you start operating the device, it is recommended to familiarize with the content
of the hereby operating instruction where you find exact recommendations concerning
correct hold-down, use and preservation of the fryer.
ADA Gastrogaz
MANUFACTURER

3
CONTENT
1. Destination of the fryer 4
2. Technical characteristic and equipment 5
3. Technical manual for appliance installer 7
3.1. Assembly order 7
4. Instructions for use and maintenance 10
4.1. Operation and maintenance 10
4.2. Use and oil change 13
4.3. Cleaning the appliance 14
4.4. Additional maintenance performed periodically 15
4.5. Deletion of the disturbance of work 15
4.6. Rules for the safe use of the appliance 16
4.7. First aid 17
4.8. Warnings 17
5. Conditions of the guarantee certificate 19
Guarante Certificate 20
PRECAUTIONS FOR PURCHASERS AND USERS
Before starting to operate the appliance one should get acquainted with the operating instruction. The
instruction contains hints and recommendations concerning proper usage of the device.
Acting according to the present instruction will assure long lasting and infallible operation, bringing in
the same time profit and satisfaction with the product purchased.
It is not allowed to heat the oil alone under pressure!
4
1. DESTINATION OF THE FRYER
The electric pressure fryer ADA SCE 12 is intended for preparing dishes in hot oil under
pressure. It is used in food industry, but mainly in gastronomy.
The fryer is especially fitted to fry meat products ( poultry, pork, fish) in special coating
but they can be prepared without it as well. You can also use the fryer to prepare toasts,
doughnuts, chips etc.
In this type of pressure devices you receive the final product crisp, crunchy and not
saturated with oil. The pressure is obtained due to the release of natural moisture from
the product. Due to the fact that steam builds up very quickly, the fried product retains
most of its natural moisture.
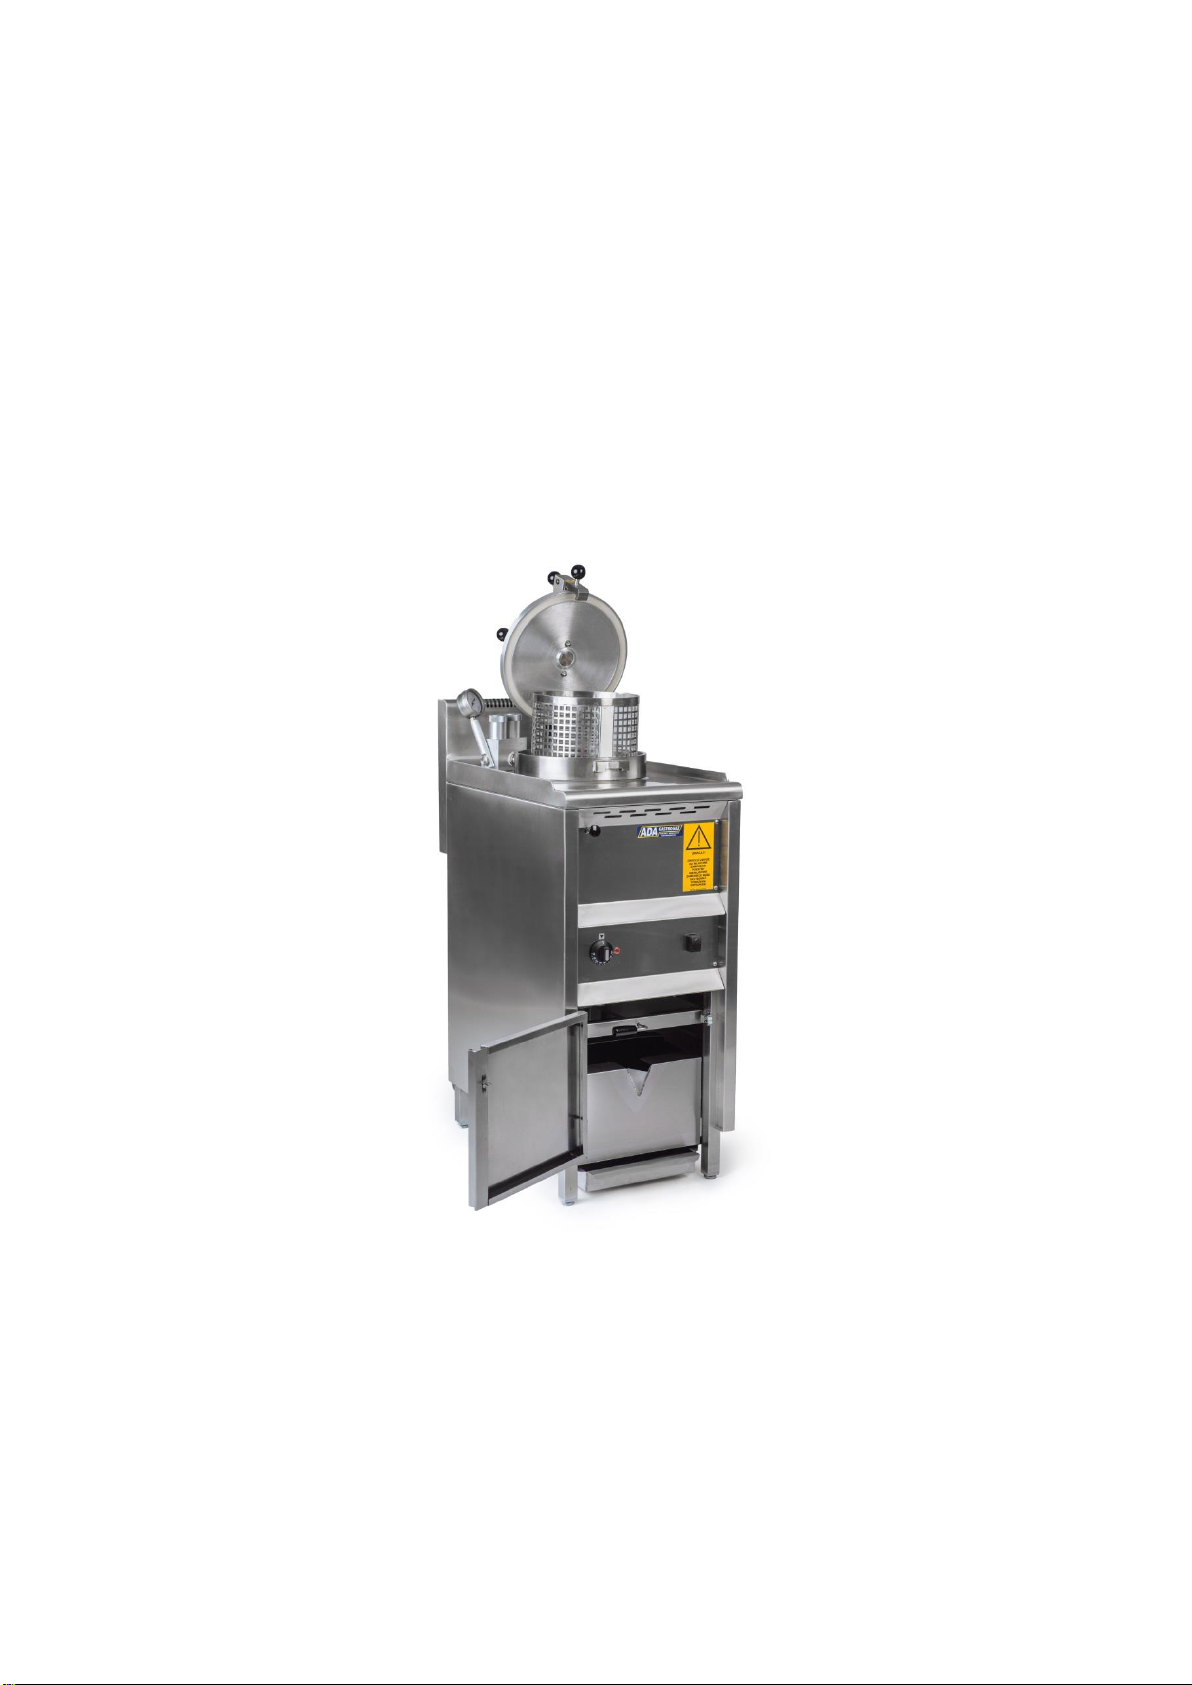
Pic. 1. Electric pressure fryer ADA SCE 12
5
2. TECHNICAL CHARACTERISTIC AND EQUIPMENT
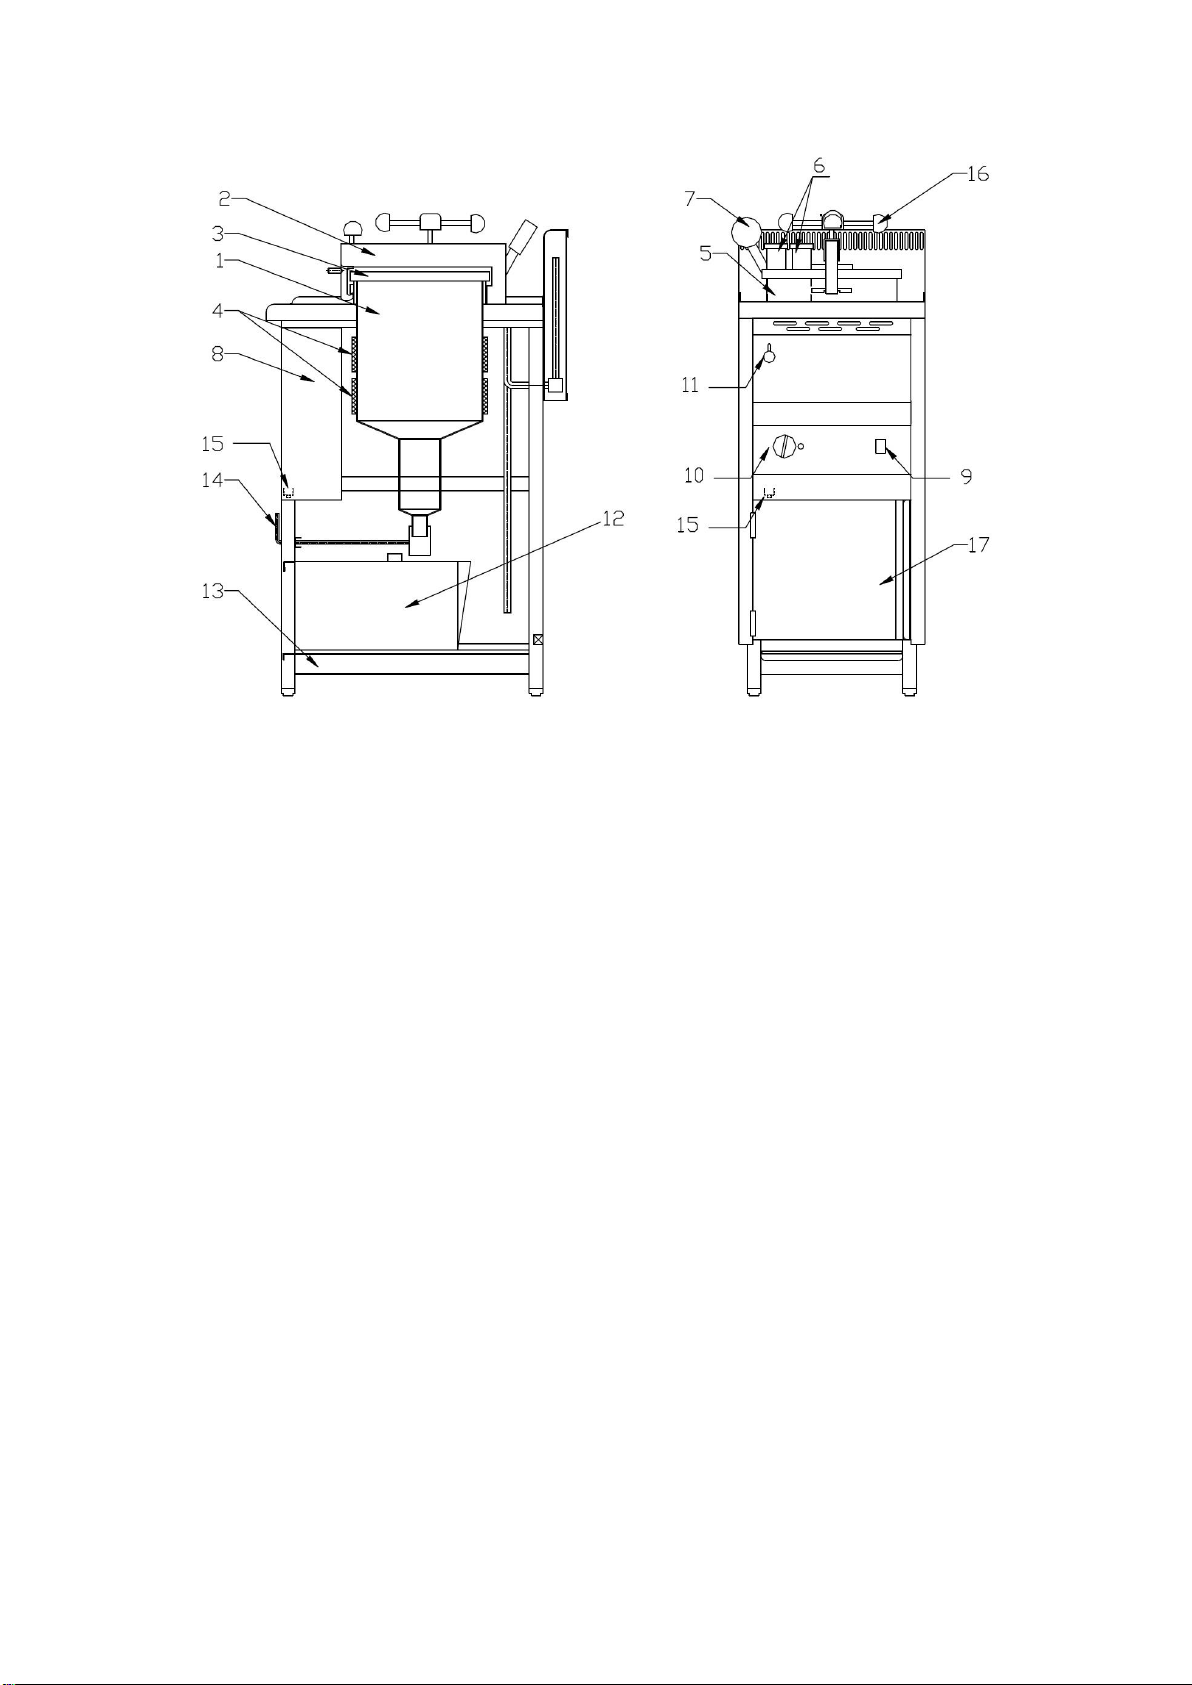
Pic. 3. Construction scheme of electric pressure fryer ADA SCE 12
1. Heating chamber; 2. Holdfast tap; 3. Cover; 4. Heaters; 5. Safety valve;
6. Safety valve weights; 7. Manometer; 8. Control panel; 9. Main switch; 10. Thermostat knob with
control light; 11. Pressure reducing lever; 12. Oil tank; 13. Condensate tank;
14. Oil valve lever; 15. Temperature limiter buton (reset); 16. Cover holdfast;, 17. Doors.
All fryer components are of metal construction, made of stainless and acid-resistant
sheets approved for contact with food. The cover and safety valve elements are made of
aluminum sheet.
The design of the appliance is based on adjustable feet on which the fryer housing
rests. Inside the housing, around the frying chamber are band heaters and electrical
installation. The heaters heat the frying chamber. The thermostat sensor and safety sensor
(temperature limiter) are mounted, which turns off the heaters when the oil reaches a
temperature of 220°C. A basket is placed in the chamber; after the frying process is
finished, the basket is pulled out by the handle.
In order to close the chamber tightly, there is cover with a gasket made of a silicon
rubber which is oil and temperature proof. The cover of the fryer is held by the holdfast
(16.) so that it is closed tightly to form the overpressure. The possible pressure
occurring in the chamber is about 0,04 MPa. After the pressure is exceeded, the safety
valve (5.) opens to reduce the pressure to 0,04 MPa.
Impurities from the coating of products settle in the "cold chamber" at the bottom of
the tank. The cold chamber allows for an extended oil life, because the burnt particles fall to
the bottom of the "pocket" where the temperature is lower than in the frying chamber. Due

6
to this difference, burnt particles are eliminated from the frying process and do not
contaminate the oil in the chamber.
In the final part of frying, steam collected in the chamber (causing overpressure)
should be removed by pulling the pressure reducing lever (11.) and letting the steam
escape from the chamber and condense in the condenser. After that, the steam
accumulates in the form of a condensate in the condensate tank (13.).
Warning!
Each time before opening the cover, release the pressure reduction lever to release the
accumulated steam! Failure to do so may result in severe burns.
After the whole process of frying is done, let the oil out of the chamber using the
chamber emptying valve (14). The used oil should be poured through a linen filter in
order to purify it and separate the remnants of a meal from it. The purified oil should be
placed in the proper tank (12).
The fryer control parts include:
- main switch (9.);
- thermostat knob with control lamp (10.);
- chamber pressure indicator (manometer) (7.);
- pressure reduction lever (11.).
Basic fryer equipment:
- basket (1 pc)
- basket holder (1 pc)
- oil tank (1 pc)
- condensate tray (1 pc)
Additional equipment (optional):
- divided basket (1 pc)
Technical data
ADA SCE 12
Dimensions [mm]
400 x 650 x 1000
Chamber capacity [l]
12
Maximum load [kg]
2,5 - 3,0
Pressure [MPa]
0,04
Working temperature [°C]
150-170
Heating power [kW]
5,8
Voltage [V]
400
Weight [kg]
57
Tab. 1. Basic technical parameters of ADA SCE 12 electric pressure fryers

7
3. TECHNICAL MANUAL FOR THE APPLIANCE INSTALLER
The device may be connected to the electrical installation only by a qualified person.
Parts that have been secured by the manufacturer may not be adjusted by the installer.
The fryer is designed for 400 V AC power supply ant the 32 A amperage.
The fryer's electrical installation includes:
-Electric theromstat (0 –200C)
-Main switch,
-overheating protection (temperature limiter - 220C)
-contactor
-electric cables
-external power cord with plug
-protective grounding clamp
When installing devices, the following legal provisions must be observed:
-Standards, regulations, building and fire regulations.
-Health and safety regulations.
-Standards, regulations, ordinances for the installation of electrical devices
-Normy, przepisy, zarządzenia dotyczące wentylacji.
The appliance installer should:
-Have a qualification certificate
-Read the information on the type plate
-Check the effectiveness of all components of the appliance's functioning.
-Familiarize the user with the operation of the device
3.1. Asembly order
Before starting to assemble the fryer, make sure that all its parts are complete and have
not been damaged in transport.
Determining the location for the fryer is extremely important in terms of operating
range, speed and convenience.
1. Place the appliance in a place that allows easy access from all sides, on a hard and
non-flammable surface. The distance from non-flammable walls should be at least 10
cm. If the walls are not resistant to high temperatures, use appropriate insulation and
keep a minimum distance of 30 cm. Also keep a distance of at least 20 cm from other
devices.

8
2. Level the fryer using the regulated legs.
Pic. 3. . Electrical diagram of the ADA SCE 12 electric pressure fryer
R1, R2 –heater 2,9 kW; W1 –main switch; T1 –temperature regulator; T2 –thermal fuse; K1 –control
lamp
Warning!
Incorrect use of the appliance can cause oil to burn and fry, which can cause severe
burns, injury, as well as fires and equipment damage.
3. Before connecting the appliance to the electrical system, check the information on the
type plate.
4. Before connecting the appliance to the electric installation, it is mandatory to connect a
protective conductor with yellow-green insulation and a cross-section of not less than 2.5 mm
to the housing. The protective terminal is located on the back of the device and is marked with
the symbol
5. The appliance should be connected to the network, and a protective switch in
accordance with standards should be installed. The ground wire must not be connected
to this switch. The electric cable should be positioned so that it does not reach a
temperature 50°C higher than its surroundings at any point.
6. After connecting the AC power cord with the socket, check the correctness of
individual phases.

9
7. It is recommended to install the appliance under an efficient ventilation system (hood).
Warning!
If any electric cable is damaged, do not turn on the appliance to avoid danger. Contact aservice
center and order repair.
After completing the installation of the device, the packaging components must not be
kept within the reach of children, as they may cause hazards. Therefore, they must be
disposed of (also for environmental protection reasons) in accordance with applicable
regulations.
10
4. INSTRUCTIONS FOR USE AND MAINTENANCE
Each appliance has been thoroughly inspected and tested before shipment. However, it is
good practice to check the device before starting it.
4.1. Operation and maintenance
Warning!
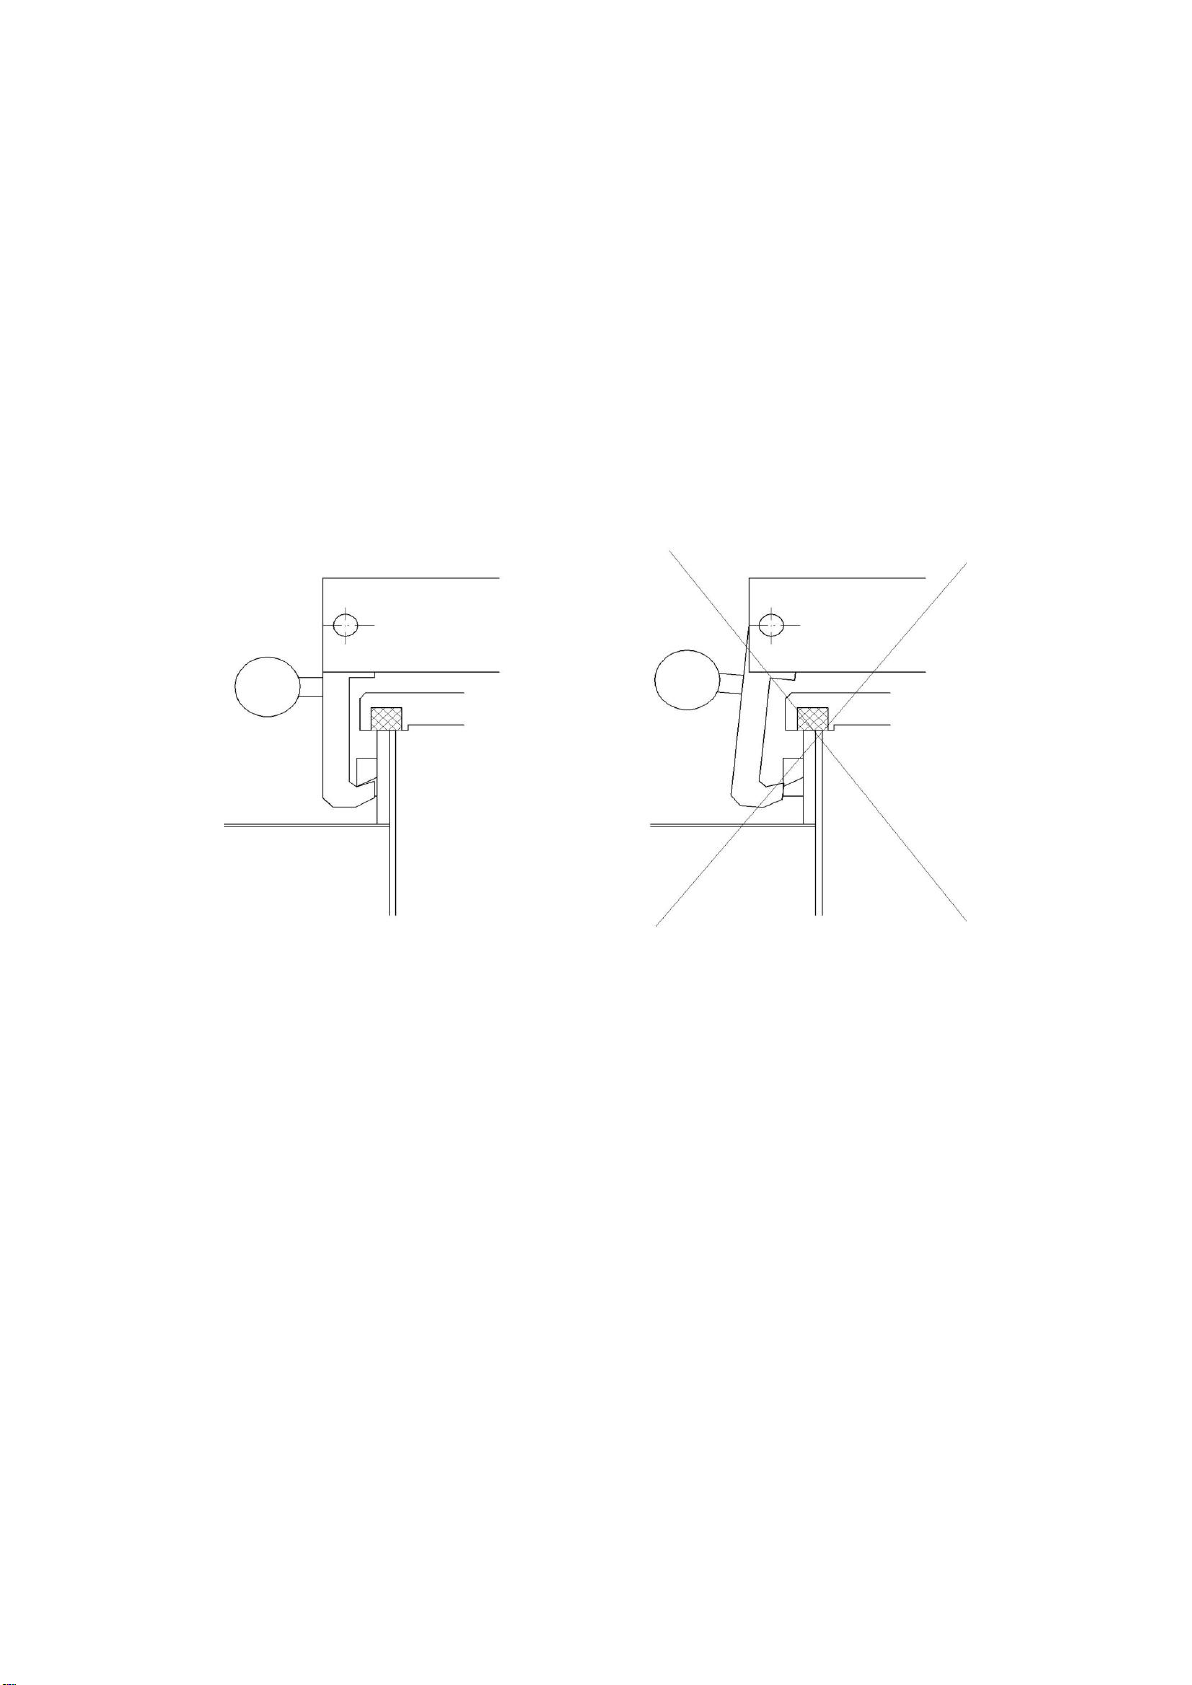
Make sure that the cover closes properly and locks. Incorrect closing can result in
severe burns, injury, as well as fire or material damage. (Pic. 4.)
Pic. 4. Correct closing of the fryer cover (left)
Before starting the first frying process, wash the frying chamber and the rest of the
elements which may contact with food with hot water and suitable detergents.
- Close the chamber drain valve.
- Fill the chamber with water and bring to a boil (it causes cleaning the cover).
Warning!
When heating the oil in the chamber, never close the cover!
- When boiling water, in a closed chamber, do not leave the appliance unattended. When
the water reaches boiling point, release the pressure relief valve every few moments so
that the steam escapes from the chamber.
- Drain the water from the chamber, use a suitable detergent if necessary and rinse.

11
- Fill the chamber with 100 ml of vinegar again to neutralize the alkalis from the cleaning
agents and bring to a boil.
- Empty the chamber andrinse with hot water several times.
- Carefully dry the chamber and additional elements and close the drain valve.
Warning!
The chamber must not be filled with oil until the chamber is thoroughly drained of
water and it is not checked that the drain valve has not retained water. Remember to
place an oil container under the drain valve. If the valve is not closed, oil will flow into
the tank.
Before starting the fryer, turn on the power supply, fill the chamber with oil (the
minimum oil level is the one at which the sensor tube is completely covered with oil). Do
not start the fryer when the chamber is empty.
During the first start, when the device is cold, never turn the thermostat knob to the
maximum position. Choose the minimum value and slowly increase the setting until the
operating temperature is reached. During heating, mix the oil several times to avoid
uneven heating of the oil. This operation should always be carried out when the oil has
cooled to ambient temperature.
Warning!
Under no circumstances should the cover be closed when the oil is warming up. The
cover can only be closed after placing the products in the fryer chamber. Failure to
comply with this rule may result in severe burns, injury, as well as fire and material
damage.
Regularly check the filling level of the chamber.
- Never operate the device with an empty chamber, it may damage the device.
- If the oil level is too low, the machine may overheat and damage.
- Too high oil level may cause leakage and burns.
- Do not add oil to a hot chamber, as this may cause splashing.
After reaching the desired temperature (the thermostat indicator goes off), place the
basket in the working position with the handle removed. We throw into the basket
previously prepared products and close the lid tightly. Be careful to avoid hot fat
splashes when inserting the product. This could cause severe burns. Working
temperature and frying time depend on the type of product and the technology used.

12
Warning!
Do not overfill the basket or introduce products with a very high degree of humidity into
it. Failure to do so may result in fat leaking out of the chamber. This can result in severe
burns or damage to the device.
During frying, we watch the pressure gauge and listen to the work of the fryer. If
there are any leaks tighten the clamping screw harder until the hissing stops. Once the
pressure reaches ~ 0.04 MPa (0.4 atm), the safety valve may be opened. Remember not
to put too much force on tightening the cover. Tighten it enough to seal the chamber.
Tightening the cover 'by force' can damage the cover, pressure arm, and seal.
After finishing the frying cycle, extend the lever of the pressure reducing valve
(Pic. 2. item 11.), reducing the pressure to 'zero' and only then you can open the lid of
the frying chamber. At the end of the cycle, when the pressure gauge reads zero, the
cover should be lifted up quickly and vigorously but avoiding hitting the hinge bumper.
To remove fried products, put a specially prepared handle on the basket. Lift the basket
and hang it on the side on the wall of the chamber to drain. Wait before you throw the
product into the tray.
Warning!
Each time before opening the cover, release the pressure reduction lever to release the
accumulated steam! Never lift the handle or use force to open the lid latch until the
pressure gauge indicates "zero". Failure to comply with this rule may result in serious health
and life risk.
If the oil temperature in the fryer exceeds 220°C, the maximum temperature limiter (15)
will operate, causing the thermostat to switch off automatically. To restart the heaters,
wait until the oil has cooled to around 150°C and then press the "reset" button (Pic. 5.).
This button is located on the lower left side of the control box. Open the appliance door
first.
Pic. 5. Item 15 –temperature limiter button (reset)

13
Products
Time [min]
Fish fillet
5
Chicken legs
9 - 12
Chicken wings
6
Chicken fillets
5
Potatoes
7 - 9
Mushrooms, cauliflower
3
Tab. 2. Frying times of some products
1) To achieve an oil pressure of about 0.04 MPa, it is necessary to place at least 0.8 kg of
raw material in the fryer. A smaller load will not allow enough steam to form.
2) Always remember to place an oil container under the drain valve. If the valve is not
closed, the oil will fall out into the tank.
3) Always before filling the chamber with oil, it is advisable to open the drain valve and
drain the accumulated water, then close the valve.
4) Remember to systematically filter and change the oil.
5) During the first morning warm-up, warm the device up by gradually mixing the oil to
avoid burning it.
6) Remember that every device used in the food industry requires proper care and
maintenance. It must also be periodically subject to mandatory maintenance checks by
persons with the required permissions.
4.2. Use and oil change
Frying breaded products requires oil filtration. Make sure that the fat does not foam
during the frying cycle. If foaming occurs, it must be replaced immediately. The
optimum oil frying temperature is 160–170°C. The oil should be protected against heavy
frying at high temperature.
Warning!
With prolonged use of fat, the flash point is lowered. If excessive smoking or foaming
occurs during frying, it should be poured out. Otherwise, there may be severe burns,
injury, fire or material damage.

14
Warning!
The fryer and basket surfaces are very hot. To avoid burns when working with the
equipment, especially when changing oil, take special care and wear protective gloves.
It is recommended to use high-quality frying fat in the fryer. Some lower quality fats
have a high moisture content, which causes foaming and boiling over.
If you use solid fat, it is recommended to melt it on the external heating device before
placing it in the chamber. The surface of the chamber in electric fryers must be
completely immersed. Otherwise the chamber / device may be damaged.
To change the oil:
1) Turn off the device and disconnect the device from the power supply
2) Make sure that the oil tank is in the right place (under the drain valve)
3) Carefully and very slowly release the trigger lever and drain the oil from the
chamber into the tank so that it does not splash.
4) Leave the oil in the tank designated for this while standing.
5) After draining the fat completely, clean the inside of the chamber thoroughly with
a brush. Carefully remove any accumulated coating particles.
6) Flush the chamber with clean oil.
7) Before the next frying, check if the oil drain valve is closed, set the oil tank and
condensate tray in appropriate positions under the device and fill the chamber with
oil to the appropriate level.
Warning!
Never open the drain valve when the chamber is under pressure. Hot fat can flow out
and cause severe burns.
4.3. Cleaning the appliance
To clean the fryer chamber, follow these steps:
- Turn off the device and disconnect the device from the power supply,
- Place a container under the oil drain valve,
- Carefully and very slowly release the trigger lever and drain the oil from the chamber
into the tank so that it does not splash.
- After complete oil leakage, flush the chamber with clean filtered oil,
- When the chamber is clean, close the drain valve,
Periodically or when the frying chamber and its parts are covered with burnt fat, then
boil the water in the chamber.

15
1) Please pay attention to choosing the right cleaning agent. The cover elements and the
safety valve are made of aluminum. Contact with unsuitable cleaning agents can cause
corrosion.
2) Do not use steel wool or other cleaning tools and cleaning / disinfecting agents
containing chlorine, bromine, iodine or ammonia, as these substances will damage
stainless steel and shorten the life of the fryer.
3) Clean the device only when it is cold - otherwise there is a risk of burns.
Warning!
-The appliance is not designed for direct spraying with a water jet. Do not use a
high-pressure water jet for cleaning the device!
-Remember to wash the inside of the safety valve weight housing and their
threaded ends periodically (even daily - depending on the degree of use). Failure to
do so may result in excessive pressure and could result in serious injury and / or
burns or material damage.
4.4. Additional maintenance performed periodically
Check screw connections as well as tightness of oil and condensate valves and pipelines
on a regular basis.
At least once a month or when the frying chamber and its elements are covered with
burnt fat, boil the water in the chamber according to the instructions in this manual.
Periodically, every few months the interior of the chimney should be washed where the
steam cooler is located. To perform this operation, remove the rear chimney cover.
4.5. Deletion of the disturbance of work
DISTURBANCE
CAUSE
ELIMINATING THE TROUBLES
Pressure is going down
- safety valve is not tight
Clean the seat and the pin of
the weight
- pressure reducing valve is not
tight
It can be caused by dirt in the
valve- it should be cleaned, or
the valve is used- it should be
replaced
-gasket has worn out
If the lid is tightened by too
much pressure, the gasket
should be turned inside out. If
the gasket has been turned
inside out it should be replaced

16
Oil is foaming or boiling over
- water in the oil
It may be caused by lifting the
lid improperly. When the frying
cycle is over the manometer
shows “0”. At that time the lid
should be lifted energeticly and
fast, without hitting the stop of
a hinge. When you lift the lid
like that, water condensated on
it will flow down through the
drain pipe to a container on the
left side of the bowl.
Other reason for that may be a
chocked drain pipe. In such case the
drain pipe should be cleaned
- oil has been used for too long
After some time of use, oil gets
impurities ( water and crumbs).
It is important to replace the oil
regularly, filtrate it and remove
crumbs from the bottom of the
chamber.
4.6. Rules for the safe use of the appliance
The electric pressure fryer ADA SCE 12 has many safety features, however, the only
method to ensure the safe use of the device is to thoroughly understand the principles
of its proper installation, operation and maintenance.
The basic condition for good operation of the device is to keep it properly clean and to
follow the instructions in this instruction manual:
• Before installing and attempting to start the fryer, read the operating instructions
carefully. Incorrect installation, operation, maintenance can damage the device and also
create a security risk.
• The device only works safely when used as intended.
• The fryer can be used in rooms with ventilation that meet the applicable
requirements.
• Pay special attention to the power cables so that they do not touch the device during
operation.
• The fryer may only be operated by adults who have been trained in the use of the
appliance and health and safety regulations.
• Do not leave the device unattended with the heaters on,
• Do not allow children or persons unfamiliar with these instructions to operate the
fryer,
• Connection of the device and all repairs should be carried out by a person with
appropriate permissions.
• Do not make any alterations to the grease spreader by yourself or make changes to
the installation,

17
• Never immerse the device in water or other liquids.
• Do not allow the electrical device connected to the mains to be spilled with liquids or
water jets. It may cause electric shock!
• Do not move or tilt the device during operation.
• Do not hit the knobs and heaters,
• Handle hot fat with particular care.
• When operating the device, remember that the temperature of the device's
components may be high. Particular care should be taken because the top of the
appliance reaches a high temperature, which may result in burns.
• The fryer must not be put into operation after it has been found to be operating
incorrectly.
• Each time after finishing work disconnect the device from the mains.
• Have the technical inspection of the fryer carried out at least once a year. Including
checking the power cords including plug and socket, connection contacts, and grounding
check. This inspection should be carried out at the manufacturer's website or in an
establishment with appropriate qualifications and equipment with the required control
equipment.
4.7. First aid
When providing first aid you should:
- call the appropriate medical services,
- facilitate breathing by removing clothing,
- If necessary, take the injured person into the fresh air,
- cover the injured person with a blanket and prevent them from falling asleep,
- constantly monitor the victim,
- in case the injured person loses consciousness and is not breathing, give artificial
respiration until the arrival of the doctor.
4.8. Warnings
The use of the device for purposes different from or deviating from its normal purpose is
prohibited and considered as improper use.
Any claims against the manufacturer or / and its proxies for damages resulting from the
use of the device contrary to its intended use are excluded.
Liability for damages caused during the use of the device in a manner inconsistent with
its intended use is borne solely by the user.
1. Connection of the fryer to the electrical installation may only be carried out by a
person with appropriate professional preparation (qualifications). The manufacturer is
not responsible for incorrect connection of the device to the installation.

18
2. Under no circumstances should you close the lid while the oil is heating. Never heat
oil alone!
3. Do not fill the chamber with oil until the chamber is thoroughly drained and before
checking that the drain valve has not retained water. Always remember to place an oil
container under the drain valve. If the valve is not closed, the oil will fall out into the
tank.
4. The fryer must not be put into operation after the electric system has been
punctured.
5. Remember to wash the inside of the safety valve weight housing and their threaded
ends daily after finishing frying.
6. Observe the safety rules and basic health and safety regulations.
7. When operating the device, remember that the temperature of the device's
components may be high. Particular care should be taken because the top of the
appliance reaches a high temperature, which may result in burns.
The manufacturer disclaims any liability for any damage that may be caused to persons
or objects as a result of failure to comply with the obligations imposed by safety
regulations and regulations regarding the installation of equipment.
This device is marked in accordance with the European Directive 2012/19 / EU and the Polish Act of 11
September 2015. "On used electronic and electronic equipment" (Journal of Laws of 23.10.2015 item
11688) with a crossed out waste container . Such marking informs that this equipment, after the period
of its use, may not be placed together with other household waste. The user is obliged to give it to the
collectors of used electrical and electronic equipment. Collectors, including local collection points,
shops and communal units, create an appropriate system enabling the delivery of this equipment.
Proper handling of used electronic and electrical equipment contributes to avoiding consequences
harmful to human health and the environment, resulting from the presence of hazardous components
and improper storage and processing of such equipment.
At the end of the life of the equipment, return the device to the appropriate institution that deals with
the disposal of the devices. On behalf of the manufacturer, the contract regarding the organization and
provision of collection, processing, followed by recovery and recycling and disposal of "Waste
Equipment" shall be completed by:
Elektro-EKO
Electrical and Electronic Equipment Recovery Organization S.A.
ul. Łopuszańska95, Warsaw
ENVIRONMENTAL PROTECTION: Both the packaging of the new device and the old, used devices
contain valuable secondary raw materials and materials for recycling. Please dispose of individual parts
by type of material. Please inform your dealer or local administration about the current disposal
method.

19
5. CONDITIONS OF THE GUARANTEE CERTIFICATE
1. The User of ADA GASTROGAZ appliances is guaranteed by a direct Seller who sets out all the
rules for the warranty he grants through a sales contract concluded with the User.
2. The manufacturer provides warranty for parts for a period of 12 months for the Seller from the
date of sale of the device. The length of the warranty and the conditions for the User are
determined by the Seller upon conclusion of the sales / purchase contract for the device. The
manufacturer recommends carrying out periodic inspection at least once a year to ensure correct
operation of the device.
3. The seller undertakes to repair the device for free during the warranty period. The condition of
the warranty validity is compliance with applicable regulations and standards related to the
installation, use and maintenance of the devices. The faulty parts will be repaired in 14 days from
their record. Buyer has got the right to replace the device with a new one when any repair is
impossible.
4. The warranty does not cover the activities provided for in the operating instructions, which the
User is obliged to carry out on his own and at his own cost, e.g. installation, checking of operation,
cleaning, maintenance of the device and periodic inspections, etc.
The warranty does not apply to parts subject to normal wear and to some parts: in gas appliances
(light bulb, thermocouple, burner protection grid, ceramic plate, glass, gasket), in electrical
equipment (light bulb, glass, gasket).
5. In the event of any faulty operation of the device during the warranty period, immediately
inform the Seller. Complaints should be made in writing (by fax, e-mail or post).
6. Both the manufacturer and the seller shall not be liable for any direct or indirect damage
suffered by the User due to a product defect, in particular loss of profits or income, resulting
downtime, loss or damage of other equipment, costs of replacement goods, etc. Further claims are
also excluded. .
Both the manufacturer and the seller shall not be responsible for connecting the device to an
electric and gas supply inconsistent with the type plate, as well as for faulty assembly and damages
resulting from random events such as: fire, flood or lightning, etc.
7. The basis for accepting a complaint under the warranty is a device purchase document (invoice)
or other document signed by the Seller, containing the terms of the warranty granted. The user is
required to provide a document confirming the right to repair under the warranty. Lack of
document will result in the service being considered for a fee.
8. Unless the contractual terms provide otherwise, the warranty is calculated from the date of
issue of the document confirming the purchase of the device.
9. Compliance with the obligations arising from the guarantee will not extend or restart the
guarantee period.
10. The guarantee do not cover any damages caused in transport.

20
GUARANTEE CERTIFICATE
Appliance: Electric pressure fryer ADA SCE 12
Fabric number:
Manufacturing date:
Manufacturer quality control sign:
Date of sale:
Sign and stamp of seler:
No.
The date of the
declared
complaint
The date of the
repair
The type of the repair
Sign and stamp
Table of contents
Other ADA GASTROGAZ Fryer manuals


Popular Fryer manuals by other brands


Frymaster
Frymaster easyTouch FilterQuick FQG60T Installation, operation and maintenance manual

Metos
Metos 700 Series Installation and operation manual

Cecilware
Cecilware HDEFS15 Operation manual

Smeg
Smeg Built In Fryer SEFR535X Directions for use

METAL SUPREME
METAL SUPREME TFGC-G Series instruction manual

Welbilt
Welbilt Dean Decathlon D Series Installation & operation manual


