Adafruit Feather 32u4 FONA User manual
Adafruit Feather 32u4 FONA
Created by lady ada
https://learn.adafruit.com/adafruit-feather-32u4-fona
Last updated on 2021-11-15 06:38:53 PM EST
©Adafruit Industries Page 1 of 58

5
9
10
11
11
12
13
14
14
17
17
18
18
20
20
21
22
23
24
25
25
25
26
27
27
27
28
28
29
29
30
33
34
36
37
38
38
38
38
39
41
41
41
42
Table of Contents
Overview
Pinouts
• Power Pins
• Logic pins
• Cellular Module
• Other Pins!
• FONA connections & LEDs
Assembly
• Header Options!
• Soldering in Plain Headers
• Prepare the header strip:
• Add the breakout board:
• And Solder!
• Soldering on Female Header
• Tape In Place
• Flip & Tack Solder
• And Solder!
Power Management
• Battery + USB Power
• Power supplies
• Measuring Battery
• ENable pin
• Alternative Power Options
• Cellular Power Usage
• Turning on the FONA Feather
• Sending an SMS
• Enabling GPRS
• TCPIP connection
• Sending an MQTT packet (about 200 bytes)
• Disabling GPRS
Arduino IDE Setup
Using with Arduino IDE
• Install Drivers (Windows 7 Only)
• Blink
• Manually bootloading
• Ubuntu& Linux Issue Fix
FONA Test
• Download Adafruit_FONA
• Wire up and Power!
• Load Demo
• Using the Test Sketch
Hardware Test
• Battery voltage
• Check SIM CCID
©Adafruit Industries Page 2 of 58

42
42
43
44
44
44
45
45
45
46
46
49
49
50
51
56
56
57
57
57
Network Test
• Check RSSI (network signal strength)
• Checking Network Registration
Audio Settings & Test
• Set and Get audio volume
• Setting Headset or External audio
• Playing Toolkit Tones
Phone Calls
• Make Phone Calls
SMS
• Send and Read SMS
FM Radio (FONA800)
• FM Radio (FONA 800 only)
Feather FONA FAQ
Feather HELP!
Downloads
• Datasheets & Files
• Schematic
• Fabrication Print
• Datasheets:
©Adafruit Industries Page 3 of 58

©Adafruit Industries Page 4 of 58
Overview
Feather is the new development board from Adafruit, and like its namesake it is thin,
light, and lets you fly! We designed Feather to be a new standard for portable
microcontroller cores.
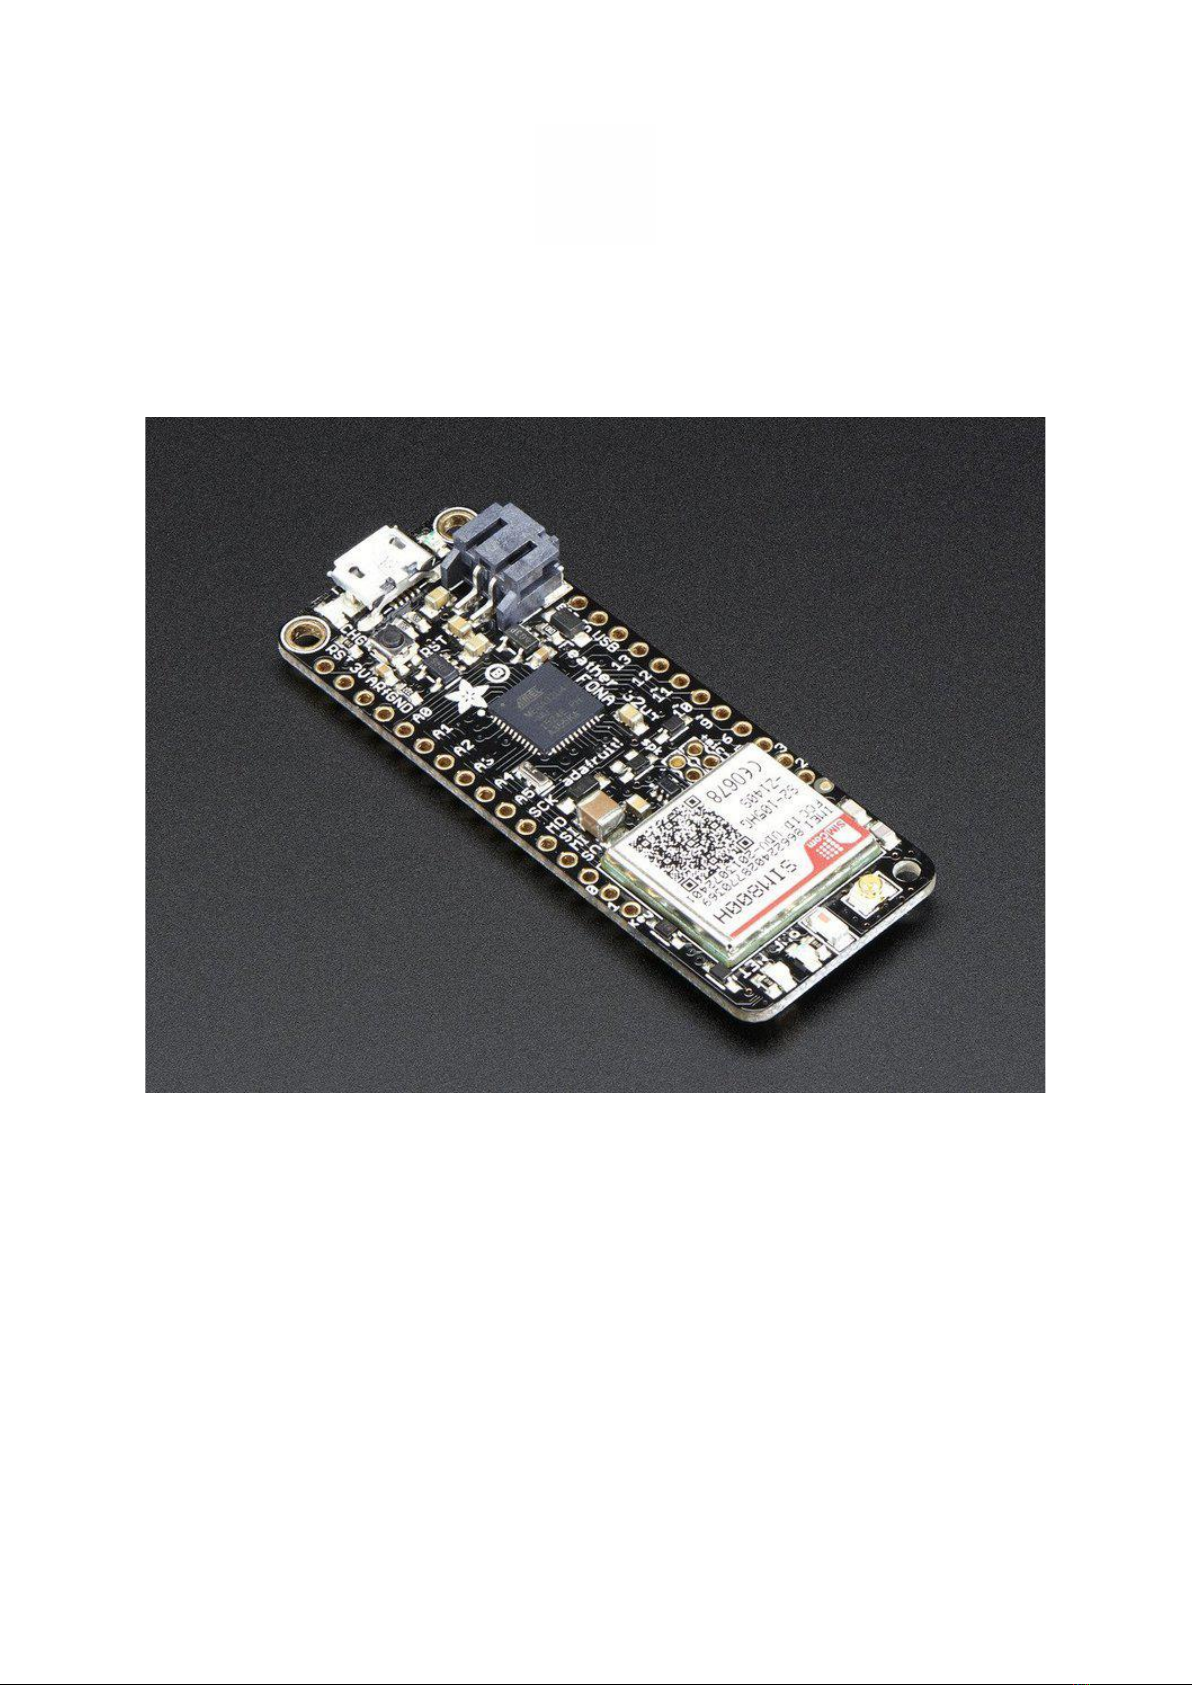
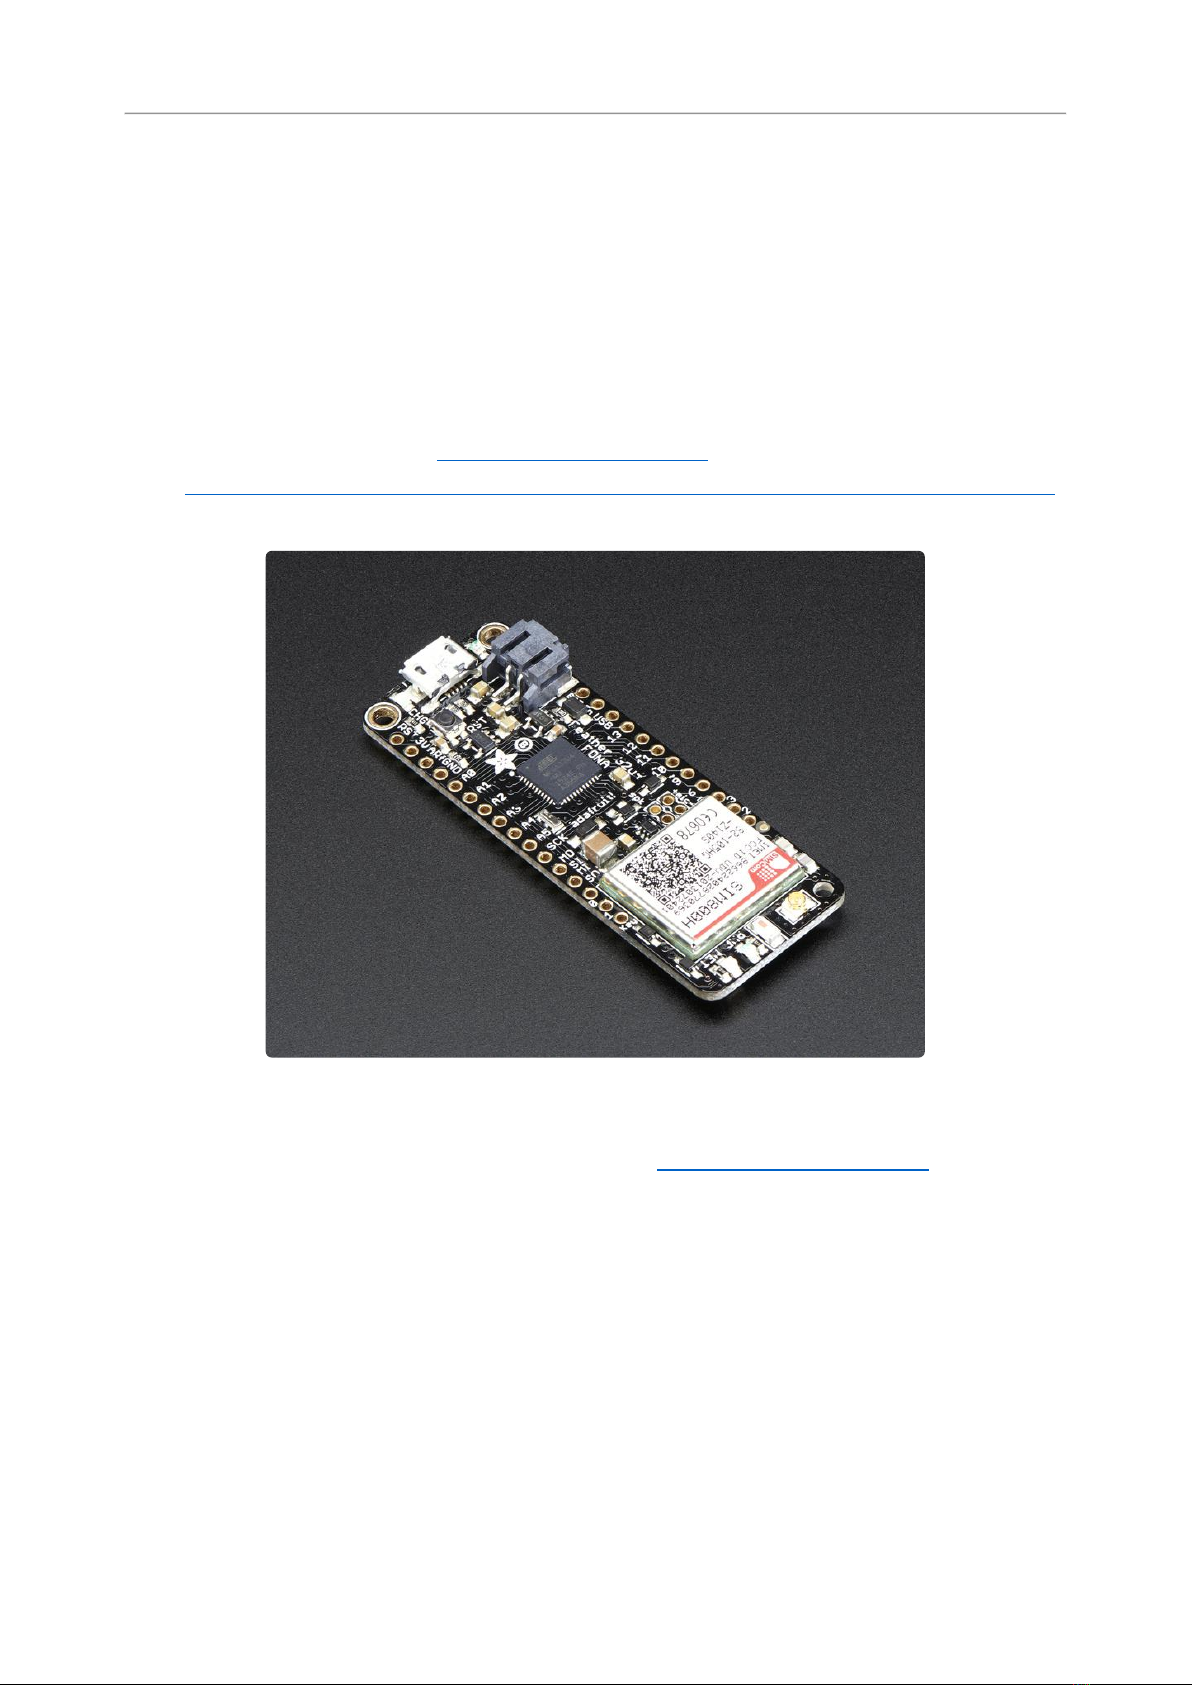
This is theAdafruit Feather 32u4 FONA - our take on an 'all-in-one' Arduino-
compatible + audio/sms/data capable cellular with built in USB and battery charging.
Its an Adafruit Feather 32u4 with a FONA800 module(http://adafru.it/1946), ready to
rock!We have other boards and accessories in the Feather family, check'em out here
(https://adafru.it/l7B).
At the Feather 32u4's heart is at ATmega32u4 clocked at 8 MHz and at 3.3V logic, a
chip setup we've had tons of experience with asit's the same as the Flora(https://
adafru.it/dVl). This chip has 32K of flash and 2K of RAM, with built in USB so not only
does it have a USB-to-Serial program & debug capability built in with no need for an
FTDI-like chip, it can also act like a mouse, keyboard, USB MIDI device, etc.
©Adafruit Industries Page 5 of 58
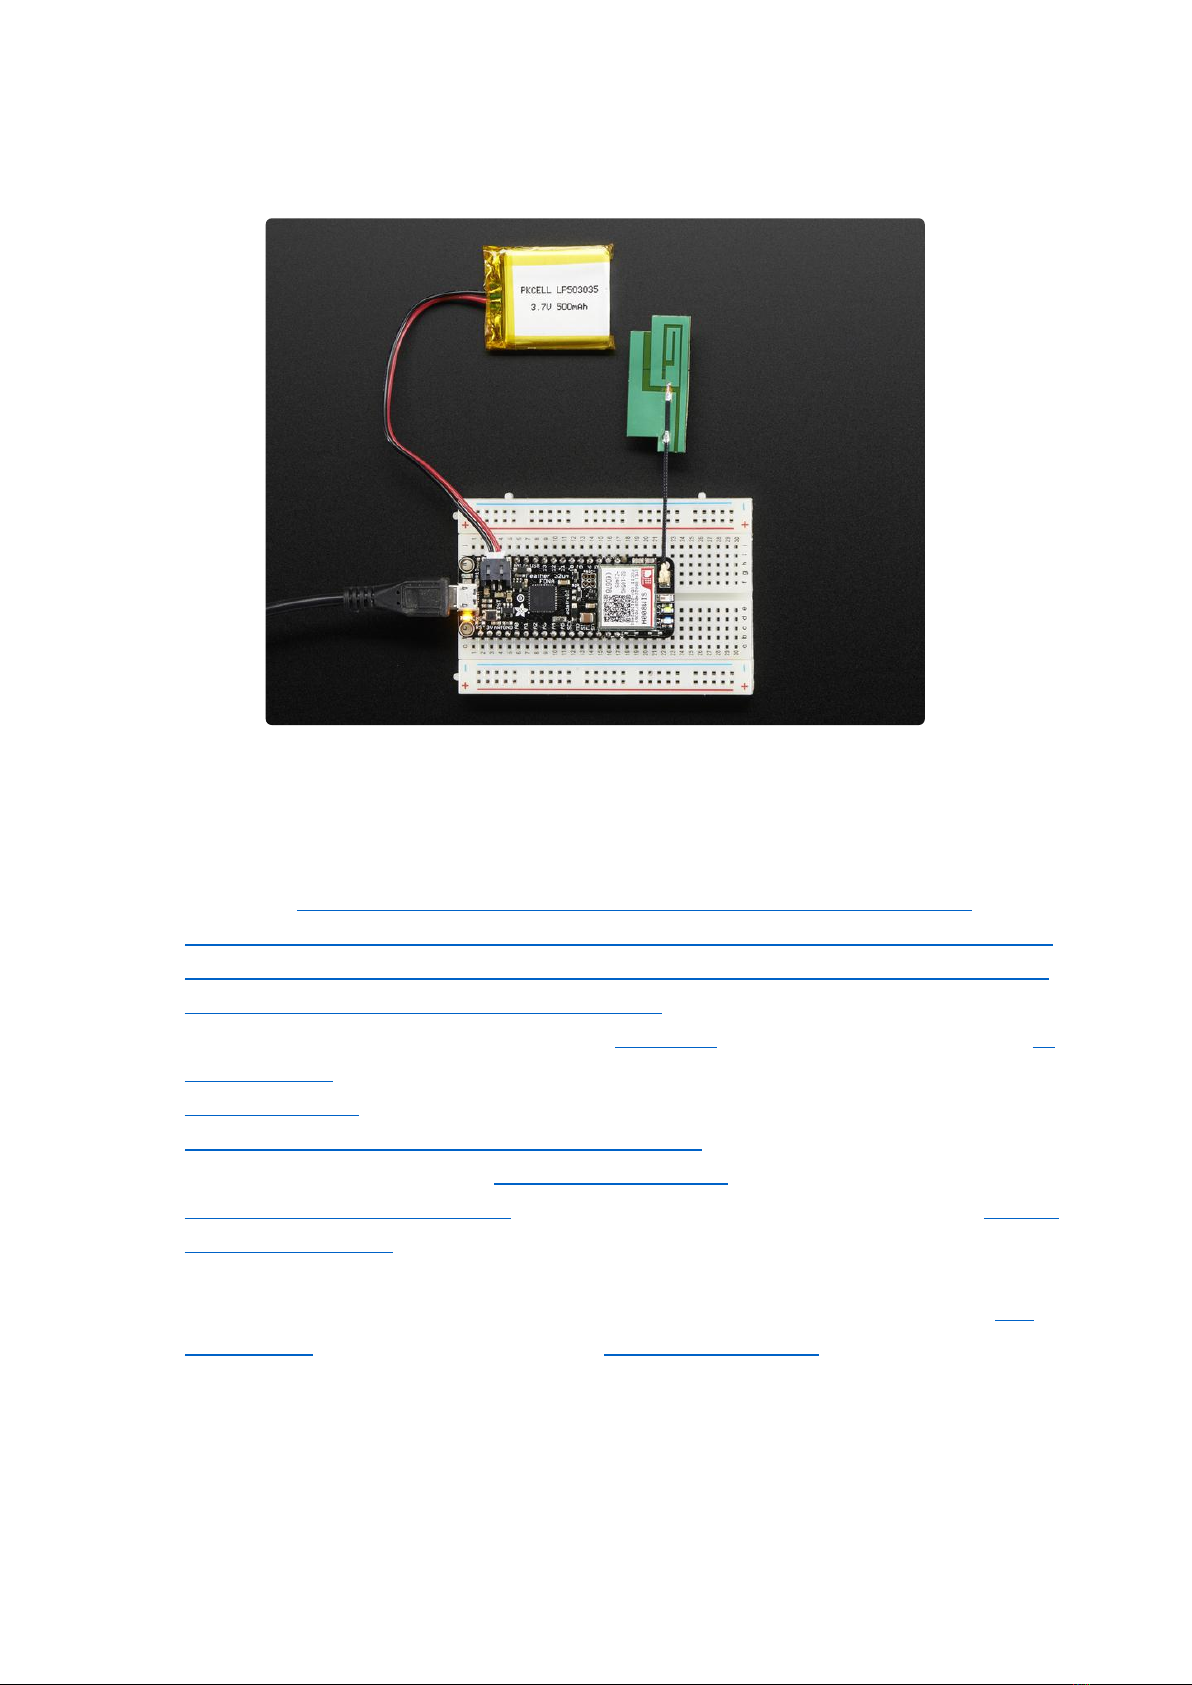
Since you'll be taking this on the road, we added a connector for any of our 3.7V
Lithium polymer batteries and built in battery charging. A 500mAh+ Lipoly battery is
required for use, it keeps the cellular module happy during the high current spikes.
Plug the Feather into microUSB to charge at 500mA.
Here's some handy specs! Like all Feather 32u4's you get:
Measures 2.4" x 0.9" x 0.28" (51mm x 23mm x 8mm) without headers soldered in
Light as a (large?) feather - 8.2 grams
ATmega32u4 @ 8MHz with 3.3V logic/power
•
•
•
©Adafruit Industries Page 6 of 58
3.3V regulator with 500mA peak current output
USB native support, comes with USB bootloader and serial port debugging
You also get tons of pins - 20 GPIO pins
Hardware Serial, hardware I2C, hardware SPI support
7 x PWM pins
10 x analog inputs
Built in 500mA lipoly charger with charging status indicator LED
Pin #13 red LED for general purpose blinking
Power/enable pin for the 3.3V regulator
4 mounting holes
Reset button
Connect your Feather to the Internet or make phone calls with our trusted-and-tested
FONA module. At the heart is a GSM cellular module (we use the latest SIM800) the
size of a postage stamp. This module can do just about everything.
Quad-band 850/900/1800/1900MHz - connect onto any global GSM network
with any 2G SIM (in the USA, T-Mobile is suggested)
Make and receive voice calls using an external 8Ω speaker + electret
microphone
Send and receive SMS messages
Send and receive GPRS data (TCP/IP, HTTP, etc.)
Scan and receive FM radio broadcasts (yeah, we don't exactly know why this
was included but it works really well)
AT command interface with "auto baud" detection
•
•
•
•
•
•
•
•
•
•
•
•
•
•
•
•
•
©Adafruit Industries Page 7 of 58
Pair-able Bluetooth client interface with SPP (for controlling the module) as well
as audio.
You will also need some required accessories to make Feather FONA work. These are
not included!
SIM Card! A 2G Micro SIM card is required to do anything on the cellular
network. US AT&T no longer sells 2G SIMs and will shut off their 2G network, so
for American customers we recommend any T-Mobile or reseller (TING, SIMPLE
mobile, etc) that uses the T-Mobile network.(http://adafru.it/2505)
Lipoly Battery - 500mAh or larger! This 500mAh (https://adafru.it/drL)battery, or
this 1200mAh(http://adafru.it/258) will work great.
MicroUSB cable(http://adafru.it/592) for charging the battery.
External Antenna - We like this slim sticker-type(http://adafru.it/1991), which
plugs right in. Alternatively, this straight SMA one(http://adafru.it/1859) or this
right-angle SMA one will work(http://adafru.it/1858) but you'll also need a uFL to
SMA adapter cable(http://adafru.it/851) so you can connect to your SMA
antenna
External Mic & Speaker - If you want to make phone calls, you'll also need this
electret mic(https://adafru.it/dDa) and mini 8 ohm speaker(https://adafru.it/dDb)
•
•
•
•
•
•
©Adafruit Industries Page 8 of 58

Pinouts
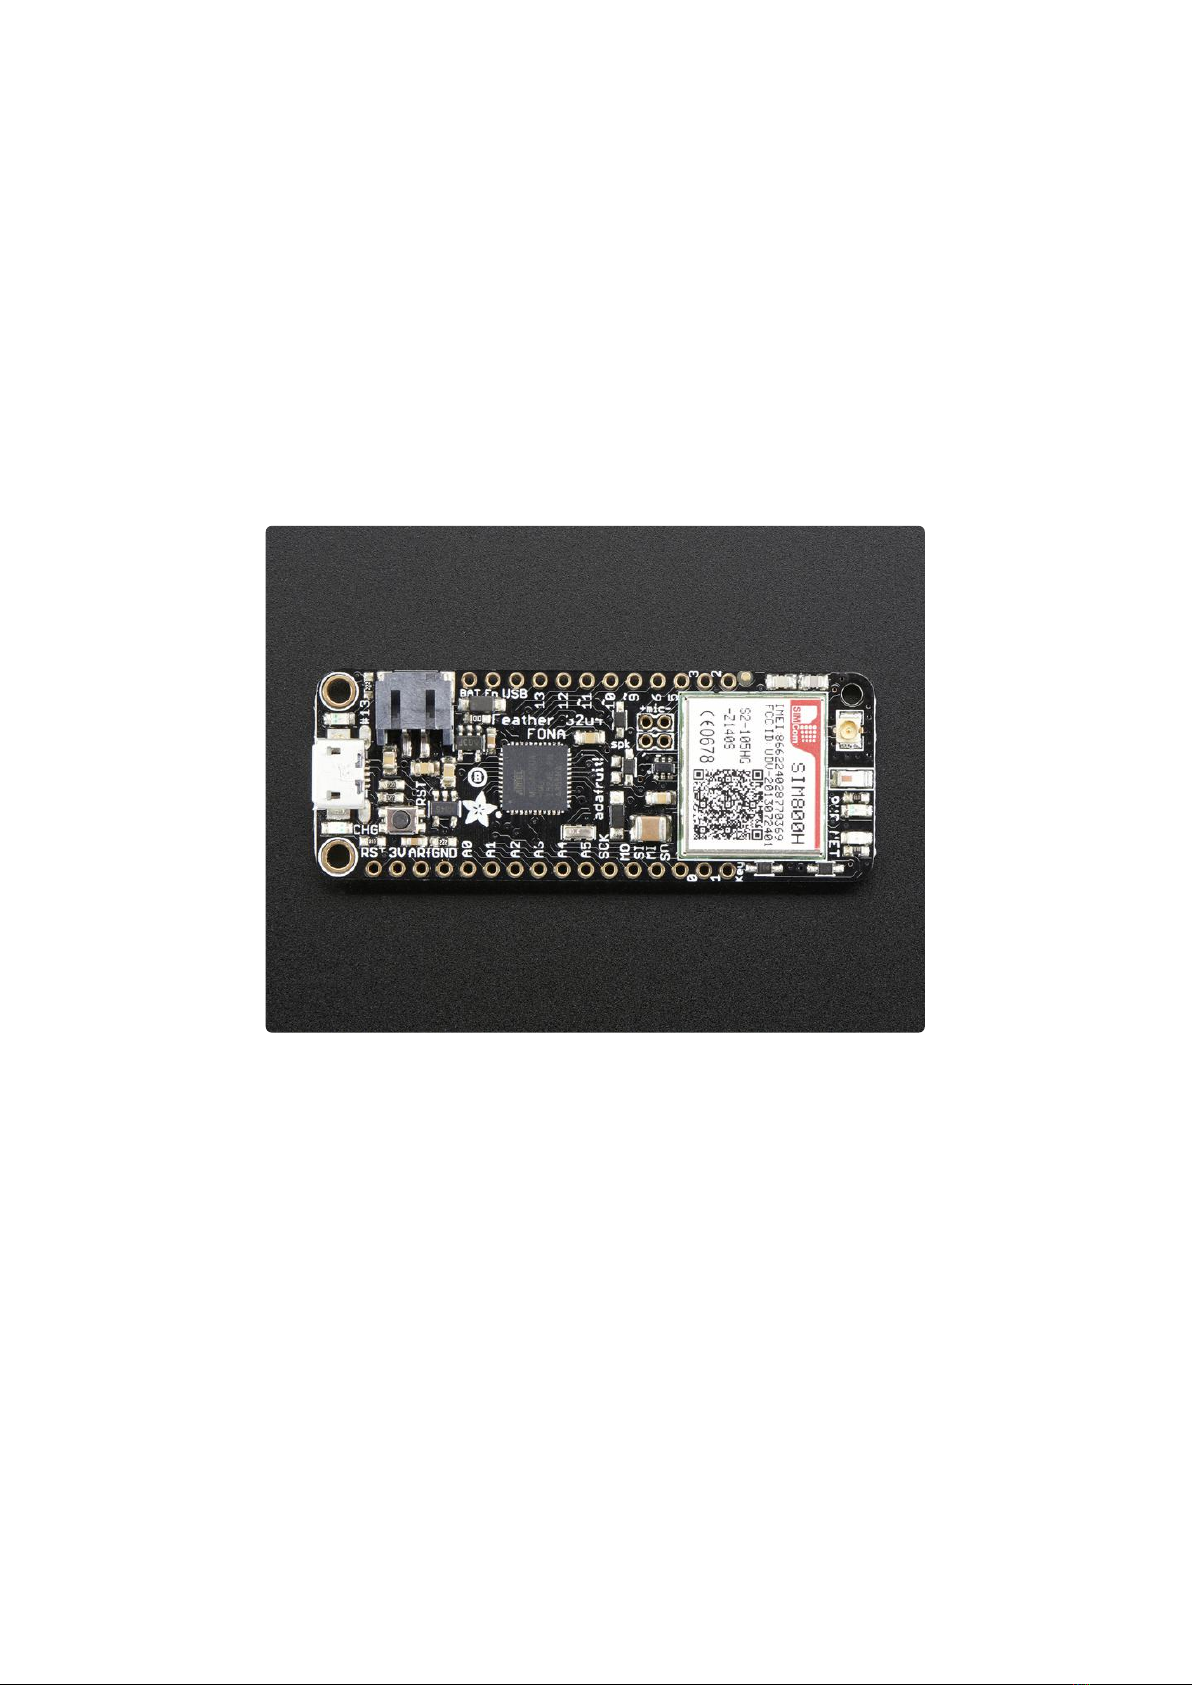
The Feather 32u4 FONA is chock-full of microcontroller goodness. There's also a lot
of pins and ports. We'll take you a tour of them now!
©Adafruit Industries Page 9 of 58

Power Pins
GND - this is the common ground for all power and logic
BAT - this is the positive voltage to/from the JST jack for the optional Lipoly
battery
USB - this is the positive voltage to/from the micro USB jack if connected
EN - this is the 3.3V regulator's enable pin. It's pulled up, so connect to ground
to disable the 3.3V regulator. Note that the cellular module is powed by VBAT so
this will only disable the microcontroller
3V - this is the output from the 3.3V regulator, it can supply 500mA peak
•
•
•
•
•
©Adafruit Industries Page 10 of 58
Logic pins
This is the general purpose I/O pin set for the microcontroller. All logic is 3.3V
#0 / RX - GPIO #0, also receive (input) pin for Serial1 and Interrupt #2
#1 / TX - GPIO #1, also transmit (output) pin for Serial1 and Interrupt #3
#2 / SDA- GPIO #2, also the I2C (Wire) data pin. There's no pull up on this pin
by default so when using with I2C, you may need a 2.2K-10K pullup. Also
Interrupt #1
#3 / SCL - GPIO #3, also the I2C (Wire) clock pin. There's no pull up on this pin
by default so when using with I2C, you may need a 2.2K-10K pullup. Can also do
PWM output and act as Interrupt #0.
#5 - GPIO #5, can also do PWM output. Also connected to the FONA's DTR pin if
you want to use it for powersaving functionality, which is not enabled by default
#6 - GPIO #6, can also do PWM output and analog input A7. Also connected to
FONA RTS in case you want to use flow control, which is not enabled by default
#9 - GPIO #9, connected to FONA RXD.
#10 - GPIO #10, also analog input A10 and can do PWM output.
#11 - GPIO #11, can do PWM output.
#12 - GPIO #12, also analog input A11 and can do PWM output.
#13 - GPIO #13, can do PWM output and is connected to the red LED next to the
USB jack
A0 thru A5 - These are each analog input as well as digital I/O pins.
SCK/MOSI/MISO - These are the hardware SPI pins. Also used to reprogram the
chip with an AVR programmer if you need.
Cellular Module
•
•
•
•
•
•
•
•
•
•
•
•
•
©Adafruit Industries Page 11 of 58
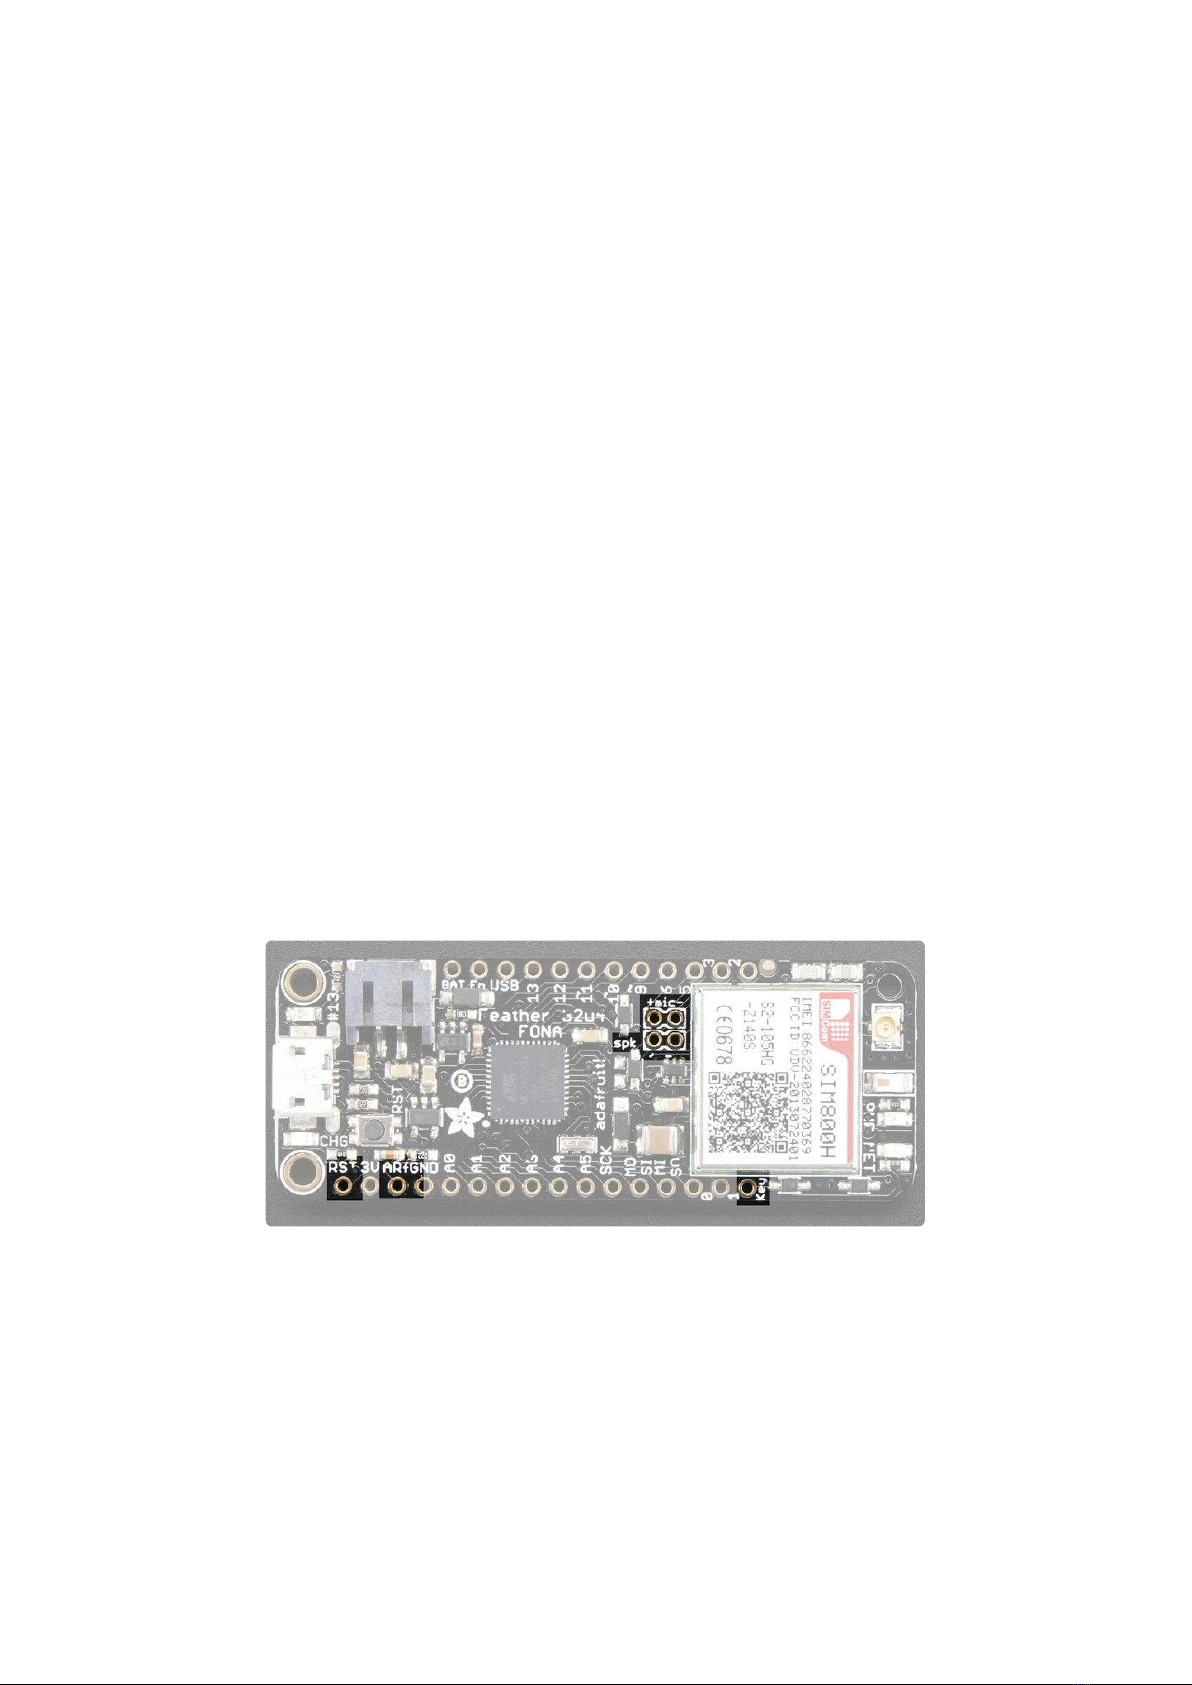
Now to the fun part, the cellular module. THere's a few pins that are used to control
the module. It uses SoftwareSerial to communicate with the microcoller
#8 - used as the FONATXD (data out from module to AVR). This pin is not
exposed on the Feather
#9 - used as the FONA RXD (data out from AVR to module)
#7 - used as the FONA RI (ring interrupt) pin, you can use this to alert you when
an SMS or phone call comes in. Note that this is interrupt #4 (but on pin #7). This
pin is not exposed on the Feather
#4 - used as the FONA Reset pin. You can pulse this pin low to reset the FONA,
handy when starting up. This pin is not exposed on the Feather
Optional pins:
#5 - This pin is available on the breakout and is also connected to the FONA's
DTR pin if you want to use it for powersaving functionality, which is not enabled
by default
#6 - This pin is available on the breakout and is connected to FONA RTS in case
you want to use flow control, which is not enabled by default
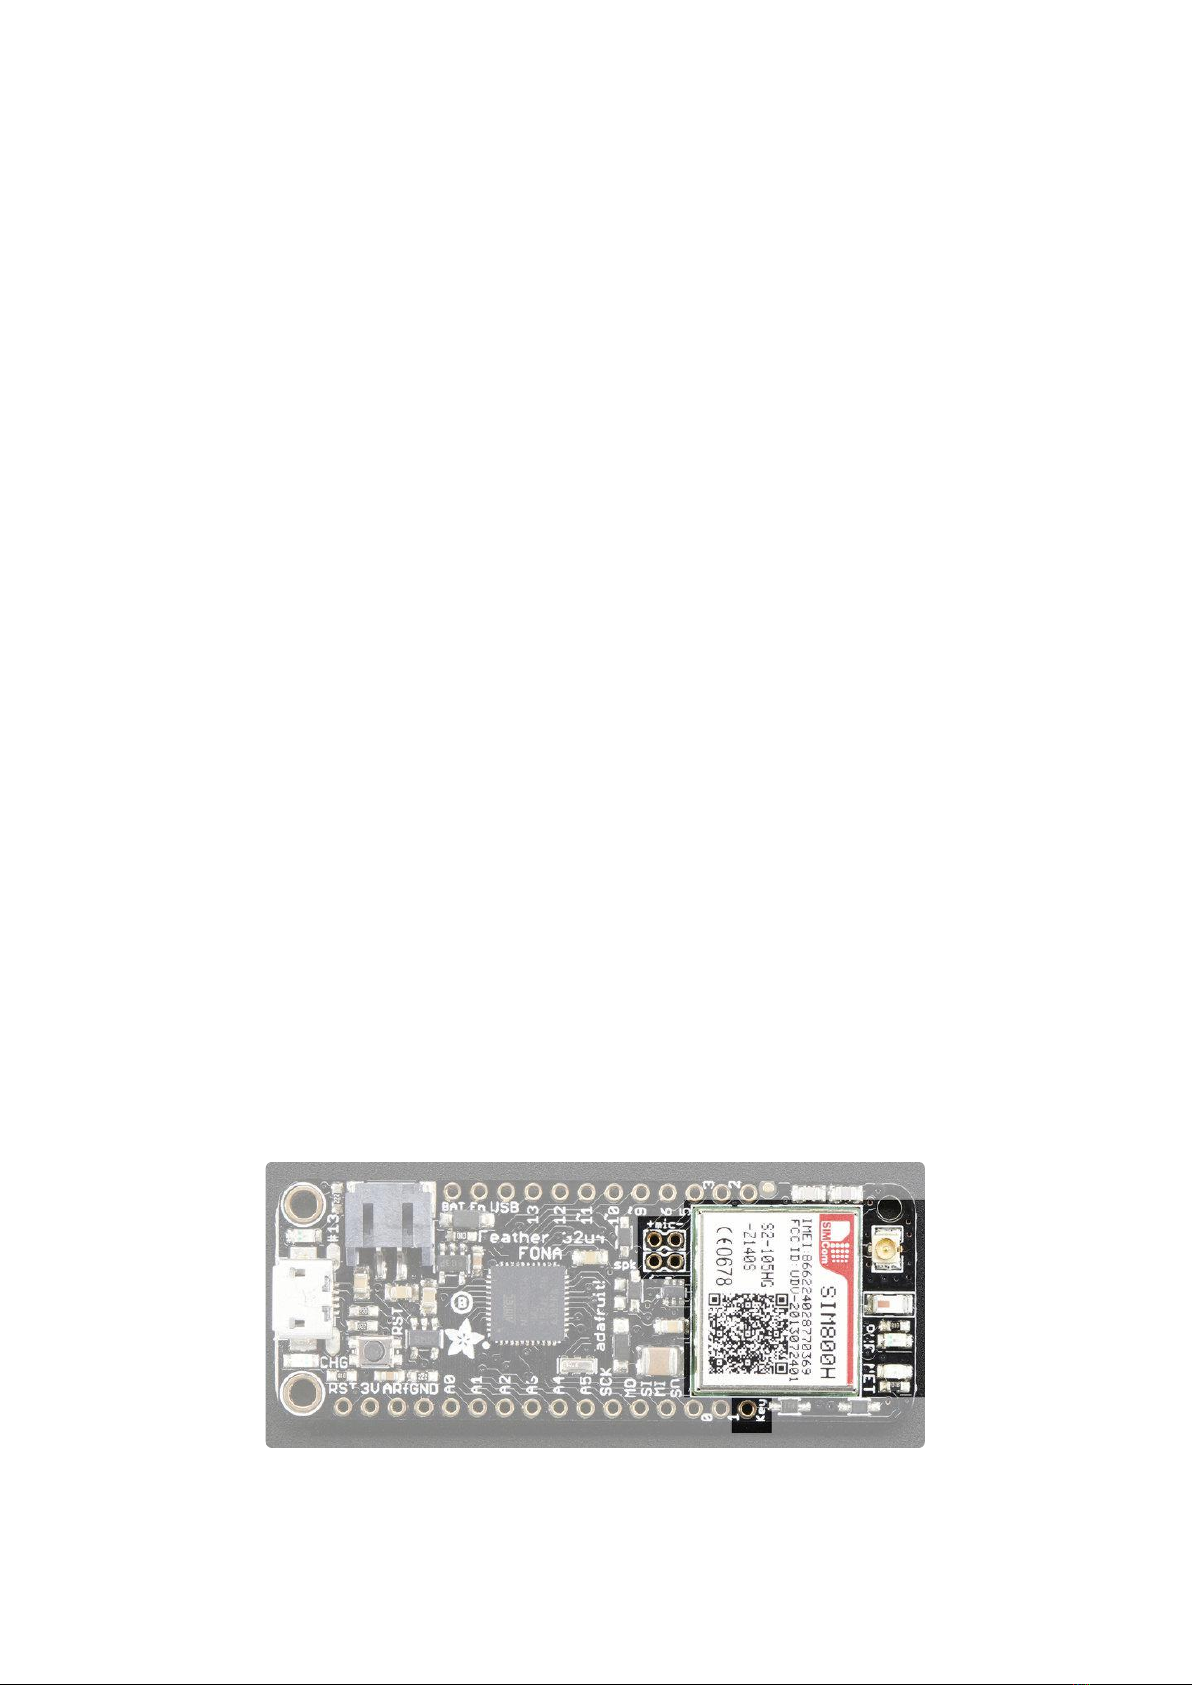
Other Pins!
RST - this is the Reset pin, tie to ground to manually reset the AVR, as well as
launch the bootloader manually
ARef - the analog reference pin. Normally the reference voltage is the same as
the chip logic voltage (3.3V) but if you need an alternative analog reference,
connect it to this pin and select the external AREF in your firmware. Can't go
higher than 3.3V!
Key - this is by default tied to ground, cut the trace on the bottom and wire to a
microcontroller pin to manually turn the module on and off. (Pulse low for a few
•
•
•
•
•
•
•
•
•
©Adafruit Industries Page 12 of 58
seconds to change from on to off) This is the only way to truly disable the
cellular module.
Mic+ and Mic- connections for attaching an electret microphone for audio
applications (external audio interface)
Spk+ and Spk- connections for attaching a 8 ohm 1W speaker for audio
applications (external audio interface)
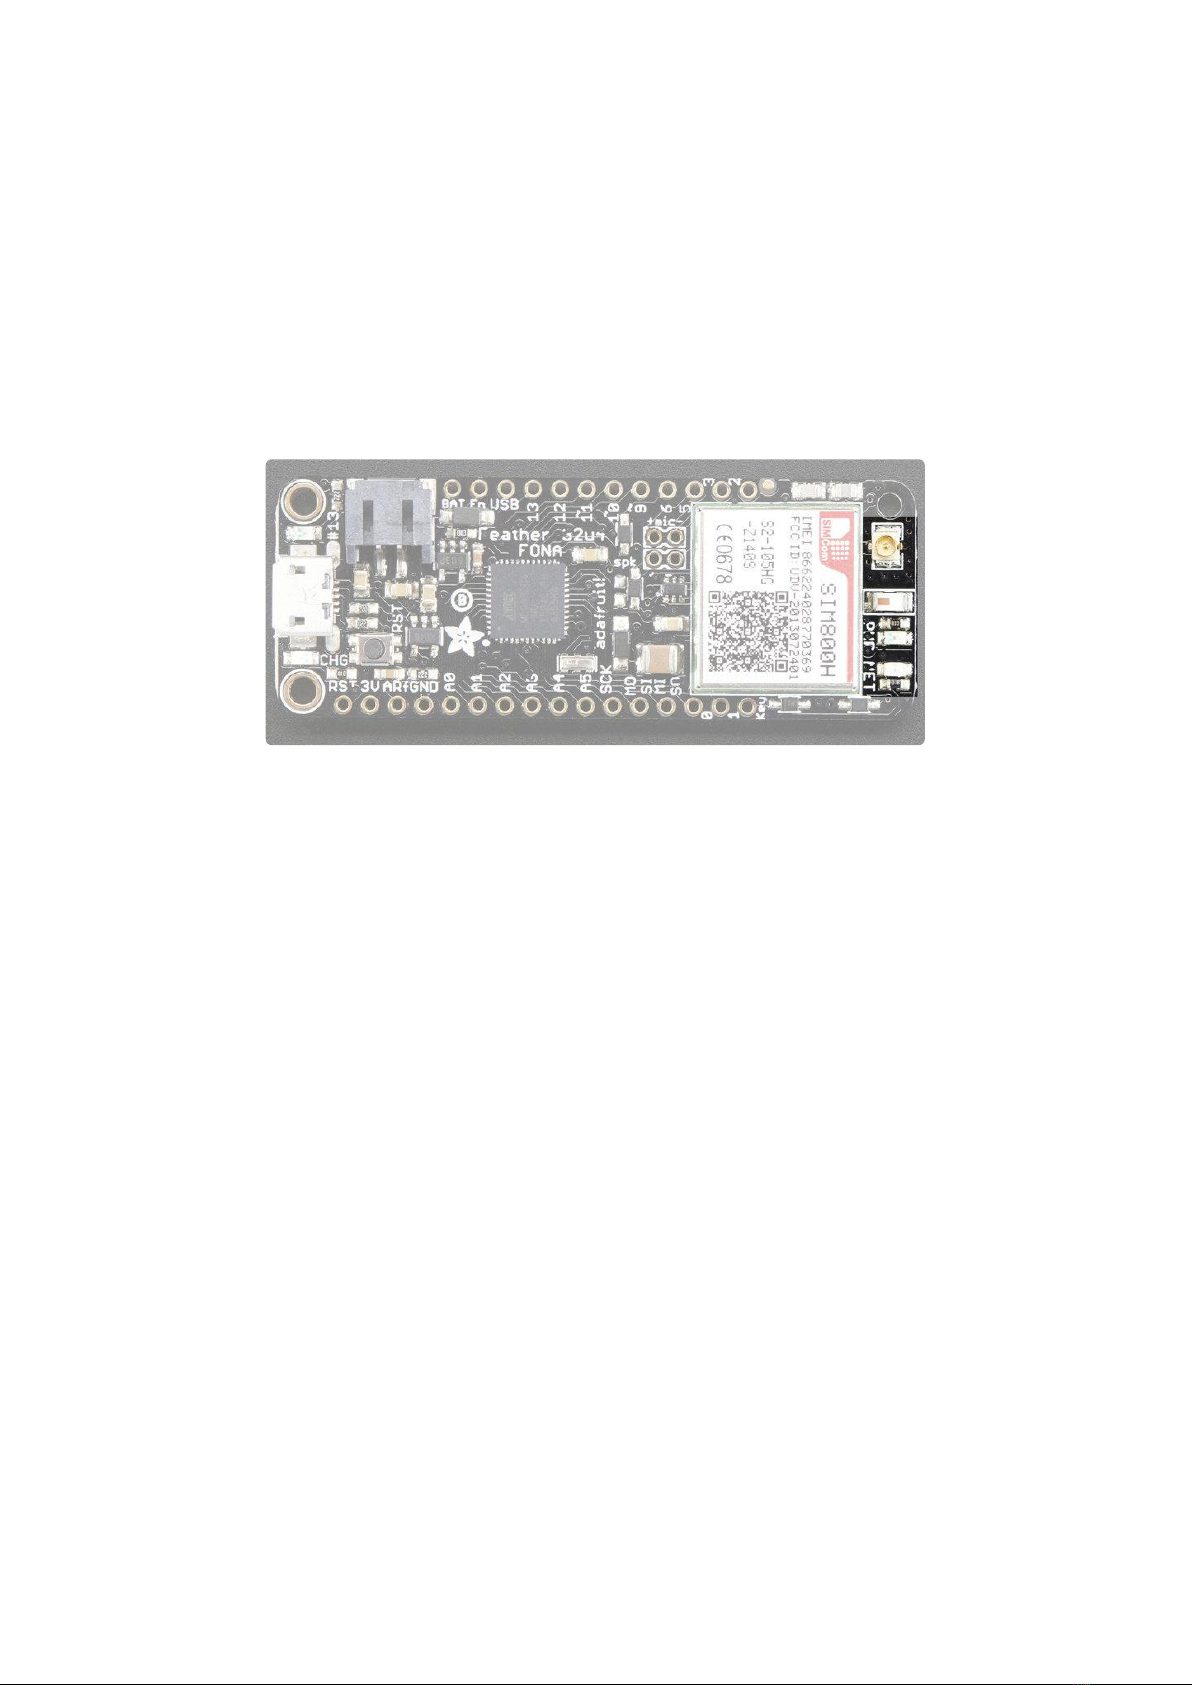
FONA connections & LEDs
All the way to the right we have the cellular-only connection parts. Up top is a
standard uFL connector, you attach your GSM antenna here
Below that is the bluetooth antenna (small white rectangle with red marking)
At the bottom are the two cell-status LEDs.
The middle PWR LED will light up green whenever the cellular module is active and
has good power.
The NET LED will blink in blue let you know the status of the cellular connection You
can use this for checking the current state without sending an AT command:
64ms on, 800ms off - the module is running but hasn't made connection to the
cellular network yet
64ms on, 3 seconds off - the module has made contact with the cellular network
and can send/receive voice and SMS
64ms on, 300ms off - the GPRS data connection you requested is active
•
•
•
•
•
©Adafruit Industries Page 13 of 58

By watching the blinks you can get a visual feedback on whats going on
On the bottom is a microSIM push-push holder. Slot your microSIM in here and press
in until it clicks
There's also a spot you can solder an antenna if you want to use the FM receiver
capability.
Above that is nicely labeled Mic/Speaker pads
At the very bottom is the jumper for the KEY pad - cut this to let you control the
module's on/off key manually. By default KEY is tied to ground so the module is
always powered and on.
Assembly
We ship Feathers fully tested but without headers attached - this gives you the most
flexibility on choosing how to use and configure your Feather
Header Options!
Before you go gung-ho on soldering, there's a few options to consider!
©Adafruit Industries Page 14 of 58

The first option is soldering in plain male
headers, this lets you plug in the Feather
into a solderless breadboard
Another option is to go with socket
female headers. This won't let you plug
the Feather into a breadboard but it will
let you attach featherwings very easily
©Adafruit Industries Page 15 of 58

We also have 'slim' versions of the
female headers, that are a little shorter
and give a more compact shape
Finally, there's the "Stacking Header"
option. This one is sort of the best-of-
both-worlds. You get the ability to plug
into a solderless breadboard and plug a
featherwing on top. But its a little bulky
©Adafruit Industries Page 16 of 58

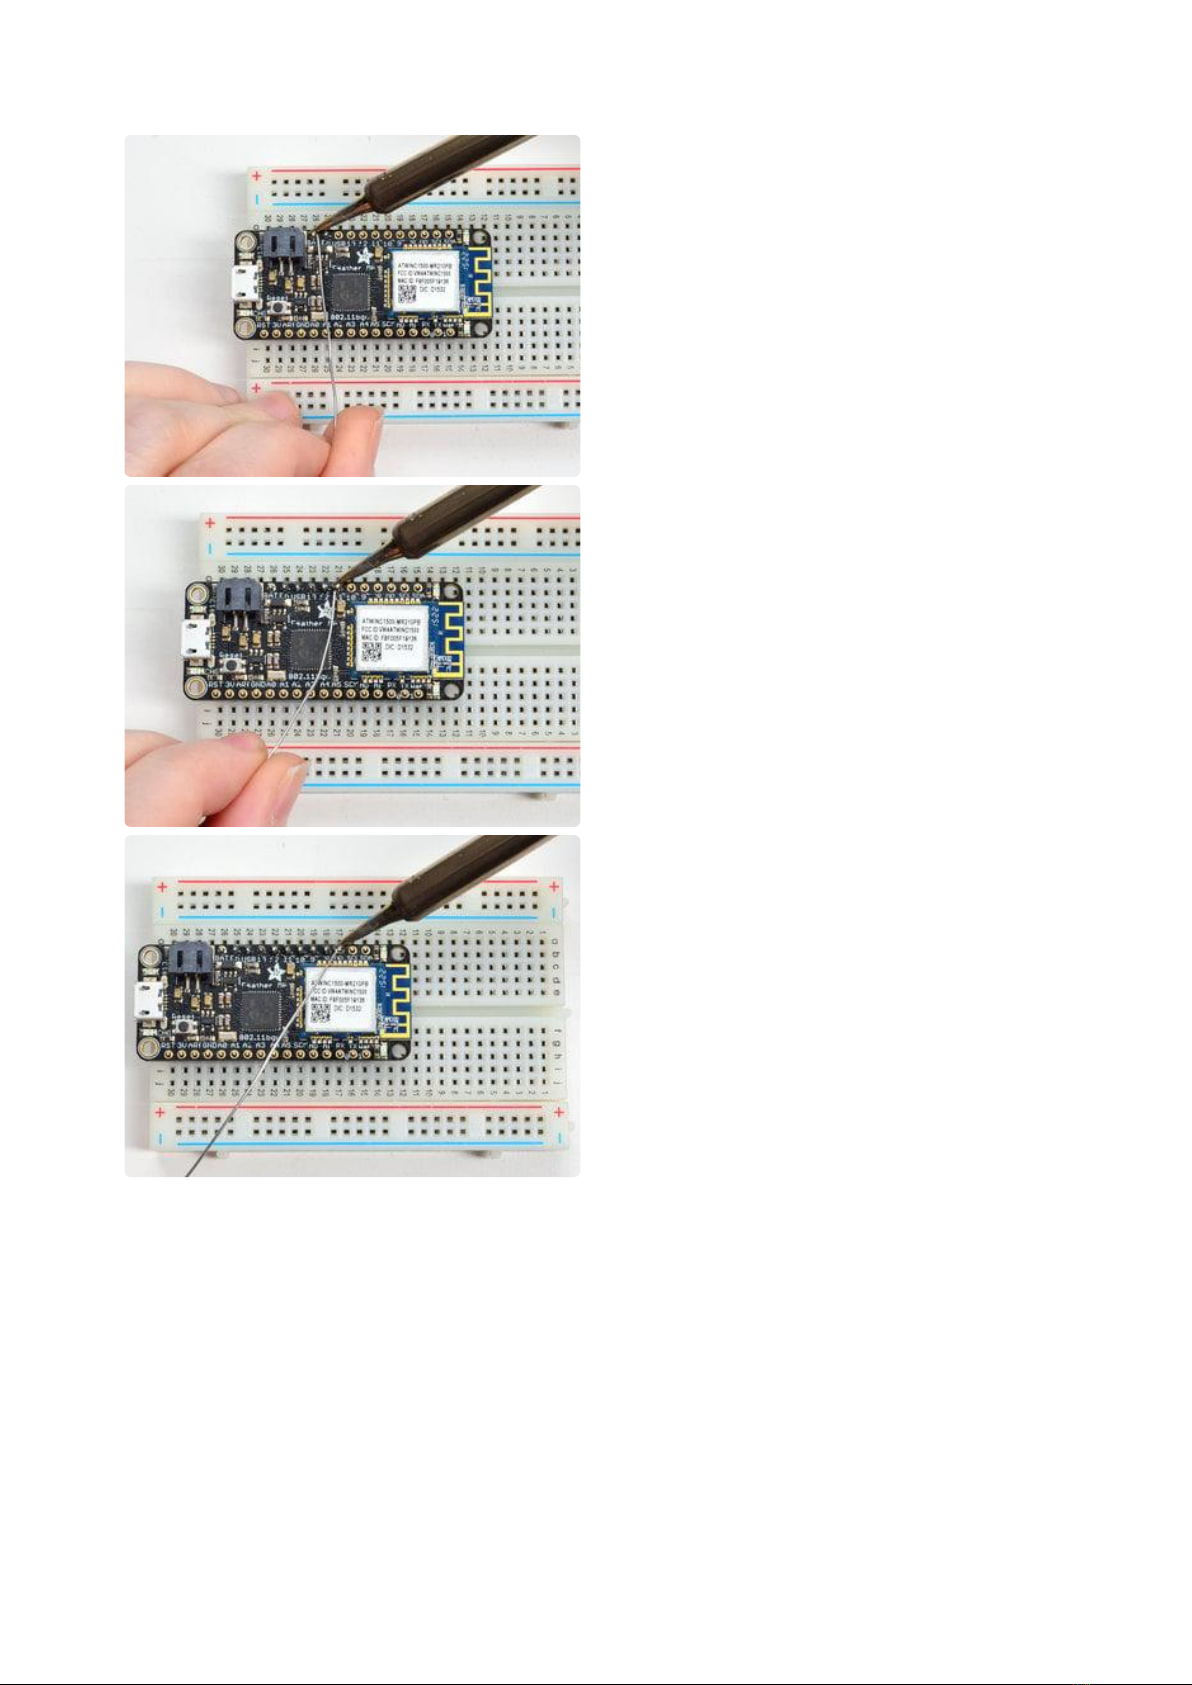
Add the breakout board:
Place the breakout board over the pins
so that the short pins poke through the
breakout pads
And Solder!
Be sure to solder all pins for reliable
electrical contact.
(For tips on soldering, be sure to check
out our Guide to Excellent
Soldering(https://adafru.it/aTk)).
©Adafruit Industries Page 18 of 58


Other manuals for Feather 32u4 FONA
1
Table of contents
Other Adafruit Motherboard manuals

Popular Motherboard manuals by other brands


Texas Instruments
Texas Instruments LMH2832EVM-50 user guide

Biostar
Biostar P4M900-M7 SE Setup manual

sparkfun
sparkfun Qwiic 12-Bit ADC HOOK-UP GUIDE

Teknor Industrial Computers
Teknor Industrial Computers TEK-AT2 Hardware reference manual

IEI Technology
IEI Technology ICPMB-8650 manual

IBASE Technology
IBASE Technology MB950 user manual