Add-A-Bathroom FP800T User manual

ADD-A-BATHROOM Pty Ltd. Specifications and details subject to alteration without notice. (c) 2019
No warranty is expressed or implied by the publication or use of this guide. Page 1 of 8
Unit 1, 18 Francis Rd. Wingfield. South Australia. 5013
Ph: 1300 559 121
info@addabathroom.com.au
www.addabathroom.com.au
Installation guide for Add-A-Bathroom 8 panel flat pack tile look bathrooms.
FP800T; FP900T; FP1000T; FP1200T; FP1400T (with door opening)
Please read the entire guide prior to commencement of assembly or installation.
Note that this guide is provided for general information purposes only and should not be relied upon
without professional advice about your personal situation and installation requirements. As this guide
does not take personal circumstances or local regulations into account and as any installation is beyond
the control of Add-A-Bathroom, no responsibility is accepted nor warranty implied by Add-A-Bathroom
(or its affiliated entities) by the publishing or use of this guide.
Add-A-Bathroom flat pack bathrooms are manufactured in our modern production facilities and are
supplied ready for assembly and installation.
Follow this guide and your Add-A-Bathroom bathroom should give you many years of trouble free
service. No leaks, no cracks, no maintenance. If you have any queries please call us on 1300 559 121.
No specialised tools are required to install an Add-A-Bathroom flat pack bathroom. Installation of a
bathroom usually requires 2 competent people.
All plumbing and electrical work must be performed by appropriately licensed contractors.
Flat pack bathrooms are normally supplied as 8 panels with pre-drilled bolt holes and fasteners. Before
commencing installation open packaging and ensure all items are correct and in acceptable condition. No
claims regarding damage or missing components can be entertained after assembly commences.
(If you have sufficient access to receive and manoeuvre an assembled bathroom, the bathroom can be
supplied fully assembled ready for installation. Please contact Add-A-Bathroom for details.)
Line up, identify and label all panels so as to facilitate assembly. Check quantity of nuts, bolts, washers
etc. Ensure sufficient suitable sealant is available; this may be included with your bathroom depending
upon individual order.
Clean and maintain your new Add-A-Bathroom bathroom with domestic grade non-abrasive cleaning
agents. Walls may be polished with automotive or marine polishes suitable for use on fibreglass. Ensure
polishes, silicone washes, waxes and the like are kept away from any bathroom floor as such products
may be slippery.

ADD-A-BATHROOM Pty Ltd. Specifications and details subject to alteration without notice. (c) 2019
No warranty is expressed or implied by the publication or use of this guide. Page 2 of 8
There are 2 parts to the installation; firstly the assembly and secondly the installation. Please read the entire guide
before any assembly is commenced. Call us on 1300 559 121 should you have any queries.
Assembly: (Before commencing, ensure the assembled bathroom can be manoeuvred to the installation area.)
A. Place the Base panel down, cut cardboard from the packaging and lay on the panel to provide protection.
B. Dry position each wall panel on the base flange and with a pencil, mark the ends of each panel on the base
flange. This will indicate where to place sealant beads during assembly. Also label the back of each panel
1 through 8 in the order of assembly.
C. Run a generous 4mm to 5mm unbroken bead of sealant (2 parallel smaller beads works well) on top of the
flange of the Base (and around the bolt holes) where the Shower End Wall panel will attach to the Base
as per the following drawings (always start with the Shower End Wall).
D. Position the Shower End Wall panel and lightly bolt to the Base, have someone hold this panel while the
next panel is attached. Always nip up and tighten horizontal join bolts before tightening vertical join bolts.
Electric, pneumatic or ratchet tools must not be used to tighten nuts and bolts. Use hand spanners only.
E. Apply sealant (as before) to the top of the flange on the Base where the first Back Wall panel will sit and
also on the vertical edge of the previously fitted Shower End Wall panel where it will bolt to the first
Back Wall. (Sounds complicated? It means seal the joins before assembly.)
F. Position the first Back Wall panel and lightly bolt first to the Base, and then to the Shower End Wall.
G. Snug up the flanges and align the internal gelcoat faces of the 2 wall panels and the base, tap in or out and
adjust as necessary. Gently nip up the horizontal join bolts first and then the vertical join bolts.
H. Apply sealant (if required) to the top of the Base flange where the second Back Wall panel will sit; also
on the vertical edge of the previously fitted first Back Wall where it will bolt to the second Back Wall.
I. Position the second Back Wall panel and lightly bolt first to the Base, and then to the first Back Wall.
Snug up flanges, align faces and gently nip up bolts as before (horizontal first).
J. Similarly seal (if required), attach, align and bolt the second End Wall panel.
K. Similarly seal the remaining horizontal flange on the Base adjacent the shower, and the vertical flange of
the Shower End Wall (these joins must be fully sealed) and then attach, align and bolt the larger of the
two Front Wall panels (the one with 5 ‘tiles’) to the Base and Shower End Wall.
L. Similarly seal (if required), attach, align and bolt the smaller of the Front Wall panels (the one with 4
‘tiles’) to the second End Wall panel.
M. Carefully lift the Ceiling Panel into position, align and gently nip up bolts (no initial sealant is required).
N. Slightly tighten all nuts and bolts. (Note: There is no need to over-tighten the bolts, a firm tighten will
suffice; do not stress the joins. Remove excess sealant.)
O. Apply the final ‘visible’ bead of sealant to joins, ensuring joins are void free. Refer to the sealant guide.
Your Add-A-Bathroom is now assembled and ready for the installation of plumbing, electrical and accessories.

ADD-A-BATHROOM Pty Ltd. Specifications and details subject to alteration without notice. (c) 2019
No warranty is expressed or implied by the publication or use of this guide. Page 3 of 8
TYPICAL ASSEMBLY AND INSTALLATION DRAWINGS
Panels, sizes and waste locations vary between units.
Note: Poor or inadequate installation of sealant may be the cause of leakage. Do it right the first time.
Please read the sealant use guide provided.
Sequence of panel assembly for all standard 8 panel, tile look flat pack bathrooms.
The initial beads of sealant to be applied in the shower areas are indicated by the coloured lines and the letters
C,E,H,K; referencing the relevant section of the assembly guide instructions. Normally it is not necessary to apply
any initial beads outside of the shower area (as indicated by H in pink). However, should local requirements
dictate a fully sealed room (which would be unusual) all joins (other than the ceiling) should be so sealed.
LEFT HAND SHOWER SHOWN

ADD-A-BATHROOM Pty Ltd. Specifications and details subject to alteration without notice. (c) 2019
No warranty is expressed or implied by the publication or use of this guide. Page 4 of 8
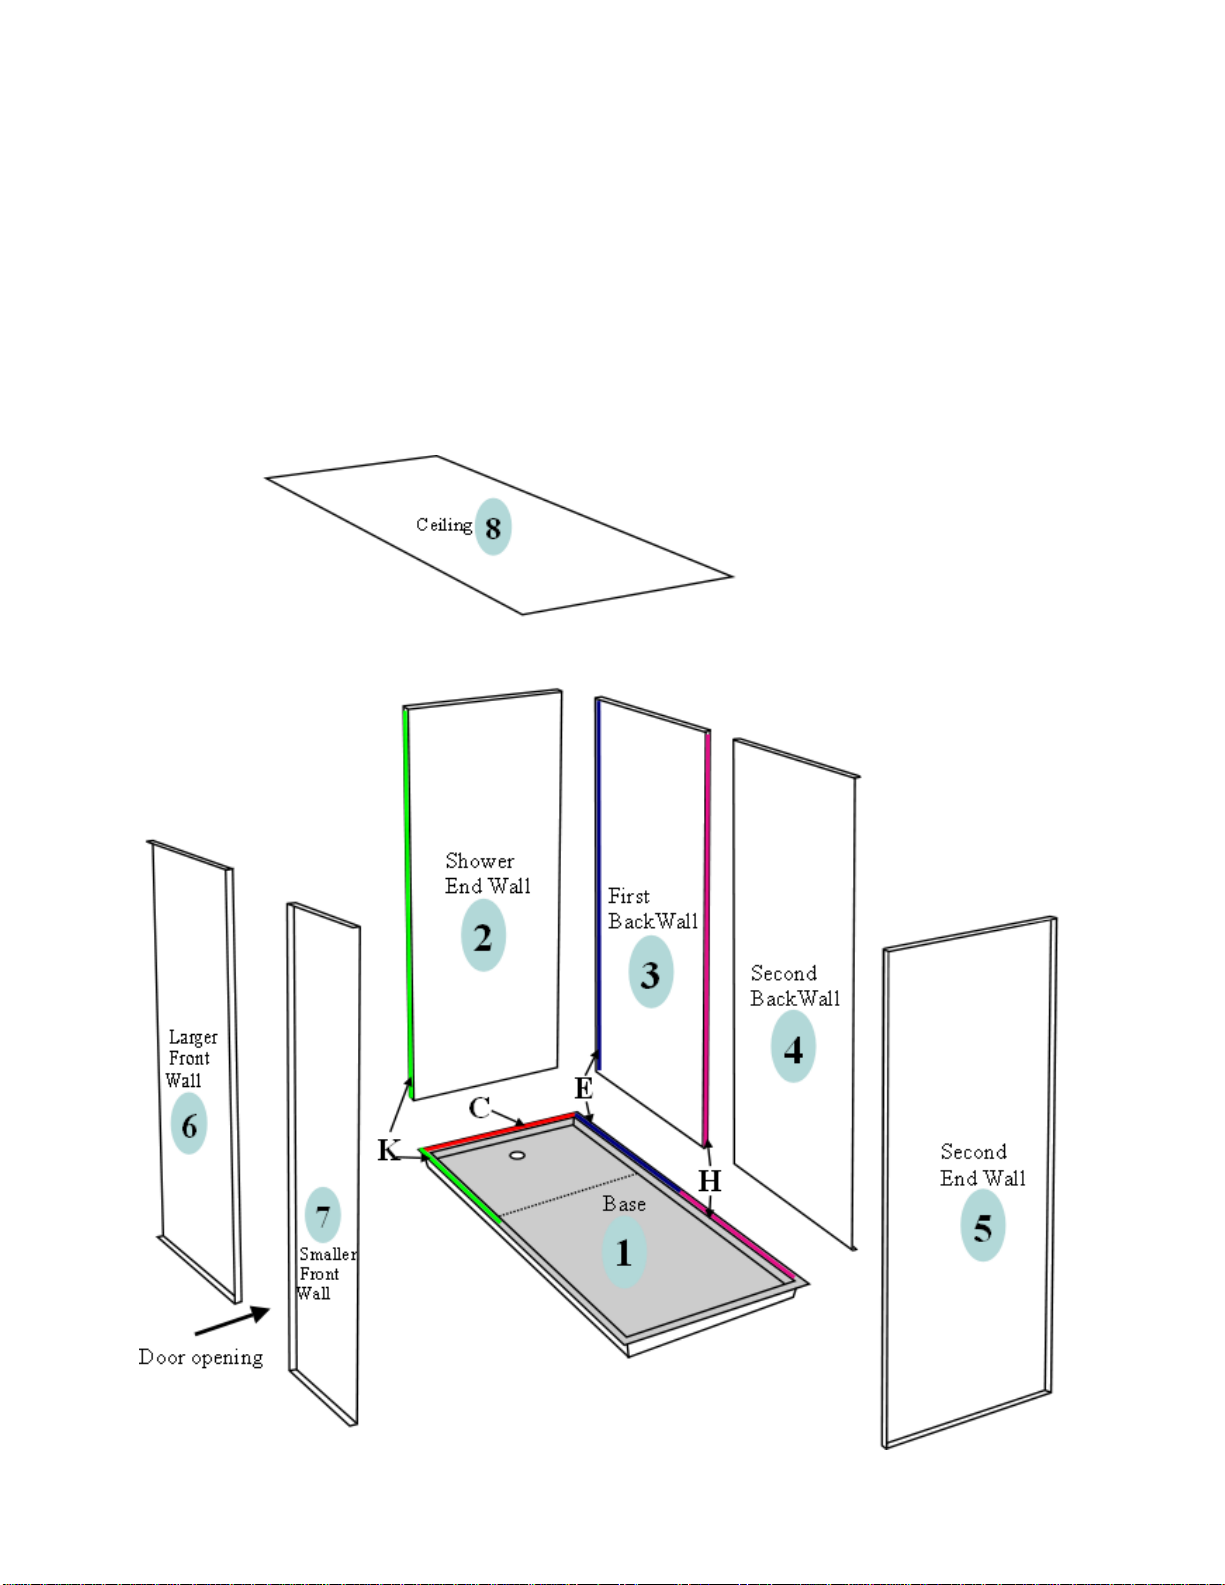
Installation:
(Prior to installation it is important to perform the stipulated ‘dry run’ to ensure correct placement.)
•Prepare the installation site, ensure the substrate is solid and level, any items that may interfere with the
bathroom have been removed (floor coverings, unwanted power points, skirtings, cornices etc.).
•Have your plumber pre-install the sewer pipe-work and bring in any hot and cold water pipes as required.
•It may be beneficial to also have your electrician pre-install wiring prior to the bathroom’s installation.
•Manoeuvre the assembled bathroom into its desired position and confirm sewer pipe, hot and cold plumbing,
electrical, etc. are all correctly placed and align; relocate the unit or plumbing as necessary and recheck. Ensure
that the bathroom sits level. (The moulded falls in the floor will then allow adequate drainage to the waste).
•Mark the floor around the edge of bathroom (to indicate area required for bedding screed). Remove bathroom.
•Should a window be required, carefully measure and mark its placement on the inside of the bathroom walls,
check, and then drill a 6mm hole in each corner. With a suitable disc (thin carborundum or diamond) attached
to an angle grinder and from inside the bathroom, carefully cut between the holes, along the marked lines.
•If your bathroom was purchased with a hot and cold pipe kit, attach this to the factory pre-drilled holes in the
bathroom wall panels. (Note: It is a requirement that pipe kits be re-pressure tested prior to installation.) If
not, have your plumber attach (and pressure test) any required pipes and plumbing fittings. (Internal fittings,
toilet, basin, taps, shower doors, etc. can be installed either at this time or after installation. Note that only
basins with inbuilt overflow protection are to be used.)
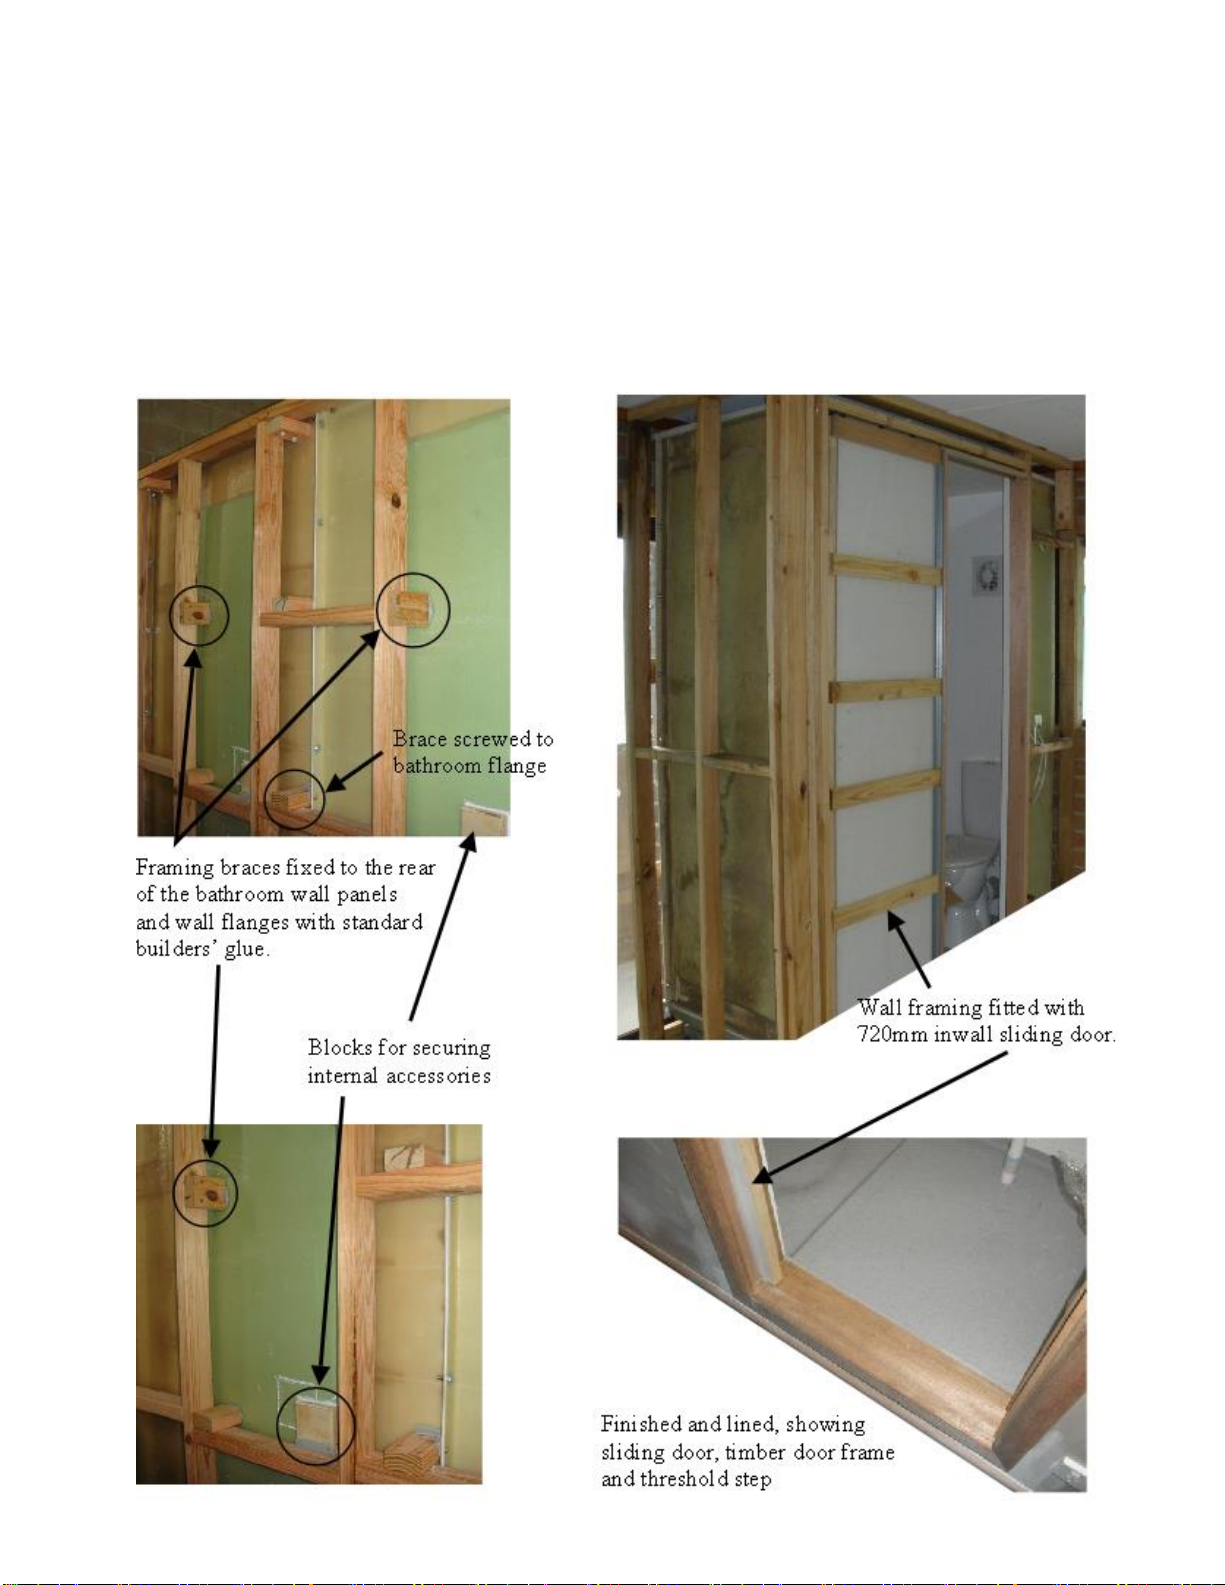
•It is important that any fittings you wish to fit inside your bathroom are securely attached. To this end we
recommend adhering (with standard builders’ glue) blocks of ply (or similar) to the back of the walls of the
bathroom where the fitting (basin, pan, towel rail etc) will be. This provides a firm fixing, and allows for the
fitting to be easily removed and replaced at a later date if required. Where safety grab rails, seats etc are
required to be fitted, contact Add-A-Bathroom as these may require additional measures, specific to the item.
•If your bathroom was purchased with an electrical kit, have this refitted at this time or have your electrician fit
electrical as required.
•The bathroom is now ready for final installation.
•Lay a thick bed of flexible ceramic waterproof floor tile adhesive (with a 6mm-12mm notched trowel), so as to
cover the entire area of the bathroom base. (Note: It is necessary that the entire base is fully supported by the
slurry; as the bottom of the bathroom will not be a perfect fit with the substrate, it is prudent to provide a thick
over-depth slurry. Any excess will be pushed to the side during installation and not present a problem.)
•Manoeuvre the bathroom into its final position. If it is too awkward to lift into position this can be achieved by
sliding the unit in on lengths of timber battens or conduit. When the unit is in its final position simply pull the
battens out letting the unit settle. Ensure the sewer pipe, hot and cold plumbing, window, etc. are all correctly
aligned. (Note: At this point it is prudent to leave the installation for sufficient time so as to enable the bed to
fully cure, usually overnight.)
•If not previously installed, install toilet, basin, taps and accessories as required. (Note: Ensure any drilled holes
in the shower area have sealant applied prior to installing the fitting so as to prevent any water penetration.)
•Connect floor waste, sewer, hot and cold plumbing.
•If not done previously, have your electrician final fit and test as required.
•Remove protective cardboard.
Your bathroom should now be fully functional, just requiring the installation of the surrounding wall and door.
Please read the relevant section at the end of this guide.
Ensure all slurries, beads, sealants and adhesives are fully set before use, (normally 24 hours).

ADD-A-BATHROOM Pty Ltd. Specifications and details subject to alteration without notice. (c) 2019
No warranty is expressed or implied by the publication or use of this guide. Page 5 of 8
Additional assembly information and sealant use guide.
To apply the initial ‘rear’ bead of sealant:-
I. Toward the rear of the flange of the base panel, both behind and around the bolt holes, place a continuous
sealant bead (4 to 5 mm in diameter). Ensure that the bead continues just past where the wall panel will
sit. Place the wall panel onto the base flange, being careful to line up the bolt holes. Attach the bolts,
washers (2 are supplied for each bolt) and nuts. Take up all the slack on the nuts but do not final tighten
the nuts just yet; look inside the unit to best line up the join between the base section and the wall. Lightly
tap the wall in or out to line up. Nip up the bolts.
II. Clean any excess sealant off the gelcoat face without smearing it over the panel, before it cures. (After the
first panel is attached, adjust the bead of sealant applied so no sealant is squeezed onto the gelcoat face)
III. Repeat this process with the remaining wall panels, to both horizontal and vertical flanges, ensuring
flanges are snug against other and each panel face lines up internally, before nipping up the bolts. (Note: It
is generally only necessary to apply the initial ‘rear’ sealant to joins in the shower area, please check
local regulations). Nip up the horizontal join bolts before the vertical join bolts.
IV. Carefully lift the ceiling panel into place and bolt, (Note: No initial ‘rear’ sealing of join required.)
To apply the final ‘visible’ bead of sealant:-
Note: Techniseal will not readily adhere to surfaces that have had the Smoothfix solution applied.
For best results we recommend Techniseal and Smoothfix although any quality sanitary grade sealant will suffice.
Both Techniseal and Smoothfix are available from Add-A-Bathroom.
Apply only as much sealant as can be worked before skin forms –usually up to 10 mins.
1. Cut the plastic nozzle at 45 degrees providing a 3mm to 4mm (approximately) orifice; attach to the tube
and place tube in gun.
2. It is best to trail sealant behind the nozzle to fill join completely; but do not overfill as this can make
cleaning up difficult. It is important to make sure you are forcing the sealant firmly and fully into the join.
Start with the join of the base to the walls, (at this time also put sealant approximately 150mm up the
vertical joins).
3. After you have made sure there are no gaps in the bead just applied, spray or lightly brush the Smoothfix
solution over the sealant bead and over each side of the join to about 50 mm wide.
4. Do not spray the vertical (or any non sealed) joins at this time. (Why you start at the bottom.)
5. Using the rubber applicator, smooth off any excess sealant.
6. Fill vertical joins with sealant as before, starting from the bottom, working up.
7. Lastly apply to wall/ceiling joins.
8. Clean up with the applicator and Smoothfix, as before. (Note: It is OK to spray more Smoothfix on after
the first cleanup if you need to run the applicator over the join a second time, this allows for a better slip
of the tool and a smoother finish.)
9. Allow the correct drying time as per the instructions on the tube.
The MSDS for these products are available on request from Add-A-Bathroom, or B&N Products Pty Ltd.
Step 2 Step 3 Step 5

ADD-A-BATHROOM Pty Ltd. Specifications and details subject to alteration without notice. (c) 2019
No warranty is expressed or implied by the publication or use of this guide. Page 6 of 8
Joining details for wall to floor flanges. Also applicable for wall to wall flanges.
Cross section of flange Top view of flange
TYPICAL FLOOR WASTE INSTALLATION INSTRUCTIONS
Apply a continuous bead of sealant
to the underside of the top flange
of the floor waste. Insert the waste
into the recess and fit the rubber
washer and rear collar; then fit the
back-nut to the thread and firmly
hand tighten. Do not over tighten.
Sealant must completely fill the
void between the bathroom base
and the underside of the waste
collar. Clean off any internal
excess sealant leaving a clean,
unbroken surface. Let cure for the
recommended time.
Should have any queries about your product, its installation or maintenance, please call
Add-A-Bathroom on 1300 559 121 or email info@addabathroom.com.au.
Thank you for purchasing an ADD-A-BATHROOM product.

ADD-A-BATHROOM Pty Ltd. Specifications and details subject to alteration without notice. (c) 2019
No warranty is expressed or implied by the publication or use of this guide. Page 7 of 8
Surrounding wall ‘framing’ guide.
Where necessary, wall framing should be to the appropriate standard. The walls around your bathroom will
generally be non structural, they are ultimately only to conceal the exposed fibreglass, plumbing and electrical and
provide a surface suitable for painting. Other wall claddings would also be quite suitable.
Around the exposed walls of your bathroom, build a standard timber or metal framed wall. Where possible,
framing should be pushed up tight against, and glued to, the bathroom walls. This is especially important adjacent
to the door opening. Where it is not possible to install the framing tight against the walls, cut short lengths of
timber and screw to the framework as braces. The braces should also be screwed or glued to the flanges of the
bathroom, and glued to the back of the bathroom’s walls. Braces (or framework) should be adhered to the
bathroom walls not more than 600mm apart.

ADD-A-BATHROOM Pty Ltd. Specifications and details subject to alteration without notice. (c) 2019
No warranty is expressed or implied by the publication or use of this guide. Page 8 of 8
Warranty
*Add-A-Bathroom Pty Ltd (the Company).
In the event of any failure within a time period of five years from date of initial sale or shipment
(whichever occurs sooner) of an Add-A-Bathroom* manufactured product (the Product) and such failure
is caused by the direct result of a defect in the material or manufacture of the Product, the Company will
at its sole option replace or repair, supply an equivalent product, or pay for doing one of these.
This warranty does not apply where the Product has been used in any manner not in accordance with the
Company’s instructions, nor the reuse of the Product after its initial installation. Installation and
maintenance must be in accordance with the relevant Add-A-Bathroom technical and installation guides;
current copies are available by phoning 1300 559 121. Add-A-Bathroom recommends that only those
products, components and systems recommended by it be used. The Company will need to be satisfied
that any defect in its Product is directly attributable to material or manufacture defect (and not another
cause) before this warranty applies.
Where Add-A-Bathroom supplies product or equipment manufactured or imported by a third party
(OEM) then the individual OEM supplier’s warranty will apply.
Other than as expressly set out in this warranty and guarantees that cannot be excluded under The
Australian Consumer Law (Schedule 2 of the Competition and Consumer Act 2010) (and any other law),
the Company excludes all other warranties and guarantees with regard to the Product. To the extent that
it is able to do so, the Company excludes all liability for loss and damage (including consequential loss)
in connection with the Product. The benefits of this warranty are in addition to other rights or remedies
of the consumer under the law in relation to the goods or services to which the warranty relates.
Notification of a warranty claim must be made to the Company prior to any return, repair or
modification of the Product. Unapproved repairs or modifications will void all warranties.
Where any defect or failure should ordinarily have been noticeable prior to the assembly or installation
of the Product, then any warranty, repair or replacement that may apply will be based upon an
unassembled and/or uninstalled Product. Any damage resulting from (however caused) impact or
abrasion after assembly or installation commences is specifically excluded from all warranties. Visible
damage to gelcoat surfaces must be reported prior to the commencement of assembly, or in the case of
an assembled product, prior to commencement of installation and in any event within seven days of
despatch of the Product from the Add-A-Bathroom facility.
To make a claim under this warranty, you must contact Add-A-Bathroom on 1300 559 121. All expense
of claiming under the warranty will be borne by the person making the claim.
The Company may require the provision of documentation supporting the claim.
The sale, supply and warranty of the Company’s Products shall be governed by the laws of South
Australia and is only applicable to products purchased for use within the Commonwealth of Australia.
Please contact the relevant import agent for overseas warranty details.
This manual suits for next models
4
Table of contents
Other Add-A-Bathroom Bathroom Fixture manuals
Popular Bathroom Fixture manuals by other brands

Wellis
Wellis PALOMA WZ00088 instruction manual

JASON Hydrotherapy
JASON Hydrotherapy forma Designer MicroSilk AirMasseur owner's manual

Hans Grohe
Hans Grohe Unica'C 27610000 Instructions for use/assembly instructions

U-Line
U-Line TORK H-5806 quick start guide

Signature Hardware
Signature Hardware CARRAWAY 948677 installation manual

Symmons
Symmons 0142-353GMRH Operation & maintenance manual