Samuel Heath V619 Operational manual

Product Data Sheet
V619 / V619-AUS
Single Lever Bidet Mixer With Pop-Up Waste
- Available Control Options -
V6K19M / V6KA19M
V6K19L / V6KA19L
V6K19MB / V6KA19MB
PLEASE NOTE: It is essential to install none return valves as part of the bidet system.


Dimension Key
V6K19L
V6K19M / V6K19MB

Dimension Key
V6KA19L
V6KA19M / V6KA19MB

The ow rate data provided in this document is indicative of each product and is given in an open
outlet condition. Installation design, external connections and ttings not supplied may aect the
data provided.
Flow Rates

Spares Information
V6K19
1
3
2
4
5
6
7
89
10
Item Part No. Description
-
-
-
-
-
VS56039
-
-
-
-
Screw
Washer
Main Cap
Locking Ring
O-Ring
Cartridge
C Washer Kit - Small
Flow Straightener
Pop-Up Waste
Flex Tail
1
2
3
4
5
6
7
8
9
10

Spares Information
V6KA19
1
3
2
4
5
6
7
89
10
Item Part No. Description
Screw
Washer
Main Cap
Locking Ring
O-Ring
Cartridge
C Washer Kit - Small
Flow Straightener
Pop-Up Waste - US 1” BSP
Flex Tail
1
2
3
4
5
6
7
8
9
10
-
-
-
-
-
VS56039
-
-
-
-

Control Assembly Instructions
1. Remove screw (A) and washer (B) from spindle
2. Position cross top (C) to tap body and assemble anti-rotational washer (B)
followed by screw (A).
Note: It is imperative that the anti-rotational washer is installed
3. Levers are also available (Assembly method is identical). Position lever at the
preferred angle.
4. Using a at edge screwdriver (E), tighten the screw (A) down against the
anti-rotational washer (B) to its fullest extent.
5. Insert the indice (D) to complete assembly.

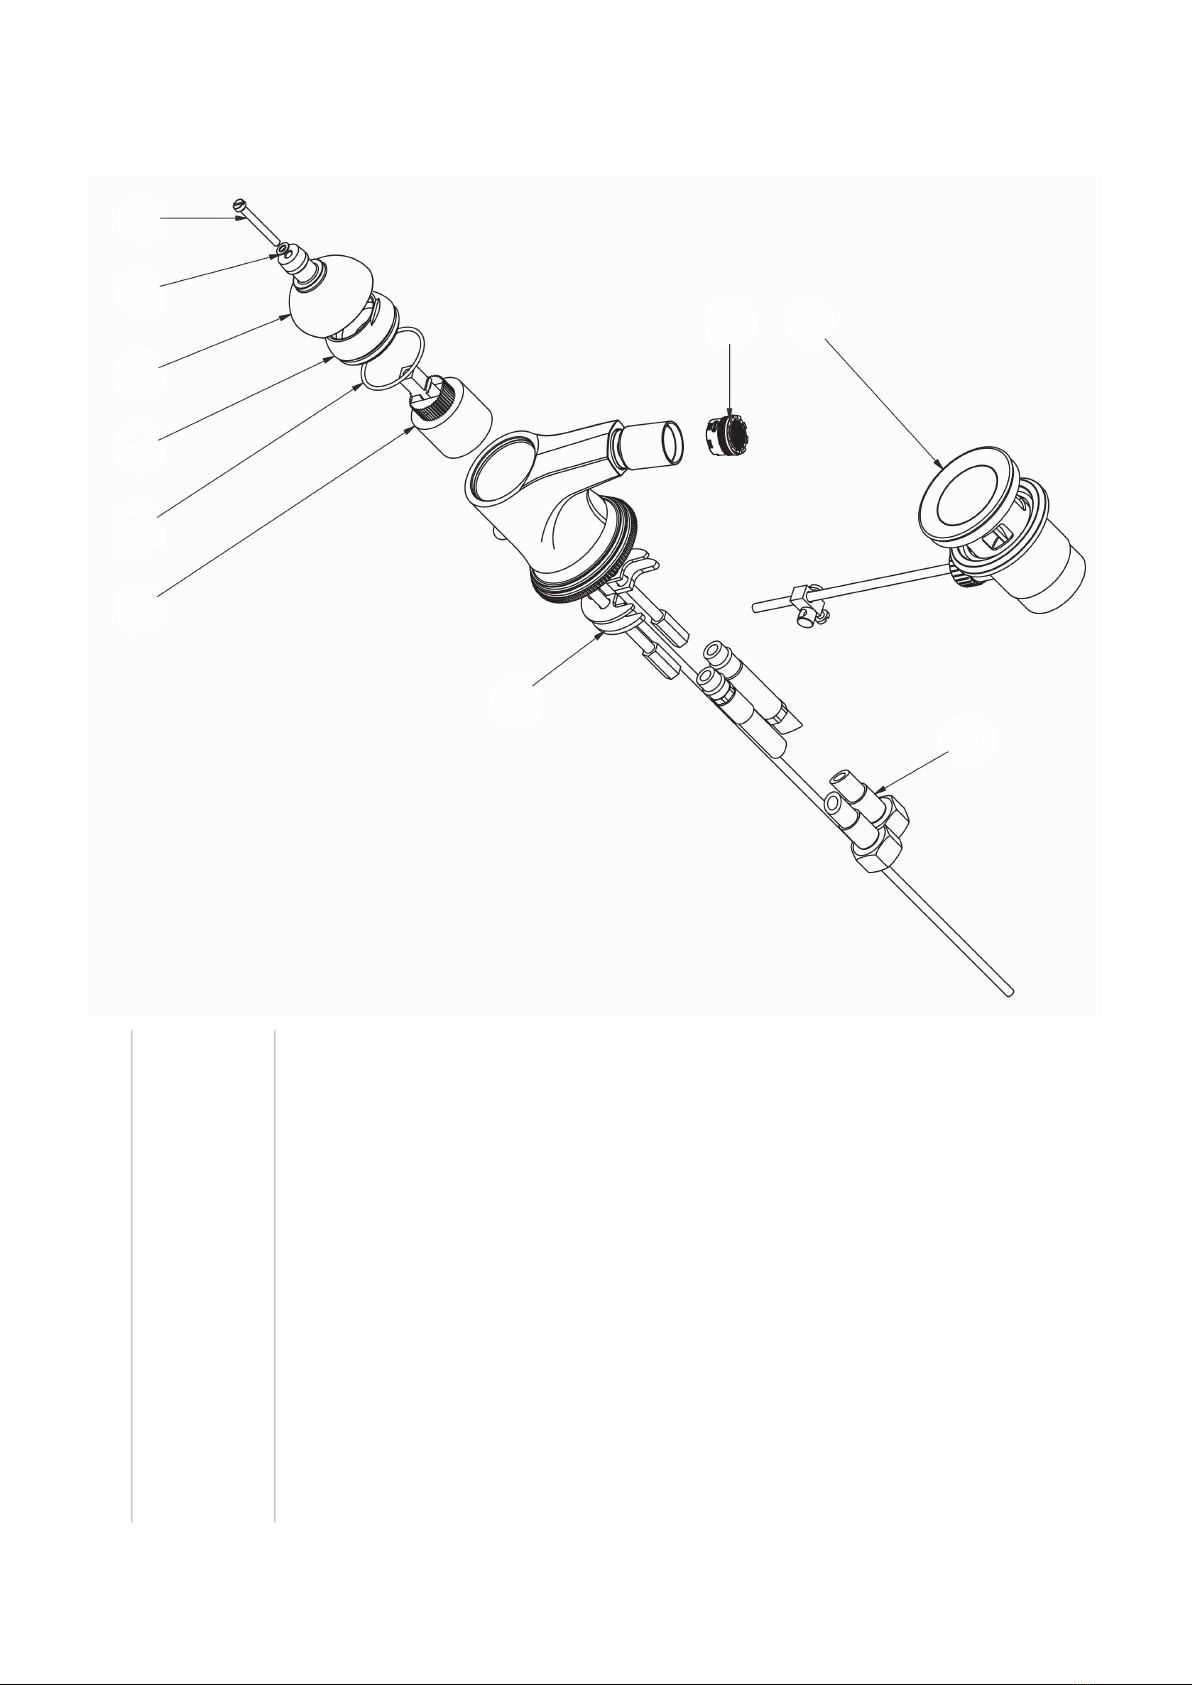
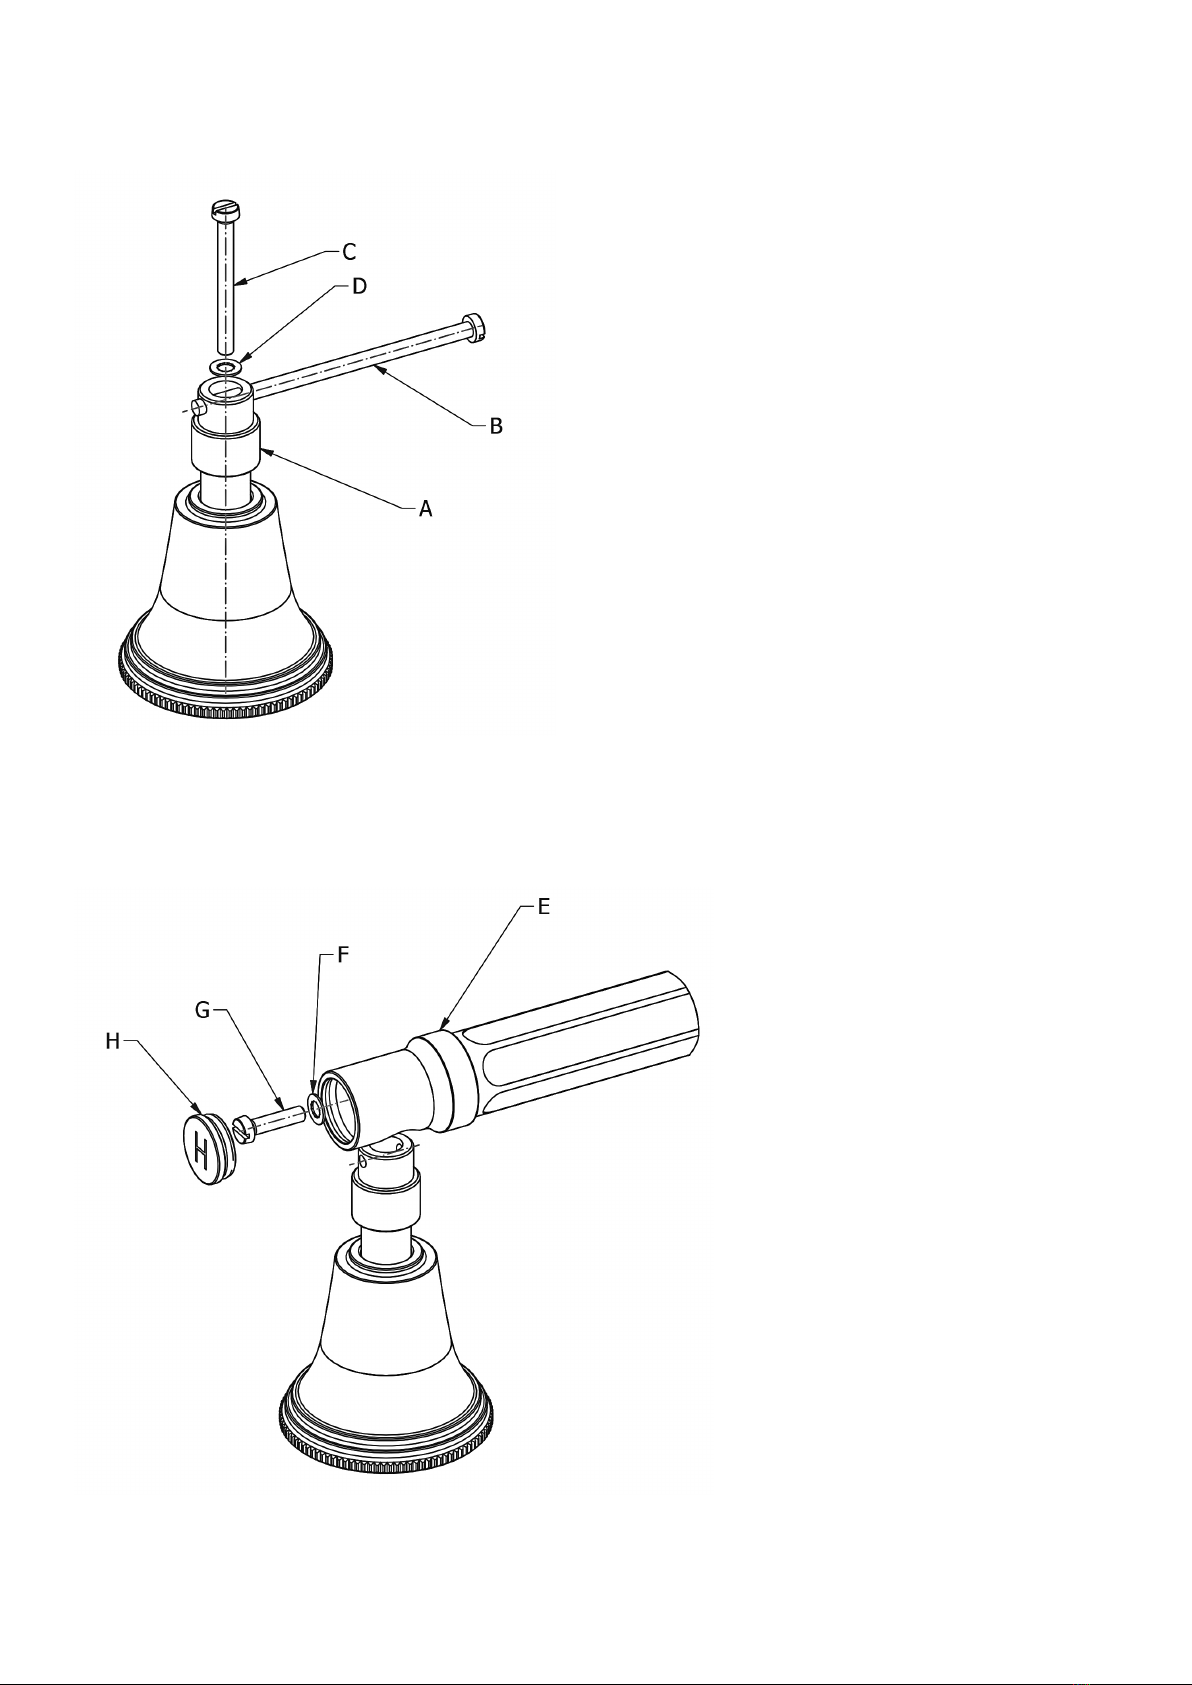
1. Place adapter (A) onto the side
valve spindle.
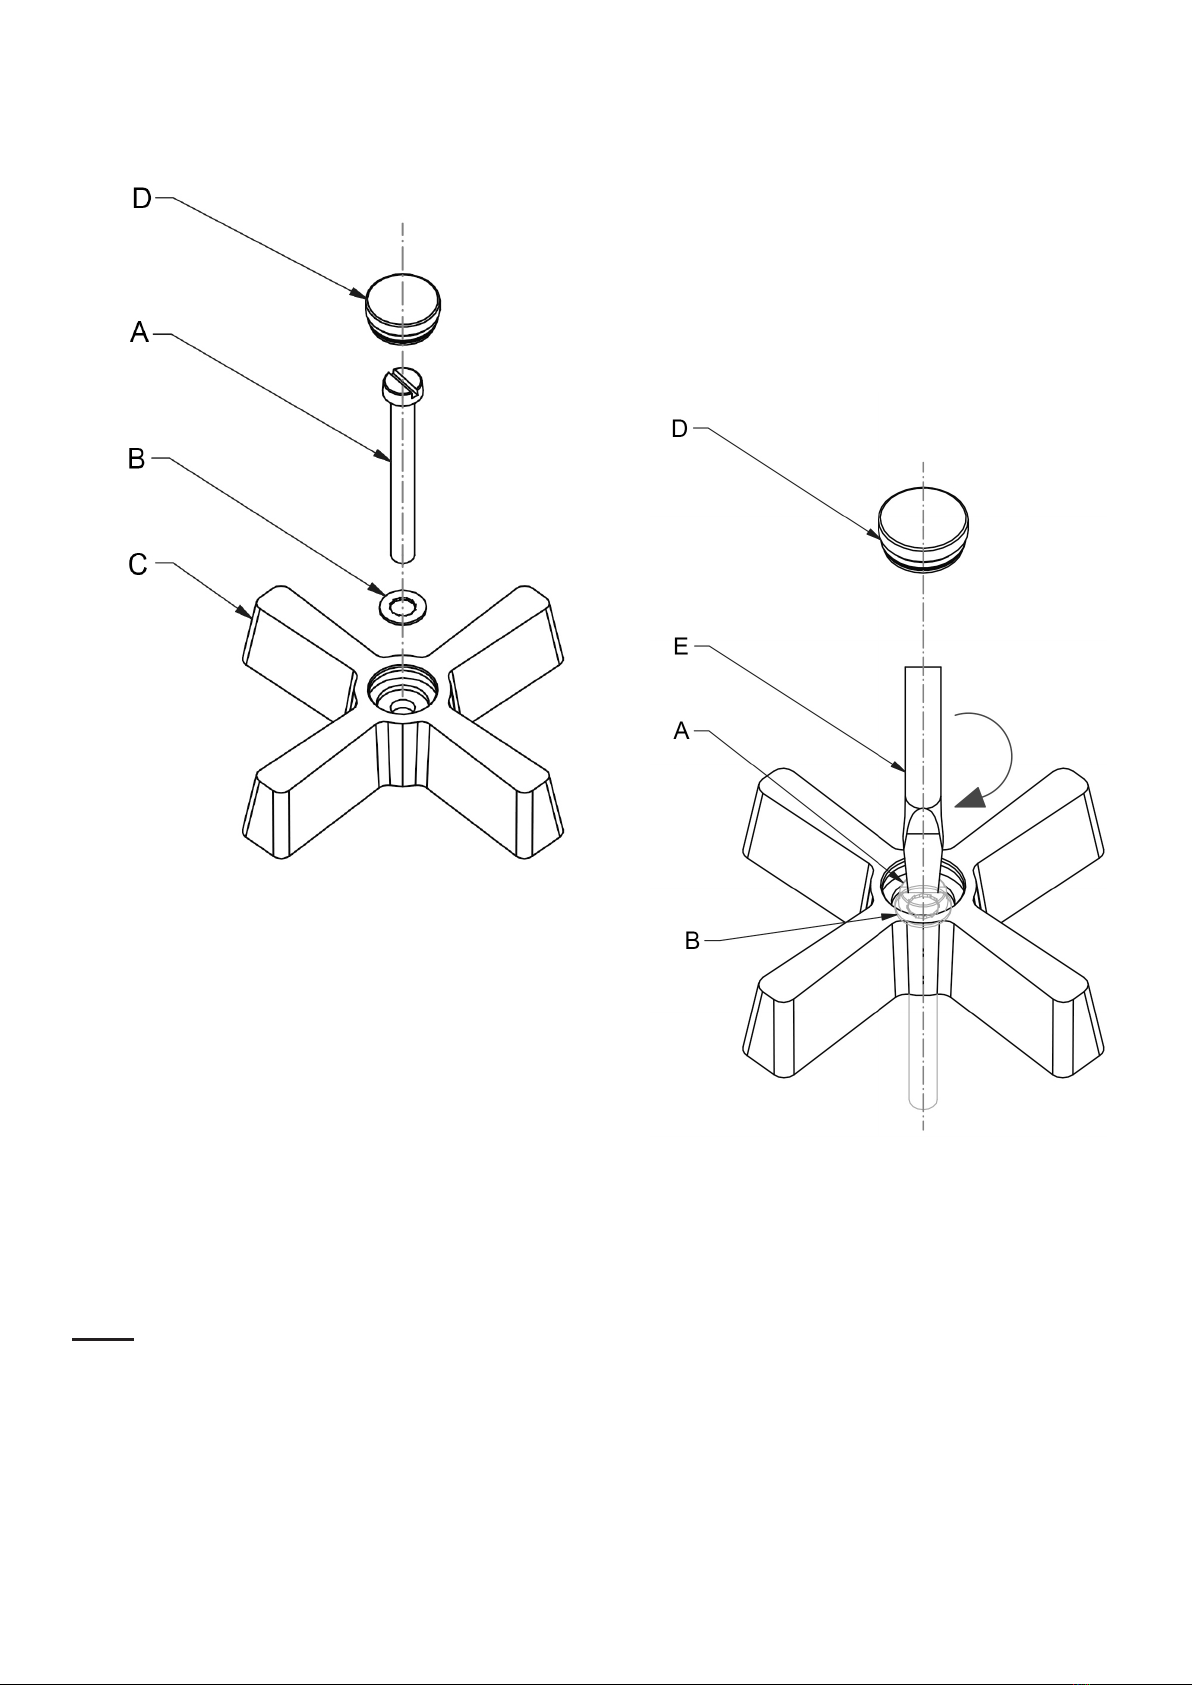
2. Align the adapter (A) using
assembly guide screw (B) to mimic the
desired position of the Luxe Lever.
3. Carefully remove screw (B) and
secure adapter using screw (C) and
washer (D).
4. Attach Luxe Lever (E) to adapter (A)
using screw (G) and washer (F).
5. Conceal screw using indice (H).
Luxe Lever Assembly Instructions

V619-A Waste Set Up
1. Assemble the drain to the basin.
2. Assemble the spout to the deck with the pop-up rod in position as shown above.

V619-A Waste Set Up
3. Assemble the ball rod to the drain.
4. Bend the metal strap to link the pop-up rod as shown above.
5. Secure the metal strap in place using wing nut and retainer clip.

V619-A Waste Set Up
6. Adjust the position of the metal strap to allow the pop-up waste to action
correctly.

Note: Alternatively, the ball rod and pop-up rod can be joined with the Joining Block
(illustrated above).
V619-A Waste Set Up


8-40358
Head Oce and Customer Service
Leopold Street
Birmingham
England
B12 0UJ
T: +44 (0)121 766 4200
F: +44 (0)121 772 3334
www.samuel-heath.co.uk
US Customer Service
Federal I.D. No. 58-1504682
www.samuel-heath.com
IMPORTANT NOTES
1. Installation should be carried out by a competent engineer, in accordance with water regulations.
2. Before installation, ensure supply pipes are ushed clean. Debris or loose particles will aect the eciency of the ceramic disc
cartridge.
3. For mixer taps, it is recommended that hot & cold pressures are equally balanced.
4. To help maintain the high quality nish, please clean with a soft damp cloth. Do not use abrasive polish or cleaners. Stains may
be removed using undiluted washing up liquid.
5. Ceramic cartridges in hard water areas. To prolong the lifespan and reduce servicing periods of your Samuel Heath tap we
recommend that a suitable water softener be tted. Consult your installer/designer for details.
6. Please note that as with all tap and shower ware it will be necessary from time to time for the products to be serviced, this should
be carried out by a qualied Plumbing Engineer.
NOTES IMPORTANTES
1. L’installation doit être faite par un ingénieur qualié, selon les réglements du Service Eau.
2. Avant l’installation, il faut s’assurer que les tuyaux d’approvisionnement sont complètement purgés. Les déchets ottants auront
un eet détrimentaire sur l’ecacité de la cartouche céramique.
3. Il est recommandé que les pressions de l’eau chaude et eau froide des mitigeurs et mélangeurs soient maintenues à un niveau
égal.
4. Pour conserver la nition de haute qualité, nettoyer avec un chion doux et humide. N’employer jamais de la cire et des produits
abrasifs. Les tâches peuvent être enlevées à l’aide de liquide vaisselle pur.
5. Cartouches en céramique dans les régions à eau calcaire. Pour prolonger la durée et réduire l’entretien de votre robinetterie
Samuel Heath, nous recommandons d’utiliser un adoucisseur d’eau convenable. Veuillez consulter votre installateur/fournisseur
pour plus de renseignements.
6. Veuillez noter qu’un entretien sera nécessaire de temps en temps et doit être eectué par un installateur qualié.
WICHTIGE HINWEISE
1. Installation sollte durch einen kompetenten Fachmann und nach den üblichen Vorschriften ausgeführt werden.
2. Vor Installation Wasserleitung gründlich durchspülen. Verschmutzung wird die Funktion der Kartusche erheblich einschränken.
3. Für Mischbatterien ist es wichtig, daß Wasser mit gleichem Druck eingefuhrt wird.
4. Um den optimalen Zustand dieses Produktes zu erhalten, wischen Sie es bitte nur mit einem feuchten, weichen Lappen ab. Auf
keinen Fall Scheuermittel verwenden. Flecken lassen sich mit unverdünntem Geschirrspülmittel entfernen.
5. Keramikkartuschen in Hartwasserbereichen. Um die Lebensdauer zu verlängern und Wartungszeiten zu reduzieren empehlt
Samuel Heath den Einsatz eines geeigneten Wasserenthärters. Fragen Sie Ihren Installateur/Designer um Rat.
6. Bitte merken Sie, dass alle Armaturen ab und zu eine Wartung brauchen. Diese soll durch einen kompetenten Installateur
ausgeführt werden.
ATENCION
1. La instalación se debe realizar por un fontanero.
2. Antes de la instalación, deben pulgar las tuberias dejándo correr el agua por las tuberias para que arrastren los residuos de
montaje/obra, con el motivo de que no afecte la ecacia del cartucho de ceramica.
3. Para grupo baño/ducha se recomienda que las presiones del agua caliente y frio sean equilibradas.
4. Para ayudar a mantener el acabado de este producto, limpiar con un paño húmedo suave. No se debe emplear productos
abrasivos de baño. Las manchas se pueden quitar empleándo liquido lava-vajillas puro.
5. Cartuchos cerámicos en áreas de aguas duras . Para prolongar su vida útil y reducir los periodos de reparación de su grifo
Samuel Heath recomendamos la instalación de un descalcicador de agua. Consulte a su instalador para más detalles.
6. Igual que con todo tipo de griferia y duchas, de vez en cuando será necesario llevar a cabo una revisión al producto; esto
deberia ser realizado por un fontanero calicado.
ATTENZIONE
1. L’impianto deve essere montato da personale tecnico in conformità alle vigenti leggi.
2. Prima dell’installazione assicurarsi che le tubature dell’ aqua siano pulite. Detriti o residui di lavorazione compromettono
l’ecenza del cartuccio.
3. Per i gruppi, si raccomanda che le pressioni acqua calda e acqua fredda siano ugualmente bilanciate.
4. Per mantenere la nizione di ottima qualità, pulire con un panno soce e inumidito.
Non usare creme lucidanti e materiali abrasivi. Le macchie potranno essere tolte usando del detersivo per piatti puro.
5. Come con tutti i tipi di rubinetti e docce, di volta in volta è necessario eettuare una revisione al prodotto; questo dovrebbe
essere fatto da un idraulico qualicato.
Issue: B
This manual suits for next models
7
Table of contents
Other Samuel Heath Bathroom Fixture manuals
Popular Bathroom Fixture manuals by other brands

Orbital Systems
Orbital Systems OAS Standart R3 Technology Installation

Felton
Felton HALO HHSKCSRW installation guide

Spectrum Brands
Spectrum Brands Pfister Capistrano 8P8-WS2-CSOS Quick installation guide

Gessi
Gessi TRASPARENZE 34201 manual

Allibert
Allibert LAJA 828572 quick start guide

Hans Grohe
Hans Grohe Status2 14180006 Assembly instructions