manuals.online logo
Brands
  1. Home
  2. •
  3. Brands
  4. •
  5. Kohler
  6. •
  7. Bathroom Fixture
  8. •
  9. Kohler ELEVATION 72679T-C7 User manual

Kohler ELEVATION 72679T-C7 User manual

1265598-2A-A 1
BEFORE YOU BEGIN
1265598-2A-A 4
INSTALLATION INSTRUCTIONS
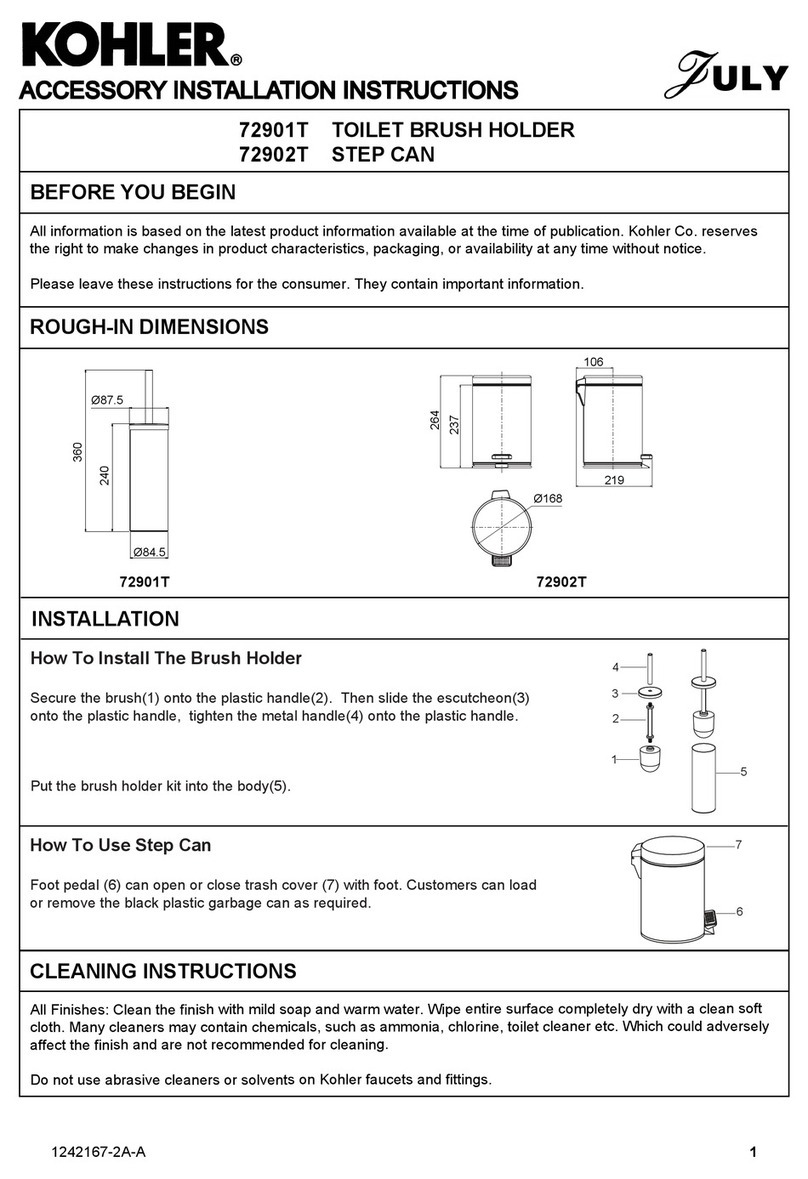
72679T-C7 Wall-Mount Bath & Dual Shower Column
ELEVATION
72679T-C7 Wall-Mount Bath & Dual Shower Column
ELEVATION
ROUGH-IN DIMENSIONS
OPERATION INSTRUCTIONS
SERVICE PARTS
**Color code must be specified when ordering
All information is based on the latest product information available at the time of publication. Kohler Co. reserves
the right to make changes in product characteristics, packaging, or availability at any time without notice.
Please leave these instructions for the consumer. They contain important information.
NOTES:
1. Shut off the water supplies to the fitting.
2. Inspect the supply tubing for damage. Replace as necessary.
3. Observe local plumbing codes.
4. The minimum inlet water pressure for diverter is 0.05MPa(0.5bar).
5. The highest working pressure for showerhead & handspray is 0.5MPa(5bar). If it exceeds 0.5MPa(5bar), a
pressure reducer is needed. The highest water and environment temperature is 60ºC. Please keep handspray,
showerhead and the shower arm away from heater, or it may become damaged and cause injury to the user.
G1/2˝
G1/2˝
500
G1/2˝
G1/2˝
1500
254×254
Finished Floor
1070~1270
879~1079
784
68
34
400
G1/2˝ G1/2˝
Recommended Height
1000~1100
G1/2˝
G1/2˝
134
68
Ø65
40°
150±15
Left handle opens with turning clockwise. Right handle opens with turning counter-clockwise. Water flows out from
spout when faucet diverter is in the normal position. Press the diverter knob, shower column works.
Turn the diverter handle counter-clockwise for handspray. Turn clockwise for showerhead.
Ø110
G1/2˝
243
252
1256397**
1256401**
3002320**
834562**
871413 871132
870916
834677
831752
833405
870916
871132
3002320**
871412
1180884**
831727**
880010
1111667**
880010
1196627**
1121294**
870992
1196610
1196607**
832751
832751
1061576
1196621**
1196628
1183267**
1109471**
1121285
1196609**
1196622**
1196610
832751
870921
870921
1061576
1196621**
1268608**
1219516**
77420
1030624
1260902**
1240266
1030624
1236561**
77420
1046290
1265598-2A-A 2
1265598-2A-A 3
INSTALLATION
CLEANING INSTRUCTIONS
All Finishes: Clean the finish with mild soap and warm water. Wipe entire surface completely dry with clean soft
cloth. Many cleaners may contain chemicals, such as ammonia, chlorine, toilet cleaner etc. which could adversely
affect the finish and are not recommended for cleaning.
Do not use abrasive cleaners or solvents on Kohler faucets and fittings.
INSTALLATION CHEKOUT
How to Install the Faucet
To perform installation, installer must provide G1/2˝ female supply
fittings(1), spaced 150mm apart and horizontal. The supply fittings should
be vertical and not beyond the finished wall. Hot supply pipe must be
located on the left.
Flush the water supply pipes thoroughly to remove any debris.
Install the two offset connectors(2) into the hot and cold supply pipes.
Use appropriate thread sealants or thread tape on pipe threads.
Adjust the center-to-center distance between the connectors to 150mm
and horizontally. They should extend 29mm beyond the finished wall.
Thread the escutcheons(3) onto the connectors until against the finished
wall.
Put the washers(4) into the nuts(5), thread the nuts to connectors.
Tighten the nuts with strap wrench or soft cloth between product and
regular wrench.
How to Install the Shower Column
Select a location in vertical wall to install shower column according to
rough-in dimensions.
Drill the lower hole as anchors(6) diameter and lower base(8-1) position
in the finished wall(NOTE: The arrow in the base is upward). Press
anchors into the hole, secure the base by the screw(7).
Rehearse the slide bar kit(9) installation for the upper base(8-2) mounting
location determination. Slide the tube joint(10) onto the slide bar kit, and
connect them to the base(NOTE: The arrow in the base is upward).
Install the screws(12) into the tube joint with the hex wrench(11), and
tighten them.
Place the slide bar and the body against the finished wall. Connect the
lower base and the diverter body kit(13). Position and tighten them by
hex wrench. Mark the hole of upper base(8-2) with a pencil. Uninstall the
slide bar kit and tube joint.(NOTE: Don’t lose the screws.)
Drill holes on the mark. Press the anchors into the holes. Secure the
upper base(8-2) by the screws. Install the tube joint(10) to the base(8-2)
and tighten them by screws. Reinstall the slide bar kit with
escutcheons(14) to the bases. Tighten the screws with the hex wrench.
Screw the escutcheons with the bases until against the finished wall.
Install the tube kit(15) into the slide bar kit. Install the nut(16) onto the
tube kit with soft cloth between internal hole of the nut and tube kit.
Then screw the nut onto the slide bar kit with strap wrench or soft cloth
between the nut and regular wrench.
How to Install the Handspray and Hose
Tighten 500mm length hose(18) to the outlet(19) and connector(20) with
two washers(17).
Turn the diverter handle(21), run hot and cold water for one minute to
remove any debris.
Tighten 1500mm length hose(24) to the connector(23) with filter
washers(22). Put the restrictor(25) into the handspray(26) inlet if needed.
Tighten the hose to the handspray with the filter washer(22).
Ensure that all connections are tight. Ensure that the handles are in the
off position.
Turn on the drain and main water supply, and check for leaks. Repair as
needed.
Remove the aerator assembly(30). Run hot and cold water through spout
about one minute to remove any debris. Clean the aerator assembly.
Shut off the faucet. Reinstall the aerator assembly.
How to Install the Showerhead
Turn the diverter handle for showerhead and run hot and cold water for
one minute to remove any debris before the showerhead(27) is installed.
Tighten the showerhead onto the tube kit outlet with strap wrench.
Before installation, install restrictor(28) if needed. Take out washer(29)
and install restrictor as shown, reinstall the washer.
150mm
Hot
Cold
3
2
1
5
4
16
15
6
712
8-2
14
6
7
12
8-1
14 13
10
11
9
30
22
25
26
24
17
20
21
22
23
17
18
19
28
27
29
Other Kohler Bathroom Fixture manuals

Kohler K-6816 User manual

Kohler

Kohler K-6816 User manual

Kohler Converge K-R77634 User manual

Kohler

Kohler Converge K-R77634 User manual

Kohler Elosis 18055T-B-CP User manual

Kohler

Kohler Elosis 18055T-B-CP User manual

Kohler K-5250 Operating manual

Kohler

Kohler K-5250 Operating manual

Kohler K-113 User manual

Kohler

Kohler K-113 User manual

Kohler K-1160-H Quick start guide

Kohler

Kohler K-1160-H Quick start guide

Kohler 10-Jet K-1005-H2 Assembly instructions

Kohler

Kohler 10-Jet K-1005-H2 Assembly instructions

Kohler STRAYT 99166T-C4 User manual

Kohler

Kohler STRAYT 99166T-C4 User manual

Kohler K-8515 User manual

Kohler

Kohler K-8515 User manual

Kohler K-31500X Assembly instructions

Kohler

Kohler K-31500X Assembly instructions

Kohler ENGLEFIELD MILANO User manual

Kohler

Kohler ENGLEFIELD MILANO User manual

Kohler K-15000 User manual

Kohler

Kohler K-15000 User manual

Kohler Mira Showers Escape Thermostatic 9.0 kW User manual

Kohler

Kohler Mira Showers Escape Thermostatic 9.0 kW User manual

Kohler K-1110 User manual

Kohler

Kohler K-1110 User manual

Kohler K-707105 Assembly instructions

Kohler

Kohler K-707105 Assembly instructions

Kohler Fluence K-702410-L User manual

Kohler

Kohler Fluence K-702410-L User manual

Kohler K-3048 User manual

Kohler

Kohler K-3048 User manual

Kohler K-108 User manual

Kohler

Kohler K-108 User manual

Kohler K-706152 Assembly instructions

Kohler

Kohler K-706152 Assembly instructions

Kohler Sterling 7104 Series User manual

Kohler

Kohler Sterling 7104 Series User manual

Kohler Mira Showers Escape Thermostatic 9.8 kW User manual

Kohler

Kohler Mira Showers Escape Thermostatic 9.8 kW User manual

Kohler K-12183 User manual

Kohler

Kohler K-12183 User manual

Kohler SINGULIER 10880 User manual

Kohler

Kohler SINGULIER 10880 User manual

Kohler K-2276 User manual

Kohler

Kohler K-2276 User manual

Popular Bathroom Fixture manuals by other brands

Gessi RETTANGOLO K 53047 Bath Mixing Program

Gessi

Gessi RETTANGOLO K 53047 Bath Mixing Program

Kinedo Kinemagic Royal 2 DES1298NG-D installation instructions

Kinedo

Kinedo Kinemagic Royal 2 DES1298NG-D installation instructions

Porcelanosa noken VITAE 100226251 manual

Porcelanosa

Porcelanosa noken VITAE 100226251 manual

Gessi 61209 manual

Gessi

Gessi 61209 manual

newform BLINK 70870E instructions

newform

newform BLINK 70870E instructions

Geberit AquaClean 8000plus operating instructions

Geberit

Geberit AquaClean 8000plus operating instructions

Porcelanosa noken BEND 100223953 N720000154 installation instructions

Porcelanosa

Porcelanosa noken BEND 100223953 N720000154 installation instructions

Hans Grohe Locarno 04832 0 Series Installation/User Instructions/Warranty

Hans Grohe

Hans Grohe Locarno 04832 0 Series Installation/User Instructions/Warranty

Viega Advantix 4935.1 Instructions for use

Viega

Viega Advantix 4935.1 Instructions for use

Franke HDTX674 Installation and operating instructions

Franke

Franke HDTX674 Installation and operating instructions

decina Cascade 1000 instruction manual

decina

decina Cascade 1000 instruction manual

Valore VS 2000 Plus Installation and user guide

Valore

Valore VS 2000 Plus Installation and user guide

LF Style SELECTION 1678VA-49-292-934 installation instructions

LF

LF Style SELECTION 1678VA-49-292-934 installation instructions

Gessi 40523 manual

Gessi

Gessi 40523 manual

LOOOX CABINET user manual

LOOOX

LOOOX CABINET user manual

Tres Shower Technology 09286399 manual

Tres

Tres Shower Technology 09286399 manual

Samo B6363 Assembly instruction

Samo

Samo B6363 Assembly instruction

DURAVIT SensoWash Slim 611000 00 1 10 1300 operating instructions

DURAVIT

DURAVIT SensoWash Slim 611000 00 1 10 1300 operating instructions

manuals.online logo
manuals.online logoBrands
  • About & Mission
  • Contact us
  • Privacy Policy
  • Terms and Conditions

Copyright 2025 Manuals.Online. All Rights Reserved.