ADDCOM ADD-685 User manual

www.addcom.com

ADD-685
DECT Headset
with USB
User Manual

CONTENTS
1. WELCOME 1
2. PACKAGE CONTENTS 1
3. PRODUCT OVERVIEW 2
3.1 Base unit with LED indicators 2
3.2 Headset 3
4. PRODUCT DESCRIPTION 4
5. HOW TO WEAR THE HEADSET 5
6. HOW TO CONNECT 7
6.1 Charging the base station 7
6.2 Connect to telephone 7
6.3 Connect to PC/VoIP 8
7. PAIRING HEADSET 9
7.1 Automatic pairing process 9
7.2 Manual pairing process 9
8. OPERATION 9
8.1 Making and receiving calls 9
9. CONNECTING MULTIPLE HEADSETS TO BASE STATION 10
10. OPTIONAL ACCESSORIES AND SPARE PARTS 11
10.1 Spare parts 11
10.2 Accessories 11
11. HEALTH AND SAFETY INSTRUCTIONS 13
12. TROUBLESHOOTING 15
1. WELCOME
Thank you for purchasing the ADDCOM ADD-685 DECT headset. Please read this manual
carefully to ensure you enjoy all the functions of your new ADD-685 headset.
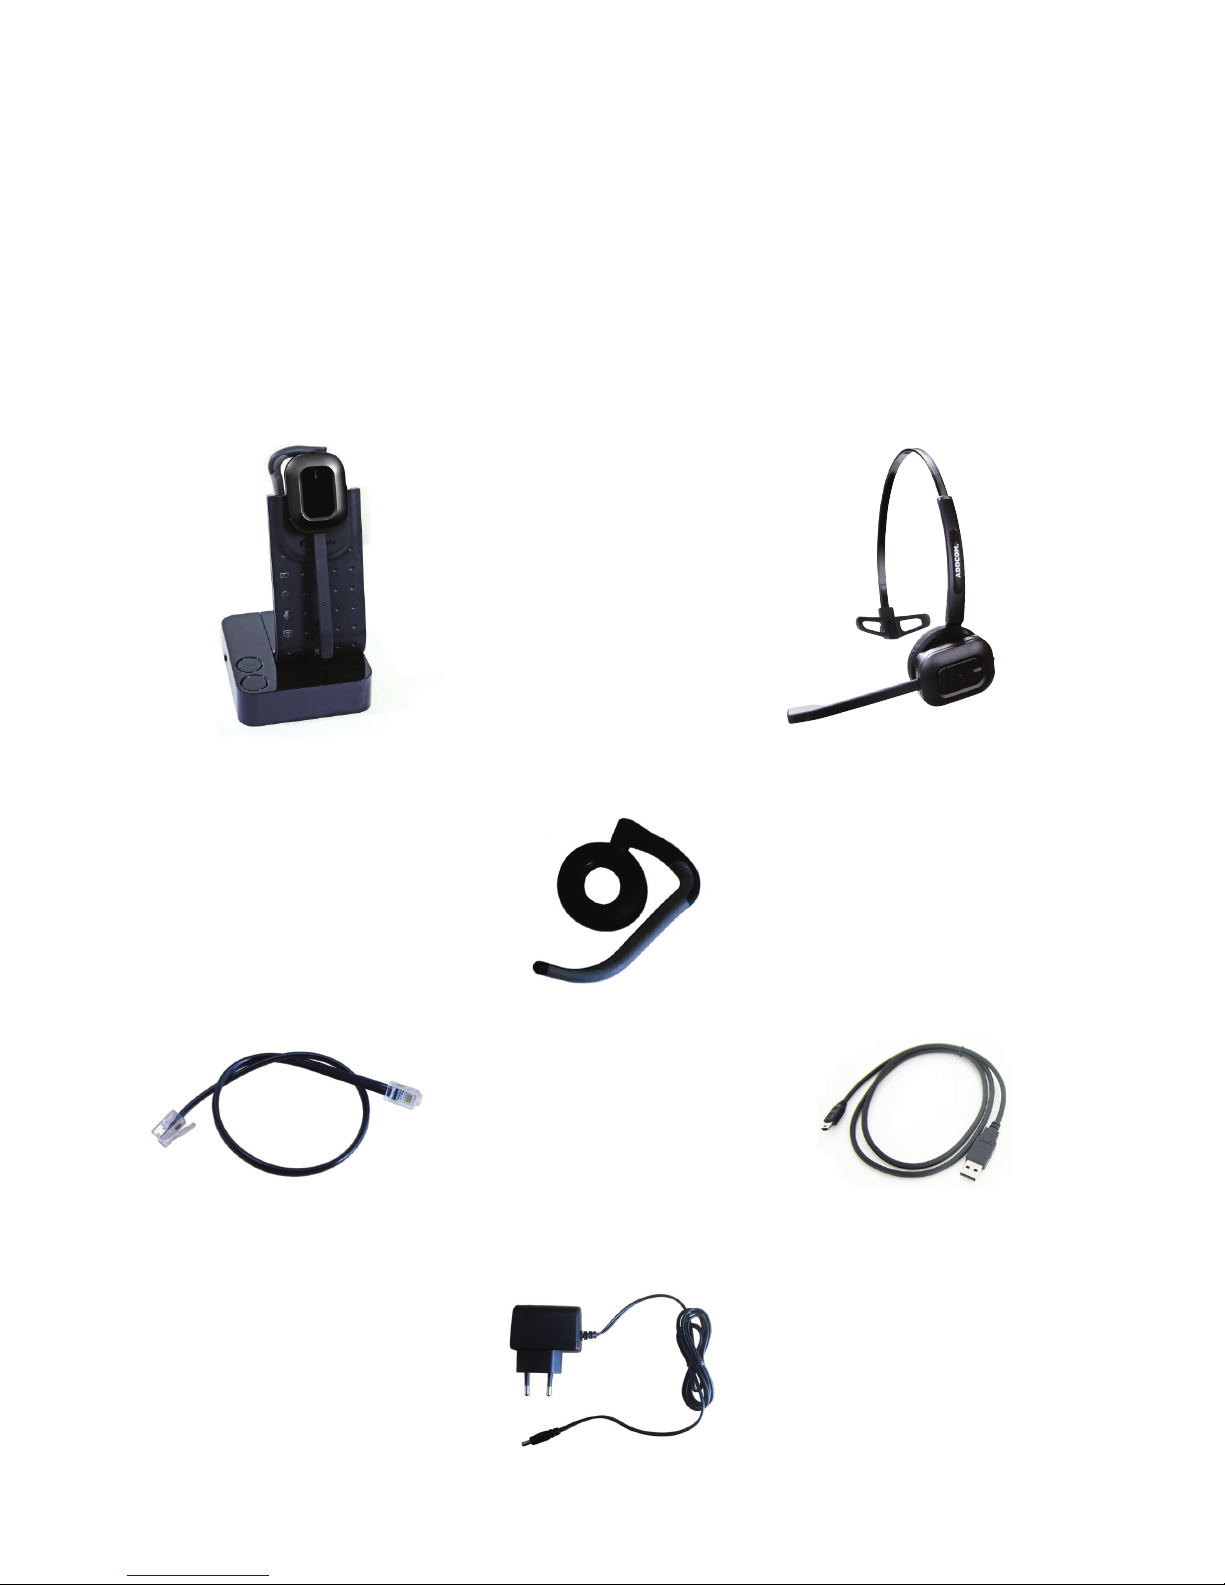
2. PACKAGE CONTENTS
Power adaptor
Connection cord
Ear hook
USB cable
Base unit & Headset
Headband

2
www.addcom.com |
3. PRODUCT OVERVIEW
3.1 Base unit with LED indicators
Base - front Base - back
Base - front with LED indicators
1 Battery indicator: Charging:Battery indicator-“blinking” 3 seconds - on, 1 second - off
Low Battery: Battery indicator “blinking” 1/2 second - on, 1/2 second - off
Fully charged: Battery indicator -“on”
2 In use indicator: Hook off: In-use indicator - “on”
3 Mute indicator: Microphone mute on: Mute indicator -“on”
4 PC/TEL indicator: Telephone connection: “off”; - PC connection: “on”
Base - back
5USB port: Connect USB cable between PC and base unit
6DC jack: Connect power adapter to DC jack
7AUX port: Connection for handset lifter (available separately)
8Telephone port: Connect telephone cord to the headset port or handset port of a
telephone/base unit
9Handset port: Plug handset cord from the telephone to handset port
1
2
3
4
567 8 9

Base - top
10 PC/TEL selection: Switch between PC and telephone
11 Microphone mute button: Press to mute microphone. Press again to release the mute
Base - underneath
12 Microphone volume: Adjust volume level up or down
Base - side
13 Compatibility switch: Select ‘1’ or ‘2’ for a dial tone is heard
3.2 Headset
14 Speaker volume up/down: Rotate wheel up or down for the best speaker volume
15 Microphone mute (press): Press down on wheel to mute microphone. Press again to
release the mute
16 In-use/on-off indicator
17 Call hook on/off: Press to pick up/end call
Base - sideBase - underneath
10
11
12
13
Down Up
Mute
14 15 16 17
Base - top

4
www.addcom.com |
4. PRODUCT DESCRIPTION
The ADD-685 Wireless DECT Headset has been designed to be compatible with both telephony and
PC with the convenience of being completely cord free.
Take advantage of its multiple connection options - take phone calls from your telephone or through
your softphone or other Internet calls with your computer’s USB connection.
Main features:
Connection Style: Desk phone and PC Softphone
Wireless technology: DECT
Compatibility: Any fixed line corded phone
Any computer
Wearing style: Ear hook
Surefit headband
DSP: Digital signalling processing (DSP)
Microphone style: Noise cancelling
Pairing: Automatic
Microphone mute: On headset
On base
Volume control: On headset - receiving
Talk time: 8 hours
Colour plates: - Black
- Red
- Pink
- Orange
- Gold
- Blue
- Green
Battery recharge: 4 hours
Standby time: 50 hours
Range: 100 metres (depending on office setup)
LED indicators: - Base Battery
- In-use
- Mute
- PC/Telephone
LED indicator: Headset In-use
Handset lifter: Compatible
Electronic Hook Switch: External port
Digital encryption: Provides secure conversations
Headset weight: 27 grams
Warranty: 2 years †
† 12 month warranty on batteries
* Will connect to Apple Mac or PC running Windows 98, Windows 2000, Windows XP, Windows Vista and
Windows 7

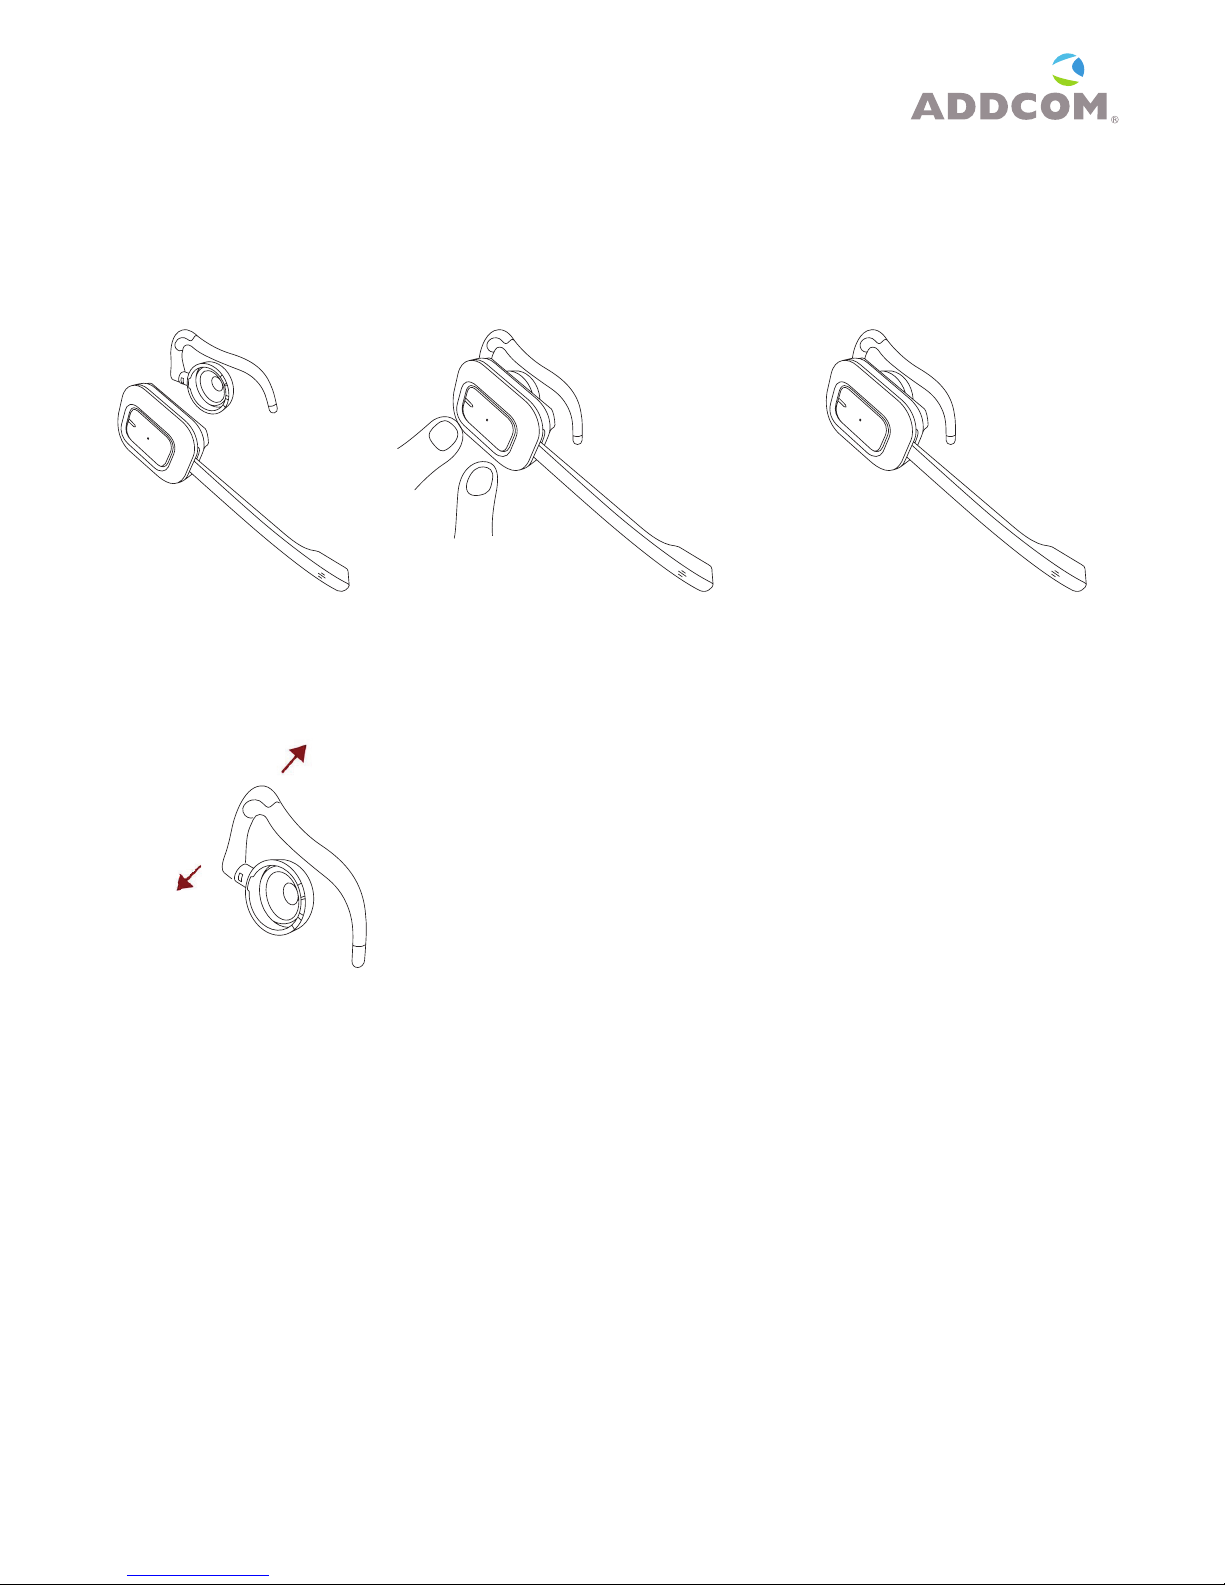
5. HOW TO WEAR THE HEADSET
Wearing styles
Your ADDCOM headset is supplied with a headband and an earhook which are interchangeable.
Adjusting microphone boom
Both the headband and earhook can be worn on the left or right ear for wearing. To maximise noise-
cancellation, please position the microphone as close to the mouth as possible.
Headband
This can be attached to the headset to allow for either left or right ear wearing and the size can be adjusted to
allow the user to find the most comfortable fit.
To attach the headband to headset, push the headset into the headband until it clicks into place.
Adjust the boom arm of your headset so that the microphone is positioned as close as possible to your mouth.
6
www.addcom.com |
Earhook
This can be attached to the headset to allow for either left or right ear wearing.
To attach the ear hook to headset, push the headset into the earhook unit until it clicks into place.
The ear hook can be moulded for optimum comfort. To switch sides, rotate the ear hook to the opposite side.
Adjust the boom arm of your headset so that the microphone is positioned as close as possible to your mouth.
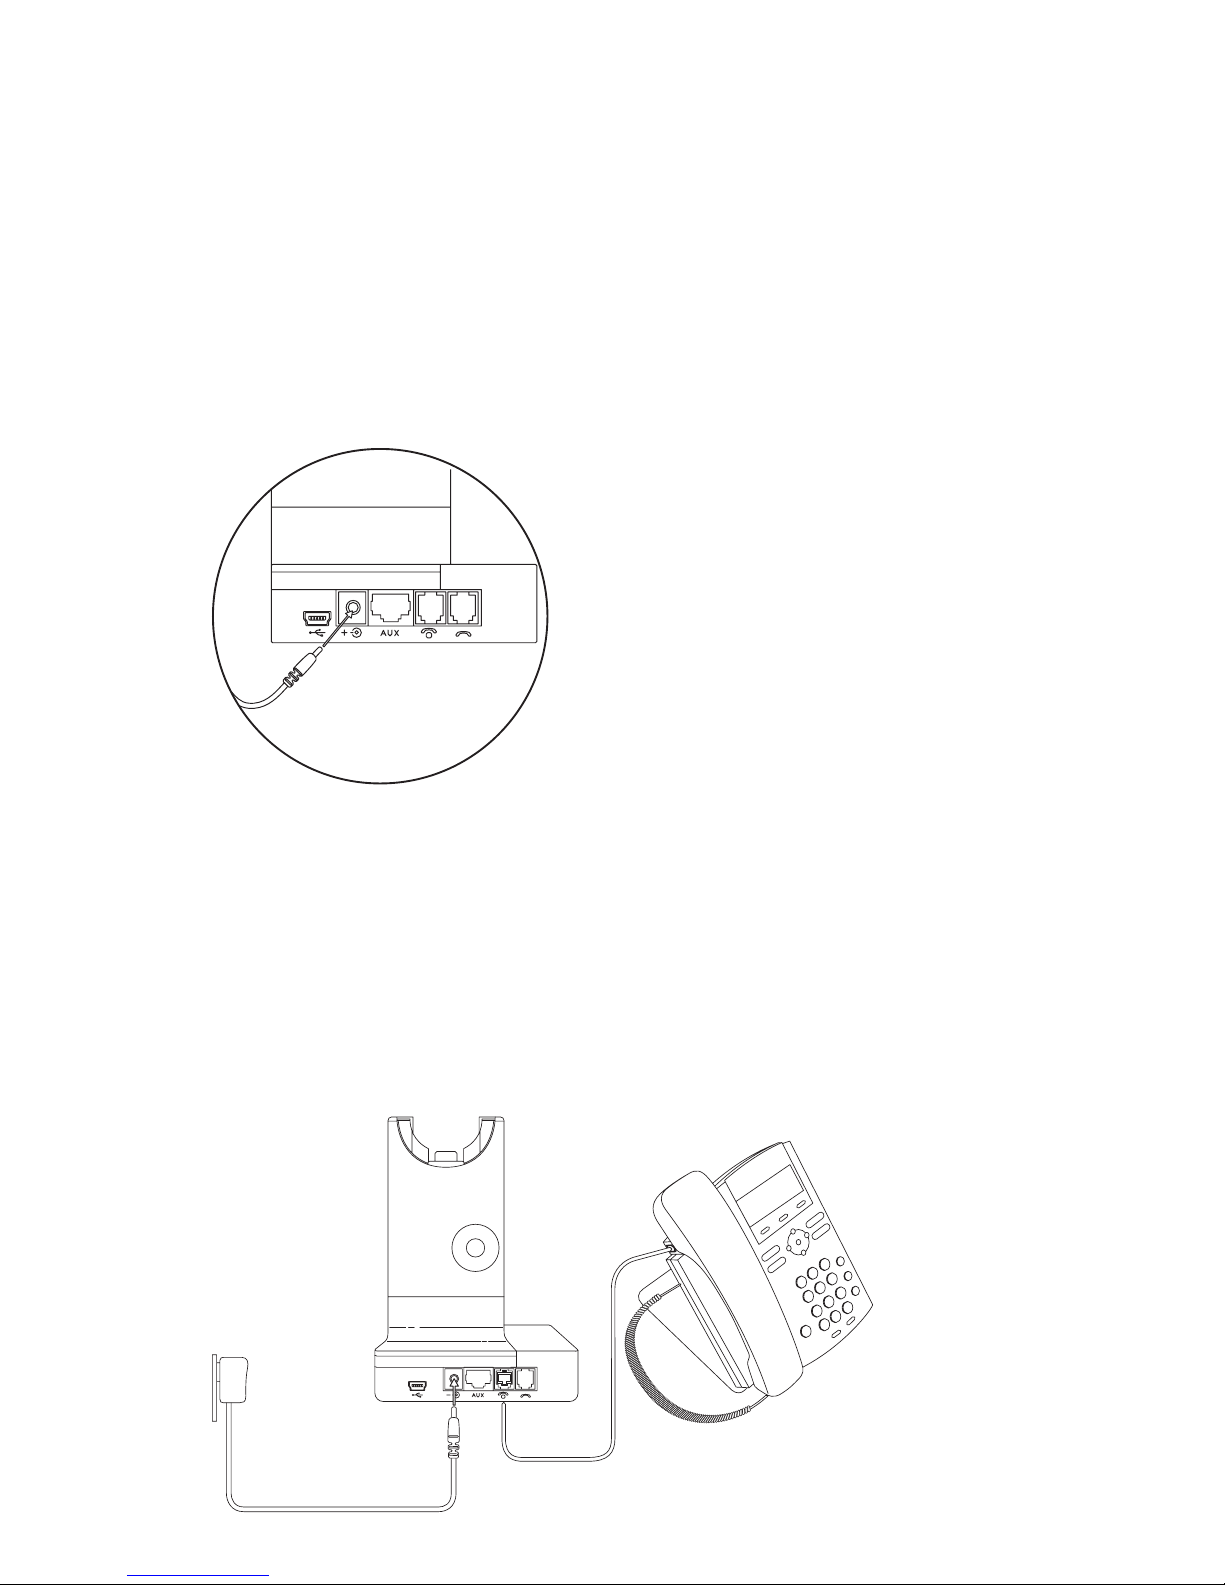
6. HOW TO CONNECT
6.1 Charging the base station
6.1.1 Connect the base station to a power supply
• Connect one end of the supplied power adapter to the DC jack (6)
• Connect the other end of the supplied power adaptor into a wall socket
• The LED light on the headset will light to indicate the headset is charging
6.2 Connect to telephone
6.2.1 Connecting to a telephone WITH a headset port
• Assemble the headset and then use the power adaptor supplied with the product to con-
nect the DC jack (6) on the back of the base unit to a power socket.
• Use the connection cord supplied with the product to connect the telephone port (8) on
headset base and the headset port on the telephone.
• You may need to adjust the compatibility switch (13) that is located on the side of the base
unit to find the correct setting for your device.
Figure 6.2.1 Connect to telephone WITH headset port
Figure 6.1.1 Connect power adaptor to DC jack
This manual suits for next models
1
Table of contents
Other ADDCOM Headset manuals


