Adhesive Dispensing 12oz User manual

12oz Size
Barrel Filler
USER GUIDE

Introduction
Thank you for purchasing the 900-120 Syringe Barrel Filling
Station. Our syringe barrel filling systems are built an pre-
assemble using high quality parts to ensure that your time is
spent where it belongs, on pro uctivity. The 900-120 is built to
accept all 12oz (360cc) cartri ges. You can use pre-fille 12oz
supplie cartri ges or empty cartri ges from us. This user
gui e will answer most of the most common questions an
help you to maximise the benefits from your new syringe barrel
filling station.
This version incorporates a precision air regulator, pressure
vessel, a justable stan an all accessories require to achieve
results. Designe for use on a work bench an as part of a
pro uction process, we keep the syringe barrel filling clean,
simple an fast. This is a simple system for setup straight out
of the box.
To achieve maximum performance from A hesive Dispensing
equipment, please rea the instructions carefully.
After completing this gui e, please o not hesitate to contact
the technical team at A hesive Dispensing Lt or contact your
authorise A hesive Dispensing Lt reseller.
Tel. 00 44 845 652 0058
Fax. 00 44 845 652 0059

Table of Contents
………………………………………………………………………………………………………………
Page
Specifications …………………………………………………………………………………………… 4
First Steps ……………………………………………………………………………………………… 5
Setup ……………………………………………………………………………………………………… 6
Reservoir Filling ………………………………………………………………………………………… 8
Component Selection Gui e ……………………………………………………………………… 10
Troubleshooting ………………………………………………………………………………………… 11
Warranty ………………………………………………………………………………………………… 12
Our Pledge
We offer you the assurance that our products will operate and perform to your
satisfaction. Our goal is to provide the highest quality products for use with your
industrial applications.
If for any reason you feel that you are not satisfied with our products, we would be
grateful if you would write or call us.
We strive to develop strong partnerships by delivering cost effective solutions that
provide savings in assembly time and raw materials. So your confidence and trust in
Adhesive Dispensing td is of the utmost importance to us.

Specifications
Capacity: 360cc, 360ml (12oz)
Initiation: Pneumatic Dispenser
Air Input: 0 to 100psi (0 to 6.9 bar)
Pressure Vessel: Anodised Aluminium
Pressure Cap: Cast Aluminium
Base Stand: Steel and Stainless Steel Rod
Weight: 1.2kg (without filled cartridge)
4
First Steps
Step 1:
Unpack the shipping box and use the supplied checklist to make sure all items are
present. If any items are missing, please contact us immediately.
Step 2:
Ensure the area where you are setting up the equipment has access to compressed
air. Air pressure should be between 0 and 100 psi (0 and 6.9 bar). We provide a high
pressure 5 micron filter/ regulator to ensure that the air supply is clean and dry. If
your material requires a higher level of filter, please contact us or source from a
specialist pneumatics supply company. Our filter/ regulator is part TSD800-6FR. A
regulated and constant air pressure must be supplied to our syringe filling station.
Step 3:
Activate your one (1) year no fault warranty by filling in and returning the postage
paid warranty card.
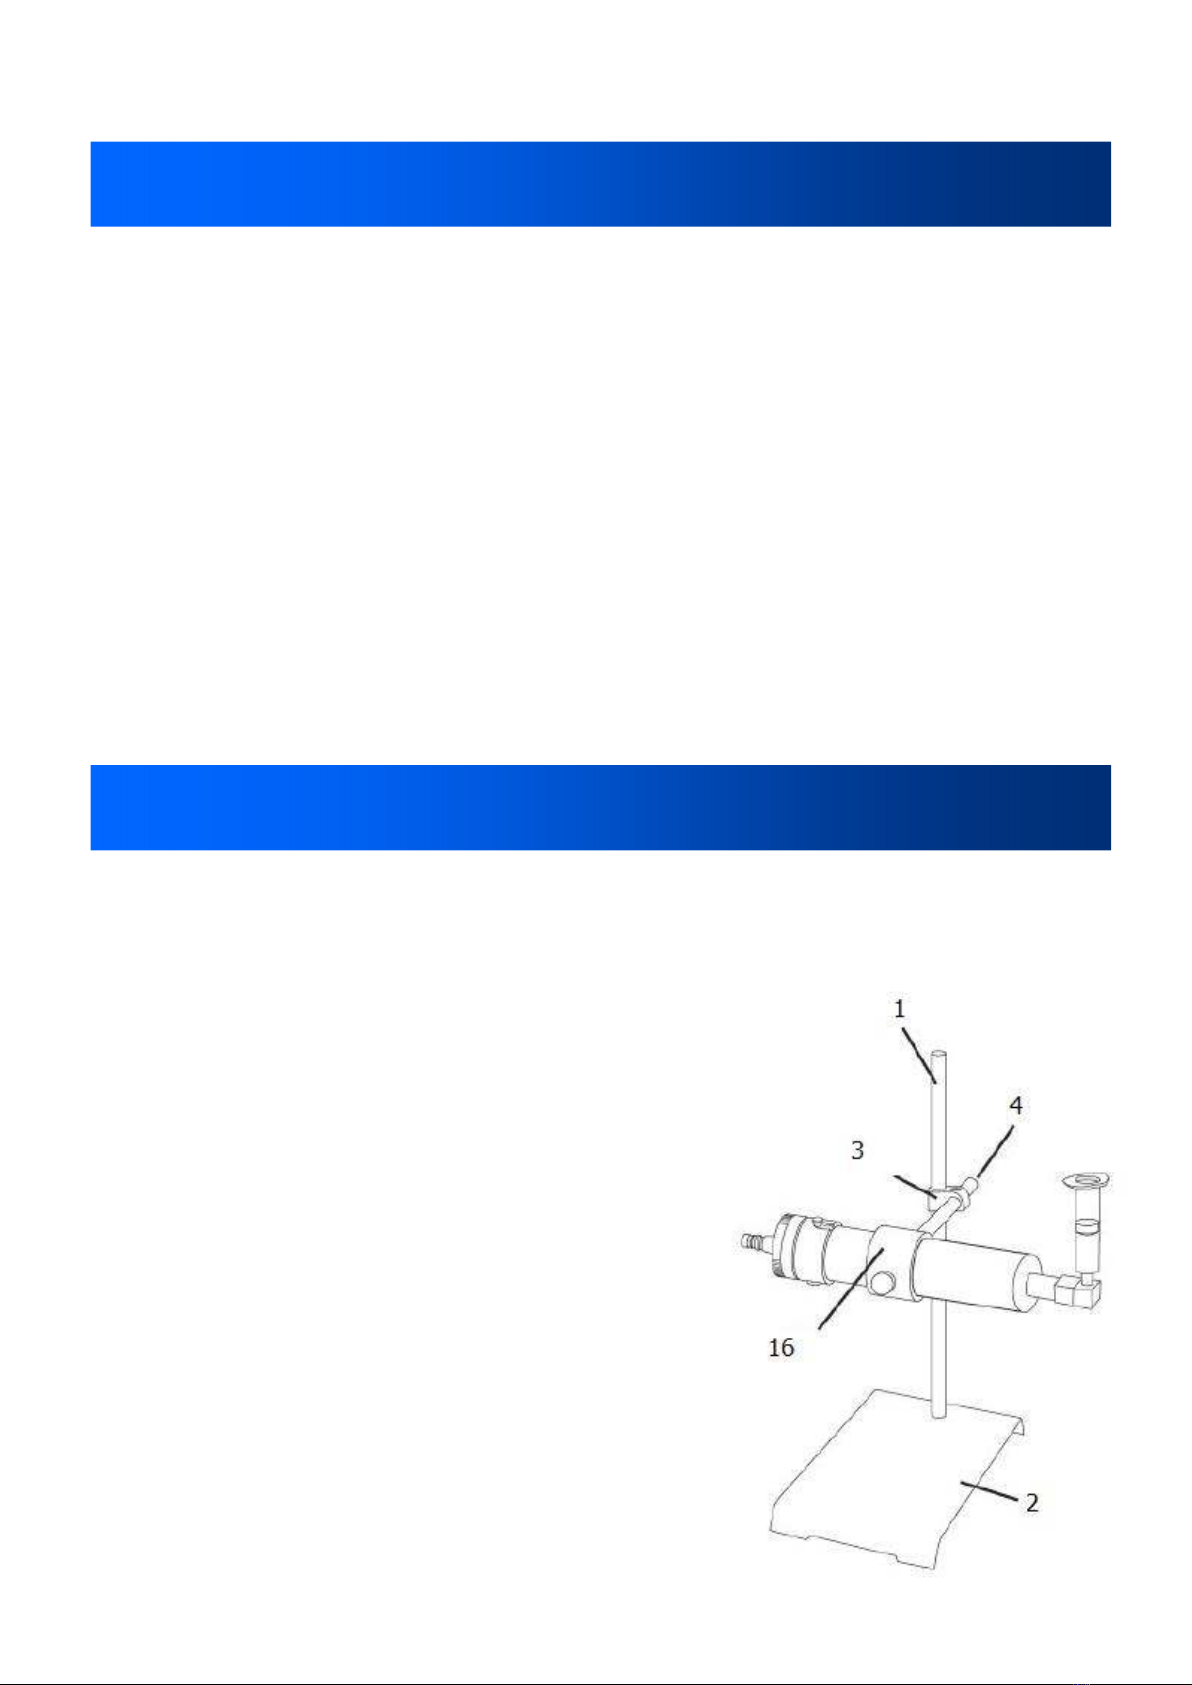
Assemble Stand:
Unpack the shipping box and use the supplied checklist to make sure all items are
present. If any items are missing, please contact us immediately.
Place the stand on a flat surface/ work bench.
Thread the pole (1) into the base (2) by using the
supplied nut. Turn clockwise and tighten.
Slide the rod clamp (3) onto the pole (1) to your
suitable height and tighten the locking nut (4).
Attach cartridge mounting bracket with rod (16) to
the rod clamp (3) and tighten. Position the arm to
hold the reservoir horizontally as pictured.
Review the setup and adjust to the suitable height
for your application.
The base stand and upright rod part number is
918-033-000 and is built specifically to handle the
weight of a filled cartridge. Please ensure all screws
are tight before inserting the filled cartridge.
Setup
5

Setup Continued
Assemble Fluid Reservoir:
ocate the reservoir pressure chamber and remove the cap (5) by turning counter
clockwise.
Insert a 12oz size cartridge reservoir that is pre-filled with your assembly fluid, in the
retainer (7) . Remove the storage cap from the large end of the cartridge.
Re-attach the reservoir chamber cap by aligning the slots in the cap with the slide
bolts (8) on the chamber pushing down and turning clockwise until tight.
Slide the assembled reservoir chamber into the reservoir holder (16). Centre the pres-
sure vessel so the weight is evenly balanced in the holder and tighten the thumb
screw (9) to secure.
Assemble 90 Degree Elbo :
Remove the end cap from the polyethylene cartridge reservoir.
ocate the cartridge adapter (10) and thread it into the polyethylene cartridge reser-
voir by turning clockwise.
ocate the 90-degree elbow (11) and thread it into the cartridge adapter by turning
clockwise. Make sure the open end of the adapter is pointed up when finished.
Assemble Air In Line:
ocate the pressure regulator (15) and air in hose (12). Connect the air pressure reg-
ulator to your air source.
Connect the opposite end of the air input hose (13) to a pneumatic dispenser such as
the TS924 footvalve, TS250 dispenser or TS350 dispenser.
Connect the opposite end of the air input line to the air pressure regulator by insert-
ing the twist lock adapter and turning clockwise. This is also a filter and will ensure
the air supply is clean and dry.
Note: Be certain your plant air is properly filtered and dry. Please use the 5 micron filter
part # TSD800-6F , to guarantee dry filtered air. A regulated and constant air pressure
must be supplied to the reservoir filler.
6

Typical Setup
This system is designed to work with a manual or timed dispenser for ON/
OFF control. Fittings are supplied to connect to most dispensers.
7

Syrin e Fillin
Pressurise the reservoir pressure chamber (15) by turning the
knob on your air dispenser pressure regulator clockwise. Adjust
to a pressure that is appropriate to the fluid you are filling.
Some common settings are as follows:
5psi for low viscosity fluids
80psi for high viscosity fluids.
Caution: Over pressurising the reservoir pressure chamber may
cause the empty syringe reservoir to fill very rapidly with the
possibility of fluid overflow. To avoid this start with a relatively
low pressure setting and test. If nothing happens increase the
pressure in small increments and repeat testing until you
optimise your fill time.
ocate an empty syringe barrel and the matching wiper piston
and insert the piston to the bottom of the barrel.
Attach the empty reservoir to the 90-degree elbow by turning
clockwise.
Press the foot pedal on your dispenser until material starts to
flow and the piston moves up the barrel toward the top. Release
the foot pedal when the piston is approx 3/4 up the syringe
barrel. Enough space needs to be left so an air adapter can be
attached without touching the piston.
Remove the filled syringe by turning anti clockwise, attach a tip
cap to the dispensing end and an end cap to the top end.
Repeat steps 1 to 7 for your next syringe barrel.
Plastic pistons work best with most materials. If the piston is
not pushed down to the bottom of the syringe, an air pocket will
appear.
All fittings and components are silicone free plastics so will not
contaminate materials being used.
Insert piston to
the bottom of
the barrel.
Twist on the
barrel to the
elbow fitting.
8

Dispense Component Selection Guide
Available in: Clear for regular
fluids; Black for visible light
cure fluids; Amber for UV
cure fluids. Each package
contains same amount of
barrels and pistons.
Size Clear UV Opaque Quanty
Amber Black Per Pack
Syringe Barrels and
Pistons
Syringe Barrel
Reservoirs Only
Available in: Clear for regular
fluids; Black for visible light
cure fluids; Amber for UV
cure fluids. Supplied in sealed
packs.
Size Clear UV Opaque Quanty
Amber Black Per Pack
Syringe Wiper Pistons
Only
Available in: White for general
purpose; Blue for improved
control over most fluids; Red
for very thick pastes. Supplied
in sealed packs.
Size White Red Blue Quanty
Per Pack
Cartridge Reservoir
Kits
Size Part
Syringe Sealing Caps
End Cap
Size Part Qty
Tip Cap
White Black Orange
9

Dispense Component Selection Guide
Cartridge Reservoir
Each cartridge system comes with an air cap and retainer
Part # Part Size A B
918-032-000 Retainer 12oz 16-3/4” 1-3/4”
918-001-004 Cap 12oz Part of above dimensions
Accessories
Each cartridge system comes with an air cap and retainer
Part # Description
TSD931-7 uer ock Adapter White 1/4” NPT
TSD931-7C uer ock Adapter Clear 1/4” NPT
TSD931-28A 90-Degree Elbow Fitting Female Clear PP
TSD931-28N 90-Degree Elbow Fitting Female White Nylon
TSD800-6FR 5 Micron Filter Regulator 0-100psi
918-000-002 Air Hose 5ft ong with Quick Connectors
534 1/4” Female Fitting Quick Connect for Cap
918-001-007 Replacement Air Cap Rubber Gasket
TSD931-28P Metal Plug Cap for Elbow Fitting
TN00DKIT Tip Kit Assortment 145 Tips
10

Troubleshootin
Problem Possible Solution
No Fluid Flo Check that air supply is properly connected.
Check air in from mains supply and air feed from
dispenser to syringe filling system.
Air pressure is too low. Gradually increase the air
pressure until fluid flows.
Air Pressure Leaking Check all connections to make sure they are
secure.
Add some Teflon tape thread to the air connection
to assist in sealing.
Fluid Leaking From Adapter Tighten all seals.
Add some Teflon tape thread to the fluid
connection threads to assist in sealing.
Fill Time Too Slo Increase air pressure.
If you require any further assistance with this product, please call us on Free Phone
0800 094 9058 or +44 (0) 845 652 0058.
Or email us at [email protected].
11

Warranty
One Year Limited Warranty
12
Table of contents
Popular Water Dispenser manuals by other brands

IBC Water
IBC Water AST0715MP-960 Installation & operating instructions

Lancaster Water Treatment
Lancaster Water Treatment X FACTOR LX15 Series Installation, operating and service manual

Elkay
Elkay EMABF8 Series Installation & use manual

Oasis
Oasis Osmosis Home installation manual

Monarch Water
Monarch Water ULTIMATE MINI AQUA HE install guide

Haier
Haier HLM-109B instruction manual


