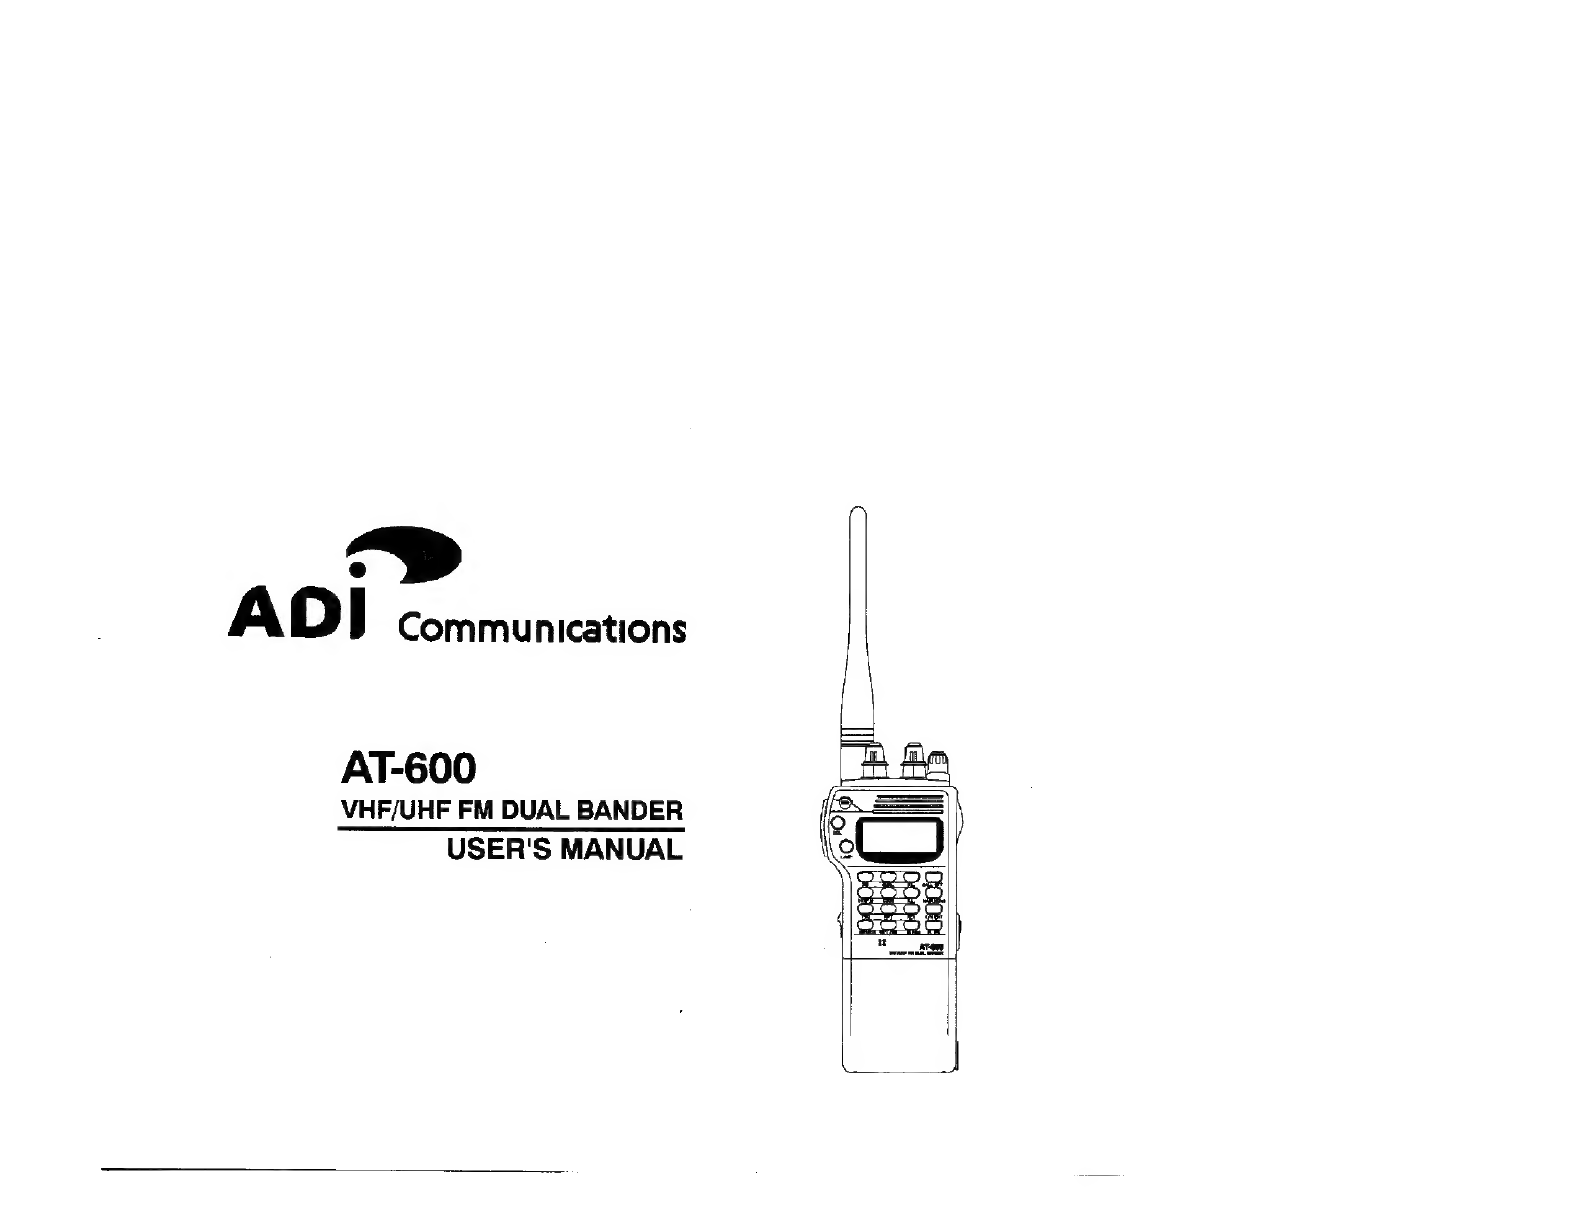
ADI AT-600 User manual
“>
ADI
Communications
AT-600
VHF/UHF
FM
DUAL
BANDER
USER'S
MANUAL
TABLE
OF
CONTENTS
re
ee
ee
1
Preparation
1-1
Features.
1-2
Accessories...
1-3
Getting
Acquainted
.....
1-4
Manual
Conventions
~----.--
en
1-5
Using
the
AT-600's
Set
Menu
1-6
A
Quick
Look
at
The
Display
2
Basic
Operations
...............
2-1
Turning
Power
On/Off
-.....
2-2
Adjusting
Volume
and
Squelch
-...
2-3
Using
SQL
OFF
.
ents
2-4
Selecting
Main
Band
«=...
2-5
Selecting
Frequency
~~.
2-6
Transmitting
2-7
Inhibiting
Transmissions
-
2-8
Selecting
Output
Power
-..-
:
2-9
Changing
Frequency
Step
~
:
2-10
Changing
pees
Step
in
100KHz,
1MHz
or
10MHz
2-11
Using
Key
Lock
--
2.00.
sibace
i
sucsteche
2-12
Using
Selector
Lock
and
Key
Lock
.-...
.
2-13
Single
Band
Operation
.
siete
ypeByccitd
2-14
Using
Display
Light
2-15
Testing
Display
Window
~~
14
15
15
1S
16
2-16
Resetting
the
AT-600
.....
3
Memory
Function
sees
3-1
Storing
Frequencies
into
Memory
ve
LF
3-2
Recalling
Memory
eee
wf
3-3
Clearing
a
Memory
--
ETS
3-4
Changing
Stored
Memories
2.
18
3-5
Protecting
MEMOPYy
os
ene
nie
IQ
3-6
Storing/Changing
Channel
ID
foreseen
[QD
3-7
Call
Channel
-
sentetin
3-8
Changing
Call
Frequeticyn
3-9
Changing
CALL
Frequency
Teraporariy
21
4
Scanning
shes
Faonanb
toner
cta
tien
ere
sD
4-1
1MHz
Sean
2
cots
thet
peak
22
4-2
Band
Scan
oe
.
sieisioscosrtbonaurcestiss
22
4-3
Program
SGa
oes
eee
eeetseiinnensennnee
22
4-4
Memory
Scan
sistent
se
ctnsceennremeenss
BY
4-5
Specific
Memory
Scan...
eee
vee
3
4-6
Memory
Block
Scan»...
24
4-7
Scan
Sika
Memory
Under
Memory
I
Block
San
eh8
2262.3"
samantha
ares
.
4-8
Tone
Squelch
Frequency
Scan
25
4-9
Selecting
Scan
Resume
Type
--
2
25
5
Dual
Watch
ste
;
cepataaie
26
5-1
Memory
MOO
Dual
Watch...
26
TABLE
OF
CONTENTS
et
ed
5-2
Any
Memory
Mxx
Dual
Watch.
-
5-3
Call
Channel
Dual
Watch
-......
5-4
Memory
Sequence
Dual
Watch
5-5
Changing
Dual
Watch
Speed
---
6
Operating
Through
Repeaters
6-1
Setting
Offest
Direction
~~~
6-2
Changing
Offset
Frequency
6-3
Reversing
Transmission
and
Reception
FREQUENCY
00.
..o-
corte
6-4
Cross-Band
Repeater
Operations
6-5
Setting
2-Second
Cross-Band
Repeater
Delay.....
iiuemisuetats
7
DTMF
Features
sseeeanee
7-1
Manually
“faneentinig
B
DTMF
Code
«eee
32
7-2
Storing
DTMF
Sequences
+
7-3
Clearing
DTIMF
Memory
7-4
Transmit
DTMF
Sequence
from
Memory
7-5
Changing
DTMF
Transmitting
Speen
.
7-6
Using
DTMF
Decode
Function
-
7-7
DTMF
Paging
~
reaesanIS
7-8
Setting
Personal
or
Group
Code..-....
7-9
Paging
from
Memory
-.
Se
7-10
Setting
Page
Squelch
--
7-11
Setting
Page
Delay
7-12
Changing
Page
Rings
7-18
Using
DTMF
Code
Squeich
8
CTCSS
Features
..
ee
8-1
Using
Tone
Encode
-
8-2
Using
Tone
Squelch
8-3
Setting
CTCSS
Tone
9
Additional
Features
.
40
9-1
Setting
AM
Reception
Mode
.
40
9-2
Setting
Auto
Power
Off
rrr
40
9-3
Setting
Reception
Attenuation(
ATT
)
9-4
Setting
Auto
AM
Mode
«>
9-5
Setting
Auto
Power
On
Function
-
9-6
Turning
Entry
eee
Tone
On/Off
9-7
Cloning
«-
9-8
Full
Duplex
Gpsiaianis
or
9-9
Setting
1KHz
Digit
Option-
9-10
Setting
Power
On
Message
~~
9-11
Battery
Save.
9-12
Selecting
Internal/External
Speaker.
9-13
Setting
Time-Out
Timer
(
T.O.T
)
9-14
Battery
Voltage
Reading
-
9-15
1750Hz
Tone
Burst
--
10
Specifications
—-

PREPARATION
1
Preparation
Precautions:
1.
To
prevent
permanent
power
loss,
do
not
charge
the
battery
pack
in
an
area
where
the
temperature
is
below about
5°C
(40°F).
2.
If
you
install
an
outdoor
antenna,
please
follow
all
cautions
and
warnings
that
come
with
the
antenna.
3.
Do
not
transmit
with
high
output
power
for
too
long
periods.
The
transceiver
maybe
overheat.
4.
The
supply
voltage
must
be
between
5.5V
and
16.0V
to
avoid
damaging
the
transceiver.
5.
Never
charge
the
battery
pack
with
a
charger
other
than
the
one
supplied
to
avoid
permanently
damaging
the
battery
pack.
6.
Rechargeable
NiCd
battery
can
be
a
hazard
to
the
environment.
It
must
be
recycled
or
disposed
of
safely
at
the
end
of
the
battery's
useful
life.
7.
Do
not
place
the
transceiver
near
the
heating
appliances
or
expose
it
to
long
periods
of
direct
sunlight.
8.
Do
not
place
the
transceiver
in
excessively
humid
or
dusty
areas.
9.
Do
not
disassemble
the
transceiver
and
modify
it.
Changes
or
modifications
to
this
equipment
not
expressly
approved
by
ADI
could
void
the
user's
authorization
to
operate
this
equipment.
This
equipment
complies
with
part
15
of
the
FCC
rules.
Operation
is
subject
to
the
following
two
conditions:
(1)
This
equipment
may
not
cause
harmful
interference,
and
(2)
this
equipment
must
accept
any
interference
received,
including
interference
that
may
cause
undesired
operation.
a
1-1
Features
The
AT-600
has
the
following
great
features:
@
Dual
Band
Operation—Capable
of
simultaneous
transmit
and
receive
on
both
2-meter
VHF
and
70-cm
UHF
bands
and
receives
in
the
ranges
130.0-172.0MHz,
350.0-
399.995MHz,
400.0-470.0MHz,
and
900.0-985.0MHz.
@
Low
battery
alert
To
alert
the
AT-600's
user
to
recharge
the
battery
pack
when
battery
icon
appears
on
the
display.
If
the
user
continues
to
use
the
battery
after
some
time,
the
AT-600
will
automatically
shut
down
80
seconds
after
flashing
"Battery
Low"
appears.
@
Large
backlit
dot
matrix
LCD
with
illuminated
keypad
—All
operating
information
for
both
VHF
and
UHF
bands
are
clearly
displayed,
and
allows
you
to
turn
on
the
lamp
so
you
can
see
the
display
and
use
the
keypad
anywhere.
120/200
non-volatile
memory
channels—Built-in
memory
allows
you
to
store
up
to
60/100
channels
with
frequency
in
both
VHF
and
UHF
bands.
When
you
select
"Memory
SET
120"
in
the
Set
Menu
mode,
memories
can
be
tagged
with
a
6-character
ID
name,
which
can
be
displayed
instead
of
the
frequency.
Under
the
circumstances,
memory
capacity
is
reduced
to
110
with
55
memories
per
band.
®
Switchable
FM
and
AM
reception—
Allows
you
to
switch
between
FM
and
AM
reception
on
the
VHF
band
so
you
can
clearly
hear
both
amateur
and
aircraft
transmissions.
©
Power
on
message
display—
Allows
you
to
set
a
6-character
power
on
message
that
appears
each
time
you
turn
on
your
AT-600.
@
New
Set
Menu
design—
Allows
you
to
access
a
menu
system
with
full
alphanumeric
display
of
functions
and
settings.
You
can
browse
through
a
summary
of
current
operational
status.
®Clone
function—
Both
wireless
cloning
and
wire
cloning
allows
you
to
copy
all
settings
and
memory
contents
from
one
AT-600
to
the
other
AT-600s.
@
DTMF
message
paging
and
decading-
Allows
you
to
store
up
to
10-memory,
15-digit
DTMF
autodialer
for
autopatch
operation
and
decode
DTMF
sequences
up
to
15
digits.
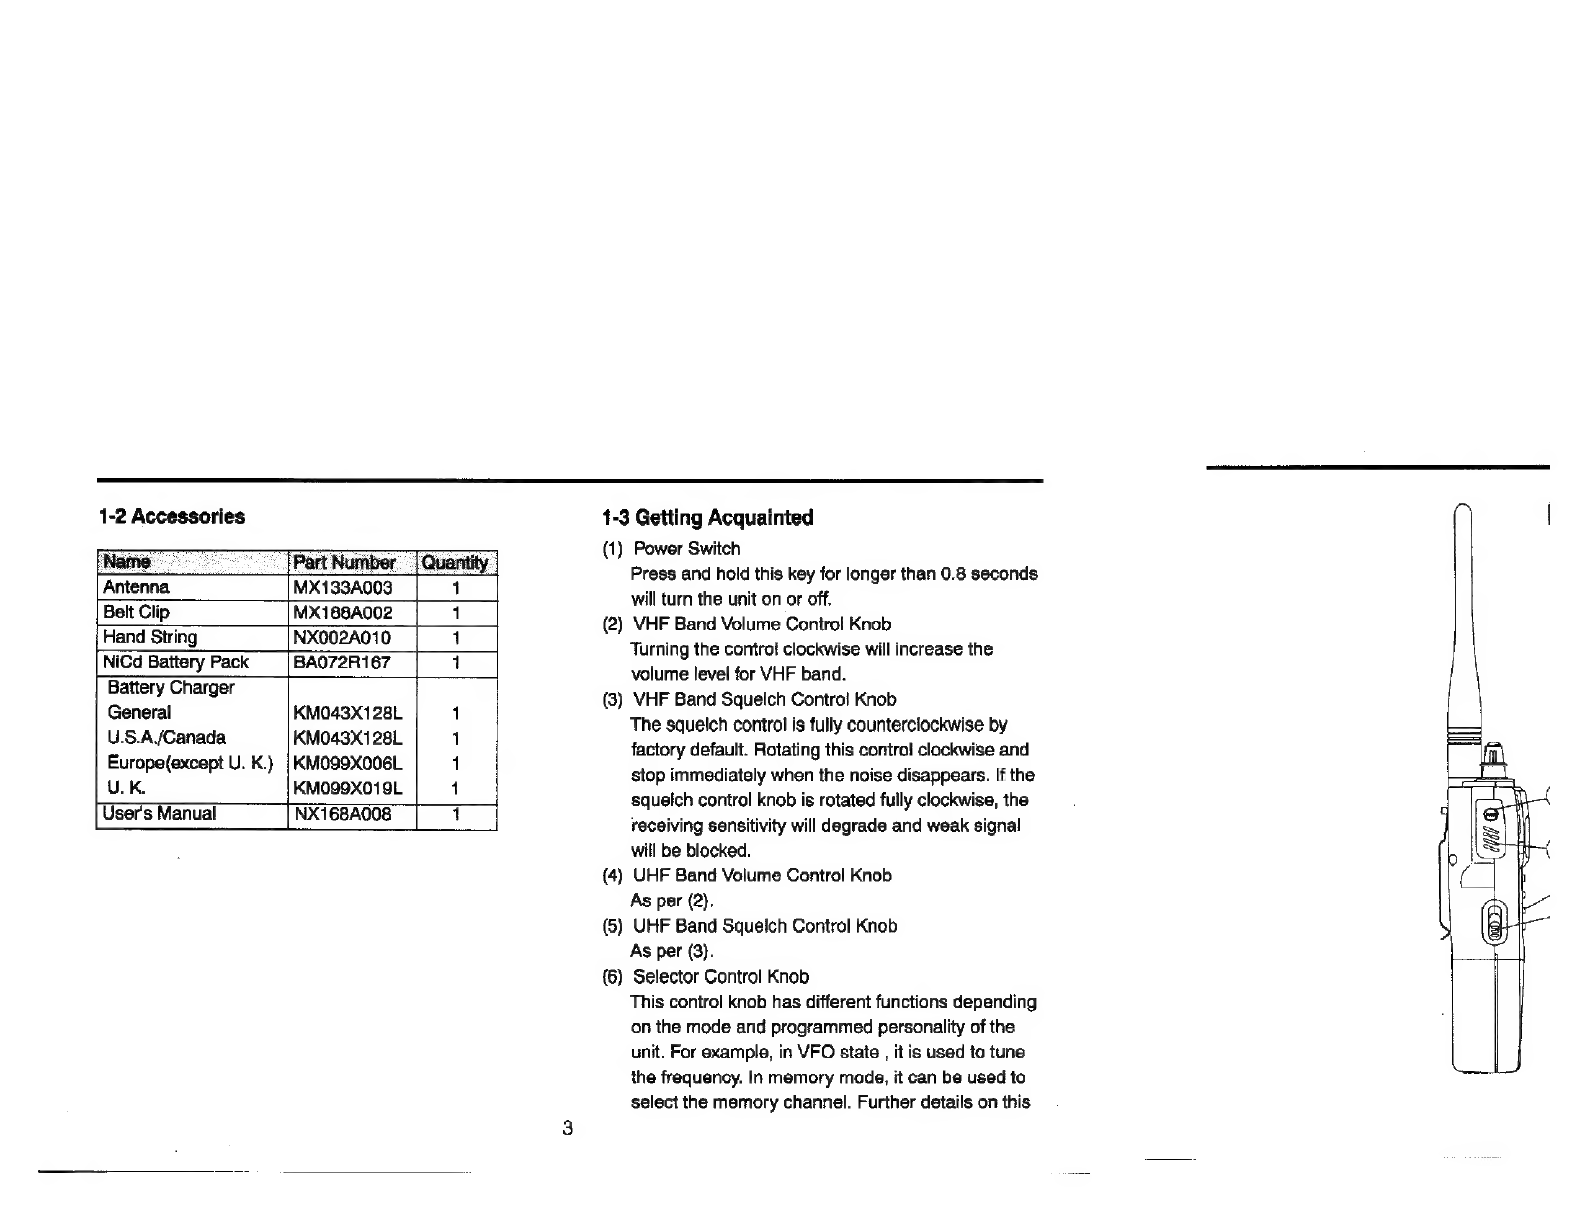
1-2
Accessories
7
[Part
Nur
Antenna
1
Belt
Clip
MX188A002
i
Hand
String
NX002A010
1
NiCd
Battery
Pack
BA072R167
1
Battery
Charger
General
KM043X128L
1
U.S.A/Canada
KM043X128L
1
Europe(except
U.
K.)
|
KMO99X006L
1
U.K.
KMO099X019L
1
i
1-3
Getting
Acquainted
(1)
Power
Switch
Press
and
hold
this
key
for
longer
than
0.8
seconds
will
turn
the
unit
on
or
off.
(2)
VHF
Band
Volume
Control
Knob
Turning
the
contro!
clockwise
will
increase
the
volume
level
for
VHF
band.
(3)
VHF
Band
Squelch
Control
Knob
The
squelch
control
is
fully
counterclockwise
by
factory
default.
Rotating
this
contro!
clockwise
and
stop
immediately
when
the
noise
disappears.
If
the
squelch
control
knob
is
rotated
fully
clockwise,
the
receiving
sensitivity
will
degrade
and
weak
signal
will
be
blocked.
(4)
UHF
Band
Volume
Control
Knob
As
per
(2).
(5)
UHF
Band
Squeich
Control
Knob
As
per
(3).
(6)
Selector
Control
Knob
This
control
knob
has
different
functions
depending
on
the
mode
and
programmed
personality
of
the
unit.
For
example,
in
VFO
state
,
it
is
used
to
tune
the
frequency.
In
memory
mode,
it
can
be
used
to
select
the
memory
channel.
Further
details
on
this

PHYSICAL
LAYOUT
rr
S
control
are
given
in
the
relevant
sections
of
this
manual.
(7)
Lamp
Press
the
[LAMP]
key
will
turn
on
the
display
lamp
for
5
seconds.
During
5
seconds,
press
[LAMP]
again
will
switch
the
display
lamp
off.
Used
in
conjunction
with
the
[FUNC]
key
to
turn
the
display
lamp
on/off
steadily.
(8)
SQL
OFF
Press
the
[SQL
OFF]
key
will
turn
off
the
squelch
and
the
hissing
noise
will
be
heard
if
no
signal
comes
in
air.
(9)
Microphone
(10)
Battery
Release
To
remove
the
battery
pack,
push
this
clip
up
towards
the
top
of
the
unit
and
then
slide
the
battery
pack
towards
the
left
of
the
unit.
To
replace
the
battery
pack,
slide
the
battery
pack
along
the
battery
rail
until
a
click
is
heard.
(11)
External
DC
Jack
A
DC
power
cord
with
appropriate
polarity
and
voltage
rating(<16V)
can
be
used
to
operate
your
unit.
(12)
Push
To
Talk(
PTT
}
To
transmit,
press
this
switch
while
halding
the
AT-600
about
Sem
to
7em
from
your
mouth
with
the
microphone
facing
you.
Speak
in
a
clear
voice
at
normal
speech
level.
The
LED(14),
should
glow
red
while
transmitting.
(13)
Function
Switch(
FUNC
)
Used
in
conjunction
with
1,
6,
7,
9
above.
(14)
LED
Light
red
during
transmission
and
light
green
during
reception.
Off
when
no
signal
comes
in
air.
(15)
External
Speaker/Microphone
Jack
Provide
the
AT-600's
user
with
using
an
external
speaker
and
microphone.
If
an
external
speaker
is
used,
the
audio
from
the
VHF
band
and
the
UHF
band
can
be
split
between
the
internal
and
external
speaker.
(16)
Antenna
Port(
BNC
type
)
The
antenna
supplied
with
your
AT-600
is
properly
tuned
to
the
UHF/VHF
amateur
band
frequencies
and
is
attached
to
the
AT-600
via
a
BNC
connector.
The
AT-600
should
never
be
operated
without
the
correct
antenna
fitted.

(17)
Battery
Charge
Input
Jack.
(18).
Alphanumeric
Keypad
The
16-key
alphanumeric
keypad
is
used
for
various
functions,
depending
on
the
mode
of
operation.
The
details
is
as
follows:
[ACALL
SFT]
Recall
the
Cail
store
to:
“Press
[KEY]
during:
"|
Press
[FUNG
bed
:
+DTMF
memory
|
fo:
Transmit
DTIMF
Enter
DTMF
"A"
Entert
text
ID
or
frequency
|
power
on
message
"A"
[B
MAIN
MONO
]
Select
the
main
Enter
DTMF
"B"
Turn
off
the
Transmit
DTMF
band
sub-band
"B"
[C
V/M
ENT]
Toggle
VFO
and
Enter
DTMF
"C"
Enter
a
setting
Transmit
DTMF
memory
modes
‘c"
[D
CLPS]
Clear
an
entry
Enter
DTMF
"D"
Start
scanning
en
DTMF
[1
PO]
Enter
a
digit
ina
Enter
DTMF
"1"
Change
the
power
Transmit
DTMF
frequency
of
transmission
ate
[2
DUAL
]
Enter
a
digit
ina
Enter
DTMF
"2"
Start
the
dual
Transmit
DTMF
frequency
watch
"2"
[SPL]
Enter
a
digit
ina
Enter
DTMF
"3"
Lock
the
[
PTT
]
Transmit
DTMF
frequenc'
function
“3°
[4
DTMF
Mj
Enter
a
digit
ina
Enter
DTMF
"4"
Access
the
DTMF
Transmit
DTMF
frequency
memory
"4"
[5
CODE]
Enter
a
digit
ina
Enter
DTMF
"5"
Access
the
paging
Transmit
DTMF
frequenc’
code
memory
hk
Enter
a
digit
ina
Enter
DTMF
“6"
Lock
the
keypad
Transmit
DTMF
frequency
76°

[7
TSQ]
Enter
a
digit
ina
Enter
DTMF
"7"
Set
the
tone
Transmit
DTMF
frequenc'
squelch
feature
“w
[8
RPT]
Enter
a
digit
ina
Enter
DTMF
"8"
Set
the
offset
Transmit
DTMF
frequency
direction
"er
[9
REV]
Enter
a
digit
ina
Enter
DTMF
"9"
Reverse
the
offset
Transmit
DTMF
frequency
"9"
[0
SET/SB
]
Enter
a
digit
ina
Enter
DTMF
"0"
Enter
the
Set
Menu
|
Transmit
DTMF
frequency
mode.
If
scanning,
“o"
change
the
scan
resume
option.
[*
MS
MS.M
]
Start
memory
Enter
DTMF
"="
Toggle
the
specific
Transmit
DTMF
scan
memory
scan
for
un
memories
[#1D
PAG]
In
memory
mode,
Enter
DTMF
"4"
Set
the
DTMF
page
|
Transmit
DTMF
toggle
the
ID
and
the
mode
or
the
DTMF
“e"
frequency
code
squelch
made
|
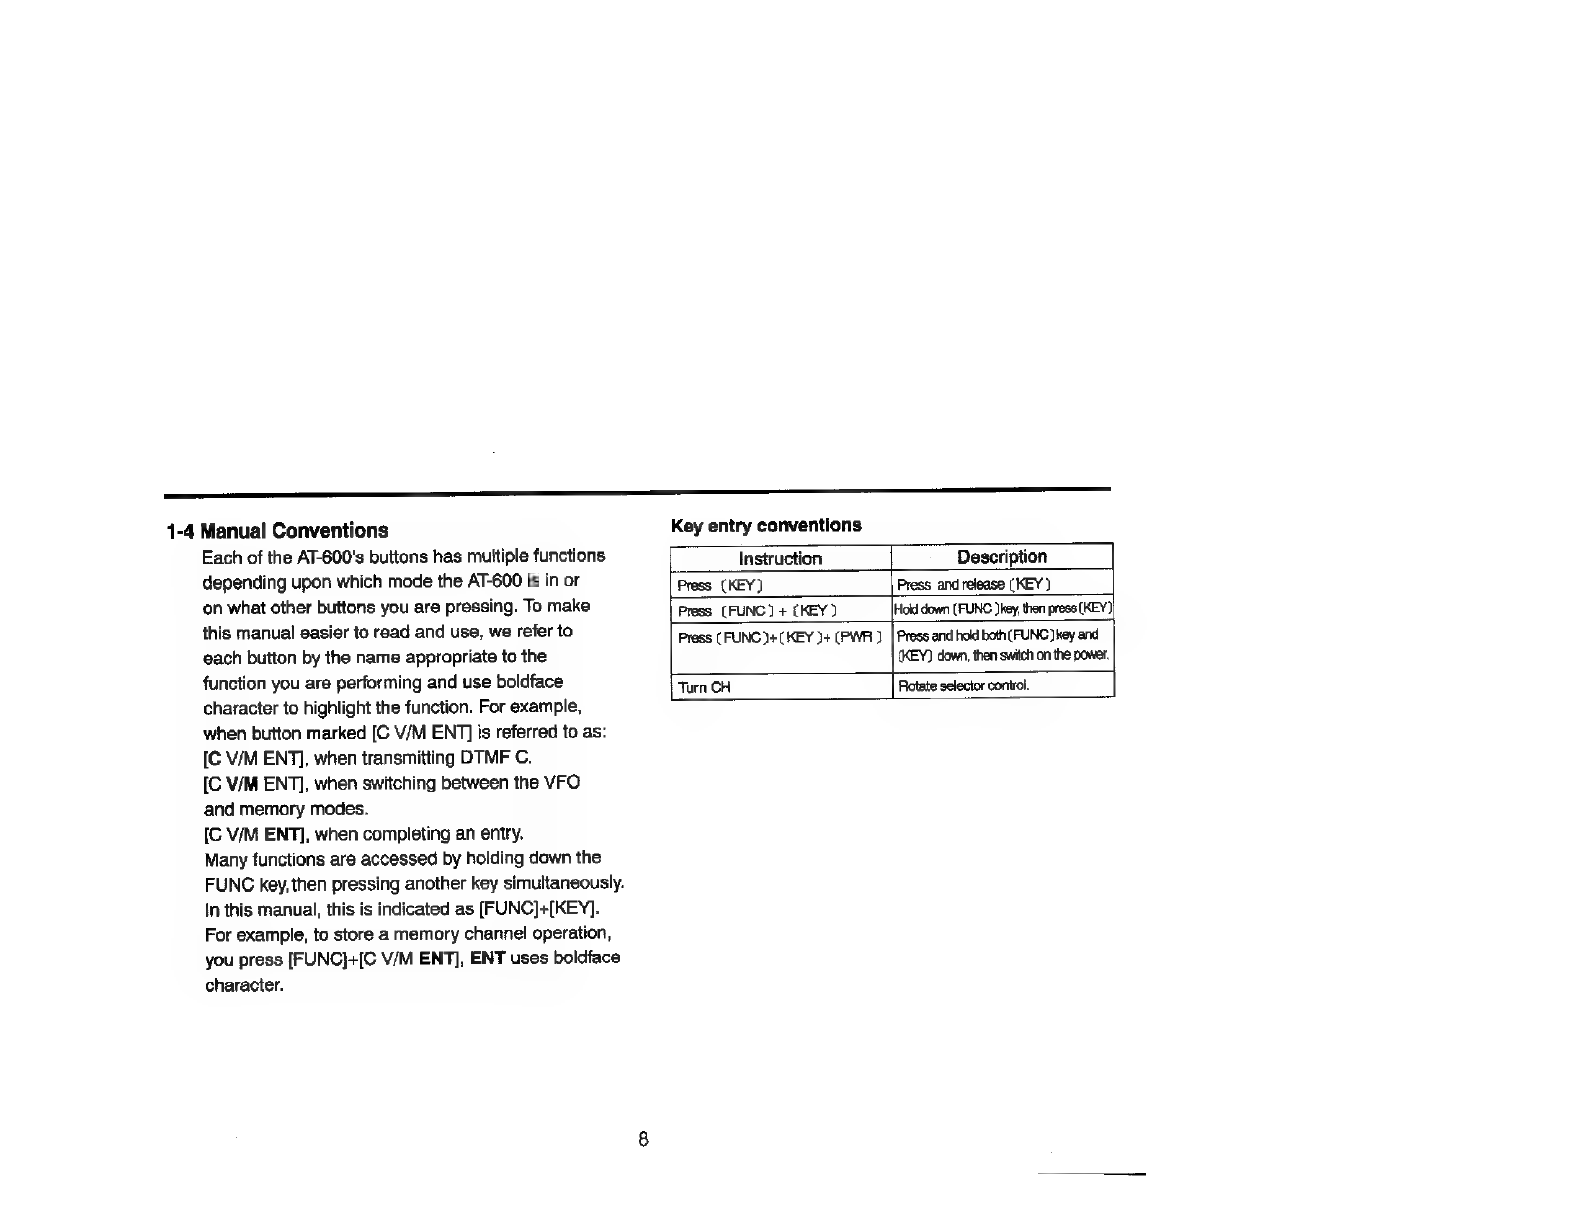
1-4
Manual
Conventions
Key
entry
conventions
Each
of
the
AT-600's
buttons
has
multiple
functions
Instruction
Description
|
depending
upon
which
mode
the
AT-600
is
in
or
Press
(KEY)
___
[Press
and
release
(KEY)
on
what
other
buttons
you
are
pressing.
To
make
Press
(FUNC)
+
(KEY)
Hold
down
(FUNC
key, then
press
(KEY)
this
manual
easier
to
read
and
use,
we
refer
to
press
[FUNG
)}+
(KEY
)+
(PWR
)
|
Press
and
hold
both
(FUNC)
key
and
each
button
by
the
name
appropriate
to
the
(KEY)
down,
then
switch
on
the
power.
function
you
are
performing
and
use
boldface
Turn
CH
Rotate
selector
control.
character
to
highlight
the
function.
For
example,
when
button
marked
[C
V/M
ENT]
is
referred
to
as:
[C
V/M
ENT],
when
transmitting
DTMF
C.
[C
V/M
ENT],
when
switching
between
the
VFO
and
memory
modes.
[C
V/M
ENT],
when
completing
an
entry.
Many
functions
are
accessed
by
holding
down
the
FUNG
key,
then
pressing
another
key
simultaneously.
In
this
manual,
this
is
indicated
as
[FUNC]+[KEY].
For
example,
to
store
a
memory
channel
operation,
you
press
[FUNC}+[C
V/M
ENT],
ENT
uses
boldface
character.
1-5
Using
the
AT-600's
Set
Menu
Many
of
the
functions
in
the
AT-600
are
configured
or
programmed
by
means
of
a
set
menu
system.
This
system
makes
it
possible
to
reduce
the
keys
and
controls
without
eliminating
any
important
features.
There
are
29
different
set
menus
or
more
which
you
can
choose.
To
enter
the
set
menu
mode,
just
press
[FUNC]
+
[0
SET/SB].Once
you
enter
the
set
menu
mode,
you
can
turn
CH
(Selector
Control)
to
select
one
of
the
menus
you'd
like
to
change.
The
configuration
structure
is
designed
in
alphabetic
order
to
help
user
quickly
find
the
desired
menu.
Each
time
you
want
to
set
the
status
of
one
menu,
just
press
[FUNC]
switch
and
then
turn
CH
to
choose
different
selections
available.
You
can
also
press
[#
ID
PAG]
or
[0
SET/SB]
key
to
set
the
status
of
one
menu
in
the
set
menu
mode.
To
stored
the
selected
value
and
exit
the
set
menu
mode,
press
[FUNC]
+
[0
SET/SB]
again
or
just
press
[D
CL
PS]
key.
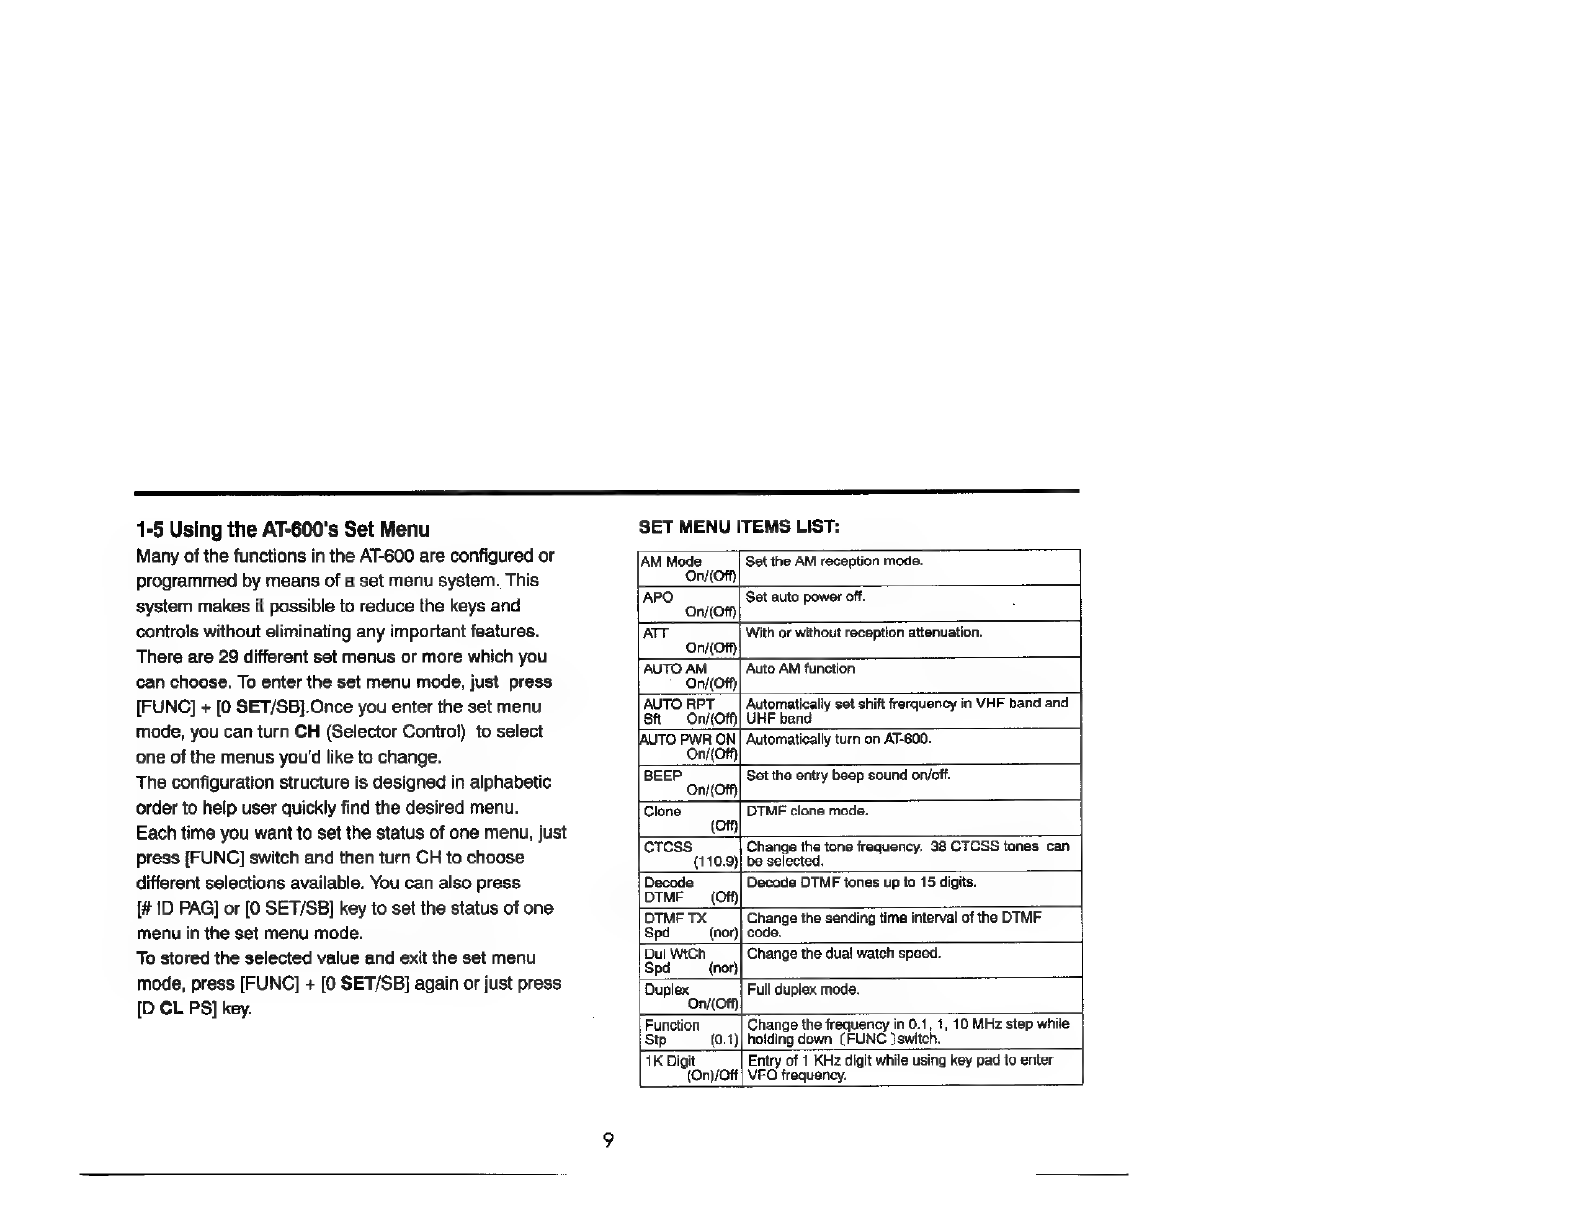
SET
MENU
ITEMS
LIST:
AM
Mode
On/(OFf)
APO
On/(Off)
ATT
On/Off)
AUTO
AM
Oni(Offy
Set
the
AM
reception
mode.
Set
auto
power
off.
With
or
without
reception
attenuation.
Auto
AM
function
AUTO
RPT
AUTO
PWR
ON
OnKOFh)
BEEP
OnKOFf)
Automatically
set
shift
frerquency
in
VHF
band
and
St
On/Otf)|
UHF
band
Automatically
turn
on
AT-600.
Set
the
entry
beep
sound
on/off.
Clone
DTMF
clone
mode.
S
(110.9)}
be
selected,
Decode
DTMF
(Off)
DTMF
TX
Spd
(nor)}
code.
Change
the
tone
frequency.
38
CTCSS
tones
can
Decode
DTMF
tones
up
ta
15
digits.
Change
the
sending
time
interval
of
the
DTMF
Dul
WtCh
Duplex
Oni(Off)
Function
Stp
(0.1)
Spd
(nor)
Change
the
dual
watch
speed.
Full
duplex
mode,
Change
the
frequency
in
0.1,
1,
10
MHz
step
while
hoiding
down
(FUNC
}switch.
1K
Digit
(On)/Ott
Entry
of
1
KHz
digit
while
using
key
pad
to
enter
VFO
frequency.
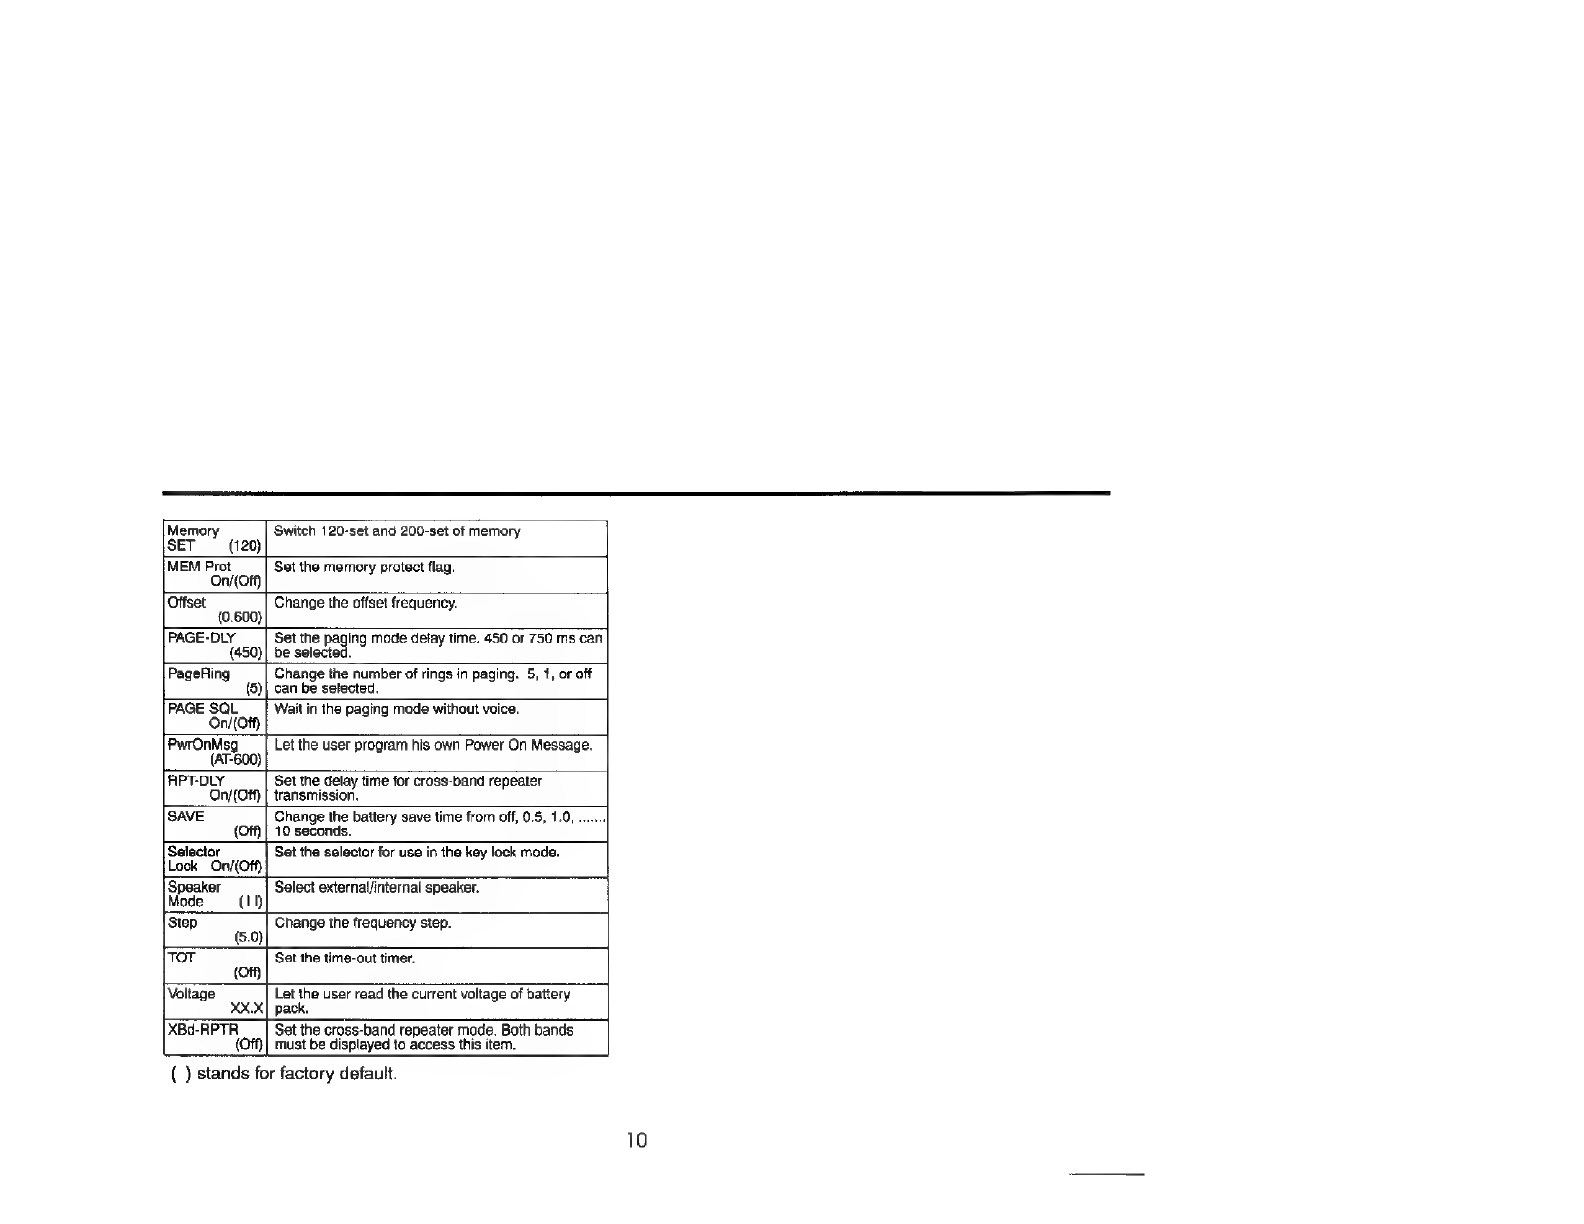
Memory
SET
(120)
Switch
120-set
and
200-set
of
memory
MEM
Prot
OniOff)
Set
the
memory
protect
flag.
Offset
(0.600)
Change
the
offset
frequency.
PAGE-DLY
(451
Set
the
paging
mode
detay
time.
450
or
750
ms
can
)
|
be
selecte
PageRing
Change
the
number
of
rings
in
paging.
5,
1,
or
off
(5)|
can
be
selected.
PAGE
SQL
Wait
in
the
paging
mode
without
voice.
Oni(Offy
PwrOnMsg
Let
the
user
program
his
own
Power
On
Message.
(AT-600)
RPT-DLY
Set
the
delay
time
for
cross-band
repeater
On/(Off)
|
transmission.
SAVE
Change
the
battery
save
time
from
off,
0.5,
1.0,
.......
(Off}
|
10
seconds.
Selector
Set
the
selector
for
use
in
the
key
lock
mode.
Lock
On/(Off)
4
Speaker
Select
external/internal
speaker.
Made
(11)
Step
Change
the
frequency
step.
(5.0)
TOT
Set
the
time-out
timer.
(Off)
Valtage
Let
the
user
read
the
current
valtage
of
battery
|
pack.
XBd-RPTR
Set
the
cross-band
repeater
mode.
Both
bands
must
be
displayed
to
access
this
item.
()
stands
for
factory
default.
10
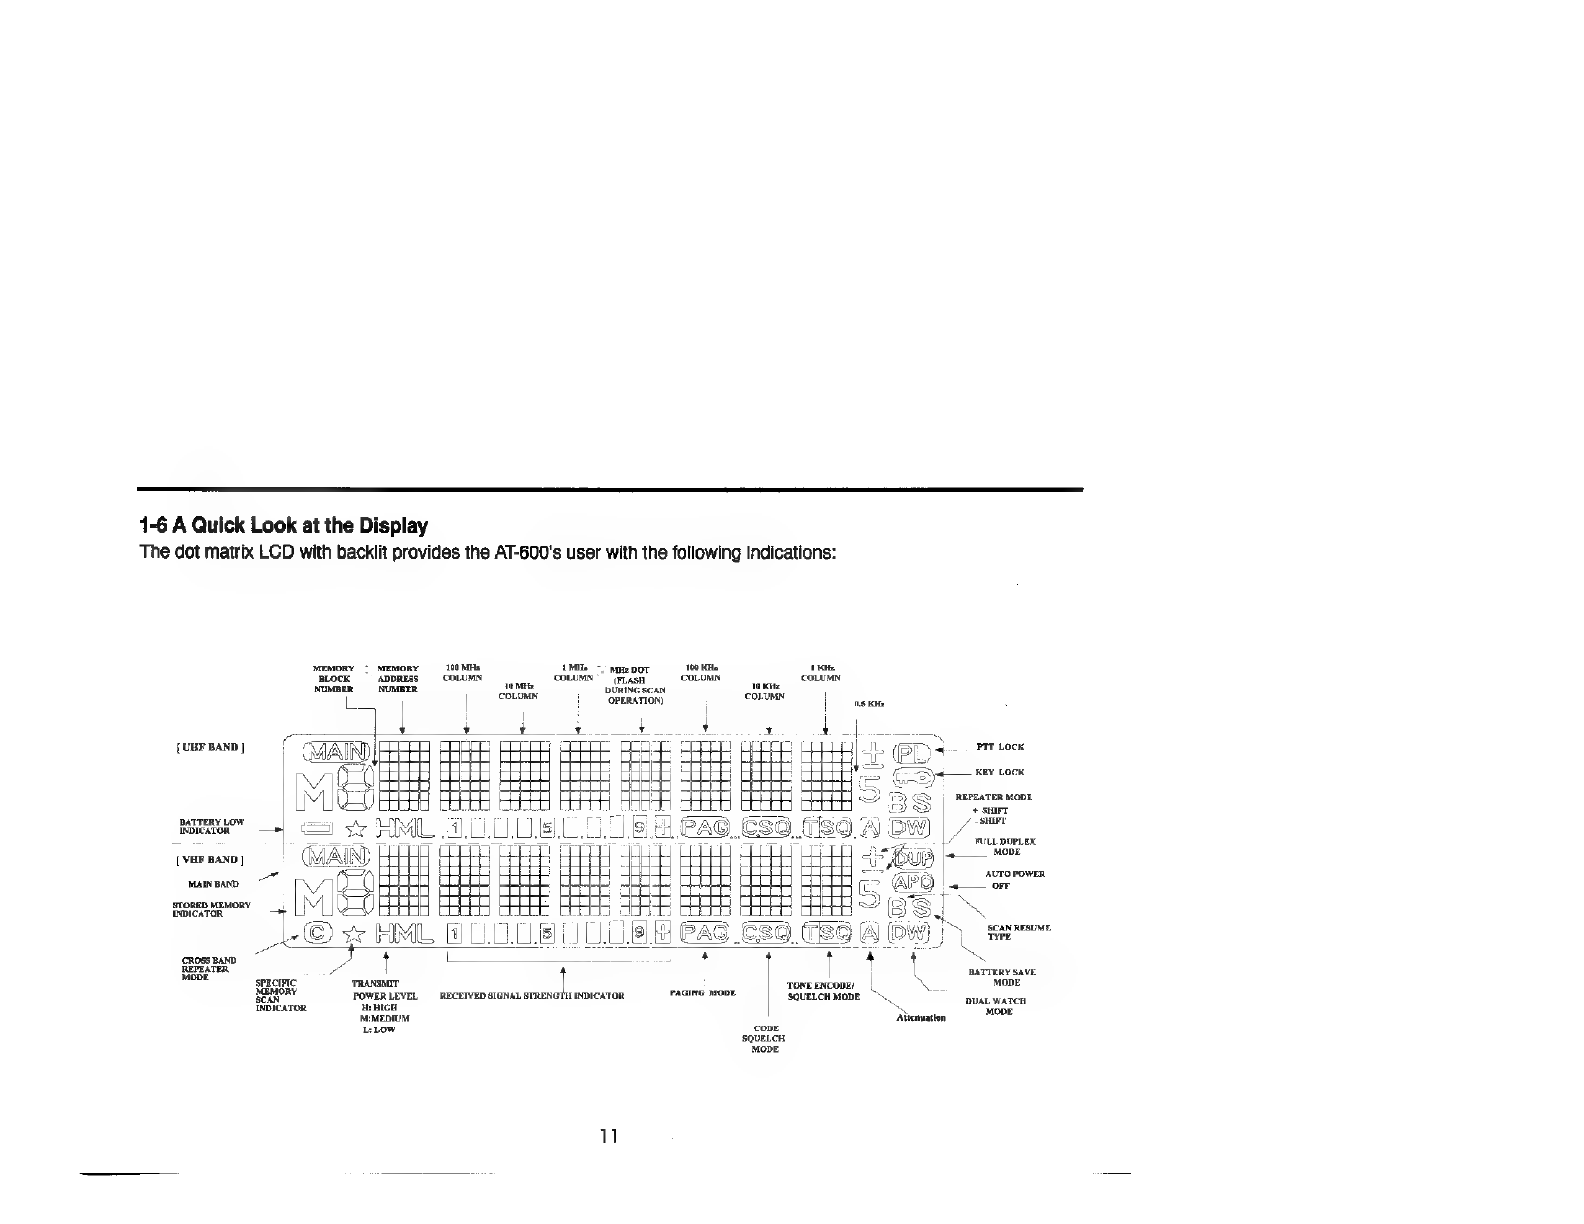
1-6
A
Quick
Look
at
the
Display
The
dot
matrix
LCD
with
backlit
provides
the
AT-600's
user
with
the
following
indications:
MEMORY
©
MEMORY
100
MHz
1Mis
—
MyupoT
BLOCK
ADDRESS.
COLUMN
cotumn
“FrasH
NUMBER
NUMBER
ia
Miz
DURING
SCAN
es
Dm
{
OPERATION)
{UBF
BAND]
100
KH:
‘COLUMN
BATTERY
LOW
=
ny
IoreArOn
=
%
KML.
[VER
BAND]
(WATS)
HHH
MAINBAND~
]
q
a
STORED
MEMORY
M|
U
0)
a
INDICATOR
=
-©
x
A
CROSS
BAND
~
3
t
REPEATER
cs
MODE
SPECIFIC
TRANSMIT
t
‘TONE
ENCODE
MEMORY
PAGING
MODE
MEM
POWERLEVEL
RECEIVED
SIGNAL
STRENGTH
INDICATOR
SQUELCH
MODE
INDICATOR
i
HIGH
M:MEDIUM
L:
Low
cope
SQUELCH
MODE
8
Avienvation
/
-
SHE
/
wnuoumex
MODE
AUTO
POWER
SCAN
RESUME.
TYPE
BATTERY
SAVE
MODE
BUAL
WATCH
MODE

BASIC
OPERATION
2
Basic
Operations
2-3
Using
SQL
OFF
2-1
Turning
Power
On/Off
e
In
two
situations
you
might
use
the
[SQL
OFF]
1.
Press
[PWR]
for
around
1
second
to
turn
ON
key:
(1)
If
you
are
using
paging,
code
squelch,
or
the
AT-600.
tone
squelch,
you
might
not
hear
a
transmission
on
2.
Press
[PWR]
again
for
around
1
second
to
turn
the
current
frequency
even
if
the
squelch
control
is
OFF
the
AT-600.
set
at
its
counterclockwise
position.
(2)
If
you'd
not
like
to
change
the
squelch
level
which
you
set
in
Ab
|
2-2,
you
might
not
hear
a
weak
signal
on
the
current
frequency.
AT-68
To
temporarily
turn
off
squelch,
so
you
can
hear
all
transmissions
on
the
frequency.
2-2
Adjusting
Volume
and
Squelch
1.
Press
[SQL
OFF]
to
turn
off
squelch.
1.
Volume
and
squelch
are
combined
on
one
2.
Release
[SQL
OFF],
the
AT-600
returns
to
normal
control
for
each
band.
The
inner
part
is
volume
squelch.
(VOL)
and
the
outer
part
is
squelch(SQL).
2.
The
left
control
is
for
VHF
band
and
the
right
24
Selecting
Main
Band
"
ity
control
is
for
UHF
band.
@
The
main
band
is
indicated
by
"MAIN"
icon
on
the
display.
The
main
band
is
the
band
where
you
can
receive
and
transmit.
Each
time
you
press
the
[B
MAIN
MONO]
Key,
"MAIN
“icon
shifts
-
between
VHF
and
UHF
band
in
display,
When
changing
frequencies,
memories,
tones..........etc,
remember
"MAIN"
should
first
be
set
to
related
band.
3.
Turn
VOL
control
clockwise
to
increase
the
volume
and
counterclockwise
to
decrease
it.
4.
Turn
SQL
control
clockwise
to
adjust
the
squelch
level
immediately
when
the
noise
disappears
5.
The
factory
default
setting
for
volume
and
squelch
control
is
at
its
counterclockwise
position.
12
1.
Press
[B
MAIN
MONO]
to
select
the
main
band.
2.
Press
[B
MAIN
MONO]
again
to
confirm
that
the
main
band
has
been
switched.
445,006
|
(©
445,000
"145,000
"145.
088
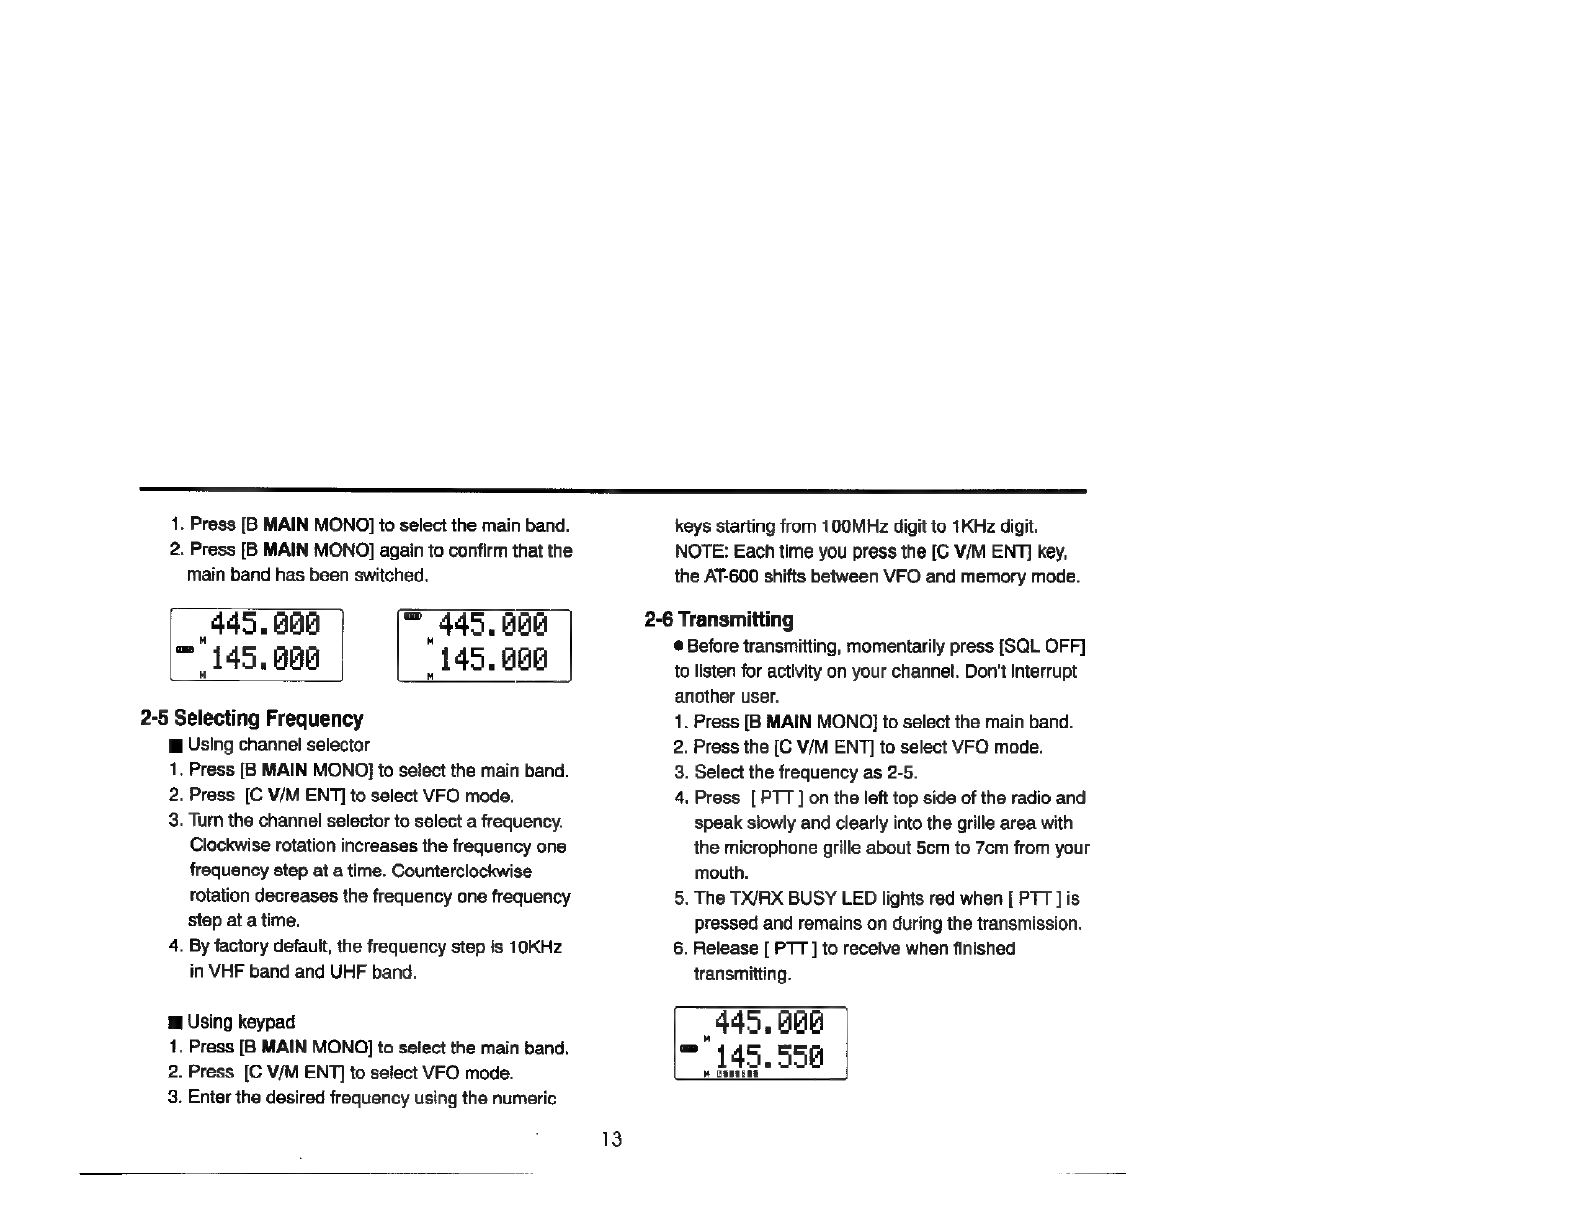
2-5
Selecting
Frequency
Using
channel
selector
1,
Press
[B
MAIN
MONO}
to
select
the
main
band.
2.
Press
[C
V/M
ENT]
to
select
VFO
mode.
3.
Turn
the
channel
selector
to
select
a
frequency.
Clockwise
rotation
increases
the
frequency
one
frequency
step
at
a
time.
Counterclockwise
rotation
decreases
the
frequency
one
frequency
step
at
a
time.
4.
By
factory
default,
the
frequency
step
is
10KHz
in
VHF
band
and
UHF
band.
Using
keypad
1.
Press
[B
MAIN
MONO]
to
select
the
main
band.
2.
Press
[C
V/M
ENT]
to
select
VFO
mode.
3.
Enter
the
desired
frequency
using
the
numeric
13
keys
starting
from
100MHz
digit
to
1KHz
digit.
NOTE:
Each
time
you
press
the
[C
V/M
ENT]
key,
the
AT-600
shifts
between
VFO
and
memory
mode.
2-6
Transmitting
®
Before
transmitting,
momentarily
press
[SQL
OFF]
to
listen
for
activity
on
your
channel.
Don't
interrupt
another
user.
1.
Press
[B
MAIN
MONO}
to
select
the
main
band.
2.
Press
the
[C
V/M
ENT]
to
select
VFO
mode.
3.
Select
the
frequency
as
2-5.
4.
Press
[PTT
]
on
the
left
top
side
of
the
radio
and
speak
slowly
and
clearly
into
the
grille
area
with
the
microphone
grille
about
5cm
to
7cm
from
your
mouth.
5.
The
TX/RX
BUSY
LED
lights
red
when
[
PTT
]
is
pressed
and
remains
on
during
the
transmission.
6.
Release
[
PTT
]
to
receive
when
finished
transmitting.
445,
00
™
145.558
M
ONSERE
a
———
2-7
Inhibiting
Transmissions
1.Press
F+
[3
P.L.].
The
PL
icon
is
displayed.
2.Confirm
the
transmission
is
inhibited
when
[
PTT
]
is
pressed.
3.Repeat
step
1
to
exit
the
power
lock
function.
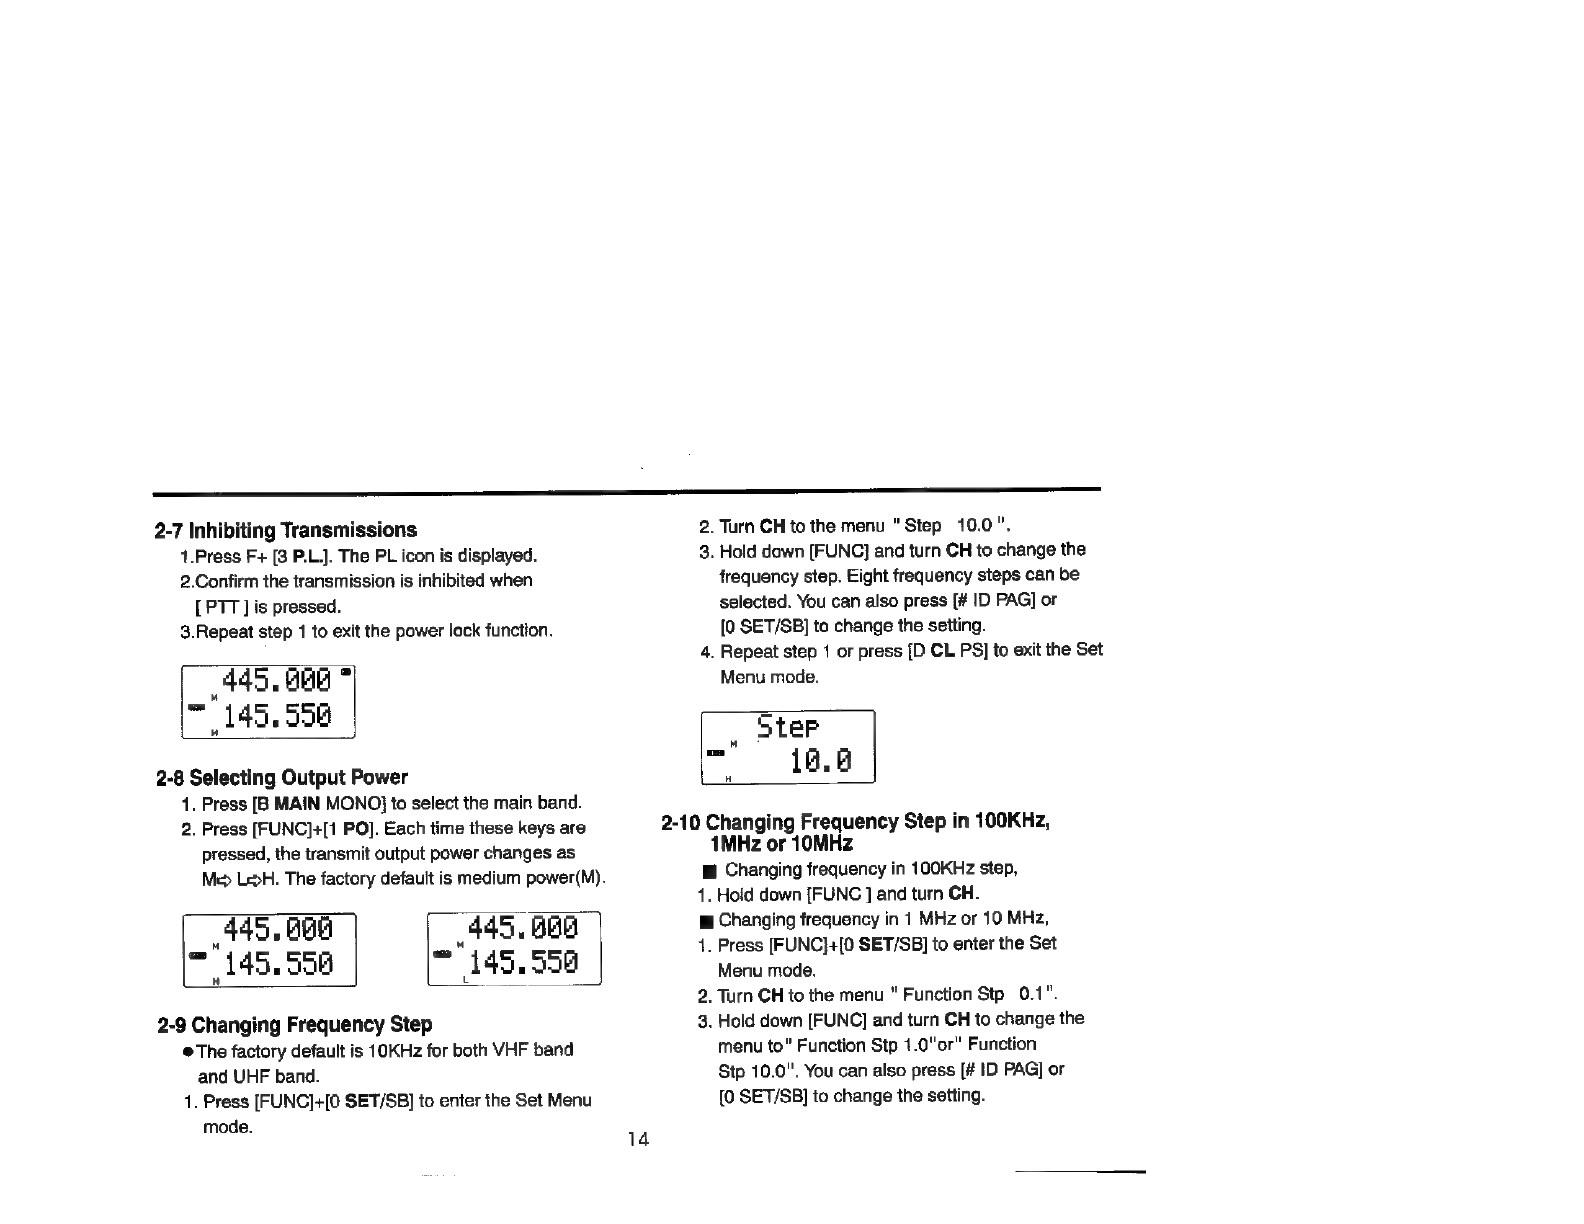
2-8
Selecting
Output
Power
1,
Press
[B
MAIN
MONO}
to
select
the
main
band.
2.
Press
[FUNC]+[1
PO].
Each
time
these
keys
are
pressed,
the
transmit
output
power
changes
as
Me>
LH.
The
factory
default
is
medium
power(M).
445,
BB
445,
G88
=
145,558
=
145,558
2-9
Changing
Frequency
Step
©The
factory
default
is
10KHz
for
both
VHF
band
and
UHF
band.
1.
Press
[FUNC]+[0
SET/SB]
to
enter
the
Set
Menu
mode.
14
2.
Turn
CH
to
the
menu
"Step
10.0".
3.
Hold
down
[FUNC]
and
turn
CH
to
change
the
frequency
step.
Eight
frequency
steps
can
be
selected.
You
can
also
press
[#
ID
PAG]
or
[0
SET/SB]
to
change
the
setting.
4.
Repeat
step
1
or
press
[D
CL
PS]
to
exit
the
Set
Menu
mode.
2-10
Changing
Frequency
Step
in
100KHz,
1MHz
or
10MHz
m@
Changing
frequency
in
100KHz
step,
4,
Hold
down
[FUNC
]
and
turn
CH.
m@
Changing
frequency
in
1
MHz
or
10
MHz,
1.
Press
[FUNC]+[0
SET/SB]
to
enter
the
Set
Menu
mode.
2.
Turn
CH
to
the
menu
"
Function
Stp
0.1".
3.
Hold
down
[FUNC]
and
turn
CH
to
change
the
menu
to"
Function
Stp
1.0"or"
Function
Stp
10.0".
You
can
also
press
[#
ID
PAG]
or
[0
SET/SB]
to
change
the
setting.
4.
Repeat
step
1
or
press
[D
CL
PS]
to
exit
the
Set
Menu
mode.
5.
To
change
the
frequency
in
1MHz
or
10MHz
step,
hold
down
[FUNC]
and
turn
CH.
Function
“ote
Gl
2-11
Using
Key
Lock
Sometimes
you
may
want
to
lock
the
AT-600's
keypad
so
you
do
not
accidentally
change
settings.
1.
Press
[FUNC]+[6
K.L.].
2.
The
key
icon
is
shown
on
the
right
top
of
the
display.
3.
Repeat
step
1
to
exit
the
key
lock
function.
=
445,
G00
©
"145.550
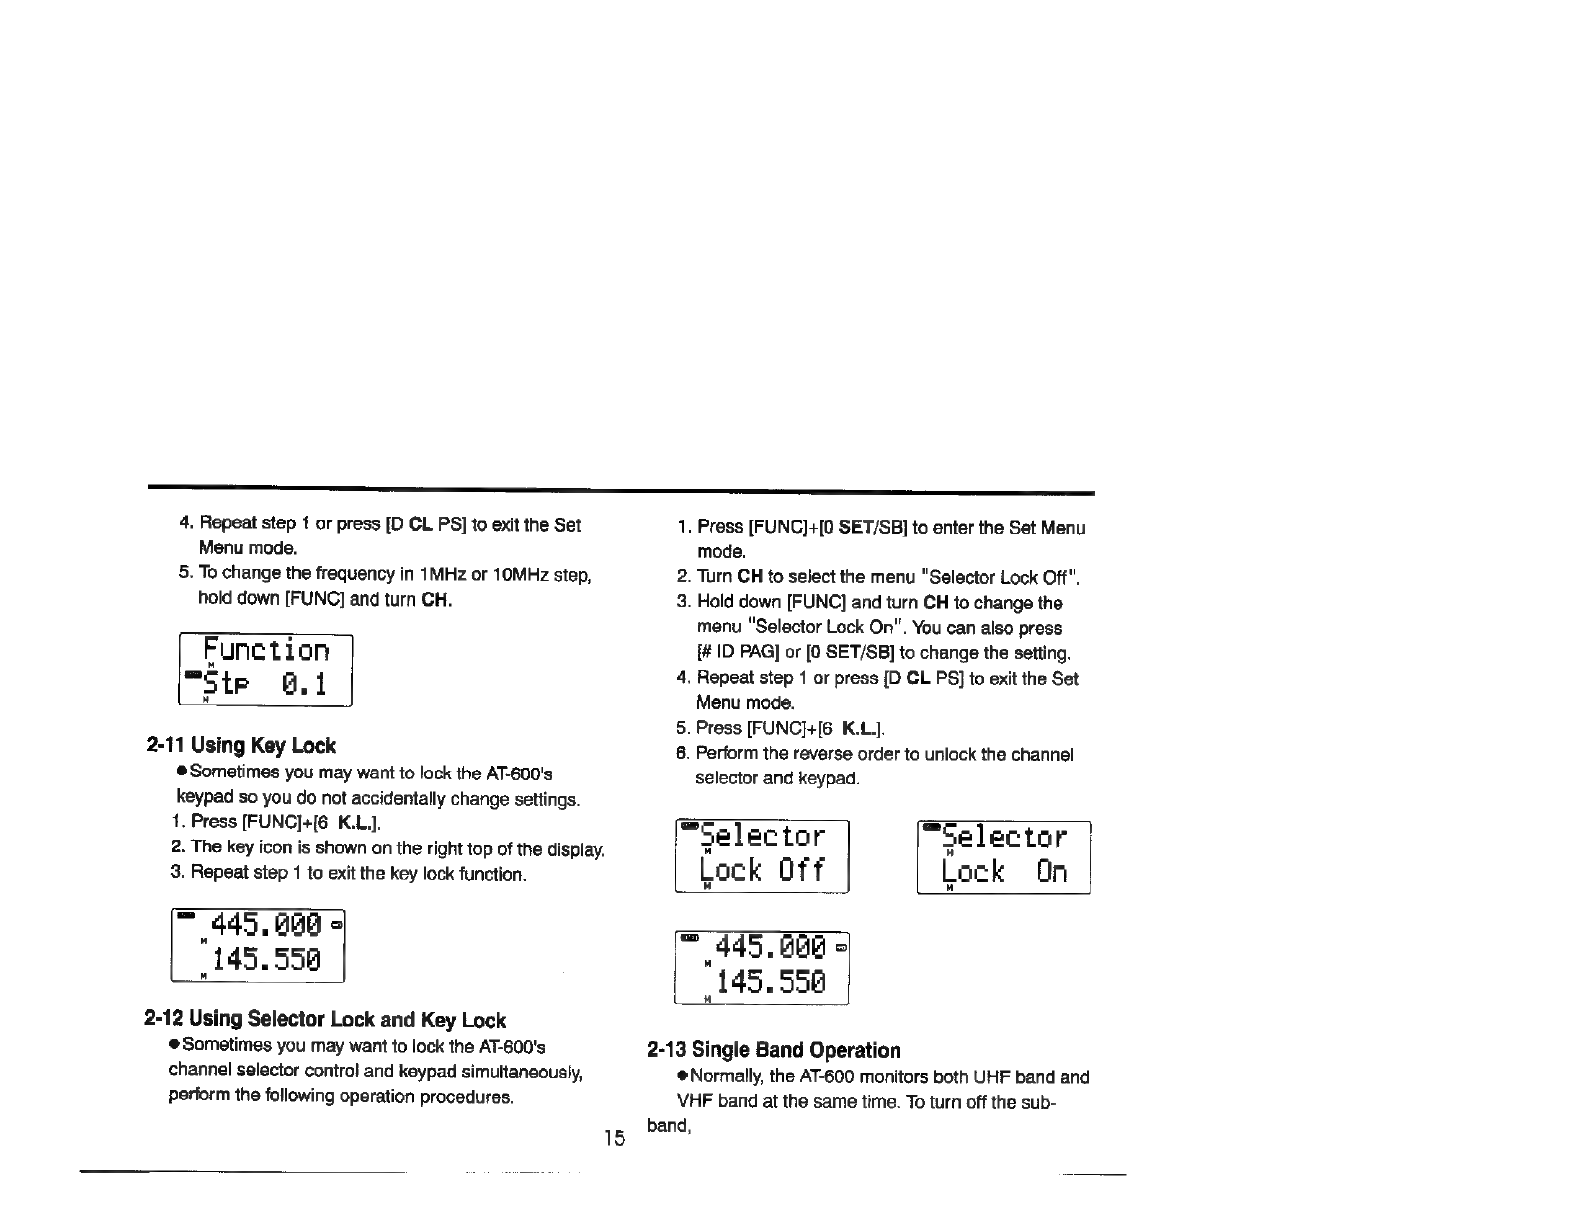
2-12
Using
Selector
Lock
and
Key
Lock
®@
Sometimes
you
may
want
to
lock
the
AT-600's
channel
selector
contro!
and
keypad
simultaneously,
perform
the
following
operation
procedures.
1.
Press
[FUNC]+[0
SET/SB]
to
enter
the
Set
Menu
mode.
2.
Turn
CH
to
select
the
menu
"Selector
Lock
Off".
3.
Hald
down
[FUNC]
and
turn
CH
to
change
the
menu
"Selector
Lock
On".
You
can
also
press
{#
ID
PAG]
or
[0
SET/SB]
to
change
the
setting.
4,
Repeat
step
1
or
press
[D
CL
PS]
to
exit
the
Set
Menu
mode.
5.
Press
[FUNC]+[6
K.L].
6.
Perform
the
reverse
order
to
unlock
the
channel
selector
and
keypad.
“Selector
Lock
Off
“Selector
Lock
On
*
445.
HEE
©
"145,550
2-13
Single
Band
Operation
@
Normally,
the
AT-600
monitors
both
UHF
band
and
VHF
band
at
the
same
time.
To
turn
off
the
sub-
band,

so
the
AT-600
only
monitors
the
main
band.
1.
Press
[B
MAIN
MONO]
to
select
the
main
band.
2.
Press
[FUNC]+[B
MAIN
MONO].
3.
The
sub-band
is
turned
off
and
the
display
only
shows
the
main
band
4.
Press
[B
MAIN
MONO]
to
return
the
dual
band
mode.
™
445,
668
2-14
Using
Display
Light
®
You
can
turn
on
the
display
lamp
for
5
seconds
or
turn
it
on so
it
stays
on
.
1.
Press
[LAMP]
to
turn
on
the
display
lamp
for
5
seconds.
2.
Press
[FUNC]+[LAMP]
to
turn
on
the
display
lamp
so
it
stays
on.
3.
Press
[FUNC]+[LAMP]
again
to
turn
off
the
display
lamp.
2-15
Testing
Display
Window
1.
Press
[PWR]
for
around
1
second
to
turn
off
the
AT-600.
2.
Press
[PWR]+[3
RL].
3.
Release
[PWR]
and
press
[3
P.L.]
only,
the
whole
display
keeps
on.
4.
Release
[3
P.L.]
and
return
to
the
normal
operation
mode.
NOTE:
This
is
for
test
purpose
only.
oe
INS
ONNE
AO
fe
2-16
Resetting
the
AT-600
@If
the
AT-600
seems
to
be
malfunctioning,
follow
these
steps
to
reset
it.
4.
Press
[PWR]
for
around
1
second
to
turn
off
AT-600.
2.
Press
[FUNC]+[D
CL
PS]+[PWR]
to
turn
on
AT-600.
The
AT-600
displays
"RESET?
Press
C".
3.
Press
C
to
confirm
the
reset
or
press
any
other
key
to
cancel.
CAUTION!
This
erases
all
data
in
memories.
'
RESET?
RESET!
|
Press
C

MEMORY
FUNCTION
3
Memory
Function
Besides
two
Calling
channels,
the
AT-600
allows
you
to
store
up
to
120/200
sets
of
frequency
into
memory,
with
60/100
memory
channels
in
each
VHF
and
UHF
band.
When
you
select
"Memory
SET
120"
in
the
Set
Menu
mode,
memories
can
be
tagged
with
a
6-character
ID
name,
which
can
be
displayed
instead
of
frequency.
Under
the
circumstances,
the
memory
capacity
is
reduced
to
110
with
55
memories
(MO0-M54)
in
each
band.
In
addition
ta
store
frequency
and
ID
name,
each
memory
can
hold
repeater
mode,
offset
frequency,
paging
mode
or
code
squelch
mode,
and
tone
encode
mode
or
tone
squelch
mode.
3-1
Storing
Frequencies
into
Memory
1.
Press
[B
MAIN
MONO]
to
select
the
main
band.
2.
Press
[C
V/M
ENT]
to
select
the
VFO
mode.
3.
Set
the
frequency
you
want
to
store
and
set
all
other
options
to
your
desired
settings.
3.
Press
[FUNC]+[C
V/M
ENT].
Two
dashes
should
appear
to
the
left
of
the
frequency.
4.
Use
the
keypad
to
enter
a
two-digit
number
(from
00
to
55).
7
5.
Confirm
"M" and
the
memory
number
appear
for
one
second
and
returns
to
the
VFO.
Note:
If
you
enter
an
invalid
memory
number,
the
AT-600
sounds
a
"Bu"
tone
and
memory
store
is
canceled.
Repeat
steps
3-
4.
If
you'd
like
to
store
frequency
only,
you
can
store
60
memories.
<-445,
668
me1445,
BBG
145,
558
145.558
3-2
Recalling
Memory
@
You
can
use
the
selector
contro!
or
the
keypad
to
recall
stored
memory.
If
you
select
a
memory
which
has
information
stored
in
It,
"M"
appears
to
the
left
of
the
memary
number
and
the
AT-600
recalls
all
stored
settings.
If
you
select
a
memory
which
has
no
information
stored
in
it,
"M"
doesn't
appear.
1.
Press
[B
MAIN
MONO]
to
select
the
main
band.
2.
Press
[C
V/M
ENT]
to
select
the
memory
mode.
3.
Turn
CH
to
select
a
memory
address
or
use
the
keypad
to
enter
a
two-digit
memory
number.
4.
Turn
CH
while
holding
down
the
[FUNC]
key
will
change
memories
10
at
a
time.
Table of contents
Other ADI Radio manuals


