Adkins PARTY BAR X5 User manual

User’s Manual
(330) 436-3260 Fax: (330) 436-3283
E-mail: support@adkinsprolighting.com
www.adkinsprolighting.com

Unpacking: Thank you for purchasing the Party Bar X5 by Adkins Pro Lighting. Every Party Bar X5 has been
thoroughly tested and has been shipped in perfect operating condition. Carefully check the shipping carton for
damage that may have occurred during shipping. If the carton appears to be damaged, carefully inspect your fixture
for any damage and be sure all accessories necessary to operate the unit has arrived intact. In the case damage has
been found or parts are missing, please contact our customer support number for further instructions. Do not return
this unit to your dealer without first contacting customer support.
Installation: This unit should be placed on a stable solid surface to ensure that it will not fall. Also, always use a
safety cable that can hold 6 times the weight of the unit when installing the fixture. The equipment must be installed
by a professional, and it must be installed in a place where it is out of the reach of people’s grasp.
Caution! No user serviceable parts inside do not attempt repairs. In the event your
Party Bar X5 should fail, contact Adkins Pro Lighting.
Introduction
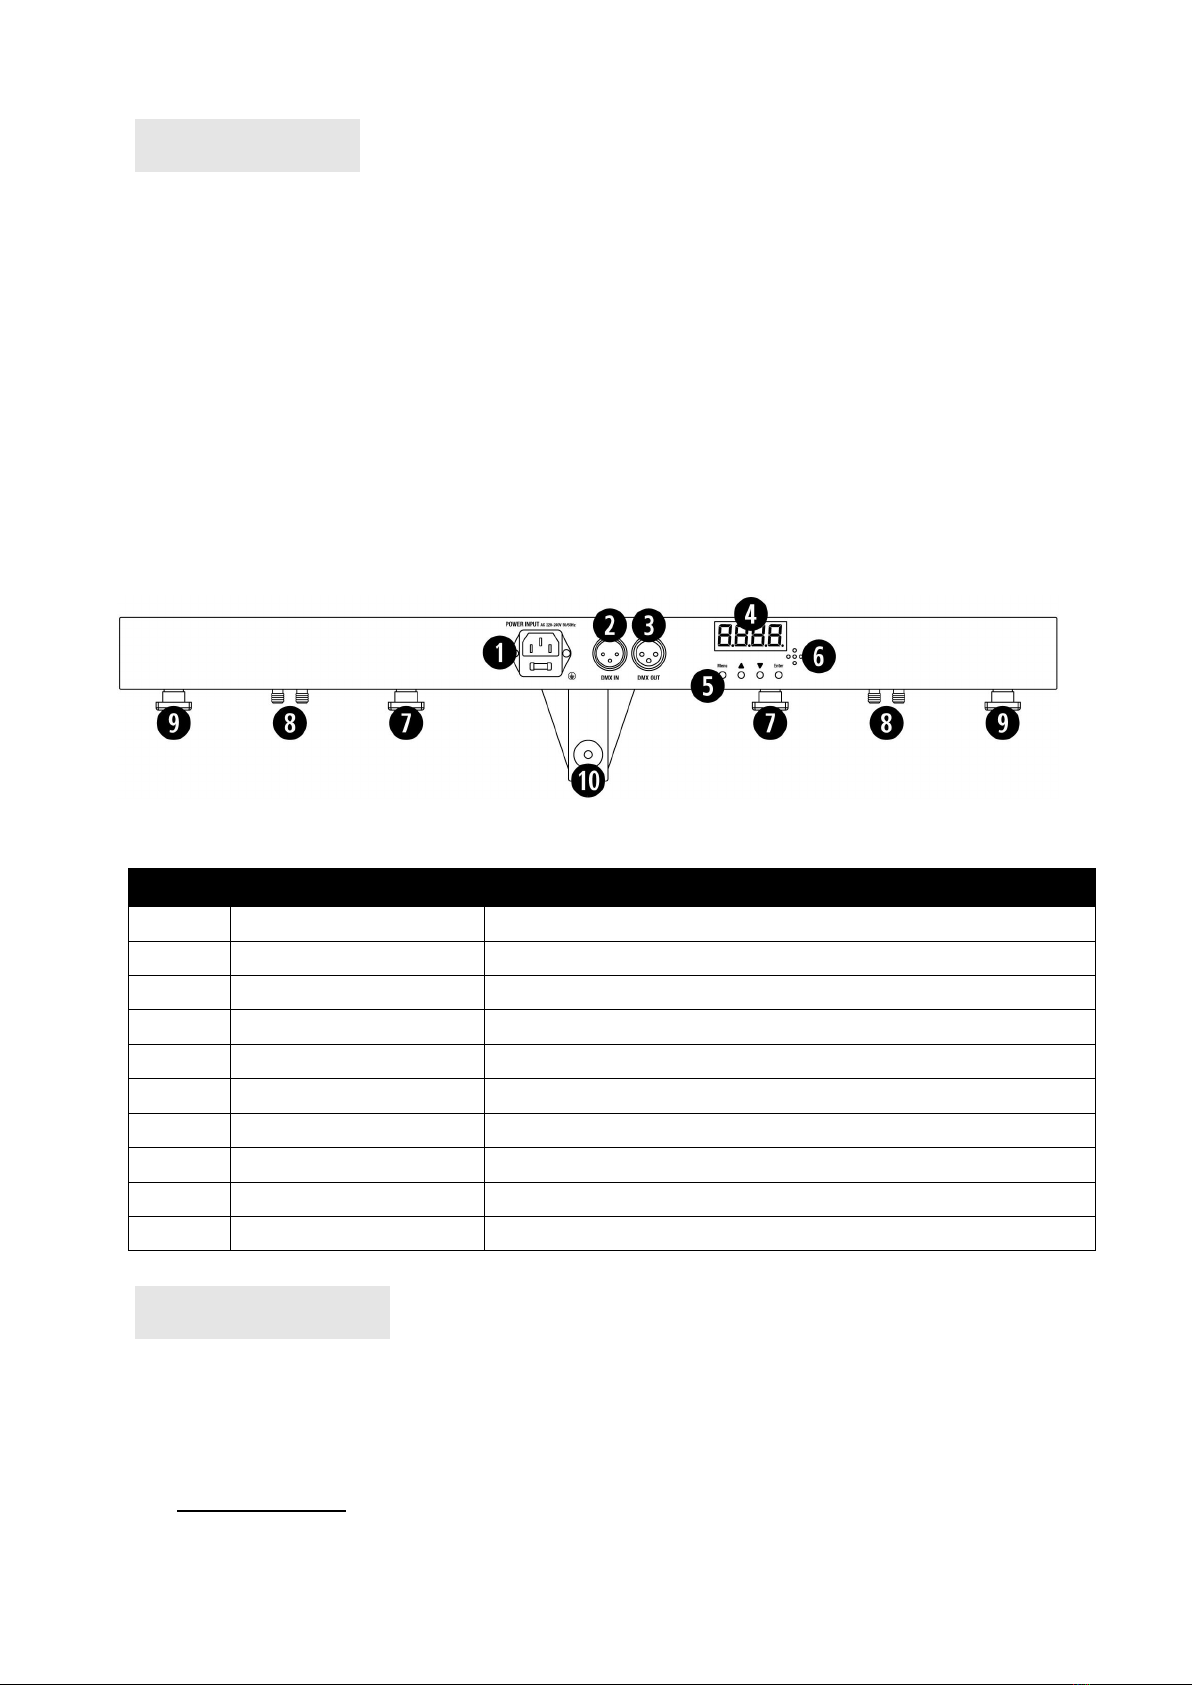
The Adkins Lighting Party Bar X5 is a high quality, high power, intelligent, DMX Light fixture. This fixture can be used
in standalone mode or DMX Controller mode. Please read these instructions carefully to familiarize yourself with the
basic operations of this unit.
Note: The data inside this Manual may changed without notifying you due to continuous improvement.
Safety specifications
This device for indoor use only,the protection grade is: IP20
The installation, operation and maintenance must be managed by the qualified professional, and make sure to
operate it under the instruction of the Manual.
The light was designed to protect against electric shock and must connected to an outlet that is well grounded.
Please check if the voltage is AC 110-120V/50-60Hz before installing.
Do not operate when the cover is opened.
No user serviceable parts inside.
To
reduce
the risk of
electrical shock
or fire, do not
expose
this
unit
rain or
moistur
e
Do not spill water or other liquids into or on to your
unit.
Do not
attempt
to
operate
this unit if the power cord has
been
frayed
or
broken.
Do not
attempt
to
remove
or
break off the
gr
ound
prong from the
electrical
cord. This prong is
used
to
reduce
the
risk
of
electrical shock
and fire
in
case
of an internal
short.
Disconnect
from main power before making any type of
connection.
Do not
remove
the cover under any
conditions.
There are no
user
serviceable parts inside.
Never
operate
this unit when
it’
s
cover is r
emoved.
Never plug this unit in to a dimmer
pack
Always be sure to mount this unit in an area that
will
allow
pr
oper
ventilation. Allow
about
6” (15cm)
between
this
device
and a wall.
Do not
attempt
to
operate
this unit,
if
it
becomes damaged.
During long
periods
of
non-use, disconnect
the
from wall outlet
powe
r
.
Always mount this unit in safe and
stable matte
r
.
Power-supply cords should
be
routed
so that they are not likely
to
be walked on or
pinched
by items
placed
upon or
against them,
paying
particular attention
to the point they exit from the
unit.

Features
Control Channels: 3 or 12 Channel DMX Modes
Control Mode: Sound Active mode, Auto mode, Master/Slave, DMX-512 (3/6/15CH), Remote
control
Mixing Color: RGBW mixing color
IP Grade: IP20
Power Supply: AC 110-240V/50-60Hz Consumption: 60W
LED Units: Par Cans (2) 4x3W RGBW 4in1, (1) Led Ball 4x3w 4-in-1 RGBW LEDs, UV-White strobe
LEDs- 6x2W UV + 6x2W Strobe LEDs, RG Laser diode: 100mW 650nm red diode ,30mW 532nm
Green diode
5IN1 effects : UV effects, white strobe effects, LED Ball effects, Par light effects, Laser effects.
Weight: 12.1 lbs
Dimensions: 28.35 " x 7.87" x 5.9"
Operation
When power is on in DMX mode, the digital LED screen will show a red dot in lower right corner.
DMX address code setting: Press “MENU” button. When the digital LED displays d001-d512, press
“UP” or “DOWN” to set the address code. The code ranges from 001-512.
Function setting
Using the four function buttons on the controller bar you can set the operating mode of the unit.
Number Feature Function
1 Power supply input Attach the power cable here. Built-in fuse.
2 DMX input 3 pin XLR connector for DMX512 input communication.
3 DMX output 3 pin XLR connector for DMX512 output communication.
4 LED display LED function display and menu buttons to control the operating mode.
5 MENU buttons MENU function buttons x 4 (see below for operation).
6 Mic Built-in microphone for Sound-to-Light operation.
7 Par can mounts Attach the par can lights to the controller bar at the 2 points shown.
8 Lighting unit connections Attach all 4 lighting cables to the controller bar at the points shown.
9 Derby FX mounts Attach the derby FX to the controller bar at the 2 points shown.
10 Light stand socket Tighten screw to secure the controller bar to the light stand.

Press the Menu button to display the different functions (see table below for a description of the
functions). Use the Up or Down arrow buttons to make your selection. When you have chosen
your desired function, press the Enter button to confirm the change.
Auto modes: AT01 – AT09 can be adjusted by Speed S_01 – S_32
Sound to Light modes: So01 – So09 can be adjusted by Sensitivity Sn01 – Sn09
Display Mode
d001 -512 DMX Control
chnd
DMX Channels
3CH 3 channel DMX mode
6CH 6 channel DMX mode
AT01 – AT09
Auto Built-in Programs
S_01 – S_32 Speed
So01 – So03 Sound
Sn01 – Sn09 Sound Sensitivity
Slav Slave Mode
DMX-512 connection
If you are using a standard DMX controller, you can connect the DMX output of the controller
directly to the DMX input of the first unit in a DMX chain. If you wish to connect a DMX controller
with other XLR outputs you will need to use adapter cables.
Connection of Signal Cable
To connect multiple Party Bar X5 systems you can use a 3-pin XLR cable to connect the OUT socket
of the first light to the IN socket of the following light. A DMX signal terminator is recommended on
the OUT socket of the last unit of the chain. A DMX terminator is a XLR connector with a 120Ω
resistor between the pin 2 and pin 3 of the XLR connector.
DMX output
1
= Shield
DMX
input
2
= Signal (-)
3
= Signal (+)
Connect the DMX output of the first unit in a DMX chain with the DMX input of the next unit in the
chain. Always connect the the output of one unit with the input of the next unit until all units are
connected.

3 Channel DMX Mode
3CH (2xPar + 1x LED Ball+ 1xLaser + 6*2W UV-WH BAR)
CH1
0-9 Black Out
10-39 AT01 Whole Unit
40-69 AT02 Par Light (Jump change )
70-99 AT03 Par +LED Ball + Laser
100-129 AT04 Par + LED Ball + Laser + Strobe
130-159 AT05 Par + LED Ball + Laser + UV
160-189 AT06 Par + LED Ball + Strobe + UV
190-219 AT07 Par + Laser + Strobe + UV
220-249 AT08 LED Ball+ Laser + Strobe + UV
250-255 AT09 Strobe
CH2
0-9 Black Out
10-89 So.01 Corresponding AT01
90-169 so.02 Corresponding AT04
170-255 So.03 Corresponding AT08
CH3 0-255 Speed/Sensitivity
12 Channel DMX Mode
12CH (2xPar + 1x Derby + 1xLaser + 6*2W UV-WH BAR)
CH1 0-255 Red
LED Ball Light(No.1)
CH2 0-255 Green
CH3 0-255 Blue
CH4 0-255 White
CH5 0-255 Motor
CH6 0-255 Red
Par Light(No.2)
CH7 0-255 Green
CH8 0-255 Blue
CH9 0-255 White
CH10
0-63 Laser_Off
64-127 Laser_R Simultaneous start motor
128-197 Laser_G Simultaneous start motor
198-255 Laser_RG Simultaneous start motor
CH11 0-255 UV UV
CH12 0-9 White White,Off
10-255 White,Strobe,Slow >Fast

Customer Support: Adkins Pro Lighting provides a customer support line, to provide set up help and to
answer any question should you encounter problems during your set up or initial operation. You may also visit us on
the web at www.adkinsprolighting.com for any comments or suggestions. Service Hours are Monday through Friday
10:00 a.m. to 5:00 p.m. Eastern Standard Time.
(330) 436-3260 Fax: (330) 436-3283
E-mail: support@adkinsprolighting.com
See website for warranty details -www.adkinsprolighting.com
Table of contents
Other Adkins Dj Equipment manuals
Popular Dj Equipment manuals by other brands

Chauvet Professional
Chauvet Professional OVATION REVE E-3 IP user manual

Pioneer
Pioneer DDJ-WEGO3 operating instructions

Numark
Numark MIXDECX QUARD quick start guide

LIGHTSIDE
LIGHTSIDE NANO PAR user manual

SYNQ AUDIO RESEARCH
SYNQ AUDIO RESEARCH DMC.2000 Operation manual

ELAN Lighting
ELAN Lighting CAB-5R-BEAM user manual

Party Light & Sound
Party Light & Sound PARTY-BOX410 user manual

American DJ
American DJ Roto-Balls User instruction

American DJ
American DJ S-10S User instructions

ADJ
ADJ MDF2PSUX156 Safety manual

Chauvet DJ
Chauvet DJ EZLink FS BT Quick reference guide

Enabling Devices
Enabling Devices Musical Disco Ball user guide