ADO A20F User manual

Attention!
Please keep the instruction manual properly!
To ensure your safety, please read the
instruction manual carefully before using
the electric bicycle to better understand the
performance of the electric bicycle.
A20F Beast
Original Instructions

Português 81-96
English 01-16
Français
17-32
Deutsche
33-48
Italiano
49-64
65-80
Español

Required preface
Dear user friends:
First of all, than you for choosing to buy our products. All the sta of our company epress their heartfelt thans
for your choice This manual will introduce you to the common sense and maintenance methods of electric
bicycles produced by our company. lease read the manual carefully after purchasing to understand the
performance, characteristics, precautions and maintenance common sense of this bicycle, mae sure you use
the electric bicycle safely in the best driving condition.
In order to ensure the safety of using our electric bicycle, please be sure to use our professional spare parts. If
you have any uestions, please contact our authoried service station or our company.
Dear users, when purchasing the products of our company, please ll in the electric bicycle sales warranty
registration card in detail completely and clearly and eep the user warranty properly, deliver the other two
copies to the companys resident service station or distribution unit so that we can contact and serve you in time.
★ Important Tips
1.The patterns and tet descriptions of this manual are only used as instructions for operation and are not used
as the basis for inspection of products;
2.The illustration in this manual may not match the actual product, and the actual sales style shall prevail
3.The company has the right to improve product performance and related congurations without prior notice
4.This vehicle can only ride alone, and do not carry people.
5.This product is suitable for daily short-distance commuting. lease do not use it for dangerous performances
such as competitions and stunts. therwise, it may cause damage to the bicycle or cause inury to the rider.
6. iding in rainy days may lead to fall and inury, which is not recommended.
7. This product is a general-purpose product. Mae sure the product complies with local regulations before
using it. therwise, all legal responsibilities shall be borne by the user.
8. If the user modies or changes the default state of the electric bicycle without permission,. sers will bear all
legal responsibilities by themselvescaused therefrom shall be borne by the user.
our choice-the beginning of our service In the following days,we will wholeheartedly provide you with
convenient,timely, fast and satisfactory service lease read the instructions carefully before using, and do not
use it before nowing the characteristics of this car please read carefully for the terms of danger, warning
and attention.
Danger: ignoring this warning can lead to personal accidents. In order to reduce the harm to yourself
or others, special warning must be done or not allowed to do.
arning: ignoring this warning can cause damage to the vehicle and its euipment, especially noting
what to do or not to do.
Note: ignoring this warning may cause slight damage to the vehicle and its
euipment or the vehicle cannot run normally, telling what to do or what not to do.
01

Special tips for using security
Dear users, for your safety and prevention of safety accidents, please read and follow the following tips:
I.hen using electric bicycles, you should abide by trac regulations and pay attention to driving safety.
1It is forbidden for people under 16 years old to drive electric bicycles on the road
2E-bies should be driven on non-motoried lanes, lower than the maimum speed specied by local laws and
regulations.
3Do not lend electric bicycles to people who will not operate to avoid inury
4Electric bicycles shall carry personnel or articles according to laws and regulations
5It is recommended to wear a helmet when riding
6iding in rainy and snowy days, the braing distance will be prolonged, pay attention to slow down eavy rain
and other bad weather, try to avoid traveling.
II. lease pay attention to the safety of electric bicycles.
1Electric bicycles should not be pared in the building foyer,evacuation stairs, walways and safety eits
2Electric bicycles should not be charged and pared in residential buildings, and should be ept away from
combustibles when charging, and the charging time should not be too long
3Correct use and maintenance of battery:
lease charge the battery for 12 hours for the rst time after purchase or long-term storage. hen using it
normally, charge it for 12 hours every two months. hen not in use for a long time, please separate the battery
from the vehicle power cord, supplement every half a month.
It is forbidden to short circuit the positive and negative poles of the input and output terminals of the battery
pack;
eep away from children, re sources and heat sources, and it is forbidden to put the battery pac into the
re
trenuous vibration, impact and etrusion of the battery are strictly prohibited
ay attention to waterproof to prevent battery pac from being eposed to water shower and immersion
The battery pac should be charged with use. hen not in use for a long time, be sure to remove it from the
whole vehicle for storage
The battery pack should be stored in a clean,dry and ventilated place, and should avoid contact with
corrosive substances, away from re sources and heat sources
torage Conditions of battery pac: ambient temperature -2055C Ambient humidity65.The
temperature of battery operation: -1045C.
Danger: waste batteries shall not be dismantled without authoriation, and shall not be
discarded at will to avoid environmental pollution;The waste batteries of this product shall
be recycled by the enterprise or distributors or government designated outlets
arm tips
1.Water inlet is not guaranteed, please use the original charger to charge;
2.Do not charge in the itchen, living room, bedroom and other domestic places
3.It is recommended that the battery life cycle be 2years to avoid damage caused by aging.
4. Braing will mae the braes and discs become hot, which may burn the human body, please do not touch.
5. If there is any item on the wheel hub, it may cause inury to the rider, so please chec and clean up before
riding.
6. hen riding, you need toplease avoid prevent any obects from touching the hub to avoid inury.
7. Avoid touching the wheel hub with any part of body during riding so as to avoid personal inury.
8. This product will not produce a sound of more than 50 dBA. If there is obvious noise, please stop and chec
whether the bicycle is abnormal. 02

Special tips for using security
4safe use method of charger:
It is forbidden to place any items on the charger
It is forbidden to put any liuid or metal into the charger
It is strictly prohibited to disassemble and modify the charger
hen charging, insert the output of the charger into the charging port of the battery pac rst, and then
insert the AC power plug of the charger into the Mains socet It is forbidden to plug and remove the power plug
with wet hands
Do not use the charger when thunder and lightning
Do not play with the charger and battery pac when charging
Do not use the charger in unstable, ecessive lampblac and dust and ecessively humid environments
eep good ventilation and heat dissipation conditions when the charger wors, and avoid using the charger
in direct sunlight;
When the output of the charger is not connected to the battery pack, do not connect the charger to the
mains for a long time
During the charging process, the indicator light of the charger is red. When the indicator light turns green,
continue charging for 2 hours to be fully charged;
The normal charging time is 3-10 hours no more than 12 hours, and the fast charging station is not allowed
to charge.
5recautions for washing:
hen washing the bicycle, do not directly splash water on the brae drum, motor and front and rear ale to
prevent water from aecting the service performance and life
Do not use steam or high-pressure water pipes when washing bicycle
ay special attention to the woring condition of the brae after cleaning the vehicle or driving in the water.
After cleaning or driving in the water, the braing eect may decrease. At this time, pay attention to safety when
driving slowly.
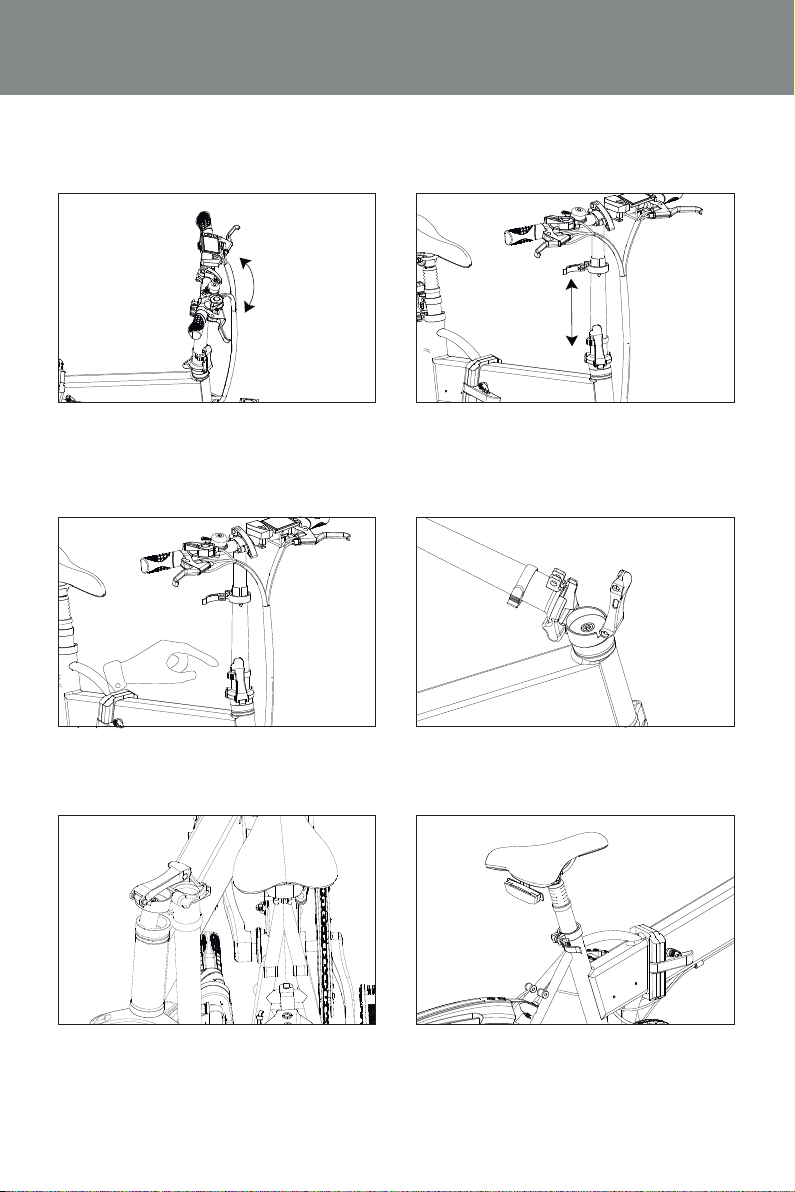
6Adustment of handlebar and saddle if applicable
hen adusting the handlebar or saddle, be careful not to epose the safety line mar of stem and saddle
pipe;
After adusting the horiontal pipe, stem, saddle and saddle pipe, pay attention to fastening, and the
recommended torue is 18N.m.
ANIN 1 As with all mechanical components, EAC is subected to wear and high stresses. Dierent
materials and components may react to wear or stress fatigue in dierent ways. If the design life of a
component has been eceeded, it may suddenly fail, possibly causing inuries to the rider. Any form of
crac, scratches or change in color in highly stressed areas indicates that the component has been reached
its service life and should be replaced.
Note: when replacing the charger, it should match the battery model;The special charger provided by our
company must be used, and other Chargers are not allowed to charge the battery pac.
ANIN 2 For composite components impact damage may be invisible to the user, the manufacturer
shall eplain the conseuences of impact damage and the conseuences in the event of an impact
composite components should be returned to the manufacturer for inspection or destroyed and replaced.
03

Precautions before riding
Dear users, for your safety and to prevent safety accidents, please do the following checs before riding. If there
is any abnormality,please repair it in time or nd a professional repair
1Inspection of power supply circuit and lighting circuit:
Chec whether the power supply circuit, lighting circuit and device are damaged Turn on the power supply,
operate the lighting switch, chec whether the headlights and taillights are on, and whether the brightness of the
headlights and taillights is normal
Chec that the left brae handle is corresponding to the rear brae, while the right brae handle is
corresponding to the front brake, and the brake icon is indicated on the display.
2Chec of brae device:
Chec whether the front and rear braes can wor normally Chec the braing eect of the front and rear
braes to ensure that the braes are normal and eective
Conrm whether the power-o switch is normal when the rear wheels are o the ground with double
support of the whole vehicle
lease chec the fastening status of each ale to ensure that the front and rear ales and handlebars are
fastened reliably.
3Chec the fastening status of handlebar and front and bac wheels:
hae the handlebar up, down , front, bac, left and right to chec whether it is loose or pongee
hae left and right front and bac wheels to chec whether there is looseness whether the rotating wheel is
too tight or stuck.
4Tire inspection:
Chec that the wheel ination pressure is within the range mared on the tire.
whether the tire has cracs or abnormal wear
hether the tire is embedded with nails, stones and glass
hen the tire is used to the tread wear mar, the tire should be replaced.
5Inspection of reector and license plate:
Chec whether the reector is missing. If it is found missing, contact the after-sales service immediately to
reassemble the reector of the same specication and model, and the installation position should be consistent
with the original bicycle .lease do not change the position, modify, disassemble, etc. privately.
Before each use, chec that the function of the reector is normal and the surface of the reector is ept
clean.
The eector device cannot be bloced by luggage, children chair, clothes and other obects, otherwise it will
cause potential safety hazards.
Chec whether the license plate is installed rmly, whether the number is clear, whether there is any damage
or pollution, and if there is any should, reinforce, clean or replace it in time.
Chec the front brae and rear brae respectively. The left brae handle corresponds to the front brae and
right brake handle corresponds to the rear brake. The brake icon is indicated on the display.
All endurance mileage data of the battery in this manual are from tests done in AD outdoor test site on
the condition that the battery is full, at 25C, with no wind, and under 65g load. It is normal that the actual
riding mileage may be signicantly dierent due to rider habits, weight, road conditions, weather, etc.
Before each ride, please mae sure that the following items: whether the frame loc,vertical tube lock,
seat tube locing fastener are loced, whether the brae system is normal, and the tires are full of gas to
ensure riding safety! 04

67 8
Adjustment methods of each part
I.Adustment of front and rear brae system: the adustment method of front and rear braes is the same
1.The rear integrated disc braesee gure 1 Adust the upper and lower nuts of the disc brae to mae the
spacing between disc brae and brae caliper 1.5-3mm, adust the height of disc brae, and then tighten the
nuts.
2.Front integrated disc brae see gure 2: Adust the A and B nuts of the disc brae and adust the height of the
disc brae so that the distance between the disc brae and the caliper is 1.5-3mm. If the distance is deviated, use
the C screw to adust, and then tighten the nut.
otate the Adusting nut to rotate the Adusting nut forward, the brae becomes tight, otherwise it becomes
loose. hen adusting, hold the brae handle at the same time, so that when the position of the brae handle is
1/3 of the total stroe, the brae rubber bloc can be tightly attached to the brae drum. ee gure 3
3.Disc brae: see Figure 7 and 8
ey points of disc brae adustment: there is enough clearance between disc brae and brae pad there is no
interference between the brae disc and the brae sin when rotating, and the best braing eect is appropriate
adust the nut, lengthen about brae cable, chec whether the brae handle has been adusted to the appropri-
ate tightness Then test ride to ensure eective and normal braing.
II.Chain adustment see gure 4
1.oosen the rear ale left and right fastening nuts, adust the chain regulator, move the rear wheels bac and
forth, and tighten the tightness of the chain so that the sag in the middle of the chain is 10-15mm.At this time,
the tightness of the chain should be suitable for go slic, no abnormal sound.
2.eep the center surface of the rear wheel basically in the center surface of the frame, and tighten the rear ale
left and right fastening nuts. ecommended torue is not less than 30N.m
III.Front wheel disassembly see Figure 5
1.oosen the left and rear fastening thread of the front ale, remove the nut, remove the front ale, and remove
the front wheel.
2.hen assembling, align the center hole of the front wheel with the double arm hole of the hydraulic front for,
penetrate the front ale into the hole, and tighten the left and right fastening nuts of the front ale cloc wise.
After installation, rotate the front wheel, and there shall be no stuc or loose phenomenon. The recommended
torue is not less than 18N. m
I.ear wheel disassembly see Figure 6
1.ull the motor cable o the connector, turn the car body overnote: Do not touch the handlebar, head cover,
toolbo parts, rotate the rear ale nut, rear brae positioning nut and brae cable in the counterclocwise
direction, unpac the chain oint, and then remove the rear wheel in the direction of the opening.
Note: To ensure driving safety, brae rubber the woring face is worn to 1/2 of brae rubber, a new brae
rubber should be replaced.
ABC
1
5
2 3 4
05

Adjustment methods of each part
.The folding and epansion methods of folding bicycle are as follows: the epansion steps are from ⑩to ①
①Rotating T handle ②ower by vertical tube
The height cannot eceed the limit mar.
③pen safety loc ④Rotate vertical tube
⑥ ower seat tube
The height cannot eceed the limit mar.
⑤Folding riser 06

Adjustment methods of each part
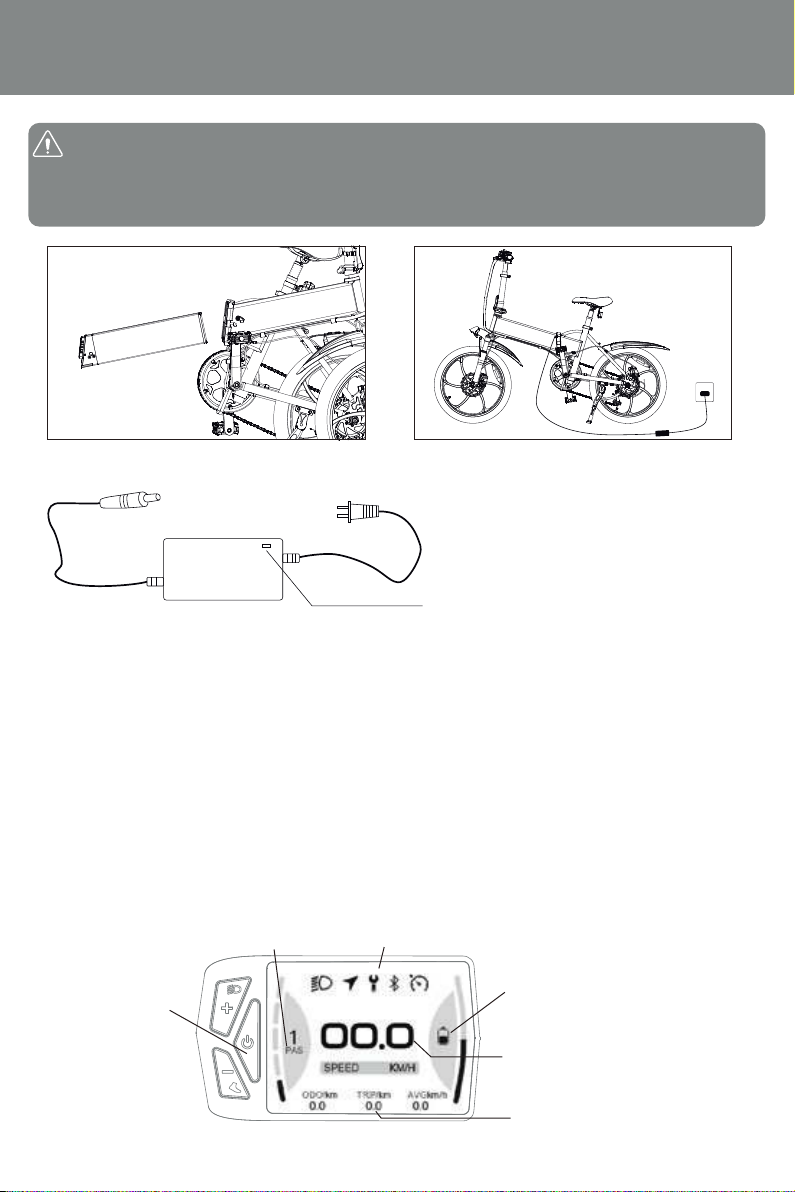
VI.Battery installation
The battery is mainly composed of two pieces, cell and protection board CM power battery is generally called
battery management system BM. Cell is euivalent to the heart of the battery, and the management system is
equivalent to the brain of the battery.
Cell is mainly composed of positive electrode material,negative electrode material, electrolyte, diaphragm and
hell, while the protection board is mainly composed of protection chipor management chip, M tube,
resistor, capacitor, CB board, etc.
pen the ed loc with the ey. Dial o the power plug, tae out the battery, instead, insert the power plug, loc
the battery loc, and conrm that it is safe and rm before riding.
⑦Folding pedal ⑧ pen the frame and fold safety loc
⑨ Folding frame ⑩Finish folding
1.pen folding connector 2.Fold the vehicle and pull out the key
insert the key to unlock
07

Adjustment methods of each part
VIII.Instructions for using the code table:
1. Long press Power key for 3 second to switch on/off the ebike;
2. In the power-on state, press POWER KEY, the multi-function area will display ODO, TRIP, TIME.
ODO: Total mileage of this bicycle
TRIP: Miles since the ride
TIME: Start-up time of this ride
3. Press the“+” button to increase the gear. The higher the gear, the faster the speed.
4. Press the“-” button to lower the gear. The lower the gear, the slower the speed.
5. PAS gear: (After pedaling to 6 km/h, start the power assist)
Gear 1: Max 15km/h Gear 2: Max 20km/h Gear 3: Max 25km/h
Note: Before using the bicycle, insert the ey and turn it counterclocwise by 45, the battery is activated.
Finished using the bicycle, turn the ey 45 cloc wise, the battery is powered o, and tae out the ey.
emove the battery step, insert the ey, press it upward and then rotate it 90 clocwise. Note that need
to remove the ey and then tae out the battery to avoid damaging the ey.
3.Take out the battery and charge the
battery separately
4. You can also choosevehicle
charging
ed light indicates normal charging reen
light indicates charging completed
Switch on/off Battery power
Speed display
Assist gear Vehicle status
Multifunctional display area
08

Guide for App Installation and Registration
1. Download the App:
2. Register an account:
3. Login:
1.1 For an iOS device, please search for "ADO EBIKE" in the App Store and install it.
1.2 For an Android device, please search for "ADO EBIKE" in Play Store or scan the QR
code below to download and install it.
* When installinq the App, please read all the relevant prompts and agreements, and
agree to all the authorizations, otherwise the ADO EBIKE App may not work normally.
Click "Sign up"
Enter your username
Enter your personal email
Click“OK”to complete the
registration
Enter your personal email Enter your personal email
Click on the orange text to
obtain a verication code, and
enter the received verication
code in the input box
Enter your login password
Set your login password
Click on the orange text to obtain
a verication code, and enter the
received verication code in the
input box
Log in with the account and password
you registered Log in with the registered email and
verication code
09

Guia de instalação e registo da aplicação
5. Main features of the APP:
Click "Adding a Device" on the pop-up
window
* Data connection and statistics
* Navigation for travel
* Special statistics on navigation data
* Riding record
* Meet users' demands
* ADO QTLlab display
* Parameters setting
* Device upgrade
Click "Start searching" Click the device "ADO-EBIKE" for
connection
Power on the bicycle and enable your
mobile phone Bluetooth, and then click
"Choose Bluetooth" on the upper right
corner
Guide for App Installation and Registration
4. Device connection:
Please click on the top right if you
need to switch to your desired language Click "Select a voice" to switch
10

Electric bicycle fault inspection
and troubleshooting methods
Note: hen a fault that cannot be eliminated by yourself or a fault that cannot be determined, the internal
damage of the motor, controller, charger, battery pac, etc. please send the vehicle to the place of
purchase or the companys special maintenance station for inspection and maintenance. During the
warranty period, please do not open important parts without authoriation, otherwise the company will
not guarantee.
1.hen doing bicycle maintenance, the battery must be removed to avoid abnormality that may cause re
or damage to the battery.
2. riginal parts should be used in repairing or maintaining the bicycle, otherwise your bicycle may not
wor properly, or related parts may be damaged.
Speed regulation failure
or speed less than 10 m/h
1,ow battery voltage
2,Speeder failure
3,Transmission roup failure
1, Fully charge the battery
2.end to maintenance station
for repair
1, Tae out the battery bo and
hang it up.
2,Fastening wiring plug
3, end to maintenance station
for repair
1, ucient gas
2, ucient power or chec the
charger
3, Replace battery
4, It is recommended to use
pedal assist
1, Fastening socket
2,Send to repair station for
replacement
3,Replace fuse
1,eplace new battery
2,Reconnection \fastening
3,end to maintenance station
for repair
1, eplace motorcycle handlebar
and repair lines
2, Timely charging
3, Replace left and right brake handle
4, eplace controller or motor
eplace damaged parts/
maintenance lines
Chec switch position/replace
booster/overhaul line
1,oose battery wiring
2,Motor wiring plug loose o
3,Speeder failure
1,The plug is not inserted
properly
2,Charger fuse blown
3,Battery pac fuse blown
1, When starting the electric hub.
the voltage is lower than 30
2, Battery switching line fall o
3, Monitor connector loose
4, Controller failure
1, Battery under voltage;
2, Left and right brake handle
damage
3, The controller or motor is
damaged
4, Abnormal line
5, Motorcycle handlebar damage
or line dierence
1, The startup mode switch or
motorcycle handlebar is
damaged.
2, Abnormal line
1, Incorrect start-up ta switch
overlap or booster damage
2, Abnormal line
1,Insucient tire pressure
2,Insucient charging or
charger failure
3,Battery aging or damage
4,There are many uphill strong
headwinds heavy load poor
road Mow temperature
ub motor does not wor
after power on
Insucient mileage
after charging
Charger not charging
The battery has sucient
power but no voltage
indicates that the electric
wheel hub is dicult to
After opening electric door
lock, it is found that the
signal part is normal and
the driving part is abnormal.
Abnormal ero start mode
switch left and right dis
Non-ero startup mode
eception switch in
the middle
Serial Number Fault description Failure cause analysis Troubleshooting methods
1
2
3
4
5
6
7
8
11

Maintenance and Repair
Daily maintenance:
1.The vehicle should be ept clean and clean, and the vehicle should be wiped with dry cloth in time after being
drenched to avoid rusting of parts and short circuit of electrical components.
2.Always chec the air storage capacity of the tire to eep it in normal use.
3.The main transmission parts such as front ale, a roar ale, conter ale, front for, Flywheel and electric hub
should be checed and adusted freuently to eep the transmission parts eible without impact sound and
noise Chec the screws and nuts of the bicycle, if it is found that it is loose, it should be tightened in time to
prevent the parts from being worn out or causing greater damage and fracture due to looseness.
4.The braing part should be checed and adusted freuently to mae it in a eible state, for eample, the gap
between the brae rubber and the gate core should not be too large.
5.Always chec whether the operating parts and cable are eible, and ensure that there is no stagnation, no
stagnation, and properly drip lubricating oil from one end of the hose slowly, and pull the wire rope at the same
time, feel that the wire rope slides lightly in the hose.
6.Electric bicycle moving parts should be often inected with a small amount of lubricating oil to reduce wear and
eep riding light, as shown in the following table:
Correct use and maintenance methods of motor, controller and battery:
1.The motor should be ept clean, no foreign matter, corrosive liuid, gas, etc. should enter the motor, and the
motor hell should not be noced and baed to avoid damage to the motor.
2. All wires should avoid friction and contact with sharp metal, and the wires should be tied rmly with the frame.
3.The controller is a high-tech intelligent computer memory program password. If the user opens the repair by
himself, the components will be easily damaged. If the controller fails, please go to the service department to
repair it.
4.This battery is a special battery for electric bicycles. hen the electric bicycle is not used for a long time, the
battery should be stored after sucient electricity, and the electric energy should be replenished regularly to
avoid battery vulcaniation caused by long-term under power.
5.The battery cannot be near open ame or high temperature heat source, and the battery cannot be thrown
into the re. Direct eposure to the sun is strictly prohibited in hot and hot weather.
Note that the tightening torue of front wheel, handlebar core screw rod, saddle pipe clamping Bolt and
saddle clamping Bolt shall not be less than18N.mThe tightening torue of rear wheel, bottom bracet Cup
and bottom bracet Cup loc nut shall not be less than 30N.m
Front ale, center ale, a rear
ale bearing 3 calcium-based lubricating oil i months to one year
alf a year
alf a year
alf a month
alf a month
3 calcium-based lubricating oil
3 pieces of calcium-base
lubricating oil
30 mechanical oil
30 and mechanical oil
front fork headset
edal bearing
Chain
Double support locking plate side
support and transmission parts
Name andle
horizontal tube stem Saddle Saddle pipe front ale rear ale Center shaft nut
Running torque 18N. m 18N. m 18N. m 18N. m 18N. m 30N. m 30N. m
Lubrication part Lubricant Lubrication cycle
Location Method Time
Center shaft
Front and
rear wheels
brake cable
brake handle
Chain
Front and rear nut, handlebar
core screw, saddle clamping screw
Chec whether the bottom bracet Cup is loose/disassemble
the central shaft, wash and change oil, and chec the parts.
Chec the wheel swing, spoe tension, spoes, mother spoe
for damage Adust the wheel
If there is a steel wire at the root of the rolling head,
replace the new brae line.
If there is a steel wire at the root of the rolling head,
replace the new brae line.
Chec whether the pin shaft is loose or bulging, and
whether the etension of the chain is too large.
Chec for looseness
Chec freuently /once every year
The rst month/year after the
rst new car
nce every month
nce every three months
nce every si months
nce every si months
12

After-sales service and warranty scope
rovide correct operation methods and maintenance items, provide valid car purchase ticets, warranty cards,
and the address and contact number of the warranty unit.
2.sers should operate correctly according to the product manual. Any performance failure caused by produc-
tion quality,according to relevant laws and national Three uarantees regulations,the company shall
uniformly fulll the Three uarantees obligations.
3.The company is responsible for the repair of faults outside the scope of the Three uarantees and the main
components after the Three uarantees period, but the fees shall be charged as appropriate.
4.If the battery replacement eceeds the Three uarantees period, the company will supply it at the e-factory
price, but the battery must be recycled one by one and returned to the battery manufacturer to ensure safety
and avoid environmental pollution.
- warranty period for maor parts
Details of warranty scope and term
It does not belong to the scope and content of the Three Guarantees:
1.Failure caused by users failure to use, maintain and adust according to the instruction manual.
2.The user disassembles and rets himself, as well as faults caused by non-compliance with the rules of use.
3.Faults caused by improper use, storage, or accidents.
4.There is no warranty card, and the receipt lin is not sent bac to our company, or vehicles with inconsistent
cards and goods.
5.earing parts and consumables shall not be provided in three pacs. Including brae, seat bag, plastic parts,
spokes, RIM, brake cable, surface scratch, etc.
6.The cost of self-repair without the consent of the special maintenance unit.
7.After the accessories leave the factory, the shell is scratched or the shell is damaged without repair. The lead is
scratched or broen without repair.
art name
Frame
arranty eriod ecept human factors Warranty Service content
Natural open welding, desoldering and fracture
phenomena
aint patches fall o
5 years
12months
12months
12months
12months
12months
12months
15 days
6 months
Free replacement
Free replacement
Free replacement
Free replacement
Free replacement
alf-year renewal and
half-year maintenance
Since the date of delivery,
the capacity is less than
60. Free maintenance or
replacement
Free repair or replacement
Free replacement
front for Frame,
Fender, chain cover,
anger
andlebar, IM,
Sprocket, crank,
Front or rear ale,
Flywheel and other
rotating parts
Motor
Controller. charger
ithium battery
Inner tube
aint parts
Fuse, Bulb, cable. switch,
brake shoe
uter tire
Electroplating parts fall o
Damage or fracture of heat treatment parts
otor breaing, casing cracing. inding damage
Circuit damage and component damage
Ecessive capacity drop, no voltage
release, battery safety hazards
Air leaage caused by internal uality problems such
as trachoma will not be replaced after repair.
arge pieces fall o, obviously fade, blister, crac
ulnerable parts, not covered by warranty
eplacement for cracing within 1 month non-human factor
13

Maintenance record
Warranty description:
1.All parts of the vehicle will be guaranteed strictly according to the warranty period.
2.The warranty period starts from the factory date.
3.If you unpac the controller, charger, battery and motor privately, no warranty will be given.
4. If the parts eceed the warranty period, the warranty will not be granted.
5.hen the vehicle fails, the maintenance must be carried out at the designated maintenance
point, and the accessories must not be disassembled and assembled privately. Controller, battery
and charger must ensure that all labeling is complete, and no one is damaged.
6.hen the vehicle is repaired, relevant certicates such as warranty card, invoice, certicate of
conformity and so on must be presented.
7.Battery warranty adopts one-to-one warranty. In case of battery problems, the battery must be
returned to the manufacturer rst. After the battery is tested by the manufacturer, udge whether
the battery is broen according to the battery testing standard, and determine whether the battery
damage is within the scope of warranty, and then carryout warranty.
8.The controller will be maintained for warranty. The replacement of the controller must ensure
that the plug-in is complete for testing. If it cannot be repaired, a new controller will be replaced. If
the controller is damaged manually, it will not be guaranteed.
9.ay attention to the maintenance of the whole vehicle and avoid riding in the water as much as
possible. The damage of electrical devices caused by water inow will not be guaranteed.
10. If you buy the bicycle from an oine store, please go to the point of purchase for after-sales
service.
11. If you bought abuy the bicycle from an online store. hen you need to repair it, please bring
the proof of purchase and apply for after-sales service at the corresponding online store.
12. If you are dissatised with the after-sales service at the point of purchase, please provide the
relevant purchase information and contact the following customer service:
After-sales ervice email : upportadoebie.com
cial website : www.adoebie.com
Date Maintenance content Remarks
14

Electrical schematic diagram
ower negative
Motor line
Motor all
ear brae handle power-o switch
eadlight switch
Anti-theft
device
ower supply
electric door lock
Charger dipped
headlight
Speeder
Speeder
Taillight
Contraller
30A fuse
Batter
M
-
ACC
A3
w
F5
eadlight
Fuse
Fuse
Battery
Charger
charging interface
5A
Controll 15

A20F Beast Product Description
+DUGZDUH&RQJXUDWLRQ
Bicycle type
Tires Size:
Ma peed:
Mileage:
oad Capacity:
roduct Net eight:
roduct ross eight:
verall nit:
After Folding:
acing sie:
Body Material:
Motor Type:
Transmission:
Shock Absorber:
Brae ystem:
Battery Type:
Battery Capacity:
Battery Charger ower:
Folding Electric Bicycle
204.0 inches Fat tire
25m/h
<120m
120g
28.5kg
37.5kg
17405301200mm
980450770mm
1010490730mm
Aluminum alloy 6061
all Brushless DC Motor
himano 7 speed
Front fork shock absorber
Front and rear hydraulic disc brakes
ithium battery
36/14.5A
42/2ACE/ afety
ear wheel
Motor
ehicle nameplate
location
Saddle
Battery pack
Transfer handle
ehicle Code
engraving position
eadlight
Front fork
16

Introducción requerida
Queridos usuarios:
rimero ue nada, gracias por comprar nuestros productos. Todo el euipo de la compaa les agradece
cordialmente por elegirnos Este manual incluye el sentido comn y los mtodos de mantenimiento de las
bicicletas elctricas producidas por nuestra compaa. ea el manual con cuidado luego de su compra, para
poder entender cmo funciona, sus caractersticas, precauciones y el sentido comn de mantenimiento de est
bicicleta, asegrese de usar la bicicleta elctrica de manera segura y en la meor condicin de maneo.
ara asegurar la seguridad al usar nuestra bicicleta elctrica, asegrese de usar nuestros repuestos
profesionales. i tiene alguna pregunta, contctese con nuestra central de atencin autoriada o con la
compaa.
ueridos usuarios, al comprar nuestros productos, complete la tareta de registro de ventas garanta de la
bicicleta elctrica de manera clara y guarde la garanta de usuario con cuidado, entregue las otras dos copias a
la central de atencin local de la compaa o a la distribuidora para ue podamos contactarnos con usted a
tiempo.
★ Conseos importantes
1.os patrones y descripciones de teto de este manual solo deben usarse como instrucciones para el maneo y
no como una base para revisar los productos
2.uede ser ue la ilustracin de este manual no coincida con el producto real, y el estilo real de venta
prevalecer
3.a compaa tiene el derecho de meorar el funcionamiento del producto y conguraciones pertinentes sin
aviso previo;
4.Este vehculo se puede manear solo, y no llevar gente.
5.Este producto sirve para recorrer distancias cortas a diario. No lo use para recorridos peligrosos como ser
competiciones y acrobacias. De lo contrario, se pueden provocar daos a la bicicleta o lesiones personales.
6.ara evitar cadas y lesiones, no se recomienda andar en bicicleta en das lluviosos.
7.Este producto es de uso general. Asegrese de ue el producto cumple con las normas locales antes de usarla.
Tenga en cuenta ue deber asumir todas las responsabilidades legales.
8.i modica o cambia el estado por defecto de la bicicleta elctrica sin permiso, deber asumir todas las
responsabilidades legales.
Elegiste usar nuestros servicios En los siguientes das, le proporcionaremos un servicio conveniente, oportuno,
rpido y satisfactorio de todo coran ea las instrucciones con cuidado antes de usar, tampoco debe usarla sin
saber sus caractersticas lea con cuidado los trminos peligro, advertencia y atencin
eligro: i ignora esta advertencia puede sufrir accidentes personales. ara reducir el dao
hacia usted o a terceros, se dar una advertencia especial sobre lo ue se puede o no hacer.
Advertencia: i ignora esta advertencia puede provocar daos al vehculo y su euipo, advierte en
detalle lo que se puede o no hacer.
Nota: i ignora esta advertencia puede provocar daos leves al vehculo y su euipo, o el
vehculo no funcionar de manera correcta, advierte sobre lo ue se puede hacer o no.
17

Consejos especiales para un manejo seguro
ueridos usuarios, para su seguridad y para evitar accidentes, lea y siga los siguientes conseos.
I.Al usar bicicletas elctricas, debe cumplir con las normas de trco y prestar atencin a la seguridad de maneo.
1ersonas menores de 16 aos no pueden manear bicicletas elctricas en la calle
2as bicicletas elctricas solo deben manearse en carriles no motoriados y a menos del mimo de velocidad
denido por leyes y normas locales.
3No preste las bicicletas elctricas a personas ue no manean con cuidado
4as bicicletas elctricas pueden llevar personal u obetos segn las leyes y normas
5e recomienda usar casco al manear
6Manear en das lluviosos o nevosos, la distancia del freno se prolonga, est atento a disminuir la velocidad En
caso de lluvia fuerte u otro mal tiempo, es meor no viaar.
II.reste atencin a la seguridad de las bicicletas elctricas.
1No se deben estacionar las bicicletas elctricas en los vestbulos de edicios, escaleras de emergencia, pasillos
o salidas de emergencias
2No se deben cargar y estacionar las bicicletas elctricas en edicios residenciales, y deben mantenerse leos
de combustibles al cargar, adems el tiempo de carga no debe ser muy largo
3so correcto y mantenimiento de la batera:
Cargue la batera por 12 horas la primera ve luego de su comprar o despus de estar almacenada por un
largo tiempo. i la usa con regularidad, crguela por 12 horas cada dos meses. i no la usa en mucho tiempo,
separe la batera del complemento del cable de alimentacin del vehculo, cada mitad de mes.
No se debe hacer corto circuito los polos positivos y negativos de los tomas de entrada y salida de la batera
Mantenga leos de nios, fuentes de fuego y calor, no se debe colocar la batera en fuego
ibraciones arduas, choues y etrusiones sobre la batera estn absolutamente prohibidas
reste atencin a la proteccin de agua para evitar ue la batera se moe o sumera en agua
e debe cargar la batera al usar. i no la usa en mucho tiempo, asegrese de retirarla de todo el euipo para
luego almacenarla
a batera debe almacenarse en un lugar limpio, seco y ventilado, y no debe entrar en contacto con sustancias
corrosivas y debe estar aleada de fuentes de fuego y calor
Conseos sobre temperatura
1.Entrada de agua no garantiada, use el cargador original para cargar
2.No cargue en la cocina, sala de esta, habitacin u otros lugares domsticos
3.e recomienda ue el ciclo de vida de la batera sea de 2 aos para evitar daos por antigedad.
Condiciones para almacenamiento de la batera. Temperatura ambiente -2055C umedad ambiente
65. Temperatura de la batera en funcionamiento: -10-45C.
eligro: No se deben desmantelar las bateras vieas sin autoriacin, tampoco se deben tirar
para no contaminar el medioambiente as bateras de este producto deben ser recicladas
por la empresa o distribuidores o puntos designados por el gobierno
Conseos sobre temperatura
1.Entrada de agua no garantiada, use el cargador original para cargar
2.No cargue en la cocina, sala de esta, habitacin u otros lugares domsticos
3.e recomienda ue el ciclo de vida de la batera sea de 2 aos para evitar daos por antigedad.
4.No toue los frenos y los discos luego de frenar para evitar uemarse.
5.evise si hay algn obeto en el cubo de la rueda antes de andar para evitar lesiones personales.
6.Al andar, no permita ue obetos toue el cubo para evitar lesiones.
7.Al andar no toque el cubo de la rueda con ninguna parte del cuerpo para evitar lesiones personales.
8.Este producto no produce un sonido mayor a 50 DB. i siente un ruido claro, pare y revise si la bicicleta est
uncionando de manera correcta. 18
This manual suits for next models
1
Table of contents
Languages:
Other ADO Bicycle manuals