Bzooma Amsterdam User manual

1
Owner’s Manual
Marketed in Australia and New Zealand by Bzooma Pty Ltd ABN 37 640 907 507

2
CONTENTS
Bzooma Pty Ltd ................................................................................................................................................................................... 3
Manufacturing Profile ......................................................................................................................................................................... 3
Assembly ............................................................................................................................................................................................. 4
Set Up. ................................................................................................................................................................................................. 4
Install front wheel ............................................................................................................................................................................... 4
Alignment of the handle bars. ............................................................................................................................................................ 5
Install Pedals and Tighten Crank. ........................................................................................................................................................ 7
Front Brake Set Up .............................................................................................................................................................................. 7
Gear adjustments ................................................................................................................................................................................ 8
Gear Adjustment-all cable-operated Nexus and Alfine 4-, 7-, 8- and 11-speeds: .............................................................................. 8
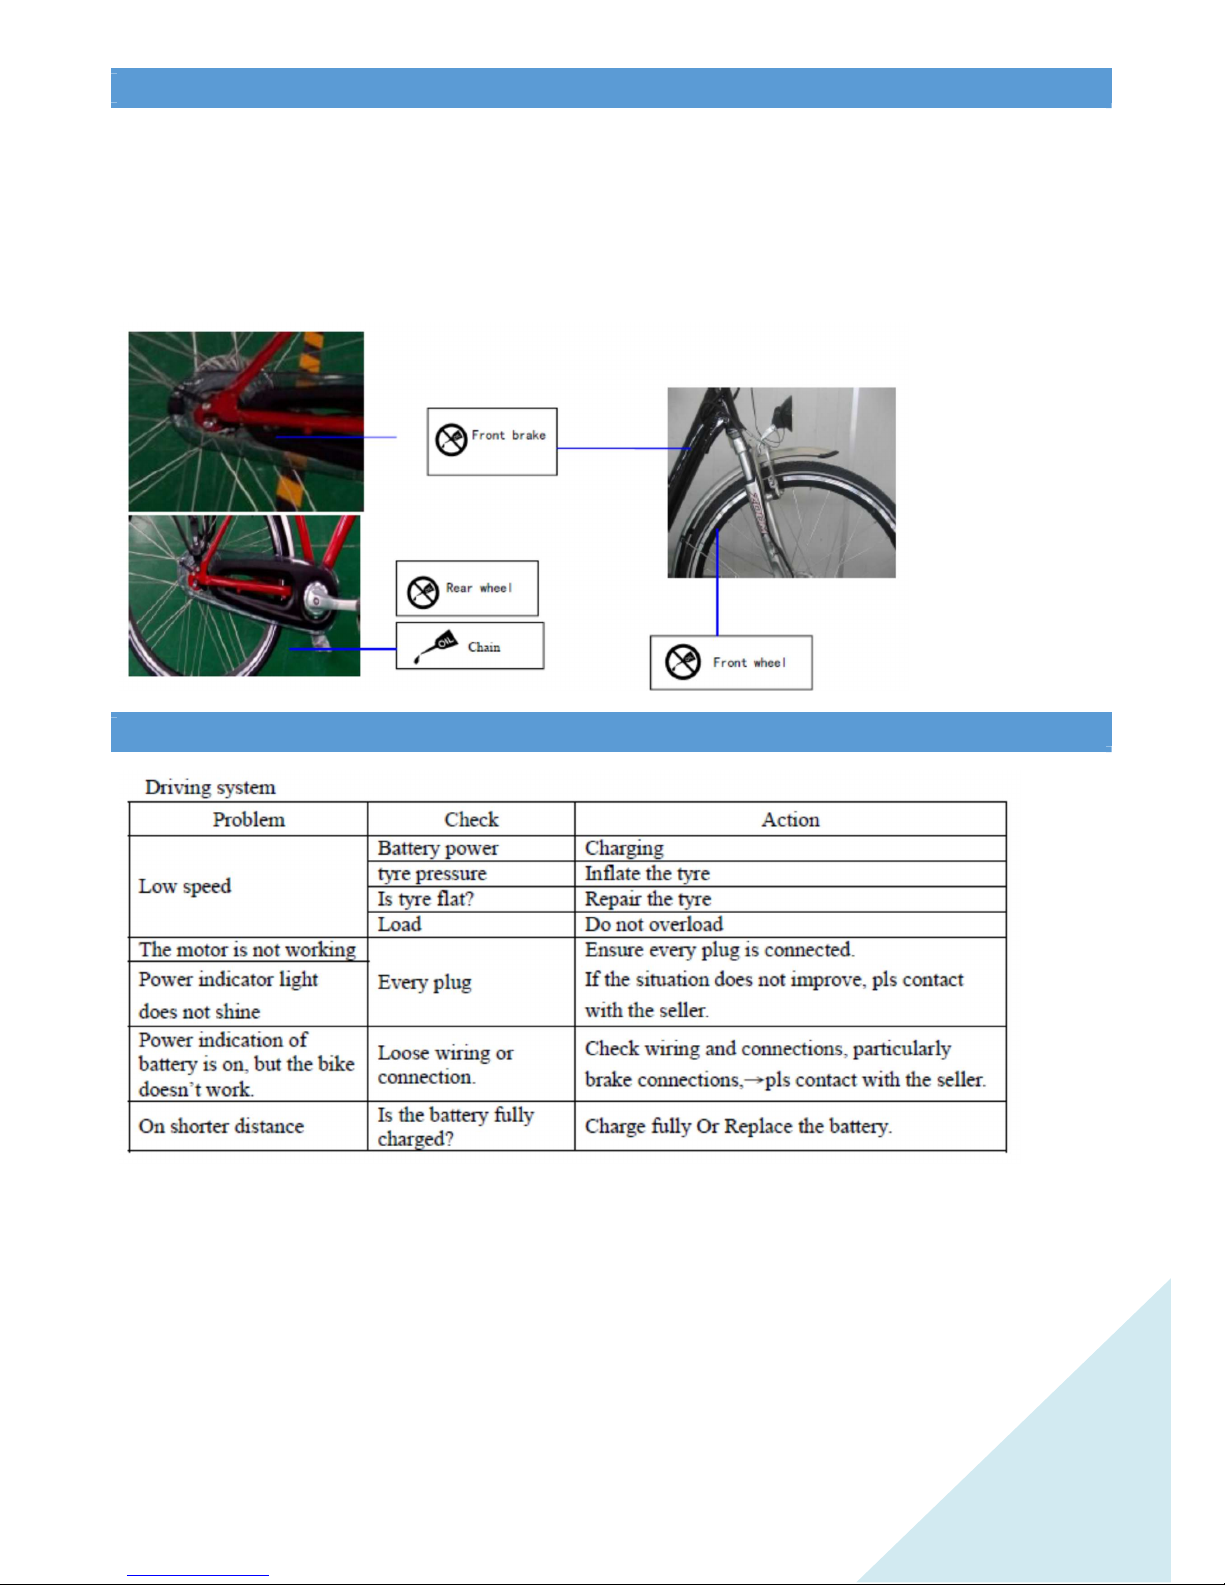
Inspect before riding ........................................................................................................................................................................... 9
Charging .............................................................................................................................................................................................. 9
Maintenance ..................................................................................................................................................................................... 10
Simple Troubleshooting .................................................................................................................................................................... 10

3
BZOOMA PTY LTD
This User Manual is written and published according to the latest BZOOMA PTY LTD specifications. We will continue the
policy of improvement and may make some changes in the design and specifications without notice. If you have any
enquiries, please contact your local dealer or buy directly from this web site bzooma.com.au. We recommend delivery to
your nearest Bzooma dealer.
This manual is published by Bzooma Pty Ltd
MANUFACTURING PROFILE
Amsterdam Factory
Our new factory here in China is one of the most modern in the world. We produce several high-end European brands as well as
our brands. We specialise in producing and marketing E-Bikes. Most of our exports are to Western Europe.
Our factory occupies a production area of 30,000 square meters with five state-of-the-art automated production lines. We
employ 500 permanent engineers, production operators and quality control staff, with an annual production capacity of 150,000
e-vehicles. Our factory has achieved ISO certification, and our products have attained European CE and EMC certifications and
EPAC and EN15194 certifications. We practice ISO9002 Quality Management and 5S Implement System to monitor performance
and problem-solving. We have an excellent reputation in our field not only for the quality of our products but most importantly
for our customer care, after-sales service, distributor support and market share understanding.
We believe "Our survival depends on quality” hence our products are unmatched for value, and price. Our company offers the
best service to the old and new customers alike.

4
ASSEMBLY
Tools Required
8 mm ring spanner, 10 mm ring spanner, 15mm pedal spanner, 14 mm open end spanner, 5 mm hex key, 6 mm hex key, screw
driver, cutters/plier
Set Up.
Install front wheel
It is important that you fit the front wheel with the axle locked to the fork with the anti-rotation locking washers. (Washer with
locating lug as shown in photo 1)
The pressure of the nuts alone will not prevent the axle turning and pulling the electrical cable from the motor. If that occurs,
the damage is irreparable and not covered by warranty.
Locating Lug

5
Disconnect the brake cable to spread the brake pads ( see photo) which then allows the tyre to fit between the brake pads as
the wheel drops into place.
Drop the fork on to axle as shown in the photo 2. Ensure you observe the locating washer lug fits into place on the fork.
The washer and nut go on last. Tighten the nuts to torque 40-45N/m.
Fit the mudguard and reconnect the brake cable.
Connect the electrical cable ensuring the arrows on the plugs are aligned, then fix the cable to forks with the at the provided
points.
Fork Fits Here

6
Alignment of the handle bars.
The handle bar assembly may need some small adjustment for the alignment of the headset to the
front wheel. Slide the black lock device with your thumb to lift and release the handlebar adjustment. No tools are required.
Use a 6 mm Alen key to loosen the handle bar stem.
Align handle bars, so it is perpendicular to the front wheel.
Carefully lower the handlebars back down and tighten the 6mm hex key firmly. Check and
recheck for firmness.

7
Install Pedals and Tighten Crank.
Use a small amount of grease on the shaft before installing. Right and left pedals are marked because the thread differs on each.
Tighten with the pedal spanner or 15mm spanner. Remember bicycle pedals tighten in a clock wise direction.
Remove Plastic chrome cap on the crank and tighten with 14mm socket. Both Left and right-hand sides.
Front Brake Set Up
V-Type brake. Clip Cable Guide through black support holder as shown. Loosen the 5 mm Allen key cable
holder and pull the cable through until the pads are just touching the rim. Ensure you have removed the rubber
band from the lever. Adjust as necessary, so brake shoes are square with wheel surface and are not rubbing
on wheel during rotation. Around 1-2 mm clearance is ideal.

8
Gear adjustments
The factory sets up the gears perfectly, so if ever necessary; we recommend you have a bicycle workshop assist you with the
adjustment of the gears.
Gear Adjustment-all cable-operated Nexus and Alfine 4-, 7-, 8- and 11-speeds:
Adjustment is made with the shifter in 4th gear for the 4, 7- and 8-speed hubs, 6th gear for the 11-speed hub. On the right side of
the hub, just outboard of the sprocket, there is the "cassette joint pulley" which the cable turns as you change gears. Next to this
is the "cassette joint bracket" which is stationary. Both the pulley and the bracket have index marks, and gear adjustment is correct
when the marks on the two parts align with the shifter in 4th gear (6th gear on the 11-speed).
There are two sets of these marks, one on top, the other on the bottom which lets you see one set of marks whether the bike is
right-side up or upside down.
This procedure is the same for the Nexus 4-, 7- and 8-speed hubs, using the 4th gear as the reference. In the case of the 8-speed,
however, the marks you need to line up are yellow, not red.

9
INSPECT BEFORE RIDING
1.Check the grip.
2. Check tyre pressure.
3. Check brake pads for wear and replace in necessary.
4. Check Brakes for alignment of front pads and wear.
5. Check the tightness of chain and Q-release
6.Check the gear function.
7. Check pedal tightness on the crank.
8.Check the power indication.
9.Check battery status via Charge light on charger and bike
10.Check the tightness of saddle.
CHARGING
The bike will arrive with some charge in it however it is recommended you charge it before riding. Follow charging instructions
provided with the charger carefully.
Connect the plug to the battery case firstly, and then connect the alternating current power supply. When in charging, the
indicator light is red. When fully charged, the indicator is green. When fully charged unplug in the reverse order. Unplug the
power supply firstly, and then from the battery case.
Do not drop the charger as it has sensitive electronics inside and damage may result.
Do not cover with any material or substance that may restrict airflow around the charger.
Charge the bike each time you use it no matter how far the trip will prolong the life of the battery.
DO NOT leave the battery discharged for long periods as it will damage the battery.
Charge only in a cool well-ventilated area. Never cover charger.
Never open the charger or change settings on the charger.

10
MAINTENANCE
1. Wipe the bike with a dry cloth, or neutral detergent.
2. Use lubricating oil for metal parts.
3. Wipe the plastics, paint coating part with a dishcloth.
4. Increase the frequency of lubricating oil in wet and humid areas
See as below (Recommend 30SAE lubricating oil).
Need lubricating oil: Do not wipe with lubricating oil
SIMPLE TROUBLESHOOTING

11
Warranty
Bzooma Pty Ltd Limited Warranty
Bzooma Pty Ltd provides this Limited Warranty to the original
purchasers of new Bzooma machines in Australia and New Zealand.
Bzooma Pty Ltd guarantees the machine, power base including Motor,
Battery and charger, against defects in materials and workmanship for
a period of one (1) year, from date of delivery to the original purchaser.
Damage caused by accident or obvious abuse is not covered by this
warranty.
To make a claim covered by this warranty the purchaser must contact
an authorised BZOOMA Pty Ltd Dealer for inspection and service.
Indications of abuse, accident, or unauthorised tampering with the
machine power base mechanical, or electrical equipment, will void any
claim. Bzooma Pty Ltd is not responsible for transport costs associated
with obtaining service or repairs under this warranty.
Table of contents
Other Bzooma Bicycle manuals