Adonis FX-8100 User manual

ADONIS
FX-8100
FLEXIBLE MOBILE MICROOHONE
WITH WIRELESS PTT SWICH
INSTRUCTION MANUAL
Space Electric Corporation
OSAKA, JAPAN

SEC
- 2 -
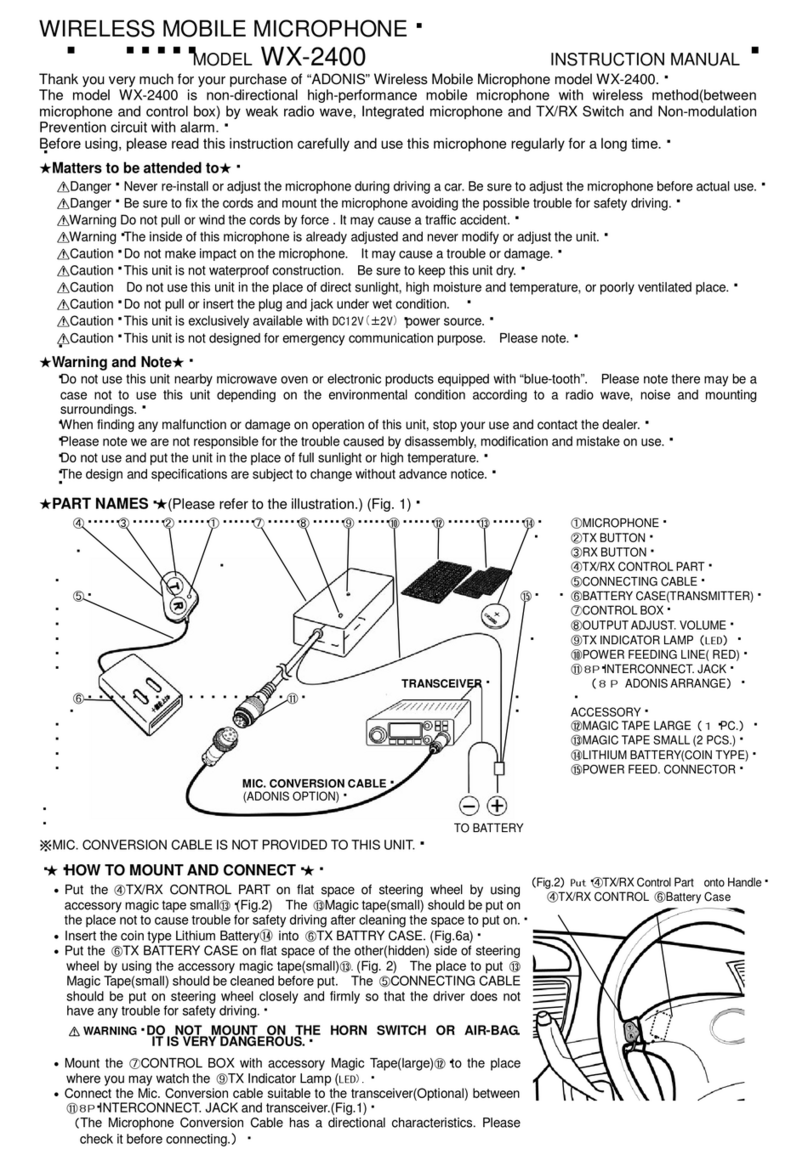
“ADONIS”MOBILE MICROPHONE MODEL FX・8100 WITH OPTICAL WIRELESS PTT SWITCH
Thank you very much for your purchase of Mobile Microphone model FX-8100.
The model FX-8100 is unidirectional highly efficient mobile microphone provided with optical
wireless PTT switch and Non-Modulation Prevention circuit with alarm sound.
FEATURES:
●Safety driving is assured for you by optical wireless PTT switch.
The switching of transmission and reception can be done without releasing a steering wheel.
The switching of transmission and reception can be done also from both optical TX/RX controller
and Switch Box of optical receiver.
The Switch Box of optical receiver is equipped with “PTT”,“LOCK”,”UP”,“DOWN”switches
and LED transmission indicator lamp.
Mount the flexible microphone onto the sun visor.
Microphone sensitivity can be adjusted by output volume.
Corresponding to each transceiver by using microphone conversion cable optionally available.
●Microphone conversion cable with power feeding line is available.
Power feeding from both car battery(DC12V)and microphone connector of transceiver are
available. (When using the transceiver providing the power to the microphone, ”ADONIS””
D” series conversion cable with power feeding line is recommendable to use. )
●Non-Modulation Prevention Circuit with Alarm Sound.
The alarm circuit with alarm sound will activate for continuous transmitting condition and
return the condition to receiving mode automatically.
SPECIFICATIONS:
●Uni-Directional Electret Condenser Mic. : 1 piece
●Flexible Gooseneck :8mmφ(length 28cm)
●Microphone&Interface Cords : Approx. 3 m
●ln/Output Cord :10 cm
●Matching Output Impedance :500Ω~50kΩ
●Output Voltage :O~50mV
●Power Voltage
Power Feeding Line (Red):DC12~15V
Mic. Conversion Cable “D” series :DC5~10V
●Control Box Size :90(H)×50(W)×25(D)mm
●Weight(only for Control Box) :200g
PART NAMES (See the illustration):

SEC
- 3 -
①Flexible Gooseneck
②Mounting Hardware
③Mic. Cord with RCA plug
④ln/Output Cord
⑥Switch Box(Optical Receiver)
⑥Sensor Window
⑦TX Indicator Lamp (LED)
⑧PTT Switch
⑨LOCK Switch
⑩UP Switch
⑪DOWN Switch
⑫Interface Cord
⑬Control Box
⑭Output volume hole
⑮Power Feeding Line
⑯8P Interconnecting Jack
⑰Mic. Conversion Cable
⑱T〉く/RXController
⑲Txbutton
⑳Rxbutton
6Infrared Emission of Light
7Battery case for optical Transmitter
8Holder Wire for TX/RX Controller
-Accessories -
9Windscreen
:Coin type Lithium battery(CR2032)
;Magic tape for battery case mount
<Magic tape for control box mount
8 PIN “ADONIS” Terminal Connection
(8P Relay Jack)
1E: Earth (Mic. Signal) Shield
2M: Mic. Signal Yellow
3P: PTT(press to talk) Red
4G: Earth (PTT) Purple or Blue
5U: Up Green
6D: Down White
7C: U/D Common Orange
8B: DC Feeding(+) Gray
HOW TO MOUNT AND CONNECT:
●Fasten the Mounting Hardware②of flexible microphone to sun visor or fix it to any convenient
place.
●TX/RX Controller⑱should be fixed to the convenient place on flat surface of steering wheel
after cleaning the space to be fixed. (Please refer to the illustration of mounting sample
on the package.)Set the coin lithium battery (CR2032) into the battery case for optical
transmitter and stick it at the appropriate position on the rear side of steering wheel with
magic tape. The holder wire for TX/RX controller should be closely fixed to the wheel so it
may not interrupt driving.
WARNING: Do not fix on the “Horn Switch”or “Air Bag”.
●The Control Box⑬should be mounted by the magic tape provided.
●Connect the ③Mic. Cord with RCA plug to the ④ln/Output Cord which is out from Control Box
⑬.
●Connect the ⑰Mic. Conversion Cable (option)which is suitable to the transceiver in-between
⑯8P Interconnecting Jack of ④In/Output Cord and transceiver. The Mic. Conversion Cable has
a directional characteristics. Be sure to check it before connecting.
●The ⑮Power Feeding Line should be connected to the (+)side(12~15V)of Power Supply of the
transceiver. ※lf the transceiver Mic. Connector has a output of DC Power feeding,DC5V
~10V,50mA,“D” series conversion cable,optionally available, can be connected directly
with getting the DC power from transceiver microphone connector. The wiring of ⑮Power
Feeding Line is not required.
●The mounting of ⑤Switch Box(Optical Receiver)should be done on the panel,at the driving
seat,around the rear of steering wheel or center part while keeping the ⑥Sensor Window to
face to driver by removing the paper of adhesive tape. The infrared beam from Infrared emission
of light6must reach to Sensor Window after reflecting to the driver. The TX/RX Controller
⑱should be fixed to the position for easy and steady switching controls. (Refer to the
illustration on the package.)There may be non-operation or unstable condition under the direct
sunlight.

SEC
- 4 -
HOW TO USE:
●To make TX/Rx operation from ⑱TX/RX Controller, press the ⑲TX button and mode changes to
“TX”with “pip”sounding from ⑬Control Box and lighting up ⑦TX Indicator Lamp (LED).To
return to receiving mode, press⑳Rx button while monitoring “peep" sounds. When operating,
be careful not to cover6 Infrared Emission of Light.
●To make TX/Rx controls by ⑤Switch Box(Optical Receiver),press⑧PTT Switch. While pressing
PTT switch,the condition is kept at transmitting. To keep transmitting condition,press the
⑨LOCK Switch. To reset the continuous transmitting condition,press the ⑧PTT Switch.
●⑩UP Switch and ⑪DOWN Switch are the same functions as those of microphone provided with the
transceiver.(For details, read the instruction manual of transceiver.)
●Keep the distance of 10cm or less between your mouth and the head of microphone.
●The Output level is factory-preset to optimum level. However, when
you cannot get optimum level of modulation, please readjust it.
Insert a small minus screw driver into ⑨Output volume hole and
adjust it carefully under monitoring by local station. Turn the
volume to clockwise for increasing the output and to
anti-clockwise for decreasing. The volume can be rotated 土90°
to both right and left from center position. (“0”position)
HOVV TO REPLACE THE COIN TYPE LITHIUM BATTERY:
When you cannot control from ⑩TX/RX Controller, you must change the
battery under following procedure.
a) Push out the battery by sharp-pointed goods like a ball-point
pen.
b) Press the ⑲TX button and ⑳RX button a few times.
c) Check the polarity of new battery (CR2032) and set the (+) side
of battery to upper side.
※Waming: Please be sure to use CR2032 Battery only.
NON-MODULATION PREVENTION CIRCUIT:
When keeping transmitting condition more than 2.5 minutes,by mistake
or in normal operation, the alarm circuit activates and sounds alarm
for 30 seconds and the condition is reset to “RX"(Receiving)mode.
lf you want to continue the “TX”condition, press the ⑲TX button
or ⑨LOCK Switch for releasing the alarm circuit.
[When you do not want to activate the alarm circuit]
●Remove the 4 screws of ⑬Control Box and cut the “JP-6”Jumper
wire (resister type)(arrow mark on fig 4).
RF FEEDBACK NOISE:
When transmitting with low power, the noise may be negligible. But, when transmitting with high
power, there are possibilities to have abnormal modulation interference with offensive sound
and other noise. In such a case, the bad matching between antenna and coaxial cable may cause
the problem,i.e., the Standing Wave effects onto microphone cable. To get better condition,
please do not place the microphone cable in parallel to the antenna coaxial cable. Also please
check the SVVR between antenna and transceiver.
CAUTIONS:
●Regarding the microphone conversion cable, please be sure to use “ADONIS”optional microphone
cables.
●Be sure to use the microphone with windscreen.
●Please keep microphone away from high temperature and moisture area.
●The design and specifications are subject to change without advance notice.
Table of contents
Other Adonis Microphone manuals
