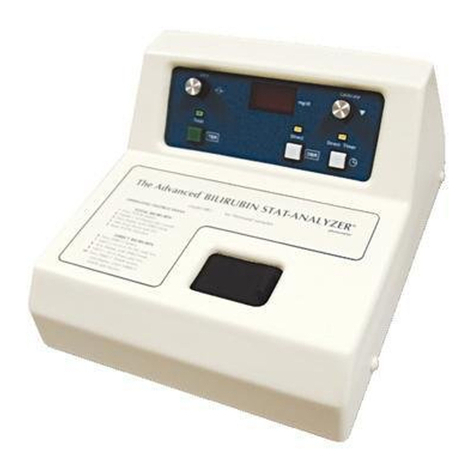
Advanced Bilirubin Stat-Analyzer BR2 User manual

The Advanced® Bilirubin
Stat-Analy er™ Photometer
Models BR2 and BR2E for Neonatal samples
Service Manual
BR25SM Rev8 082416


3The Advanced®Model BR2 Service Manual
1. Introduction
Instrument pecifications . . . . . . . . . . . .7
General Description and Purpose . . . . . .8
The ervice Manual . . . . . . . . . . . . . . . .8
ervice Assistance . . . . . . . . . . . . . . . . .8
afety . . . . . . . . . . . . . . . . . . . . . . . . . . .8
afety/Regulatory Information . . . . . . . .9
ymbol Conventions . . . . . . . . . . . . . . .9
General Cautions . . . . . . . . . . . . . . . . . .9
ervice & Maintenance Cautions . . . . .10
Hazardous Material Cautions . . . . . . . .11
Regulatory Notices . . . . . . . . . . . . . . . .11
ymbol Conventions . . . . . . . . . . . . . .11
2. General Overview
Removing the Instrument Cover . . . . .15
Calibration . . . . . . . . . . . . . . . . . . . . . .16
Circuit Description . . . . . . . . . . . . . . . .17
BR2100 Main Board Description . . . .17
BR2950 Display Board Description . .19
Design Changes . . . . . . . . . . . . . . . . . .20
Replacement Parts . . . . . . . . . . . . . . . .21
upplies & Accessories . . . . . . . . . . . .21
3. Maintenance
Optical Lamp . . . . . . . . . . . . . . . . . . . .25
Optical Filters . . . . . . . . . . . . . . . . . . . .25
4. Troubleshooting
Internal elf-Diagnosis Voltage Checks .29
Troubleshooting Table . . . . . . . . . . . . .31
5. Ad ustments
Lamp Adjustment . . . . . . . . . . . . . . . . .37
Measuring Circuit Adjustment . . . . . . .39
Direct Zero Adjustment . . . . . . . . . . . .40
6. Replacement Instructions
Interference Filter et (BR2650) .B2P650
Lamp (BR2625) . . . . . . . . . . . . . .B2P625
Voltage election & Fuse
(70027/70028) . . . . . . . . . . . .B2P70011
7. Schematics
BR2003 chematic
BR2100 Main Board Assembly Drawing
BR2950 Display Board Assembly Drawing
APPENDICES
A: ymbol Definitions
B: Product Disposal and Recycling
C: ervice Log
Index
Table of Contents

4
he Advanced®Model BR2 Service Manual
Notes:

1. Introduction


7The Advanced®Model BR2 Service Manual
Model BR2 Specifications
Electrical:
Voltage: 100 to 120 VAC (1/4 A) or 200 to 240
VAC 1/8 A)
Frequency: 50 or 60 Hz
Fuses: 1/4-Amp time delay for 100-120 VAC;
1/8-Amp time delay for 200-240 VAC
Power: 15 Watts
STAT Mode: Power left on continuously
Test Ca ability: Total and Direct Bilirubin, both on
the same serum orplasma sample
Sam le Volume: 30 µL
Sam le Ca acity: Single sample, disposable cuvettes
Readout: Three-digit, seven-segment LED display
Units: mg/dL or µmol/L (S. . units for export
only; 1 mg/dL bilirubin = 17.1 µmol/L)
Range: 0 to 30 mg/dL
Resolution: ±0.1 mg/dL
Performance at Reference Conditions1
Linearity: Within ±0.2 mg/dL from zero to 30 mg/dL
(straight-line method)
Re eatability: Within ± 0.2 mg/dL over entire range
Drift:
Zero: Less than 0.2 mg/dL/hr after 30-minute
warm-up
Calibration: Less than 0.2 mg/dL/24 hr after 30-minute
warm-up
Performance Over O erating Conditions
Hemolysis: No interference from HbO2levels up to
600 mg/dL
Turbidity: Negligible interference from turbidity
associated with triglyceride (TGL) levels
up to 500 mg/dL
O erating Conditions
Tem erature: 15°C to 32°C (59°F to 90°F)
Room Humidity: 5 to 80% relative humidity;
(non-condensing)
Storage Tem erature: -40°C to +70°C
(-40°F to +160°F)
Test Time: nstantaneous for TOTAL Bilirubin, 2
minutes for D RECT Bilirubin
Dimensions inches centimeters
Width: 11 28
Depth: 13 33
Height: 7 18
Weight pounds kilograms
Net: 9 4
Shipping: 12 5.5
Warranty: One-year limited warranty on work-
manship and all parts except glass,
plastic and parts warranted by their
makers.
Certification:
Refer to Regulatory Notices (see page 11) for appli-
cable standards.
*CE marking only available on units delivered prior
to July 22, 2016.
1Reference Conditions: 20 to 25°C (68 to 77°F); 40 to 60% Relative Humidity; tolerances of reference or calibration
solutions excluded.
*

8
he Advanced®Model BR2 Service Manual
General Description and Purpose
The Advanced®Models BR2 and BR2E
Bilirubin Stat-Analyzer™ Photometers are
dual-arm, dual-wavelength, narrow-bandpass
photometers that measure Bilirubin (TBR)
and Azobilirubin (DBR) absorbance quantita-
tively. The digital readout is calibrated to
read bilirubin in milligrams per deciliter
(mg/dL) for the BR2, or micromoles per liter
(µmol/L) for the BR2E of serum or plasma.
The BR2 wavelengths are fixed and will not
shift during the life of the instrument.
he Service Manual
The BR2 Service Manual contains:
• instructions for performing repairs;
• guides for troubleshooting operational and
mechanical problems;
• circuit system illustrations; and
• information about replacement parts and
service repairs.
This manual is designed to assist
service tec nicians, and does not
imply a license to perform repairs
without proper qualifications.
Service Assistance
To contact Advanced Instruments Product
Service:
• Call (800) 225-4034 (toll-free within the
USA and Canada); after normal business
hours, dial extension 2191
• Call +US (781) 320-9000 (elsewhere)
• Or fax (781) 320-3669
When calling Advanced Instruments, have the
model and serial number from the label on
the back of the instrument, and a description
of the problem. Use a telephone as close to
the instrument as possible in order to facili-
tate making recommended diagnostic checks.
A service technician may assist in making
minor repairs over the phone, providing you
with recommended parts (or part numbers),
or may issue an authorization (RMA) to ship
the instrument for factory repair.
The RMA procedure is as follows:
1. Contact Advanced Instruments to obtain
an RMA.
2. Pack and ship the instrument in its origi-
nal carton. Do not send instrument sup-
ply items.
3. Prepay shipment to the factory.
Advanced Instruments cannot accept col-
lect shipments. Insure the shipment or
accept the damage risk.
Safety
Removing the instrument cover
exposes dangerous 200-250 and/or
100-130 AC voltages. Before remov-
ing the cover, make sure the instru-
ment is turned off and unplugged.

he Advanced®Model BR2 Service Manual
To reduce the risk of bodily injury,
electric shock, fire, and damage to
your instrument, please read and
observe the following precautions.
• If the product is used in a manner not in
accordance with the equipment design,
operating instructions or manufacturer's
recommendations, the operation of the
product may be impaired to the extent that
a safety hazard is created.
• Do not attempt to perform electrical work
if you are not fully qualified. This manual
is not a substitute for electrical training.
Symbol Conventions
The exclamation point within an
equilateral triangle is intended to
alert the user to the presence of
important operating and maintenance
(servicing) instructions in the litera-
ture accompanying this product.
The lightning flash with arrowhead
symbol within an equilateral triangle
is intended to alert the user to the
presence of uninsulated dangerous
voltage within the product's enclo-
sure that may be of sufficient magni-
tude to constitute risk of electric
shock to persons.
The static symbol within an equilat-
eral triangle is intended to alert the
user to the presence of internal com-
ponents that could be damaged by
static electricity.
This static symbol is intended to
alert the user to the presence of a
specific component that could be
damaged by static electricity.
This symbol indicates the presence
of alternating current (AC).
This symbol indicates the presence
of a fuse.
This symbol indicates the presence
of protective earth ground.
This symbol indicates the power is
ON.
This symbol indicates the power is
O .
NO E Additional symbol definitions are
available in the Symbols section.
General Cautions
• This product should be operated only with
the type of power source indicated on the
product’s electrical ratings label. Refer to
the installation instructions included with
the product.
• If the power cord provided is replaced for
any reason or if an alternate cord is used,
the cord must be approved for use in the
local country. The power cord must be
approved for the product’s listed operating
voltage and be rated at least 20% greater
than the ampere ratings marked on the
product’s electrical ratings label. The cord
end that connects to the product must have
an IEC 60320 connector.
• Plug the product into an approved ground-
ed electrical outlet.
• Do not disable the power cord’s grounding
plug.
• If an extension cord or power strip is used,
make sure that the cord or strip is rated for
the product, and that the total ampere rat-
ings of all products plugged into the exten-
sion cord or strip do not exceed 80% of the
cord’s or strip’s rating limit.
Safety / Regulatory Information
9

he Advanced®Model BR2 Service Manual 10
• Route power cords so that they will not be
walked on, tripped on, or pinched by items
placed upon or against them. Pay particu-
lar attention to the plug, electrical outlet,
and the point where the cord exits the
product.
• Do not pull on cords and cables. When
unplugging cords or cables, grasp the cor-
responding connector.
• Do not install or use this product in any
area subject to extreme short-term temper-
ature variations, or locations that exceed
the specified operating environment tem-
peratures.
• Never use this product in a wet area.
• To avoid injury or fire hazard, do not oper-
ate this product in an explosive atmos-
phere.
• Do not install or use the product on an
unstable, non-level work surface.
• Do not operate this product with the covers
removed or unsecured.
Service & Maintenance Cautions
•Unplug the power cord prior to opening or
removing covers, or else you may be
exposed to electric shock, excessive tem-
peratures, or mechanical hazards.
•Performing service or maintenance not
detailed in the User’s Guide, with or with-
out this Service Manual, should only be
done by a qualified service technician.
•Never restrict airflow into or out of the
product. Occasionally, check the air vents
for blockage.
•Wipe the exterior of the product with a
soft, damp cloth as needed. Using cleaning
products other than those specified, may
discolor or damage the finish.
•If the product requires service for any of
the following reasons, unplug the product
from the electrical outlet and refer service
to a qualified service technician.
-The power cord, extension cord, power
strip or power input module is dam-
aged.
-Liquid has been spilled into the interior
of the product.
-A foreign object has fallen into the
product.
-The product has been dropped or dam-
aged by a falling object.
-There are noticeable signs of overheat-
ing or a burning odor.
-The product does not operate normally
when you follow the operating proce-
dures.
-The main supply fuse(s) or any internal
fuse(s) continually fail.
•A discharge of static electricity from con-
tact with the human body or other conduc-
tor may damage system boards or static
sensitive devices. Never perform internal
maintenance without following recom-
mended static protection procedures.
• The product is equipped with operator
accessible fuses. If a fuse blows, it may be
due to a power surge or failure of a com-
ponent. Replace the fuse only once. If the
fuse blows a second time, it is probably
caused by failure of a component part. If
this occurs, refer service to qualified serv-
ice personnel. Always replace the fuse
with one of the same rating, voltage, and
type. Never replace the fuse with one of a
higher current rating.
• When servicing the product, use only fac-
tory-specified parts.
• WARNING: When returning this product
for service, or shipping this product to a
second location, remove all hazardous
specimens and decontaminate the product
before packaging for shipment. If the
product cannot be decontaminated, consult
with your shipping agent on appropriate
packaging and marking.

he Advanced®Model BR2 Service Manual
Hazardous Material Cautions
• WARNING: Handle all biohazardous
materials according to established good
laboratory practices and follow your insti-
tution’s exposure control plan. Persons
handling human blood and body fluid
samples must be trained in blood-borne
hazards and observe universal precautions.
Universal precautions is an approach to
infection control, where all human blood
and body fluids are treated as if known to
be infectious. Use personal protective
equipment such as gloves, gowns, etc., to
prevent exposure. Store biohazardous
materials in regulated waste containers and
dispose of these materials in a safe and
acceptable manner that is in compliance
with all country, state and local require-
ments.
•If a biohazardous material is spilled on or
inside the equipment, decontaminate the
equipment using a 1% bleach solution, or
as outlined by those policies and proce-
dures established within your institution.
•To avoid injury or fire hazard, do not oper-
ate this product in an explosive atmos-
phere.
Regulatory Notices
•This product has been designed and manu-
factured in accordance with U.S.,
Canadian, and European regulatory
requirements as outlined below.
Modifications made to this product that are
not expressly approved in writing by the
manufacturer will void the user’s authority
to operate this product, previously issued
factory approvals, and the user’s rights
under the warranty.
•The distributor or dealer may have applied
additional local, national, or international
approvals to this product. Consult the dis-
tributor or dealer for more information and
documentation.
Symbol Conventions
This symbol indicates conformity to
relevant European directives.
This symbol indicates the product
was tested to conform to relevant
Canadian and U.S. safety standards
by Intertek Testing Services NA,
Inc. The ETL mark is approved in
the United States as a Nationally
Recognized Testing Lab (NRTL) by
OSHA, and in Canada by the
Standards Council of Canada.
In Vitro Diagnostic Medical Device
complying with EU Directive
98/79/EC.
11

The Advanced®Model BR2 Service Manual 12
U.S. Safety This product has been listed by ETL
testing laboratories as being in compli-
ance with the requirements of UL
61010-1 2nd edition, "Electrical
Equipment for Laboratory Use”. The
"US" in the lower right of the ETL
mark demonstrates this listing.
Canadian Safety This product has been listed by ETL
testing laboratories as being in compli-
ance with the requirements of
CAN/CSA C22.2 No. 61010-1 2nd
edition, "Safety Requirements for
Electrical Equipment for Measure-
ment, Control and Laboratory Use”.
The "C" in the lower left of the ETL
mark demonstrates this listing.
EC Declaration of This product meets the intent of
Conformity - EMC Directive 2004/108/EC for
Electromagnetic Compatibility.
Compliance was demonstrated using
the following standards, as listed in the
Official ournal of the European
Communities: Consult the Declaration
of Conformance certificate shipped
with the product for the latest update.
• EN 61326-1:2006, Group 1, Class
B, "Electrical Equipment for
Measurement, Control, and
Laboratory Use".
EC Declaration of: This product meets the intent of
Conformity - Low Directive 2006/95/EC, the Low
Voltage Voltage Directive. Compliance was
demonstrated using the following stan-
dards as listed in the Official ournal
of the European Communities:
Consult the Declaration of
Conformance certificate shipped with
the product (if required) for the latest
update.
·IEC/EN 61010-1 2nd edition,
"Safety Requirements for Electrical
Equipment for Measurement,
Control and Laboratory Use”.
·IEC 61010-2-101 (2002-01) -
“Safety Requirements for Electrical
Equipment for Measurement,
Control, and Laboratory Use; Part 2-
101: Particular Requirements for In
Vitro Diagnostic (IVD) Medical
Equipment, First Edition”.
EC Declaration of This product meets the intent of
Conformity - IVD Directive 98/79/EC for In Vitro
Diagnostic Medical Devices. Consult
the Declaration of Conformance certifi-
cate shipped with the product (if
required) for the latest update.
Regulatory
approval type Description
Regulatory
approval type Description
EC Declaration of This product does not meet the
Conformity - WEEE intent of Directive 2012/19/EU for
“Waste Electrical and Electronic
Equipment” (WEEE) due to the presence
of a restricted material, lead (> 0.1%), in
some of the electronic components used.
Instruments delivered prior to uly 22,
2016 were in compliance with the ruiles
in effect at that time.
EC Declaration of This product does not meet the
Conformity - RoHS intent of Directive 2011/65/EU for
“Restriction of the Use of Certain
Hazardous Substances in Electrical and
Electronic Equipment” (RoHS) due to the
presence of a restricted material, lead
(> 0.1%), in some of the electronic com-
ponents used. Instruments delivered prior
to uly 22, 2016 were in compliance with
the rules in effect at that time.
FCC - Part 15, This device complies with Part 15
Subpart B, Class B of the FCC Rules. Operation is subject
to the following two conditions: (1) this
device may not cause harmful interfer-
ence, and (2) this device must accept any
interference received, including interfer-
ence that may cause undesired operation.
Canadian ICES-003 This Class B digital apparatus complies
with Canadian ICES-003.
Cet appareil numérique de la classe
B est conforme à la norme NMB-003 du
Canada.
CB Report A CB report and certificate have
CB Certificate been issued for this product. The standard
used was IEC 61010-1, 2nd edition and
61010-2-101, 1st edition.
U.S. FDA Listing The Bilirubin Test System, along with the
calibrators and controls manufactured by
Advanced Instruments, are listed with
U.S. Department of Health and Human
Services, Food and Drug Administration,
as:
Bilirubin Test System Class 2
Calibrators Class 2
Controls Class 1
Health Canada The Bilirubin Test System, along with
License the calibrators and controls manufactured
by Advanced Instruments, are licensed
with Health Canada, Therapeutic
Products Directorate, Medical Devices
Bureau, as:
Bilirubin Test System Class 2
Calibrators Class 2
Controls Class 2

2. General
Overview


15 he Advanced®Model BR2 Service Manual
Tool needed: lat-bladed screwdriver
Wa ning-Haza dous Voltage
Wa ning-Inte nal components may
be damaged by static elect icity.
CAUTION: Improper connections
may cause damage to the instrument.
1. Turn off the power and unplug the instru-
ment.
2. Remove the four screws (A) from both
sides of the BR2 and pull the instrument
cover straight up and off.
A
Removing the Instrument Cover

16
he Advanced®Model BR2 Service Manual
NO E When the instrument is first turned
on, the measuring circuit requires
thirty minutes’ warm-up (to avoid
frequent re-zeroing to compensate
for initial thermal drift). It should be
left on during STAT duty (electrical
consumption is less than 20 watts).
Calibration Procedure
Verify the stated bilirubin values on the labels
of calibration standards and control sera,
preferably by using an acceptable manual
method. Record the actual values. Then cali-
brate the BR2:
1. Press the Total button.
2. Pipette 1 mL of pH-adjusted saline diluent
from an Advanced Bilirubin Test Kit into
one of the cuvettes provided. Open the
cuvette chamber and load the cuvette into
it so that the light beam passing from right
to left passes through the clear, not the
ribbed sides. Close the cuvette chamber
cover against extraneous light.
3. Adjust the readout to 00.0 with the Zero
knob.
4. Add 30 µL of calibration standard or con-
trol serum to the saline diluent in the
cuvette and mix thoroughly.
NO E A positive-displacement pipette is
recommended for optimum accu-
racy in pipetting these fluids; at
high TBR concentrations, small
pipetting errors can lead to signif-
icant falsely-low readings. It is
further suggested that the same
pipettes be used each time, to
assure sample-to-sample and day-
to-day consistency.
5. Adjust the readout as necessary, by means
of the Calibrate knob, to the actual value
of the standard or control serum used (as
determined in step 0 above). Repeat
steps 0 through 4 with enough additional
aliquots to verify instrument calibration.
The BR2 is now calibrated and ready for
operation with unknown bilirubin samples.
Calibration

17 he Advanced®Model BR2 Service Manual
Circuit Description
Signal-conditioning Ci cuit: This circuit
receives two analog photocurrent signals via
solder terminals X8 and X11 on the front left
side of the Main board, from photodiodes
Sensor 1 and Sensor 2, the 540 and 454-nm
absorbance detectors, respectively.
These photocurrents are applied to IC5 and
IC6, which are fixed-gain, high-impedance
op-amps that have been adjusted by means of
R35 and R39 (the ZERO SET potentiometers
near the left front corner of the Main board)
for outputs at each pin 6 within 0.1 mV of
zero (measured at the ends of R36 and R40
nearest each IC) with the optical light path
through the cuvette holder completely
blocked.
When a cuvette containing a water and saline
diluent “blank” solution is placed in the
cuvette chamber, the output from pin 6 of IC6
changes to its adjusted value of -25 to -29
mV, and IC5 changes to between -55 mV and
-130 mV (the difference is due to unequal
optical characteristics).
These uneven outputs are balanced (with the
water or saline diluent blank still in the
cuvette chamber) by means of R38 and R42
(the two GAIN potentiometers next to the
large, square IC7 near the left center of the
Main board) for 18 mV ±0.1 mV (represent-
ing equal 18-uA currents) measured at the
ends of R37 (TP 540) and R41 (TP 454) near-
est the two potentiometers.
The direct reference voltage is then set (with
the water or saline diluent blank still in the
cuvette chamber) by pressing the Direct but-
ton and adjusting R43 (the SET DIRECT
potentiometer at the left front of the Main
board) for 18 mV ±0.1 mV at the end of R41
(TP 454) nearest R42.
Module IC7 is a log ratio converter which
performs the electrical analogy of the mathe-
matical equation,
The electronic circuits in the BR2 are con-
tained on two printed circuit boards, the Main
board and the Display board.
BR2100 Main Board Description
Powe Supply Ci cuit: The power supply is
required to provide +15 V, - 15 V and +5 V
from either 100-120-V or 200-240-V AC
power. To accomplish this, transformer T1
has two equal primary windings which may
be connected either in series or parallel sim-
ply by positioning the small programming
card in the fuse holder/line cord socket ( 1),
as marked on the card. Transformer T1 has
two secondaries, also.
One secondary provides 20-0-20 VAC at pins
8, 9 and 10. These voltages are rectified by
D11, filtered by C1 and C2, and fed to regu-
lators VR1 and VR2, which produce +15 V
and -15 V, respectively.
The other secondary provides 10-0-10 VAC
at pins 5, 6 and 7. These voltages are rectified
by D1 and D2, filtered by C5 and fed to regu-
lator VR3 which produces +5 V.
Lamp Ci cuit: The function of the lamp cir-
cuit is to tightly control the optical lamp volt-
age. Reference diode D4 supplies divider-
string R2, R3 and R4 with 6.9 V; potentiome-
ter R3 (LAMP ADJ in the right center area of
the Main board) allows the voltage across the
optical lamp to be accurately set at 3.35
±0.01 V (measured between X6 and X7, the
LAMP OUTPUT terminals on the right rear
side of the Main board). IC1 and Q1 form a
current amplifier with the voltage from the
arm of R3 as its reference.
After setting the lamp input voltage, the lamp
light output is optimized, by means of physi-
cal adjustment (see Lamp Adjustment sec-
tion), for an output of -25 to -29 mV from pin
6 of IC6 in the Signal Conditioning Circuit.

18
he Advanced®Model BR2 Service Manual
where Isig is the 454 nm photocurrent, Iref is
the 540 nm photocurrent, and k is set by
means of R45 to a value of 10.
With a water or saline diluent blank in the
light path, the output at pin 3 of IC7 should
be zero volts if the signal conditioning circuit
has been properly adjusted. Minor unbalance,
seen by the user as a non-zero readout with a
water or saline diluent blank in the light path,
is corrected by adjusting the Zero control
(R48) on the front panel.
Replacement IC7 modules may be supplied
with a different value R46 resistor for
improved Zero response.
When a known bilirubin standard is placed in
the light path, the output at pin 3 of IC7 goes
to a higher value, which is scaled by the user
via the Calibrate control on the front panel,
to calibrate the instrument. The voltage on
the arm of the Calibrate control potentiome-
ter is the calibrated signal input to the digital
voltmeter (DVM) circuit.
Digital Voltmete (DVM) Ci cuit: Most of
the DVM circuit is contained within IC4,
which is of LSI (large scale integrated) con-
struction featuring a 0 to 2-volt input range
and automatic zeroing (auto-zero). C15 and
R25 form the time constant for its internal
clock, C16 is the auto-zero storage capacitor,
and C17 is the integration capacitor. Resistor
R27 and potentiometer R26 provide a 1 V ±1
mV reference. The outputs of IC4 are non-
multiplexed, parallel, seven-segment and
directly drive the three-digit LED (light emit-
ting diode) display without need of buffers.
Total/Di ect Cont ol Logic Ci cuit: This cir-
cuit translates the signals from the Total,
Direct, and Direct Timer switches into prop-
er form to correctly control each test selected.
During power-up, flip-flops IC3-C, D and
IC3-A, B are reset, causing pin 10 of IC3 to
turn on Q6 to light the Total LD. At that point
the operator may elect either to complete a
total bilirubin test, or switch to Direct for a
direct bilirubin test (see Bilirubin Test
Instructions).
Pressing the Direct button sets flip-flop IC3-
C, D, placing a high level on the base and
emitter of current amplifier Q4. The high
level on Q4 emitter turns on Q5, which lights
the Direct LED and turns on relay RL1.
Relay RL1 switches the pin 5 Isig input of
IC7 from monitoring the 454 nm signal from
IC6 to a negative reference voltage provided
by divider R44 and R43. This reference volt-
age has been factory-set after the balancing
procedure described in section Signal-
Conditioning Circuit, by switching to Direct
and adjusting R43 (the SET DIRECT ponte-
tiometer at the left front of the Main board)
for a zero readout with the water or saline
diluent blank still in the light path.
After pressing the Direct button for a direct
bilirubin test, the operator adds HC1 to the
cuvette, re-zeros the readout with R48 (the
Zero control on the front panel), adds the
diazo reagent to the cuvette, and presses the
Direct Timer button.
Pressing the Direct Timer button on the front
panel triggers IC1 on, causing its output to go
high for 2 minutes ±10 seconds as factory set
via R8 (the 2 MIN TIMER control on the
right rear edge of the Main board where it
may be adjusted through the round hole in the
back of the instrument cabinet) of the time
constant circuit R7, R8 and C9. While the
output from pin 3 of IC2 is high, it keeps Q2
turned on, lighting the Direct Timer LED.
At the end of the two-minute time period, IC2
turns off Q2, setting flip-flop IC3-A, B. This
causes pin 3 of IC3 to lock the readout dis-
play by placing a high level on pin 1 of IC4.
IC2 also enables Q3, at the end of the two-
minute time period, to repeatedly flash the
Direct Timer LED by means of the astatic
multivibrator circuit using Q7 and Q8.
Built-in Test Ci cuit: The built-in test circuit
enables the service technician to use the
EO= -k Log10
Isig
Iref

19 The Ad anced®Model BR2 Ser ice Manual
DVM of the BR2 to measure and display, in
place of the mg/dl or µmol/1 readout, impor-
tant circuit voltages at the following points:
540, 454, DIR.PO , LAMP, D4 REF, +5, -15,
and +15. his is accomplished by switching
S2 (the NORMAL/ ES toggle switch near
the center of the Main board) from the NOR-
MAL to the ES position and manipulating
S3 (the long selector switch near the left center
of the Main board) as instructed in the
roubleshooting section, below.
CAUTION Be sure to return S2 to NOR-
MAL and S3 to the far right
(+15) position as soon as this
test is finished.
NOTE Beginning with instruments produced
in 2016 or instruments having the
main PCB, BR2100 replaced in 2016,
the built-in test circuit will not be
available.
BR2950 Display Board Description
he Display board contains the three-digit
display modules, the Total, Direct and Direct
Timer switches and LEDs, and the Zero and
Calibrate controls. It is connected to the
Main board by means of the J1-J2 ribbon
cable.

20
he Advanced®Model BR2 Service Manual
BR2 Description
The serial number suffix (referred in this manual simply as the suffix) indicates the revision of the
instrument. The charts below list the major changes made at each revision of the Model BR2.
Design Changes
No suffix Original model released.
ebruary 1980
Serial Suffix ‘A’
November 1994
Serial Suffix ‘B’ Updated to carry the CE/ETL
August 1996 marks.
BR2E Description
No suffix Original model released.
ebruary 1980
Serial Suffix ‘A’
November 1994
Serial Suffix ‘B’ Updated to carry the CE/ETL
August 1996 marks.
Other manuals for Bilirubin Stat-Analyzer BR2
1
This manual suits for next models
1
Table of contents
Other Advanced Measuring Instrument manuals
