Advanjet HM-2600 Setup guide

Repair
HM-2600 Hotmelt Jet
Maintenance and Repair
3A6328A
Diaphragm-Jet™Technology EN
For non-contact dispensing of hot melt material in industrial environments.
For professional use only.
Kits – See page 3 for kits information
Important Safety Instructions
Read all warnings and instructions in this manual and all related
manuals before using this equipment. Save these instructions.
Model 25B315
PROVEN QUALITY. LEADING TECHNOLOGY.

Table of Contents
KITS..............................................................................................................................................................4
RELATED MANUALS ..................................................................................................................................4
WARNINGS ..................................................................................................................................................5
1. REQUIRED TOOLS AND PARTS ......................................................................................................... 6
1.1 Maintenance Kits ..........................................................................................................................6
1.1.1 Bushing Kit (P/N BK-2001)..............................................................................................6
1.1.2 Heater Kit (P/N HK-2600)................................................................................................7
1.1.3 Jet Repair Kit (P/N JK-9500) ...........................................................................................8
1.2 Required Tools..............................................................................................................................9
2. JET DISASSEMBLY............................................................................................................................10
2.1 Overview.....................................................................................................................................10
2.2 Disassembled Jet (Melter Cover Removed)...............................................................................11
2.3 Remove Syringe and Feed Tube Enclosure...............................................................................12
2.3.1 Remove the Melter Cover..............................................................................................12
2.3.2 Remove the Receiver Head...........................................................................................12
2.3.3 Remove the Syringe ......................................................................................................12
2.3.4 Remove the Feed Tube Enclosure................................................................................12
2.4 Remove Mounting Plates and Top Cover...................................................................................13
2.4.1 Remove Nozzle Plate (if present)..................................................................................13
2.4.2 Remove the Dovetail Plate............................................................................................13
2.4.3 Remove the Mounting Plate ..........................................................................................13
2.4.4 Disconnect Heater Block ...............................................................................................13
2.4.5 Remove Heater Bearing ................................................................................................13
2.5 Remove Melter, Top Cover, and Heater Block...........................................................................14
2.5.1 Remove the Top Cover Screws.....................................................................................14
2.5.2 Detach the Top Cover....................................................................................................14
2.5.3 Remove the Melter Assembly........................................................................................14
2.5.4 Remove the Nozzle Plate Screws .................................................................................14
2.5.5 Remove the Heater Assembly (HK-2600 only)..............................................................14
2.6 Remove Spacer Assembly .........................................................................................................15
2.6.1 Remove the Spacer.......................................................................................................15
2.6.2 Remove the Air Cylinder................................................................................................15
2.6.3 Remove the Air Valve Mount and Silencer....................................................................15
2.7 Check for Parts Set Aside...........................................................................................................16
3. INSTALL NEW PARTS AND REASSEMBLE THE JET.....................................................................17
3.1 Overview.....................................................................................................................................17
3.2 Install the Main Air Valve and Hammer Cylinder........................................................................18
3.2.1 Install the Air Valve........................................................................................................18
3.2.2 Install the Silencer .........................................................................................................18
3.2.3 Install the Air Cylinder....................................................................................................18
3.2.4 Tighten the Air Cylinder Setscrew .................................................................................18
3.3 Assemble the Spacer..................................................................................................................19
3.3.1 Assemble the Spacer Parts ...........................................................................................19
3.3.2 Check the Lever Assembly............................................................................................19
3.3.3 Attach the Spacer ..........................................................................................................19
3.3.4 Align the Lever with the Shoulder Bolt...........................................................................19
3.3.5 Install the Shoulder Bolt.................................................................................................19
Page 2 of 28 Advanjet HM-2600 Hotmelt Jet Maintenance and Repair 3A6328A

Table of Contents
3.4 Reassemble the Heater Block....................................................................................................20
3.4.1 Install New Heater Seal and Washer.............................................................................20
3.4.2 Install New Spring..........................................................................................................20
3.4.3 New Heater Block Bearing.............................................................................................20
3.4.4 Position Heater Block ....................................................................................................20
3.4.5 Attach Heater Block.......................................................................................................20
3.4.6 (Optional) Connect New Heater Block...........................................................................20
3.5 Attach the Valve Mount...............................................................................................................21
3.5.1 Verify O-Rings................................................................................................................21
3.5.2 Install Valve Mount Screws............................................................................................21
3.6 (Optional) Replace Melter Cable ................................................................................................22
3.6.1 (Optional) Remove the Melter Cable.............................................................................22
3.6.2 (Optional) Identify Cartridges on New Melter Cable......................................................22
3.6.3 (Optional) Shorter Heater Cartridge ..............................................................................22
3.6.4 (Optional) Longer Heater Cartridge...............................................................................22
3.6.5 (Optional) Install Cartridges and Tighten Setscrews....................................................22
3.7 Reassemble the Jet....................................................................................................................23
3.7.1 Insert the Nozzle Plate Screws......................................................................................23
3.7.2 Position the Melter Assembly ........................................................................................23
3.7.3 Position the Top Cover ..................................................................................................23
3.7.4 Attach Top Cover...........................................................................................................23
3.7.5 Connect the Melter ........................................................................................................23
3.7.6 Install Feed Tube Spacer...............................................................................................23
3.7.7 Attach Upper Feed Tube Enclosure ..............................................................................23
3.7.8 Tuck the Cables.............................................................................................................24
3.7.9 Trim the Cables..............................................................................................................24
3.7.10 Connect the Air Valve....................................................................................................24
3.7.11 Position Mounting Plate.................................................................................................24
3.7.12 Attach the Mounting Plate..............................................................................................24
3.7.13 Attach the Dovetail Plate ...............................................................................................24
4. SET THE JET HAMMER GAP............................................................................................................. 25
4.1 Using the Gap Set Fixture ..........................................................................................................25
4.2 Prepare the Gap Set Fixture.......................................................................................................26
4.2.1 Check the Zeroing Plate ................................................................................................26
4.2.2 Zero the MIcrometer ......................................................................................................26
4.2.3 Remove the Zeroing Plate.............................................................................................26
4.2.4 Attach the Jet.................................................................................................................26
4.3 Measure the Gap........................................................................................................................27
4.3.1 Connect the Jet..............................................................................................................27
4.3.2 Reading the Dial ............................................................................................................27
4.4 Adjust the Gap............................................................................................................................27
GRACO STANDARD WARRANTY ...........................................................................................................28
3A6328A Advanjet HM-2600 Hotmelt Jet Maintenance and Repair Page 3 of 28
Kits
This manual accompanies these HM-2600 Jet Repair kits:
Part Number
Kit
BK-2001
Bushing Kit
HK-2600
Heater Kit
JK-9500
Jet Repair Kit
Related Manuals
Manuals are available at www.graco.com. Component manuals below are in English:
Part Number
Manual
3A6327
HM-2600 Hotmelt Jet Setup and Operation
3A6166
HM-2600C Hotmelt Jet Controller Setup and Operation
3A5937
Jet Dispensing Parameters Supplement
3A5908
Jet Maintenance Tool Kits
Page 4 of 28 Advanjet HM-2600 Hotmelt Jet Maintenance and Repair 3A6328A

Warnings
The following warnings are for the setup, use, grounding, maintenance, and repair of
this equipment. The exclamation point symbol alerts you to a general warning and the
hazard symbols refer to procedure-specific risks. When these symbols appear in the
body of this manual or on warning labels, refer back to these Warnings. Product-specific
hazard symbols and warnings not covered in this section may appear throughout the
body of this manual where applicable.
WARNING
ELECTRIC SHOCK HAZARD
This equipment must be grounded. Improper grounding, setup, or usage of the system can cause
electric shock.
Turn off and disconnect power cord before servicing equipment.
Connect only to grounded electrical outlets.
Use only 3-wire extension cords.
Ensure ground prongs are intact on power and extension cords.
TOXIC FLUID OR FUMES HAZARD
Toxic fluids or fumes can cause serious injury or death if splashed in the eyes or on skin, inhaled, or
swallowed.
Read Safety Data Sheets (SDSs) to know the specific hazards of the fluids you are using.
Store hazardous fluid in approved containers and dispose of it according to applicable guidelines.
BURN HAZARD
Equipment surfaces and fluid that is heated can become very hot during operation. To avoid severe
burns: Do not touch hot fluid or equipment.
PERSONAL PROTECTIVE EQUIPMENT
Wear appropriate protective equipment when in the work area to help prevent serious injury,
including eye injury, hearing loss, inhalation of toxic fumes, and burns. Protective equipment includes
but is not limited to:
Protective eyewear, and hearing protection.
Respirators, protective clothing, and gloves as recommended by the fluid and solvent
manufacturer.
EQUIPMENT MISUSE HAZARD
Misuse can cause death or serious injury.
Do not operate the unit when fatigued or under the influence of drugs or alcohol.
Do not exceed the maximum working pressure or temperature rating of the lowest rated system
component. See Technical Specifications in all equipment manuals.
Use fluids and solvents that are compatible with equipment wetted parts. See Technical
Specifications in all equipment manuals. Read fluid and solvent manufacturer’s warnings. For
complete information about your material, request SDSs from distributor or retailer.
Turn off all equipment and relieve air pressure when equipment is not in use.
Check equipment daily. Repair or replace worn or damaged parts immediately with genuine
manufacturer’s replacement parts only.
Do not alter or modify equipment. Alterations or modifications may void agency approvals and
create safety hazards.
Make sure all equipment is rated and approved for the environment in which it is used.
Use equipment only for its intended purpose. Contact your distributor for information.
Route hoses and cables away from traffic areas, sharp edges, moving parts, and hot surfaces.
Do not kink or over bend hoses or use hoses to pull equipment.
Keep children and animals away from work area.
Comply with all applicable safety regulations.
3A6328A Advanjet HM-2600 Hotmelt Jet Maintenance and Repair Page 5 of 28
1. Required Tools and Parts
For optimal jet performance, it is suggested to perform periodic preventive maintenance.
These HM-2600 jet maintenance kits are available for this purpose:
BK-2001: Replaces just the heater block bushing, jet spring, washer, and heater
seal.
HK-2600: Replaces the heater block assembly (heater block with bushing and
cable assembly). Also includes the jet spring, washer and heater seal.
JK-9500: Replaces the jet hammer cylinder, lever, shoulder bolt, main air valve,
muffler, and heater block assembly.
This document describes procedures for installing the HM-2600 jet maintenance kits.
Whenever the jet hammer spring is removed, as in these maintenance kits, the jet
hammer gap must be set before dispensing can proceed. The gap set fixture and
specific tools required for this procedure are included in the Advanjet Jet Maintenance
Kit (P/N JKT-2600).
1.1 Maintenance Kits
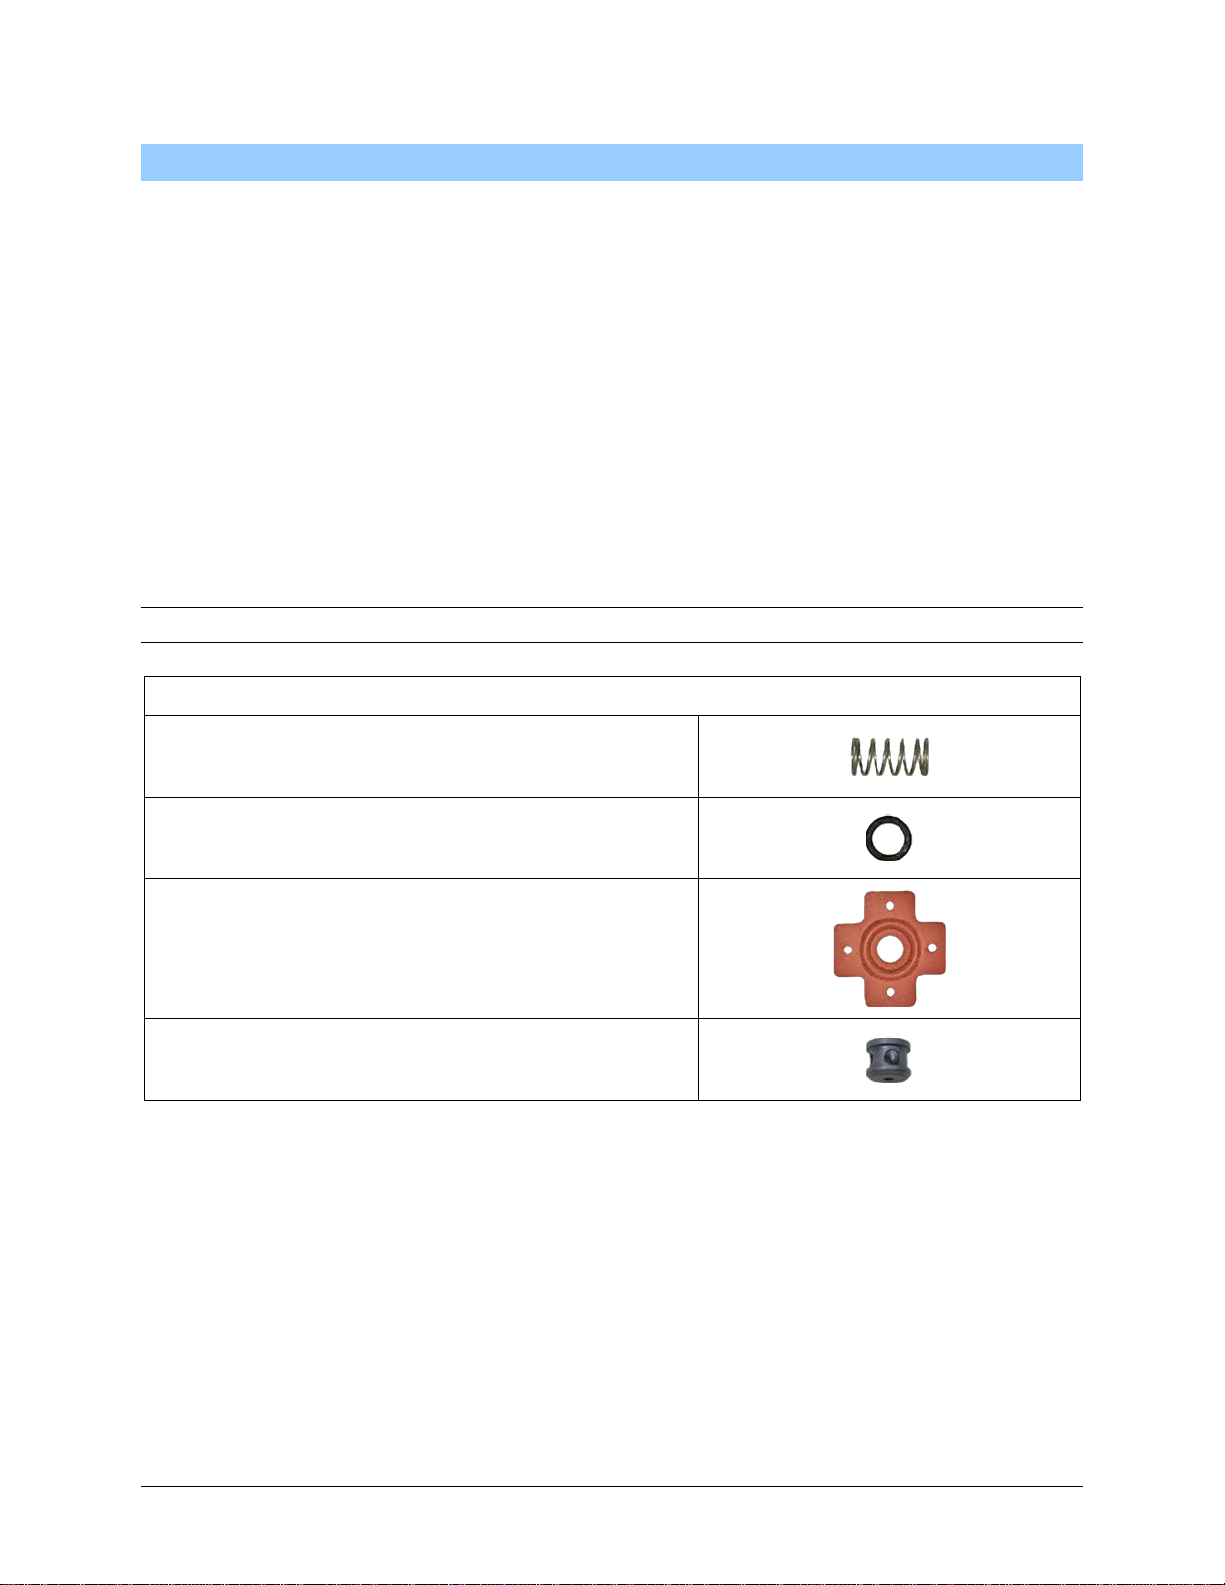
1.1.1 Bushing Kit (P/N BK-2001)
JET SPRING P/N 60-2102
WASHER P/N 60-2116
HEATER SEAL P/N 03-2261-00
BUSHING P/N 03-2162-00
Page 6 of 28 Advanjet HM-2600 Hotmelt Jet Maintenance and Repair 3A6328A
1.1 Maintenance Kits (continued)
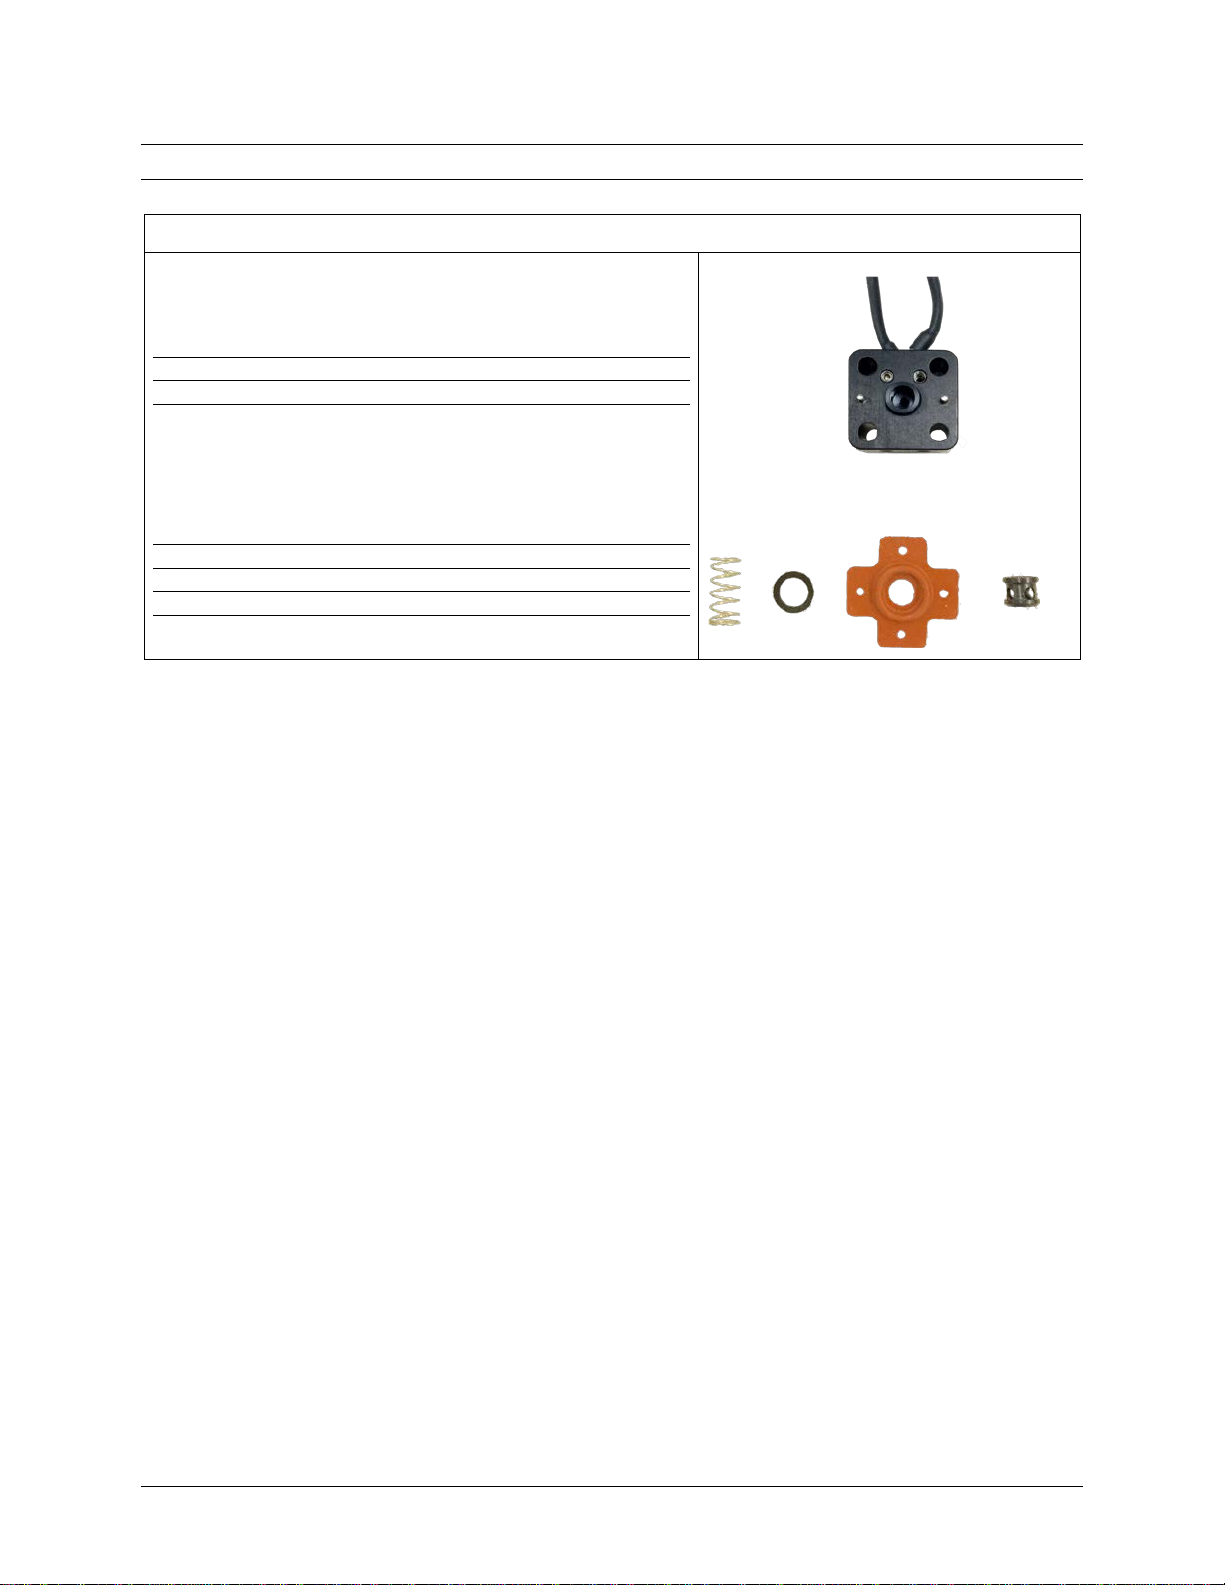
1.1.2 Heater Kit (P/N HK-2600)
HK-2600 (STANDARD, 40W)
HEATER BLOCK 03-2214-02
HEATER CABLE 06-1043-00
HEATER BLOCK SCREWS (2) M3 X 25 FHMS
- and –
JET SPRING P/N 60-2102
WASHER P/N 60-2116
HEATER SEAL P/N 03-2261-00
BUSHING P/N 03-2162-00
3A6328A Advanjet HM-2600 Hotmelt Jet Maintenance and Repair Page 7 of 28

1.1 Maintenance Kits (continued)
1.1.3 Jet Repair Kit (P/N JK-9500)
MAIN AIR VALVE P/N 60-2105
MAIN AIR (JET HAMMER)
CYLINDER ASSEMBLY P/N 60-2266
SILENCER P/N 60-2107
LEVER P/N 03-2281-00
PIVOT BOLT P/N 60-2104
HEATER SEAL P/N 03-2261-00
WASHER P/N 60-2116
JET SPRING P/N 60-2102
BUSHING P/N 03-2162-00
Page 8 of 28 Advanjet HM-2600 Hotmelt Jet Maintenance and Repair 3A6328A
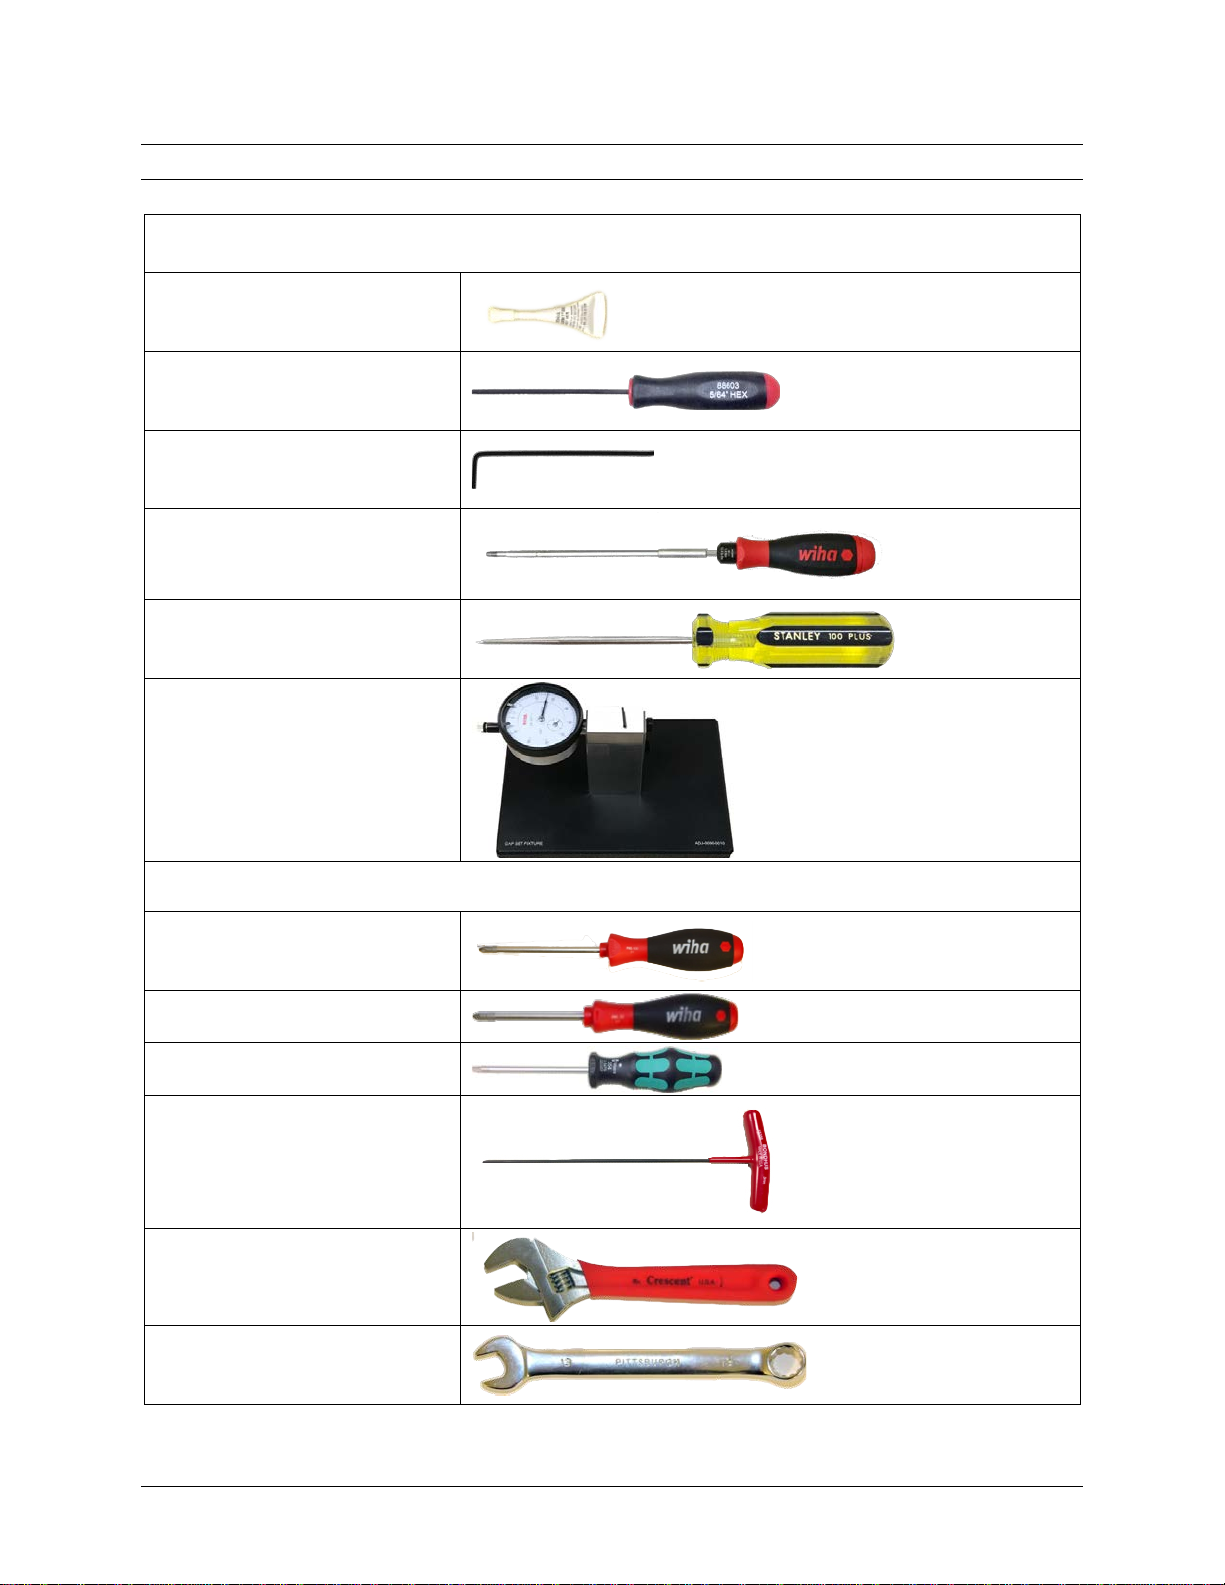
1.2 Required Tools
Jet Maintenance Tool Kit (P/N JKT-2600)
Loctite® 242 small screw
threadlocker
(P/N 113500)
5/64 in. hex wrench
(P/N 60-2293)
0.050 in. hex wrench
(P/N 60-2294)
Torque tool
(P/N 60-2264)
Awl
(P/N 60-2296)
Gap Set Fixture
(P/N 90-0010)
Other Tools
#1 Phillips screwdriver
#2 Phillips screwdriver
2.5 mm hex wrench
3 mm hex wrench (9 in.)
150-mm adjustable wrench
13 mm open end wrench
3A6328A Advanjet HM-2600 Hotmelt Jet Maintenance and Repair Page 9 of 28
2. Jet Disassembly
2.1 Overview
Note: It is important to flush and clean the jet prior to making repairs. Follow the steps
for cleaning the jet in the HM-2600 Jet Setup and Operation manual 3A6327.
To avoid personal injury:
Move the nozzle close to the collection device
so there is minimal misting of the solvent
during flushing.
Be sure there is proper ventilation and wear appropriate eye and skin protection as
instructed by the solvent manufacturer.
Material inside the applicator can be near setpoint temperature. Wear protective clothing to
avoid severe burns.
Turn off the power switch and the air switch on the HM-2600C Jet Controller before
beginning disassembly of the jet. Allow all parts of the jet to cool. Refer to the
HM-2600C Jet Controller Setup and Operation manual 3A6166.
The extent of jet disassembly depends on which kits are being installed.
For all repair kits, remove and keep:
Nozzle plate and two screws with two washers each
Top cover and two screws
Mounting plate and two screws
For the Bushing and Heater Kits (BK-2001 and HK-2600):
Detach the Heater Block; keep for BK-2001, discard for HK-2600
Remove and discard the heater seal, washer, and jet hammer spring
For the Jet Maintenance Kit (JK-9500), remove and discard jet parts in this order:
Heater block and cable
Heater seal, washer, and jet hammer spring
Hammer air cylinder
Pivot bolt
Lever
Bullet air valve
Muffler
When noted, use the tool specified.
Section 2.7 provides a checklist of parts and screws that should be set aside. Take care
to set aside screws as they are removed so they can be easily located for installing the
new parts.
Page 10 of 28 Advanjet HM-2600 Hotmelt Jet Maintenance and Repair 3A6328A

2.2 Disassembled Jet (Melter Cover Removed)
3A6328A Advanjet HM-2600 Hotmelt Jet Maintenance and Repair Page 11 of 28
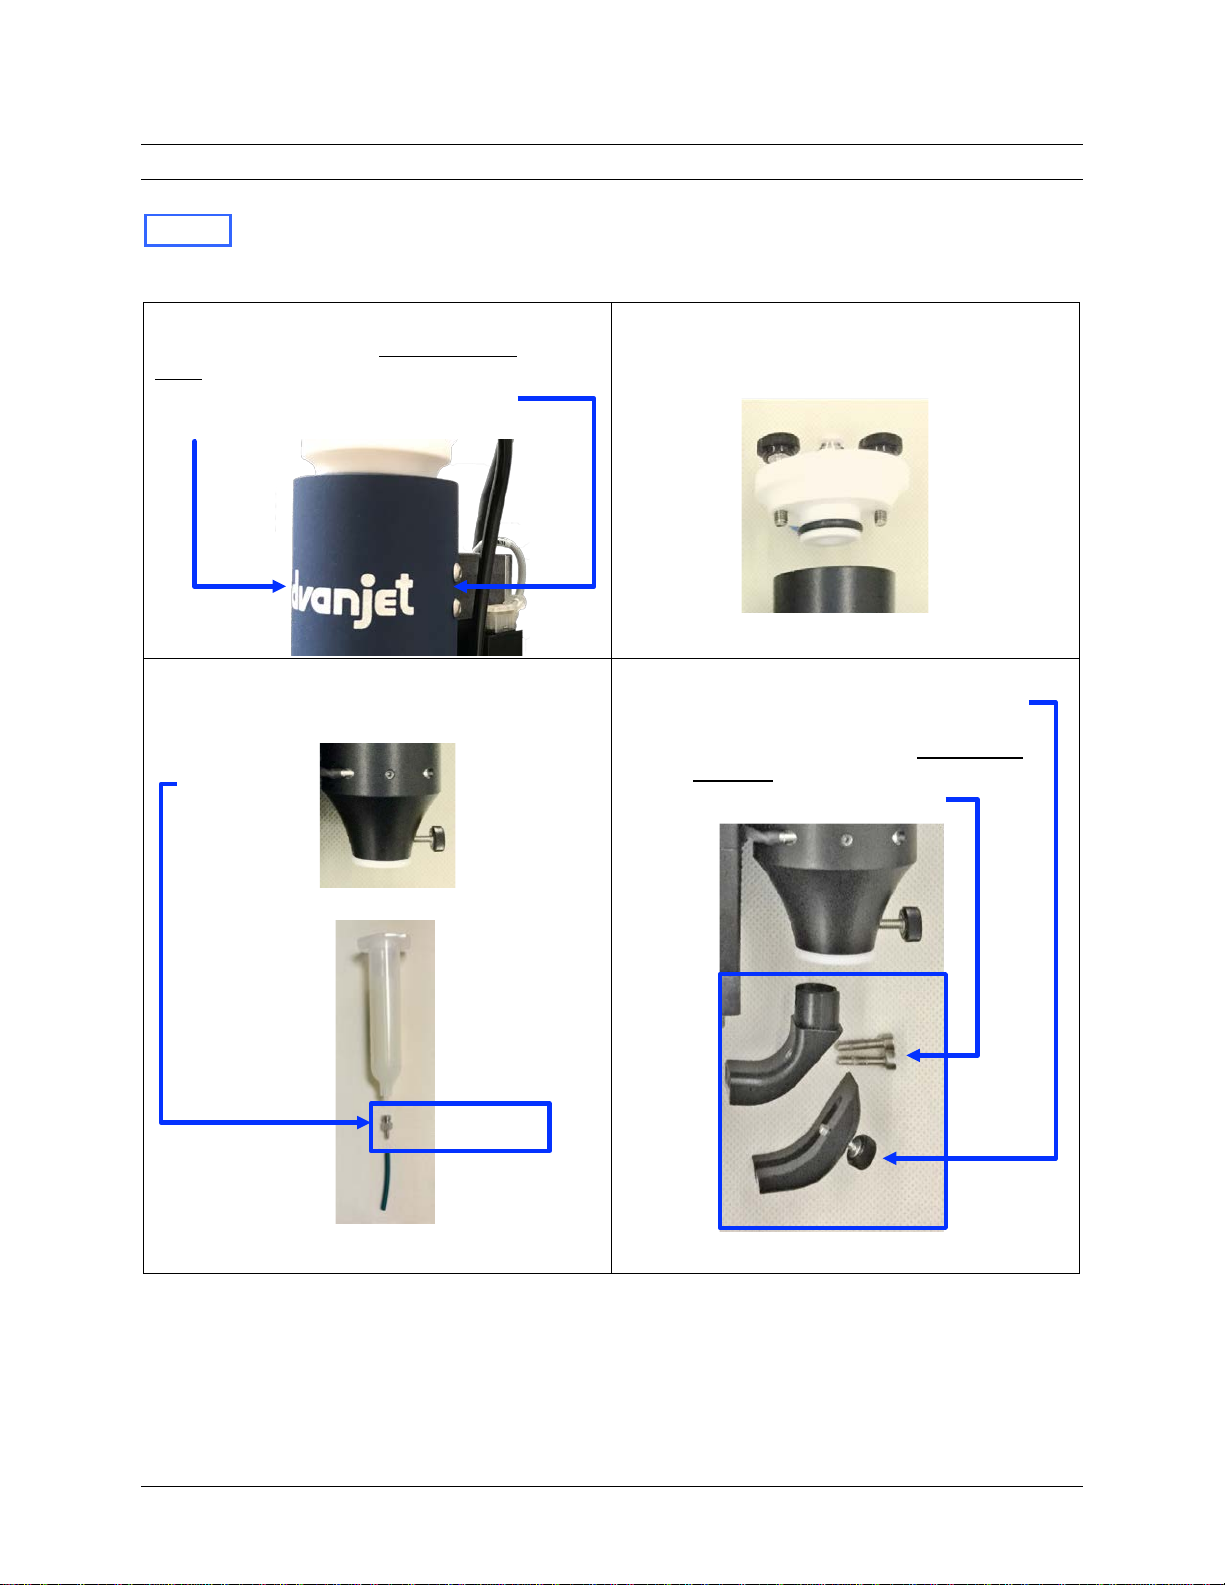
2.3 Remove Syringe and Feed Tube Enclosure
KEEP these parts and screws to set aside and reinstall. A checklist is provided in
section 2.7.
2.3.1 Remove the Melter Cover
Use the 2.5 mm driver to remove and set
aside the four screws securing the melter
cover to the syringe holder (two on each
side).
2.3.2 Remove the Receiver Head
Loosen the receiver head thumbscrews and
remove the receiver head.
2.3.3 Remove the Syringe
Loosen the luer lock securing the feed
tube.
2.3.4 Remove the Feed Tube Enclosure
Loosen the thumbscrew securing the
lower feed tube enclosure.
Use the 2.5 mm driver to remove and
set aside the two screws securing the
upper feed tube enclosure.
Detach the
luer from
the feed
tube. Keep
luer to
clean and
reuse.
Discard
feed tube.
KEEP
KEEP
Page 12 of 28 Advanjet HM-2600 Hotmelt Jet Maintenance and Repair 3A6328A
2.4 Remove Mounting Plates and Top Cover
KEEP these parts and screws to set aside and reinstall. A checklist is provided in
section 2.7.
BK-2001 or HK-2600 kit replaces these parts.
2.4.1 Remove Nozzle Plate (if present)
Going through the melter holder, use the 3 mm driver to loosen the two screws that secure the nozzle
plate. Remove the nozzle plate and set aside; nozzle plate screws will be removed later.
2.4.2 Remove the Dovetail Plate
Using the 3 mm driver, remove and set aside the
four screws securing the dovetail plate.
2.4.3 Remove the Mounting Plate
Using the 3 mm driver, remove and set aside the
three screws securing the mounting plate.
2.4.4 Disconnect Heater Block
Use the #1 PH to remove and set aside the two
screws securing the heater block.
Remove and discard the heater seal and
washer, and the jet compression spring.
2.4.5 Remove Heater Bearing
Use a cleaning swab or similar tool to push out
the heater bearing.
Leave any lubricant in place in the heater block;
Discard the bearing.
KEEP
DISCARD
3A6328A Advanjet HM-2600 Hotmelt Jet Maintenance and Repair Page 13 of 28
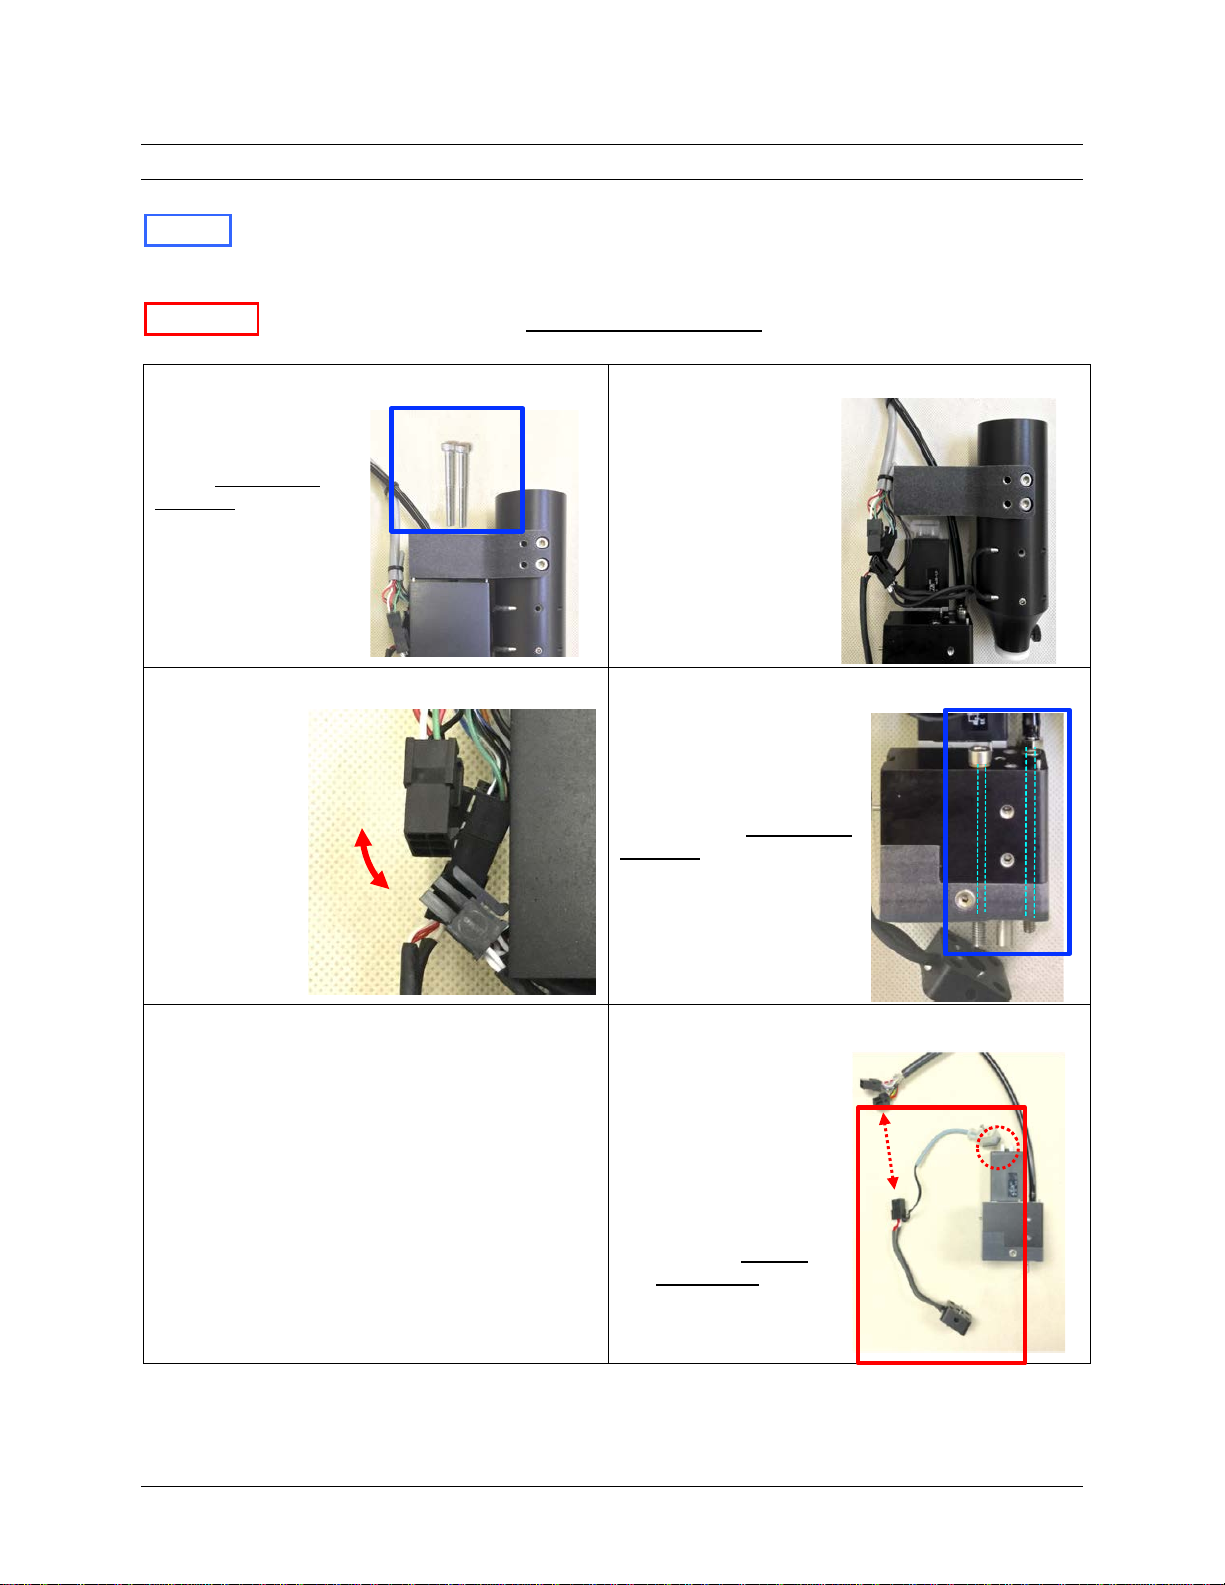
2.5 Remove Melter, Top Cover, and Heater Block
KEEP these parts and screws to set aside and reinstall. A checklist is provided in
section 2.7.
HK-2600 kit replaces these parts. Do not discard screws.
2.5.1 Remove the Top Cover Screws
Use the 3 mm hex to
loosen the two screws
securing the top
cover; remove and
set aside.
2.5.2 Detach the Top Cover
Separate the top cover
from the melter
assembly, set aside
2.5.3 Remove the Melter Assembly
Separate the
melter
connector from
the end of the
jet cable;
remove the
melter
assembly and
set aside.
2.5.4 Remove the Nozzle Plate Screws
The loosened nozzle plate
screws were captured in
place by the melter
holder. After the melter
holder is removed from
the top cover, remove and
set aside the nozzle plate
screws.
To replace the heater block,
continue to step 2.5.5.
To keep the heater block,
skip to step 2.6.1
2.5.5 Remove the Heater Assembly
(HK-2600 only)
Loosen the screw
on the air valve
cable connector
and separate the
connector.
Separate the heater
block connector
from the end of the
jet cable; remove
and discard.
JET
CABLE
MELTER
CABLE
REMOVE
KEEP
DISCARD
Page 14 of 28 Advanjet HM-2600 Hotmelt Jet Maintenance and Repair 3A6328A
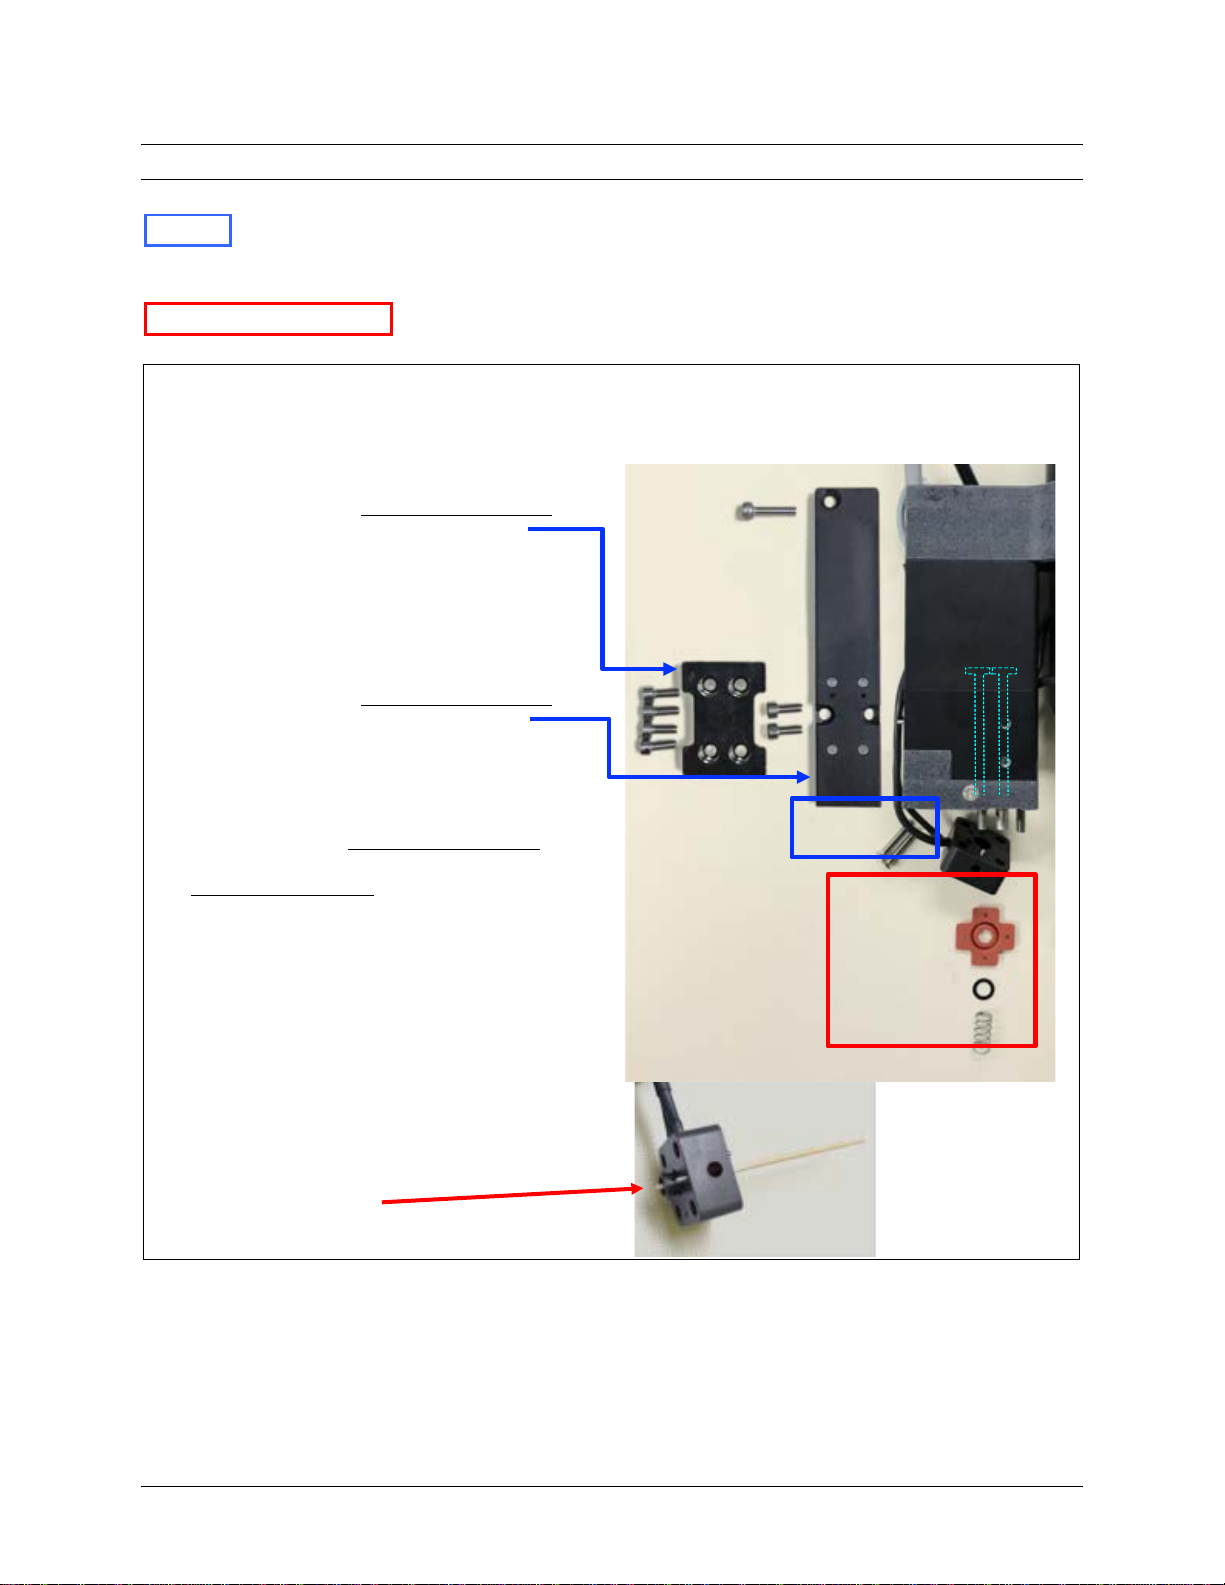
2.6 Remove Spacer Assembly
KEEP these parts and screws to set aside and reinstall. A checklist is provided in
section 2.7.
JK-9500 kit replaces these parts.
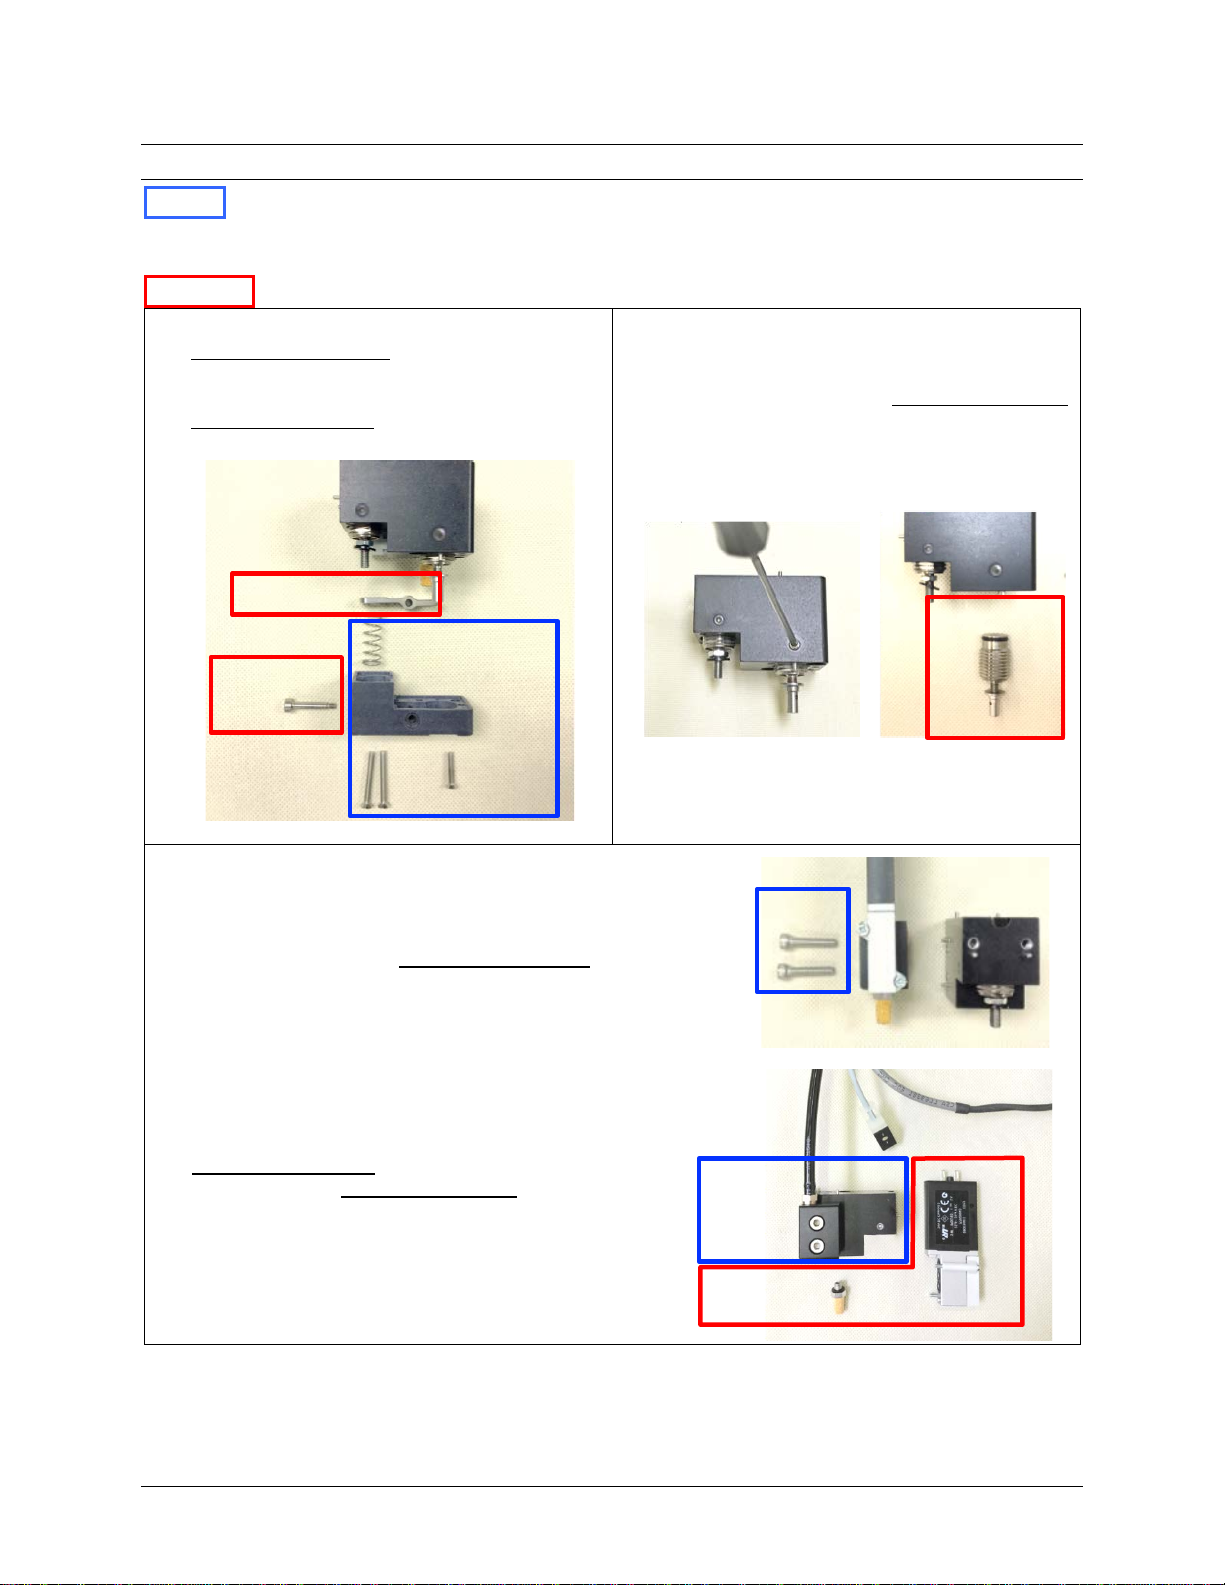
2.6.1 Remove the Spacer
Remove and set aside the spacer screws
(#1 PH), the nylon spacer, and the automatic
shutoff spring.
Remove and discard the shoulder bolt (2 mm
hex) and the lever.
2.6.2 Remove the Air Cylinder
Use the 2 mm hex driver to loosen the
setscrew that locks the main air cylinder.
Use the 13 mm wrench to remove and discard
the air cylinder.
2.6.3 Remove the Air Valve Mount and Silencer
Use the 3 mm driver to remove and set aside the screws
securing the valve mount to the jet body.
If still attached, use a #1PH to loosen the screw on the jet
cable connector.
Loosen screws attaching the air valve to the valve mount.
Remove and discard the air valve.
Use a wrench to remove and discard the muffler.
DISCARD
DISCARD
KEEP
DISCARD
DISCARD
KEEP
KEEP
3A6328A Advanjet HM-2600 Hotmelt Jet Maintenance and Repair Page 15 of 28

2.7 Check for Parts Set Aside
Check that these parts have been set aside. If necessary, remove built-up threadlocker.
FEED TUBE ENCLOSURE
(2) M3 X 14 SHCS
MELTER COVER
(4) M4 X 8 BHCS
DOVETAIL PLATE
(4) M4 X 10 SHCS
MOUNTING PLATE
(2) M4 X 10 SHCS
NOZZLE PLATE
(2) M4 X 55 SHCS
TOP COVER
(2) M4 X 40 SHCS
HEATER BLOCK
(2) M3 X 20 FHMS
SPACER
(1) M3 X 16
(2) M3 X 25
SHUTOFF SPRING
JET VALVE MOUNT
(2) M4 X 20 SHCS
Page 16 of 28 Advanjet HM-2600 Hotmelt Jet Maintenance and Repair 3A6328A

3. Install New Parts and Reassemble the Jet
3.1 Overview
In general, parts are reinstalled in the reverse order that they were removed.
Gather the screws set aside as shown in Section 2.7.
Install the Main Air Valve and Hammer Cylinder
Attach the air valve
Attach the silencer
Install the hammer air cylinder.
Assemble the Spacer
Assemble the lever and lever spring
Attach the spacer
Align the lever
Install the pivot (shoulder) bolt
Reassemble the Heater Block
Install the heater seal, washer, and hammer spring
Install the bushing
Align and attach heater block
Attach the Valve Mount
(Optional) Replace Melter Cable
Reassemble the Jet
Insert nozzle plate screws
Position and attach melter assembly and top cover
Tuck cables
Attach air valve connector
Attach the mounting plate
Attach the dovetail plate
NOTICE
Use Loctite®242 threadlocker as indicated. To avoid damage to the jet,
do not substitute with other products.
3A6328A Advanjet HM-2600 Hotmelt Jet Maintenance and Repair Page 17 of 28
3.2 Install the Main Air Valve and Hammer Cylinder
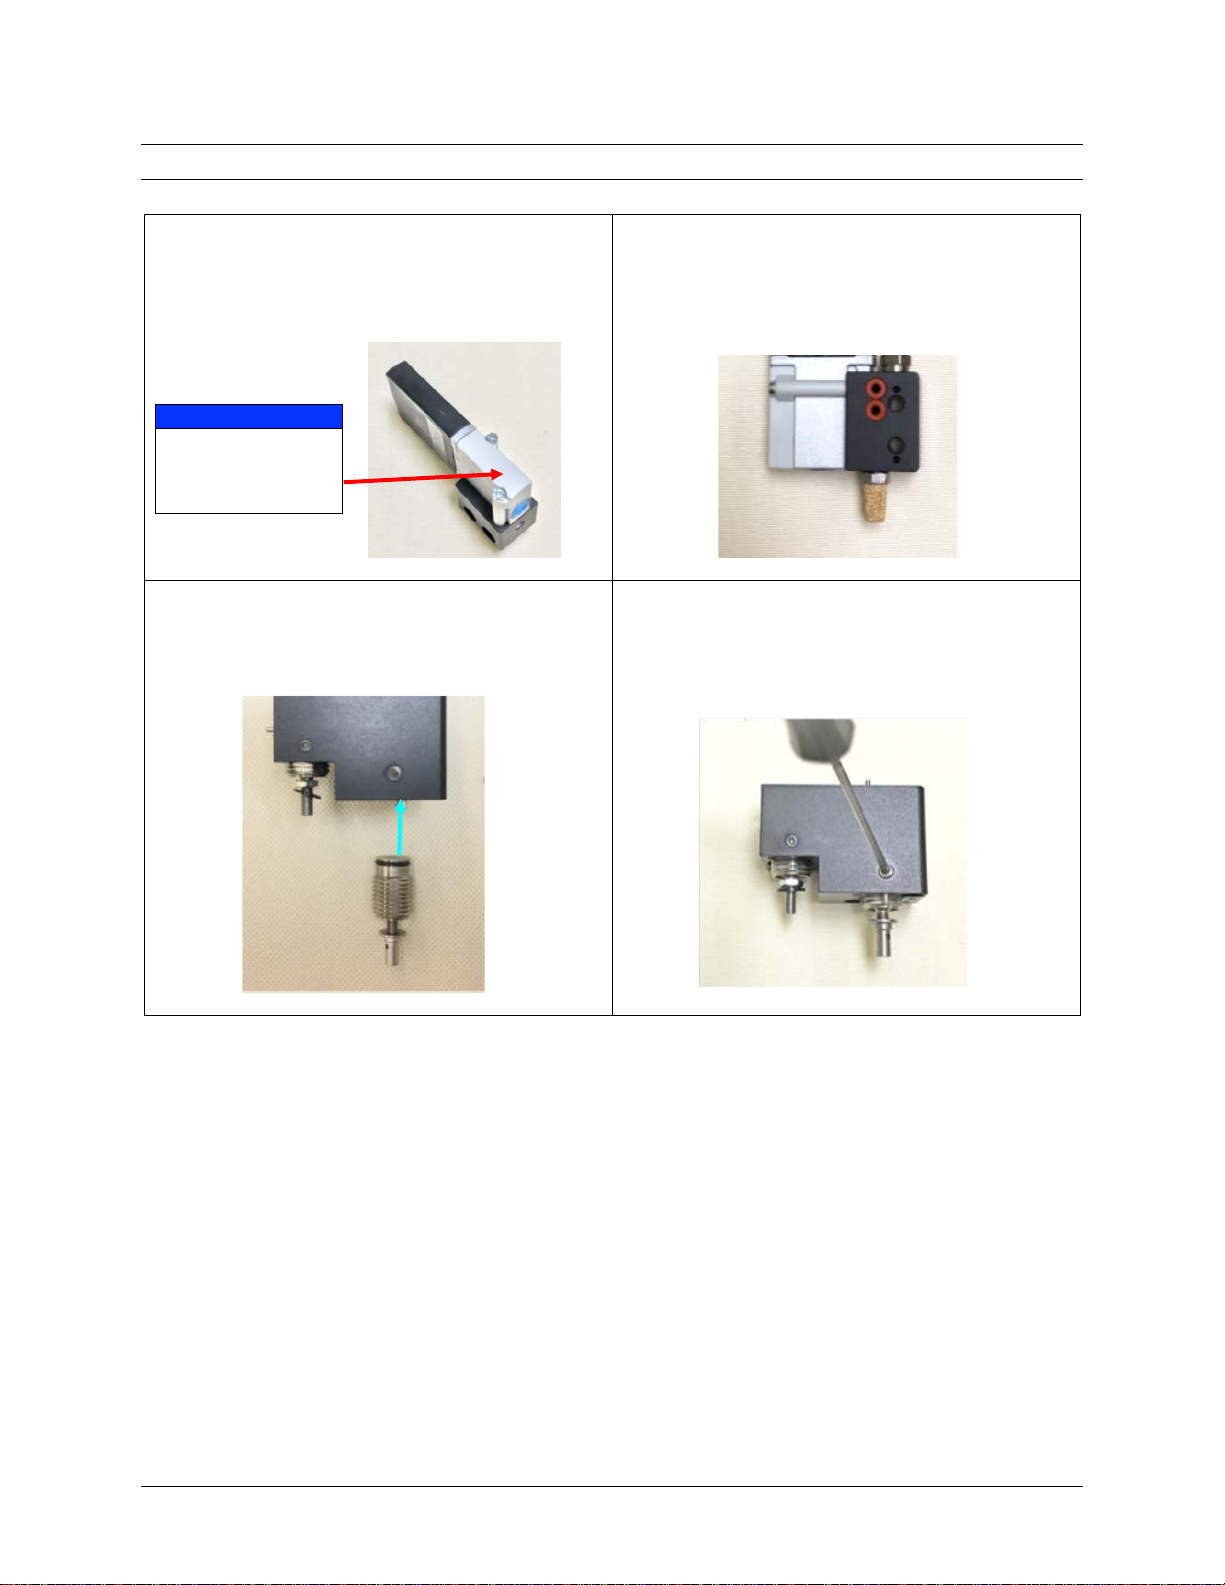
3.2.1 Install the Air Valve
Apply a small amount of Loctite 242 to the air
valve screws and install the new air valve on the
valve mount as shown.
NOTICE
Over-tightening
can easily break
this plastic.
3.2.2 Install the Silencer
Apply a small amount of Loctite 242 to the new
muffler and install into the valve mount. The fit
should be snug, but not so tight that it crushes the
rubber washer.
3.2.3 Install the Air Cylinder
Install the new air cylinder and use the 13 mm
wrench to tighten the cylinder in place until it hard
stops.
3.2.4 Tighten the Air Cylinder Setscrew
Apply a small amount of Loctite 242
to the
setscrew and use the 2 mm hex driver to tighten.
Page 18 of 28 Advanjet HM-2600 Hotmelt Jet Maintenance and Repair 3A6328A

3.3 Assemble the Spacer
3.3.1 Assemble the Spacer Parts
Locate the new lever and shoulder bolt, and also
the nylon spacer, spacer screws, and automatic
shutoff spring that were set aside.
3.3.2 Check the Lever Assembly
Observe the orientation of the lever and washers
as shown:
The bore in the lever faces the shutoff spring.
There is one washer on the shutoff cylinder
below the lever.
Proper positioning is critical.
3.3.3 Attach the Spacer
With the spring resting in the bore of the lever, position the
spacer over as shown.
Locate the three spacer screws that were set aside. Apply a
light coating of Loctite 242 to the threads. Firmly squeeze the
spacer closed and install the spacer screws.
3.3.4 Align the Lever with the Shoulder Bolt
Use an awl to line up the hole for the pivot (shoulder) bolt
with the hole in the lever. Insert the 2 mm driver from the
opposite side and line it up with the awl.
Push out the awl with the driver.
3.3.5 Install the Shoulder Bolt
Apply a light coating of
Loctite 242 to the threads of
the pivot bolt and wipe off
any excess.
Note: Do not allow Loctite
from the shoulder bolt tip
to transfer to the lever.
Push out the driver with the
shoulder bolt.
Screw in the shoulder bolt
with the 2 mm driver until it
is barely snug. Do not over-
tighten.
Verify that the lever is not
binding—the hammer
cylinder hat should move up
and down freely.
HAT MOVES
UP & DOWN
SPRING
FITS INTO
LEVER
BORE
3A6328A Advanjet HM-2600 Hotmelt Jet Maintenance and Repair Page 19 of 28
3.4 Reassemble the Heater Block
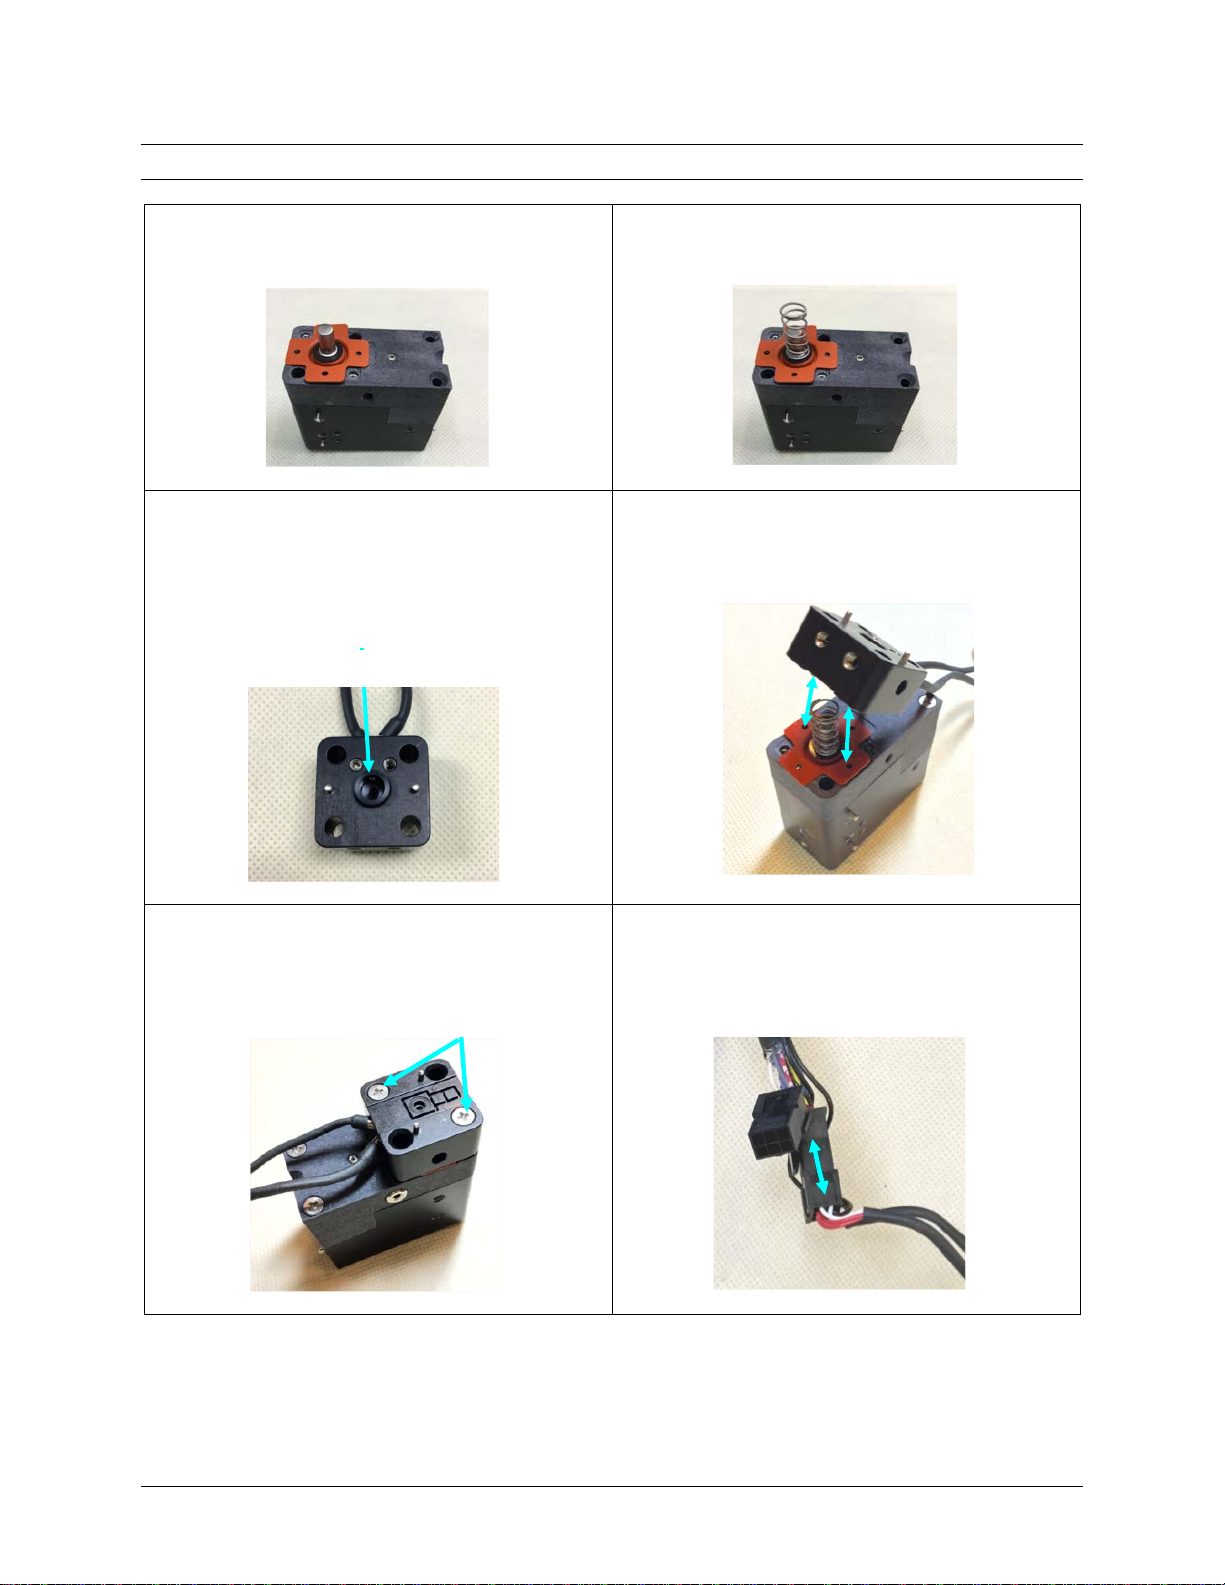
3.4.1 Install New Heater Seal and Washer
Install the heater seal and washer on the tip of the
air cylinder with the indent positioned as shown.
3.4.2 Install New Spring
Install the new jet compression spring.
3.4.3 New Heater Block Bearing
If a new heater block is being installed, the new
bearing will be in place. If the existing heater block
is being used, use a wooden cotton swab to push
the new bearing into place, leaving any existing
lubricant in place.
3.4.4 Position Heater Block
Align the pins in the heater block with the heater
seal as shown.
3.4.5 Attach Heater Block
Locate the two heater block screws that were
set aside.
Apply Loctite 242 to the tips of both screws
and attach the heater block.
3.4.6 (Optional) Connect New Heater Block
If using the HK-2600 to install a new heater block,
attach the heater block connector to the jet cable.
PUSH BEARING INTO PLACE
Page 20 of 28 Advanjet HM-2600 Hotmelt Jet Maintenance and Repair 3A6328A
Table of contents
Other Advanjet Industrial Equipment manuals


