Advent ADVEXL10HD User manual

ADVEXL10HD
10.1" OVERHEAD LED BACKLIT
LCD MONITOR WITH
DVD PLAYER
R
OWNER'S
MANUAL
S
PUSH
®


3
TABLE OF CONTENTS
FCC Statement .......................................................................................4
Important Notice ................................................................................. 5
Warnings ................................................................................................. 5
Congratulations ................................................................................... 6
Safety Precaution ................................................................................ 6
Features .................................................................................................. 6
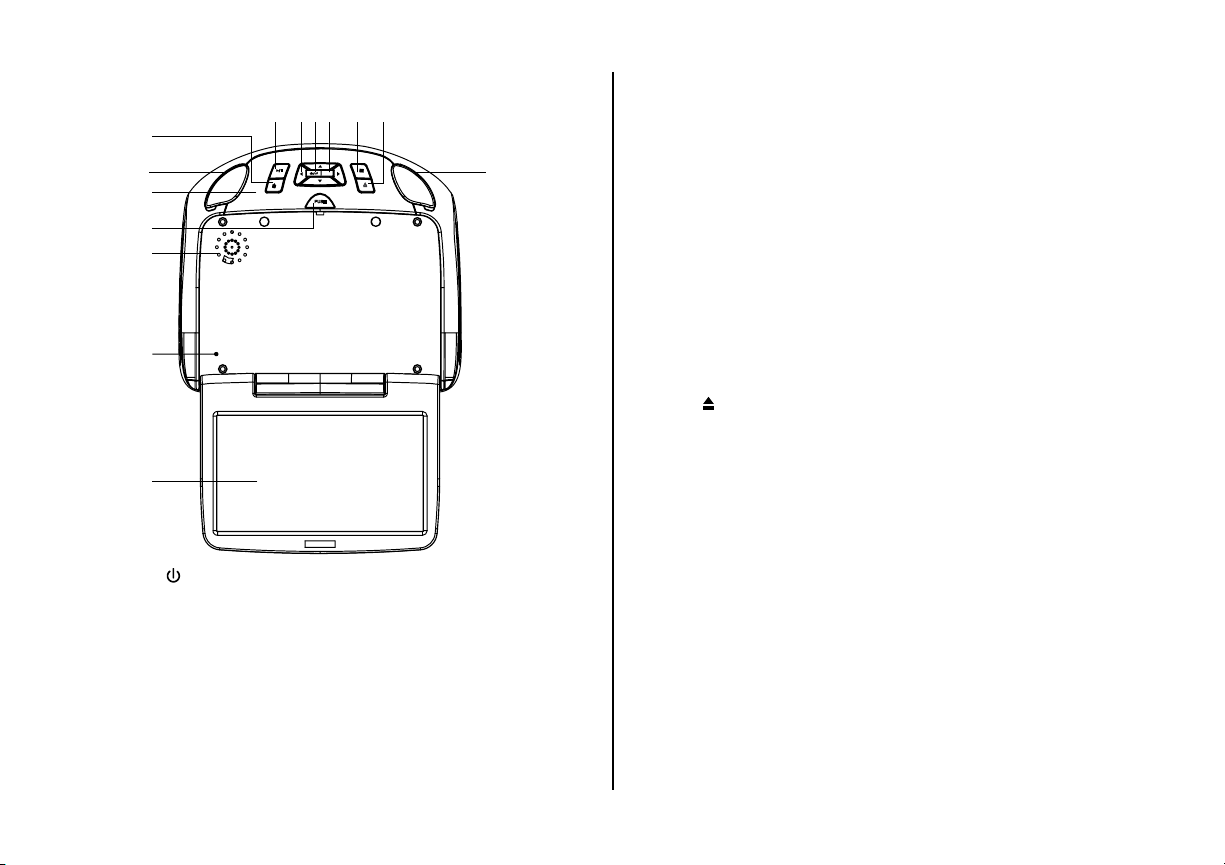
Controls and Indicators Diagram (Front View)........................... 7
Controls and Indicators Diagram (Side Views)........................... 8
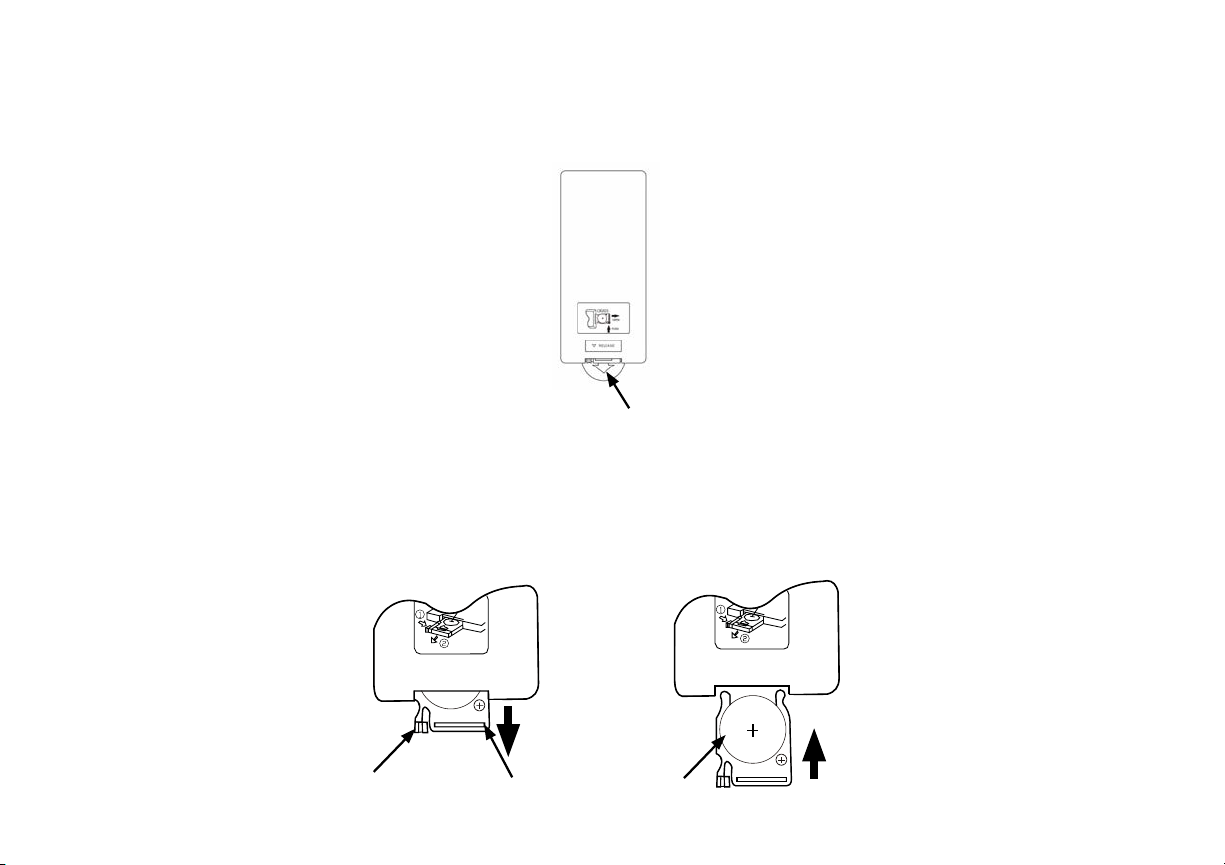
Remote Control Operation ............................................................... 9
Remote Control Functions ............................................................. 10
Turning the Unit On or O .............................................................. 13
Source Menu........................................................................................ 14
System Menu Settings and Adjustments .................................. 16
Picture (Control)................................................................................. 16
WFMM (FM Modulator) .................................................................... 17
Settings .................................................................................................. 18
Default DVD.......................................................................................... 18
Screen Mode ........................................................................................ 18
Monitor Mode...................................................................................... 19
Language .............................................................................................. 20
Smart Stream ....................................................................................... 20
Factory Setting.................................................................................... 20
SETTINGS AND ADJUSTMENTS ..................................................... 21
Using the Setup Menu...................................................................... 21
SYSTEM Setup...................................................................................... 21
TV SYSTEM ............................................................................................ 21
SCREEN SAVER ..................................................................................... 22
TV TYPE .................................................................................................. 22
PASSWORD ........................................................................................... 23
DDFAULT-RESTORE ............................................................................ 23
LANGUAGE SETUP ............................................................................. 24
OSD LANGUAGE ................................................................................. 24
AUDIO LANG ........................................................................................ 24
SUBTITLE LANG ................................................................................... 24
PLAYING DEVICES............................................................................... 25
PLAYING USB MEMORY DEVICES ................................................. 25
Playing MP3 Discs ............................................................................. 26
Selecting of Audio/Photo/Video mode..................................... 26
DVD BASICS......................................................................................... 27
Overhead Dome Lights.................................................................... 28
Accessories ........................................................................................... 29
Wireless Headphones ....................................................................... 29
Wireless Game Package (MVGP1)................................................. 29
HDMI and USB Port Information................................................... 30
HDMI1..................................................................................................... 30
Smartphones and Tablets................................................................ 30
USB Port................................................................................................. 30
Troubleshooting ................................................................................. 31
Replacement Parts............................................................................. 33
Specications...................................................................................... 33
Warranty ................................................................................................ 34
Notes....................................................................................................... 35

4
FCC Statement
This device complies with Part 15 of the FCC Rules. Operation is subject to the following two conditions: (1) This device may not cause harmful
interference, and (2) this device must accept any interference received, including interference that may cause undesired operation. This equipment has
been tested and found to comply with the limits for a Class B digital device, pursuant to Part 15 of the FCC Rules. These limits are designed to provide
reasonable protection against harmful interference in a residential installation.
-Reorient or relocate the receiving antenna.
- Increase the separation between the equipment and receiver.
- Connect the equipment into an outlet on a circuit dierent from that to which the receiver is connected.
- Consult the dealer or an experienced radio/TV technician for help.
FCC Caution: Any change or modications not expressly approved by the party responsible for compliance could void the user’s authority to operate this
equipment.
Radiation Exposure Statement
This equipment complies with FCC radiation limits set forth for an uncontrolled environment. This equipment should be installed and operated with
minimum distance 4.5in (20cm) between the radiator & your body.

5
Important Notice
Installation of overhead products requires careful planning and preparation. Be extremely careful when working on a vehicle with side curtain air bags.
Do not route wires near any portion of the side curtain air bag assemblies. This includes any anchor points in A, B, C or D pillars of the vehicle. Routing
wires in these areas or running wires by the side curtain air bags can prevent the side curtain air bag from fully deploying which can result in personal
injury to vehicle occupants. If you have any questions regarding wire routing in a vehicle, please contact Audiovox Technical Support at 1-800-225-6074.
When connecting power and ground in a mobile video installation ensure that the ACC wire is fused at the point where it is connected to the vehicle
ACC wiring. Failure to do so can result in damage to the vehicle if a short circuit develops between the vehicle connection point and the mobile video
product.
An LCD panel and/or video monitor may be installed in a motor vehicle and visible to the driver if the LCD panel or video monitor is used for vehicle
information, system control, rear or side observation or navigation. If the LCD panel or video monitor is used for television reception, video or DVD play,
the LCD panel or video monitor must be installed so that these features will only function when the vehicle is in “park” or when the vehicle's parking
brake is applied.
An LCD panel or video monitor used for television reception, video or DVD play that operates when the vehicle is in gear or when the parking brake is not
applied must be installed to the rear of the driver's seat where it will not be visible, directly or indirectly, to the operator of the motor vehicle.
Warnings
• Do not use any solvents or cleaning materials when cleaning the video monitor.
• Do not use any abrasive cleaners, they may scratch the screen.
• Use only a lightly dampened lint free cloth to wipe the screen if it is dirty.
• Lock the LCD screen in the fully closed position when not in use.
• Before putting on headphones always adjust the volume setting to the lowest position.
• Remember to leave the dome light switch in the o or auto positions when the vehicle is unattended, as the dome lights, if left on, can drain
the vehicle's battery.
• Do not put pressure on the screen.
• Caution children to avoid touching or scratching the screen, as it may become dirty or damaged.
Patented: Refer to www.voxxintl.com/company/patents

6
Congratulations
Congratulations on your purchase of the ADVENT ADVEXL10HD DVD
Player with drop-down video / monitor. The ADVEXL10HD has been
designed to give you and your family many years of video entertainment
in the mobile environment. Please read the directions that follow to
familiarize yourself with the product to ensure that you obtain the best
results from your equipment.
Note: Installation options vary, see the individual owner's manuals for
each component in your system to obtain a full understanding of each
component's operation.
Safety Precaution
For safety reasons, when changing video media, it is recommended that
the vehicle is not in motion, and that you do not allow children to unfasten
seat belts to change video media or make any adjustments to the system.
System adjustments can be accomplished using the remote control, while
seat belts remain fastened. Enjoy your ADVENT entertainment system but
remember the safety of all passengers remains the number one priority.
FEATURES
• 10.1”TFT (Thin Film Transistor) Active Matrix LCD (Liquid Crystal
Display) Monitor
• LED Backlighting
• Built-in DVD Player
• Auto-On With Disc Insertion
• HDMI Inputs
• OSD (On Screen Display) for Control of Picture Quality and Functions
• Selectable (M1 and M2) IR Receive and Transmit Codes (See page 9)
• Switchable Dual Channel IR Infrared Transmitter (See page 19)
• Eight Source Input*
(DVD, USB, HDMI 1, HDMI 2, SMART STREAM, Game, AV, SETTING)
• Dome Lights with Built-in Three Way Switch
• Built-in 100 Channel Wireless FM Modulator
• Last Position Memory for DVD
• Screen Mode Selection (4:3, 16:9)
• Full Function Remote Control
• Backlit Controls
• AV Output via RCA Jacks
• Plays DVD, CD and MP3 Discs
• Game Port Ready

7
CONTROLS AND INDICATORS DIAGRAM FRONT VIEW
1. POWER ( ) Button
This button is used to turn the system on/o.
2. Play/Pause (u/II ) Button
This button is used to start playback of a disc or pause a disc.
3. UP / DOWN / LEFT / RIGHT (pqt u) Cursor Buttons
These cursor buttons are used to navigate menu selections on the
screen.
4. HOME/MENU Select Button
This button is used to display and select options on the system menu.
Press and hold for 3 seconds to access the System Menu.
5. Source/Select (S) Button
Press this button to display the Source OSD screen. Use the cursor
buttons to highlight the desired source. Press the Source/Select button
to access the desired source.
6. STOP (n) Button
-Press the STOP button once: Stops playback.
-Pressing the PLAY button again will resume normal playback from
where movie was stopped.
-Press the STOP button twice and then press the PLAY button to start
playback from the beginning of the DVD.
7. EJECT ( )Button
This button is used for ejecting a disc from the disc compartment.
8. Dome Lights
Provide additional interior illumination.
9. Infrared Transmitter/Remote Sensor
(Location)
10. Screen Release
Push this button to release the screen from the locked position.
11. Ventilation Openings
12. LCD Cut O Switch
Used to turn o the LCD backlight when the LCD is in the closed
position.
13. LCD Panel
S
PUSH
1
2 3 4 5 6 7
10
8
9
11
12
13
8

8
CONTROLS AND INDICATORS DIAGRAM SIDE VIEWS
1. DVD Disc Insertion Slot
For loading and removing discs. Insert the disc with disc label side facing up.Disc Insert Slot design with disc insert auto detect. When unit in standby
mode insert the disc to disc slot, the unit will automatically turn ON at DVD source and load in the disc to play the disc.The disc detect function can
be activate in others sources mode and it will automatically switch the source to DVD source immediately when disc is inserted.
Note: The disc slot indicator is red when a disc is inserted and green when the disc slot is empty.
2. USB INPUT
For connection of a USB memory device. This input will also charge a USB device that contains a battery. See page 30 for
more information.
Note: The USB input supplies up to 1 Amp of charging current. Devices such as tablets may require more than 1 Amp of charging current
and it is recommended to connect the device to a vehicle power outlet for full charging capabilities. When the unit is in DVD/USB mode,
1 Amp charging is not available.
3. HDMI1 INPUT
For connection of devices with HDMI outputs. See page 30 for more information.
Note: Requires a HDMI enabled device and a special HDMI adapter. Contact your HDMI device supplier for the adapter.
4. THREE POSITION DOME LIGHT SWITCH
ON - Turns on the dome lights.
OFF - The dome lights will not turn on in this position.
AUTO - Automatically turns on the dome lights in conjunction with the vehicle's interior illumination.
1

9
REMOTE CONTROL OPERATION
Installation of the Remote Control Battery
Each Remote Control comes with a battery already installed with a Pull Tab to prevent battery discharge. Remove the Pull Tab before attempting to use
the Remote Control.
1. While holding the Remote Control, insert thumbnail into the battery door side notch (1) and index ngernail into battery door upper notch (2) and
slide battery holder open in the direction shown.
2. Install one CR2025 battery (3) into the battery holder.
NOTE: Make sure that the proper polarity (+ or -) is observed.
3. Slide the battery holder back into the Remote Control until it locks in place.
Remote control
Back View
Protective Pull Tab (Clear Plastic)
CR2025
3V
(3)
(1) (2)
CR2025
3V

10
* Function control is available on the unit and the Remote Control.
** Function not available in this model.
1. POWER*
Press this button to turn the unit ON and OFF.
2. MONITOR SELECT
M1 Button – Set the remote control code to allow control of the unit
in M1 mode.
M2 Button – Set the remote control code to allow control of the unit in
M2 mode.
Note: M1/M2 operation is only for when 2 systems are installed in
the same vehicle.
This allows independent Remote Control and independent playback
of audio for each system.
REMOTE CONTROL FUNCTIONS 3. SOURCE*
Press to display the Source OSD for DVD, USB, HDMI 1, HDMI 2, SMART
STREAM, Game, AV and SETTING.
4. TV Mode Select
Switches certain function keys on the remote control for monitor
functions.
5. DVD Source**
No function on this model.
6. PIX ( Picture Select )**
No function on this model.
7. SYSTEM MENU
Allows the user to access the system menu. Press the por qcursor
buttons to select PICTURE, WFMM and Settings.
8. CURSOR (pqt u)
Use the cursor buttons to access menu selections on the screen.
9. ENTER
Used to execute a selected setting or menu option.
10. DISPLAY
Press once to display current disc information of Title, Chapter & Time.
Press again to display Subtitle, Audio & Angle while the disc is playing.
11. BACKWARD ( )
Press to search in a backward direction. Press repeatedly to change the
search speed from 2, 4, 8, 20 times and normal speed.
12. PLAY (u)*
Press to activate the play mode while a disc is loaded into the disc
compartment.
13. PREVIOUS ( )
Press to return to the previous chapter or track.
DVD TT 0/12 CH 0/25 00:00:00
OFF OFF OFF
....

11
14. PAUSE (II)*
Press to pause playback.
15. NUMBERS
Allows the user to enter the numbers 0-9 for selection of the tracks, titles, chapters or password setting.
16. FMM ON/OFF
Turns the FM Modulator power on/o.
17. IRT ON/OFF
Turns the Infrared Transmitter on/o for IR wireless headphones.
18. NEXT ( )
Press to skip to the next chapter or track.
19. STOP (n)*
Press to stop playback. (Playback will resume from the point it is stopped).
Press twice to stop playback fully. (Playback will resume from the beginning of the disc).
Note: For MP3 or photo mode, press twice to return to Audio/Photo/Video option menu.
20. SCAN FORWARD ( )
Press to search in a forward direction. Press repeatedly to change the search speed from 2, 4, 8, 20 times and normal speed.
21. AUDIO
Press to display and select audio language in DVD mode. Each time this button is pressed, the language changes.
22. SETUP**
No function on this model.
User can use the system to select the function may need.
23. SUBTITLE
Press to display and select the subtitle language in DVD mode. Each time this button is pressed, the subtitle language changes.Pressing the button
will also turn the subtitles o.
Note: The type and number of subtitle languages vary from disc to disc.

12
24. REPEAT
Allows the user to repeat a selected chapter, title or all track.
25. DISC MENU
In DVD mode, press once to access the Root Menu and then press again to resume to previous screen.
26. ZOOM
Press this button to enlarge or decrease the picture size when playing a DVD disc.
Press ZOOM button DVD Player performs
1 Time Enlarges the picture 2X
2 Times Enlarges the picture 3X
3 Times Enlarges the picture 4X
4 Times Reduces the picture 1/2
5 Times Reduces the picture 1/3
6 Times Reduces the picture 1/4
7 Times Picture is returned to original size
27. VOLUME DOWN (-) or UP (+)**
No function on this model.
28. MUTE
Press this button to mute the audio for the wireless FM Modulator, IR headphones and audio output.
Pressing the button again restores the audio to the previously set level.
29. DVD Mode Select Button
Switches certain function keys on the remote control for DVD function.
30. EJECT ( )*
Press this button to eject the disc.

13
S
PUSH Screen Release
Power
ON/OFF
Button
TURNING THE UNIT ON OR OFF
1.Push in the Screen Release button to unlock the LCD screen. The screen will drop down slightly.
2.Pivot the screen downward until a comfortable viewing angle is reached. The hinge friction will hold the screen in position while the system is in use.
3.Press the power button on the unit or the remote control to turn the system on and o. When in use, the internal backlighting will illuminate the
controls.
4.After the unit has been turned on and is displaying a picture, adjust the viewing angle by pivoting the screen to optimize the picture quality.
5.Remember to turn the unit o and pivot the LCD screen to the locked position when not in use.

14
SOURCE MENU
The ADVEXL10HD System is capable of accessing eight source inputs. To select or change a source, press the source (s)button on the front panel or the
SRC button on the remote control. The Menu OSD will appear on the screen as shown in the gure below. Use the pqtor ucursor buttons on the
front panel or the pqtor ucursor buttons on the remote control to highlight a source. Press the Source button on the front panel or the ENTER
button on the remote control to select the desired source.
Note: If a source is grayed out, that source is not available or not installed such as HDMI2, SMART STREAM or Game.
DVD
The DVD source input is used to play DVDs, Audio CDs and MP3 discs.
USB
The USB source input is used to play MP3 les, JPEG les (Photos) and MPEG I, II les. See page 30 for more information.
HDMI 1 & HDMI 2
The HDMI inputs allow the user to enjoy high-denition digital images and high-quality sound by connecting a HD device such as a Blu-ray player or
smartphone with an HDMI output to the system. The HDMI inputs also allow the user to connect with a Mobile High-Denition Link mobile phone. Plug
in the HDMI device with a special adapter available from your mobile phone provider. See page 30 for more information.
Notes:
• This source requires an HDMI enabled device and a special HDMI adapter. Contact your HDMI device supplier for the adapter.
• Phone functionality (phone calls, texting, etc.) may be limited while using the adapter.
• HDMI content is copy protected and is not available on the AV output of the ADVEXL10HD System.
APPLICABLE HDMI FEATURE
- Input audio signal: 2 channel.
- Input video signal: 480p, 576p, 720p, 1080i, and 1080p..

15
SMART STREAM(Optional )
This setting allows you to select Wireless Streaming Display Mode. Press ENTER button on the remote control to change the Wireless Streaming Display
Mode.
Note: The SmartStream Wireless Streaming Display feature will only work when optional module WM1 is connected to the system. Please refer
to the SmartStream manual for user operation.
GAME(Optional )
The optional MVGP1 Wireless Game Package consists of 2 game controllers and a game module containing 54 games, 6 of which are two player games.
If the MVGP1 Wireless Game Package is not installed, the Game Source will be grayed out on the source selection screen and cannot be selected. Check
with your installer for availability.
AV
An external video source, video game system, or other audio/video devices can be connected to the AV input. This AV input connection is normally
performed when the unit is installed. Turn the video source component on with its power button or remote control and it is now ready to play the audio
and video signals from the source connected to the AV input.
SETTING
Allow user to access the system menu. Use on the front panel or remote control button to select PICTURE,WFMM,SETTING. Press ENTER button on the
front panel or ENTER button on the remote control to execute a selected option.

16
SYSTEM MENU SETTINGS AND ADJUSTMENTS
The System Menu contains features and options that let the user customize the system. For example, the user can change the Picture, FM Modulator, OSD
language, source default, screen mode display, and the monitor mode.
Using the System Menu
1. Press the SYSTEM MENU button on the remote control. The system menu main page will appear on the screen.
2. Use the pqtor ucursor buttons to select an item in the sub menu, then press OK to select.
3. Press the System Menu button to exit the System Menu.
Note: The System Menu can be controlled via Remote Control or the Home button on the front panel of the unit (Items selected in the menu will have a
yellow background).
PICTURE (CONTROL)
When watching a program, the picture quality can be adjusted to the user’s preferences.
1. Press the System Menu button on the remote control (or press and hold the Home/System menu button on the front panel for 3 seconds) and the
Picture Control Menu will be displayed. The menu contains the on screen picture “adjustment bar” for BRIGHTNESS, CONTRAST, COLOR, TINT (for
NTSC only) or RESET.
PICTURE WFMM SETTING
EXIT
BRIGHTNESS
CONTRAST
COLOR
TINT
RESET
16
16
16
0
2. Use the pqtor ucursor buttons on the remote control or the front panel to adjust the selected adjustment bar for picture quality.
Note: The System Menu will time out after 5 seconds if no buttons are pressed.

17
WFMM (FM MODULATOR)
The FM Modulator allows the user to listen to audio through the vehicle’s radio.
ON - Turns the wireless FM Modulator on if audio playback through your vehicle’s radio is preferred.
OFF - Turns the wireless FM Modulator o.
FREQUENCY - Allows the user to select the wireless FM Modulator frequency. The unit has a 100 channel built-in wireless FM Modulator. The FM
Modulator can be set from 88.1 MHz to 107.9 MHz in 0.2 MHz steps, i.e. 88.1, 88.3, 88.5, 88.9, 90.1 etc.
PICTURE WFMM SETTING
ON
FREQUENCY
OFF
EXIT
88.10
88.90
89.70
90.50
91.30
88.30
89.10
89.90
90.70
91.50
88.5088.70
89.3089.50
90.1090.30
90.9091.10
91.7091.90
To choose an FM frequency for audio playback through your vehicle’s radio:
1. Press the SYSTEM MENU button to access the System Menu. The System Menu screens appears.
2. Use the ucursor button to highlight wireless FM modulator (WFMM).
3. Use the qcursor button to highlight the FREQUENCY Submenu.
4. Use the pqtor ucursor buttons to select a frequency not used by a radio station in the area. Press OK to select the highlighted frequency.
There are a total of 5 FM CHANNEL pages containing frequencies from 88.1 MHz to 107.9 MHz in 0.2 MHz steps. To access the additional FM Channel
pages, use the tor ucursor buttons to highlight the on screen left and right arrows and press OK. Once the frequency has been selected, tune the
vehicle’s radio to the selected frequency.
5. Press the DVD button to restore the remote control to DVD functions.
Note: The wireless FM modulator will perform well in most applications. However, in certain geographical areas the quality of the wireless signal may be
less than optimal, resulting in static or strong local station bleed through. If this is a consistent problem, an FMDIRB (hard wired FM connection) can be
installed by your dealer.

18
PICTURE WFMM SETTING
DEFAULT DVD
SCREEN MODE
MONITOR MODE
LANGUAGE
SMART STREAM
FACTORY SETTING
ON OFF
16:9 4:3
M1 M2
EXIT
ENGLISH
MIRACAST/AIRPLAY
PICTURE WFMM SETTING
DEFAULT DVD
SCREEN MODE
MONITOR MODE
LANGUAGE
SMART STREAM
FACTORY SETTING
ON OFF
16:9 4:3
M1 M2
EXIT
ENGLISH
MIRACAST/AIRPLAY
SETTINGS
DEFAULT DVD
This allows the user to set the system default source to DVD on or o. If
source default is set to ON, every time the unit is turned o then on, the unit
will power up and automatically switch the source to DVD. If source default
is set to OFF and the unit is turned o then on, the unit will power up in the
source that waslast selected.
1. Press the System Menu button.
2. Use the ucursor button to highlight SETTING.
3. Use the qcursor buttons to highlight DEFAULT DVD.
4. Use the tor ucursor buttons to select to select ON or OFF.
5. Press ENTER to conrm the setting.
Note: The unit is set to source default DVD on as the default mode of
operation.
Selection of Source default can only be made from within the system menu.
SCREEN MODE
This allows the user to change the screen format (aspect ratio 16:9, 4:3).
To select the screen aspect ratio format:
1. Press the System Menu button.
2. Use the ucursor button to highlight SETTING.
3. Use the qcursor button to highlight SCREEN MODE.
4. Use the tor ucursor buttons to select 16:9, 4:3.
5. Press OK to conrm the setting.

19
MONITOR MODE
MONITOR MODE SETTINGS
The ADVEXL10HD System has an option that allows the user to select from two IR transmit and receive codes (M1 or M2). This feature can be used when using two
ADVEXL10HD systems in the same installation or if the vehicle has RSA (Rear Seat Audio) that uses an “A” channel headset. The ADVEXL10HD system comes factory
set to M1. When in the M1 mode, the unit will respond to remote commands when M1 is selected on the remote control and will transmit audio on the A channel.
When in the M2 mode, the unit will respond to remote commands when M2 is selected on the remote control and will transmit audio on the B channel.
Note: Use 2-channel IR headphones set to CH B when the monitor is set to M2 mode.
Selecting a Monitor Mode (M1 or M2)
1. Power ON the unit and wait until M1 or M2 appears on the OSD. M1 or M2 will appear on the screen for 4 ~ 5 seconds.
2. Press the System Menu button on the remote control to display the System Menu to change the monitor code from M1 to M2.
3. Use the tor ucursor buttons to select the Setting sub menu.
4. Use the por qcursor buttons to select the Monitor Mode sub menu.
5. Use the tor ucursor buttons to select the desired Monitor Mode (M1 or M2).
6. Press ENTER to conrm the setting. The following screen will appear.
7. Use the por qcursor buttons to select Monitor Mode (M1 or M2).
8. Press OK to conrm the setting.
9. Press the System Menu button on the remote control to exit the System Menu Mode.
Note: If no action is taken, this menu will disappear in 10 seconds.
WARNING
SETTING THE MONITOR TO THE M2 MODE WILL
REQUIRE USING 2-CHANNEL HEADPHONES.
USE THE DOWN KEY ON THE REMOTE CONTROL
TO SELECT M2 AND PRESS OK TO SET THE
MONITOR TO M2 MODE
TO REMAIN IN THE M1 MODE PRESS OK
M1
M2
PICTURE WFMM SETTING
DEFAULT DVD
SCREEN MODE
MONITOR MODE
LANGUAGE
SMART STREAM
FACTORY SETTING
ON OFF
16:9 4:3
M1 M2
EXIT
ENGLISH
MIRACAST/AIRPLAY

20
LANGUAGE
This allows the user to return the on-screen display language. The user can
select English, Spanish, French, or German for the on-screen display language.
To select the screen aspect ratio format:
1. Press the System Menu button.
2. Use the ucursor button to highlight SETTING.
3. Use the qcursor button to highlight LANGUAGE.
4. Use the tor ucursor buttons to select the desired language.
5. Press OK to conrm the setting.
SMART STREAM
This setting allows you to select Wireless Streaming Display Mode. Press
OK button on the remote control to change the Wireless Streaming
Display Mode.
Note: The SmartStream Wireless Steaming Display feature will only
work when optional module WM1 is connected to the system. Please
refer to the SmartStream manual for user operation.
FACTORY SETTING
This allows the user to return the system to the factory default settings.
1. Press the System Menu button.
2. Use the ucursor button to highlight SETTING.
3. Use the qcursor button to highlight FACTORY SETTING.
4. Press ENTER to conrm the setting.
PICTURE WFMM SETTING
DEFAULT DVD
SCREEN MODE
MONITOR MODE
LANGUAGE
SMART STREAM
FACTORY SETTING
ON OFF
16:9 4:3
M1 M2
EXIT
ENGLISH
MIRACAST/AIRPLAY
PICTURE WFMM SETTING
DEFAULT DVD
SCREEN MODE
MONITOR MODE
LANGUAGE
SMART STREAM
FACTORY SETTING
ON OFF
16:9 4:3
M1 M2
EXIT
ENGLISH
MIRACAST/AIRPLAY
PICTURE WFMM SETTING
DEFAULT DVD
SCREEN MODE
MONITOR MODE
LANGUAGE
SMART STREAM
FACTORY SETTING
ON OFF
16:9 4:3
M1 M2
EXIT
ENGLISH
MIRACAST/AIRPLAY
Table of contents
Other Advent Portable DVD Player manuals