Adventure Kings AKTA-RTTA User manual

2
Adventure Kings Roof Top Tents
Warning
Improper installation or use of your Roof Top Tent may result in serious injury or death. You will need to follow
these installation instructions carefully to ensure proper installation on your vehicle and safe use of your Roof
Top Tent. Please contact your vehicle manufacturer for specified loading capacity of your roof rack. Not all
factory roof racks or aftermarket roof bars can safely accommodate tent models.
ANY ELEMENTS APPLIED ON THE VEHICLE ROOF CHANGES THE NORMAL VEHICLE HANDLING. THE
MANUFACTURER DISCLAIMS ALL RESPONSIBILITY IN CASE OF ACCIDENTS DUE TO IMPROPER USE,
WRONG MAINTENANCE, OR NOT CHECKING THE TIGHTNESS OF THE FASTENING HARDWARE/
BRACKETS ON THE ROOF RACK SYSTEM
DO NOT CLIMB ON LADDER UNTIL CORRECT ANGLE IS ACHIEVED (approx. 30 degrees
between ladder and ground).
NOTE: If the angle of the ladder is at 90 degrees and/or does not reach the ground, you will need a ladder
extension or longer extendable ladder (sold separately).
4WD Supacentre - The wholesaler / manufacturer shall not be liable for special, indirect incidental or
consequential damages including but not limited to lost profits.
3
WARNING
Improper installation or use of your Roof Top Tent may result in serious injury or
death. You will need to follow these installation instructions carefully to ensure proper
installation on your vehicle and safe use of your Roof Top Tent. Please contact your
vehicle manufacturer for specified loading capacity of your roof rack. Not all factory
roof racks or aftermarket roof bars can safely accommodate tent models.
Any elements applied on the vehicle roof changes the normal vehicle handling. The
manufacturer disclaims all responsibility in case of accidents due to improper use,
improper maintenance, or checking the tightness of the brackets regarding the
installation of the roof rack system.
For your safety and protection, ensure correct placement and angle of ladder.
DO NOT CLIMB ON LADDER UNTIL CORRECT ANGLE IS ACHIEVED (approx. 30 degrees
between ladder and ground). NOTE: If the angle of the ladder is at 90 degrees and/or
does not reach the ground, you will need a ladder extension or longer extendable
ladder (sold separately).
Adventure Kings - The wholesaler / manufacturer shall not be liable for special,
indirect incidental or consequential damages including but not limited to lost profits.
3
SAFETY WARNING
KEEP ALL FLAME AND HEAT SOURCES AWAY FROM THE TENT MATERIALS.
UNDER NO CIRCUMSTANCE SHOULD ANY NAKED FLAME SOURCES OR HEATING DEVICES
BE USED INSIDE OR NEAR THE TENT.
KEEP CAMP FIRES WELL AWAY FROM TENT.
KEEP A LOOK OUT FOR ANY AIRBORNE BURNING EMBERS THAT MAY COME
INTO CONTACT WITH THE TENT.
KEEP A FIRE EXTINGUISHER OR WATER BUCKET NEARBY.
DO NOT SMOKE WITHIN THE TENT.
DO NOT OPERATE ANY DEVICE WHICH BURNS FUEL INSIDE OF THE TENT.
KEEP EXIT CLEAR.
WARNING
Improper installation or use of your Roof Top Tent may result in serious injury or
death. You will need to follow these installation instructions carefully to ensure
proper installation on your vehicle and safe use of your Roof Top Tent. Please contact
your vehicle manufacturer for specified loading capacity of your roof rack. Not all
factory roof racks or aftermarket roof bars can safely accommodate tent models.
Any elements applied on the vehicle roof changes the normal vehicle handling. The
manufacturer disclaims all responsibility in case of accidents due to improper use,
improper maintenance, or checking the tightness of the brackets regarding the
installation of the roof rack system.
For your safety and protection, ensure correct placement and angle of ladder.
DO NOT CLIMB ON LADDER UNTIL CORRECT ANGLE IS ACHIEVED (approx. 30 degrees
between ladder and ground). NOTE: If the angle of the ladder is at 90 degrees and/
or does not reach the ground, you will need a ladder extension or longer extendable
ladder (sold separately).
Adventure Kings - The wholesaler / manufacturer shall not be liable for special,
indirect incidental or consequential damages including but not limited to lost profits.
J001157 - Adventure Kings RTT Manual-Insert2.indd 3 7/05/2014 10:11:22 a.m.
AK_RTT_Manual.indd 3 29/08/2014 12:24 pm
Inspections: During trips regularly check that all nuts and bolts attaching your Roof Top Tent to your vehicle
are tight and in good repair.
3
Adventure Kings Roof Top Tents
Roof Top Tent Hardware Identication Chart
4
4
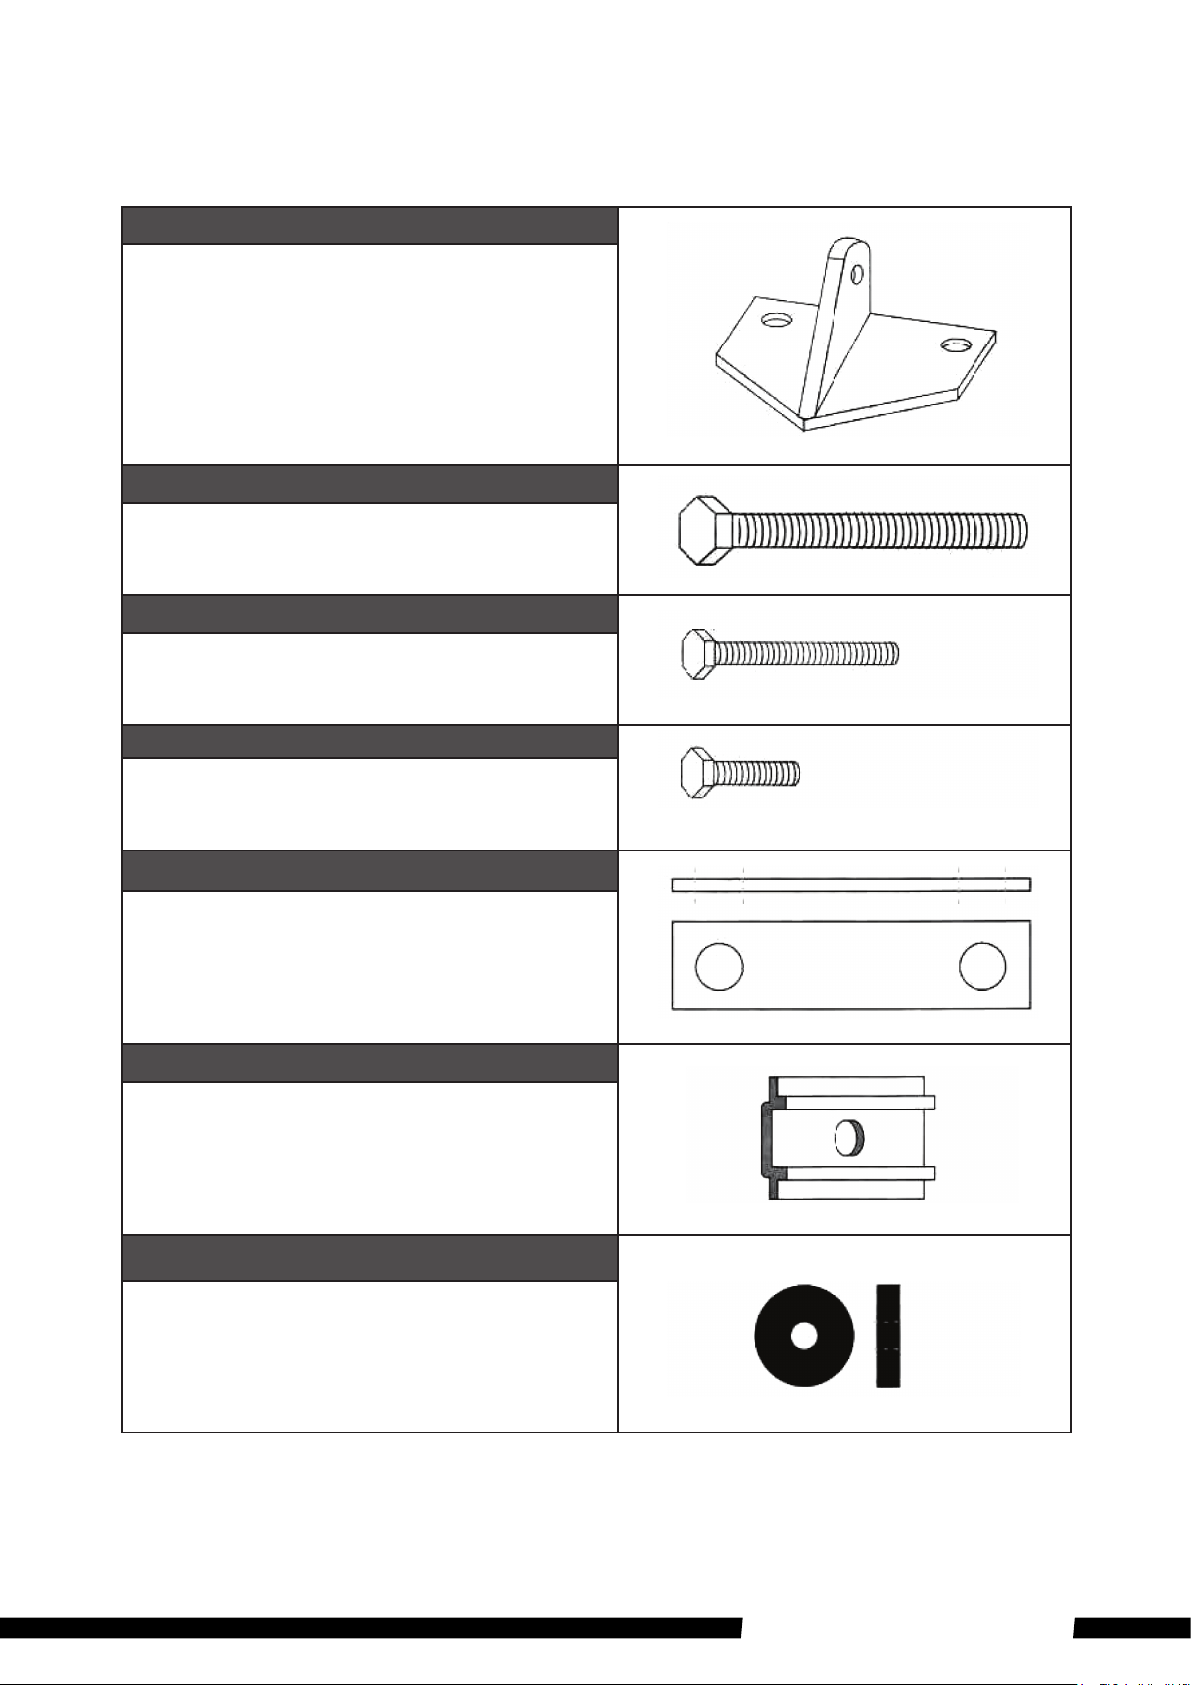
ROOF TOP TENT HARDWARE INDENTIFICATION CHART
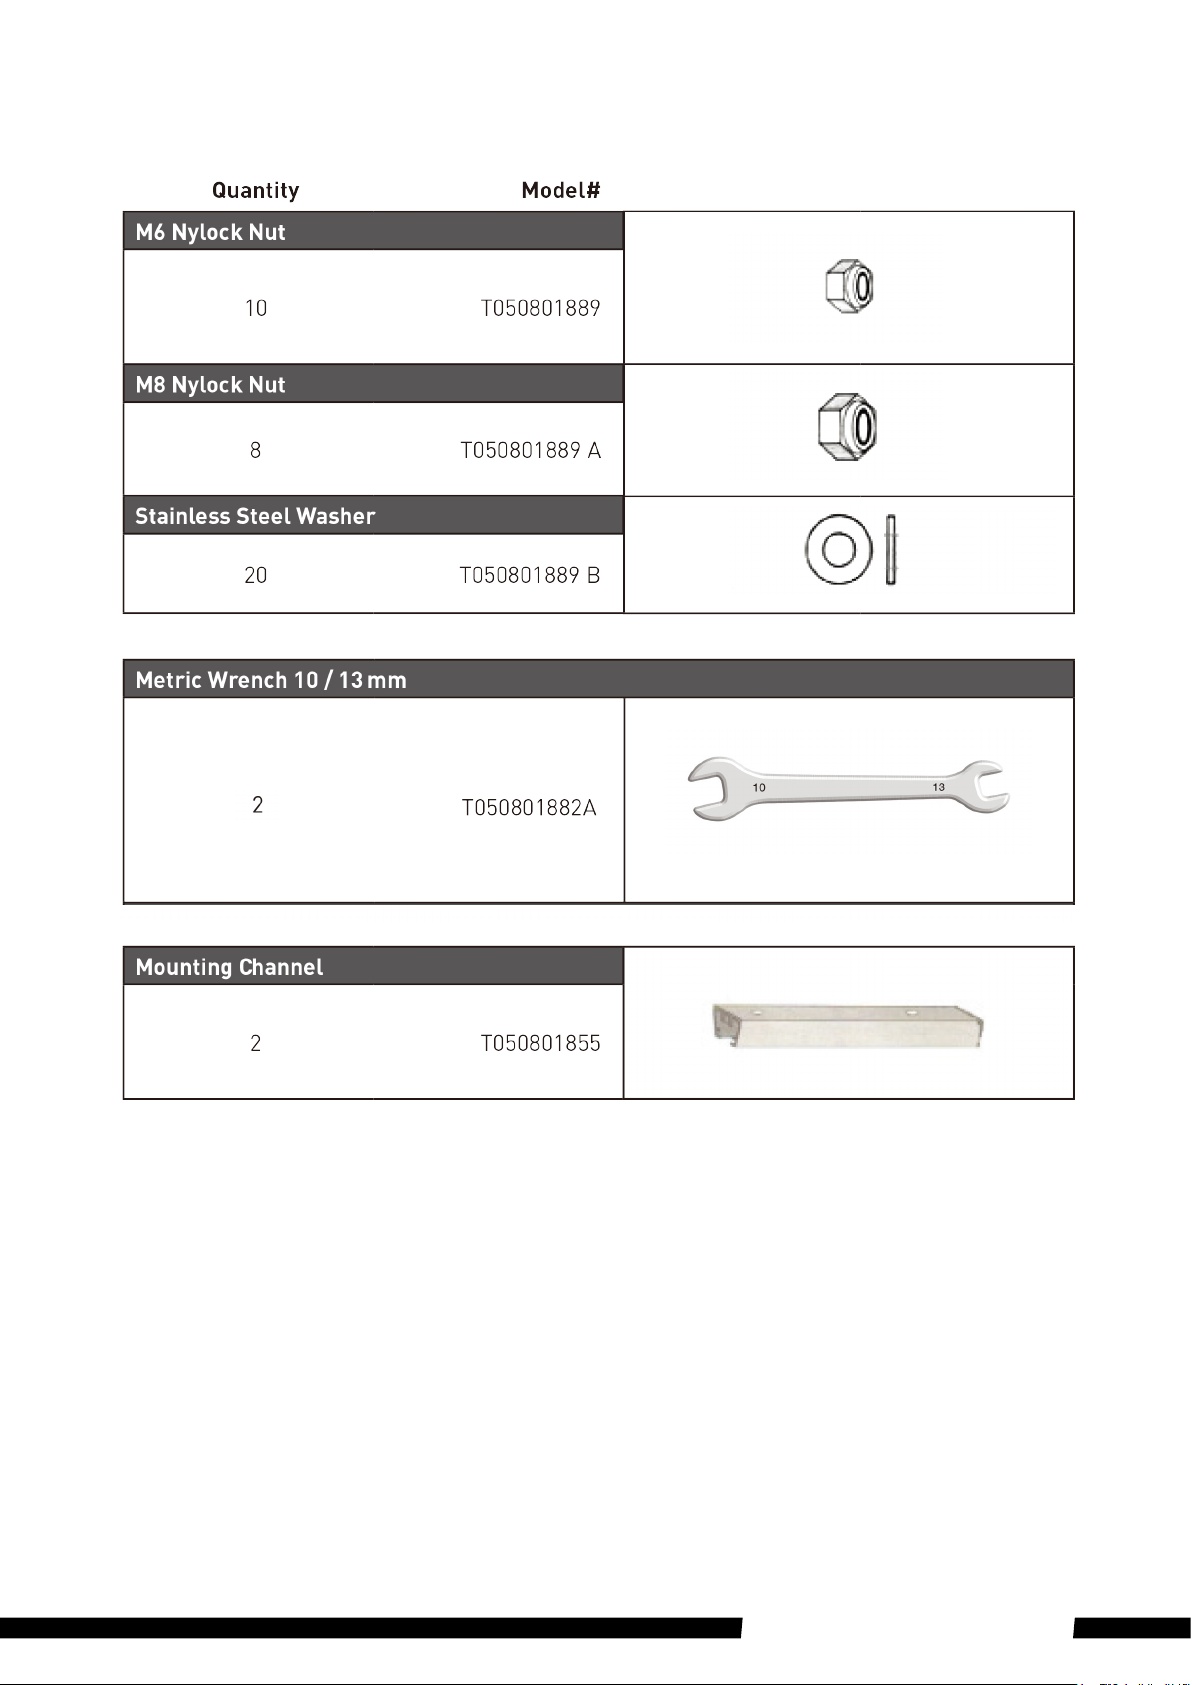
Quantity Model#
Ladder Mounting Bracket
2 T050801878
55 mm Steel M8 Bolt
8 T050801879
40 mm Steel M6 Bolt
8 T050801885
16 mm Steel Bolt To Mount Ladder M6
2 T050801887
Stainless Steel Mount Plate
4 T050801880
Aluminium Slide Plate
8 T050801881
Rubber Washer To Mount Ladder
2 T050801888
J001157 - Adventure Kings RTT Manual-Insert2.indd 4 7/05/2014 10:11:30 a.m.
AK_RTT_Manual.indd 4 29/08/2014 12:24 pm
4
Adventure Kings Roof Top Tents
Roof Top Tent Hardware Identication Chart cont.
5
AK_RTT_Manual.indd 5 29/08/2014 12:24 pm
5
AK_RTT_Manual.indd 5 29/08/2014 12:24 pm
5
Adventure Kings Roof Top Tents
Tent Orientation on Your Vehicle
6
6
TENT ORIENTATION ONYOUR VEHICLE
There are two mounting options for the orientation of your new Roof Top Tent.
Either the Roof Top Tentwill open so that the ladder extends off the back of your
vehicle, ”Rear Mounted”. Or alternatively the ladder extends off the side of your vehicle,
”Side Mounted”. Either orientation will work for larger vehicles, however, most
sedans or smaller SUVs are better suited for the side mounted option. If the
Roof Top Tent is rear mounted, the mounting channels need to be cut to match
the width of the Roof Top Tent base. We will go over this in the next section.
J001157 - Adventure Kings RTT Manual-Insert2.indd 6 7/05/2014 10:11:34 a.m.
AK_RTT_Manual.indd 6 29/08/2014 12:24 pm
There are two mounting options for the orientation of your new Roof Top Tent. Either the Roof Top Tent will
open so that the ladder extends off the back of your vehicle, “Rear Mounted”. Or alternatively the ladder
extends off the side of your vehicle, “Side Mounted”. Either orientation will work for larger vehicles, however,
most sedans or smaller SUVs are better suited for the side mounted option.
NOTE: If the Roof Top Tent is rear mounted, you will need to cut the mounting channels to suite the width of
the roof top tent base.
6
Adventure Kings Roof Top Tents
Attaching Mounting Channels
1. Remove the Roof Top Tent from the carton and place on a clean surface. Observe the top surface. If
it has four holes in the centre area of the base, then this is the side which will receive the mounting
channels. Otherwise you are looking at the surface which will receive the ladder. Open tent to gain
entrance to interior and remove contents.
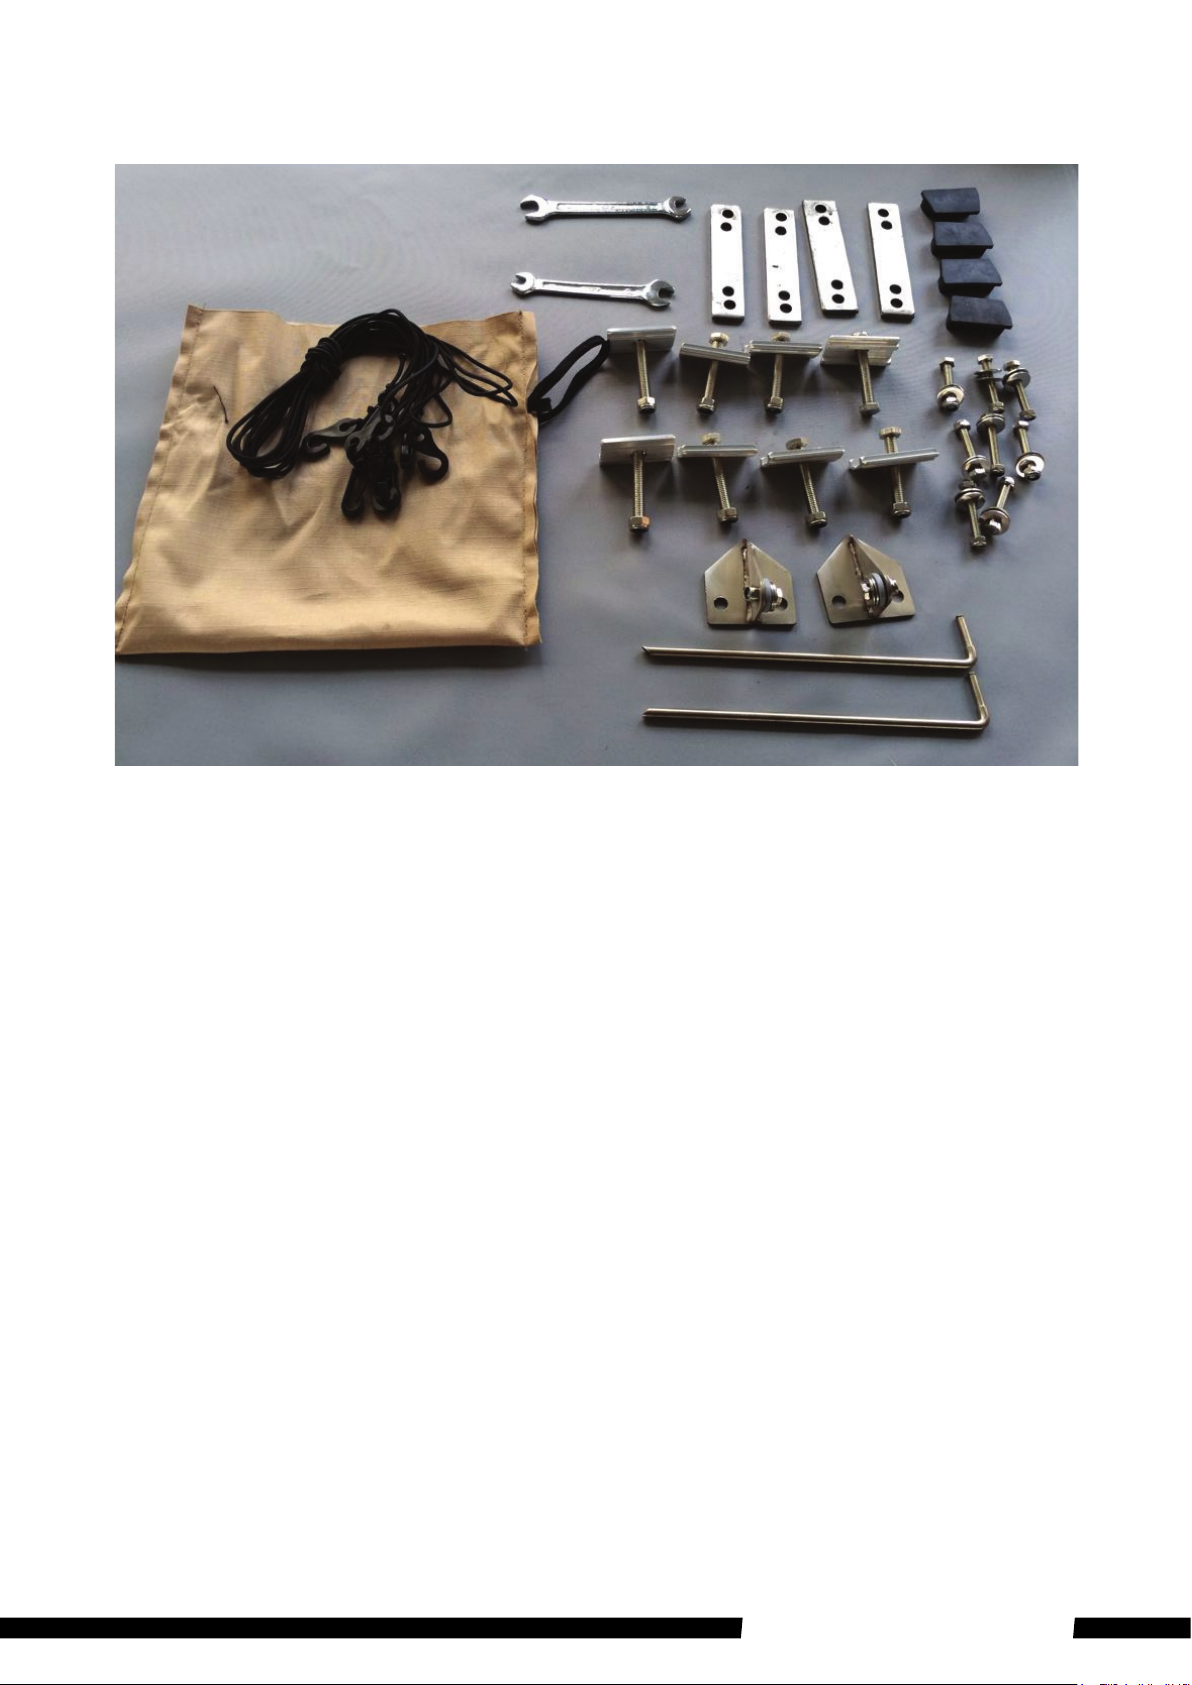
CONTENTS:
Ladder – 1 pce, PVC cover – 1 pce, Annex room – 1 pce, Rod for window – 6 pces, mounting channel
– 2 pces, Mounting accessories – 1bag.
2. After removing the contents, close the Roof Top Tent, so the channel mounting surface is
facing upward, then move the cap of holes (side with 4 holes).
7
7
ATTACHING MOUNTING CHANNELS
1. Remove the Roof Top Tent from the carton and place on a clean surface. Observe
the top surface. If it has four holes in the center area of the base, then this is the
side which will receive the mounting channels. Otherwise you are looking at the
surface which will receive the ladder. Open tent to gain entrance to interior and
remove contents.
Contents:
Ladder – 1 pce, PVC cover – 1 pce, Annex room – 1 pce, Rod for window – 6 pces,
Mounting channel – 2 pces, Mounting accessories – 1bag.
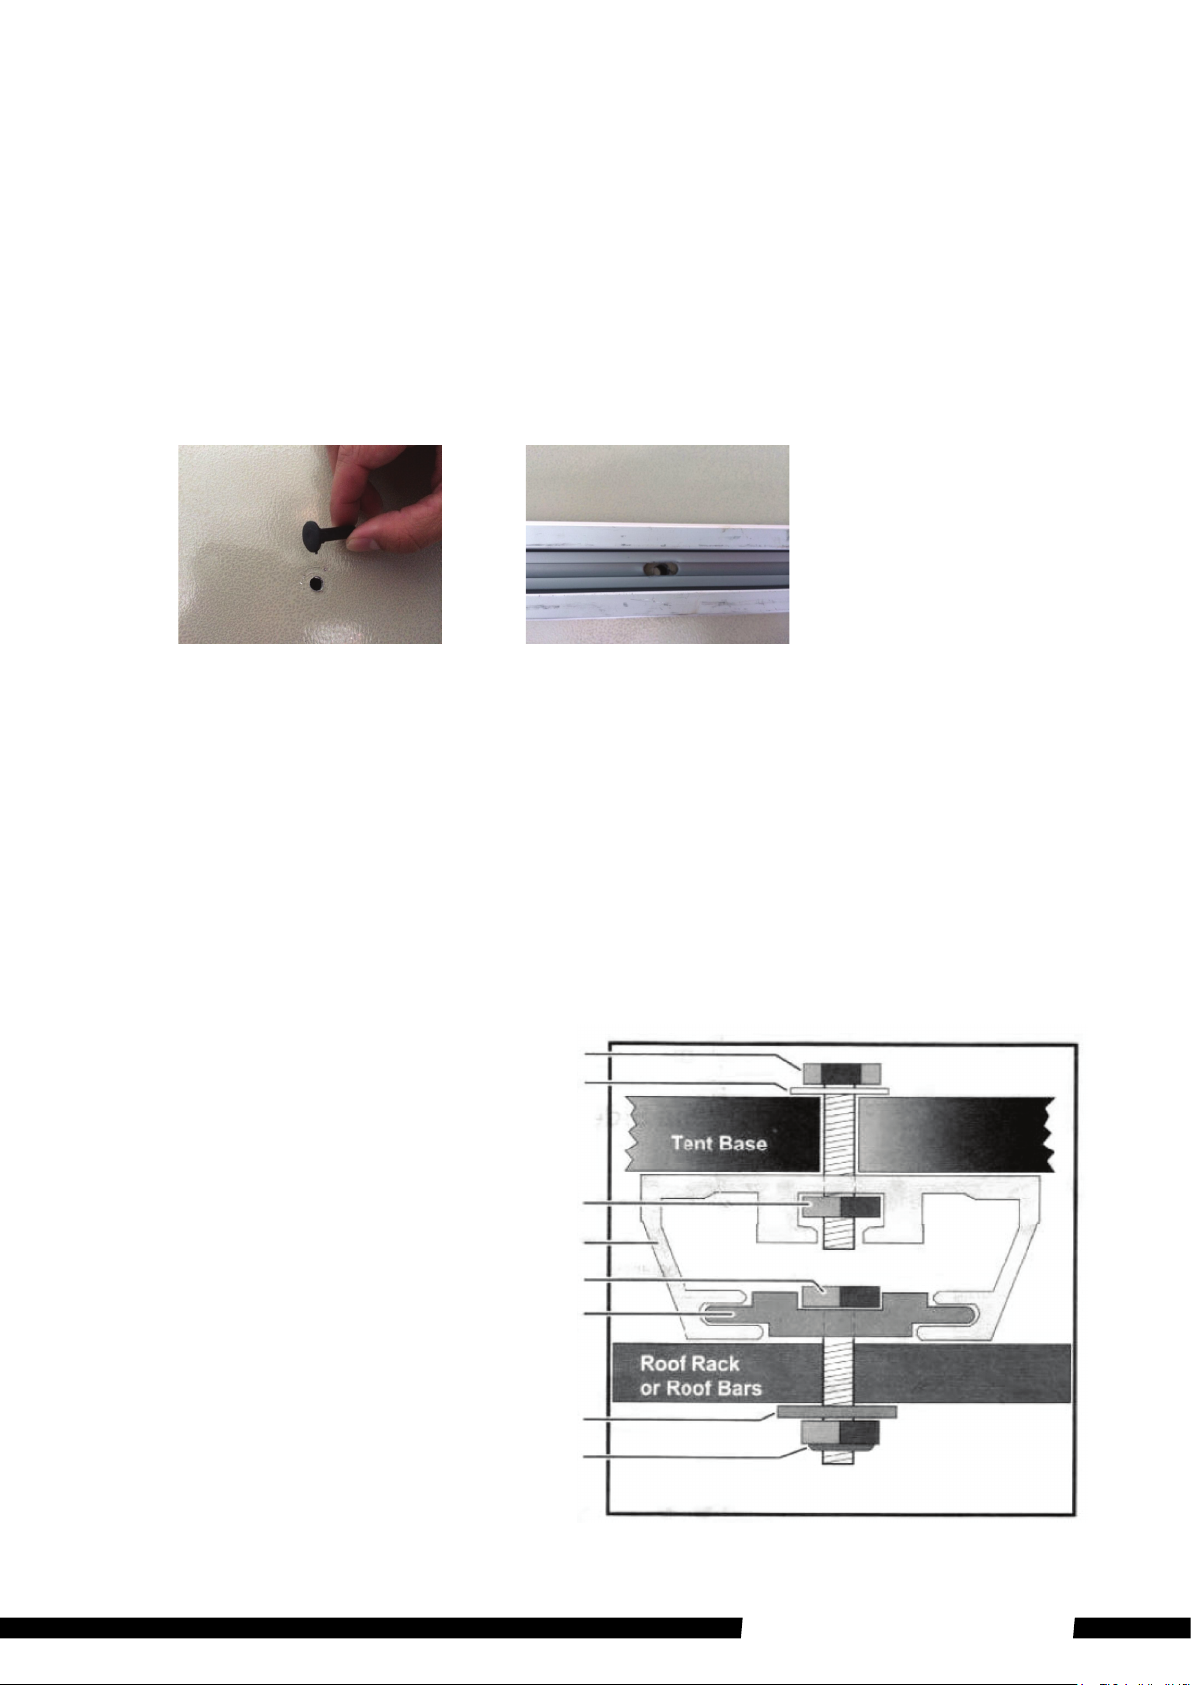
2. After removing the contents, close the Roof Top Tent, so the channel mounting
surface is facing upward, then move the cap of holes (side with 4 holes).
3. Using the four supplied 40mm Steel M6 bolt, slide your hand between the base
and mattress, and insert the bolts with washers into the pre-drilled holes.
4. Place mounting channels on exposed bolts. For side mounted orientation, ensure
the mounting channels are perpendicularto hinge side. For rear mounted
orientation, ensure the mounting channels are parallel to hinge side.
5. Slide the M6 Nylock Nut into the inner slot in the center of the mounting channels,
until they are aligned with the bolts sticking through the base. Tighten the bolts
firmly from below, using the supplied 10mm wrench. If you chose a rear mounted
orientation, you will notice that the mounting channels extend (20cm) beyond the
edges of the base. You will need to mark each channel where they extend beyond
the tent base and cut the mounting channels so they fit within the tent base. Fasten
mounting channels to base as described above.
J001157 - Adventure Kings RTT Manual-Insert2.indd 7 7/05/2014 10:11:34 a.m.
AK_RTT_Manual.indd 7 29/08/2014 12:24 pm
3. Using the four supplied 40mm Steel M6 bolt, slide your hand between the base and mattress,
and insert the bolts with washers into the pre-drilled holes.
4. Place mounting channels on exposed bolts. For side mounted orientation, ensure the
mounting channels are perpendicular to hinge side. For rear mounted orientation, ensure the
mounting channels are parallel to hinge side.
5. Slide the M6 Nylock Nut into the inner slot in the centre of the mounting channels, until they
are aligned with the bolts sticking through the base. Tighten the bolts firmly from below,
using the supplied 10mm wrench. If you chose a rear mounted orientation, you will notice
that the mounting channels extend (20cm) beyond the edges of the base. You will need to
mark each channel where they extend beyond the tent base and cut the mounting channels
so they fit within the tent base. Fasten mounting channels to base as described above.
8
8
DIAGRAM A
40mm Steel M6 Bolt
M6 Nylock Nut
Washer
Aluminium Mounting Channel
55mm Steel M8 Bolt
Slide Plate
Steel Mount Plate
M8 Nylock Nut
J001157 - Adventure Kings RTT Manual-Insert2.indd 8 7/05/2014 10:11:36 a.m.
AK_RTT_Manual.indd 8 29/08/2014 12:24 pm
DIAGRAM A
7
Adventure Kings Roof Top Tents
Attaching the Ladder
1. Flip the tent base over.
2. Locate the pre-drilled holes at the edge of the base
and attach the ladder bracket to the base using 40mm
Steel M6 bolt, washers, and nylock nuts.
For your safety and protection see Diagram C below for correct placement and angle of
ladder. DO NOT CLIMB ON LADDER UNTIL CORRECT ANGLE IS ACHIEVED (approx. 30
degrees between ladder and ground). NOTE: If the angle of the ladder is at 90 degrees and/or
does not reach the ground, you will need a ladder extension (not included). The ladder placed
in correct position also acts as a brace for the suspended base of your tent.
9
9
DIAGRAM C
DIAGRAM B
WARNING–DISCLAIMER
Anyelementsappliedonthevehicleroofchangesthenormalvehiclehandling.
Themanufacturerdisclaimsallresponsibilityincaseofaccidentsduetoimproperuse,wrong
Maintenance,orcheckingthetightnessofthebracketsregardingtheinstallationoftheroofrack
system.
ROOSYSTEMS–Thewholesaler/manufacturershallnotbeliableforspecial,indirectincidentalor
consequentialdamagesincludingbutnotlimitedtolostprofits.ROOSYSTEMSreservestherighttochange
design.
WARRANTY
12monthlimitedwarrantyappliestooriginalpurchaserunderthefollowingconditions.ROOSYSTEMSwill
warrantagainstmanufacturingfaultsanddefectsforaperiodof12monthsfromoriginalpurchased
date.Thiswarrantydoesnotincludedamagecausedbymould,insects,animals,children,misuse,
incorrectsetuporsetdown,weather,accidents,abuse,wearandtear.
Tomakeaclaim,pleaseensureyouretainyoursalesreceiptofpurchase.
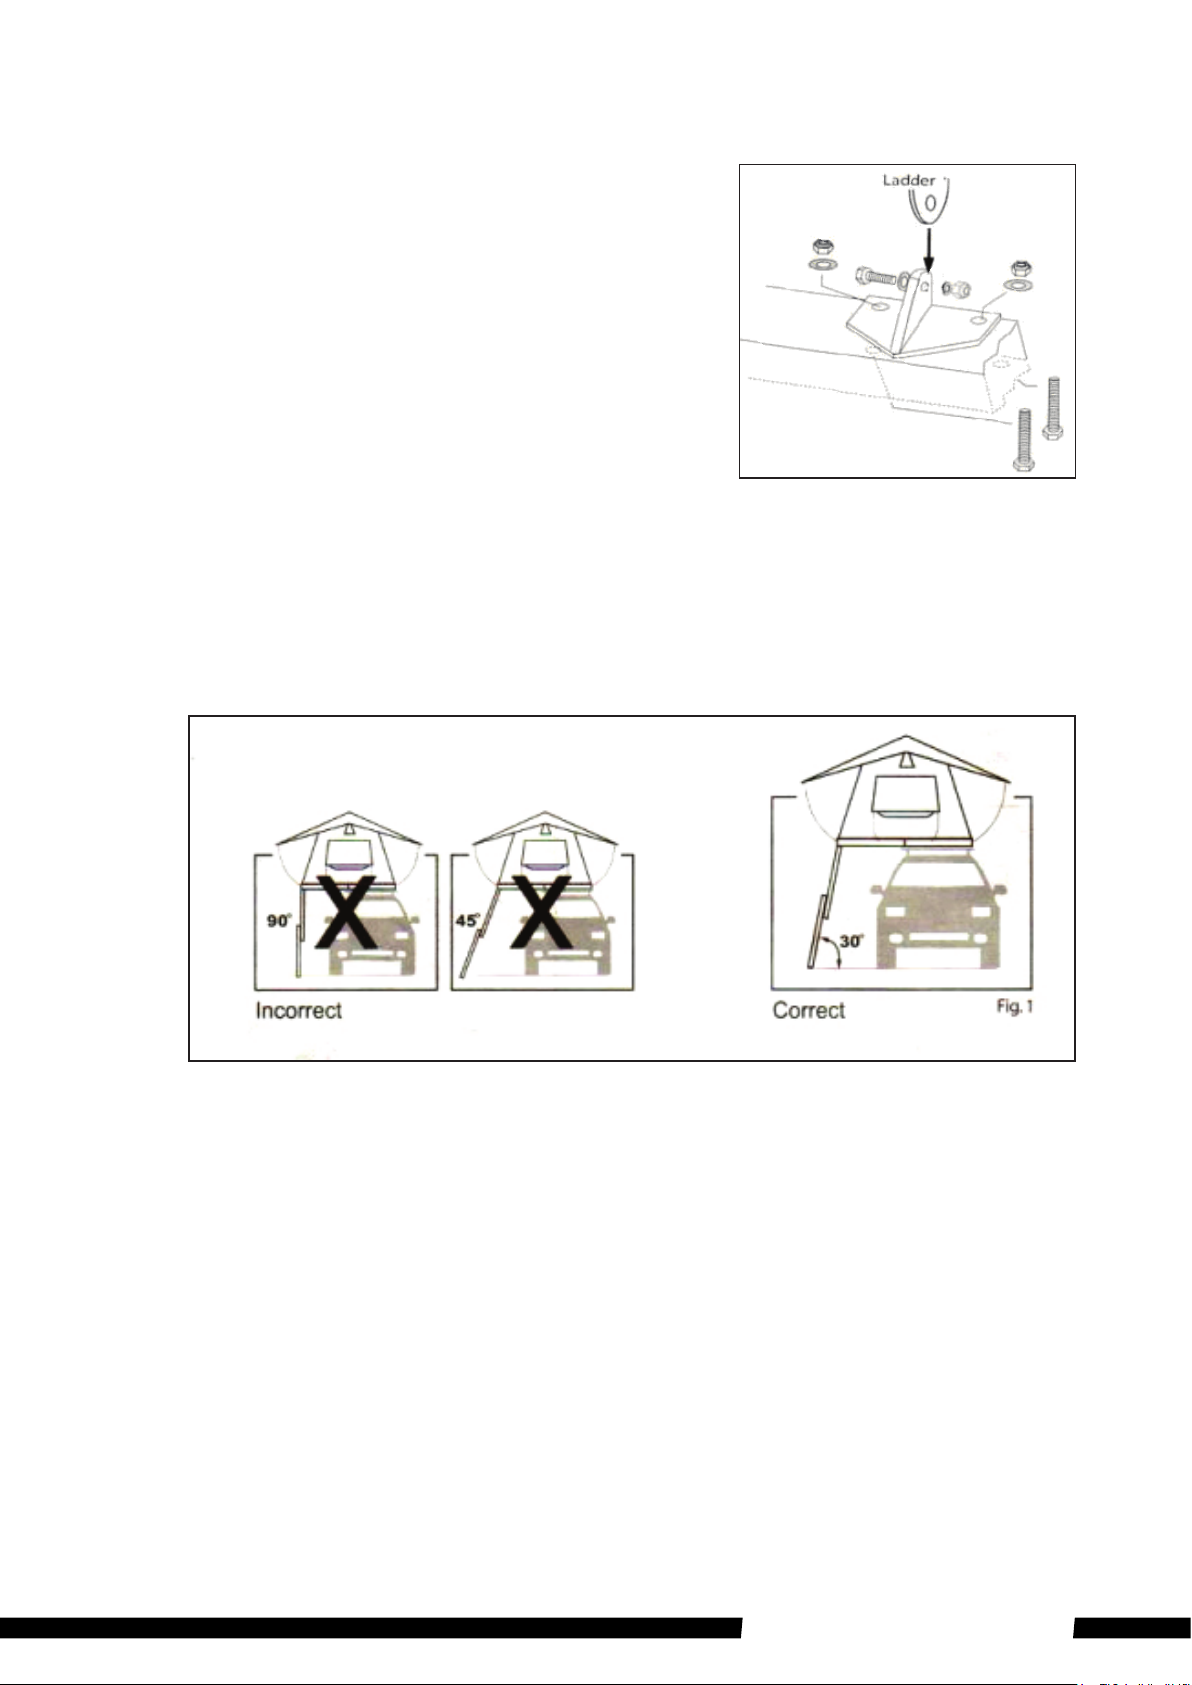
For your safety and protection see Diagram C below for correct placement and angle
of ladder. DO NOT CLIMB ON LADDER UNTIL CORRECT ANGLE IS ACHIEVED (approx.
30 degrees between ladder and ground). NOTE: If the angle of the ladder is at 90
degrees and/or does not reach the ground, you will need a ladder extension (not
included). The ladder placed in correct position also acts as a brace for the suspended
base of your tent.
ATTACHING THE LADDER
1. Flip the tent base over.
2. Locate the pre-drilled holes at the
edge of the base and attach the
ladder bracket to the base using
40mm Steel M6 bolt, washers, and
nylock nuts.
J001157 - Adventure Kings RTT Manual-Insert2.indd 9 7/05/2014 10:11:36 a.m.
AK_RTT_Manual.indd 9 29/08/2014 12:24 pm
9
9
DIAGRAM C
DIAGRAM B
WARNING–DISCLAIMER
Anyelementsappliedonthevehicleroofchangesthenormalvehiclehandling.
Themanufacturerdisclaimsallresponsibilityincaseofaccidentsduetoimproperuse,wrong
Maintenance,orcheckingthetightnessofthebracketsregardingtheinstallationoftheroofrack
system.
ROOSYSTEMS–Thewholesaler/manufacturershallnotbeliableforspecial,indirectincidentalor
consequentialdamagesincludingbutnotlimitedtolostprofits.ROOSYSTEMSreservestherighttochange
design.
WARRANTY
12monthlimitedwarrantyappliestooriginalpurchaserunderthefollowingconditions.ROOSYSTEMSwill
warrantagainstmanufacturingfaultsanddefectsforaperiodof12monthsfromoriginalpurchased
date.Thiswarrantydoesnotincludedamagecausedbymould,insects,animals,children,misuse,
incorrectsetuporsetdown,weather,accidents,abuse,wearandtear.
Tomakeaclaim,pleaseensureyouretainyoursalesreceiptofpurchase.
For your safety and protection see Diagram C below for correct placement and angle
of ladder. DO NOT CLIMB ON LADDER UNTIL CORRECT ANGLE IS ACHIEVED (approx.
30 degrees between ladder and ground). NOTE: If the angle of the ladder is at 90
degrees and/or does not reach the ground, you will need a ladder extension (not
included). The ladder placed in correct position also acts as a brace for the suspended
base of your tent.
ATTACHING THE LADDER
1. Flip the tent base over.
2. Locate the pre-drilled holes at the
edge of the base and attach the
ladder bracket to the base using
40mm Steel M6 bolt, washers, and
nylock nuts.
J001157 - Adventure Kings RTT Manual-Insert2.indd 9 7/05/2014 10:11:36 a.m.
AK_RTT_Manual.indd 9 29/08/2014 12:24 pm
DIAGRAM B
DIAGRAM C
8
Adventure Kings Roof Top Tents
Fitting the Roof Top Tent to your Roof Rack
1. Place the Roof Top Tent on top of your vehicle’s roof rack system (minimum 2 persons
required)
2. Place 55mm Steel M8 bolt into the slide plates. Slide the plates and bolts into the mounting
channel. You will need to lift a Roof Top Tent side, so as to have one of the bolts on the
inside of the roof rack bar.
3. Inspect the position of the Roof Top Tent to ensure it is centred on the roof rack and
positioned to open on the desired side.
10
10
FITTING THE ROOF TOP TENT TO YOUR ROOF RACK
1. Place the Roof Top Tent on top of your vehicle’s roof rack system
(minimum 2 persons required).
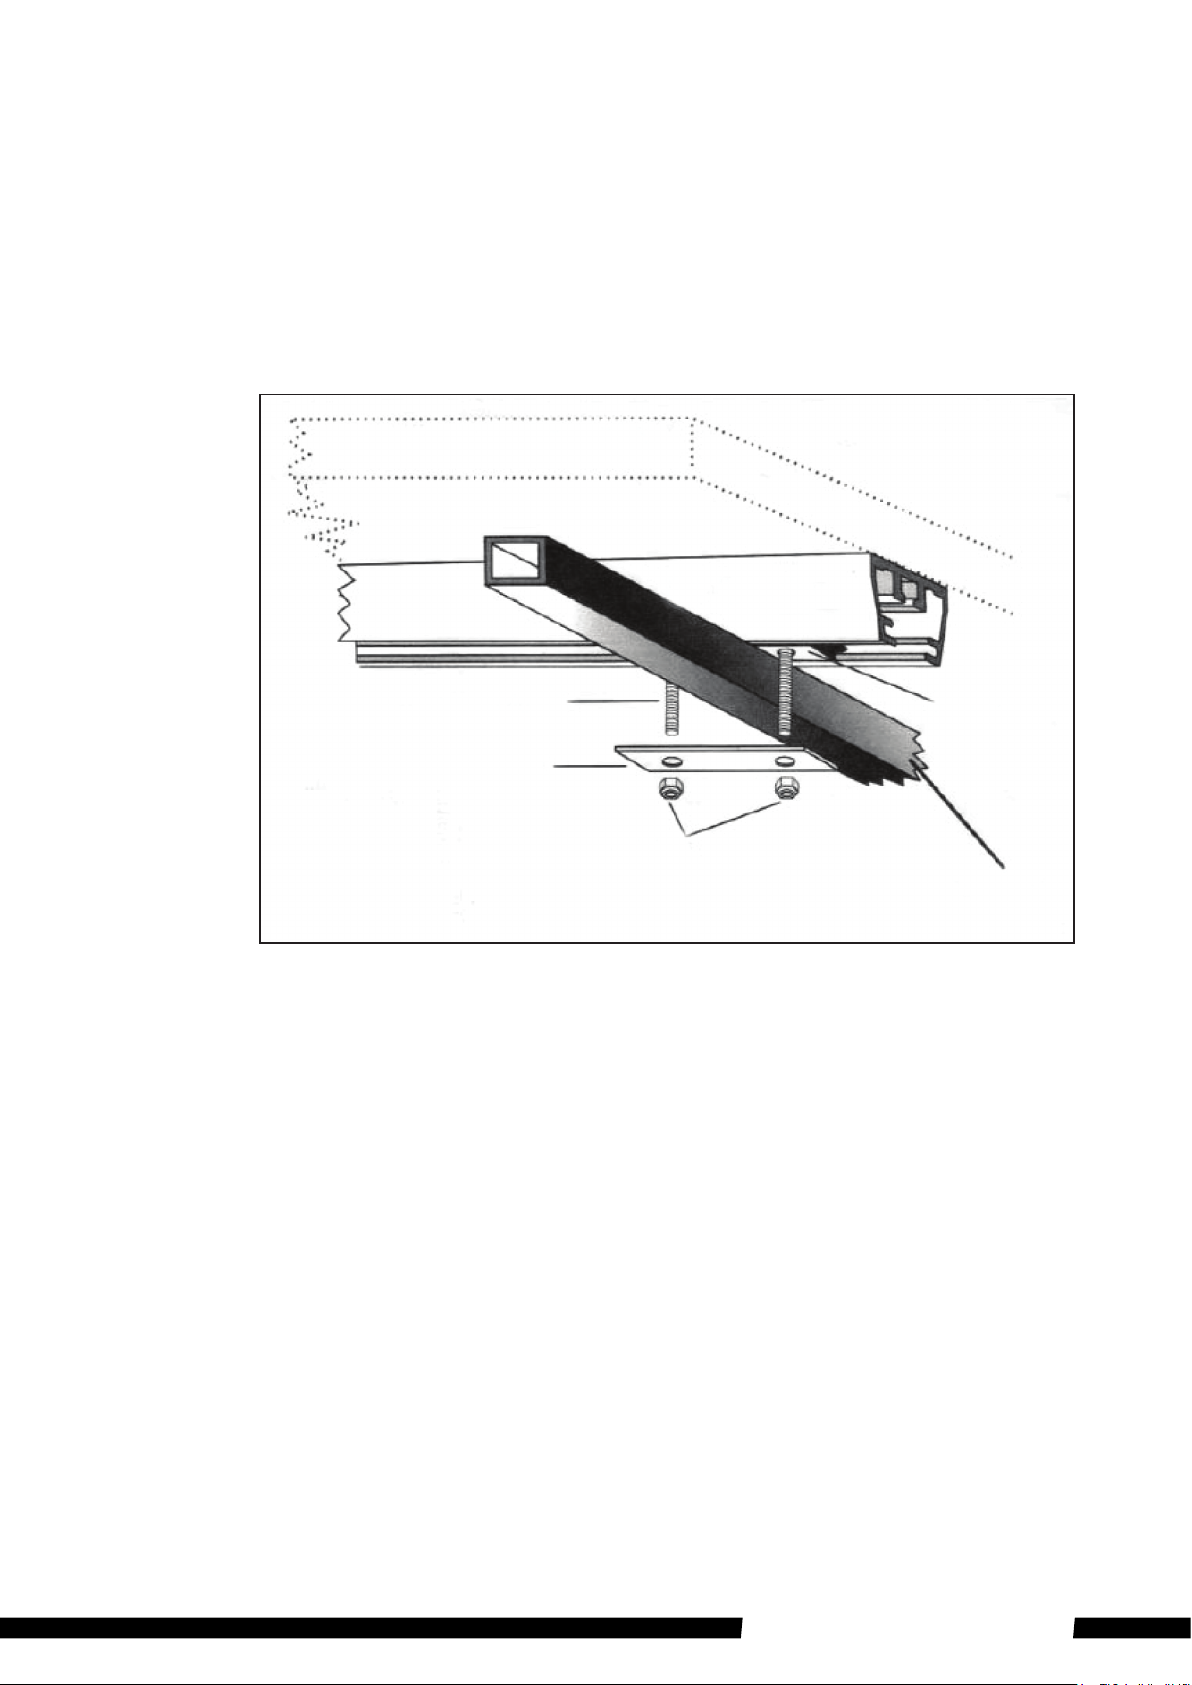
2. Place 55mm Steel M8 bolt into the slide plates. Slide the plates and bolts into the
mounting channel. You will need to lift a Roof Top Tent side, so as to have one of
the bolts on the inside of the roof rack bar.
3. Inspect the position of Roof Top Tent to ensure it is centered on the roof rack and
positioned to open the desired side.
DIAGRAM D
4. Attach the Roof Top Tent to your roof rack at the four points where the rack and
mounting channels cross. Tighten all eight bolts securely. It is important that you
check all the mounting bolts and brackets periodically to ensure they are securely
fastened to your base and roof rack or after-market roof bars.
5. After ensuring the Roof Top Tent is positioned correctly, and all eight bolts are
tightened securely, insert the rubber end caps into the ends of the mounting
channel (this may require light taps from a hammer).
Roof Top Tent Base
Mounting Channel
Slide Plate
55mm Steel M8 Bolt
Steel Mount Plate
M8 Nylock Nut
After-Market Roof Rack Bars
J001157 - Adventure Kings RTT Manual-Insert2.indd 10 7/05/2014 10:11:37 a.m.
AK_RTT_Manual.indd 10 29/08/2014 12:24 pm
DIAGRAM D
4. Attach the Roof Top Tent to your roof rack at the four points where the rack and mounting
channels cross. Tighten all eight bolts. It is important that you check all the mounting bolts
and brackets periodically to ensure they are securely fastened to your base and roof rack or
after-market roof bars.
5. After ensuring the Roof Top Tent is positioned correctly, and all eight bolts are tightened,
insert the rubber end caps into the ends of the mounting channel (this may require light taps
from a hammer).

9
Adventure Kings Roof Top Tents
Care Instructions
Clean only with cold water and soft brush - do not use soap or detergent.
Do not expose to petrol, oil or solvents.
Fitting the Roof Top Tent to your Roof Rack Cont.
NOTE: The Adventure Kings Roof Top Tent has not been designed to be installed in this manner. The
increased force from the wind due to the large air gap beneath the Roof Top Tent may cause the Roof Top Tent
mounting hardware to fail. 4WD Supacentre will not be held liable if a Roof Top Tent is installed in this manner
and the mounting hardware fails.

10
Adventure Kings Roof Top Tents
WARRANTY PERIOD:
Full 12 month warranty from date of purchase against all manufacturing defects.
WHAT DOES THE WARRANTY COVER?
Under normal usage conditions, this warranty covers:
a. Any defect in design or manufacture which results in the product failing to perform substantially as
described in authorised advertising or literature.
b. We will either repair or replace the product at our discretion providing that the fault is found to have
been caused by a design or manufacturing defect and not misuse or tampering.
Our goods come with guarantees that cannot be excluded under the Australian Consumer Law. You are
entitled to a replacement or refund for a major failure and for compensation for any other reasonably
foreseeable loss or damage. You are also entitled to have the goods repaired or replaced if the goods
fail to be of acceptable quality and the failure does not amount to a major failure. The benefits provided
to you as the consumer by this warranty are in addition to other rights and remedies available to you
under the law.
THE WARRANTY DOES NOT COVER:
a. Any damage resulting from improper use
b. Faulty installation or modification made during installation
c. The cost of removing and reinstalling the product
d. Travel and /or other expenses due to customer’s remote location
e. Transport charges and damage in transit. It is your responsibility to deliver and pick up your product,
including any costs associated with the postage of your repair or replacement product. If you do
freight your product we recommend that you insure against loss or damage.
f. Any loss directly or indirectly associated with the product failing to operate.
g. Damage caused by mould, insects, animals, misuse, incorrect operation, adverse weather, accidents
and fair wear and tear
TO MAKE A CLAIM, PLEASE ENSURE YOU RETAIN YOUR SALES RECEIPT OF PURCHASE
CALL 1800 88 39 64
12 MONTH LIMITED
WARRANTY
OUTDOOR SUPACENTRE PTY LTD
2 Stanley St Silverwater NSW, 2128
PHONE: 1800 88 39 64
www.4wdsupacentre.com.au
Table of contents
Other Adventure Kings Automobile Accessories manuals


Popular Automobile Accessories manuals by other brands

Reese
Reese Carry Power TransRACK quick start guide

Atera
Atera SIGNO User information

Defender
Defender 111 manual

Thule
Thule 8895 instructions

FulTyme RV
FulTyme RV PLATFORM BIKE RACK-2 BIKE quick start guide

Hirschmann Car Communication
Hirschmann Car Communication AUTA 4000 F 458 L installation instructions

Amphenol
Amphenol Excel Mate CC manual

Nav TV
Nav TV C.O.D-F53 installation manual

Metra Electronics
Metra Electronics 99-1003 installation instructions

Thule
Thule 1040 instructions

Wellgain Auto Technology
Wellgain Auto Technology WT310 user manual

Quadratec
Quadratec 12033.1000 Assembly & installation manual


