AEG Electrolux CaFamosa User manual

CaFamosa
Kaffee-Espresso-Vollautomat
Fully Automatic Espresso-Maker
Macchina per espresso completamente automatica
Volautomatische koffie- en espressomachine
Täysin automaattinen espressokahviasema
Gebrauchsanweisung
Operating instructions
Istruzioni per l’uso
Gebruiksaanwijzing
Käyttöohje

2
23
D
E
F
A
B
C
G
H
J
K
1
P
L
M
N
O
J
K
L
M
N
O
P
A
B
C
D
E
F
G
H

3
456
78
9/A
9/B 10 11/A
11/B 12 13

4
14 15/A 16/A
15/B
16/B
17 18/A 18/B
19/A 19/B 20
21 22 23

g
18
gFeatures (Figure 1)
AFresh Water Tank, Lid
BFiller Opening for Ground Coffee with
Lid
CCup Rack
DBean Container with Lid
(inside: grinding texture adjustment)
ESelector Dial for Steam and Hot Water
FSwivelling Nozzle for Steam and Hot
Water
GHeight Adjustable Outlet
HSpouts
JDrip Grille
KDrip Catcher
LSpent Coffee Drawer with Spent Cof-
fee Container
MFloat
NRating Plate (on the underside of the
appliance)
OControls and Indicators (see Figure 2)
PMeasuring Spoon
Controls (Figure 2)
APower Indicator: Illuminates when the
appliance is switched on
BMain Switch: Switches the appliance
on and off
CIndicator For 1 Cup of Strong Coffee
DIndicator For 1 Cup of Normal Coffee
EButton For 1 Cup of Coffee
FButton For 2 Cups of Coffee
GIndicator For Ground Coffee
HButton For Ground Coffee
JIndicator For “Flushing“
KButton For Flushing
LIndicator For “Cleaning“
MIndicator For “Descaling“
NIndicator For “Water Tank“
OIndicator For Emptying or Refitting The
“Drip Catcher and Spent Coffee Con-
tainer“
PSelector Dial For Amount of Water per
Cup
Indicator illuminates:
Indicator flashes:
Dear customer,
Please read these operating instruc-
tions through carefully. Above all,
observe the safety instructions! Please
keep these operating instructions for
later reference, and pass them on to
any subsequent owners of the appli-
ance.
The form and function of your fully
automatic coffee machine guarantee
you
• straightforward operation and
• excellent, individual taste
• with the easiest of maintenance and
care.
The excellent, individual taste is
achieved by
• The pre-brewing system: prior to the
actual brewing process, the ground
coffee is moistened to extract its full
aroma,
• The individually adjustable quantity of
water per cup that can be varied
between a small espresso and a large
“frothy“ coffee,
• The grinding texture that can be
adjusted to suit the roasting of the
beans,
• The facility to choose between normal
or strong coffee,
• And last but not least, through the
guaranteed crema, that small crown of
froth that makes an espresso incompa-
rable for connoisseurs.
Incidentally: The time that the water is
in contact with the ground coffee is
considerably shorter for espressos than
for conventional filter coffee. As a
result, less bitterness is released from
the coffee, it is this that makes
espresso coffee so much pleasanter!

g
19
Table of Contents
Safety Instructions
1. Before Using for the First Time
1.1. Setting Up the Appliance
1.2. Cable Compartment (Figure 3)
1.3. Adjusting the Water Hardness
1.4. Adjusting the Safety Cut-Out
2. Prior to Making Coffee
2.1.
Filling the Water Tank (Figure 4)
2.2. Filling the Bean Container
(Figure 5)
2.3. Adjusting the Grinding Texture
(Figure 6)
2.4. Switching On the Appliance
(Figure 7)
2.5.
“Flushing“ the Appliance (Figure 8)
3. Making Coffee
3.1. Adjusting the Amount of Water
(Figure 9/B)
3.2. One Cup of Normal Coffee from
Beans (Figure 10)
3.3. One Cup of Strong Coffee from
Beans (Figure 11/A)
3.4. One Cup of Extra Strong Coffee
from Beans (Figure 11/B)
3.5. Two Cups of Normal Coffee
from Beans (Figure 12)
3.6. One or Two Cups of Coffee from
Ground Coffee (Figure 13, 14)
4. Frothing Milk (for Cappuccino)
(Figure 15, 16)
5. Preparing Hot Water (Figure 16)
6. Switching Off the Appliance
7. Emptying the Water Tank, Drip
Catcher and Spent Coffee Con-
tainer (Figure 17, 18)
8. Cleaning
8.1.
Exterior Cleaning (Figure 19, 20)
8.2. Internal Cleaning: “Clean“ Indi-
cator Illuminates (Figure 21)
9. Descaling the Appliance: “Des-
cale“ Indicator Illuminates (Fig-
ure 22, 23)
10. What to do if ...
11. Protecting the Environment
12. In the Case of Need for Service
1 Safety Instructions
• The appliance may only be connected
to a mains supply on which the volt-
age, type of supply, and frequency
match the information given on the
rating plate (see underside of the
appliance)!
• Never allow children to operate the
appliance unsupervised.
• Never bring the mains lead into con-
tact with the hot parts of the appli-
ance.
• Never pull the plug from the socket by
means of the mains lead!
• Do not use the appliance if:
– the mains lead is damaged or
– the housing shows visible signs of
damage.
• The coffee outlet, swivelling nozzle,
and cup rack will become hot during
use due to the nature of their func-
tions. Keep children away!
• Only fill the water tank with cold
water, do not use hot water, milk or
other liquids.
• Do not place frozen or caramelised
coffee beans in the bean container,
only use roasted coffee beans! Remove
any foreign bodies from the coffee
beans. Otherwise the guarantee will be
void.
• Only put ground coffee in the ground
coffee filler opening.
• Observe the cleaning and descaling
instructions.
• Prior to maintaining or cleaning,
switch off the appliance and unplug it
from the mains!
• Never immerse the appliance in water.
• Do not allow any liquid to enter the
housing via the ventilation holes on
the cup rack.
• Do not wash the parts of the appliance
in a dishwasher.
• Do not leave the appliance switched on
longer than necessary.
• Do not expose the appliance to the
weather.

g
20
Do not open or repair the appliance.
Improper repairs can give rise to signif-
icant hazards for the user.
Repairs to electrical appliances are only
to be performed by qualified service
engineers.
In the case that repair becomes neces-
sary, including the replacement of the
mains lead, please contact the dealer
from whom you purchased the appli-
ance, or the AEG Service Line.
If the appliance is used for a purpose
other than that intended, or is incor-
rectly operated, no liability for any
resulting damage or claims under the
guarantee can be accepted - this is also
the case if the cleaning and descaling
programs are not performed immedi-
ately after the illumination of the cor-
responding indicators (Figure 2), and in
accordance with the information given
in these operating instructions.
; This appliance complies with the fol-
lowing EC directives:
• 73/23/EWG dated 19.02.1973 “Low
Voltage Directive“, including Directive
Amendment 93/68/EWG
• 89/336/EWG dated 03.05.1989 “EMC
Directive“, including Amendment
Directive 92/31/EWG
1. Before Using for the First Time
1.1. Setting Up the Appliance
Choose a suitable, level, stable,
unheated, dry surface. Pay attention to
adequate air circulation.
Important: If the appliance is placed in
a warm room after being brought in
from the cold - wait approx. 2 hours
before switching on the appliance!
1.2. Cable compartment (Figure 3)
Your appliance has a cable compart-
ment on the rear. If the mains lead is
too long, you can push the cable that is
not needed into the cable compart-
ment.
1.3. Adjusting the Water Hardness
Your appliance can be adjusted to the
hardness of the water used. The correct
adjustment of the water hardness is
necessary for the correct function of
the automatic scaling indicator (see
also Section 9.).
Use the Aquadur® test strips supplied
to determine the hardness the local
water. Follow the instructions given on
the test strip packaging. Or: Ask your
water board about the hardness of
your water!
The appliance has 5 hardness settings,
the appliance is set to the middle set-
ting, 3, in the factory (corresponds to
16°-23° degrees German hardness).
You can change this setting as follows:
0Plug the appliance into the mains.
0Do not switch on the appliance.
0Press the “1 Cup“ button for
approx. 3 seconds. The “Descale“
indicator flashes.
Pressing the “1 Cup“ button again
changes the water hardness setting by
one step to 4, 0, 1, 2, 3, and so on.
0To store the water hardness setting and
to end the procedure, press the
“On/Off“ button. All indicators go out.
If a button is not pressed for more than
30 sec., the procedure is automatically
ended without changing the value
saved previously.

g
21
The individual water hardness settings
(degrees German hardness, ° dH) are
indicated as follows:
The “Descale“ indicator flashes
( ), in addition the following indica-
tors illuminate ()
for setting 1 (1°-7° dH): “1 Strong
Cup“
for setting 2 (8°-15° dH): “1
Strong Cup“ and “Ground Coffee“
for setting 3 (16°-23° dH): “1
Strong Cup“, “Ground Coffee“
and “Spent Coffee“
for setting 4 (24°-30° dH): “1
Strong Cup“, “Ground Coffee“,
“Spent Coffee“ and “Clean“
for setting 0: no further indicators
illuminate. The automatic descale indi-
cator is switched off.
Note: The water hardness setting is
only to be adjusted prior to using the
appliance for the first time, or if the
quality of the water used changes.
Note: The appliance is prepared for the
use of a water filter in the water tank.
With the use of this water filter sub-
stances that spoil the taste of the tap
water such as chlorine, are extracted to
a large extent. In addition the amount
of calcium in the water is greatly
reduced. This lets the flavour of your
coffee develop fully. If the appliance is
operated with water filters, we recom-
mend setting the hardness to setting 0
and descaling it once or twice a year.
1.4. Adjusting the Safety
Cut-Out
If the appliance is not used for an
extended period of time, it switches
itself off for safety reasons and to save
energy.
The appliance has 3 timer settings;
after the expiry of the time set, the
appliance switches off automatically.
The middle setting 2 (switch off after
2 hours), is set in the factory.
You can change this setting as follows:
0Plug the appliance into the mains.
0Do not switch on the appliance.
0Press the “2 Cups“ button for
approx. 3 seconds. The “Flush“
indicator illuminates.
0Pressing the “2 Cups“ button again
adjusts the timer setting by one step to
3, 1, 2 and so on.
0To save the safety cut-out setting and
end the procedure, press the “On/
Off“ button. All indicators go out.
If a button is not pressed for more than
30 sec., the procedure is automatically
ended without changing the value
saved previously.
The individual timer settings are indi-
cated as follows:
The “Flush“ indicator flashes, in
addition the following indicators illu-
minate
for setting 2 (switch off after 2
hours): “Water Tank“ and
“Spent Coffee“
for setting 3 (switch off after 5
hours): “1 Strong Cup“,
“Ground Coffee“, “Clean“,
“Water Tank“ and “Spent Coffee“
for setting 1: no further indicator illu-
minates, the automatic cut-out is not
activated.
2. Prior to Making Coffee
2.1. Filling the Water Tank
(Figure 4)
Open the lid (Figure 1/A) and remove
the water tank by the handle. Please
only use cold, clear water, and do not
fill beyond the MAX mark.
Then refit the water tank in the appli-
ance and press it down until it engages
so the valve on the base is opened.
For aromatic coffee, you should:
• Change the water in the tank daily,
• Not use mineral or distilled water and
• Clean the water tank at least once a
week in normal washing up water (not
in a dishwasher). Then rinse with clean
water.

g
22
Incidentally: When the “Water
Tank“ indicator (Figure 2/N) illumi-
nates, your appliance is signalling to
you that the water tank must be
refilled.
2.2. Filling the Bean Container
(Figure 5)
Open the lid of the bean container
(Figure 1/D) and fill the container with
roasted coffee beans (do not use fro-
zen and caramelised beans). Ensure
that no foreign bodies enter the bean
container. Close the lid.
Tip: You can use both espresso and fil-
ter coffee beans! Try out different sorts
of beans to find the ones that taste the
best to you!
2.3. Adjusting the Grinding Tex-
ture (Figure 6)
To release the full aroma from the
beans, you can adjust the grinding tex-
ture to suit the roasting of the beans.
The grinding texture adjustment is on
the rear right inside the bean con-
tainer.
Important: The grinding texture is only
to be adjusted when the grinder is in
operation.
Starting from the factory medium set-
ting, turn the adjustment knob clock-
wise for darker beans (coarser
grinding texture), anticlockwise for
lighter beans (finer grinding tex-
ture).
Tip: Try different grinding textures to
find the one that suits your taste the
best!
2.4. Switching On the Appliance
(Figure 7)
By pressing the “On/Off“ button
(Figure 2/B) for approx. 1 second, you
can switch on the appliance. The red
power indicator (Figure 2/A) illumi-
nates.
Only when using the appliance for
the first time:
To show that the system must be filled,
the green “1 Strong Cup“, “1
Normal Cup“, “Ground Coffee“
and “Flush“ indicators flash
(Figure 7).
0Place an empty cup under the swivel-
ling nozzle (Figure 1/F).
0Turn the selector dial (Figure 1/E) anti-
clockwise to the stop.
0Hot water runs out of the swivelling
nozzle and is stopped automatically.
0Turn the selector dial again in a
clockwise direction to “0”.
If the 4 green lights are still flashing,
please repeat this procedure.
To show that the appliance is heating
up, the display “1 cup normal”
flashes.
The working temperature has been
reached when the display “1 cup
normal” is lit.
2.5. “Flushing“ the Appliance
(Figure 8)
When the operating temperature is
reached, the green “Flush“ indica-
tor (Figure 2/J) illuminates. Place an
empty cup under the spouts (Figure
1/H) and press the “Flush“ button
(Figure 2/K). The flushing process stops
automatically. The “1 Cup of Nor-
mal Coffee“ indicator (Figure 2/D) then
illuminates. The appliance is now ready
for brewing coffee.
Note: The water left in the appliance is
removed from the the system by the
flushing action so that coffee is made
with fresh water.
3. Making Coffee
Although you are brewing espresso
coffee with your coffee machine, the
term coffee is used in the following for
clarity.
Note: The following process starts
completely automatically after
the “1 Cup“ or “2 Cups“ button
is pressed: grinding, portioning, press-
ing, pre-brewing, brewing, and ejection
of the used ground coffee.
You can interrupt this process at any
time by pressing the “1 Cup“
or “2 Cups“ button!

g
23
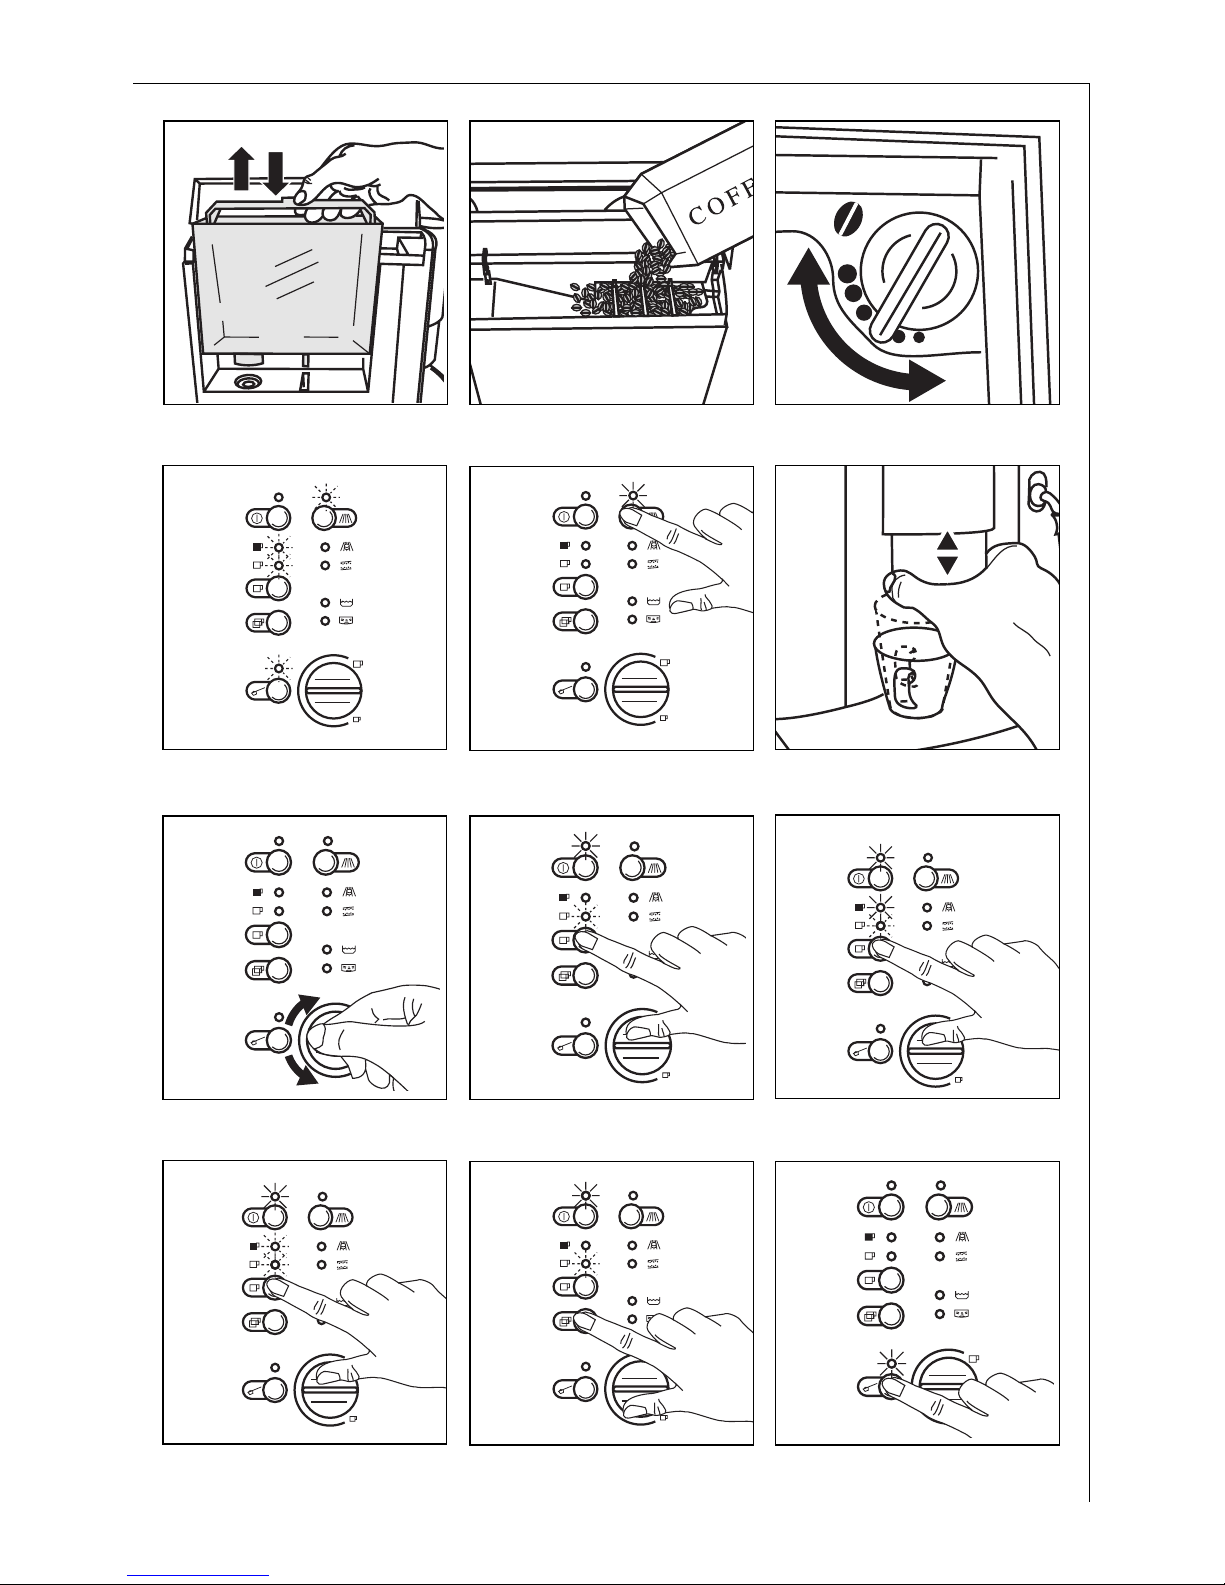
Store your cups upside down on the
cup rack (Figure 1/C). Steam escapes
through the openings in the cup rack,
this warms the cups!
The outlet (Figure 1/G) can be
adjusted in height and can thus be
adjusted to suit different sizes of cup.
To adjust the height, use the thumb
and index finger to grip the ribbing on
the side of the outlet and move it up or
down (Figure 9/A). Important: There is
a risk of burns!
3.1. Adjusting the Amount of
Water (Figure 9/B)
Using the selector dial (Figure 2/P),
adjust the amount of water per cup.
Depending on your taste, select a
“small“ espresso (turn selector dial
anticlockwise) or a large “frothy“ cof-
fee (turn selector dial clockwise).
Note: You can also change the amount
of water during the brewing process.
To adjust the required quantity during
the brewing process: turn the selector
dial slowly anticlockwise from the
maximum setting, until coffee ceases
to run out at the required quantity.
When two cups of coffee are drawn,
the amount of water is more or less
doubled.
Note: While the appliance is heating
up, the “1 Normal Cup“ indicator
(Figure 2/D) flashes.
3.2. One Cup of Normal Coffee
from Beans (Figure 10)
The appliance is ready for use when
the “1 Normal Cup“ indicator (Fig-
ure 2/D) illuminates. Place an empty
cup centrally under the spouts. By
briefly pressing the “1 Cup“ but-
ton (Figure 2/E), you will obtain one
cup of normal coffee. “1 Normal Cup“
flashes.
3.3. One Cup of Strong Coffee
from Beans (Figure 11/A)
The appliance is ready for use when
the “1 Normal Cup“ indicator (Fig-
ure 2/D) illuminates. Place an empty
cup centrally under the spouts. Now
press the “1 Cup“ button (Figure
2/E) until the “1 Strong Cup“ indi-
cator (Figure 2/C) illuminates and “1
Normal Cup“ flashes. You will then
obtain one cup of strong coffee.
3.4. One Cup of Extra Strong
Coffee from Beans (Figure 11/B)
The appliance is ready for use when the
“1 Normal Cup“ indicator (Figure 2/D)
illuminates. Place an empty cup cen-
trally under the spouts. Now press the
“1 Cup“ button (Figure 2/E) until the “1
Normal Cup“ and “1 Strong Cup“ indi-
cators flash. You will then obtain one
cup of extra strong coffee.
3.5. Two Cups of Normal Coffee
from Beans (Figure 12)
The appliance is ready for use when
the “1 Cup“ indicator (Figure 2/D)
illuminates. Place a cup under each of
the spouts.
Note: The correct position for the cups
is given by the two holes in the drip
grille (Figure 1/J) as these are directly
below the spouts.
By pressing the “2 Cups“ button
(Figure 2/F), you will obtain two cups
of normal coffee. “1 Normal Cup“
flashes.
3.6. One or Two Cups of Coffee
from Ground Coffee (Figure 13, 14)
Using this function you can, e.g., brew
decaffeinated coffee.
Caution: Please do not use ground
coffee that is too fine, as this could
block the brewing unit.
The appliance is ready for use when
the “1 Normal Cup“ indicator
(Figure 2/D) illuminates.
0Place one or two cups under the
spouts.
0Press the “Ground Coffee“ button
(Figure 2/H) until the “Ground Cof-
fee“ indicator (Figure 2/G) illuminates
(Figure 13).
0Open the lid (Figure 1/B) and place the
required amount of ground coffee for

g
24
one or two cups in the filler opening
(Figure 14).
0Close the lid.
Note: Add a maximum of 2 portions of
ground coffee. The filler opening for
ground coffee is not a storage con-
tainer. Do not add anything other than
ground coffee!
0Now press the “1 Cup“ button for
one cup or the “2 Cups“ button
for two cups.
Note: If the “Ground Coffee“ but-
ton is pressed inadvertently, you can
cancel this setting by pressing the
“1 Cup“ button again. The appliance
then performs a normal flush.
4. Frothing Milk (for Cappuc-
cino) (Figure 15, 16)
Hot steam can be used both for froth-
ing milk for cappuccino and for heat-
ing liquids.
Note: For one cup of cappuccino, fill a
large cup up to 2/3 full with espresso
and then add the frothed milk.
Frothing milk:
Slide the moving tube on the swivel-
ling nozzle all the way down (Figure
15/A).
Warming liquids:
Slide the moving tube up (Figure 15/B).
0Switch on the appliance using the On/
Off switch (Figure 2/B) and flush if
necessary (see Section 2.5.). The appli-
ance is ready for use when the “1
Normal Cup“ indicator (Figure 2/D)
illuminates.
0Immerse the swivelling nozzle in the
container with the milk to be frothed
or the liquid to be heated, and start
the production of steam by turning the
selection dial (Figure 1/E) anticlock-
wise to the stop (Figure 16/A).
Due the nature of the system, a little
water runs out of the swivelling nozzle
first, this can be run off first, however
it will not affect the quality of the
result, e.g., on frothing milk.
Important: Only immerse the swivel-
ling nozzle around half way into the
liquid so that air can be drawn in
unhindered. The swivelling nozzle
should not touch the base of the con-
tainer to avoid the hindrance of the
outlet of steam. Important: There is a
risk of burns!
0You can stop the outlet of steam by
turning the selector dial clockwise to
the O-position (Figure 16/B).
In particular after frothing milk, it is
recommended to briefly activate the
outlet of steam to “blow out the swiv-
elling nozzle“. Then clean the any milk
residues from the swivelling nozzle
using a damp cloth. Move the moving
metal tube up and down during this
process.
After steam has been drawn off, all
4 green indicators flash to indicate
that the system must be refilled with
water. Proceed as follows:
0Place a container under the swivelling
nozzle (Figure 1/F).
0Turn the selector dial (Figure 1/E) anti-
clockwise to the stop (Figure 16/A).
0Press the “Flush“ button (Figure
2/K). Wait until the flow of water stops
automatically. All 4 green indicators
then flash.
0Turn the selector dial (Figure 1/E)
clockwise back to the 0-position (Fig-
ure 16/B). The appliance is now ready
for use again.
5. Preparing Hot Water
(Figure 16)
You can use the hot water function for
prewarming cups, for preparing instant
beverages or tea. Important: There is a
risk of burns!
0Switch on the appliance using the On/
Off switch (Figure 2/B) and flush if
necessary (see Section 2.5.). The appli-
ance is ready for use when the “1
Normal Cup“ indicator (Figure 2/D)
illuminates.

g
25
0Hold a container under the swivelling
nozzle and initiate the preparation of
hot water by turning the selector dial
(Figure 1/E) anticlockwise to the stop
(Figure 16/A) and press the “Flush“
button (Figure 2/K).
0You can stop the flow of hot water by
turning the selector dial clockwise
back to the O-position (Figure 16/B).
6. Switching Off the Appliance
By pressing the On/Off switch (Fig-
ure 2/B), you can switch off the appli-
ance. The power indicator (Figure 2/A)
goes out.
7. Emptying the Water Tank,
Drip Catcher and Spent Coffee
Container (Figure 4, 17, 18)
Note: You should perform the fol-
lowing tasks daily!
0Remove the water tank (Figure 4) and
pour away the remaining water. Use
fresh water each day.
At the end of the day, however at the
latest when the red float (Figure 1/M)
at the rear of the drip grille becomes
visible, you should empty the drip
catcher and the spent coffee container.
Leave the appliance switched on when
performing these tasks.
0Lift the drip catcher slightly and
remove it carefully from the appliance
to the front (Figure 17).
0Remove the spent coffee container and
empty it (Figure 18/A).
0
Remove the drip grille by pressing on
the left or right hand side (Figure 18/B).
Pour away the water left in the drip
catcher.
0Then clean the drip catcher, drip grille,
as well as the spent coffee drawer and
spent coffee container.
8. Cleaning
8.1. Exterior Cleaning
(Figure 17, 18, 19, 20)
Water tank: Clean at least once a
week in normal washing up water, not
in a dishwasher. Then rinse with clean
water.
Drip grille, drip catcher, and spent
coffee drawer: Clean after use in nor-
mal washing up water, not in a dish-
washer (Figure 17, 18).
Spent Coffee container: This part is
dishwasher-safe (Figure 18/A)!
Swivelling nozzle:
Wipe with a damp
cloth after use. Unscrew with a coin if
blocked (Figure 19/A). Remove the lower
part of the nozzle and clear the frothing
duct with a needle (Figure 19/B). On
reassembly, ensure that the nozzle is
correctly seated.
Outlet and spouts: Clean with a damp
cloth as required.
Filler opening for ground coffee:
Clean with a damp cloth as required.
Then wipe dry.
Housing: Clean with a damp cloth as
required, also the inner parts of the
housing that only become accessible
when the drip catcher is removed
(Figure 20).
Bean container: Clean with a dry
cloth from time to time.
8.2. Internal Cleaning: “Clean“
Indicator Illuminates (Figure 21)
Important: Only use original AEG
cleaning tablets!
Incidentally: You can obtain original
AEG cleaning tablets from the Cus-
tomer Care Department (ET No. 663
910 480) or from your dealer (E No.
950 078 803).
Your appliance has a cleaning program
for the regular cleaning of the compo-
nents inside the appliance (duration
approx. 15 min.); it is not necessary to
removing the brewing unit for cleaning
on this appliance.

g
26
If the “Clean” indicator (Figure
2/L) illuminates, you should run the
cleaning program immediately as
described below. Cleaning can also be
carried out as described below before
the indicator illuminates. You can con-
tinue to use your appliance and run
the cleaning program later. However,
in this way you will endanger your
rights to make a claim under the
guarantee, as the unit (and thus also
customer service) will detect overdue
cleaning!
0Switch the appliance on using the On/
Off switch (Figure 2/B).
0
Press the “Flush“ button (Figure 2/K)
for approx. 3 seconds until the following
indicators illuminate: “Empty Spent
Coffee“, “Clean“ and “Ground
Coffee“ (Figure 21).
0Fill the water tank to the maximum
mark, empty the drip catcher and
remove the spent coffee container.
0Refit just the drip catcher.
0The “Water Tank“ (Figure 2/N) and
“Spent Coffee“ indicators (Figure
2/O) go out.
0Now place one original AEG cleaning
tablet in the filler opening for ground
coffee (Figure 1/B).
0Now press the “Ground Coffee“
button (Figure 2/H), the “Ground
Coffee“ indicator (Figure 2/G) goes out.
The “Clean“ indicator (Figure 2/L)
flashes to show that the cleaning pro-
gram has started.
Note: The cleaning program can also
be started by pressing the “1 Cup“
or “2 Cups“ button!
Water is now pumped through the sys-
tem at short intervals to release, with
the aid of the cleaning tablet, residues
of coffee inside the machine.
0If during the cleaning program the
“Spent coffee” indicator (Figure 2/O)
illuminates, empty the drip catcher,
refit it and press the “Flush”
button (Figure 2/K). The cleaning pro-
gram is then continued.
This action may need to be repeated up
to four times.
0The cleaning program is at an end
when the “Flush“ indicator (Figure
2/J) illuminates. Flush the appliance by
pressing the “Flush“ button (Figure
2/K).
0Then empty the drip catcher and refit
it with the spent coffee container.
The appliance is now ready for use
again when the “1 Normal Cup“
indicator (Figure 2/D) illuminates.
9. Descaling the Appliance
(Figure 22, 23)
Your appliance has a descaling pro-
gram for the regular descaling of the
appliance (duration approx. 60 min.).
If the “Descale“ indicator (Figure
2/M) illuminates, you should run the
descaling program as described below.
Descaling can also be performed before
the indicator illuminates by leaving the
appliance to cool down for 2 hours and
pressing the “Flush“ button (Figure
1/K) for approx. 3 seconds with the
appliance switched off. You can also
continue to use your appliance and run
the descaling program later. However,
you will endanger your rights to
make a claim under the guarantee,
as the appliance (and thus also cus-
tomer service) will detect overdue
cleaning!
Caution: Do not under any circum-
stances use descalers based on formic
acid or vinegar or pure lemon juice, as
these can damage the appliance. Pow-
dered descalers are not recommended.
Use only AEG descaling tablets.
If other descaling agents are used, AEG
accepts no liability for any damage.
You can get descaling tablets from
dealers (E no. 900 195 537/7) or from
the AEG Service Line.
0Switch the appliance off using the On/
Off switch (Figure 2/B) and leave it
to cool down for at least 2 hours.

g
27
0Fill the water tank with approx. 600 ml
of water, only then add the liquid
descaler (never the other way
round)!
Do not switch the appliance on!
0With the appliance switched off, press
the "Flush" button (Figure 2/K) for
approx. 3 seconds until the following
indicators illuminate: "Empty Spent
Coffee", "Descale" (Figure 22).
0Empty the spent coffee container and
the drip catcher, and refit them. The
“Spent Coffee“ indicator (Figure
1/O) goes out. All 4 green indicators
flash, the “Descale“ indicator (Fig-
ure 1/M) illuminates.
0Place a sufficiently large container
under the swivelling nozzle (Figure 23).
0Start the descaling program by turning
the selector dial (Figure 1/E) anticlock-
wise to the stop (Figure 16/A). The
“Descale“ indicator (Figure 2/M)
flashes.
Descaler is now pumped through the
system at short intervals.
0If during the cleaning program the
“Spent Coffee“ indicator (Figure 2/O)
lights up, empty the drip catcher and
then replace it. All 4 green indicators
flash, the “Descale“ indicator illu-
minates (Figure 1/M).
0Turn the selector dial (Figure 1/E)
clockwise back to the 0-position (Fig-
ure 16/B). The descaling program is
continued. If the “Spent Coffee“
indicator (Figure 2/O) lights up, empty
the drip catcher and then replace it. Do
not fill the water tank until the
"Water Tank" indicator (Figure 2/N)
illuminates.
After a period of time, the “Flush“
indicator (Figure 2/J) flashes while
the “Descale“ (Figure 2/M),
“Water Tank“ (Figure 2/N) and
“Spent Coffee“ indicators (Figure 2/O)
illuminate.
0Now fill the water tank with fresh
water and refit it to the appliance.
0Empty the drip catcher and refit. All 4
green indicators flash, the “Des-
cale“ indicator (Figure 1/M) illuminates.
0Place a sufficiently large container
under the swivelling nozzle (Figure 23)
and turn the selector dial (Figure 1/E)
anticlockwise to the stop (Figure16/A).
The indicators “Flush“ (Figure 2/J)
and “Descale“ (Figure 2/M) flash.
After a certain amount of time, the
“Flush“ indicator (Figure 2/J)
flashes while the “Descale“ (Figure
2/M) and “Spent Coffee“ (Figure
2/O) indicators illuminate.
0Empty the drip catcher and refit. Turn
the selector dial (Figure 1/E) clockwise
back to the 0-position (Figure 16/B).
The indicators “Flush“ (Figure 2/J)
and “Descale“ (Figure 2/M) flash. If
the “Spent Coffee“ indicator (Fig-
ure 2/O) lights up, empty the drip
catcher and then replace it. The descal-
ing program is continued.
After a certain amount of time, the
“Flush“ indicator (Figure 2/J)
flashes while the “Descale“ (Figure
2/M) and “Spent Coffee“ (Figure
2/O) indicators illuminate.
Empty the drip catcher and then
replace it. The “Flush“ indicator
(Figure 2/J) illuminates.
0Flush the appliance by pressing the
“Flush“ button (Figure 2/K).
0Rinse out the water tank.
The appliance is now ready for use
again when the “1 Normal Cup“
indicator (Figure 2/D) illuminates.

g
28
10. What to do if ...
• no coffee runs out of the spouts:
– Check that the water tank is cor-
rectly seated!
– Fill the water tank!
– Check the correct seating of the drip
catcher!
• coffee only drips out of the spouts:
– Set the grinding texture to a coarser
setting.
• too little froth is produced on the milk
during frothing?
– Always use cool, fresh (low fat) milk!
– Use a suitable container (e.g. jug)!
– Also cool the container if necessary!
– Dismantle the swivelling nozzle and
clean!
• the temperature of the coffee is too
low?
– Prewarm cups with steam or hot
water!
Caution: Sugar and milk lower the
temperature of the coffee!
• coffee brewing is interrupted after
grinding?
– Fill the bean container as the brew-
ing unit has detected that too few
beans have been ground, as a result
the cycle has been interrupted.
• all green indicators are flashing simul-
taneously?
– E.g. during the cleaning program or
when coffee is being drawn off, see
Section 4. (After drawing off steam).
– See Section 2.4. (Only when using
the appliance for the first time).
– Switch off the appliance. Wait 1/2
hour. Switch on the appliance, see
Section 2.4. (Only when using the
appliance for the first time).
– It is possible that the filter is clogged
with ground coffee. Disconnect the
appliance from the mains. Pull out
the spent coffee drawer. Feel inside
the appliance - you will find a mov-
able flap at the top rear of the appli-
ance. The filter is located behind this
flap. Wipe the filter clean with a dry
cloth. Replace the spent coffee
drawer. Finally, the system must be
filled with water again. See Section
4 (After drawing off steam).
• the spent coffee container is stuck in
the appliance?
– Pull out the drip catcher together
with the spent coffee drawer, care-
fully remove the spent coffee con-
tainer from the appliance. Refit the
drip catcher with the spent coffee
drawer, but without the spent cof-
fee container and wait until the
process is complete and the
“1 Cup“ indicator illuminates. Then
insert the drip catcher with the
spent coffee container and spent
coffee drawer!
• Indicators flash alternately?
– Appliance is too cold. Switch off and
wait approx. 1 hour before switching
on the appliance again!
• the 4 green and the 4 red indicators are
flashing alternately?
– Switch off the appliance, unplug
from the mains, plug into the mains
again, and switch on the appliance
again. If this malfunction is no
longer indicated, the appliance is
again ready for use.
– If the malfunction is still present,
please call customer service!
• the grinder is making loud noises?
– Check the grinder for foreign bodies.
If necessary, have the appliance
checked by Customer Care Departe-
ment.
• the appliance is to be transported?
– Keep the original packaging to pro-
vide protection during transport.
– Protect the appliance from knocks.
–Inthecasearisk of frost, drain the
heater system by drawing off steam
prior to transport:
–Switch off the appliance.
–Place a container under the swivel-
ling nozzle.
–Turn the selector dial (Figure 1/E)
anticlockwise to the stop (Figure
16/A).
–Switch on the appliance. All 4
green indicators flash.

g
29
–Press the “Flush“ button (Fig-
ure 2/K) until the only the
“Flush“ indicator (Figure 2/J) is still
flashing. Steam comes out after a
short delay.
–Wait until the steam stops auto-
matically.
–Turn the selector dial (Figure 1/E)
clockwise back to the 0-position
(Figure 16/B).
–Switch off the appliance.
–Empty the bean container, water
tank and drip catcher.
11. Disposal
2 Packaging material
The packaging materials are environ-
mentally friendly and can be recycled.
The plastic components are identified
by markings, e.g. >PE<, >PS<, etc.
Please dispose of the packaging mate-
rials in the appropriate container at
the community waste disposal faci-
lities.
2 Old appliance
The symbol Won the product or on
its packaging indicates that this pro-
duct may not be treated as household
waste. Instead it shall be handed over
to the applicable collection point for
the recycling of electrical and electro-
nic equipment. By ensuring this pro-
duct is disposed of correctly, you will
help prevent potential negative conse-
quences for the environment and
human health, which could otherwise
be caused by inappropriate waste
handling of this product. For more
detailed information about recycling
of this product, please contact your
local city office, your household waste
disposal service or the shop where you
purchased the product.
12. If service is needed
If repairs should become necessary,
including replacement of the mains
cable, please telephone in the first
instance our AEG-Electrolux Service
Line.
For Germany: 01805-22 83 84*:
*from Deutsche Telekom’s fixed-line network 12 Ct./min..
For Austria:
For Repairs service: 0810-955 400*
For Product service: 0810-955 200*
*from TELEKOM AUSTRIA’s fixed-line network 10 Ct./min.
Original packaging including expanded
foam must be retained.
To avoid damage in transport, the
appliance must be packed securely.
The warranty period runs for 2 years
from the date of purchase. The
warranty period is limited to 6 months,
if the appliance is used commercially.
More than 3,000 brewing cycles per
year is understood as commercial use.
Visit our Cafamosa website. Here you
will find information on the subject of
coffee plus further tips about using the
Cafamosa: www.aeg-hausgeraete.de/
cafamosa/

66

67

Electrolux Hausgeräte Vertriebs GmbH
Muggenhofer Str. 135
D-90429 Nürnberg
http://www.electrolux.de
©Copyright by Electrolux
822 949 052 - 1105
Table of contents
Other AEG Electrolux Coffee Maker manuals

AEG Electrolux
AEG Electrolux CP 2 User manual

AEG Electrolux
AEG Electrolux CREMAPRESSO EA250 User manual

AEG Electrolux
AEG Electrolux PE 8038-m User manual

AEG Electrolux
AEG Electrolux CG6600 User manual

AEG Electrolux
AEG Electrolux KF 31xx User manual

AEG Electrolux
AEG Electrolux KF 7000 User manual

AEG Electrolux
AEG Electrolux PE3820-M User manual

AEG Electrolux
AEG Electrolux PE3810-M User manual

AEG Electrolux
AEG Electrolux CP 33 User manual

AEG Electrolux
AEG Electrolux CG6600 User manual