Aerial Media Pros Inspire 1 v2.0 FPV User manual

DIY AERIAL MEDIA PROS INSPIRE 1 v2.0 FPV INSTALLATION GUIDE

The great thing about our Inspire 1 v2.0 FPV kit is that it’s very easy to install. Everything is plug-n-play. No soldering is required with this kit.
Installing this kit will not void your warranty with the drone. Our Inspire 1 FPV Kit uses a high quality Sony CCD camera.
The mount that attaches the FPV camera to your Inspire has tilting action, allowing you to adjust it between
flights to ensure you get the right angle and field of view. The video transmitter is a reliable 5.8Ghz 400mW video transmitter.
Light weight yet powerful. Optionally, included in this kit is the FlySight Black Pearl Diversity 7" Monitor.
Thanks to the included dual monitor mount for your controller, you can use two monitors at the same time, getting vision from both cameras.
• Aerial Media Pros Custom FPV Pilot Camera
• Aerial Media Pros Custom FPV Pilot Camera
• Aerial Media Pros Custom FPV Video Transmitter
• Aerial Media Pros Custom Inspire 1 Mount (only compatible
with Inspire 1 V2.0 and Pro)
• Aerial Media Pros Custom Dual Monitor Adapter for Inspire 1
Remote
• Black Pearl 7" FPV Diversity Monitor
• Power Cable Harness
• All needed mounting hardware
• Connector cables for the Inspire 1
• Dual Lock
• Detailed instructions on installation and operation Aerial
Media Pros Custom FPV Video Transmitter
• 2.5mm Hex driver
• #00 Phillips Screwdriver
• Flathead Screwdriver
INTRODUCTION
Materials List Tools Needed

Introduction................................................................................................1
Tools Needed............................................................................................1
Materials List..............................................................................................1
Installation Guide.........................................................................2-9
Black Pearl FPV Monitor Setup............................................10
Transmitter on drone settings............................................11
Recommended Foxeer Camera Settings.............12
TABLE OF CONTENTS

Using a 2.5mm Hex bit remove the (qty 4) Nose Cone Bolts.
Using a Phillips Screw driver remove the
(qty 2) Phillips screws below the Gimbal Vibration Damping Bracket.
Gently remove the Nose Cone of the Inspire 1.
Once the Nose Cone has been removed, insert the red and black Power Plug of the FPV
Wiring Harness into the open port of the Inspire 1.
Run the Power Leads under the Cables to the right to keep them tight, safe and away from the Compass.
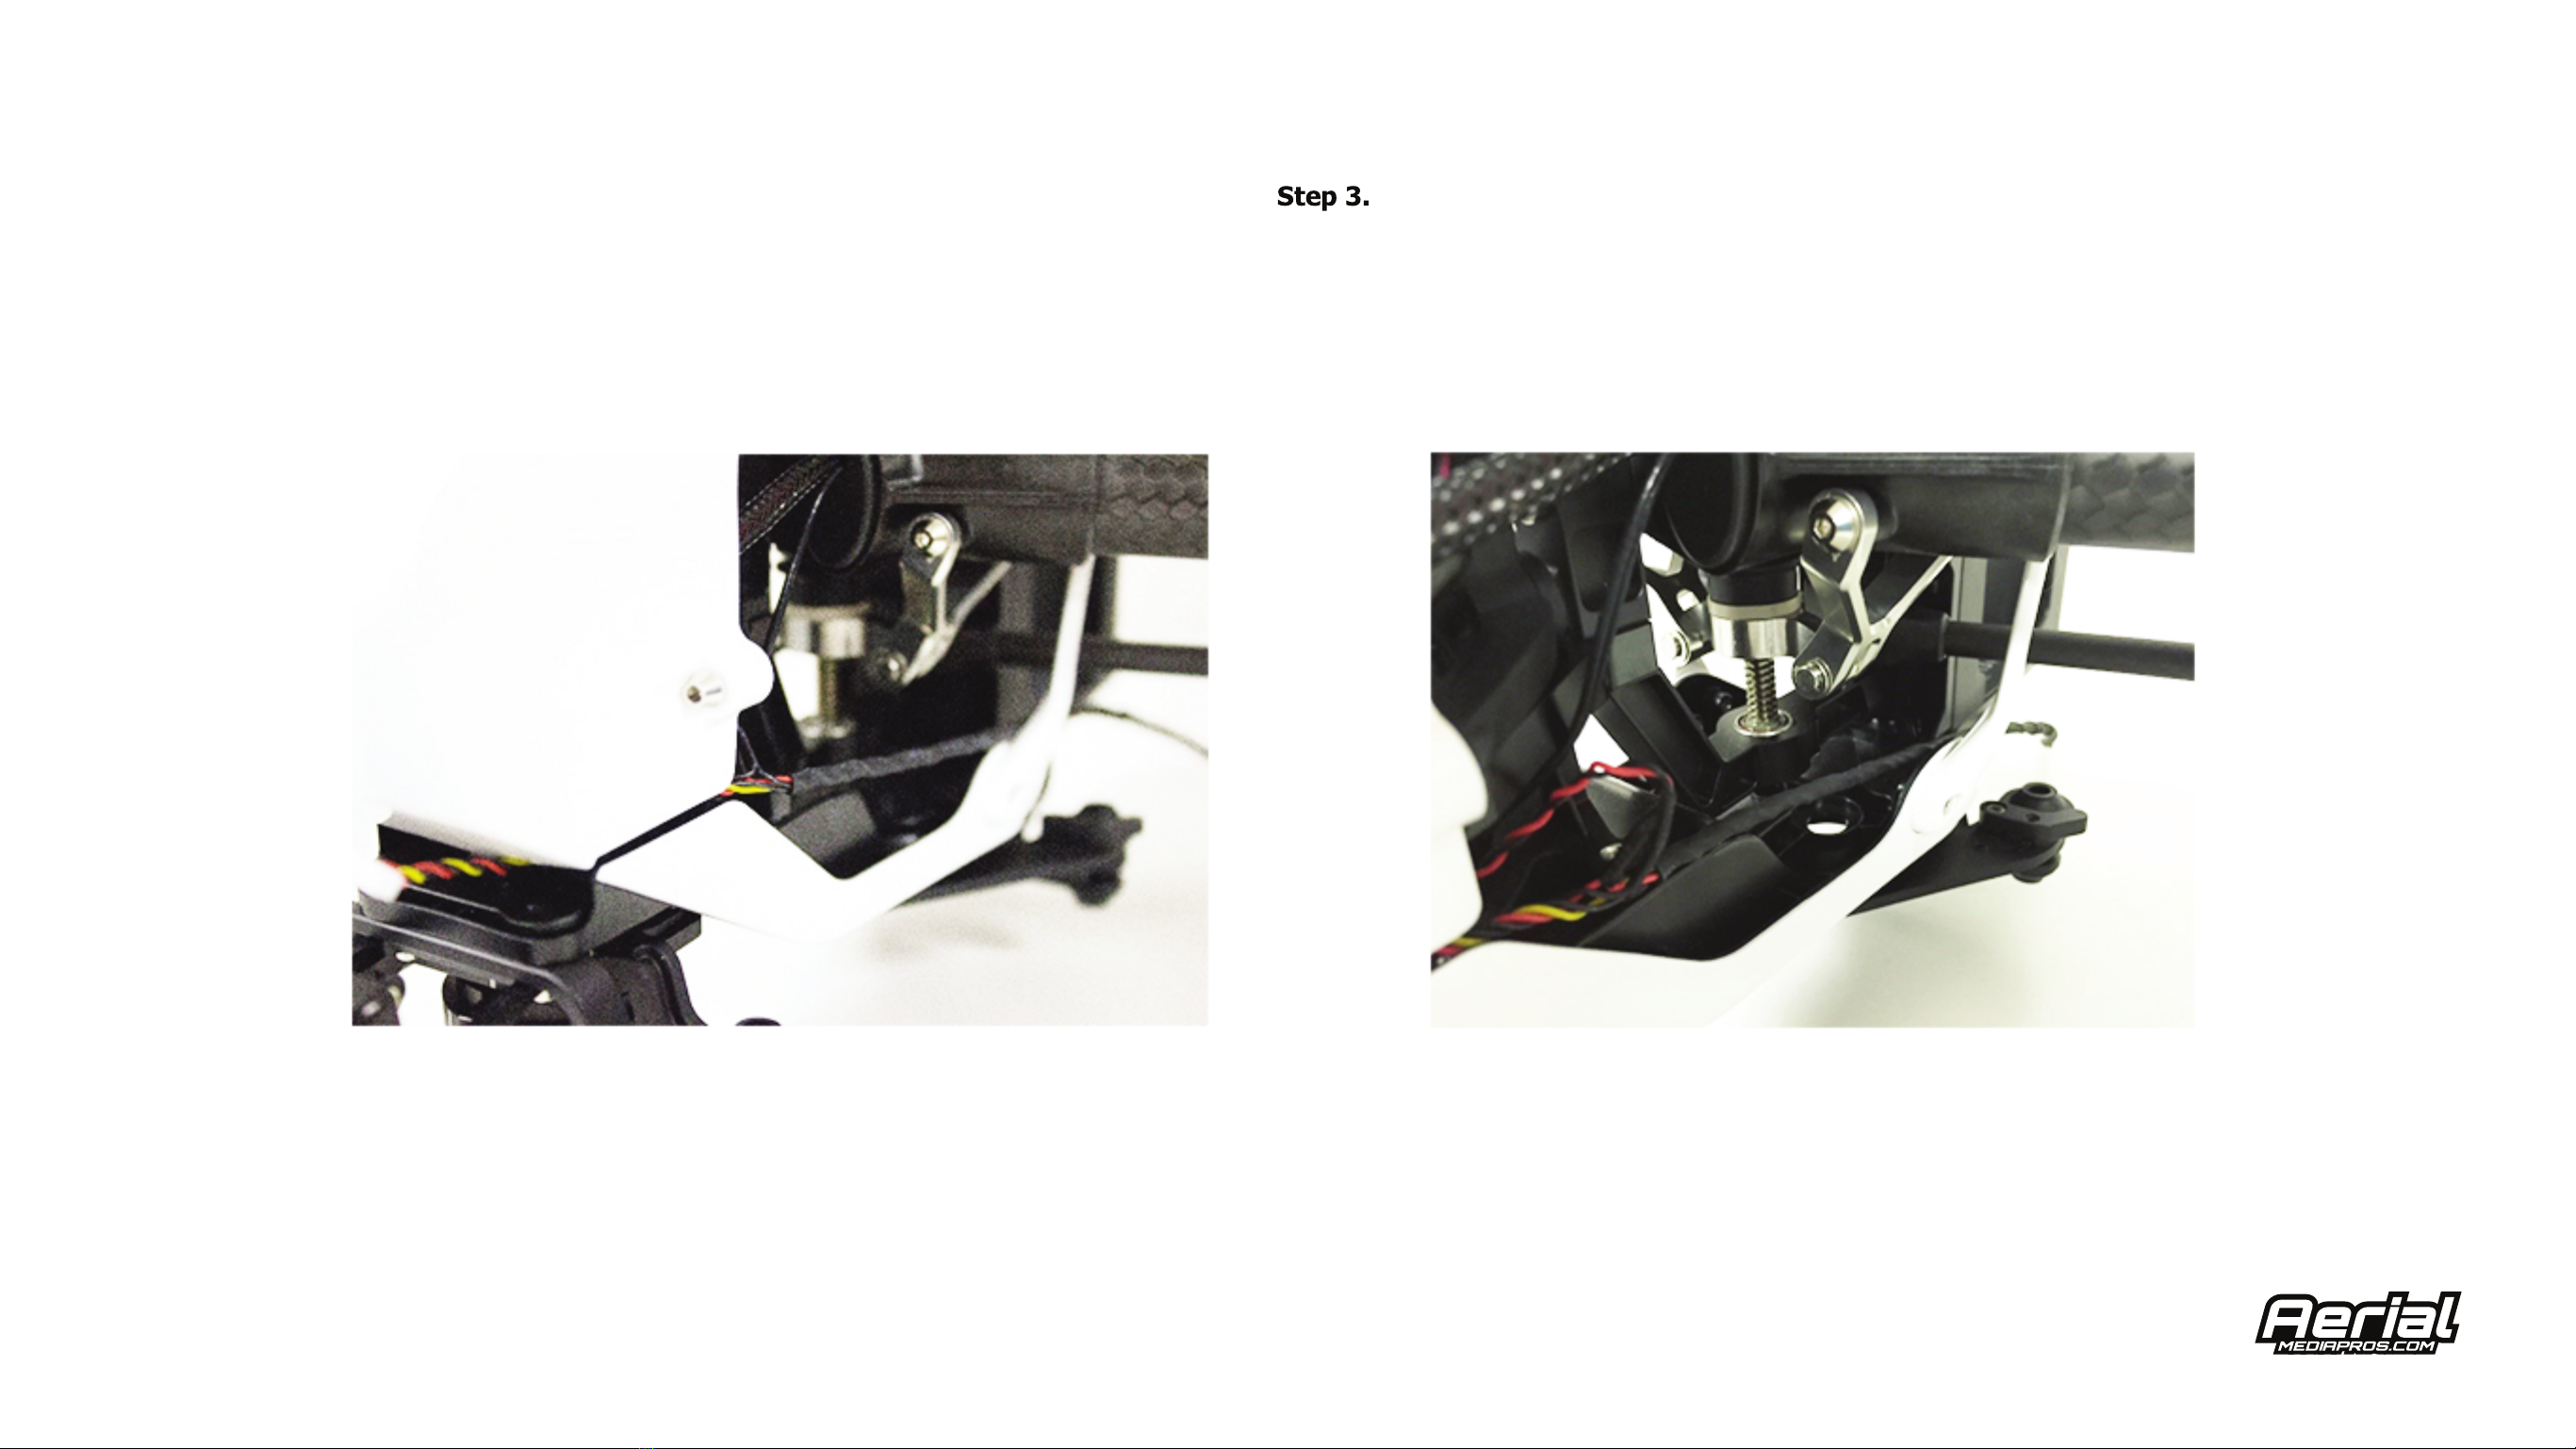
Reattach the Nose Cone using all (qty 4) 2.5mm Bolts as well
as the (qty 2) Phillips Screws. Run the FPV Camera Lead down through the front of the Inspire 1.
Once the Nose Cone has been removed, insert the red and black Power Plug of the FPV
Wiring Harness into the open port of the Inspire 1.
Run the Power Leads under the Cables to the right to keep them tight, safe and away from the Compass.
Reattach the Nose Cone using all (qty 4) 2.5mm Bolts as well
as the (qty 2) Phillips Screws. Run the FPV Camera Lead down through the front of the Inspire 1.
Be sure to run the FPV Wiring Harness clear of any moving parts such as the Landing Gear, Arms, Motors, and Propellers.
Use tape or cable ties as needed to secure the cable clear of any moving parts.
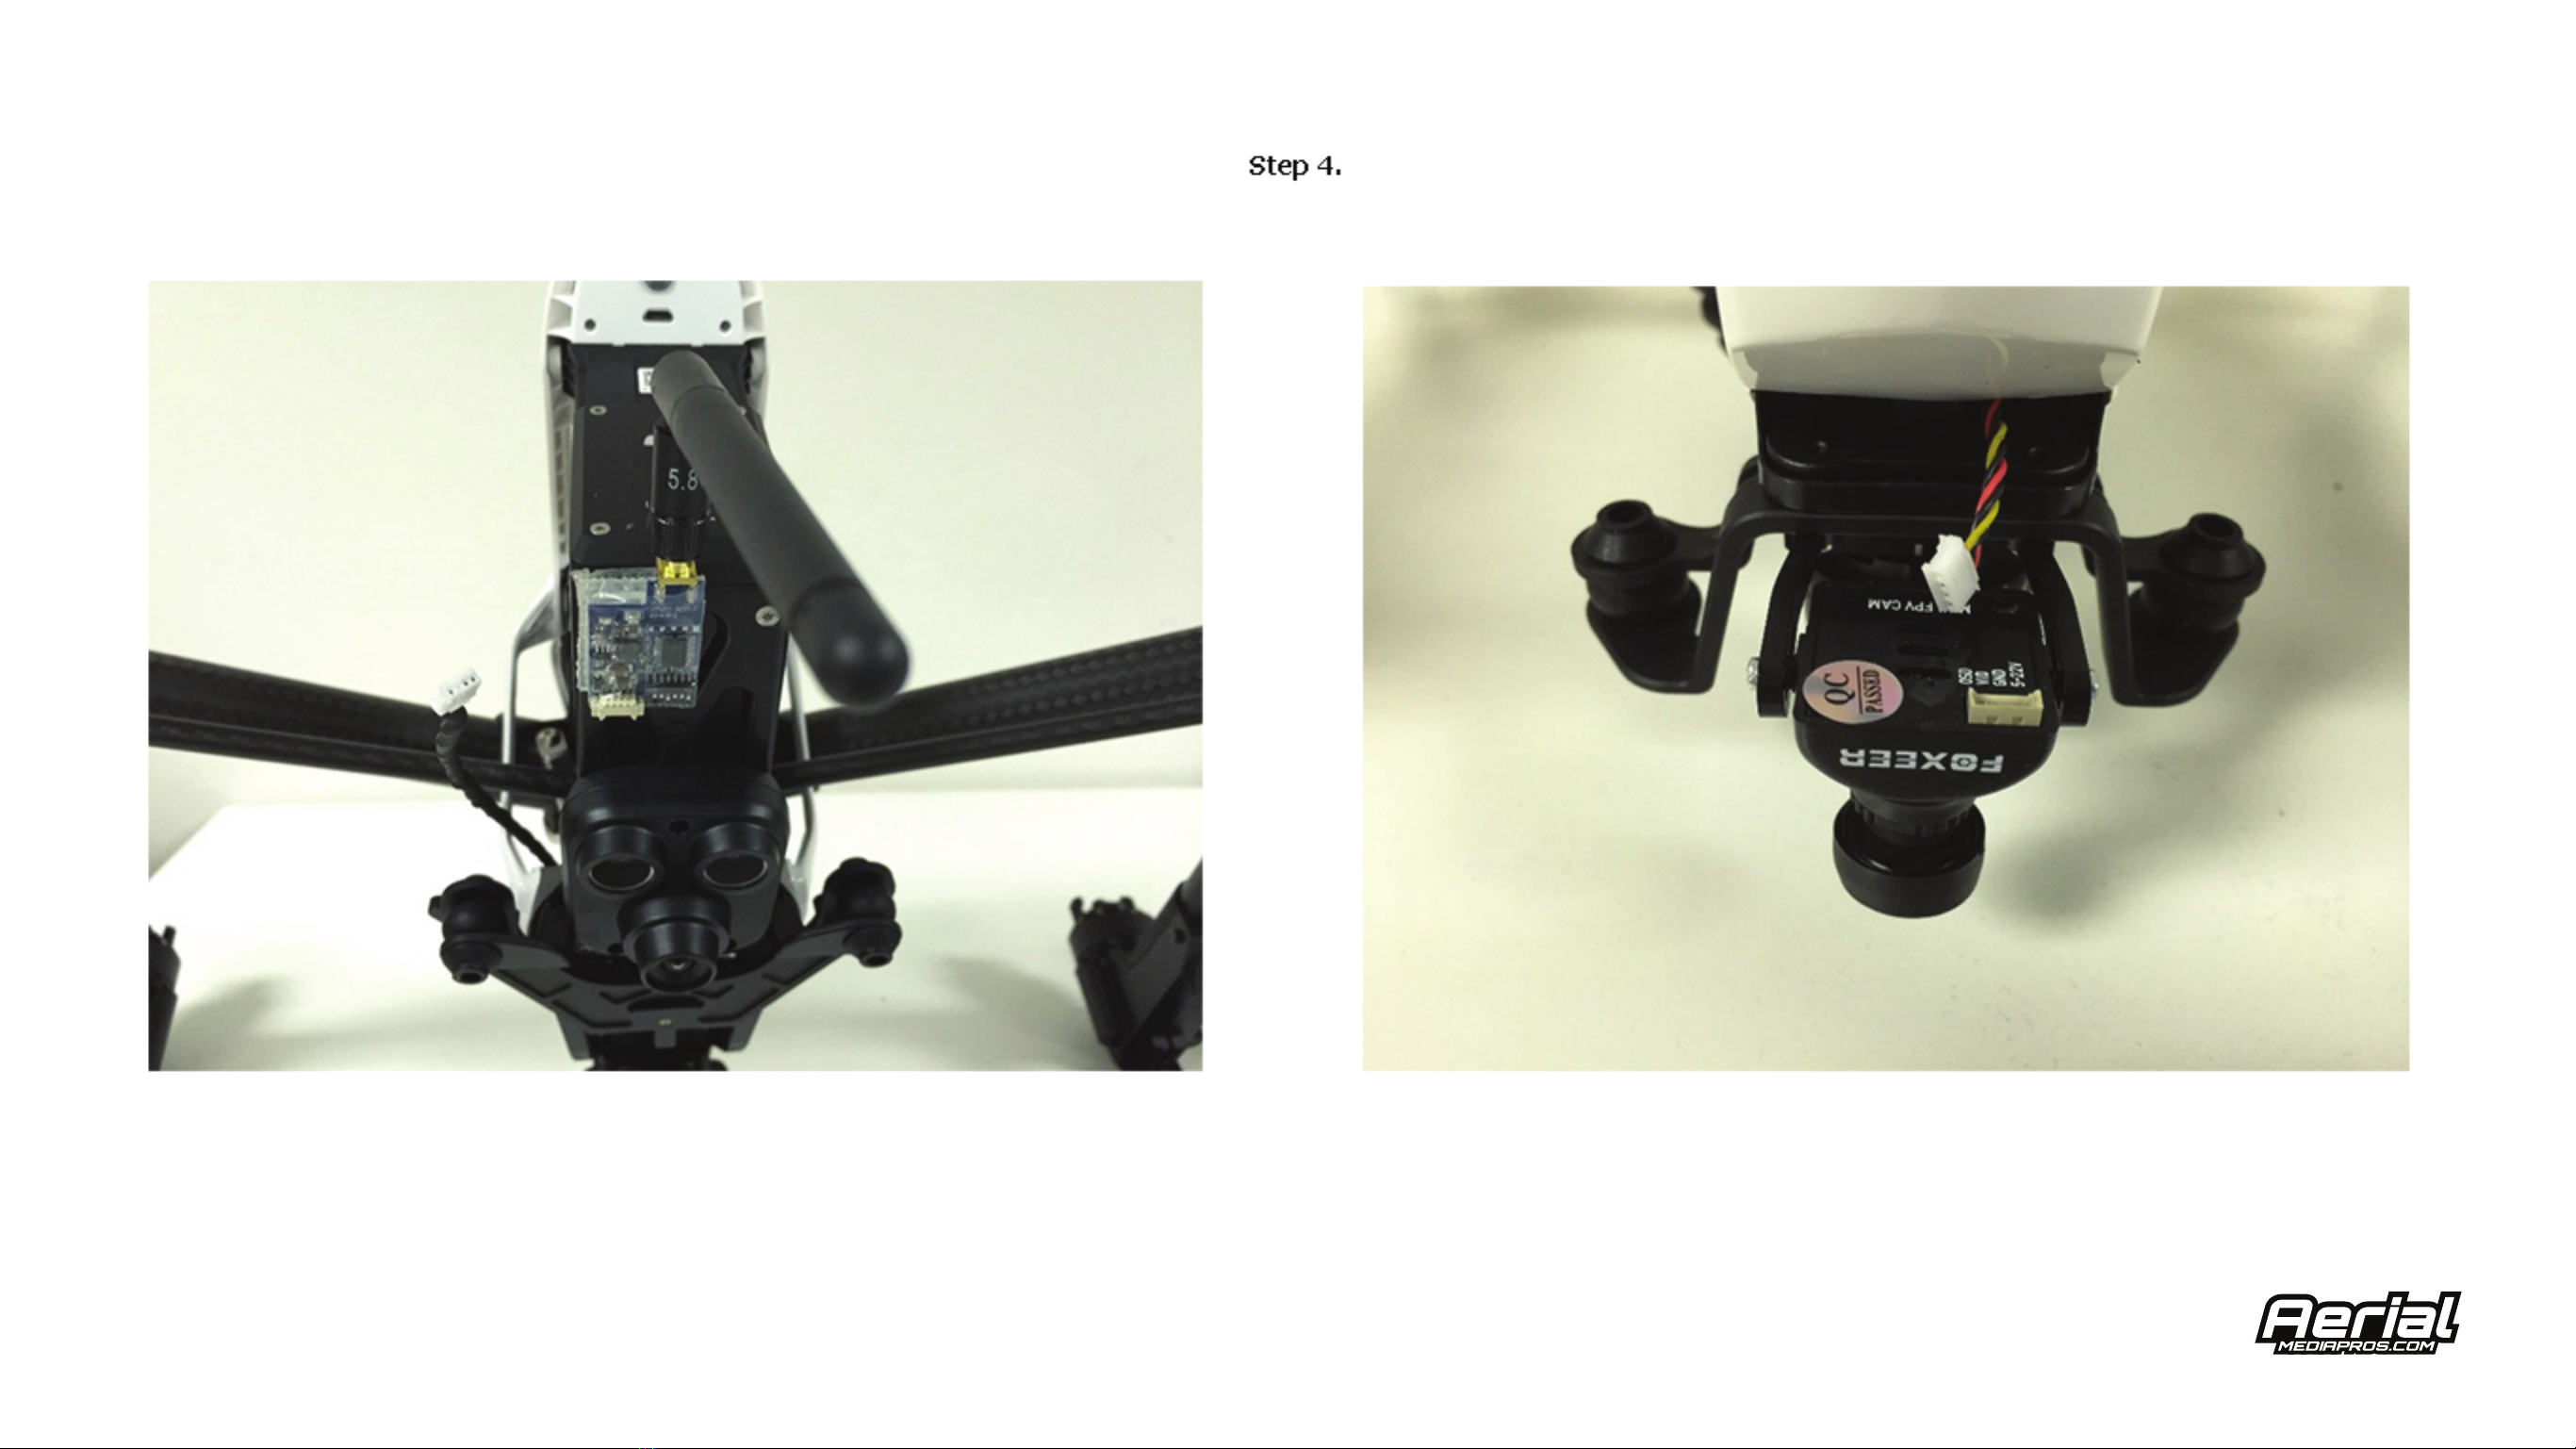
Attach the FPV Transmitter to the bottom or rear of the Inspire 1 using Dual Lock or Velcro.
Be sure that you have the antenna firmly attached each time before powering ON the Inspire 1. Failure to do so will result in
damage to the FPV Transmitter.

Remove the stock DJI Mobile Device Holder using a Flat Head Screw Driver. Use a 1.5mm Hex to remove the
Setscrew on the inside of the stock DJI Mobile Device Holder.
Once the Setscrew is removed, the Mounting Pin can be removed from the stock DJI Mobile Device Holder
and then installed onto the new Aerial Media Pros Dual FPV Monitor/Mobile Device Holder.

Install the new Aerial Media Pros Dual FPV Monitor/Mobile Device Holder onto your Inspire 1 Remote Controller
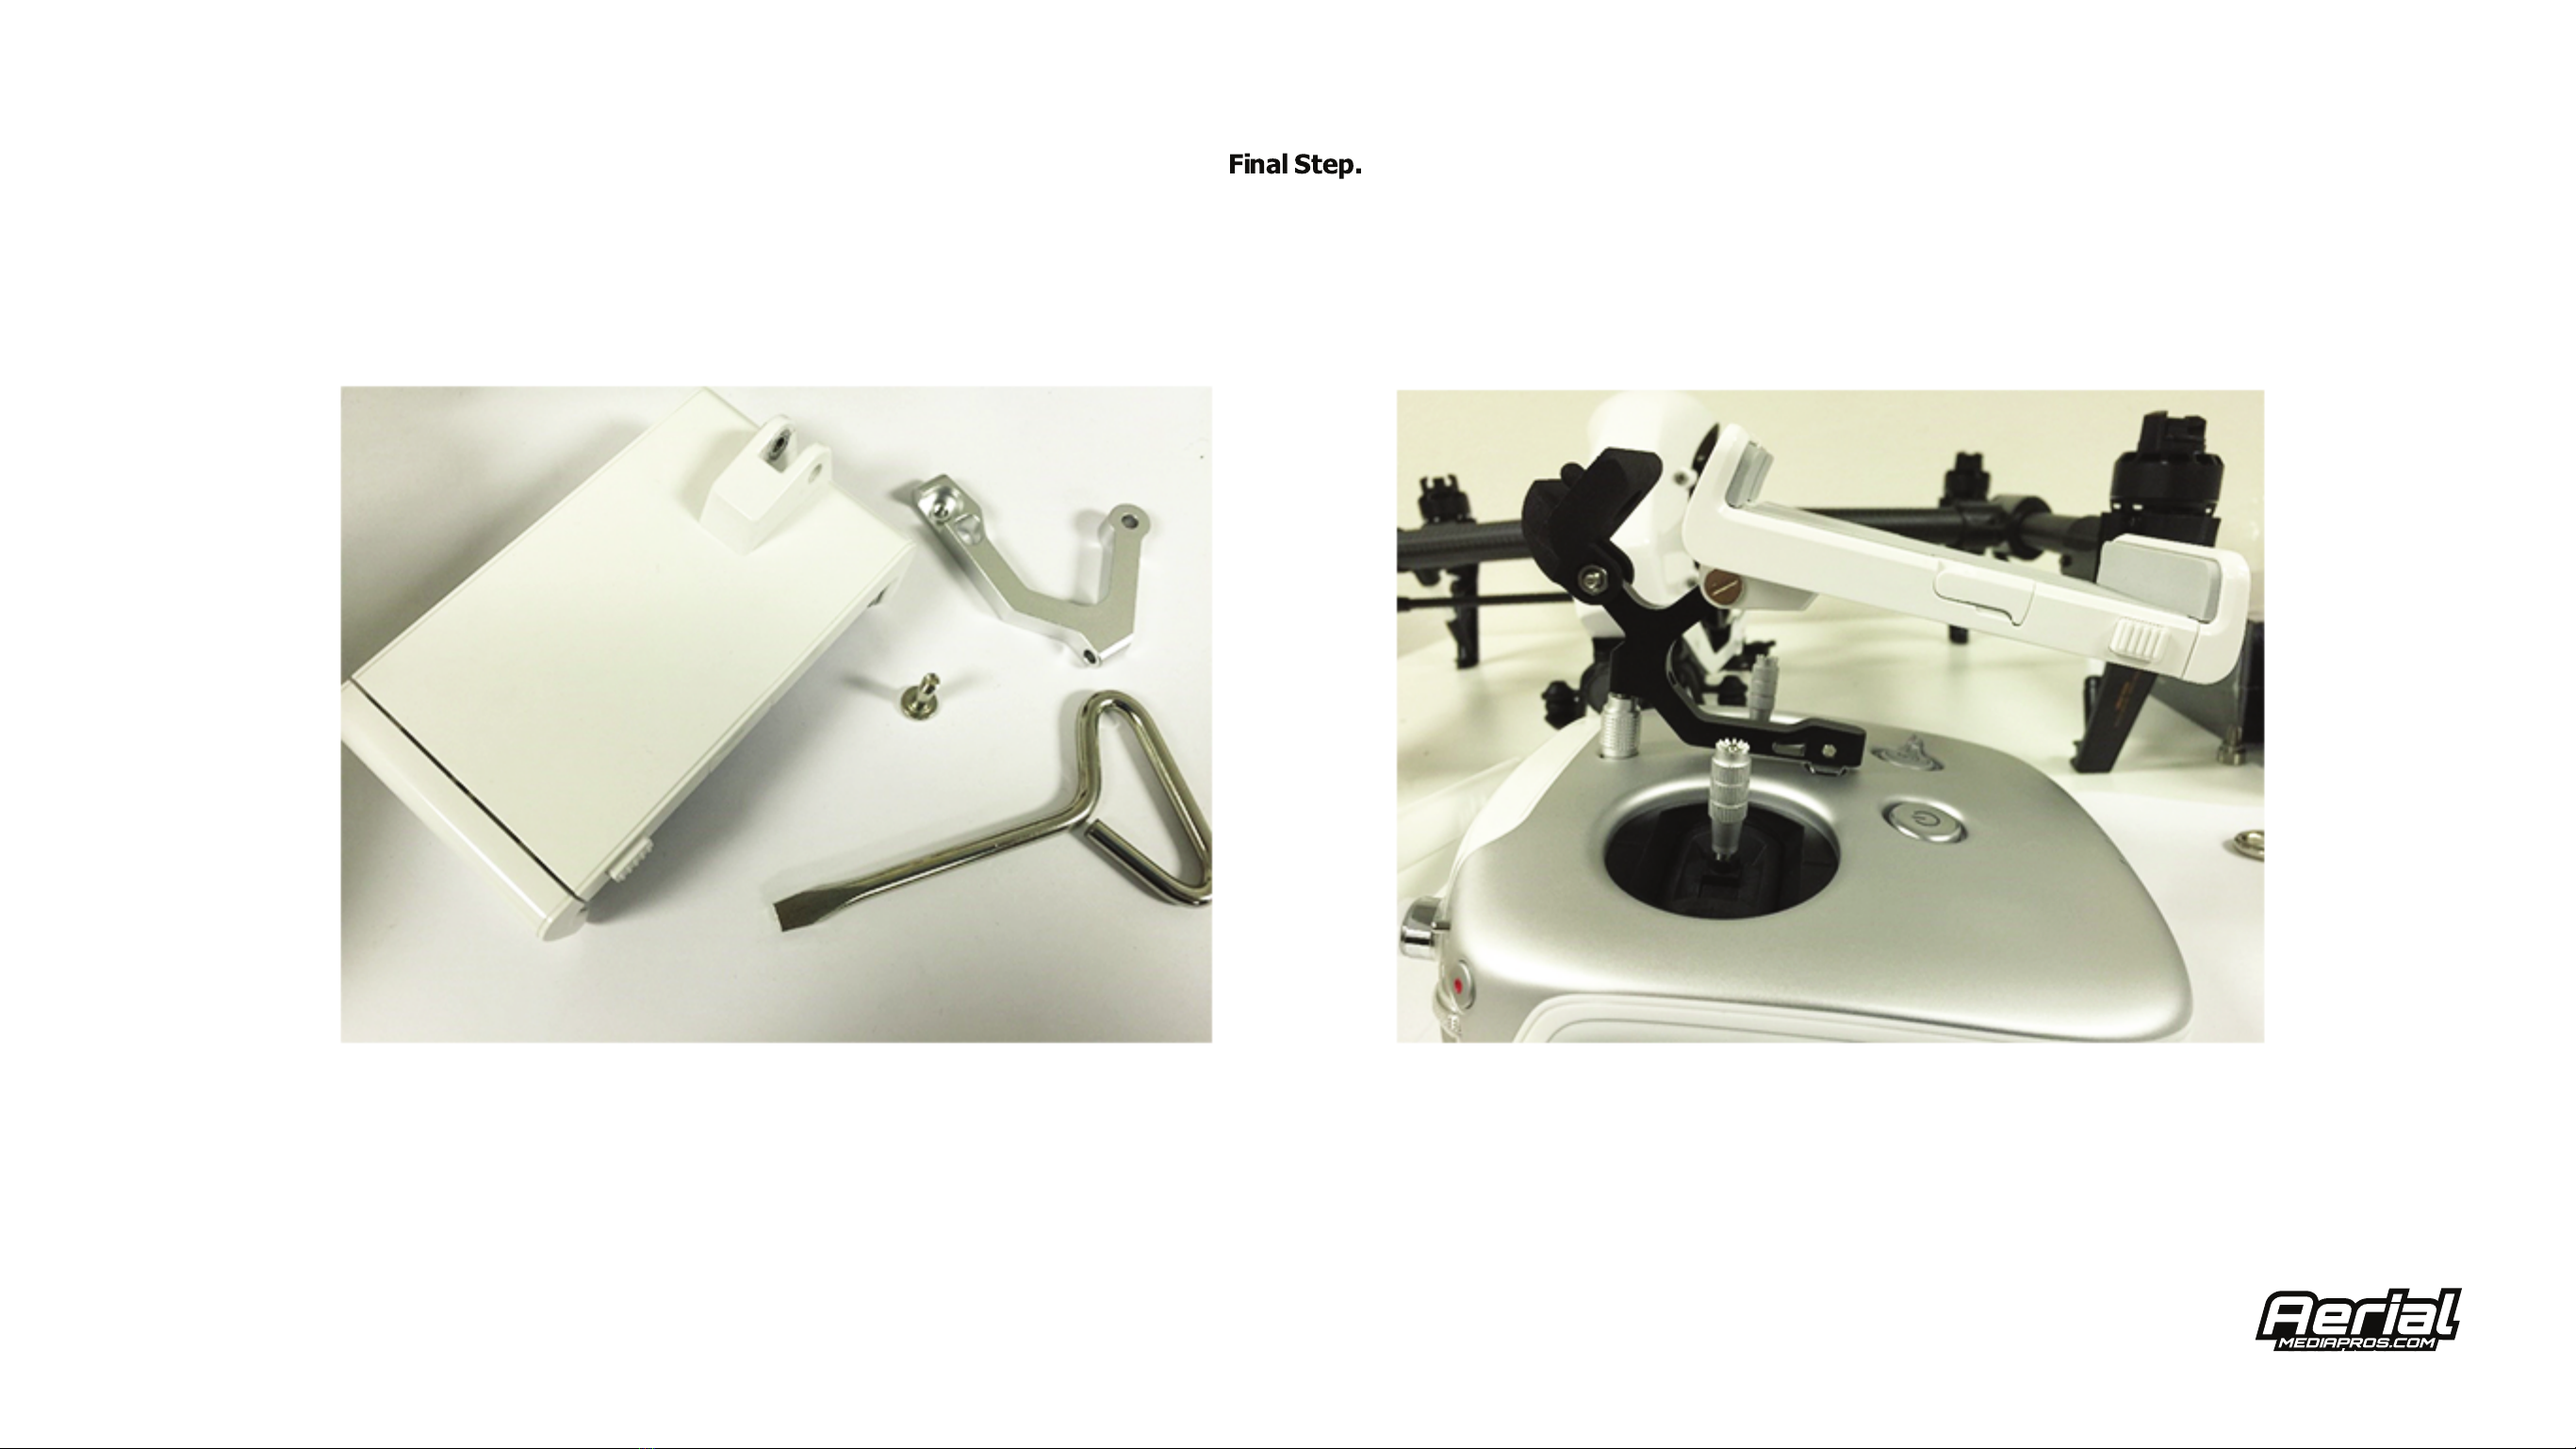
Remove the Mobile Device Clamp from the stock DJI Mobile Device Holder using a flathead screwdriver.
Mount the Mobile Device Clamp to the new Aerial Media Pros Dual FPV Monitor/Mobile Device Holder upside down as shown in the picture above.
This will allow you to use both the FPV Monitor as well as your smart device for piloting, operating the camera, and monitoring the aircraft status.

Using a 2.5mm Hex bit remove the (qty 4) Nose Cone Bolts.
Using a Phillips Screw driver remove the
(qty 2) Phillips screws below the Gimbal Vibration Damping Bracket.
Gently remove the Nose Cone of the Inspire 1.
Once the Nose Cone has been removed, insert the red and black Power Plug of the FPV
Wiring Harness into the open port of the Inspire 1.
Run the Power Leads under the Cables to the right to keep them tight, safe and away from the Compass.
Reattach the Nose Cone using all (qty 4) 2.5mm Bolts as well
as the (qty 2) Phillips Screws. Run the FPV Camera Lead down through the front of the Inspire 1.
Controls for the FPV monitor:
Power On and Off: Press and hold power button (approximately 3 seconds)
Menu: Press power button.
Select: M
Back / Return: Power
Change in Menu: up/down
Change Channel: -/+
FPV Monitor Band and Channel Change:
1. Press and hold power button (approximately 3 seconds) to power On the monitor.
2. Press power button twice, rapidly to access menu.
3. Press the down arrow until you reach the RF menu (Small T.V.).
4. Press M to enter menu. (Ensure Diversity Band, Rx1 band, and Rx2 band are all on the same band).
5. Press M again to select the band.
6. Press up or down to change the band.
7. Press power button to go back.
8. Repeat steps 4-7 till all bands are the same.
9. Press power button to go back and exit the menu.
10. Change channel with the -/+ Button.
(Recommended Band and Channel: Band A Channel 1)
Changing Video System (Monitor):
1. Press power button twice, rapidly to access menu.
2. Press the down arrow until you reach the Function menu (Crossed Tools).
3. Press M to enter the Function menu.
4. Press the down arrow until you reach Video System.
5. Press M to select the video system.
6. Press the down arrow to select NTSC or PAL.
Black Pearl FPV Monitor setup

Once the Nose Cone has been removed, insert the red and black Power Plug of the FPV
Wiring Harness into the open port of the Inspire 1.
Run the Power Leads under the Cables to the right to keep them tight, safe and away from the Compass.
Reattach the Nose Cone using all (qty 4) 2.5mm Bolts as well
as the (qty 2) Phillips Screws. Run the FPV Camera Lead down through the front of the Inspire 1.
Be sure to run the FPV Wiring Harness clear of any moving parts such as the Landing Gear, Arms, Motors, and Propellers.
Use tape or cable ties as needed to secure the cable clear of any moving parts.
Make sure the antenna is attached at all times
when powering up transmitter. The transmitter
will burn out if no antenna is attached when
powered on.
For easy setup we recommend Band/Group A
Channel 1. All tiny flip switches will be in the UP
position.
If you change the Band/Group and Channel on
transmitter, make sure you change the Band/Group
and Channel on the monitor to match.

Attach the FPV Transmitter to the bottom or rear of the Inspire 1 using Dual Lock or Velcro.
Be sure that you have the antenna firmly attached each time before powering ON the Inspire 1. Failure to do so will result in
damage to the FPV Transmitter.
The camera settings for the Foxeer out of the box aren't the best. Here are recommended settings that are popular with FPV enthusiasts.
1. Exposure = set to 47
2. DWDR (Digital Wide Dynamic Range) = ON
3. Go to SPECIAL, CAM TITLE , optionally add a name to the OSD for identification. Select POS for title positioning on screen.
4. Remaining in SPECIAL menu, go to IMAGE ADJ, and bring down the contrast to your liking.
5. Turn the sharpness all the way up.
6. Go to LCD ADJUST, turn GAMMA to .55
7. Turn COLOR GAIN up to your liking.
Recommended Foxeer FPV Camera Settings
Table of contents
Popular Drone manuals by other brands


RUKO
RUKO F11 GIM manual

Odyssey
Odyssey StarChaser Instruction & reference manual

Zerotech
Zerotech DOBBY quick start guide

Brigmton
Brigmton BDRON-400 instruction manual

Gold Light Toys Factory
Gold Light Toys Factory JG2017B24GT Getting to know your

Eavision Robotic Technology
Eavision Robotic Technology EA2021E user manual