AERMEC SMUFFO DF 12 User manual

AERMEC S.P.A.
ISO 9001 - Cert. nº 0128/3
C
E
R
T
I
F
I
E
D
Q
U
A
L
I
T
Y
S
Y
S
T
E
M
IDFUJ
0505
69593.02_03
DEUMIDIFICATORE
DEHUMIDIFIER
DESHUMIDIFICATEUR
ENTFEUCHTER
DESHUMIDIFICADOR
DF
Sostituisce il - Replace - Remplace le n° - Ersetzt:
69593.02_02 / 0411
MANUALE UNICO
BOOKLET
MANUEL UNIQUE
HANDBUCH
MANUAL UNICO

2
AERMEC S.p.A.
I-37040 Bevilacqua (VR) Italia – Via Roma, 44
Tel. (+39) 0442 633111
Telefax (+39) 0442 93730 – (+39) 0442 93566
www.aermec.com
DICHIARAZIONE DI CONFORMITÀ
Noi, firmatari della presente, dichiariamo sotto la nostra
esclusiva responsabilità, che la macchina in oggetto è
conforme a quanto prescritto dalla Direttiva 73/23/CEE e
89/336/CEE e dalla Normativa EN 60335-2-40.
Bevilacqua, 1/1/2004 La Direzione Commerciale - Sales and Marketing Director
LUIGI ZUCCHI
DF
DECLARATION OF CONFORMITY
We declare under our own responsibility that the above
equipment complies with provisions of Standards
73/23/CEE, EMC 89/336/CEE and EEC 92/31/CEE and
Regulation EN 60335-2-40.
CERTIFICAT DE CONFORMITÉ
Nous, signataires de la présente, certifions sous notre propre
responsabilité, que l’appareil en objet est conforme à les
Directives 73/23/CEE, EMC 89/336/CEE et EEC 92/31/CEE
ainsi qu’aux Normes EN 60335-2-40.
KONFORMITÄTSERKLÄRUNG
Wir, Unterzeichner dieser Bescheinigung, bestätigen, daß
dann diese Geräte den Vorschriften 89/392/CEE, EMC
89/336/CEE und EEC 92/31/CEE und der Norm EN 60335-2-
40 entsprechen.
DECLARACION DE CONFORMIDAD
Declaramos bajo nuestra responsabilidad que los equipos
arriba indicados cumplen con las siguientes directivas:
- Directiva 73/23/CEE e 89/336/CEE e Diractiva EN 60335-
2-40.

3
INFORMAZIONI GENERALI
4
Descrizione dell’unità 5
Presentazione delle versioni 6
Simbologia 7
Raccolta dell’acqua di condensa 8
Pulizia del filtro 9
Avvertenze 10
Importanti norme di sicurezza 11
Se il deumidificatore non funziona 11
Dati tecnici 12
Schemi elettrici 49
Servizio Assistenza Tecnica 55
GENERAL INFORMATION
13
Description of the unit 14
Presentation of the versions 15
Symbols used 16
Condensate water collection 17
Filter cleaning 18
Notices 19
Important safety rules 20
If the dehumidifier does not work: 20
Technical data 21
Wiring diagrams 49
INFORMATIONS GÉNÉRALES
22
Description de l'unité 23
Présentation des versions 24
Symbologie 25
Récolte de l'eau de condensation 26
Nettoyage du filtre 27
Avertissements 28
Normes de sécurité importantes 29
Si le déshumidificateur ne fonctionne pas 29
Caractéristiques techniques 30
Schéma électrique 49
ALLGEMEINE INFORMATIONEN
31
Beschreibung der Einheit 32
Vorstellung der Ausführungen 33
Symbole 34
Kondensatsammlung 35
Filterreinigung 36
Hinweise 37
Wichtige Sicherheitsnormen 38
Wenn der Entfeuchter nicht funktioniert 38
Technische Daten 39
Stromplaufplan 49
INFORMACION GENERAL
40
Descripción de la unidad 41
Presentación de las versiones 42
Símbolos 43
Recogida del agua condensada 44
Limpieza del filtro 45
Advertencias 46
Normas importantes de seguridad 47
Si el deshumidificador no funciona 47
Datos técnicos 48
Esquema eléctrico 49

4
Conservare il manuale in luogo asciutto, per evitare il deterioramento, per almeno 10 anni per eventuali riferi-
menti futuri.
Leggere attentamente e completamente tutte le informazioni contenute in questo manuale.
Prestare particolarmente attenzione alle norme d’uso accompagnate dalle scritte “PERICOLO” o “ATTENZIO-
NE” in quanto, se non osservate, possono causare danno alla macchina e/o a persone e cose.
Per anomalie non contemplate da questo manuale, interpellare tempestivamente il Servizio Assistenza di zona
che si attiverà immediatamente per risolvere i problemi del Vostro “Smuffo” con l’intento di crearvi il minor
disagio possibile.
AERMEC S.p.A. declina ogni responsabilità per qualsiasi danno dovuto ad un uso improprio della macchina, ad
una lettura parziale o superficiale delle informazioni contenute in questo manuale.
Il numero di pagine di questo manuale è: 56.

5
ISTRUZIONI PER L’USO
Leggere attentamente le seguenti
istruzioni prima di usare l'apparec-
chio.
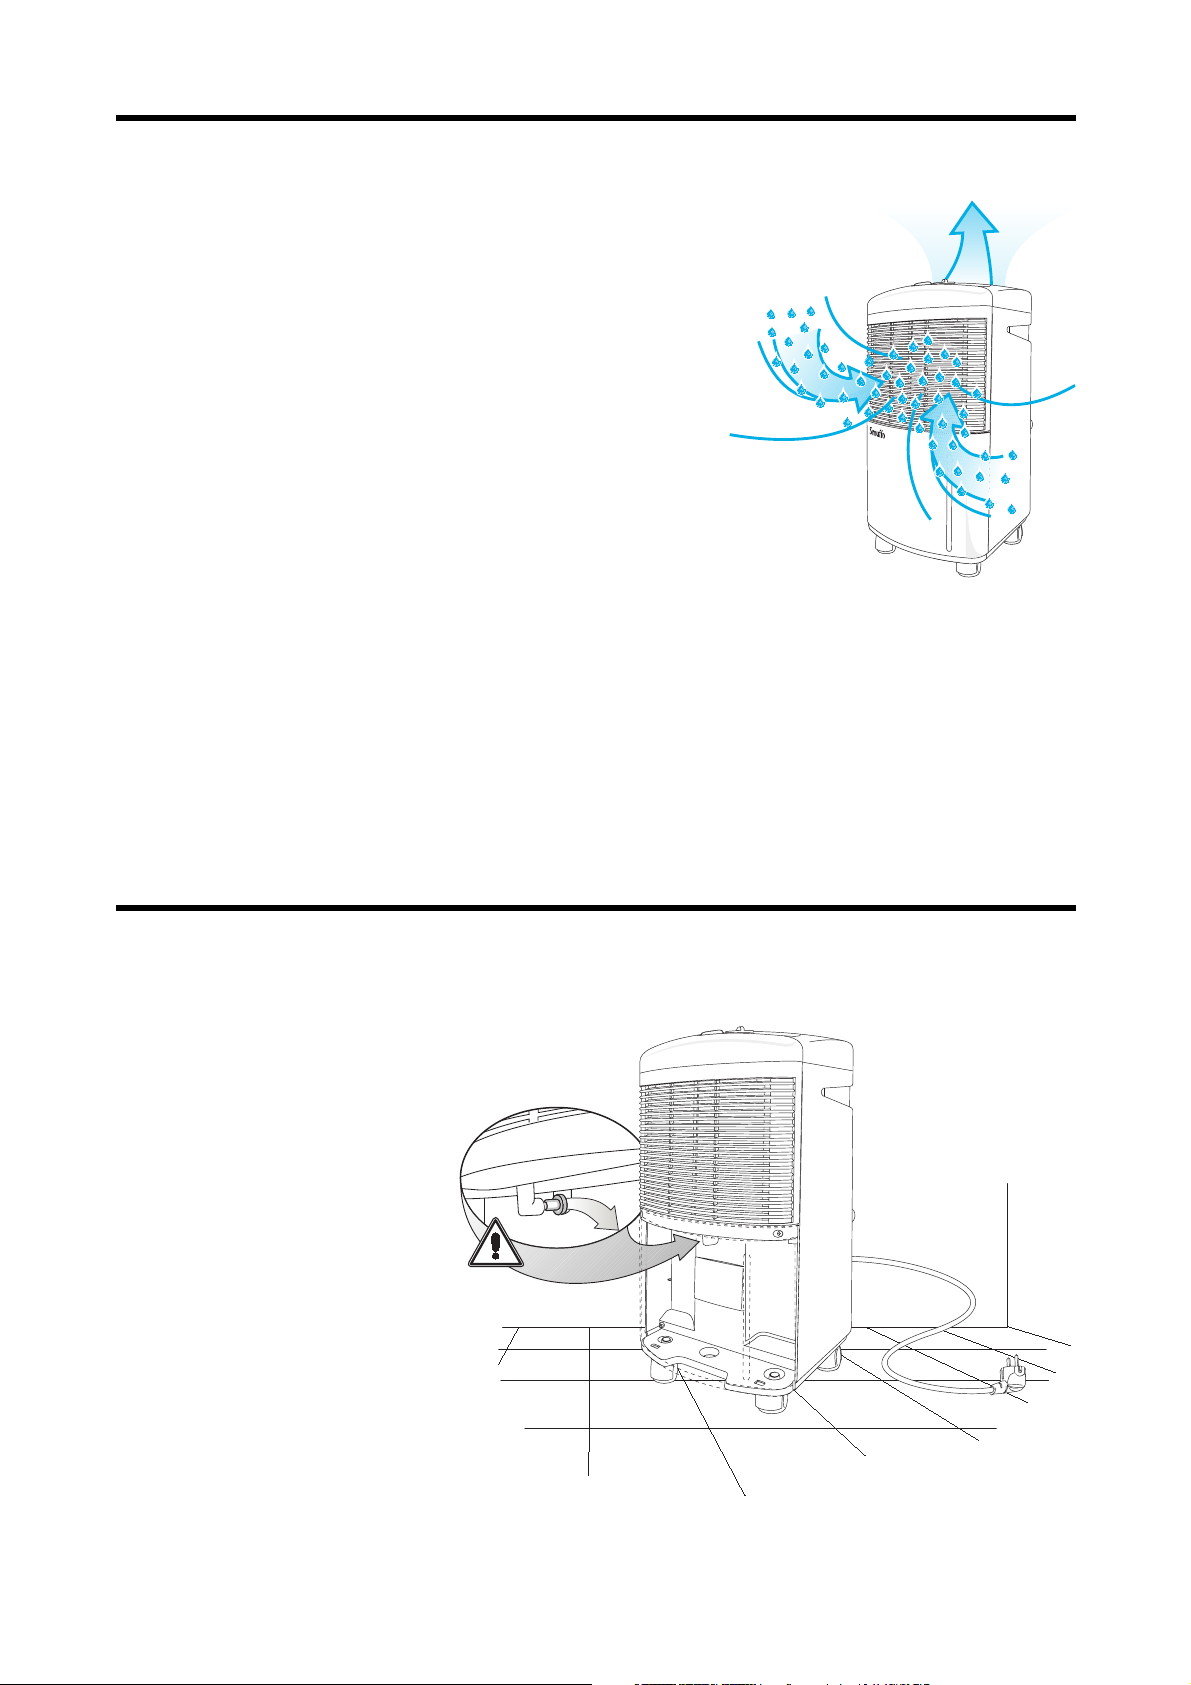
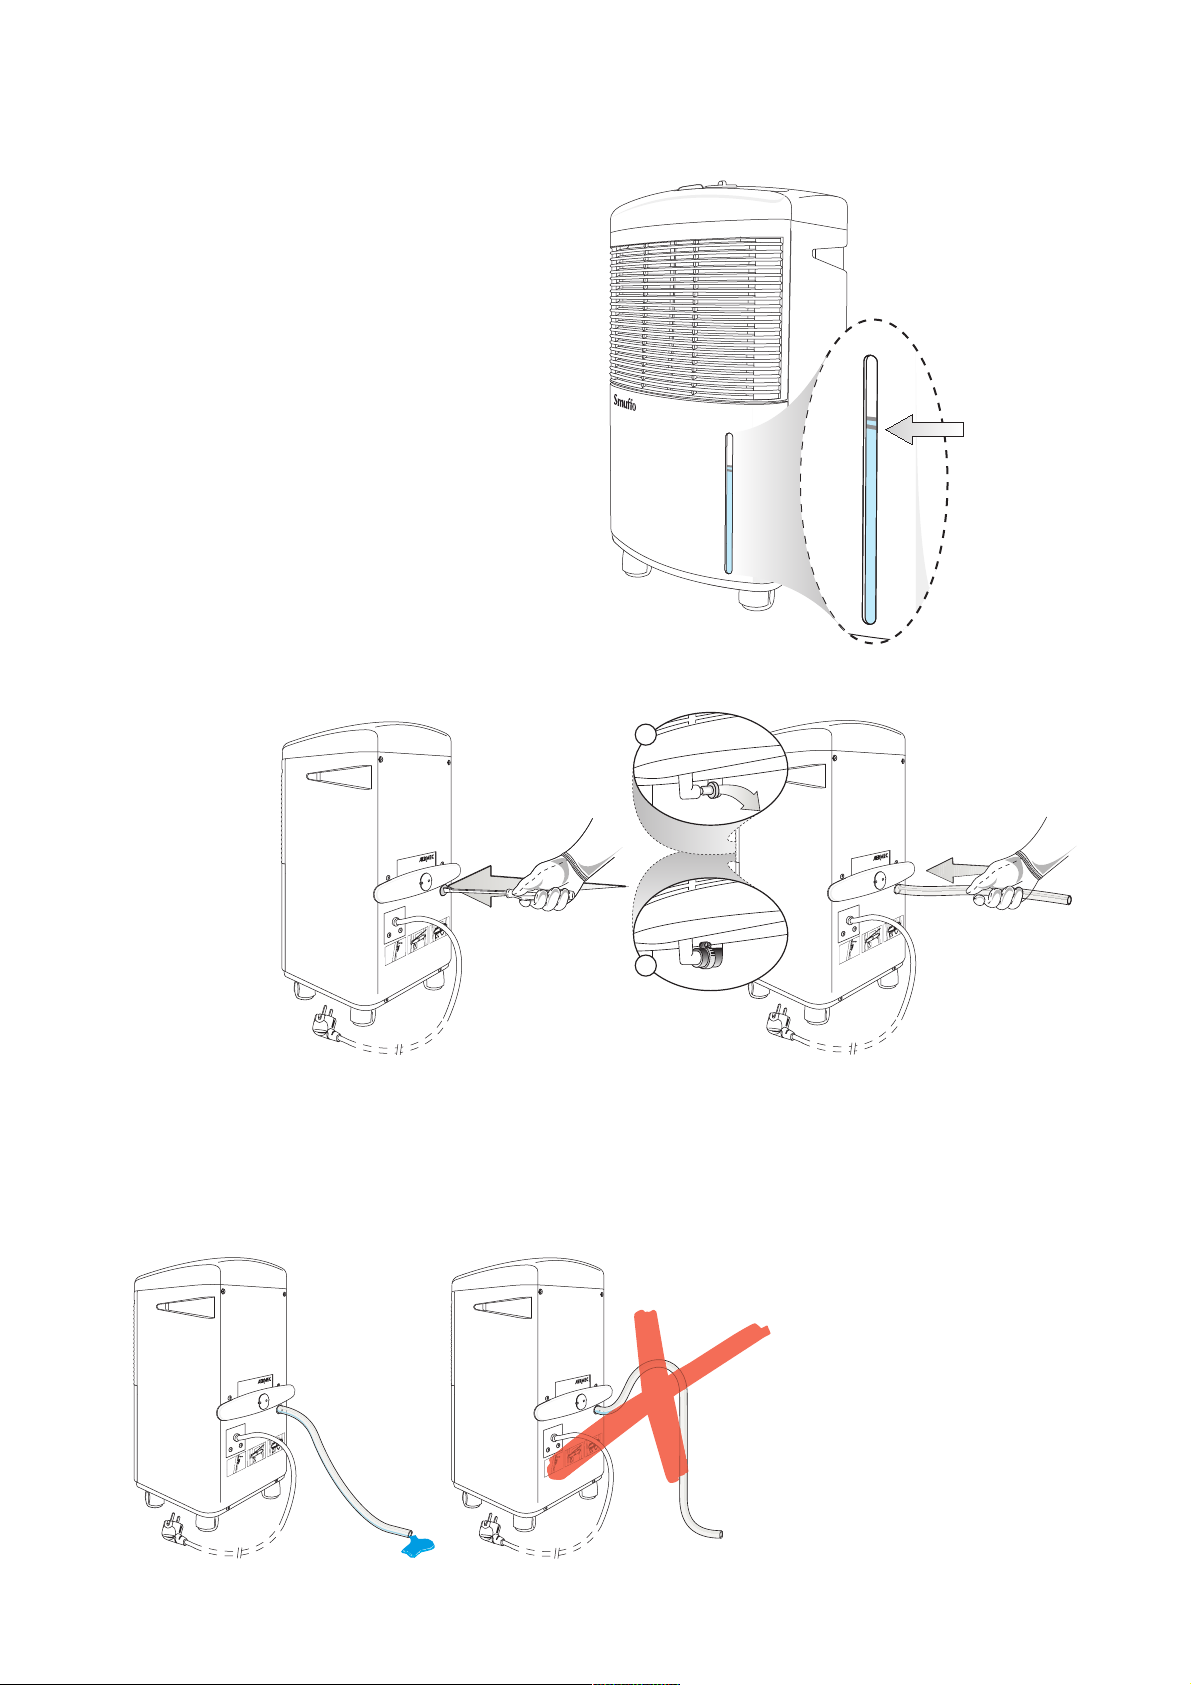
Prima di collegare il deumidificatore
assicurarsi che:
- sia appoggiato su un pavimento sta-
bile e piano;
- sia stato tolto il tappo che chiude la
pipetta di scarico all’interno del deu-
midificatore sopra la tanica raccogli
condensa;
- la tanica per raccogliere la condensa
sia vuota e correttamente inserita;
- il cavo di alimentazione sia svolto
completamente.
Grazie all'uscita dell'aria posta nel
pannello superiore, la macchina può
essere appoggiata ad una parete.
I migliori risultati saranno ottenuti
collocandolo lontano da fonti di calo-
re e tenendo porte e finestre esterne
ben chiuse.
L'apparecchio non funziona con tem-
peratura inferiore a 5°C e superiore a
35°C e con umidità inferiore al 30%.
Desideriamo complimentarci con Voi per l'acquisto del deumi-
dificatore portatile "Smuffo" Aermec.
Realizzato con materiali di qualità superiore, nel rigoroso
rispetto delle normative di sicurezza, "Smuffo" è di facile utiliz-
zo e vi accompagnerà a lungo nell'uso.
Il deumidificatore "Smuffo" Armec è un apparecchio che riporta
l'umidità negli ambienti domestici a valori di confort.
Versatile e semplicissimo da usare, può essere collocato in
stanze, cantine, bagni, nei locali dove viene messa ad asciuga-
re la biancheria, al fine di ridurre a livelli ideali il grado di umi-
dità che, se troppo elevato, è fonte di disagi fisici e degrado
della casa per la formazione di muffe.
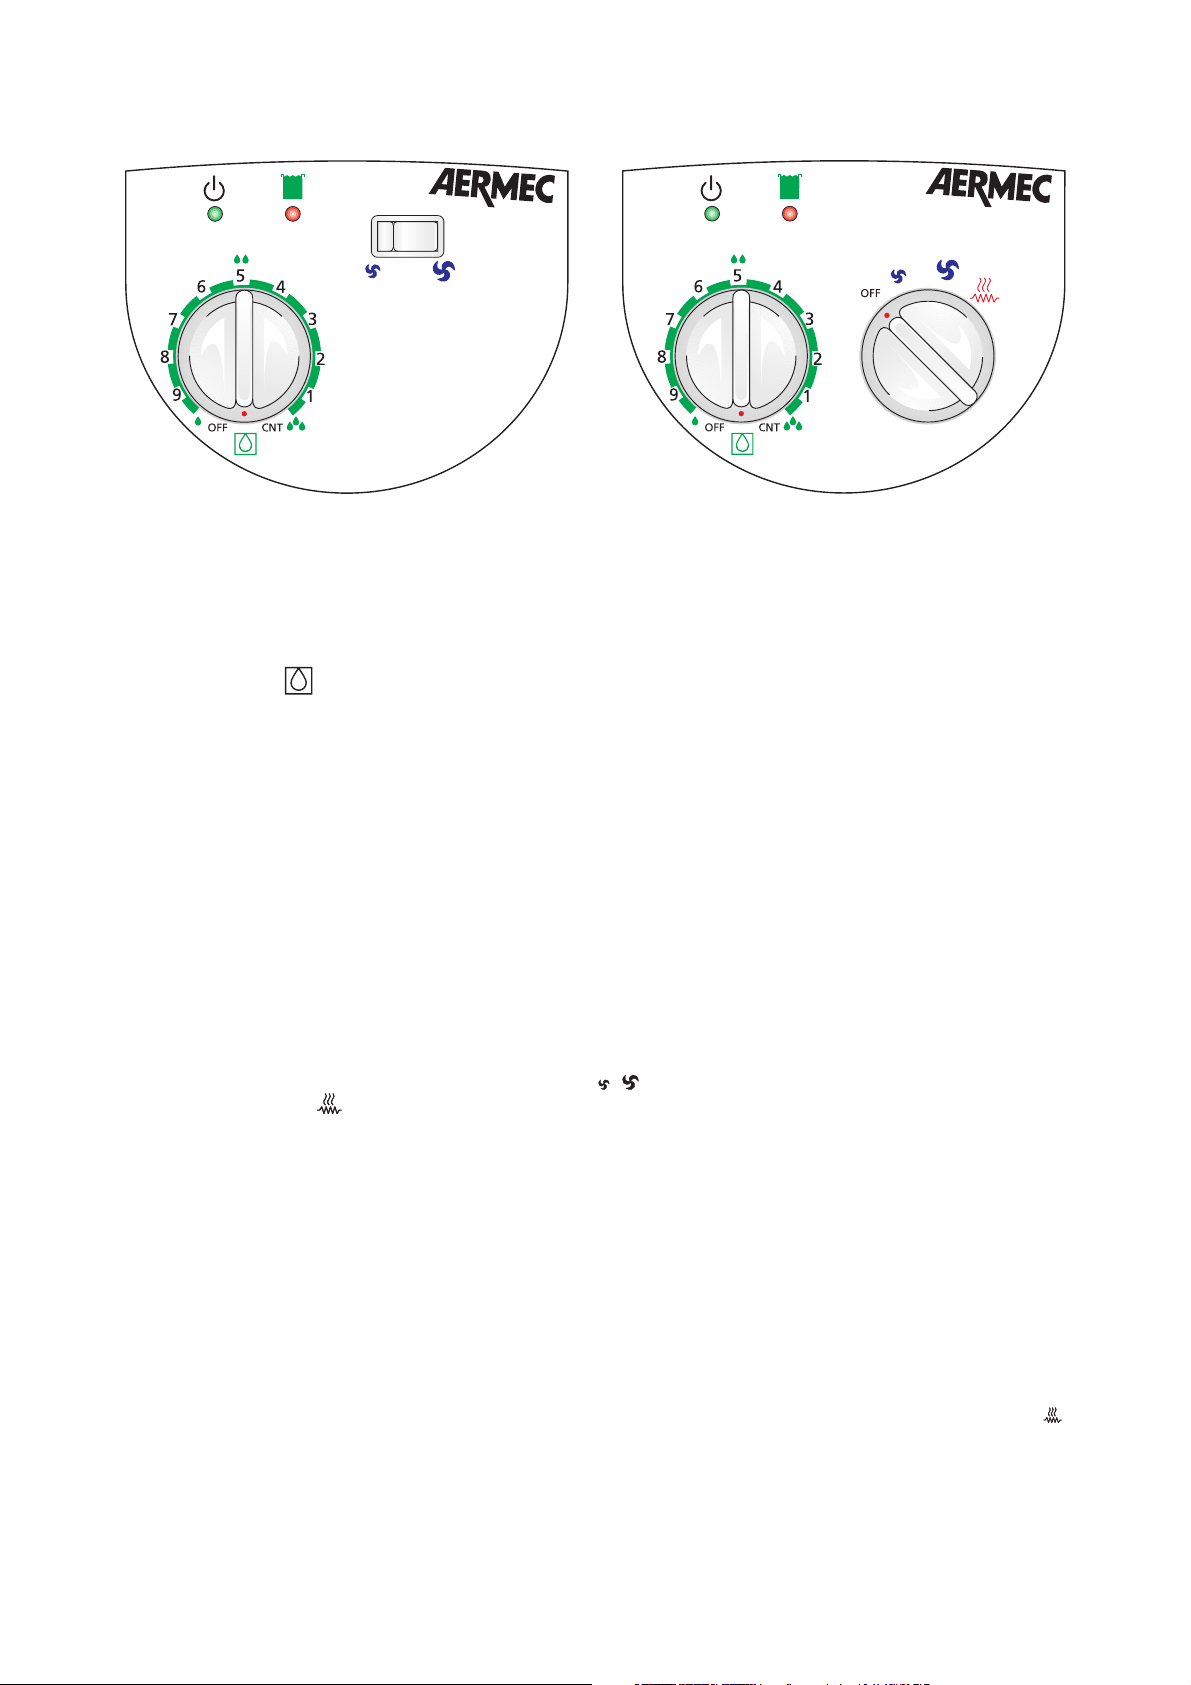
COME SI PRESENTA
È essenzialmente costituito da una unità montata su rotelle per un agevole spostamento dell'apparecchio da un
locale ad un'altro; il pannello comandi sul lato superiore è ben visibile ed accessibile.
E' disponibile in tre modelli di differente potenza e capacità di deumidificazione e due versioni.
DF 12 DF 12 R
DF 20 DF 20 R
DF 35 DF 35 R
Versioni:
DF (standard) Deumidificatore.
DF R (con resistenza) Deumidificatore dotato di resistenza elettrica, oltre alla normale funzione di deumidifi-
cazione attivando la resistenza elettrica avremo la funzione di riscaldamento con resistenza elettrica.
entrata aria
umida
uscita aria
deumidificata
DEUMIDIFICATORE D'ARIA PORTATILE "Smuffo"

6
ACCENSIONE
1. Inserire la spina nella presa di corrente dell'impianto elettrico (l’alimentazione elettrica sia monofase 230V a 50Hz,
la spina in dotazione è di tipo Schuko 10/16A con doppio contatto di terra, secondo le norme CEE 7 (VII).
2. Ruotare la manopola del regolatore di umidità (umidostato) scegliendo la posizione più idonea in funzione
della percentuale di umidità da eliminare (v. paragrafo “UMIDOSTATO”).
3. Posizionare il selettore delle funzioni sulla velocità desiderata.
UMIDOSTATO
Misura l'umidità dell'aria e attiva o disattiva il compressore in base al livello selezionato con la manopola:
minore è il livello selezionato, più elevata sarà la percentuale di umidità eliminata dall'aria. Il comando dell'u-
midostato va dalla posizione OFF (deumidificatore spento) alla posizione CNT (deumidificatore in funziona-
mento continuo) e da' un'indicazione approssimativa sulla percentuale di umidità che si desidera ottenere
nella stanza (ad esempio, a metà fra OFF e CNT è indicato il 50% di umidità relativa, consigliata per gli
ambienti domestici).
Per regolare l'umidostato a livello ottimale si suggerisce di iniziare girando la manopola sulla posizione CNT,
in modo che l'apparecchio elimini l'umidità in eccesso nell'ambiente.
Quando l'umidità sarà quella desiderata, ruotare lentamente il comando dell'umidostato in senso antiorario,
fino a che l'apparecchio si spegnerà.
Da questo momento il deumidificatore sarà regolato sul vostro livello di confort, e l'umidostato lo manterrà
automaticamente.
E' opportuno impostare il grado di umidità nell'umidostato al cambiare delle stagioni o secondo le condizioni
del tempo.
SELETTORE DELLE FUNZIONI
Permette di scegliere la velocità di ventilazione desiderata e, nei modelli (DF R) dotati di resistenza elettrica, di
attivare il riscaldamento .
DF R
FUNZIONAMENTO
Versione DF
Il deumidificatore può eseguire le seguenti operazioni:
1. deumidificazione: si seleziona il grado di umidità
desiderato.
2. ventilazione: si sceglie la velocità di ventilazione
desiderata.
Versione DF R (modelli con resistenza elettrica)
Il deumidificatore può eseguire le seguenti operazioni:
1. deumidificazione: si seleziona il grado di umidità
desiderato.
2. ventilazione: si sceglie la velocità di ventilazione
desiderata.
3. riscaldamento: l'umidostato resta nella posizione
OFF e il selettore delle funzioni va posizionato su .
DF

7
Simboli
Non ostruire le grigle di mandata.
Accesa indica che il deumidificatore è collegato alla rete di alimentazione elettrica.
Umidostato.
Funzione di riscaldamento con resistenza (solo la versione “DF R”).
accesa indica che la tanica per raccogliere la condensa è piena
(l'apparecchio si spegne automaticamente).
Regolazione dell’umidostato per una bassa deumidificazione.
Regolazione dell’umidostato per una media deumidificazione (circa 50% U.R.).
Regolazione dell’umidostato per una alta deumidificazione.
Ventilazione alla minima velocità.
Ventilazione alla massima velocità (massimo potere deumidificante).

8
RACCOLTA DELL'ACQUA DI CONDENSA
La raccolta dell'acqua di condensa può avvenire in due modi:
1. nella tanica (da svuotare periodicamente);
2. direttamente in uno scarico.
1.Scarico della condensa nella tanica
Quando il contenitore di raccolta della condensa è
pieno, il deumidificatore si spegne automaticamente e
si accende la spia rossa "vaschetta piena".
Sollevare leggermente la tanica afferrandola ai lati con
forza, e quindi tirare verso se stessi (fig.1); se ci fossero
difficoltà nell'estrazione, a causa del peso dell'acqua,
tenere una mano sul fianco della vaschetta e sollevarla
da sotto come illustrato nel particolare (fig.2).
Attenzione a non appoggiare la vaschetta piena sul
pavimento, perché instabile.
Una volta svuotata, rimettere la tanica all'interno del-
l'apparecchio.
2. Scarico diretto
Il deumidificatore può essere collegato direttamente ad
uno scarico, funzionando così senza bisogno di vuotare
la tanica.
ATTENZIONE: STACCARE LA SPINA PRIMA DI COLLEGARE IL DEUMIDIFICATORE ALLO SCARICO.
Per effettuare il collegamento allo scarico, rimuovere la tanica raccogli condensa e seguire le seguenti istruzioni:
1. nella parte
posteriore della
macchina è pre-
sente un piccolo
tassello rotondo
in plastica (fig.3),
toglierlo con
l'aiuto di un cac-
ciavite a taglio
(questa operazio-
ne implica la rot-
tura del tassello
che non potrà più
essere reinserito).
2. infilare il tubo
in dotazione nel foro appena liberato (fig.4) e spingerlo avanti fino a farlo uscire dalla parte anteriore dell'appa-
recchio.
3. inserire a mano il tubo nella pipetta di scarico, posta sotto la griglia di entrata dell'aria; per maggiore sicurez-
za consigliamo di fissare il tutto con una fascetta (fig.5).
4. reinserire la tanica, che, a questo punto, avrà solo una funzione puramente estetica di completamento della
macchina.
NOTE: assicurarsi che il tubo di
scarico rimanga sotto il livello di
uscita dall'unità in modo che vi
sia la pendenza necessaria per il
deflusso dell'acqua.
Per ritornare allo scarico stan-
dard, spegnere il deumidificatore
ed aspettare che il tubo si svuoti
completamente, sfilarlo e reinse-
rire la vaschetta di raccolta della
condensa.
livello acqua
di condensa
1
1

9
PULIZIA DEI FILTRI
Il deumidificatore è dotato di 2 filtri:
1. filtro antipolvere;
2. filtro a carboni attivi, per prevenire la proliferazione di batteri e cattivi odori.
La pulizia dei filtri deve essere effettuata periodicamente (almeno ogni tre mesi) nel seguente modo:
1. spegnere il deumidificatore e staccare la spina;
2. togliere la vaschetta di raccolta della condensa;
3. estrarre il filtro verso il basso;
4. aprire delicatamente il telaio che contiene i due fil-
tri onde evitare di romperlo;
5. pulire i due filtri con l'aspirapolvere come in figura
3 (il filtro a carboni attivi non può essere rigenerato);
la durata di questo filtro è legata al grado di inquina-
mento presente nella stanza.
Si consiglia di sostituire il filtro a carboni attivi alme-
no ogni stagione.
11
2
3
I filtri sono disponibili come ricambi presso la rete Aermec, gli indirizzi sono
pubblicati nelle ultime pagine di questo manuale o potete telefonare a questi
numeri:

10
Quando il deumidificatore non viene utilizzato, si consiglia di avvolgere il cavo sul retro e di riporre la spina
nell'apposito incastro, come illustrato nelle immagini a fianco. Il cavo standard della macchina è lungo 235 cm:
qualora venisse sostituito e la lunghezza cambiasse, risulterà impossibile avvolgere correttamente il cavo.
3
2
1
21 3
2
1
1
2
AVVERTENZE FINALI

11
IMPORTANTI NORME DI SICUREZZA
ATTENZIONE PRIMA DI QUALSIASI OPERAZIONE:
- STACCARE SEMPRE LA SPINA
- VUOTARE LA TANICA RACCOGLI CONDENSA.
Non utilizzare mai il deumidificatore all'aperto.
IN CASO DI UTILIZZO NELLA STANZA DA BAGNO PORRE ATTENZIONE A NON FARE ENTRARE ACQUA
DALLA GRIGLIA SUPERIORE DELL'APPARECCHIO.
Non coprire le griglie e fare in modo che nessun oggetto possa ostacolare il flusso dell'aria.
L'apparecchio non deve essere collegato ad una presa multipla.
Non tirare il cavo elettrico per estrarre la presa.
Non aprire mai la carrozzeria del deumidificatore.
Dopo aver spento l'apparecchio attendere sempre almeno un minuto e mezzo prima di riaccenderlo.
Dopo aver spostato l'apparecchio lasciarlo fermo almeno per un'ora prima di accenderlo.
Questo deumidificatore è utilizzabile esclusivamente per uso domestico (abitazioni, uffici, negozi): ogni altro
uso deve essere considerato improprio.
Non utilizzare la macchina in caso di malfunzionamento o se appare danneggiata: staccare la spina e richiede-
re l'intervento dell'assistenza tecnica.
SE IL DEUMIDIFICATORE NON FUNZIONA
Se il deumidificatore non funziona, prima di ricorrere al servizio di assistenza tecnica, è opportuno controllare che:
1. la spina sia collegata alla presa di corrente in modo corretto;
2. l'interruttore generale sia inserito;
3. la spia rossa indicante "vaschetta piena" non sia accesa;
4. la tanica per raccogliere la condensa sia bene inserita;
5. l'umidostato sia regolato bene;
6. il filtro dell'aria non sia troppo sporco o ostruito.
Se l'unità non funzionasse ancora, staccare la spina e richiedere l'intervento dell'assistenza tecnica.
1
2
3
4
5
6
7
8
9
OFF CNT
OFF
1
2
3
4
5
6
7
8
9
OFF CNT
OFF
MAGAZINE
MAGAZINE
ZINE
MAGAZINE
MAGAZINE

12
LIMITI OPERATIVI - PROTEZIONE CONTRO IL GELO E L'ECCESSO DI CALORE
Il dispositivo di protezione ha la funzione di evitare il congelamento incontrollato del circuito frigorifero in caso
di freddo eccessivo e di impedire il surriscaldamento dell'impianto nel caso opposto di temperature esterne
troppo elevate. In tal modo l'apparecchio è protetto da eventuali danni irreparabili.
La protezione interviene in modo automatico spegnendo il deumidificatore quando la temperatura della stanza
scende sotto i +5°C.
Il deumidificatore riprende a funzionare automaticamente solo quando la temperatura della stanza raggiunge i
+12°C.
La protezione per sovratemperatura interviene a circa +35° C.
Mod. DF12 DF12R DF20 DF20R DF35 DF35R
Capacità di deumidificazione [l/24h] 12 12 20 20 35 35
Potenza termica della resistenza elettrica [W] - 500 - 800 - 1000
Portata d’aria max [m3/h] 180 180 240 240 300 300
min 140 140 170 170 230 230
Pressione sonora max [dB (A)] 42 42 48 48 48 48
min 40 40 44 44 44 44
Capacità vaschetta [l] 2,3 2,3 4 4 10 10
Alimentazione (n°fasi - tensione - frequenza) [1~ / V /Hz] 1~ / 230 / 50
* Potenza assorbita [W] 250 750 370 1170 680 1680
* Corrente assorbita [A] 1,4 3,7 2,2 5,7 3,5 8,3
Refrigerante R134a R134a R134a R134a R407C R407C
Carica refrigerante [kg] 0,19 0,19 0,21 0,21 0,35 0,35
Altezza (A) [mm] 505 505 586 586 710 710
Dimensioni Larghezza (B) [mm] 250 250 300 300 350 350
Profondità (C) [mm] 240 240 300 300 360 360
Peso netto [kg] 14 14 18,5 19 24,5 24,5
Peso lordo [kg] 15 15 20 20 26,5 26,5
DATI TECNICI
= pressione sonora misurata in ambiente a tre metri di distanza.
* = Deumidificazione, Taria = 32 °C, UR = 80%
³1500 mm
A
B
C

13
Keep the manual in a dry place to avoid deterioration, for at least ten years for any future references.
Carefully and thoroughly read all the information referred to in this manual.
Pay particular attention to the usage regulations accompanied by the words “HAZARD” or “CAUTION”
because, if they are not complied with, damage can be caused to the machine and/or injury to persons or
damage to property may result.
For faults that are not contemplated in this manual, contact the area After Sales service quickly and they will set
to work immediately to solve the problems your “Smuffo” is having with the intention of causing as little incon-
venience as possible.
AERMEC S.p.A. declines all liability for any damage due to improper use of the machine or the partial or super-
ficial reading of the information contained in this manual.
This manual contains the following number of pages: 56.

14
INSTRUCTIONS FOR USE
Carefully read the following instruc-
tions before using the device.
Before connecting the dehumidifier,
be sure that:
- it is standing on a flat, stable floor;
- the cap closing of the drainage pipe
inside the dehumidifier above the con-
densate collection tank has been remo-
ved;
-the tank to collect the condensate is
empty and correctly inserted;
- the power cable is run out to its full
extent.
Thanks to the air outlet on the upper
panel, the machine can be leant
against a wall.
The best results are obtained by pla-
cing it a long way from heat sources
and keeping outside windows and
doors tightly shut.
The device does not function with a
temperature lower than 5°C and
above 35°C and with humidity lower
than 30%.
Congratulations on your purchase of the Aermec "Smuffo" por-
table dehumidifier.
Made with superior quality material , in the rigourous respect
for the safety standards, "Smuffo" is easy to use and be with you
for a long time.
The Armco "Smuffo" dehumidifier is a device that brings the
humidity in rooms in the home to within comfortable levels.
Versatile and very simple to use, it can be positioned in rooms,
cellars, bathrooms, rooms where it is placed to dry linen, for
the purpose of reducing the degree of humidity to comfort
levels. If this level is too high, it creates an uncomfortable envi-
ronment and causes the house to decay because of mould.
WHAT DOES IT LOOK LIKE
it consists essentially of a unit fitted on wheels for easy movement of the device from one room to another; the
command panel on the top is clearly visible and easy to get at.
It comes in three models with different power and dehumidifying capacity and two versions.
DF 12 DF 12 R
DF 20 DF 20 R
DF 35 DF 35 R
Versions:
DF (Standard) Dehumidifier.
DF R (with resistor) Dehumidifier fitted with an electric heater in addition to the normal dehumidifying
function by activating the electric heater we will have the heating function with the electric heater.
humid air
inlet
dehumidified air
outlet
PORTABLE AIR Dehumidifier "SMUFFO"

15
STARTING
1. Plug into the socket of the electrical system (the electrical power supply is single phase 230V at , the plug provided
is a Schuko 10/16A with double ground contact, according to the EEC standards (VII).
2.Rotate the humidistat, choosing this way the most ideal position according to the percentage of humidity to
be extracted (see following paragraph).
3.Position the function selector at the desired speed.
humidistat
The humidistat measures the air humidity and activates or deactivates the compressor, according to the level
that has been selected with the rotary control: The lower the level selected the higher the percentage of humi-
dity eliminated from the air The scale of the rotary control starts with OFF position (dehumidifier switched off),
and finishes with CNT position (dehumidifier operating continuously).The scale of the rotary control give an
approximate indication on the percentage of humidity which must be obtained in the room.Ex.if the switch in
the middle between OFF and CNT it means that we have a 50% of relative humidity, suggested for domestic
rooms.
In order to adjust the humidistat at the optimal level it is advisable to begin by adjusting it on position (CNT) so
that the machine eliminates the excess of humidity in the environment.
When the humidity is at the level required slowly rotate the command of the humidistat anticlockwise until the
apparatus turns off.
From this moment the dehumidifier will be regulated to your comfort level and the humidistat will keep it
automatically.
It is advisable to set the degree of humidity in the humidistat when the seasons change or according to the
weather conditions.
FUNCTION SELECTOR
This makes it possible to select the speed of ventilation required and, in the models with electrical heater (DF R)
, to activate the heating .
DF R
WORKING
DF Version
The dehumidifier can carry out the following opera-
tions:
1.dehumidification: the degree of humidity required is
selected.
2.fan: the required ventilation speed is chosen.
DF R version (models with heating element)
The dehumidifier can carry out the following opera-
tions:
1.dehumidification: the degree of humidity required is
selected.
2.fan: the required ventilation speed is chosen.
3. heating: the humidistat stays in the OFF position
and the function selector must be positioned on .
DF

16
Symbols
Do not obstruct the delivery grilles.
When on it indicates that the humidifier is connected to the power network.
humidistat.
Heating function with heater (only the “DF R” version).
when on indicates that the condensate collection tank is full
('device turns off automatically).
Regulation of the humidistat for a low dehumidification.
Regulation of the humidistat for a medium dehumidification (around 50% R.H.).
Regulation of the humidistat for a high dehumidification.
Ventilation at the minimum speed.
Ventilation at the maximum speed (maximum dehumidification capacity).

17
CONDENSATE WATER COLLECTION
The condensate water can be collected in two ways:
1. in the tank (to be periodically emptied);
2. directly into a drain.
1.Drainage of the condensate into the tank
When the condensate collection tank is full, the dehu-
midifier turns off automatically and the red "full tank
pilot light comes on<
Slightly raise the tank by firmly gripping the sides and
then pull it towards you (fig.1); if you encounter diffi-
culties pulling it out, because it is the water makes it
too heavy, keep one hand on the side of the tank and
lift it from underneath as shown in the detail (fig.2). Be
careful not rest the full tank on the floor because it is
not
Once emptied, put the tank back into the device.
2.Direct drainage
The dehumidifier can be connected directly to a drain,
thus working without the need for a tank.
WARNING: REMOVE THE PLUG BEFORE CONNEC-
TING THE DEHUMIDIFIER TO THE DRAIN.
To make the connection with the drainage, remove the condensate connection tank and follow the instructions
below:
1. at the rear of
the machine there
is a small round
plastic piece
(fig.3), remove it
with the help of a
flat blade screw-
driver (this opera-
tion implies
breaking the
piece and it will
not then be possi-
ble to reinsert it).
2. insert the tube
supplied in the
hole that has just been freed (fig.4) and push it forwards until it comes out of the front of the device.
3. insert the tube by hand into the discharge pipe under the air inlet grille; for greater safety we advise you to fix
everything with a cable tie (fig.5).
4. reinsert the tank, that, at this point will only have a purely aesthetic function of completing the machine .
NOTE> make sure that the drainage tube is below the level of the unit's outlet in such a way that there is the
necessary slope for the water to run off.
To return to the standard drain,
turn off the dehumidifier and wait
for the tube to empty completely,
remove it and reinsert the con-
densate collection tank.
condensate
water level
1
1

18
CLEANING OF THE FILTERS
The dehumidifier is fitted with two filters:
1. dust filter;
2. active carbon filter, to prevent bacteria and bad smells from developing.
The cleaning of the filters must be carried out periodically, at least every three months. The operations to carry
out are the following:
1. turn off the dehumidifier and remove the plug;
2. remove the condensate collection tank;
3. pull the filter out downwards;
4. gently open the frame containing the two filters so as to avoid breaking it;
5. clean the two filters with a vacuum as in figure 3 (the active carbon filters cannot be regenerated); the life of
this filter depends on the degree of pollution in the
room.
It is recommended to replace the activated carbon fil-
ter at least every season
11
2
3
The filters are available as spares from the Aermec network.

19
When the dehumidifier is not being used, you are advised to wind the lead on the back and put the plug back
into its special housing as shown in the picture at the side. The machine's standard cable is 235 cm long: if, in
case of replacement, this length should be altered, it will be impossible to wind the cable correctly.
3
2
1
21 3
2
1
1
2
FINAL NOTICES

20
IMPORTANT SAFETY RULES
WARNING: BEFORE CARRYING OUT ANY OPERATION
- ALWAYS REMOVE THE PLUG
- EMPTY THE CONDENSATE COLLECTION TANK.
Never use the dehumidifier outside.
IF THE DEHUMIDIFIER IS USED IN THE BATHROOM MAKE SURE THAT WATER DOES NOT GET IN
THROUGH THE UPPER GRILLE OF THE DEVICE.
Do not cover the grilles and ensure that no object can obstruct the air flow.
The device must not be connected to a multiple plug.
Do not pull the electric cable in order to remove the plug.
Never open the casing of the dehumidifier.
After turning off the device always wait for at least a minute and a half before turning it back on.
After removing the equipment leave it off for at least one hour before turning it on.
This dehumidifier can only be used for domestic uses (houses, offices, shops): any other use must be considered
improper.
Do not use the machine in the case of malfunctioning or if it appears damaged: remove the plug and contact
the after sales division for help.
IF THE DEHUMIDIFIER DOES NOT WORK:
If the dehumidifier does not work, before contacting the after sales service division, it is as well to check that :
1. the plug is inserted correctly in the socket;
2. the on/off switch is at on;
3. the red light showing the tank is full is not on
4 -the tank to collect the condensate is empty and correctly inserted;
5. the humidistat is regulated properly;
6. the air filter is not too dirty or obstructed.
If the unit does not yet function remove the plug and contact the after sales service for assistance.
1
2
3
4
5
6
7
8
9
OFF CNT
OFF
1
2
3
4
5
6
7
8
9
OFF CNT
OFF
MAGAZINE
MAGAZINE
ZINE
MAGAZINE
MAGAZINE
This manual suits for next models
5
Table of contents
Languages:
Other AERMEC Dehumidifier manuals