Aeropro RP17407 User manual

1
INSTRUCTION MANUAL
Contain:
◎Technical Data
◎Important safety rules
◎Operating Instructions
◎Maintenance
◎Parts List
1/2” Heavy Duty Air Impact Wrench
Model No.: RP17407
IMPORTANT:
Upon receipt of the product,
read and follow all safety rules,
operating instructions before first use it.
And retain this manual for future reference.
2013

2
※ Technical Data
Square drive………………………………………………………………………………………………..1/2”
Capacity Bolt Size …………………………………………………………………………..…...5/8” (16mm)
Free speed………………………………………………………………………………………….…7,500rpm
Max torque………………………………………………………………………………..…..450ft/lb(610N.m)
Avg.air consumption………………………………………………………………………....6.5cfm(184 l/min)
Operating pressure………………………………………………………………………….……...90psi(6.3bar)
Air inlet size…………………………………………………………………………………………...…….1/4”
Air hose………………………………………………………………………………………………….3/8” ID
Weight…………………………………………………………………………………………...4.64Lbs(2.1kgs)
A weighted sound pressure level…………………………………………………………84.4dB(A), k=3dB(A)
Sound power level……………………………………………………………………… 95.4dB(A) , k=3dB(A)
Max LPc………………………………………………………………………………………………………………………………….………………..106.9dB
Vibration in the handle…………………………………………………………….…….…8.47m/s2,k=1.33m/s2
※ Important Safety Rules
1. Follow all workshop safety rules, regulations, and conditions when using wrench.
2. Do not wear watches, rings bracelets or loose clothing when using air tools.
3. WARNING! Disconnect from air supply before changing accessories or servicing.
4. Maintain the wrench in good condition and replace any damaged or worn parts. Use genuine parts only.
Non-authorised parts may be dangerous.
5. WARNING! Check correct air pressure is maintained and not exceeded. We recommend 90psi.
6. Keep air hose away from heat, oil and sharp edges. Check air hose for wear before each use and ensure that all
connections are secure.
7. Only use impact sockets which are specifically designed for use with an impact wrench.
8. Wear approved safety eye/face shield, ear defenders, and hand protection.
9. WARNING! Due to the possible presence of asbestos dust from brake linings, when working around vehicle
brake systems we recommend you wear suitable respiratory protection.
10. Maintain correct balance and footing. Ensure the floor is not slippery and wear non-slip shoes.
11. Keep children and non essential persons away from the working area.
12. DO NOT use the wrench for a task it is not designed to perform.
13. DO NOT use wrench if damaged or thought to be faulty.
14. DO NOT use wrench unless you have been instructed in its use by a qualified person.
15. DO NOT carry the wrench by the air hose at yourself or others.
16. DO NOT direct air from the air hose at yourself or others.
17. When not in use disconnect from air supply and store in a safe, dry, childproof location.
General safety rules
For multiple hazards, read and understand the safety instructions before installing, operating, repairing, maintaining,
changing accessories on, or working near the assembly power tool for threaded fasteners.
Failure to do so can result in serious bodily injury.
Only qualified and trained operators should install, adjust or use the assembly power tool for threaded fasteners.
Do not modify this assembly power tool for threaded fasteners. Modifications can reduce the effectiveness of safety
measures and increase the risks to the operator.
Do not discard the safety instructions; give them to the operator.
Do not use the assembly power tool for threaded fasteners if it has been damaged.
Tools shall be inspected periodically to verify that the ratings and markings required by this part of ISO 11148 are
legibly marked on the tool. The employer/user shall contact the manufacturer to obtain replacement marking labels
when necessary.

3
※Operating Instruction
Description
Die cast aluminum body, Reversible, Rubber scuff guards on nose and back, Built –in –air regulator varies speed &
power, front exhaust, designed for removing and installing nuts and bolts. Also ideal for tire changing and general
assembling work and other workshop applications.
Projectile hazards
Failure of the workpiece, of accessories or even of the inserted tool itself can generate high-velocity projectiles.
Always wear impact-resistant eye protection during the operation of the assembly power tool for threaded fasteners. The
grade of protection required should be assessed for each use. Ensure that the workpiece is securely fixed.
Entanglement hazards
Entanglement hazards can result in choking, scalping and/or lacerations if loose clothing, personal
jewellery, neckware, hair or gloves are not kept away from the tool and accessories.
Gloves can become entangled with the rotating drive, causing severed or broken fingers.
Rotating drive sockets and drive extensions can easily entangle rubber-coated or metal-reinforced gloves.
Do not wear loose-fitting gloves or gloves with cut or frayed fingers.
Never hold the drive, socket or drive extension.
Keep hands away from rotating drives.
Operating hazards
The following apply.
The use of the tool can expose the operator's hands to hazards including crushing, impacts, cuts and abrasions and heat.
Wear suitable gloves to protect hands.
Operators and maintenance personnel shall be physically able to handle the bulk, weight and power of the tool.
Hold the tool correctly; be ready to counteract normal or sudden movements and have both hands available.
Maintain a balanced body position and secure footing.
In cases where the means to absorb the reaction torque are requested, it is recommended to use a suspension arm whenever
possible. If that is not possible, side handles are recommended for straightcase and pistol-grip tools. Reaction bars are
recommended for angle nutrunners. In any case, it is recommended to use a means to absorb the reaction torque above 4
N·m for straight tools, above 10 N·m for pistol-grip tools, and above 60 N·m for angle nutrunners.
Release the start-and-stop device in the case of an interruption of the energy supply.
Use only lubricants recommended by the manufacturer.
Fingers can be crushed in open-ended crow-foot nutrunners.
Do not use in confined spaces and beware of crushing hands between tool and workpiece, especially when unscrewing.
Repetitive motions hazards
When using a power tool for, the operator can experience discomfort in the hands, arms, shoulders, neck,
or other parts of the body.
While using an assembly power tool for threaded fasteners, the operator should adopt a comfortable posture whilst
maintaining secure footing and avoiding awkward or off-balanced postures. The operator should change posture during
extended tasks, which can help avoid discomfort and fatigue.
If the operator experiences symptoms such as persistent or recurring discomfort, pain, throbbing, aching, tingling,
numbness, burning sensations or stiffness, these warning signs should not be ignored. The operator should tell the employer
and consult a qualified health professional.
Accessory hazards

4
The following apply.
Disconnect the assembly power tool for threaded fasteners from the energy supply before changing the inserted tool or
accessory.
Do not touch sockets or accessories during impacting, as this increases the risk of cuts, burns or vibration injuries.
Use only sizes and types of accessories and consumables that are recommended by the assembly power tool for threaded
fasteners manufacturer.
Use only impact-wrench-rated sockets in good condition, as poor condition or hand sockets and accessories used with
impact wrenches can shatter and become a projectile.
Workplace hazards
The following apply.
Slips, trips and falls are major causes of workplace injury. Be aware of slippery surfaces caused by the use of the tool and
also of trip hazards caused by the air line or hydraulic hose.
Proceed with care in unfamiliar surroundings. Hidden hazards, such as electricity or other utility lines, can exist.
The assembly power tool for threaded fasteners is not intended for use in potentially explosive atmospheres and is not
insulated against coming into contact with electric power.
Make sure there are no electrical cables, gas pipes, etc., that can cause a hazard if damaged by use of the tool.
Dust and fume hazards
Dust and fumes generated when using assembly power tools for threaded fasteners can cause ill health (for example, cancer,
birth defects, asthma and/or dermatitis); risk assessment and implementation of appropriate controls for these hazards are
essential.
Risk assessment should include dust created by the use of the tool and the potential for disturbing existing dust.
Direct the exhaust so as to minimize disturbance of dust in a dust-filled environment.
Where dust or fumes are created, the priority shall be to control them at the point of emission.
All integral features or accessories for the collection, extraction or suppression of airborne dust or fumes should be
correctly used and maintained in accordance with the manufacturer's instructions.
Use respiratory protection in accordance with employer's instructions and as required by occupational
health and safety regulations.
Noise hazards
Unprotected exposure to high noise levels can cause permanent, disabling, hearing loss and other problems, such as tinnitus
(ringing, buzzing, whistling or humming in the ears).
Risk assessment and implementation of appropriate controls for these hazards are essential.
⎯Appropriate controls to reduce the risk may include actions such as damping materials to prevent workpieces from
“ringing”.
Use hearing protection in accordance with employer's instructions and as required by occupational health and safety
regulations.
Operate and maintain the assembly power tool for threaded fasteners as recommended in the instruction handbook, to
prevent an unnecessary increase in noise levels.
If the assembly power tool for threaded fasteners has a silencer, always ensure it is in place and in good working order
when the assembly power tool for threaded fasteners is operating.
Select, maintain and replace the consumable/inserted tool as recommended in the instruction handbook, to prevent an
unnecessary increase in noise.
Vibration hazards

5
Exposure to vibration can cause disabling damage to the nerves and blood supply of the hands and arms.
Keep the hands away from the nutrunner sockets.
Wear warm clothing when working in cold conditions and keep your hands warm and dry.
If you experience numbness, tingling, pain or whitening of the skin in your fingers or hands, stop using the assembly power
tool for threaded fasteners, tell your employer and consult a physician.
Operate and maintain the assembly power tool for threaded fasteners as recommended in the instruction
handbook, to prevent an unnecessary increase in vibration levels.
Do not use worn or ill-fitting sockets or extensions, as this is likely to cause a substantial increase in vibration.
Select, maintain and replace the consumable/inserted tool as recommended in the instruction handbook, to prevent an
unnecessary increase in vibration levels.
Sleeve fittings should be used where practicable.
Support the weight of the tool in a stand, tensioner or balancer, if possible.
Hold the tool with a light but safe grip, taking account of the required hand reaction forces, because the risk from vibration
is generally greater when the grip force is higher.
Additional safety instructions for pneumatic power tools
Air under pressure can cause severe injury:
always shut off air supply, drain hose of air pressure and disconnect tool from air supply when not in use, before changing
accessories or when making repairs;
never direct air at yourself or anyone else.
Whipping hoses can cause severe injury. Always check for damaged or loose hoses and fittings.
Cold air shall be directed away from the hands.
Do not use quick-disconnect couplings at tool inlet for impact and air-hydraulic impulse wrenches. Use hardened steel (or
material with comparable shock resistance) threaded hose fittings.
Whenever universal twist couplings (claw couplings) are used, lock pins shall be installed and whipcheck safety cables
shall be used to safeguard against possible hose-to-tool and hose-and-hose connection failure.
Do not exceed the maximum air pressure stated on the tool.
For torque-control and continuous-rotation tools, the air pressure has a safety critical effect on performance. Therefore,
requirements for length and diameter of the hose shall be specified.
Never carry an air tool by the hose.
Air supply
1. Ensure wrench air valve (or trigger) is in the “off” position before connecting to the air supply.
2. It will require air pressure of 90psi, and air flow according to specification.
3. WARNING! Ensure the air supply is clean and does not exceed 90psi while operating the wrench. Too high an
air pressure and unclean air will shorten the product life due to excessive wear, and may be dangerous causing
damage or personal injury.
4. Drain the air tank daily. Water in the air line will damage the wrench.
5. Clean air inlet filter weekly.
6. Line pressure should be increased to compensate for unusually long air hoses (over 8 metres). The hose diameter
should be 3/8” I.D.
7. Keep hose away from heat, oil and sharp edges. Check hose for wear, and make certain that all connections are
secure.
Lubrication
An automatic in-line filter-regulator-lubricator is recommended (Fig4) as it increases tool life and keeps the tool in

6
sustained operation. The in-line lubricator should be regularly checked and filled with air tool oil.
Proper adjustment of the in-line lubricator is performed by placing a sheet of paper next to the exhaust ports and
holding the throttle open approximately 30 seconds. The lubricator is properly set when a light stain of oil collects on
the paper. Excessive amounts of oil should be avoided.
In the event that it becomes necessary to store the tool for an extended period of time (overnight, weekend, etc.), it
should receive a generous amount of lubrication at that time. The tool should be run for approximately 30 seconds to
ensure oil has been evenly distributed throughout the tool. The tool should be stored in a clean and dry environment.
zIt is most important that the tool be properly lubricated by keeping the air line lubricator filled and correctly
adjusted. Without proper lubrication the tool will not work properly and parts will wear prematurely.
zUse the proper lubricant in the air line lubricator. The lubricator should be of low air flow or changing air flow
type, and should be kept filled to the correct level. Use only recommended lubricants, specially made for
pneumatic applications. Substitutes may harm the rubber compounds in the tools, O-rings and other rubber parts.
IMPORTANT!!!
If a filter/regulator/lubricator is not installed on the air system, air operated tools should be lubricated at least once a
day or after 2 hours work with 2 to 6 drops of oil, depending on the work environment, directly through the male
fitting in the tool housing.
Loading and operation
)WARNING: Ensure you read, understand and apply safety instructions before use.
1. Only use impact sockets which are specifically designed for use with impact wrench.
2. Connect the wrench to the air hose .
3. Place the socket over the subject nut and depress the trigger to operate the wrench.
4. To change direction push the button at the top of the handle. Direction of .R. for reverse and “F” for forward
5. The flow of air may be regulated by adjusting flow valve at the base of the handle.
6. Ensure the air supply is clean and does not exceed 90psi while operating the wrench. Too high an air pressure and
unclean air will shorten the product life due to excessive wear, and may be dangerous causing damage or personal
injury.
7. Make children away from the tools and workplaces.
DO NOT use any additional force upon the wrench in order to remove a nut.
DO NOT allow wrench to free run for an extended period of time as this will shorten its life.

7
※ Maintenance
)WARNING: Disconnect wrench from air supply before changing accessories, servicing or performing
maintenance. Replace or repair damaged parts. Use genuine parts only. Non-authorised parts may be dangerous.
1. Lubricate the air wrench daily with a few drops of air tool oil dripped into the air inlet
2 DO NOT use worn, or damaged sockets.
3. Loss of power or erratic action may be due to the following:
a) Excessive drain on the air line. Moisture or restriction in the air pipe. Incorrect size or type of hose
connectors. To remedy check the air supply and follow instructions.
b) Grit or gum deposits in the wrench may also reduce performance. If your model has an air strainer (located
in the area of the air inlet), remove the strainer and clean it.
4. When not in use, disconnect from air supply, clean wrench and store in a safe, dry, childproof location.
※ Trouble Shooting
The following form lists the common operating system with problem and solutions. Please read the form
carefully and follow it.
)WARNING:If any of the following symptoms appears during your operating, stop using the tool immediately,
or serious personal injury could result. Only a qualified persons or an authorized service center can perform repairs or
replacement of tool.
Disconnect tool from air supply before attempting repair or adjustment. When replacing O-rings or Cylinder,
lubricate with air tool oil before assembly.
PROBLEMS POSSIBLE CAUSES REMEDIES
Tool runs at normal speed
but loses under load
■ Motor parts worn.
■Cam clutch worn or sticking
due to lack of lubricant.
■Lubricating clutch housing.
■Check for excess clutch oil. Clutch cases need
only be half full. Overfilling
can cause drag on high speed clutch parts, ie. a
typical oiled/lubricated wrench requires 1⁄2
ounce of oil.
GREASE LUBRICATED:NOTE: Heat
usually indicates insufficient grease in chamber.
Severe operating conditions may require more
frequent lubrication.
Tool runs slowly. Air flows
slightly from exhaust
■Motor parts jammed with dirt
particles
■Power regulator in closed
position
■Air flow blocked by dirt.
■Check air inlet filter for blockage.
■Pour air tool lubricating oil into air inlet as per
instructions.
■Operate tool in short bursts quickly reversing
rotation back and forth where applicable.
■Repeat above as needed.
Tools will not run. Air flows
freely from exhaust
■One or more motor vanes
stuck due to material build up.
■Pour air tool lubricating tool into air inlet.
■Operate tool in short bursts of forward and/or
reverse rotation where applicable.
■Tap motor housing gently with plastic mallet.
■Disconnect supply. Free motor by rotating
drive shank manually where applicable
Tool will not shut off
■‘O’ rings throttle valve
dislodged from seat inlet valve.
■Replace ‘O’ ring.
Note: Repairs should be carried out by a qualified person.
8
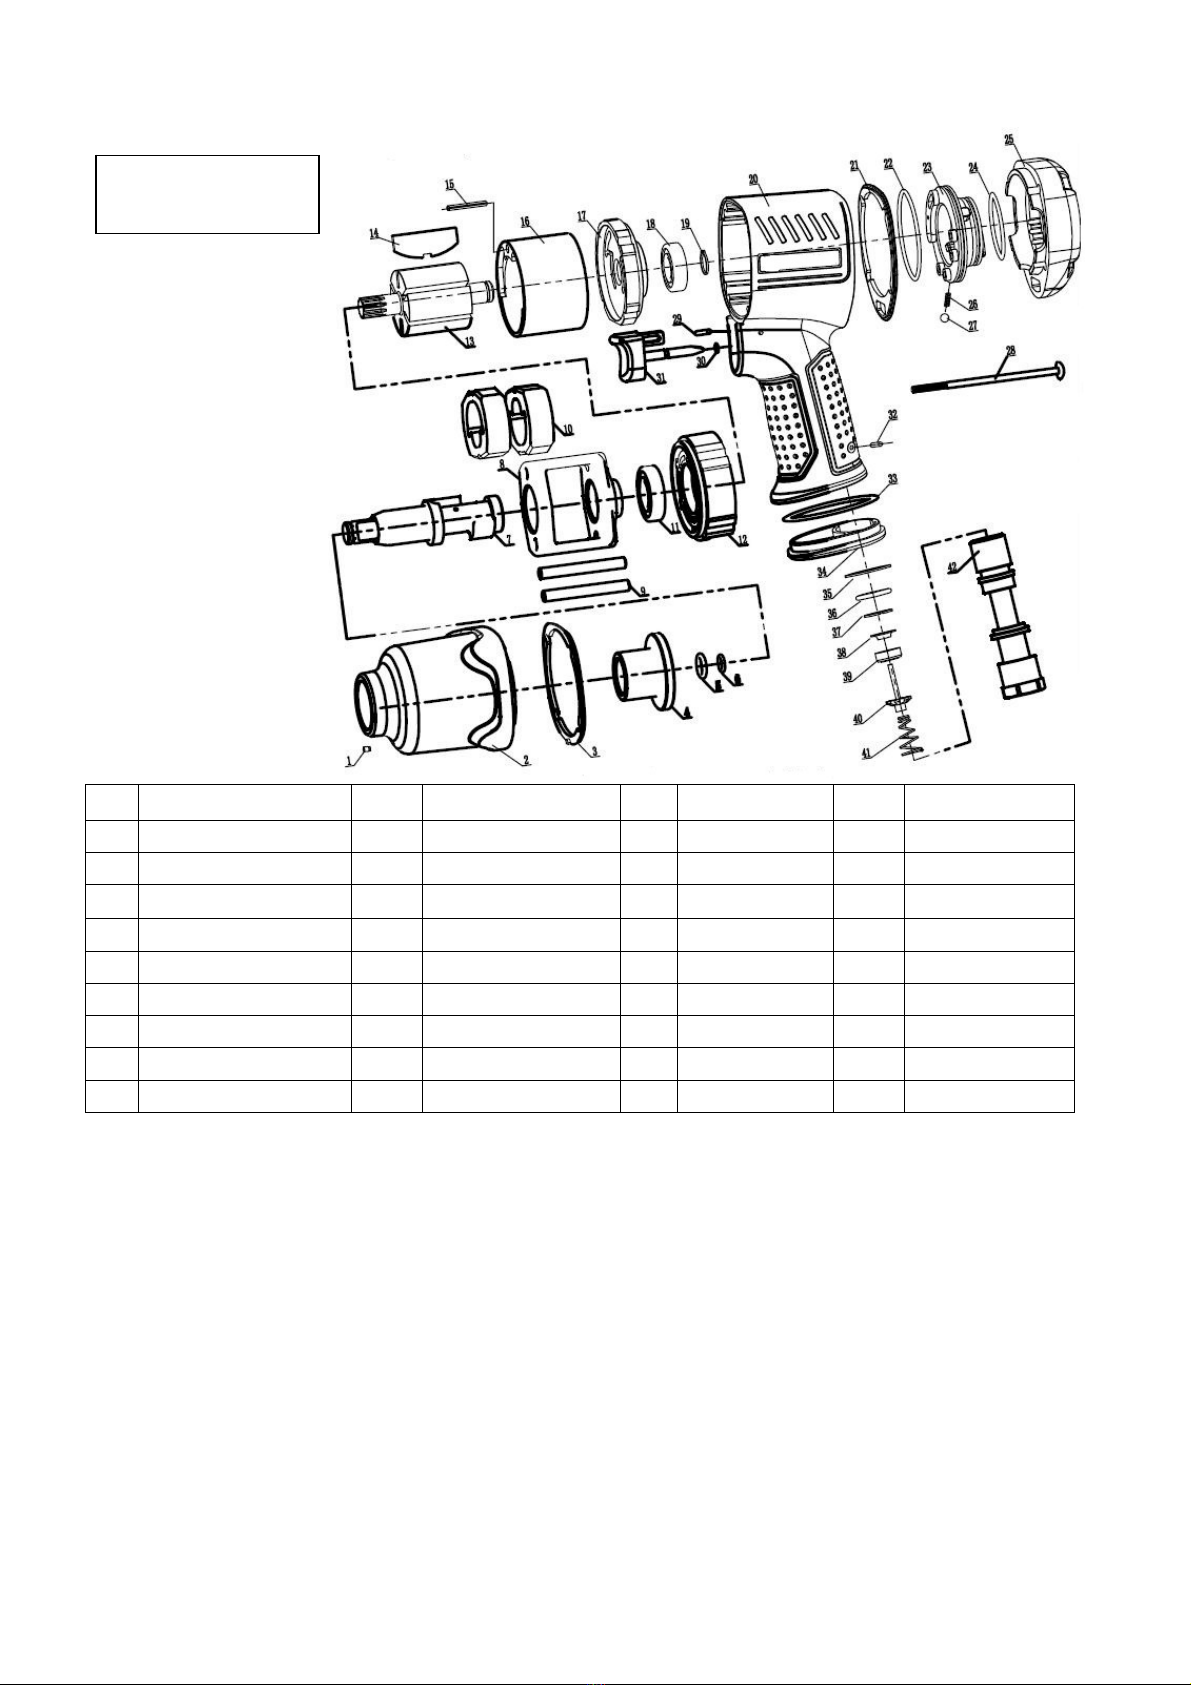
※ Parts list
No. Description No. Description No. Description No. Description
1 Air Inlet plug 10 Gunbody 19 Cylinder 27 Closing cap
2 Valve Spring 11 Oilite bushing 20 Rotor 28 Bolt
3 Valve 12 Transmission shaft 21 Blade 29 O-ring
4 Valve stem 13 Hammering rod 22 Rear cover 30 O-ring
5 Rear bolt 14 Hammer case 23 Cylinder pin 31 Reversal knob
6 Exhaust plate 15 Hammer extension 24 Bearing 32 Level spring
7 Elastic cylindrical pin 16 Gasket 25 Retainer ring 33 Steel ball
8 Trigger 17 Bearing 26 Sleeve 34 Bolt
9 socket head screw 18 Front cover
Note: Please contact with us if customer need to know parts material .
If you need spare parts of this model, pls feel free to contact us or the distributor where you bought this tool. Tks!
EC DECLARATION OF CONFORMITY
Business name of the manufacturer: Zhejiang Rongpeng Air Tools Co., Ltd.
full address of the manufacturer: Shuiquetou Village, Pengjie Town, Luqiao District, Taizhou City, Zhejiang 318057,
P.R. China
We declaring that the machinery
product name: Air Impact Wrech model: RP17407 type: Pneumatic
fulfils all the relevant provisions of Directives 2006/42/EC
based on EC type-examination of
Name, address and identification number of the notified body:
TÜV Rheinland LGA Products GmbH
Tillystrasse 2, 90431 Nürnberg, Germany 0197
and tested in accordance with below standards EN ISO 11148-6:2011
Issue date:28.06.2012
Version number:V1
Table of contents
Other Aeropro Impact Driver manuals


Popular Impact Driver manuals by other brands


Hitachi
Hitachi WR22SA - 3/4" Impact Wrench parts list

stayer
stayer ISL120K operating instructions

Paoli Avvitatori
Paoli Avvitatori DP 635 2 Operating and maintenance manual

Stanley
Stanley Fatmax SFMCF800 Original instructions

Makita
Makita DTD137 instruction manual

Hitachi
Hitachi WH10DL Handling instructions