Aeropro AP7431 Instruction Manual

1
Air Impact Wrench 7431 Http://www.aeroprotools.com
Operating Instruction and safety manual
1/2”Air Impact Wrench(Twin Hammer)
Model No.: 7431
Residual risks
Even when the tool is used as prescribed it is not possible to eliminate all residual risk factors. The
following hazards may arise in connection with the tool’s construction and design:
1. Damage to lungs if an effective dust mask is not worn.
2. Damage to hearing if effective hearing protection is not worn.
3. Health defects resulting from vibration emission if the power tool is being used over longer period of time or not
adequately managed and properly maintained.
4. Wear eye protection.
IMPORTANT:
Upon receipt of the product,
read and follow all safety rules,
operating instructions before first use it.
And retain this manual for future reference.
2013
2014

2
Air Impact Wrench 7431 Http://www.aeroprotools.com
Technical Data
Square drive……………………………………………………………………………………1/2”(13mm)
Capacity Bolt Size ……………………………………………………………………………...5/8”(16mm)
Free speed………………………………………………………………………………………7,500rpm
Max torque……………………………………………………………………………………..420ft/lb(567N.m)
Avg. air consumption…………………………………………….…………………………..5 cfm(142.5 l/min)
Operating pressure……………………………………………………………………………...90psi(6.3bar)
Air inlet size…………………………………………………………………………………….1/4”
Air hose …………………………………………………………………………………………3/8”ID
Weight……………………………………………………………………..…………………...5.70Lbs(2.6kgs)
A weighted sound pressure level……………………………………………………………….92.6dB(A)
Sound power level………………………………………………………………………………103.6dB(A)
Vibration in the handle………………………………………………………….…….………..2.8m/s2
Important Safety Rules
1 When using the tool always wear safety goggles, an appropriate face mask or respiratory equipment.
2. Always ensure machine is switched off before connecting to air supply.
3. Disconnect any machine from the air supply before changing blades or discs, and before servicing any type of
machine.
4. Always keep your air tool clean and lubricated. Daily lubrication is essential to avoid internal corrosion and possible
failure.
5. Do not wear watches, rings bracelets or loose clothing when using air tools.
6. Using only light weight coil hoses from a tool to the wall or compressor coupling. Do not fit quick change couplings
onto the machine as vibration can cause the coupling to fail.
7. Do not overload the machine. Allow the tool to operate at its optimum speed for maximum efficiency.
8. Do not increase the air pressure above the manufacturers recommended level, as excessive overload can cause the
machine casing to split. Also this creates excessive wear on moving parts and possible failure.
9. In the interests of safety and possible damage to the machine/operator, always ensure that the machine has stopped
before putting it down after use.
10. Always ensure that the work piece is firmly secured leaving both hands free to control the machine.
11. Always ensure that the accessories such as blades, discs, sockets, etc. are designed for use with the machine. Also
correctly and securely fastened before connecting the machine to the air supply.
Operating Instruction
Description
Durable twin hammer impact wrench mechanism,Pressure-feed lubrication,Adjustable power regulator,Variable
speed,High Torque, Front exhaust,Sheer power and performance features to tackle the toughest jobs with ease and
proven durability and economy.

3
Air Impact Wrench 7431 Http://www.aeroprotools.com
Air supply
1. Ensure wrench air valve (or trigger) is in the “off”position before connecting to the air supply.
2. You will require an air pressure of 90psi, and an air flow according to specification.
3. WARNING! Ensure the air supply is clean and does not exceed 90psi while operating the wrench. Too high an air
pressure and unclean air will shorten the product life due to excessive wear, and may be dangerous causing damage
or personal injury.
4. Drain the air tank daily. Water in the air line will damage the wrench.
5. Clean air inlet filter weekly.
6. Line pressure should be increased to compensate for unusually long air hoses (over 8 metres). The hose diameter
should be 3/8”I.D.
7. Keep hose away from heat, oil and sharp edges. Check hose for wear, and make certain that all connections are
secure.
Lubrication
An automatic in-line filter-regulator-lubricator is recommended (Fig4) as it increases tool life and keeps the tool in
sustained operation. The in-line lubricator should be regularly checked and filled with air tool oil.
Proper adjustment of the in-line lubricator is performed by placing a sheet of paper next to the exhaust ports and holding
the throttle open approximately 30 seconds. The lubricator is properly set when a light stain of oil collects on the paper.
Excessive amounts of oil should be avoided.
In the event that it becomes necessary to store the tool for an extended period of time (overnight, weekend, etc.), it
should receive a generous amount of lubrication at that time. The tool should be run for approximately 30 seconds to
ensure oil has been evenly distributed throughout the tool. The tool should be stored in a clean and dry environment.
It is most important that the tool be properly lubricated by keeping the air line lubricator filled and correctly
adjusted. Without proper lubrication the tool will not work properly and parts will wear prematurely.
Use the proper lubricant in the air line lubricator. The lubricator should be of low air flow or changing air flow type,
and should be kept filled to the correct level. Use only recommended lubricants, specially made for pneumatic
applications. Substitutes may harm the rubber compounds in the tools O-rings and other rubber parts.
IMPORTANT!!!
If a filter/regulator/lubricator is not installed on the air system, air operated tools should be lubricated at least once a day
or after 2 hours work with 2 to 6 drops of oil, depending on the work environment, directly through the male fitting in
the tool housing.

4
Air Impact Wrench 7431 Http://www.aeroprotools.com
Loading and operation
WARNING:Ensure you read, understand and apply safety instructions before use.
1. Only use impact sockets which are specifically designed for use with a impact wrench.
2. Connect the wrench to the air hose .
3. Place the socket over the subject nut and depress the trigger to operate the wrench.
4. To change direction push the button at the top of the handle. Direction of .R. for reverse and “F”for forward
5. The flow of air may be regulated by adjusting flow valve at the base of the handle.
DO NOT use any additional force upon the wrench in order to remove a nut.
DO NOT allow wrench to free run for an extended period of time as this will shorten its life.
Maintenance
WARNING:Disconnect wrench from air supply before changing accessories, servicing or performing
maintenance. Replace or repair damaged parts. Use genuine parts only. Non-authorised parts may be dangerous
1. Lubricate the air wrench daily with a few drops of air tool oil dripped into the air inlet
2. DO NOT use worn, or damaged sockets.
3. Loss of power or erratic action may be due to the following:
a) Excessive drain on the air line. Moisture or restriction in the air pipe. Incorrect size or type of hose connectors. To
remedy check the air supply and follow instructions .
b) b) Grit or gum deposits in the wrench may also reduce performance. If your model has an air strainer (located in the
area of the air inlet), remove the strainer and clean it..
4. When not in use, disconnect from air supply, clean wrench and store in a safe, dry, childproof location.

5
Air Impact Wrench 7431 Http://www.aeroprotools.com
Trouble Shooting
The following form lists the common operating system with problem and solutions. Please read the form
carefully and follow it.
WARNING: If any of the following symptoms appears during your operating, stop using the tool immediately, or
serious personal injury could result. Only a qualified persons or an authorized service center can perform repairs or
replacement of tool.
Disconnect tool from air supply before attempting repair or adjustment. When replacing O-rings or Cylinder,
lubricate with air tool oil before assembly.
PROBLEMS
POSSIBLE CAUSES
REMEDIES
Tool runs at normal speed
but loses under load
■Motor parts worn.
■Cam clutch worn or sticking
due to lack of lubricant.
■Lubricating clutch housing.
■Check for excess clutch oil. Clutch cases need
only be half full. Overfilling
can cause drag on high speed clutch parts, ie. a
typical oiled/lubricated wrench requires 1⁄2
ounce of oil.
GREASE LUBRICATED:NOTE: Heat
usually indicates insufficient grease in chamber.
Severe operating conditions may require more
frequent lubrication.
Tool runs slowly. Air flows
slightly from exhaust
■Motor parts jammed with
dirt particles
■Power regulator in closed
position
■Air flow blocked by dirt.
■Check air inlet filter for blockage.
■Pour air tool lubricating oil into air inlet as
per instructions.
■Operate tool in short bursts quickly reversing
rotation back and forth where applicable.
■Repeat above as needed.
Tools will not run. Air flows
freely from exhaust
■One or more motor vanes
stuck due to material build up.
■Pour air tool lubricating tool into air inlet.
■Operate tool in short bursts of forward and/or
reverse rotation where applicable.
■Tap motor housing gently with plastic mallet.
■Disconnect supply. Free motor by rotating
drive shank manually where applicable
Tool will not shut off
■„O‟ rings throttle valve
dislodged from seat inlet valve.
■Replace „O‟ ring.
Note: Repairs should be carried out by a qualified person.
6
Air Impact Wrench 7431 Http://www.aeroprotools.com
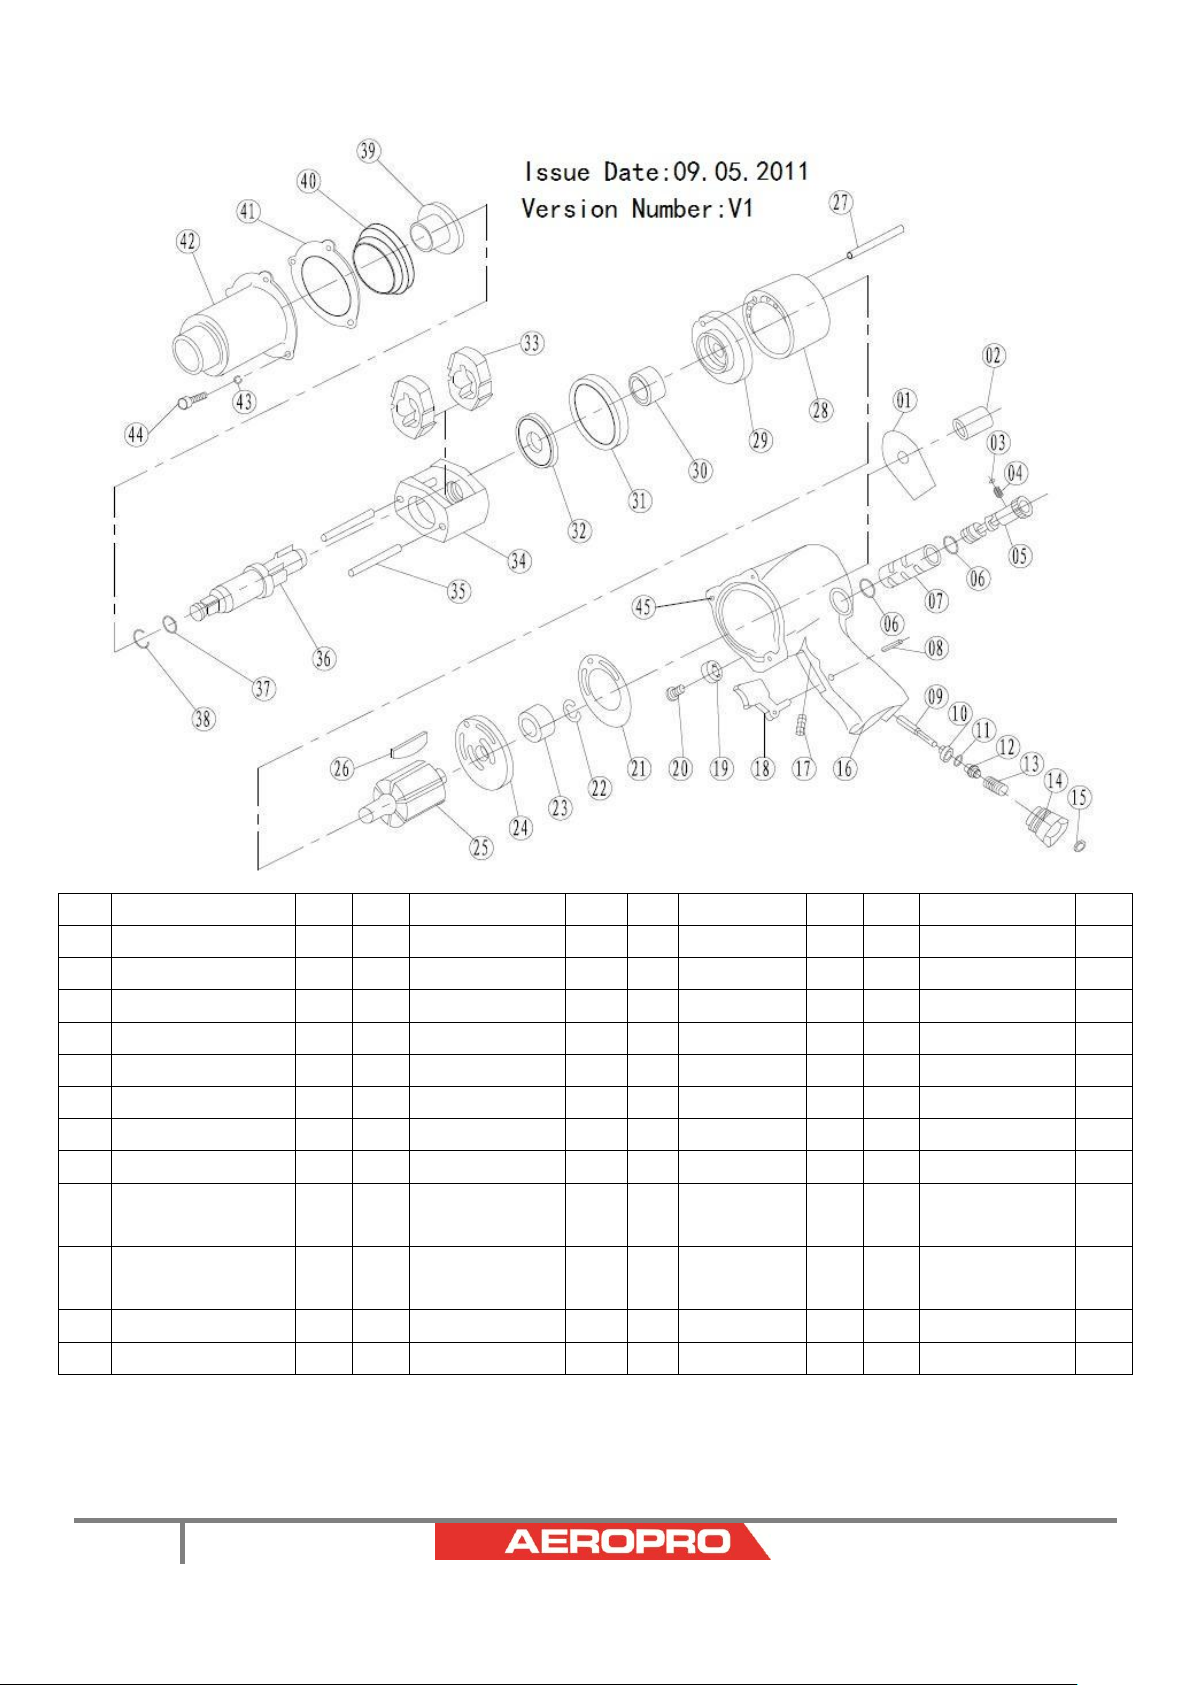
Exploding view & Parts list
Note: Please contact with us if customer need to know parts material .
If you need spare parts of this model, pls feel free to contact us or the distributor where you bought this tool. Tks!
No.
Description
Qty
NO
Description
Qty
No.
Description
Qty
NO
Description
Qty
1
Warning Label
1
13
Inlet Spring
1
25
Rotor
1
37
O-ring
1
2
Oil Inlet cup
1
14
Air Inlet Plug
1
26
Rotor Blade
6
38
Retainer O-ring
1
3
Steel ball
1
15
Dust Free Cover
1
27
Pin
1
39
Anvil Bushing
1
4
Adj.Spring
1
16
Housing
1
28
Cylinder
1
40
Washer
1
5
Regulating Screw
1
17
Bolt
1
29
Front Plate
1
41
Gasket
1
6
O-ring
2
18
Trigger
1
30
Pin
1
42
Hammer Cage
1
7
Valve Sleeve
1
19
Adj. Screw Cap
1
31
Gasket
2
43
Washer
3
8
Pin
1
20
Bolt
1
32
Washer
1
44
Bolt
3
9
Valve Stem
1
21
Seal Washer
1
33
Hammer
Dog
2
45
Helicoil
3
10
Throttle valve
bushing
1
22
Retainer ring
1
34
Hammer
Cage
1
11
O-ring
1
23
Bearing
1
35
Hammer Pin
2
12
Valve stem Screw
1
24
End Plate
1
36
Anvil
1
This manual suits for next models
1
Table of contents
Other Aeropro Impact Driver manuals


Popular Impact Driver manuals by other brands

Makita
Makita DTD134 instruction manual

HIKOKI
HIKOKI WH 18DBSL Handling instructions

Hitachi
Hitachi WH14DBL Handling instructions

Chicago Pneumatic
Chicago Pneumatic CP6910-P24 Series Operator's manual

Sunex Tools
Sunex Tools SX951 operating instructions

Ingersoll-Rand
Ingersoll-Rand 2135Qi Product information


