Aeropro CN45RA User manual

1
COIL ROOFING NAILER CN45RA
OPERATING INSTRUCTIONS FOR FASTENER DRIVING TOOLS OPERATED BY
COMPRESSED AIR
AIR-POWERED COIL ROOFING NAILER
Model No.: CN45RA
Residual risks
Even when the tool is used as prescribed it is not possible to eliminate all residual risk factors. The
following hazards may arise in connection with the tool’s construction and design:
Damage to lungs if an effective dust mask is not worn.
Damage to hearing if effective hearing protection is not worn.
Health defects resulting from vibration emission if the power
tool is being used over longer period of time or not adequately managed and properly maintained.
Wear eye protection.
2019
IMPORTANT:
Read all safety rules and operating Instructions carefully before first use it.
Keep this Manual for future reference.
TABLE OF CONTENTS:QUICK START GUIDE
TECHNICAL SPECIFIACTIONS
SAFETY GUIDELINES
KEY PARTS DIAGRAM
IMPORTANT INFORMATION
TYPES OF FASTENERS
OPERATING INSTRUCTIONS
MAINTENANCE
TROUBLESHOOTING
EXPLODED VIEW
PARTS LIST
2
COILROOFINGNAILERCN45RA
Technical Specifications
FastenerDetails:
15°7/8"to1-3/4"WireCollatedCoilRoofingNails
Operatingpressure:
70-115PSI(4.8to7.9bar)
Maximumpressure:
120PSI(8.3bar)
Airinlet:
1/4”(6.35mm)
Dimensions:
11.14”x11.02”x4.52”(283x280x115mm)
Weight:
2.5kg(5.5Lbs)
SCFM:StandardCubicfeetperminute(thevolumetricflowrateofaircorrectedtostandardizedconditionsof
temperatureandpressure).
Environmental Responsibilities
Pleaserecycleunwantedmaterialsinsteadofdisposingofthemaswaste.Alltools,hosesandpackagingshould
be sorted, taken to the local recycling centre and disposed of in an environmentally safe way.
Safetyguidelines
Thismanualcontainsinformationthatrelatestoprotectingpersonalsafetyandpreventingequipment
problems.itisveryimportanttoreadthismanualcarefullyandunderstanditthoroughlybeforeusingthe
product.thesymbolslistedbelowareusedtoindicatethisinformation.
DANGER!
Potentialhazardthatwillresultinseriousinjuryorlossoflife.
WARRNING!
Potentialhazardthatcouldresultinseriousinjuryorlossoflife.
CAUTION!
Potentialhazardthatmayresultinmoderateinjuryordamagetoequipment.
Note-Theword“note”isusedtoinformthereaderofsomethinghe/sheneedstoknowaboutthetool.
PERSONALSAFETY
These precautions are intended for the personal safety of the user and others working with the user. please take
timetoreadandunderstandthem.
DANGER!
Potentialhazardthatwillresultinseriousinjuryorlossoflife.
Keepchildrenawayfromtheworkarea.Donotallowchildrentohandlepowertools.
Keepairhoseawayfromheat,oil,andsharpedges.Checkairhoseforwearbeforeeachuseandensurethatall
connectionsareproper.Alwaysensurethattheworkpieceisfirmlysecuredleavingbothhandsfreetocontrolthe
3
COIL ROOFING NAILER CN45RA
tool.Always ensure that the tool has stopped before putting it down after use, in the interest of safety and to
prevent possible damage to the tool/user.
Keep proper footing at all times in order to ensure correct balance.
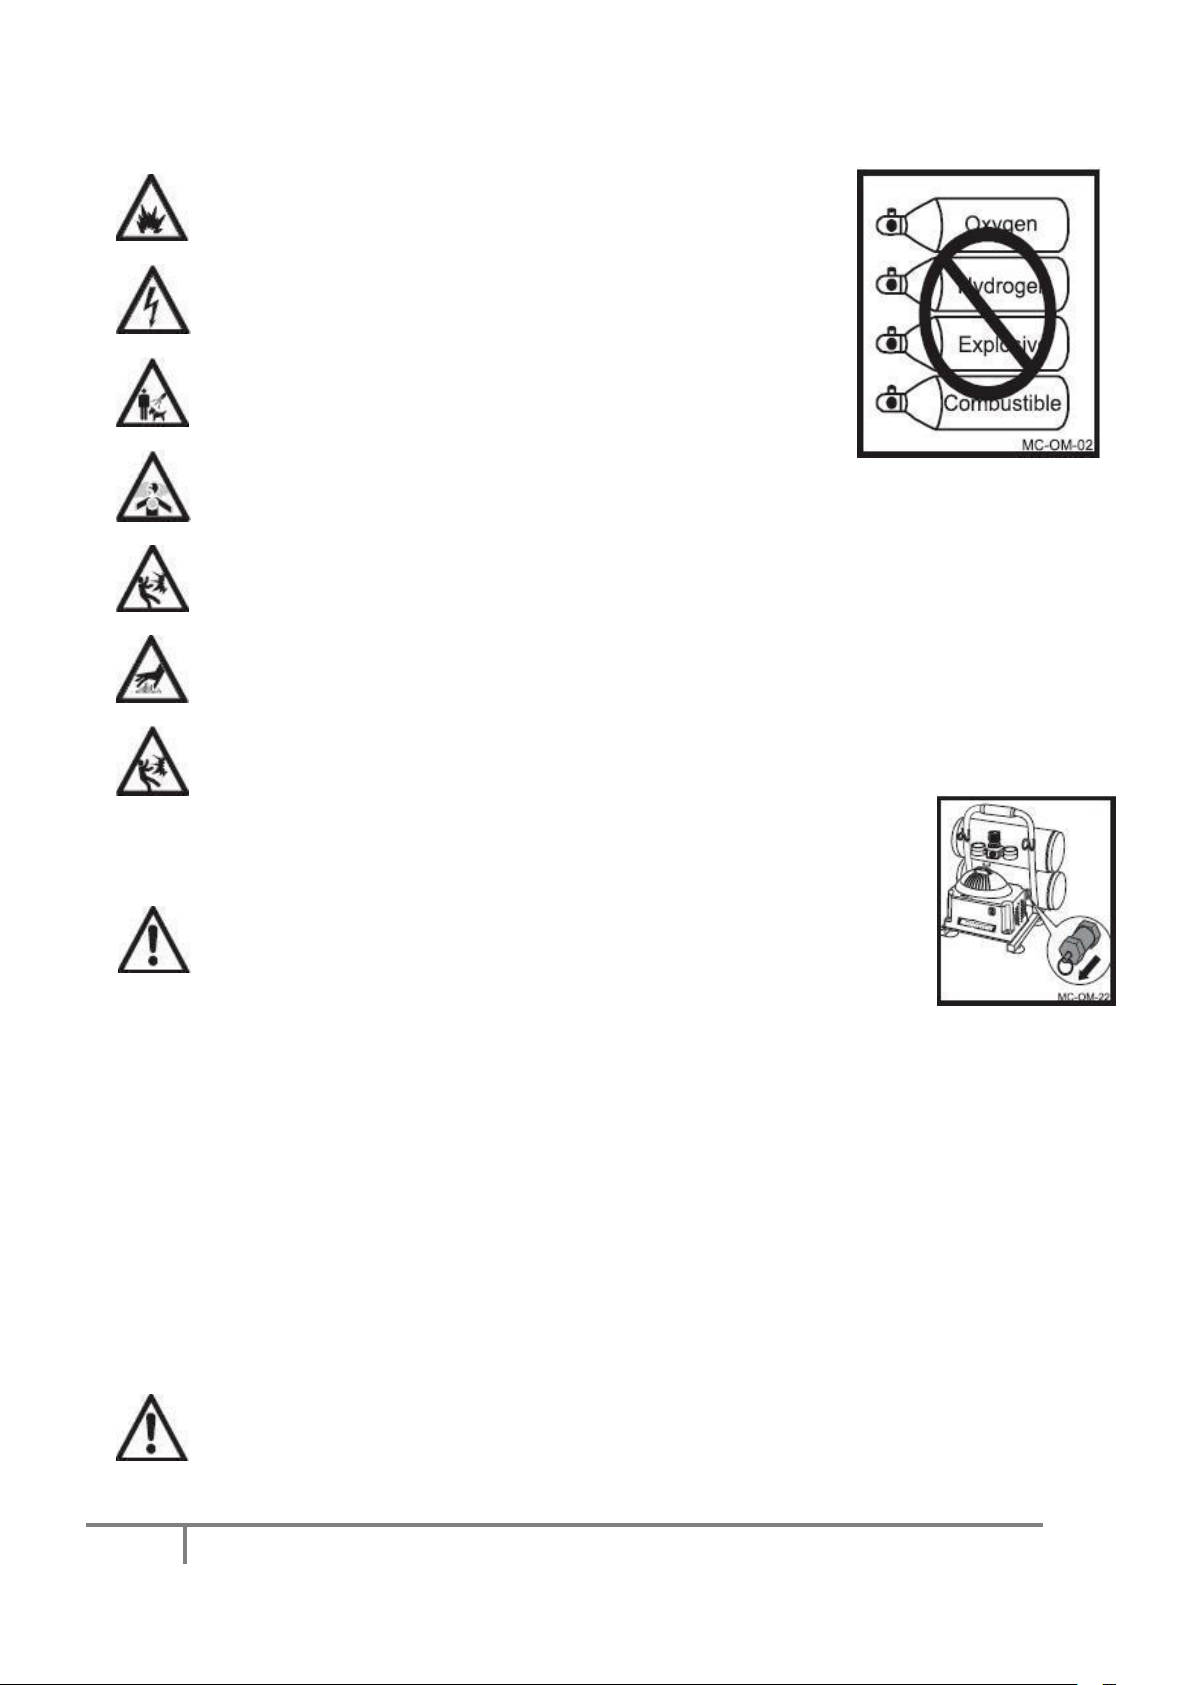
Do not use oxygen or any other combustible or bottled gas to power
air-powered
tools. Failure to observe this warning can cause explosion and serious personal
Use a minimum of 25’(7.6m) of hose to connect the tools to the compressor.
Failure to comply will result in serious injury or loss of life.
Risk of electric shock: Do not expose a compressor to rain. Store it
indoors. Disconnect
the compressor from power source before servicing. Compressor must be
grounded. Do not use grounding adaptor.
Risk of personal injury: Do not direct compressed air from the air hose toward the user or other
personnel. Risk of inhalation: Never directly inhale the air produced by the compressor.
Risk of bursting: Do not adjust the pressure switch or safety valve for any reason. They have been
preset at the factory for this compressor’s maximum pressure. Tampering with the pressure switch or
the safety valve
Risk of burns: The pump and the manifold generate high temperatures. In order to avoid burns or
other injuries, do not touch the pump, the manifold or the transfer tube while the compressor is running.
Allow the parts to cool down before handling or servicing. Keep children away from the compressor at
all times.
Risk of bursting: Make sure the regulator is adjusted so that the compressor outlet
pressure is set lower than the maximum operating pressure of the tool. Before
starting
the compressor, pull the ring on the safety valve to make sure the valve moves
freely.Drain water from tank after each use. Do not weld or repair tank. Relieve all
pressure in the hose before removing or attaching accessories.
WARNING!
Potential hazard that could result in serious injury or loss of life.
Do not allow unskilled or untrained individuals to operate the air powered tools.
Do not use the air powered tools for any task other than that it is designed to perform.
Do not use the air tools unless you have been trained to do so. Only a qualified person should use the tool.
Locate the compressor in a well-ventilated area for cooling, and must be a minimum of 12”(31cm) away from the nearest wall.
Protect the air hose and the power cord from damage and puncture. Inspect them for weak or worn spots every week, and replace them if
necessary . Always wear hearing protection when using the air compressor. Failure to do so may result in hearing
loss.
Do not carry the compressor while it is running.
Do not operate the compressor if it is not in a stable position.
Do not operate the compressor on a rooftop or in an elevated position that could allow the unit to fall or be tipped
over. Always replace a damaged gauge before operating the unit again.
CAUTION!
Potential hazard that may result in moderate injury or damage to equipment.
Always ensure that the tool has stopped before connecting to the air supply.

4
COIL ROOFING NAILER CN45RA
Do not wear watches, rings, bracelets, or loose clothing when using any air tool.
Do not overload the tool. Allow the tool to operate at its optimum speed for maximum efficiency.
Do not use a tool that is leaking air, with missing or damaged parts, or that requires repairs. Verify that all screws
are securely tightened.
For optimal safety and tool performance, inspect the tool daily in order to ensure free movement of the trigger,
safety mechanisms, and springs.
Always keep your air tools clean and lubricated. Daily lubrication is essential to avoid internal corrosion and
possible failures.
Ensure the floor is not slippery and wear non-slip shoes. Floors should be kept clean can clear.
Always follow all workshop safety rules, regulations, and conditions when using the tools.
Carry the tool by the handle only. Do not carry the tools with a finger on the trigger. Do not carry the tool by the
hose, magazine or any other parts.
Do not use the tool near or below freezing temperatures, as doing so may cause tool failure.
Do not store the tool in a freezing environment to prevent ice formation on the operating valves of the tool, as
doing so may cause tool failure.
Handling and storage of oil: Use with adequate ventilation. Avoid contact of oil with eyes, skin, and clothing. Avoid
breathing spray or mist. Store in a tightly closed container in a cool, dry, well-ventilated area free from
incompatible substances.
CAUTION!
Potential hazard that may result in moderate injury or damage to equipment.
Disconnect tool from the air supply and turn off the compressor before performing any
maintenance, or changing accessories, when the tool is not in use, when it is being handed
to another person, and when it is left unattended. Failure to comply may result in
moderate injury or damage to equipment.
Use safety goggles and ear protection:
Wear safety glasses with side shields when operating the tool/compressor and
verify that others in the work area are also wearing safety glasses.
Requirements and must provide protection from flying particles from the front and the sides.
Air powered tools are loud and the sound can cause hearing damage. Always wear ear
protection to
prevent hearing damage and loss. Failure to comply may result in moderate injury.
NOTE: Recycle unwanted materials father than disposing of them as waste. Sort the tools, hoses, and package
into specific categories and take to the local recycling centre or dispose of them in an environmentally safe way.

5
COIL ROOFING NAILER CN45RA
UNPACKING
-If you discover the stapler is damaged after you have signed for delivery, please immediately where you buy for
advice.
-Save the containers and all packing materials for possible inspection by the carrier or its agent. Otherwise, filing
a freight claim can be difficult. When you are completely satisfied with the condition of the shipment, you should
inventory the equipment.
-After you open the box, you should find the following. Model CN45RA Inventory (Figure 1)
Hex Wrench 3mm
Hex Wrench 4mm
Safety Goggles
Oil Pot
KEY PARTS DIAGRAM
1
Exhaust Cover
6
Magazine
2
Gun Body
7
Shingle Guide
3
Drive Guide
8
Air Inlet Plug
4
Nail Guide
9
Handle
5
Magazine Release Knob
10
Trigger
1
2
3
4
5
6
7
8
9
10
6
COILROOFINGNAILERCN45RA
IMPORTANT INFORMATION
Compatible compressors
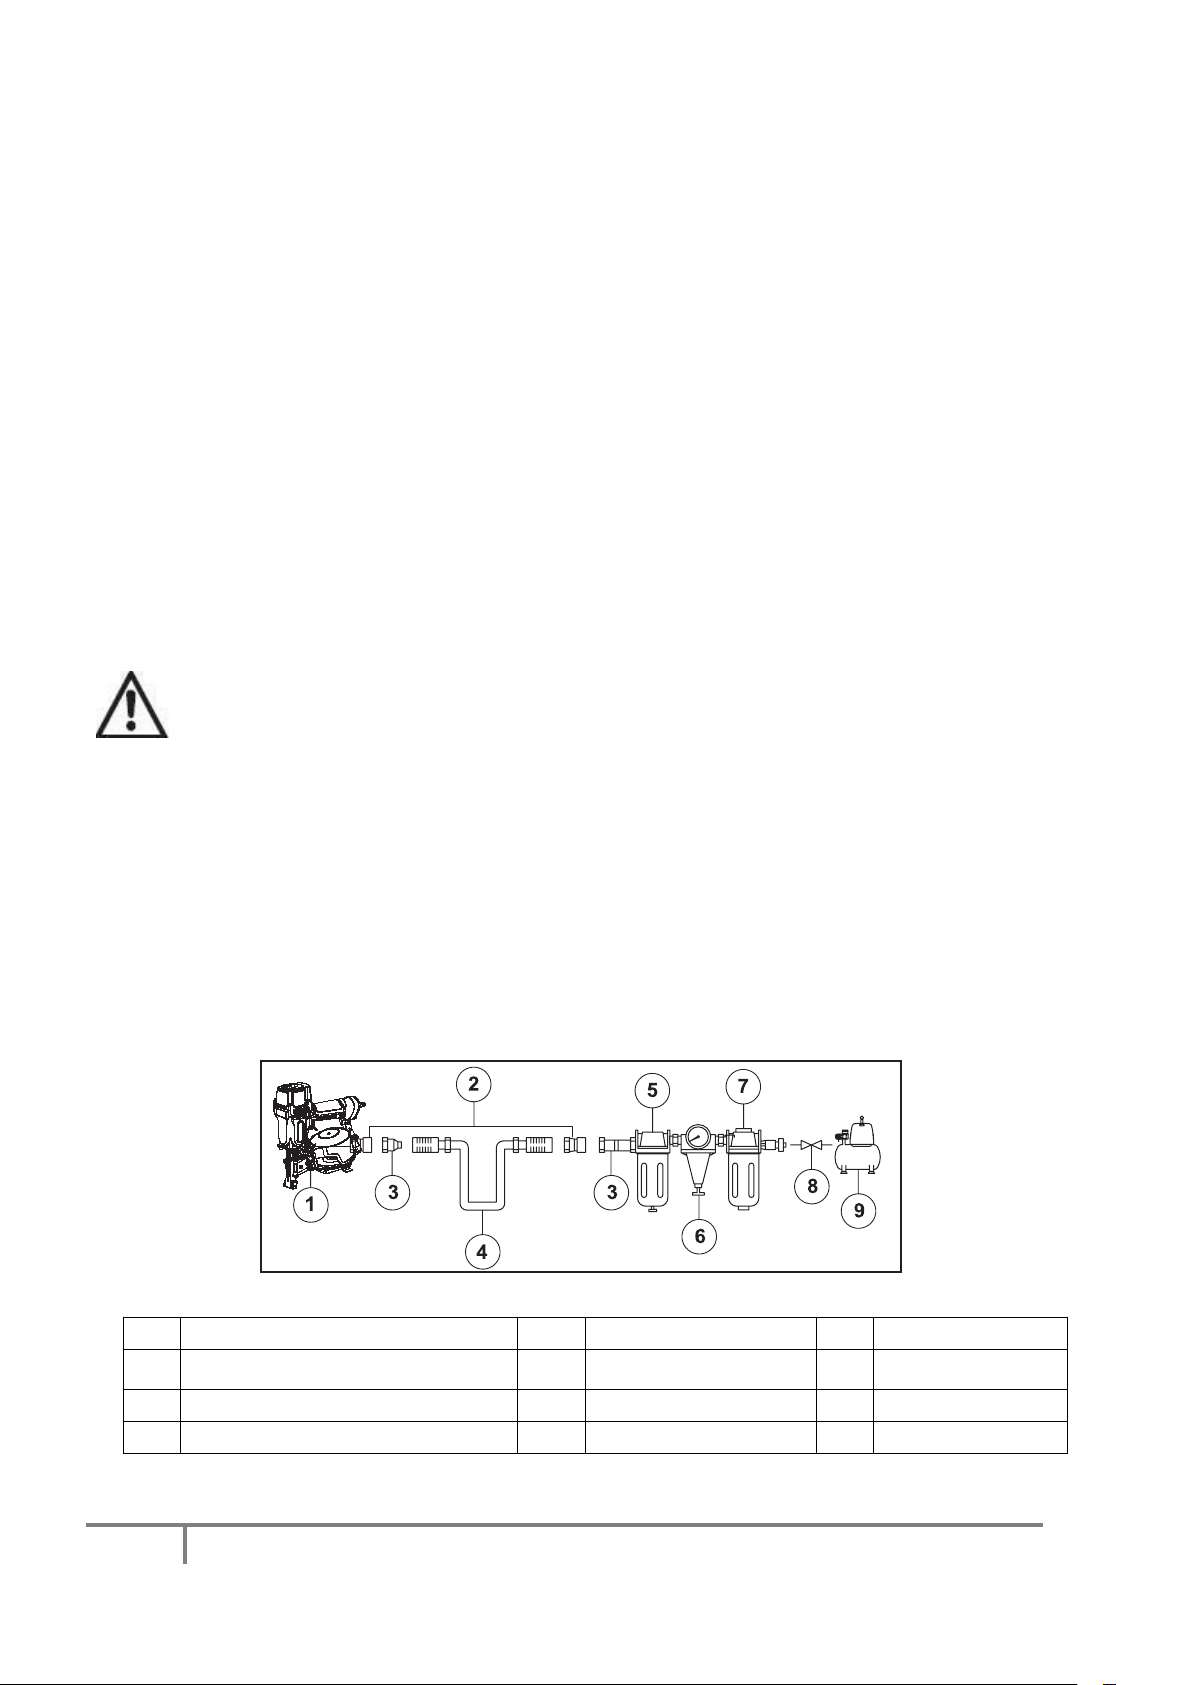
GUIDELINES FOR PROPER USE AND OPERATION
Be sure to use a proper air compressor with air powered tools.
Generaluse
TheAEROPRO15°WireCollatedCoilRoofingNailerCN45RAdrives7/8"to1-3/4"15°WireCollatedCoilRoofing
Nails.Thetoolislightweightanddurable,standsuptotheelementsandprovidesconsistentlyaccurateresults
over the life of the tool.An ideal tool for a variety of construction projects,including installation of asphalt roofing
shinglesandinsulationboards.Italsofeaturesahigh-capacityside-loadmagazine,tool-lessdepth
adjustment,durableconstruction,andmore.
Air system
Alwaysuseclean,dry,regulated,compressedairat5.5to7.5bar(80to110psi).
Donotexceedthemaximumorminimumpressures.Operatingthetoolatthewrongpressure(toolowortoohigh)
willcauseexcessivenoiseorrapidwearoftool.
WARNING!
Potentialhazardthatcouldresultinseriousinjuryorlossoflife.
Keephandsandotherpartsofthebodyawayfromthetoolsdischargeandworkingareaswhenconnectingthe
airsupply.Failuretocomplycouldleadtoseriousinjuryorlossoflife.
Itisrecommendedthatafilter-regulator-lubricatorisusedandlocatedasclosetothetoolaspossible.
Ifafilter-regulator-lubricatorinnotinstalled,placeupto6dropsofcompressoroilintotheinletplugbeforeeachuse.Ifa
filter-regulator-lubricatorisinstalled,keeptheairfilterclean.Adirtyfilterwillreducetheairpressuretothetool,
whichwillcausereductioninpower,efficiency,andgeneralperformance.
Foroptimalperformance,installaquickconnectortothetoolandaquickcoupleronthehose,ifapplicable.
Verifythatalloftheconnectionsintheairsupplysystemaresealedinordertopreventairfromleaking.
NO.
Description
NO.
Description
NO.
Description
1
AEROPROAIRCOILROOFINGNAILER
4
AirHose
7
Filter
2
Quickconnector
5
Lubricator
8
Cut-offvalve
3
Quickcoupler
6
Regulator(0to8.3Bar)
9
Aircompressor
7
COIL ROOFING NAILER CN45RA
WARNING!
Potential hazard that could result in serious injury or loss of life.
Do not use the tool if it is not in proper working order.
Do not use oxygen,carbon dioxide or any other combustible, or bottled gas to power this tool.
Do not use this tool in the presence of any flammable liquids or gases.
Keep hands and other parts of the body away from the firing head during use.
Do not point the tool towards the operator or other people.
Never attempt to clear a jammed fastener while the air hose is connected.
Do not drive a fastener on top of an existing fastener. Failure to comply could lead to serious injury or loss of life.
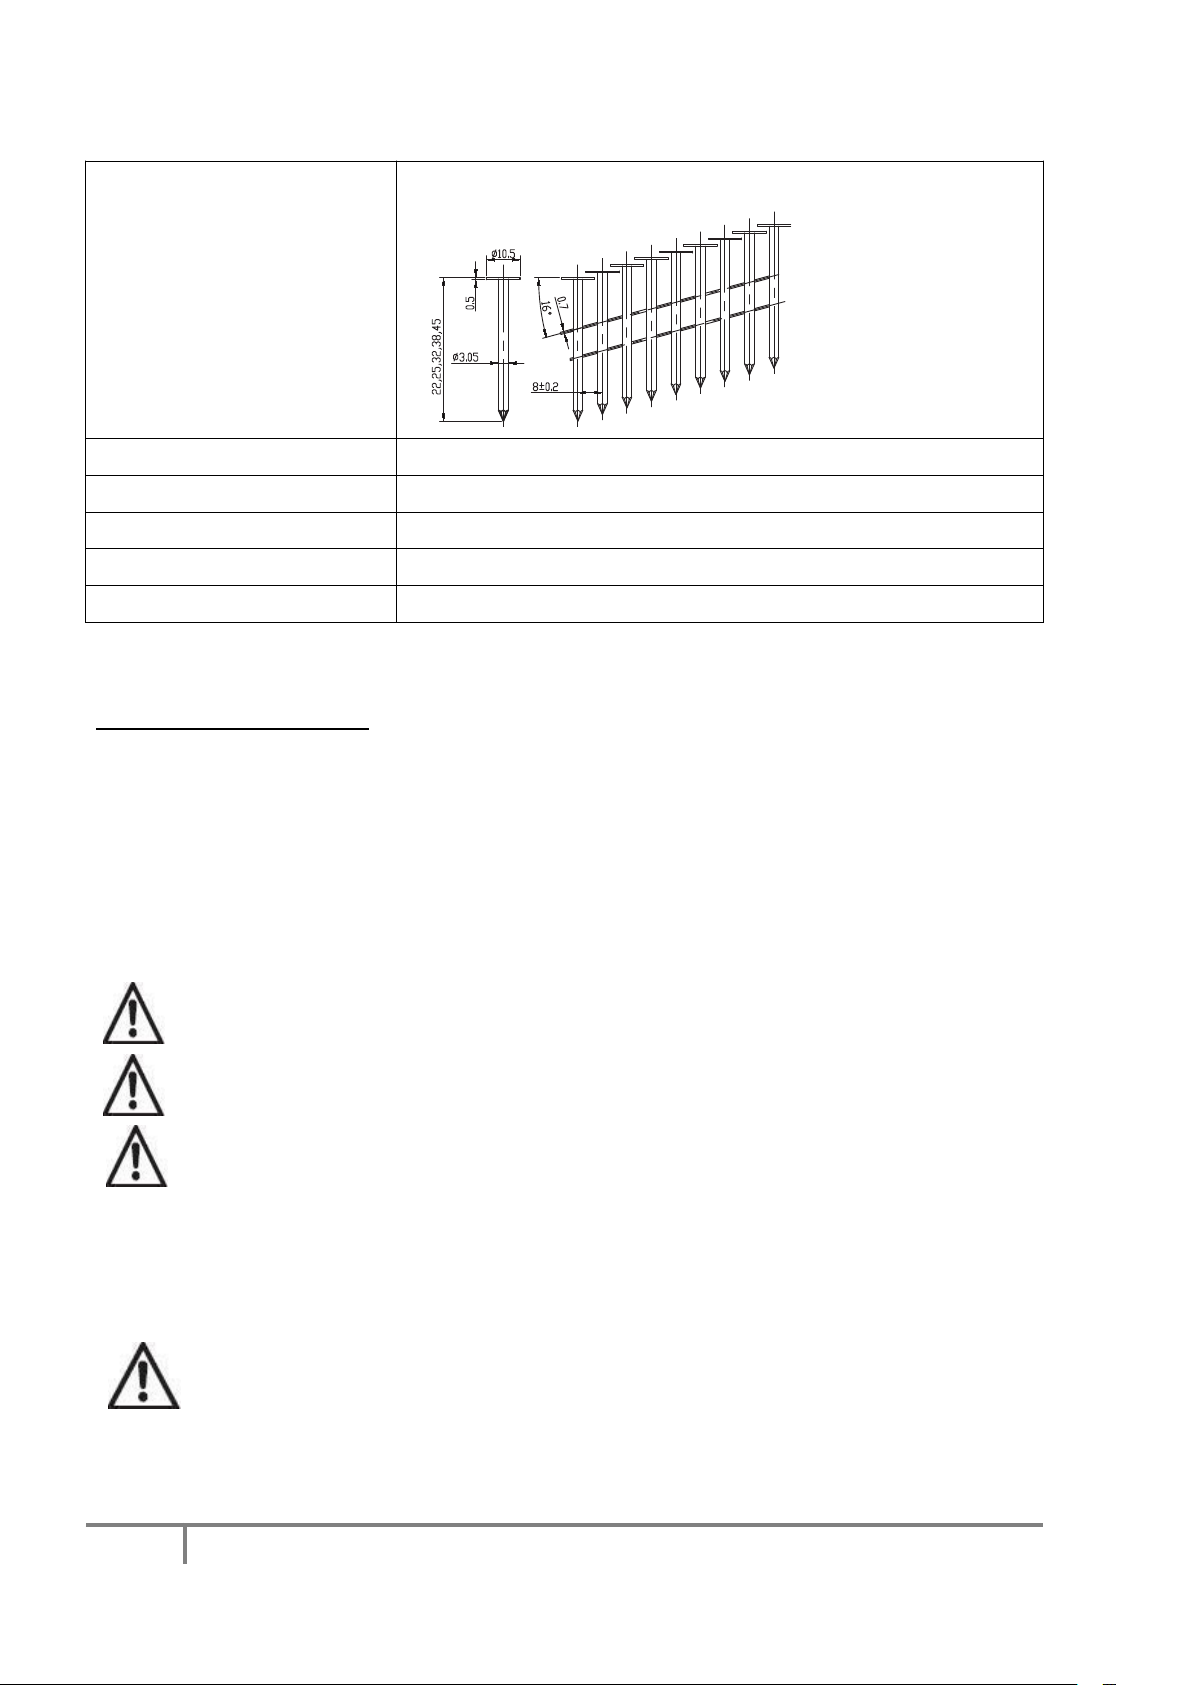
TYPES OF FASTENERS
Please see the TECHNICAL SPECIFIACTIONS.
WARNING!
Potential hazard that could result in serious injury or loss of life.
The use of any other types of fasteners will cause the tool to jam. Failure to comply could lead to serious injury or loss of life.
OPERATING INSTRUCTIONS
Loading Nails
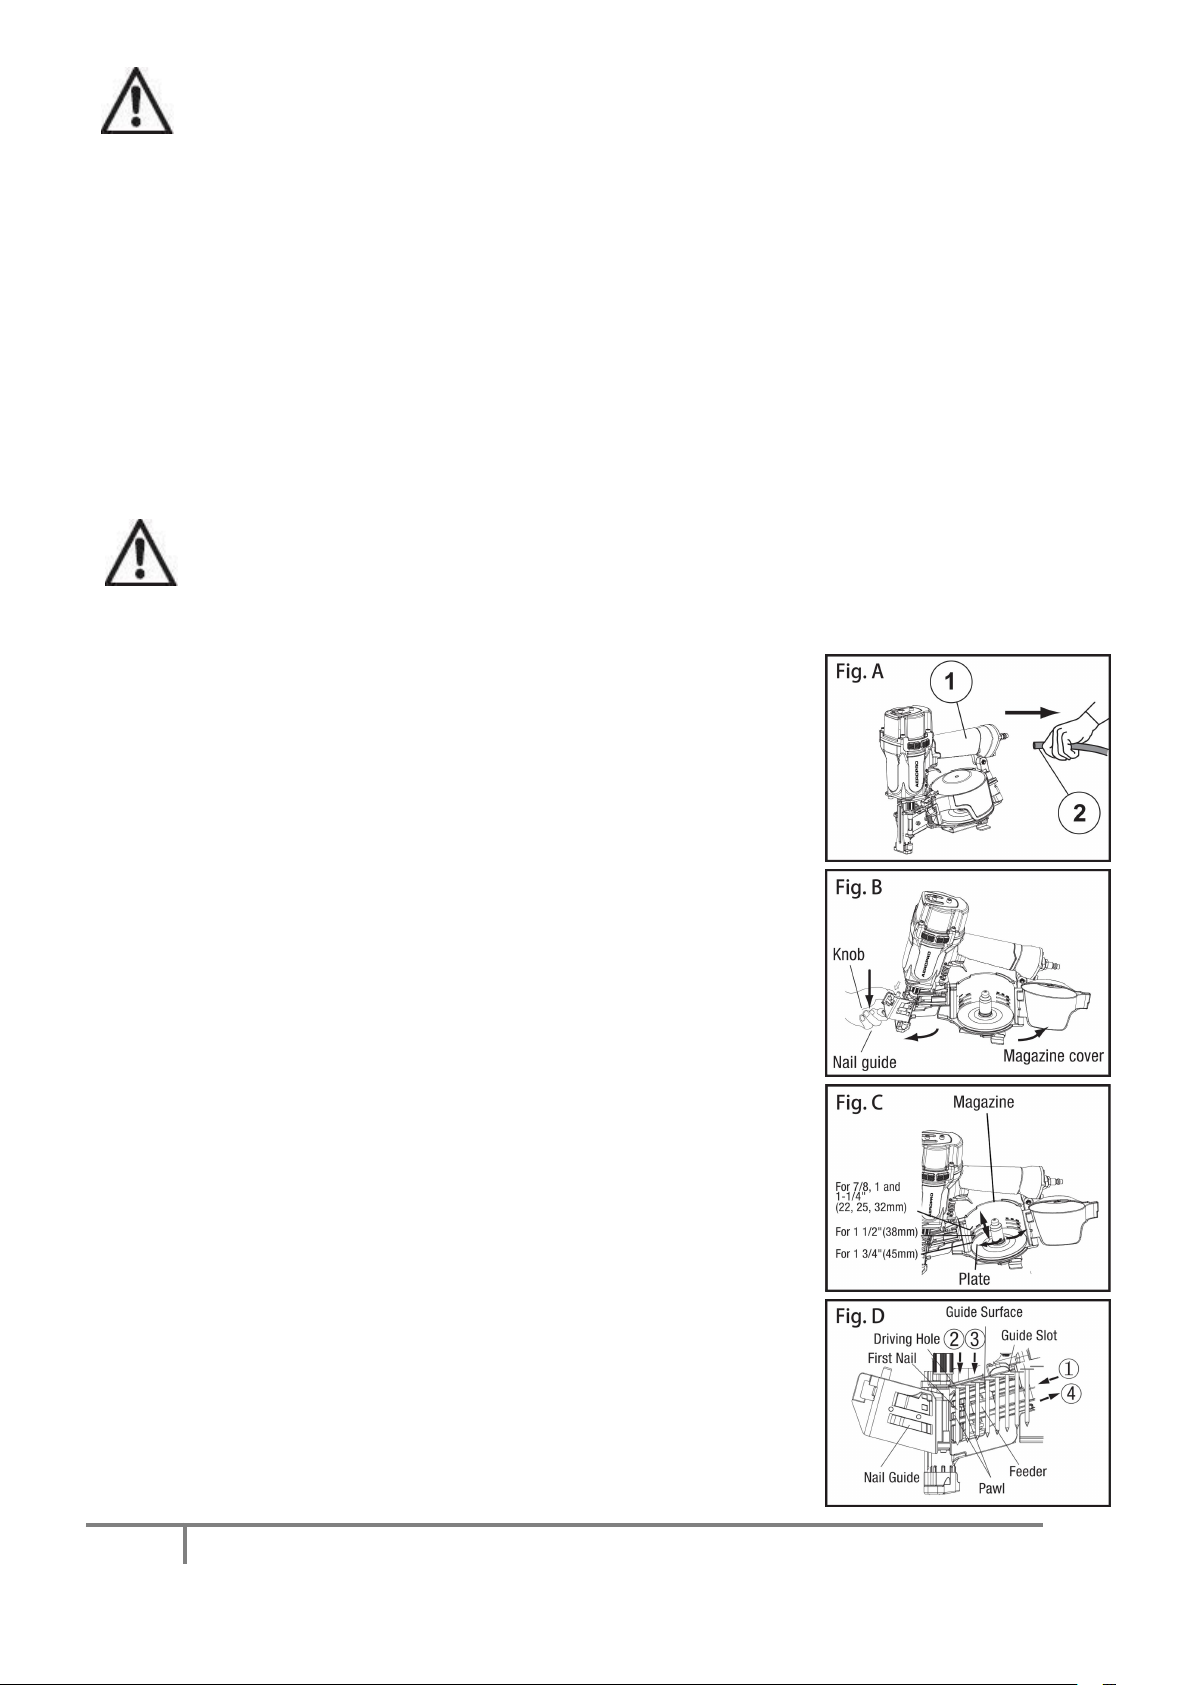
1. Disconnect the tool(1)from the air supply(2)(Fig.A).
2. Grip the nail guide and knob with finger.Press the knob down,swing
the nail guide open and open the magazine cover (Fig.B).
3. Adjust the position of the nail holder to correspond with the
nail length.The nail will not feed smoothly if the nail holder is not
correctly adjusted.
• Turn the nail holder about 90°counter-clockwise.
• Move the nail holder up and down to align the plate of the nail holder with
the mark on the magazine that correspond with the length of the nails
being used.
• Turn the nail holder 90 clockwise until you hear“click"(Fig.C).
4. Place the nails in the magazine.Insert the first nail coil into the
magazine opening.
• Uncoil enough nails to reach the driving hole.
• Insert the first nail into the driving hole and the second nail between the two
pawls of the feeder.
• Fit the nail heads in the guide slot.
• Pull the nails to the right.After checking and making sure that the magazine
cover is closed,hook your fingers on the nail guide and knob,turn the nail
guide clockwise while pressing the knob downward,and then close the nail
guide completely.
• Lock the knob completely (Fig.D).

8
COIL ROOFING NAILER CN45RA
Operation
The AEROPRO Air-powered Coiled Roofing Nailer CN45RA is equipped with a push lever at the nailing
point and
will not operate unless the push lever is depressed (pushed upwards).
Bump fire(multiple shots)
• Pull the trigger with the nailer off the workpiece.
• Drive a nail by pressing the nailer against the workpiece to
depress the push lever.
• Drive additional nails by moving the nailer along the workpiece with
a bouncing motion.Each depression of the push lever will drive a nail.
When the required nails have been driven, remove finger from the trigger(Fig.E).
Adjusting The Nailing Depth
To assure that each nail penetrates to the same depth,be sure that:
①The air pressure to the Nailer remains constant (regulator is installed
and working properly)
②The nailer is always held firmly against the workpiece.If nails are driven
too deep or too shallow into the
workpiece,adjust the nailing depth using the following instructions.
1. Disconnect air hose from nailer(Fig.F).
2.
If the nails are driven too deep,
pull the adjuster downward
and turn counter-clockwise(Fig.G)
If nails are driven too shallow,
pull the adjuster downward
and turn clockwise(Fig.H)
When the adjuster is released it will spring back up and can be set with a click at each 1/4 rotation.The
adjuster changes the nailing depth approximately 0.25 mm per 1/4 rotation.
3.Connect the air hose and perform a nailing test,ALWAYS WEAR EYE PROTECTION.
4.If additional adjustments are necessary,DISCONNECT AIR HOSE FROM NAILER and repeat step 2

9
COIL ROOFING NAILER CN45RA
Clear A Jammed Nail
To clear a jammed nail
• Disconnect the tool from the air supply line.
• Open the nail guide and insert a rod into the outlet.Tap the rod with a hammer.
• Remove the jammed nail with a slotted screwdrive.
• Cut the deformed collated wire with shipls.Correct the deformation.
• Remove the non-jammed nails that are stored in the tool's magazine.
• Operate the magazine latch and slide the pusher back to open the magazine for checking the jammed nails.
• Use pliers or any appropriate tool to remove the jammed nails.
• Close the magazine cover and slide the pusher to its original position.
• Reload the nails into the tool magazine.
• Reconnect the air supply line to the tool's air inlet.
• Test fire 3 to 5 nails into a piece of scrap wood in order to ensure proper operation.
Maintenance
•Disconnect the tool from the compressor before adjusting, clearing jams, servicing &maintenance, relocating
and during non operation. Regular lubrication, if your tool without using the in-liner automatic oilier, place 2 or 6
drops of pneumatic tool oil into the air inlet before each work day or after 2 hours of continuous use depending in
the characteristic of workpiece or type of fasteners.
•Air-operated tools must be inspected periodically, and worn or broken parts must be replaced to keep the tool
operating safely and efficiently. Check and change all worn or damaged O-ring, Seals, etc. Tighten all the screws
and caps to avoid personal injury. This should be done by an expert. Make regular inspection for free
movement of trigger, Spring and safety mechanism to assure safe system is complete and functional: no loose
and missing parts, no building or stocking parts. Keep magazine and nose of tool clean and free of any dirt lint
or abrasive particles. When temperatures are below freezing, tools should be kept warm by any convenient,
safe method.

10
COILROOFINGNAILERCN45RA
Troubleshooting
SYMPTOM
PROBLEM
SOLUTIONS
Airleakneartopoftoolor
intriggerarea
1.O-ringintriggervalvearedamage.
2.Triggervalveheadaredamage.
3.Triggervalvestem,sealorO-ringare
damaged.
1.CheckandreplaceO-ring.
2.Checkandreplace.
3.Checkandreplacetriggervalvestem,
seal or O-ring
Airleaknearbottomoftool.
1.Loosescrews.
2.WornordamagedO-ringsor
bumper.
1.Tightenscrews.
2.CheckandreplaceO-ringsorbumper.
Airleakbetweenbodyand
cylinder cap.
1.Loosescrews.
2. Worn or damaged O-rings or seals.
1.Tightenscrew.
2.Check and replace O-rings or bumper.
Bladedrivingfastenertoo
deep.
1.Wornbumper.
2.Airpressureistoohigh.
1.Replacebumper.
2.Adjusttheairpressure.
Tooldoesnotoperatewell:
cannotdrivefasteneror
operatesluggishly.
1.Inadequateairsupply.
2.Inadequatelubrication.
3.WornordamagedO-ringsorseals.
4.Exhaustportincylinderheadis
blocked.
1.Verifyadequateairsupply.
2.Place 2 or 6 drops of oil into air inlet.
3.CheckandreplaceO-ringsorseal.
4.Replacedamagedinternalparts.
Toolskipsfasteners.
1.Wornbumperordamagedspring.
2.Dirtinfrontplate.
3.Dirtordamagepreventsfasteners
frommovingfreelyinmagazine.
4.WornordryO-ringonpistonorlack
oflubrication.
5.Cylindercoversealleaking.
1.Replacebumperorpusherspring.
2.Cleandrivechannelonfrontplate.
3.Magazineneedstobecleaned.
4.O-ringneedtobereplaced.And
lubricate.
5.ReplaceSealingwasher.
Tooljams.
1.Incorrect or damaged fasteners.
2.Damagedorworndriverguide.
3.Magazineornosescrewloose.
4.Magazineisdirty.
1.Change and use correct fastener.
2.Checkandreplacethedriver.
3.Tightenthemagazine.
4.Cleanthemagazine.

11
COILROOFINGNAILERCN45RA
Explode DrawingExplode Drawing
Issue date:2019.5.7
Version:C/0

12
COILROOFINGNAILERCN45RA
Spare Parts List
Note:ifyouneedsparepartsofthismodel,plsfeelfreetocontactusorthedistributorwhereyouboughtthistool.
Tks!
No. Description Qty. No. Description Qty. No. Description Qty.
1 Screw M5*30 2 37 Flat Washer d=5 1 74 Adjustable Knob 1
2 Exhaust Cover 1 38 Handle Sleeve 1 75 Nut M6*18 1
3 Screw M5*8 2 39 O-Ring 36.3*3.55 1 76 Movable Plate 1
4 Cylinder Cap 1 40 End Cap 1 77 Plate Lock Pin 1
5 Non-Slip Gasket 2 41 Air Connector 1 78 Trigger 1
6 Anti-Collision Frame 2 42 Air Connector Protection 1 79 Pin 3*10 1
7 Cylinder Cap Washer 1 43 Pin 3*30 2 80 Trigger Spring 1
8 Switch Valve Seal 1 44 Mandrel Spring 1 81 Compress Spring 1
9 Air Plug 1 45 O-Ring 3.55*2 1 82 Screw M4*10 2
10 Switch Valve 1 46 Mandrel 1 83 Pin 3*28 1
11 O-Ring 30.5*3.5 1 47 Valve Seat 1 84 Upper Nail Stopper 1
12 Piston Assembly 1 48 O-Ring 11.8*1.5 3 85 Lower Nail Stopper 1
13 O-Ring 65*2 3 49 Rectangular Washer
12.3*8*3
1
86
Compress Spring
1
14 O-Ring 41.5*2.4 1 50 Sphere 1 87 Baffle 1
15 Upper Collar 1 51 Fixed Plate 1 88 Magazine Cover 1
16 Cylinder 1 52 Switch Seat 1 89 Tray Cap 1
17 Cylinder Seal Gasket 1 53 Switch Lever 1 90 Screw M4*50 1
18 Cylinder Spring 1 54 91 Spring Washer 4 1
19 O-Ring 56*2.4 1 55 O-Ring 2.8*1.8 1 92 Flat Washer d=4 1
20 Lower Collar 1 56 Trigger 1 93 Adjustable Lever 1
21 O-Ring 47*2.4 1 57 Push Lever 1 94 Bushing 2
22 Gun Body 1 58 Push Lever Sleeve 1 95 Circlip 1
23 O-Ring 5.3*1.22 2 59 O-Ring 8.75*1.8 1 96 Nail Tray 1
24 O-Ring 43.5*2.65 1 60 O-Ring 14.2*1.9 1 97 Magazine 1
25 Washer 2 61 Nail Pusher Piston 1 98 Magazine Cover Pin 1
26 Seal Gasket 1 62 O-Ring 11.2*1.8 1 99 Bolt M4 1
27 O-Ring 41*1.6 1 63 Pusher Seal Gasket 1 100 Magazine Guard 1
28 Screw M5*8 2 64 Nail Pusher Cap 1 101 Guided Limit Block 1
29 Drive Guide Baffle 1 65 Lock Bushing 1 102 Guide Seat 1
30 Drive Guide 1 66 Screw M5*10 3 103 Screw M5*14 2
31 Drive Guide Block 2 67 Torsion Spring 1 104 Guide Block 1
32 Screw M5*25 8 68 Nail Pusher 1 105 Screw M5*25 1
33 Safety Frame Compress Spring 1 69 Nail Pusher Pin 1 106 Oil Pot 1
34 Nut M5*16 1 70 Nail Pusher Pin Sleeve 2 107 Hex Wrench M5 1
35 Bolt M5 4 71 Movable Plate Pin Sleeve 1 108 Hex Wrench M4 1
36 Safety Frame Assembly 1 72 Movable Plate Pin 1 109 Safety Goggles 1
Table of contents
Other Aeropro Power Tools manuals


