Aerus Beyond LAUNDRY PRO 2.0 User manual

READ MANUAL CAREFULLY FOR PROPER USE AND OPERATION.
COLD WATER LAUNDRY SYSTEM (EURO)
Made in the USA
2017 Space Technology
Hall of Fame Inductee

2
CONTENTS
General Information . . . . . . . . . . . . . . . . . . . .2
Important Safety instructions . . . . . . . . . . . . . . . 3
Installation Requirements . . . . . . . . . . . . . . . . . 4
Before You Start . . . . . . . . . . . . . . . . . . . . . .5
Removing Cover. . . . . . . . . . . . . . . . . . . . . .5
Installation of Wall Anchors or Screws . . . . . . . . . . . 6
Reinstall the Cover. . . . . . . . . . . . . . . . . . . . .7
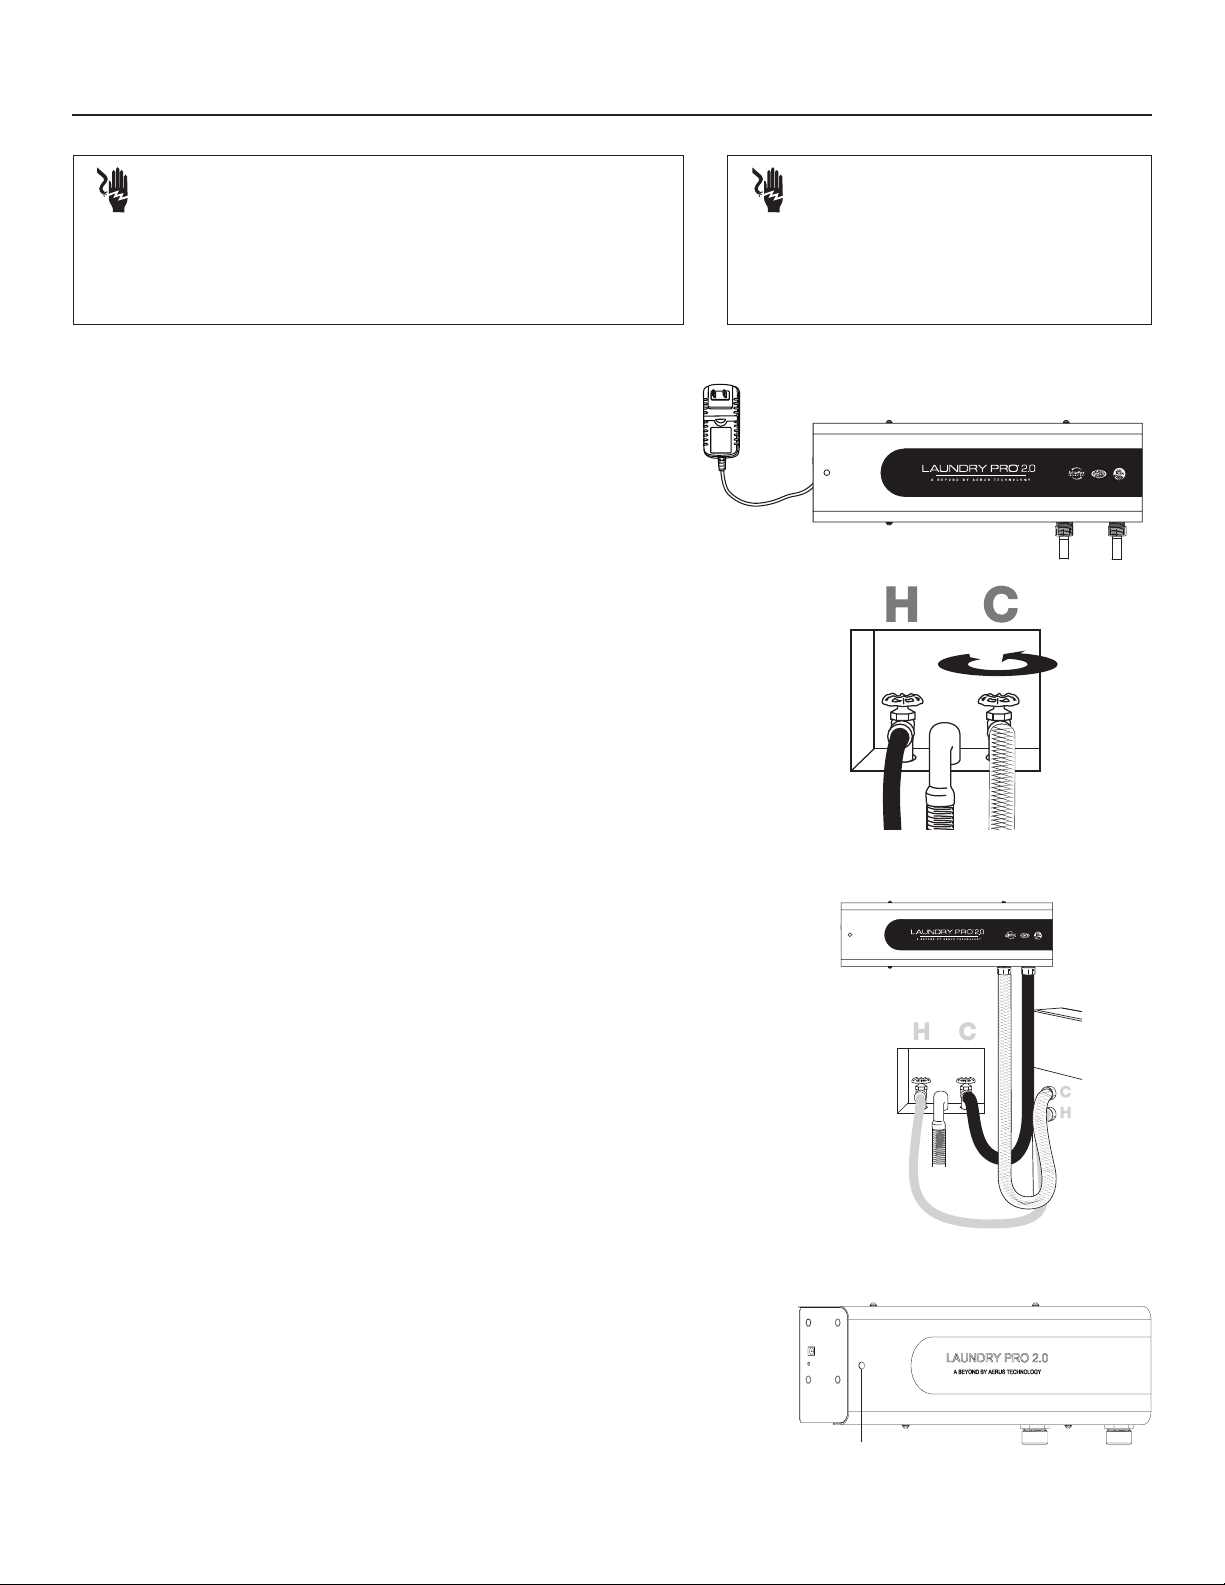
Hose Installation . . . . . . . . . . . . . . . . . . . . 7-8
Connecting the Power Adapter . . . . . . . . . . . . . . 8
System Set Up. . . . . . . . . . . . . . . . . . . . . . .9
Changing the ActivePure® Cell Assembly . . . . . . . . . 10
Before Washing Clothes . . . . . . . . . . . . . . . . . 11
Using Your Laundry Pro 2.0 . . . . . . . . . . . . . . . 11
Washers Requiring Hot & Cold Water . . . . . . . . . . . 12
Temp. Control & External Water Tap . . . . . . . . . . . 13
Status Indications . . . . . . . . . . . . . . . . . . . . 13
Frequently Asked Questions . . . . . . . . . . . . . . . 14
Installation Problems . . . . . . . . . . . . . . . . . . 14
Troubleshooting. . . . . . . . . . . . . . . . . . . .15-16
Warranty Information . . . . . . . . . . . . . . . . . . 17
PRODUCT OVERVIEW
Laundry Pro 2.0 is designed to work in conjunction with your washing
machine, using cold water and our proprietary ActivePure®Technology to
clean clothes. As your washer begins to ll, Laundry Pro 2.0 will turn on.
Laundry Pro 2.0 is equipped with an internal leak sensor.
There’s a smart new approach to laundry that’s based on earth-friendly
science and technology. Laundry Pro 2.0, designed and made in America,
eliminates the need for hot water, detergents, fabric softeners and bleaches,
thereby allowing it to pay for itself over and over again.
Laundry Pro 2.0 is easy to install. It is intended to work with residential clothes
washers and is for use by anyone interested in an economical, earth-friendly
alternative to the typical detergents and chemicals currently available,
without modifying existing appliances, electrical systems, or plumbing.
Laundry Pro 2.0 uses a variation of the technology originally developed for
use in the International Space Station and is recognized as a Certied Space
Technology by the Space Foundation.
FILL IN AND SAVE
The location of the serial number is on the back panel of the water unit,
below the water line connection. Write it here and retain for future
reference.
Model No.____________________________________________________________
Serial No. ____________________________________________________________
Date of Purchase ______________________________________________________
Aerus Distributor ______________________________________________________
_____________________________________________________________________
Distributor’s Oce Phone No. ___________________________________________
_____________________________________________________________________
Distributor’s Oce Address _____________________________________________
_____________________________________________________________________
SPECIFICATIONS
AC/DC Adapter:
• AC in: 100 - 240V ~ 50/60 Hz .45A
• DC out: 12V
Power Consumption:
• .4W AC (standby mode)
• 1.3W AC operating
UV Light:
• 185nm
Dynamic Water Pressure:
• Minimum 20 psi to 60 psi / 1.37 ~4.13 bar /
137000 – 413000 Pascal
Water Temperature:
• Use cold water only (do not use hot water)
Operating Environment:
• 50˚F - 100˚F ( 10˚C - 37.8˚C)
• Humidity 40% ~ 85%
Dimensions:
• 17.3” x 5.19” x 3.69”
• 43.94cm x 13.48cm x 9.37cm
Weight:
• 4.3 lbs
• 1.95 kg
GENERAL INFORMATION

3
Read this manual in its entirety prior to installing or using your Laundry Pro 2.0.
• For indoor use only
• Do not operate unit with cover removed
• Disconnect all power before servicing
• Do not use an extension cord or other adapter with this appliance
• Only use the Power Supply that comes with this device. DO NOT USE any other Power Supply
• This appliance is not recommended for use with high sediment content water; if your water has a
high sediment content, consult a water ltration expert for available options
• Maximum dynamic water inlet pressure is 60 psi
• Use the new hose included with the unit, when connecting the Laundry Pro 2.0 to your washing
machine; you should also replace any washing machine hose that is more than
3 years old
• Do not clean the cover of your Laundry Pro 2.0 with harsh chemicals, abrasives, or cleansers; to
clean, use a soft cloth dampened with water
• Laundry Pro 2.0 is designed for normal residential use only; use in a commercial or
non-residential setting may damage the unit and will void your warranty
• Children should be supervised around this device
• This device cannot be used by children or people with physical disabilities, sensory or mental
impairment, or with the lack of knowledge, unless they are supervised or have been instructed to
use the device by the person responsible for their safety
IMPORTANT SAFETY INSTRUCTIONS
IMPORTANT SAFETY PRECAUTIONS
• To prevent unnecessary risk of re, electrical shock, or personal injury, all wiring must be done in
accordance with the National Electrical Code ANSI/FNPA, No. 70 - Latest Revision and local codes
and ordinances in the USA. For Electrical Codes outside the USA, consult your local regulatory
agency for the latest codes and ordinances. It is the personal responsibility and obligation of the
appliance owner to provide adequate electrical service for this appliance.
We have provided important safety
warnings in this manual
and on your appliance. Always read
and obey all safety messages.
Safety warnings in this manual
are dened as follows:
WARNING:
Electrical shock hazard.
You can be killed or seriously
injured if you don’t follow
instructions.
CAUTION:
Damage to your appliance or the
surrounding area can occur if
you don’t follow instructions.
DANGER:
Death or serious injury can occur
if instructions are not followed
immediately.
NOTE:
This information is included to
aid in installation and use of this
appliance.
NOTE: Your Laundry Pro 2.0 Unit was factory tested. It is normal for some residual
water to still remain in the unit as a result of these tests.
Water treated by your Laundry Pro 2.0 unit is intended for clothes washing only and is NOT
approved for any internal consumption such as drinking, bathing, brushing teeth, etc. DO NOT
drink, ingest, or internally consume the water from your Laundry Pro 2.0 unit or washing machine.
DO NOT provide water from your Laundry Pro 2.0 to your pets or other animals.
CAUTION:
SAVE THESE INSTRUCTIONS

4
WATER
OUTLET
WATER
INLET
INSTALLATION REQUIREMENTS
17.3”(43.94 cm)
5.19”(13.48 cm)
3.69”(9.37 cm)
Incoming water pressure must be greater than 20 psi / 1.37 bar (137000
Pascal). If your household water pressure is greater than 60 psi / 4.13
bar (413000 Pascal), you must install an in-line pressure reducer before
installing Laundry Pro 2.0. Failure to follow these instructions may result
in water leakage, property damage, personal injury, and may void your
warranty. Water pressure of 20 psi / 1.37 bar (137000 Pascal) to 60 psi /
4.13 bar (413000 Pascal) is required to correctly operate your Laundry
Pro 2.0. Low water pressure may prevent your unit from operating
properly and/or cause a failure in your washing machine’s water valve.
The washer’s water valve may also not shut o completely. Check
the documentation supplied with your washing machine for exact
specications. Your washing machine and cold water faucet must be
within 4 feet of the right side of the unit to use the inlet hose provided
with your Laundry Pro 2.0.
TO AVOID THE POSSIBILITY OF WATER DAMAGE, SHOULD A HOSE
LEAK, ALWAYS HAVE FAUCETS ACCESSIBLE AND TURN OFF
FAUCETS WHEN WASHER IS NOT IN USE. DO NOT USE WITH A
CARBON FILTER.
CAUTION:
ELECTRICAL REQUIREMENTS
100 - 240 Volt 50/60 Hz 5 AMP (minimum) Fuse or Circuit Breaker.
Laundry Pro 2.0 is equipped with an AC to DC power supply.
LOCATION CONSIDERATIONS
The Laundry Pro 2.0 must never be installed in areas where water
may freeze since the unit will always maintain some water in the unit,
the water valve, and hose areas. This can cause damage to internal
components. It is also recommended to avoid installation in areas of
high humidity, as it can eect the operation of the unit.
WATER REQUIREMENTS
A dynamic water pressure of greater than 20 psi / 1.37 bar
(137000 Pascal) and less than 60 psi / 4.13 bar (413000 Pascal) is
required to correctly operate your Laundry Pro 2.0.
See Cautions below.
NEVER USE AN EXTENSION CORD
CAUTION:

5
BEFORE YOU START
REMOVING COVER
• Remove your new Laundry Pro 2.0 from its packaging
• Inspect the unit for any signs of shipping damage
NOTE: Your Laundry Pro 2.0 unit was factory tested. It is normal for some residual water to still remain in the unit as a result of these tests.
Screws
1. Remove the two (2) cover screws located on
the bottom of the unit.
2. Remove the two (2) screws (not shown) along
the top of the Laundry Pro 2.0.
3. To remove the cover, pull the top away from the
unit, then lift o the cover.

6
INSTALLATION OF WALL ANCHORS OR SCREWS
A. If using supplied wall anchors, drill two 3/16” (4.76 mm) diameter holes.
Place two wall anchors into the wall. Install two supplied screws and tighten
until almost all the way in.
B. If mounting to wall studs, drill two 3/32” (2.381 mm) diameter holes
approximately 1” (25.4 mm) deep. Install two supplied screws and tighten
until almost all the way in.
17.3”(43.94 cm)
Keyholes
NOTE: Washing machine and cold water faucet must
be within 4 feet (1.21 m) of the right side of unit.
1. Place the Laundry Pro 2.0 to the wall and mark the appropriate keyholes
with a pencil.
Screws (not shown)
2. Position the keyholes of the Laundry Pro 2.0 onto the screws (not
shown). Finish tightening screws enough to securely mount unit, but
still allowing it to be removed from wall. Remove unit from wall.
NOTE: The provided hardware kit contains adhesive backed rubber spacers
to be placed on back of unit to provide additional clearance from
wall if needed for hose installation or the use
of ActiveClean Port. (Page 12)

7
1. Turn the cold water o by shutting o the cold water faucet.
NOTE: To help prevent water spray when disconnecting hoses, you can relieve
pressure in the water line by momentarily starting your washing machine.
NOTE: To ease hose installation and prevent cross threading, connect hose
prior to mounting unit on wall.
NOTE: Remove the two black caps from the hose connections
before installing hoses.
2. Remove the cold water hose from the cold water inlet on the back of
your washing machine. Leave hot water hose attached.
When connecting hoses to your Laundry Pro 2.0 start by hand tightening the hose
connector(s). Using adjustable pliers, nish tightening hose connector(s). Do not
remove or disconnect the hot water line from your washing machine or water valve.
CAUTION:
1. Return the Laundry Pro 2.0 cover to its original position, tting the bottom in
place and tipping upward.
2. Secure with two (2) screws (not shown) along the top edge.
3. Put the two (2) remaining screws along the bottom edge and tighten.
REINSTALL THE COVER
HOSE INSTALLATION
Screws
Screws

8
CONNECTING POWER ADAPTER
1. Insert the provided power cord into the POWER IN socket located on the side of the unit.
Do not use any AC/DC adapter other than the one supplied with your Laundry Pro 2.0 or Aerus replacement AC/DC adapter
(item#: 49874-EURO/49873-US). Failure to follow these instructions may void your warranty and/or result in damage to your
unit, re, or electrical shock.
CAUTION:
HOSE INSTALLATION CONTINUED
3. Connect the hose from the cold water inlet on your washing
machine to the INLET connection on your Laundry Pro 2.0.
5. Finally, connect the new hose to the cold water inlet on your washing machine.
4. Connect the new hose provided with your Laundry Pro 2.0 to the water
OUTLET connector on your Laundry Pro 2.0 unit.
NOTE: To ease hose installation and prevent cross threading,
connect hoses prior to mounting unit on wall.
NOTE: If your existing hose is more than 3 years old, we recommend that you replace
it with the optional stainless steel hose (item#: 49738-EURO/49701-US).
NOTE: Do not plug the adapter into the wall socket until installation is complete. See page 9.

9
SYSTEM SET UP
4. Start your washer. The status light should
illuminate blue after a few seconds.
NOTE: Your Laundry Pro 2.0 will automatically turn
on and o as your washing machine starts, and stops.
Electrical Shock Hazard. When working with electrical connections, the appliance
and surrounding area should be clean and dry of any standing water. Failure to
follow these instructions can result in death, re, or electrical shock.
Electrical Shock Hazard. Do no use an extension cord.
Failure to follow these instructions can result in death,
re, or electrical shock.
WARNING: WARNING:
1. Plug power cord into the wall outlet of your
home’s electrical power system. See page 4 for
electrical requirements.
Status Indicator Lights
2. Turn on the cold water valve.
3. Check all hoses to ensure no water
is leaking. Tighten if necessary.

10 Screws
CHANGING THE ACTIVEPURE CELL ASSEMBLY (S/N 49883)
1. Unplug from power source and remove mounted
unit from wall.
2. Remove cover (See Page 5).
3. Unplug photo sensor lead (Figure 1).
4. Remove tubing from cell (Figure 2).
5. Unplug wiring harness from bulb (Figure 3).
6. Remove two screws to remove cell (Figure 4).
7. Replace with new cell (S/N 49883)
and remount to base.
8. Plug wiring harness back onto bulb.
9. Fit tubing back onto cell.
10. Re-plug photosensor lead.
11. Replace cover (See page 7).
Photo Sensor Lead
Cell Tube
Wiring Harness
Figure 1
Figure 2
Figure 3
Figure 4
NOTE: The ActivePure Cell Assembly requires replacement at approx. 9,000 hours of use. The LED will ash periodically (visual chirp) to notify that cell
replacement is required. The UV bulb will NOT be turned on again until the cell has been replaced.

11
BEFORE WASHING CLOTHES
IF YOUR WASHING MACHINE IS NOT NEW you will need to perform this
procedure to help remove any detergent buildup that may contaminate your
clothing.
1. Do not put clothes in the washer at this time.
Set your machine to its largest load setting, cold water only.
2. Start the washer and let it run through every cycle.
3. Once it has nished, repeat Steps 1 and 2 three more times.
Depending on the age and severity of detergent buildup,
it may be necessary to perform Step 3 several times.
NOTE: If you have a front loading washer, odors can develop
due to stagnant water left inside. If musty odors develop
it may be necessary to run a commercially available cleaner made
especially for front loading washers to eliminate such odors.
CAUTION:
To avoid the possibility of water damage, should a
hose leak, always have faucets accessible and turn o
faucets when washer is not in use.
IF YOUR WASHING MACHINE IS NEW, skip this section and continue
below.
BEFORE USING YOUR LAUNDRY PRO 2.0 FOR
THE FIRST TIME
USING YOUR LAUNDRY PRO 2.0
DETERGENT AND FABRIC SOFTENER
You may choose to continue to use detergent and/or fabric softeners if desired. However, to completely
experience all the benets of your new Laundry Pro 2.0, we recommend washing using nothing but cold water.
NEVER apply detergent directly to dry clothes. Allow washer to ll, then add detergent to prevent staining on
clothes.
COLD HOT NORMAL OPERATION
Using your Laundry Pro 2.0 is as simple as turning on the washing machine.
Laundry Pro 2.0 is designed to use the COLD/COLD setting of your washing machine.
HEAVY STAINS
For heavy stains, pre-treat area, apply pre-treater, rub gently and let stand for several minutes.
Wash as normal.

12
When connecting hoses to your
Laundry Pro 2.0 hand start the hose
connector(s). Using adjustable pliers, nish
tightening hose connector(s).
CAUTION:
Some washing machine models require water pressure to both the Hot and Cold valves for proper
operation. In some cases, if only the COLD water side is connected, the water valve will not operate
or the washing machine will not ll to the proper level. To solve this problem, the installation of
a “Y” adapter (available at most hardware stores) may be used. The use of the “Y” adapter allows
water to ow equally through both the HOT and COLD water valves. Optional stainless steel hose
(item #: 49738-EURO/49701-US) must be installed on the hot water connection. To Install, turn
water o at the valves and disconnect the existing HOT water hose (at the valve and washing
machine). Connect the “Y” adapter to the outlet on your Laundry Pro 2.0, then connect both the
optional stainless steel hose (item #: 49738-EURO/49701-US) and Cold hose from your washer
to the “Y” adapter (see diagram below). Operate your washer on the WARM/WARM setting (your
Laundry Pro 2.0 will still be using just cold water).
Turn o both water valves (hot and cold)
before disconnecting hoses. Failure to
follow these instructions may result in water
leakage and/or possible injury
from hot water.
CAUTION:
NOTE: Your hot source water valve will not have a hose connected to it.
Make sure it is fully turned o. It is recommended you secure a cap
(available at most home improvement stores) to prevent leakage.
NOTE: The “Y” adapter needs to be purchased locally. Use only a metal adapter.
DO NOT use plastic.
FOR WASHERS THAT REQUIRE HOT & COLD WATER INPUT
Connect to household
plumbing COLD water valve
“Y” adapter
Make sure the “Y” adapter
valve is in the on position.
NOTE: Use a metal “Y” adapter.
Do not use plastic
Connect to HOT water inlet
on washing machine
Connect to COLD water inlet
on washing machine
Disconnect the existing hose
from the HOT valve and washing
machine and remove. Replace with
optional stainless
steel hose. Part No.
49738-EURO/49701-US
(not included).
Disconnect this stainless steel hose from
the OUTLET on your Laundry Pro 2.0, then
connect it to the “Y” adapter.
Connect the “Y” adapter to the OUTLET on your
Laundry Pro 2.0. Be sure to hold the tting with
pliers while tightening the adapter.
Stainless steel hose supplied
with Laundry Pro 2.0.

13
STATUS INDICATIONS
The Laundry Pro 2.0 monitors its operations with a blue LED indicator:
• Unit on = LED on steadily. (“unit on” means whenever water is owing
through the unit).
• ActivePure® Cell replacement upcoming (@ approx.. 7500 hours) =
periodic brief LED ash (visual chirp) when unit is o, but goes to steady on
when water is owing through the unit.
• ActivePure® Cell replacement required (@ approx. 9000 hours) = periodic
brief LED ash (visual chirp) whether unit is o or on. UV bulb will NOT be
turned on again until cell is replaced.
• UV bulb failure = periodic brief LED ash (visual chirp) – same as
ActivePure® Cell replacement required above.
• ActivePure® Cell replacement: When replacing the ActivePure® Cell,
there is a switch on the main circuit board which must pressed. When this
happens, the LED will blink 3 times (longer than the brief “chirp” ashes
above) and then shut o. This indicates that the ActivePure® Cell timer has
been reset to 0. Pressing the button at any time before the 7500 hour mark
*or* before a bulb failure has been detected will NOT reset the timer.
• Leak Alarm: LED will ash in conjunction with alarm beeping.
If this occurs, please contact Customer Service at (800) 989-2299
for assistance. España: www.laundrypro.es; Italia: www.laundrypro.it;
Portugal: www.laundrypro.pt.
Electrical Shock Hazard. Disconnect power before
attempting installation or service.
Electrical Shock Hazard. When working with electrical
connections, the appliance and surrounding area should
be clean and dry of any standing water. Failure to follow
these instructions can result in death, re, or electrical
shock.
Do not operate Laundry Pro 2.0 with the front cover
removed or improperly installed. Failure to follow these
instructions can result in severe eye damage, death,
or electrical shock.
WARNING:
CAUTION:
WARNING:
TEMPERATURE CONTROLLING WATER VALVES
Some washers monitor the incoming cold water temperature and adjust too cold of water by adding hot water, even if the water temperature is set to cold. If you
have one of these washers, do not install with the “Y” adapter as it may cause the washer to not operate correctly. Consult your washing machine owner’s manual
if needed.
An optional Laundry Pro 2.0 water tap allows you to run water with hydrogen and oxygen based oxidizers for cleaning surfaces, without the cost or chemical
irritants found in most traditional cleaning products. (ActiveClean Port - 49693-US)
EXTERNAL WATER TAP AVAILABLE SEPARATELY
Status Indicator Light
Circuit Board

14
FREQUENTLY ASKED QUESTIONS
Does Laundry Pro 2.0 get out tough stains without pretreating?
Tough stains will still require pretreatment.
Does the Laundry Pro 2.0 work with all types of water including hard
water? Laundry Pro 2.0 will work with all household water qualities,
however additional sediment pre-ltering may be necessary depending
on the source water condition.
NOTE: Never use with a carbon lter.
Will the Laundry Pro 2.0 work with commercial washing machines?
Laundry Pro 2.0 is designed for residential use only.
Is a plumber required to install Laundry Pro 2.0?
The customer is responsible for installation of their Laundry Pro 2.0 unit.
Some customers may prefer to have a plumber perform the installation
although Laundry Pro 2.0 can be installed in most homes by the home
owner using standard hand tools. It should be noted there are potential
problems which can arise during the installation depending on the
condition of the plumbing in the home and the conguration and
location of the washer. If the cold water valve is stuck or the washing
machine needs to be moved back which may require re-leveling, a
plumber may be required. Aerus is not liable for improper installation or
damage caused from improper installation and recommends a licensed
plumber. Appropriate warnings and concerns are included in this
owner’s manual. Always follow local plumbing codes when installing the
Laundry Pro 2.0.
Can I hook the Laundry Pro 2.0 unit up to things other than a washing
machine? No. However, Aerus has an optional ActiveClean port kit you
can install on the Laundry Pro 2.0 to create water with oxygen based
oxidizers for other cleaning uses (see page 12).
What eect does Laundry Pro 2.0 have on elastic?
Normal operation of a Laundry Pro 2.0 unit should have no negative
impact on elastic in clothing.
Can I let my clothes soak?
It is not recommended that clothes are allowed to soak in
Laundry Pro 2.0 water.
Installation procedures can vary according to washing machine model. If you experience installation problems, read the manual rst to make sure you
have installed the unit correctly. Call Customer Service at 800-572-0502 for more information. España: www.laundrypro.es; Italia: www.laundrypro.it;
Portugal: www.laundrypro.pt.
INSTALLATION PROBLEMS?

15
TROUBLESHOOTING
LED Illumination State Condition Solution
Blue Steady on Normal operation Unit is operating normally.
Blue 2 Flashes (ash, ash -
2 sec pause, ash, ash
- 2 sec pause.....)
UV bulb start up failure 1. Press and hold the reset button for a couple seconds. When the blue LED ashes 3
times (long ashes), run the unit to verify it’s working.
2. If #1 did not correct the problem, replace the ActivePure® Cell assembly
Blue(*) 1 Flash (ash - 2 sec
pause, ash - 2 sec
pause......)
Flashes only when water IS
NOT owing
Unit is working normally however, this indicates it is time to change the ActivePure® Cell.
The blue LED will continue to ash until the ActivePure® Cell assembly has been replaced.
Blue(*) 1 Flash (ash - 2 sec
pause, ash - 2 sec
pause......)
Flashes continuously
whether water is owing
or not.
The unit has shut down as the ActivePure® Cell has reached its end of life . The ActivePure®
Cell assembly MUST be changed to continue using the laundry unit.
Blue Flashing w/ alarm Leak, high humidity,
condensation or false
indicator due to electrical
noise in line
Visible leak – Repair as needed.
No Visible leak – (a) Check for condensation build up on LP piping due to cold water temp
and excessive heat in the area or excessive humidity. (b) Try unplugging the unit for 10
seconds to see if the condition is corrected. (c) Verify dryer is vented to the outside. (d)
Make sure the sensor is completely dry.
Noise in the electrical lines – The microprocessor mistakes electrical noise for leak.
LAUNDRY TOPICS:
Issue Common Cause Solution
Washer not lling, ERR code Washer has cold water temp sensor Make sure hot water hose is connected and fully on.
Extra HE washer Use“Y”connector on washer. Temp setting to warm.
Kinked hose or water tap not fully open Make sure the hoses are not bent or kinked. Verify cold water tap is
fully open.
Dynamic water pressure less than 20 psi Connect to a water source with a dynamic water PSI greater than
20.
Odors Source water conditions. Conditions can change
throughout the year. Wells without chlorine can grow
odor causing bacteria in the water.
Adding the Pre-lter can help in many cases.
Mold / Mildew / Bacteria growth or stagnant water in
washer – Front load machine worse than top loader but
aects both.
At least monthly run a commercially available washer cleaner
through the washer.
Clothes not clean Overloading Reduce the amount of clothing in the washer.
Incorrect water level or wash cycle Adjust to proper setting for amount and soil condition of clothing.
Heavy soiled clothing Add a small amount of detergent to wash.
Source water pollutants Adding the Pre-lter can help in many cases.

16
The Laundry Pro 2.0 System does not release into the water any type of harmful chemicals or agents that will harm clothes, the washer, or the environment. The
tables below are answers to common laundry questions compiled by the washing machine manufacturers.
TROUBLESHOOTING CONTINUED
Issue Common Cause Solution
White / Dark spots or stains Grease from agitator bearing or seal Grease from top load agitators can leak and deposit on clothing during
wash. Older machines are more prone to this due to age.
Fabric softener Fabric softeners, the will leave a greasy stain if it comes into contact with
clothing before FULLY diluted in water. Never pour directly on clothing.
Iron, Magnesium in the source water Minerals can cause clothes to stain. The LP Pre-lter may help for
excessive minerals.
Perfume or body spray/ lotion Perfumes, body sprays or lotions contain chemicals that can cause stains.
Overloaded Reduce the amount of clothes being washed.
Oils from rags or towels used to clean up spills Wash separately. Make sure no oily residue is left in the washer as this will
get on clothes in the next load.
Filter on washer needs cleaned and/or replaced Some washers contain water lters that need regular maintenance. If
applicable, make sure the lter is clean or replace as needed. Contaminates
from the lter have been known to leach out and stain clothing.
Issue Common Cause Solution
White / Dark spots or stains
(Continued)
Low water Adjust the water level.
Excessive chlorine in source water Adding the LP Pre-lter can help remove excessive chlorine from
the source water.
Dried detergent in washer coming o Detergents can dry inside the washer. On the drum, under the
agitator, between the inner and outer drum. When this dried
detergent breaks free and contacts clothing, staining can occur.
White clothing turning grey
over time
Mixing of colors Whites should never be washed with other colors. Even light-
colored clothing can transfer dyes, which will cause whites to grey.
Bleach If the source water is hard, bleach can react with some minerals in
the water.
Contaminates in water Well water is more prone to issues than city water as it’s not treated
or regulated. Installing a LP Pre-lter can help with some source
water issues.
Overloading the washer Front load washers are especially susceptible since they only use
a small amount of water. Reduce the amount of clothing in the
washer.
Holes in clothing after wash Chemicals (Bleach) Do not permit clothing to come into contact with bleaching or
other harsh chemicals.
Other clothing – contact with zippers, exposed
underwire, objects not removed from clothing, etc.
Remove objects from clothing before wash.
Mechanical – getting caught in the gap between the
drum and door seal. Damaged inner tub surface.
This may require a washer repair service call to correct.

17
LIMITED TWO (2) YEAR WARRANTY
Customer should not repackage and ship the Laundry Pro 2.0™ unit due to possibility of irreparable damage.
For warranty service, please contact your Distributor or our Customer Service for the address of the nearest service center.
Customer should not repackage and ship the Laundry Pro 2.0 unit because
irreparable damage can occur. For warranty service, please contact
Customer Service at (800) 572-0502.
WHAT IS COVERED BY THIS WARRANTY
We warrant the Laundry Pro 2.0 to the consumer, subject to the conditions
below, against defects in workmanship or material, provided that the
products are returned to your distributor within the following time periods:
• Laundry Pro 2.0 within 2 years of date of purchase.
INSTALLATION AND MAINTENANCE REQUIREMENTS
This warranty is expressly conditioned upon the following installation
and maintenance requirements: (i) the Laundry Pro 2.0 must be installed,
used & maintained in accordance with the Owner’s Manual & by a licensed
professional (if applicable); and (ii) all hoses must be replaced at the
intervals prescribed in the Owner’s Manual (proof of hose change may be
required). Failure to meet any of these requirements will void this warranty.
Servicing your Laundry Pro 2.0 by parties other than an authorized
representative and/or using parts other than genuine parts will also void
this warranty.
HOW TO OBTAIN WARRANTY SERVICE
Customers must contact their distributor or Customer Service and provide
proof of purchase within the above time periods. We will repair or replace
and return the product, without charge and within a reasonable period of
time, subject to the conditions in the above paragraphs, if its examination
shall disclose any part to be defective in workmanship or material. If we, in
our discretion, are unable to repair the product after a reasonable number
of attempts, we will provide either a refund of the purchase price or a
replacement unit, at the company’s option.
WHAT IS NOT COVERED BY THIS WARRANTY
This product is intended for household use only and only for use with
municipal water systems. Ordinary wear and tear shall not be considered a
defect in workmanship or material. These warranties do not apply to lters
nor for loss or damage caused by accident, re, abuse, misuse, improper
installation, leaking, modication, misapplication, commercial use, or by
any repairs other than those provided by an authorized representative. This
warranty does not cover any water damage.
EXCLUSION OF OTHER WARRANTIES AND CONDITIONS
EXCEPT AS PROVIDED HEREIN, Aerus MAKES NO REPRESENTATION OR
WARRANTY OF ANY KIND. ALL OTHER WARRANTIES OF ANY KIND, EXPRESS
OR IMPLIED, ARE HEREBY EXPRESSLY DISCLAIMED, INCLUDING ANY
IMPLIED WARRANTY OF MERCHANTABILITY OR FITNESS FOR A PARTICULAR
PURPOSE.
UNAUTHORIZED CHANNELS & MISSING SERIAL NUMBERS
Our products are authorized for sale through Authorized Representatives
only. All warranties are void if a product is purchased through unauthorized
channels. We will not extend warranty coverage on any product sold in a
manner that violates our Internet advertising policies and guidelines. This
includes websites that are not authorized to use our trademarked names,
images and logos, as well as Internet auction sites. These websites would
include ebay® and CraigsList®. If a valid serial number is missing from the
product, the warranty will be voided. To conrm warranty coverage prior to
purchasing a product, contact Customer Service.
LIMITATION OF LIABILITY FOR SPECIAL, INCIDENTAL OR
CONSEQUENTIAL DAMAGES
Aerus SHALL NOT IN ANY CASE BE LIABLE FOR SPECIAL, INCIDENTAL OR
CONSEQUENTIAL DAMAGES ARISING FROM BREACH OF EXPRESSED OR
IMPLIED WARRANTIES, CONDITIONS, GUARANTEES OR REPRESENTATIONS,
BREACH OF CONTRACT, NEGLIGENCE OR ANY OTHER LEGAL THEORY. Such
excluded damages include, but are not limited to, loss of prots or revenue,
loss of the use of the products, and any loss caused by leaks or other water
damage.
FOR U.S. APPLICATION ONLY
This warranty gives you specic legal rights, and you may also have other
rights which vary from state to state. Some states do not allow limitations
on warranties, or on remedies for breach. In such states, the above
limitations may not apply to you.
FOR CANADIAN APPLICATION ONLY
Exclusion of Subsequent Owners: Except as otherwise required by
applicable legislation, this warranty is not transferable. This warranty gives
you specic legal rights and you may also have other rights which vary
from province to province. Some provinces and territories do not allow
limitations on warranties, or on remedies for breach. In such provinces or
territories, the above limitations may not apply to you.
If any provision of this warranty or part thereof is held by a court of
competent jurisdiction to be invalid, illegal or unenforceable, the validity,
legality and enforceability of the remaining provisions or parts thereof will
not in any way be aected or impaired within the jurisdiction of that court.
This entire warranty shall continue to be valid, legal and enforceable in any
jurisdiction where a similar determination has not been made.
This warranty is provided by:
Aerus LLC
300 East Valley Drive
Bristol, VA 24201
SERVICE
Every eort is made to ensure that customers receive an up-to-date
Owner’s Manual on the use of our products; however, from time to time,
modications to our products may, without notice, make the information
contained herein subject to alteration. For the latest information, please call
customer service at (800) 572-0502.
España: www.laundrypro.es
Italia: www.laundrypro.it
Portugal: www.laundrypro.pt

18
Aerus LLC | 300 East Valley Drive | Bristol, VA 24201 | 800.572.0502

www.beyondbyaerus.com
España: www.laundrypro.es
Italia: www.laundrypro.it
Portugal: www.laundrypro.pt
Aerus LLC | 300 East Valley Drive | Bristol, VA 24201 | 800.572.0502
© Aerus LLC. All Rights Reserved
LP_OM_65-00759_VA-01355_EURO_0819
For information regarding the use of this product please call Customer Service.
1-800-572-0502
This equipment has been tested and found to
comply with the limits for a class B digital device,
pursuant to part 15 of the FCC Rules. These limits are
designed to provide reasonable protection against
harmful interference in a residential installation. This
equipment generates, uses, and can radiate radio
frequency energy, and if not installed and used in
accordance with the instructions, may cause harmful
interference to radio communications. However, there
is no guarantee that interference will not occur in a
particular installation. If this equipment does cause
harmful interference to radio or television, which can
be determined by turning the equipment off and on,
the user is encouraged to try to correct the interference
by one or more of the following measures:
Reorient or relocate the receiving antenna.
Increase the separation between the equipment and
receiver.
Connect the equipment into an outlet on a circuit
different from that to which the receiver is connected.
Consult the Independent Contractor for help.
FCC Declaration of Conformity
Name: Aerus LLC
Model: W1017B; W1017E
Manufacturer: Aerus LLC
This device complies with Part 15 of the FCC Rules.
RESPONSIBLE PARTY
Aerus LLC
300 East Valley Drive
Bristol, VA 24201
Ph: 800.572.0502
Signature:___________________________
Printed Name: Andrew Eide
Title: Vice President of Product Development
and Manufacturing
Date: 08/06/19
Other manuals for Beyond LAUNDRY PRO 2.0
1
Table of contents