Aesculap Exacta/Isis User manual
Aesculap
B. Braun VetCare
Instructions for use
Exacta/Isis
Mode d’emploi
Exacta/Isis
Instrucciones de manejo
Exacta/Isis
取扱説明書
Exacta/Isis


DEUTSCH
3
English. . . . . . . . . . . . . . . . . . . . . . . . . . . . .4
Instructions for use
Français . . . . . . . . . . . . . . . . . . . . . . . . . . .22
Mode d’emploi
Español . . . . . . . . . . . . . . . . . . . . . . . . . . .40
Instrucciones de manejo
日本語 . . . . . . . . . . . . . . . . . . . . . . . . . . .58
取扱説明書

ENGLISH
4
Contents
1. Names of parts. . . . . . . . . . . . . . . . . . . . . . . . . . . . 7
IMPORTANT SAFETY INSTRUCTIONS . . . . . . . . . . . 7
OPERATING INSTRUCTIONS. . . . . . . . . . . . . . . . . . 9
2. Safety . . . . . . . . . . . . . . . . . . . . . . . . . . . . . . . . . . 10
2.1 Explanation of warnings . . . . . . . . . . . . . . . . . . . 10
2.2 Intended use. . . . . . . . . . . . . . . . . . . . . . . . . . . . . 11
2.3 General safety information . . . . . . . . . . . . . . . . . 11
2.4 Safety during operation. . . . . . . . . . . . . . . . . . . . 12
3. Preparation. . . . . . . . . . . . . . . . . . . . . . . . . . . . . . 13
3.1 Charging . . . . . . . . . . . . . . . . . . . . . . . . . . . . . . . . 13
3.2 Storing the power cable . . . . . . . . . . . . . . . . . . . 14
4. Operation . . . . . . . . . . . . . . . . . . . . . . . . . . . . . . . 14
4.1 Switching On and Off . . . . . . . . . . . . . . . . . . . . . 14
4.2 Comb attachment . . . . . . . . . . . . . . . . . . . . . . . . 14
5. Cleaning and care . . . . . . . . . . . . . . . . . . . . . . . . 15
USER-MAINTENANCE INSTRUCTIONS . . . . . . . . . 15
6. What should I do if .... . . . . . . . . . . . . . . . . . . . . . 17
7. Disposal. . . . . . . . . . . . . . . . . . . . . . . . . . . . . . . . . 18
8. Technical data. . . . . . . . . . . . . . . . . . . . . . . . . . . . 20
9. Two-year guarantee . . . . . . . . . . . . . . . . . . . . . . . 20

ENGLISH
5
Thank you
for choosing the Exacta/Isis, the professional trimmer
from Aesculap.
It utilises state-of-the-art technology, is innovative and
has a strong emphasis on design. When developing the
trimmer, the requirements for a professional trimmer
used in a hair salon were taken into consideration.
The trimmer is specifically designed for precision cutting
of hair contours.
In addition to optimum cutting performance, the
Exacta/Isis provides the following advantages:
• Light weight
• Quiet, low-vibration motor
• Battery operation
• Rapid charge in one hour
• 4-stage cutting length adjustment with comb
attachment
• Cable storage compartment
We hope you enjoy working with the trimmer.
Best wishes
Aesculap Suhl GmbH
ENGLISH
6
10
11
12
13
8
2
6
5
7
3
19
4

ENGLISH
7
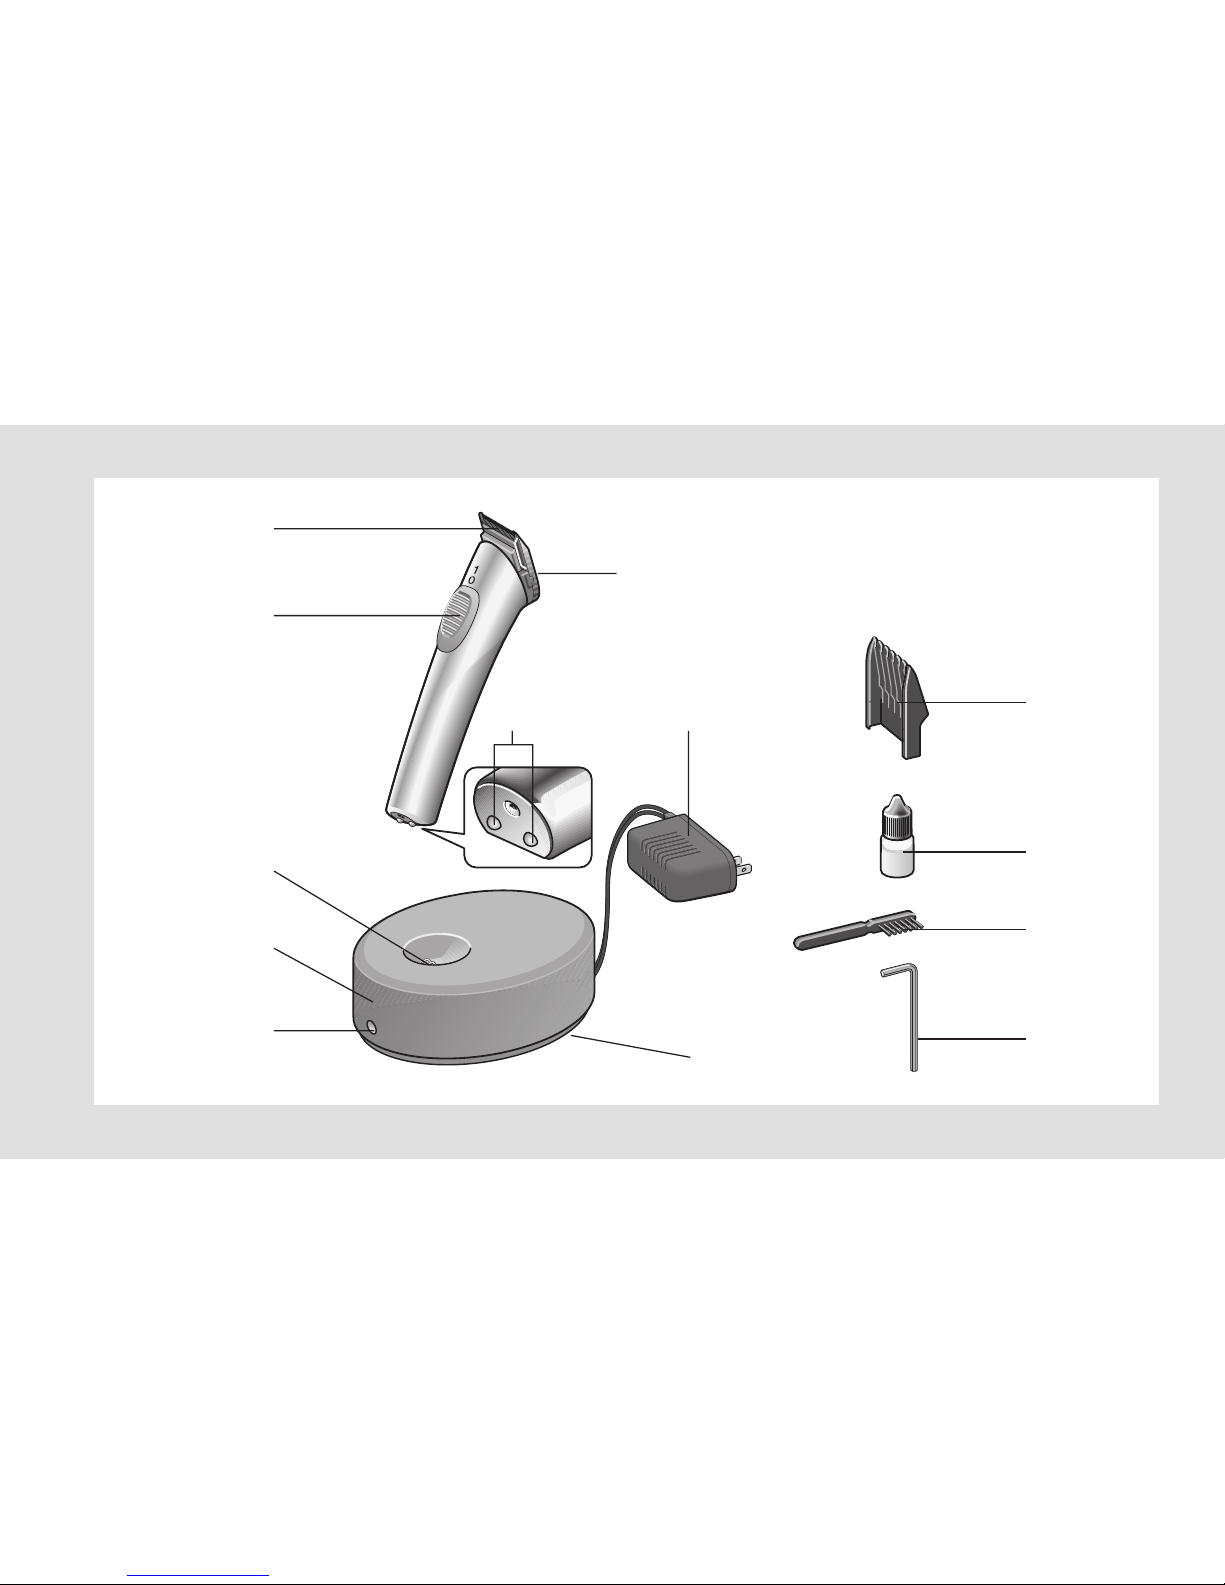
1. Names of parts
1Charging indicator
2Charging unit
3Charging contacts
4On/Off switch
5Blade set
6Blade set fixing screw
7Charging contacts of the appliance
8Mains adapter
9Cable storage compartment
10 Comb attachment
11 Oil bottle
12 Cleaning brush
13 Allen key (in base of charging unit)
When using an electrical appliance, basic precautions
are required to always be followed, including the fol-
lowing:
IMPORTANT SAFETY
INSTRUCTIONS
¾READ ALL INSTRUCTIONS BEFORE USING
THIS APPLIANCE.
DANGER
Danger of electric shock!
¾Do not reach for an appliance that has
fallen into water. Unplug immediately.
¾Do not use while bathing or in a shower.
¾Do not place or store appliance where it
is able to fall or be pulled into a tub or
sink. Do not place in or drop into water
or other liquid.
WARNING
Danger of burns, fire, electric shock, or
injury to persons!
¾Plug charger directly into receptacle -
do not use an extension cord.

ENGLISH
8
Please read the instructions carefully, especially the
chapter on “Safety”, before using the trimmer. This will
protect you from possible dangers and the appliance
from damage due to incorrect operation.
¾Keep these instructions in a safe place for future re-
ference. If you pass on the appliance to someone else,
be sure to hand over these instructions as well.
¾Except when charging, always unplug this appliance
from the electrical outlet immediately after using.
¾Unplug this appliance before cleaning.
¾Unplug charger before plugging or unplugging appli-
ance.
¾An appliance shall never be left unattended when
plugged in.
¾Close supervision is required when this appliance is
used by, on, or near children or invalids.
¾Use this appliance only for its intended use as
described in this manual. Do not use attachments not
specified by the manufacturer.
¾Never operate this appliance when it has a damaged
cord or plug, when it is not working properly, after it
has been dropped or damaged, or after it has been
dropped into water. Return the appliance to a service
center for examination and repair.
¾Keep the cord away from heated surfaces.
¾
Never operate this appliance with the air openings
blocked or while on a soft surface, such as a bed or
couch, where it is possible for the air openings to be
blocked. Keep the air openings free of lint, hair, and
similar objects.
¾Never drop or insert any object into any opening.
¾Do not use outdoors or operate where aerosol (spray)
products are being used or where oxygen is being
administered.
¾Do not use this appliance with a damaged or broken
comb, as it has the potential to result in facial injury.
¾Always attach plug to appliance first, then to outlet.
To disconnect, turn all controls to “OFF” then remove
plug from outlet.
SAVE THESE
INSTRUCTIONS.
ENGLISH
9
Servicing of double-insulated appliances
In a double-insulated appliance, two systems of insula-
tion are provided instead of grounding. No grounding
means is provided on a double-insulated appliance, nor
should a means for grounding beadded to the appliance.
Servicing a double-insulated appliance requires extreme
care and knowledge ofthe system, and should be done
only by qualified service personnel. Replacement parts
for a double-insulated appliance must be identical to the
partsthey replace.
¾A double-insulated appliance is marked with the-
words “DOUBLE INSULATION” or “DOUBLE INSULA-
TED”. The symbol may also be marked on the
appliance. This message about ...
Ground
Fault
Circuit
Interrupters
... can save a life!
¾INSTALL A GFCI*!
*GFCI is a sensitive device which reacts immediately to a
small electric current leak by stopping the electricity
flow.
OPERATING
INSTRUCTIONS

ENGLISH
10
¾IF YOU MUST USE THIS APPLIANCE IN THE BA-
THROOM, INSTALL A GFCI (GROUND FAULT CIR-
CUIT INTERRUPTER). NOW!
Your local electrician can help you decide which type is
best for you – a portable unit that plugs into the electri-
cal outlet or a permanent unit installed by your electri-
cian. The National Electrical Code now requires GFCIs in
the bathrooms, garages, and outdoor outlets of all new
homes.
Why do you need a GFCI?
A regular fuse or circuit breaker won’t protect you under
these circumstances. A GFCI offers you far greater pro-
tection.
¾A GFCI can save your life. Compared to that, the
price is small! Don’t wait… install one now!
2. Safety
2.1 Explanation of warnings
In these instructions you will find the following warn-
ings:
NOTE
Low risk. Points that you should observe when using or
handling the appliance.
Electricity and water don’t mix. If
your appliance falls into water while
it’s plugged in, the electrical shock
can kill you… even if the switch is
off.
DANGER
High risk. Failure to observe the warning
can cause serious injury.
WARNING
Medium risk. Failure to observe the
warning may cause damage to property.

ENGLISH
11
2.2 Intended use
• The trimmer must only be used for cutting hair of
small animals.
• The appliance is designed for indoor use only. Do not
use outdoors (garden, patio etc.).
• The appliance was developed for professional use
in grooming-salons and veterenary practice.
Provided the safety information is observed, it can
also be used in the home.
2.3 General safety information
¾Never use the appliance if the blade head is damaged
or breaking up, as this could cause injuries to the skin.
¾Check that the electrical outlet voltage complies with
the voltage specified on the rating plate.
¾Unplug the electrical outlet adapter if a fault occurs
during charging or when running from an electrical
outlet.
¾Keep the appliance out of reach of children.
¾Also keep the packaging material, e.g. plastic film,
away from children.
¾Protect the power cord from damage. Never pull on
the power cord. When pulling the electrical outlet ad-
apter out of the socket, always grasp the adapter its-
elf.
¾To avoid risks, repairs must only be carried out by au-
thorised Wella Customer Service Centers. This also
applies to replacing the rechargeable battery.
¾If the power cord to the appliance is damaged, it must
be replaced by the manufacturer or the manufactu-
rer's customer service or similarly qualified persons in
order to avoid risks.
¾The blade head must not be dismantled.
NOTE
The safety of Aesculap electrical appliances is in line with
the recognised state of the art and the German
Equipment Safety Act.
Light-emitting devices such as LEDs or infrared light do
not exceed Laser class 1 of IEC 825-1.

ENGLISH
12
Given the present state of the art, components of
electrical appliances are subject to a certain degree of
wear over time. To ensure perfect functioning and safety,
we therefore recommend regular inspection by the
Technical Customer Service of Aesculap Suhl GmbH.
Service Addresses
Albert Kerbl GmbH
Felizenzell 9
84428 Buchbach / Germany
Phone: +49 8086 933-100
Fax: +49 8086 933-500
E-Mail: [email protected]
www.kerbl.com
Further service addresses you can demand from the men-
tioned above address.
2.4 Safety during operation
• To ensure proper functioning of the appliance, the
blade set must be cleaned regularly and oiled in the
appropriate places (see “Cleaning and care” on
page 15).
• The appliance must be switched off whenever:
– you put it down, e.g. to recharge it or stop cutting
hair for a short period.
– you fit or remove the comb attachment.
– you want to clean or oil the appliance.
¾Use the trimmer only in combination with the original
Aesculap accessories (charging unit, comb attach-
ment etc.).
¾Never attempt to remove dust or foreign bodies from
inside the appliance with pointed objects (e.g. with
the tail of a comb).
DANGER
Do not touch the blade set of the active
appliance.

ENGLISH
13
3. Preparation
3.1 Charging
The appliance as supplied is not yet ready for operation.
Before plugging in the trimmer, make sure that the
mains voltage agrees with the voltage specified on the
rating plate.
Prior to first use, the appliance should be charged for
2 hours.
It is not possible to “overcharge” the appliance.
NOTE
Should you use both the new hair trimmer and the
previous model, you can charge the new appliance in the
old charging unit (charging time: 16 hours) and/or the old
appliance in the new charging unit (charging time:
16 hours).
¾Place the appliance in the charging unit. It positions
itself and starts charging. The red charging
indicator 1is always on when the appliance is charg-
ing. Make sure the On/Off switch 4is in the 0 position
when charging.
To maintain the charging capacity of the battery we
recommend occasionally draining the battery until
the motor stops.
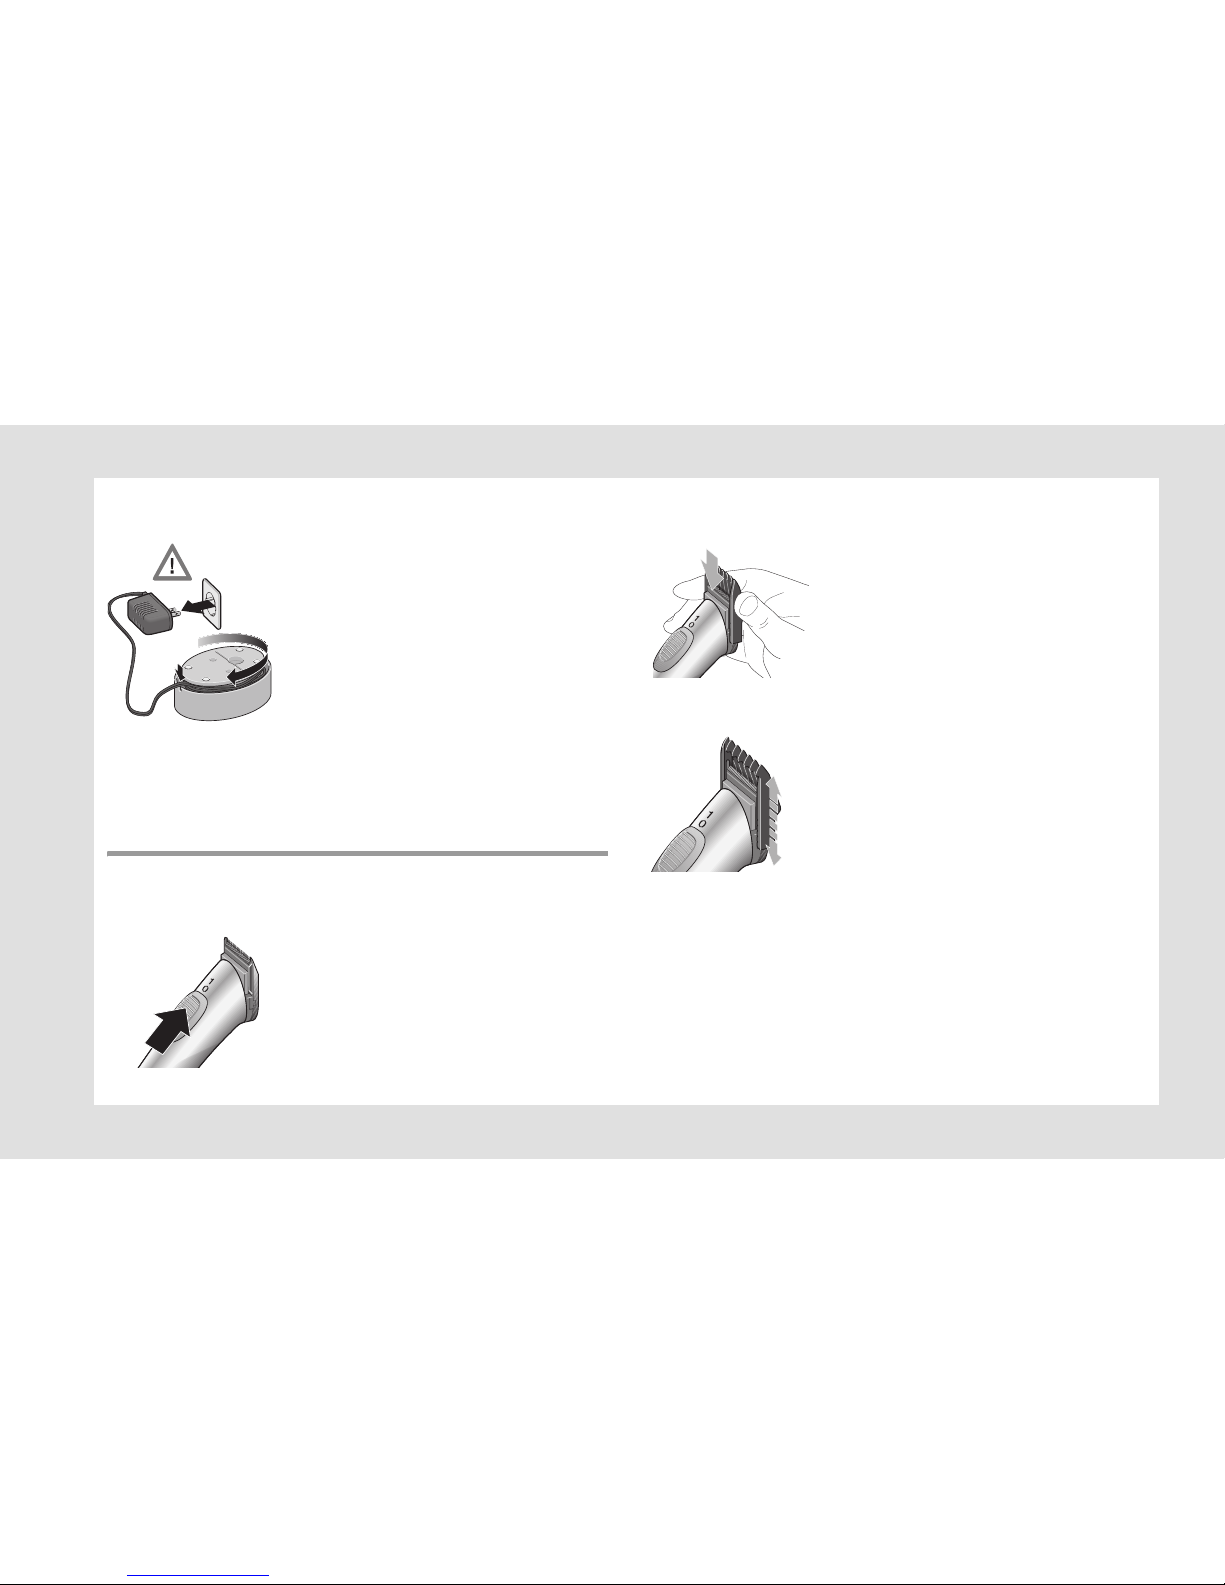
¾Insert the mains adapter 8in a
power socket.
¾Place the charging unit 2on a
flat surface.
ENGLISH
14
3.2 Storing the power cable
4. Operation
4.1 Switching On and Off
4.2 Comb attachment
The further you push the comb attachment onto the
blade set, the shorter the cutting length.
If you do not need the full length of
the cord, part of it can be stored in
the cable storage compartment 9.
¾Pull out the mains plug.
¾Turn the charging unit upside
down.
¾Wind the excess cable round the
holder in the base, then run the
cable through the small recess in
the housing to the outside.
¾To switch the appliance on, slide
the On/Off switch 4forward.
¾To switch the appliance off, slide
the On/Off switch to position 0.
¾Switch off the trimmer and slide
the comb attachment onto the
blade set until it snaps into place.
You can now start trimming hair
with the trimmer in the usual way.
¾The comb attachment can be ad-
justed to 4 different cutting
lengths (approx. 3 to 6 mm). To
do so, push it to the required po-
sition on the blade set.

ENGLISH
15
5. Cleaning and care
To ensure proper functioning and full performance from
your trimmer, clean and oil the appliance regularly.
Cleaning the blade set
If used regularly, the blade set 5should be thoroughly
cleaned once a day.
¾Switch the appliance off.
¾Remove the comb attachment if fitted.
¾Use the cleaning brush 12 to remove any hairs.
Oiling the blade set
To maintain the high-quality cutting performance of the
blade set as long as possible, it must be oiled regularly –
preferably daily.
USER-MAINTENANCE
INSTRUCTIONS
WARNING
Damage to the clipper head caused by its
removal!
¾Never remove the clipper head. Once
removed it cannot be reattached.
¾Remove the comb attachment if
fitted.
¾Lubricate the areas where there
is contact between the upper and
lower parts of the blade set (see
illustration).

ENGLISH
16
Replacing the blade set
The blade set is subject to wear. Even if you look after the
appliance properly, the cutting performance will deteri-
orate. Replace the blade set when it is worn. The blade
set can be ordered separately as a spare part from
Aesculap Customer Service (see addresses at the end of
these instructions).
WARNING
Damage to casing when screwing on
clipper head!
¾Do not over tighten the screw.
¾Make sure the On/Off switch 4
is in the 0 position.
¾Remove the Allen key 13 from
the base of the charging unit
and use it to loosen the blade
set screw 6.
¾Loosen the screw fully and re-
move it.
¾Push the blade set upwards with
your thumb.
¾Push the new blade set on until
it snaps into place and secure it
using the screw.

ENGLISH
17
While the blade set is removed, you can use the
cleaning brush to remove residual hair from inside the
appliance.
Cleaning the appliance
¾Clean your appliance occasionally with a damp cloth,
then wipe it dry.
Cleaning the charging contacts
If the charging contacts 7on the appliance or the charg-
ing contacts 3on the charging unit are dirty, charging
may not be possible or may be interrupted.
¾Clean the contacts using a cloth or wad of cotton
wool soaked in alcohol or spirit.
Care of the NiMH rechargeable battery
To maintain the charging capacity of the battery we rec-
ommend occasionally draining the battery until the mo-
tor stops.
If the battery is run down (motor stops), be sure to
switch the On/Off switch to 0 and place the appliance
in the charging unit.
¾Make sure you do not leave the appliance switched
on when putting it aside if the battery is run down.
¾Make sure the appliance is switched off (On/ Off
switch to 0) when you place it in the charging unit.
6. What should I do if ...
… the appliance will not switch on?
¾Is the battery low? Plug in the mains adapter for the
charging unit and charge the trimmer.
¾Is the blade set dry? The blade set must be oiled. Pro-
ceed as described on page 15.
… the blade set “sticks”?
¾The blade set must be oiled. Proceed as described on
page 15.
ENGLISH
18
… the charging indicator does not light up when
charging?
¾Clean the charging contacts.
¾The appliance may not be positioned correctly in the
charging unit. Position it correctly.
¾Is the charging unit properly connected?
… the appliance switches itself off?
¾The battery is low. Charge the trimmer.
… the battery will no longer charge?
¾Send the appliance to Aesculap. Our customer service
technicians will fit a new battery and ensure environ-
mentally sound disposal of the old one.
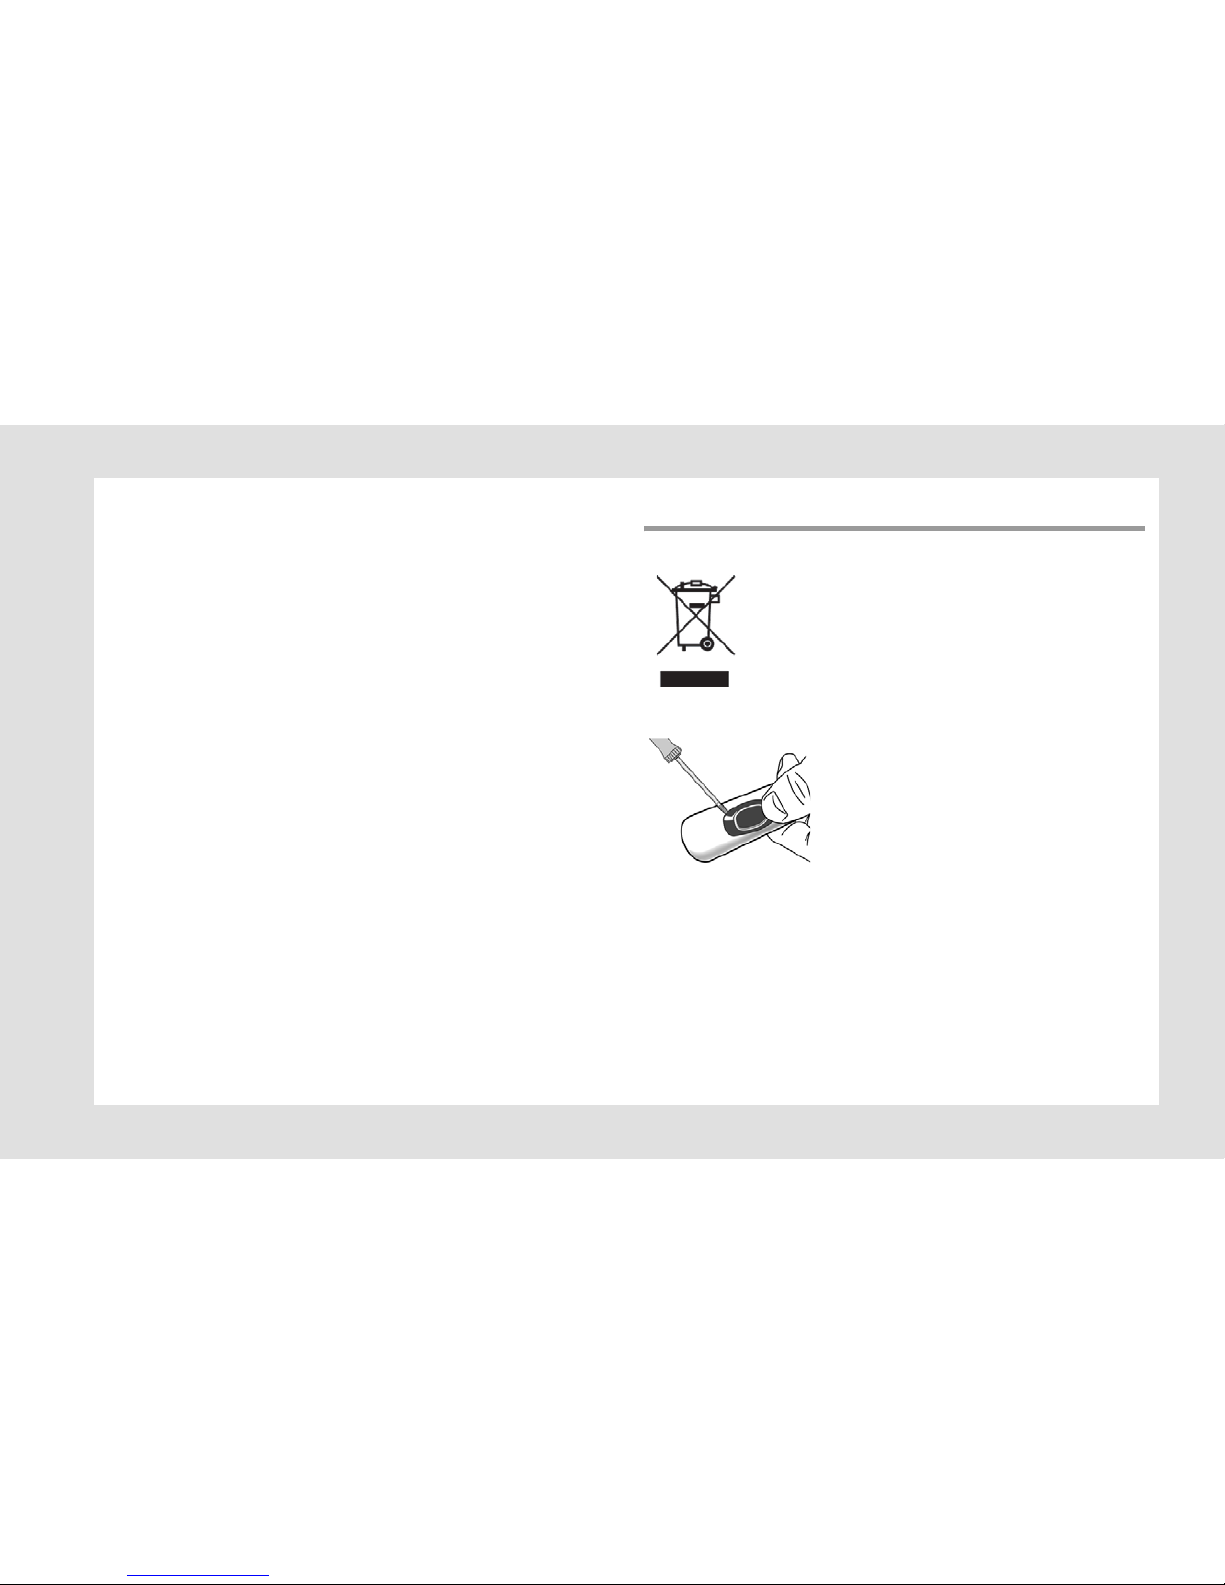
7. Disposal
This electric appliance is fitted with an
integral battery.
NOTE
The battery must be removed prior to
disposing of the appliance!
¾Unscrew the shearing head.
¾Lever off the control button (see
illustration).
ENGLISH
19
At the end of its service life, have the electric appliance
returned to the supplier/stockist or the appropriate
collection point at the local, public waste disposal
facility (recycling center, materials collection center,
etc.).
Electric appliances must not be disposed of as residual or
general waste.
This also applies to electric appliances ultimately used
for other than private purposes, e.g. for trade or com-
merce. Should the relevant local, public disposal facili-
ties refuse acceptance of electric devices used for other
than private purposes, the facilities’ recycling advice of-
fice will provide information pertaining to the environ-
mentally compatible disposal of the items in question.
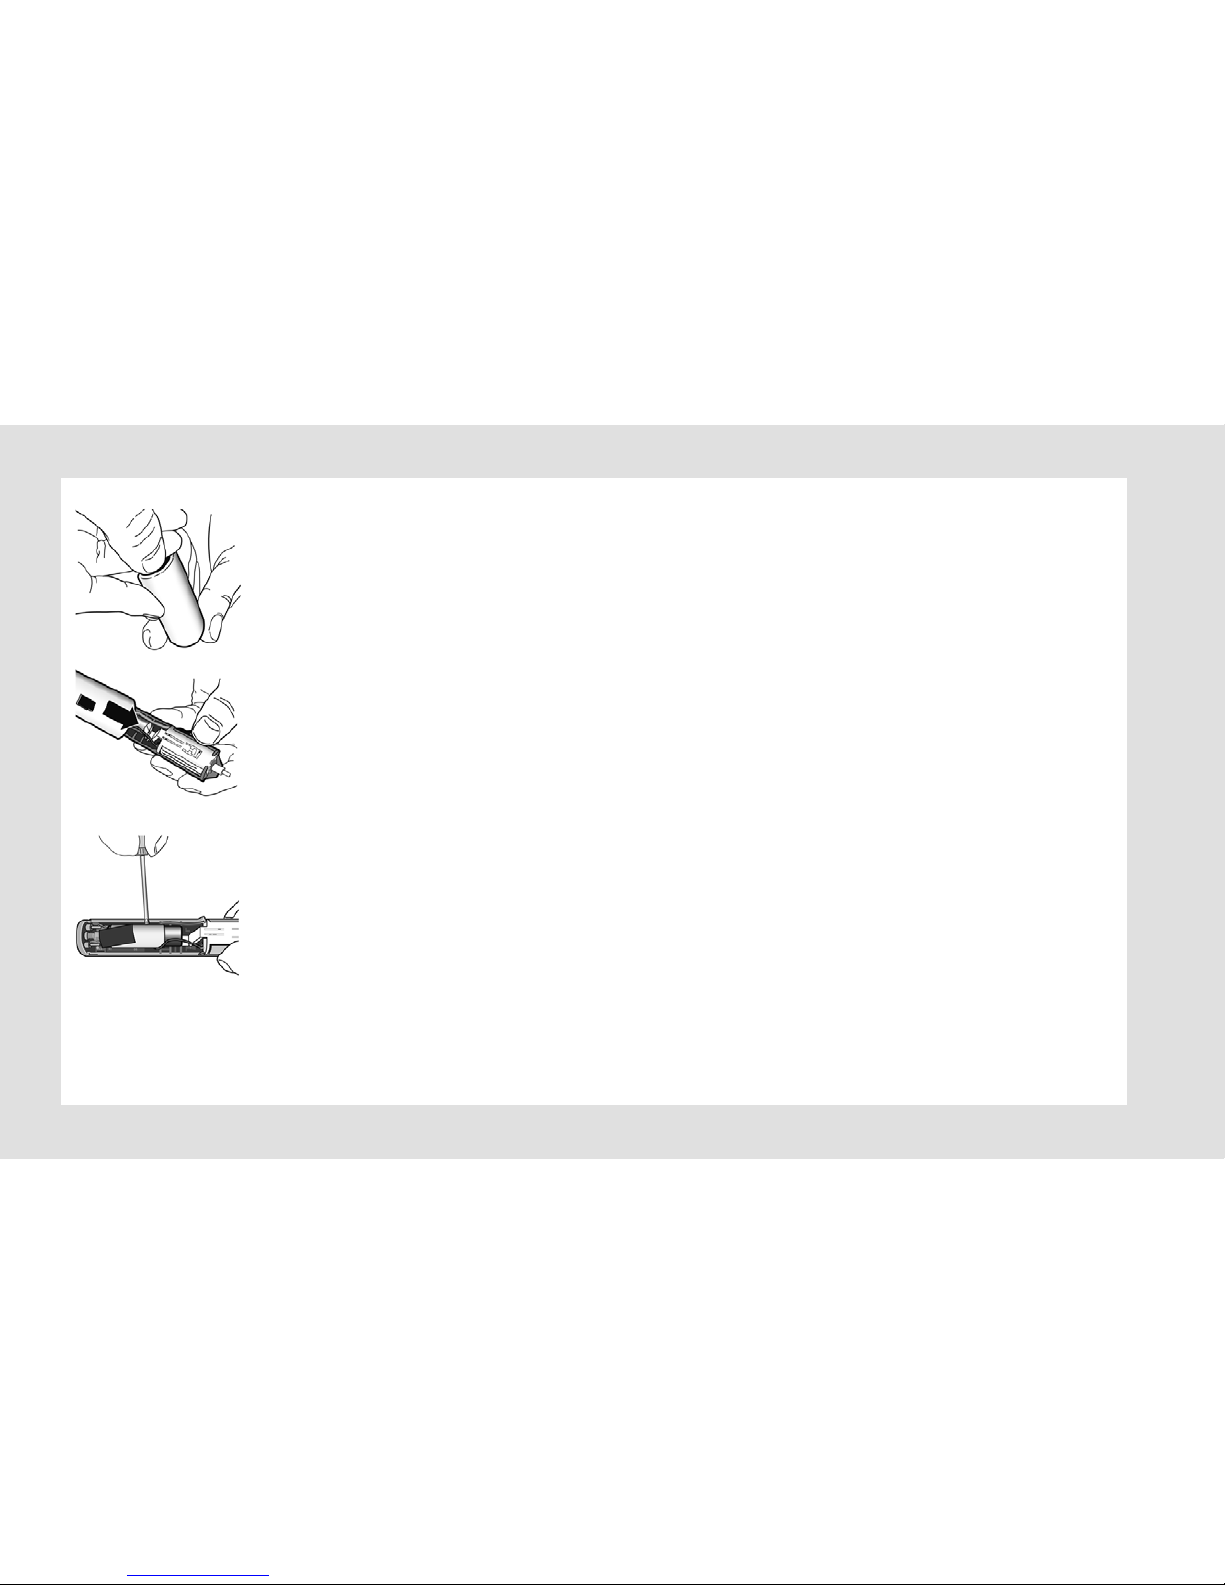
¾Push out the inner part (see
illustration).
¾Pry out the battery (see
illustration).
¾Dispose of the battery,
separately.
ENGLISH
20
8. Technical data
Subject to technical change without notice.
9. Two-year guarantee
Dear Customer,
Thank you for choosing a product from our company.
For decades, the name Aesculap has stood for proven
quality and first-class service. We are known to provide
innovative, high-performance products for our custom-
ers. Aesculap manufactures high-quality devices, using
high-quality materials and careful manufacturing pro-
cesses. We would like to point out to you that we are not
liable for defects in our products, if these are caused by
improper use, normal wear or are caused by the product
being improperly used or if inappropriate or not properly
functioning third-party products are used.
Parts that are typically subject to wear, and for which we
are therefore not liable, are the battery and clipper head.
Defects that do not affect or only negligibly affect the
value or function of the product are also excluded from
our warranty.
If we are liable under our warranty, we reserve the right
to repair or replace the product.
Product Exacta/Isis
Electrical outlet adapter:
Input voltage
Output voltage 110–240 V ~ 50/60 Hz
DC4V,700mA
Emission sound pressure
level LpA ≤70 dB(A)
Total vibration level ah = 2.76 m/s²
Attachment 1 comb attachment
Dimensions 140 x 30 x 36 mm
Weight 120 g
Table of contents
Languages:
Other Aesculap Trimmer manuals


