manuals.online logo
Brands
  1. Home
  2. •
  3. Brands
  4. •
  5. AGM
  6. •
  7. Welding System
  8. •
  9. AGM JS-1 User manual

AGM JS-1 User manual

AGM Pin Welder
Instruction Manual
Model JS-1
AGM Industries, Inc.
16 Jonathan Drive, Brockton, MA 02301
TELEPHONE: 1 (800) 225-9990 FAX: 1 (800) 342-5246
www.agmind.com
Read equipment manufacturer’s manual before using this product. Failure
to do so can result in serious injury or death.
2
As is true for all types of welding equipment, serious injury may result if not properly
used and maintained. Though numerous safety features are built into this welder, the
users must familiarize themselves with the proper installation, usage and maintenance of
the welder as outlined in this instruction manual.
In addition, the following should be observed:
1. Refer all service to qualified personnel.
2. DO NOT operate the welder with the cover removed.
3. DO NOT work with or keep welder in wet or damp areas.
4. DO NOT weld in the rain.
5. DO NOT look directly at the weld as it is taking place, as this may cause eye
injury.
6. DO NOT touch the weld pin immediately after the weld has been made, as
the pin can become very hot and may burn the skin if touched. Allow
sufficient time for the pin to cool before handling it.
7. DO NOT weld near flammable materials or liquids, in or near areas
containing explosive gases or fumes.
8. DO wear protective clothing when welding to prevent weld slag from
contacting and burning the skin.
9. DO keep this manual with the welder at all times and be certain that anyone
who operates the welder reads and understands this manual thoroughly.
10. DO wear safety glasses.
11. DO follow guidelines for a safe workplace.
3
TABLE OF CONTENTS –MODEL JS-1 WELDER
PAGE
Foreword and Warranty 4
Description of Welding System 5
System Operating Instructions 7
Model 250-C Weld Gun
Description of Accessories 9
Installing and Removing Collets, Stops, etc. 11
Installing 437G- & 250C-G Type Stops 12
250C-G & 437-G Type Stops Selection Sheet 13
Installing and Removing Collet Adaptor 14
Installing or Changing Springs 15
Disassembly of Weld Gun 16
Illustration 1 17
Operating Suggestions 18
Maintenance 19
Model 250-C Weld Gun Set-up Sheets
Welding Steel Pins 20
Welding Aluminum CD Pins 21
Welding Pins Over 7” Long 22
Welding Flanged Steel & Stainless Studs up to ¼-20 Dia. 23
Welding to Curved Surfaces 24
Typical Template 25
Welding Through a Template 26
Welding Aluminum Non-Flanged & Flanged Studs 27
Welding Non-Flanged Steel and Stainless Steel Studs 27
Setup for Adjustable Foot Assembly 28
Welding Cupped Head Pins 29
Cupped Head Pin Application Sheet 30
Assembly & Disassembly of 437-PM 31
Legend –Wiring Diagram 32
Welder Part Illustrations
Illustration 2 34
Illustration 3 35
Illustration 4 36
Power Pack Parts List 37
4
FOREWORD
The AGM Model JS-1 is the most up to date welding system in the pin and stud welding
industry.
This welding system has been carefully constructed from the finest and most reliable
parts available, with all components being rigidly inspected and tested to assure long and
trouble free performance.
This Initial Contact Capacitor Discharge (CD) welding system requires no flux, inert gas
or arc shields to weld pins or studs.
The JS-1 welding system incorporates features that make it inexpensive to operate and
maintain. It will give excellent service over a long period of time with just ordinary care
and maintenance.
This manual provides adequate information for the operation and maintenance of the
system. If you are in need of additional application information or service, contact your
AGM representative or the factory direct.
LIMITED WARRANTY
No Warranty, including warranty of merchantability, express or implied, is made in
connection with the sale of this machine, except that AGM Industries will repair or
replace defective parts which may develop under normal and proper use of the machine
during a period of ninety (90) days from the date of delivery, provided that the warranty
shall not be valid if the machine has been subjected to misuse or abuse or has not been
installed, adjusted, maintained, operated, or used in accordance with instructions
furnished by AGM Industries, or if pins or studs other than those manufactured by AGM
Industries, even though purchased from sources approved by AGM Industries, are used
with it. Notice of any claim hereunder shall be given by the purchaser to AGM Industries
in writing within five (5) days after the defect shall have been discovered. AGM shall
have no liability for any labor or material charge or shipping cost not expressly
authorized by them in writing; and in this event, their liability shall be limited as in these
conditions set forth.
5
DESCRIPTION OF WELDING SYSTEM
The AGM Model JS-1 Welding System is a versatile, solid state, portable pin and stud
welding system designed for a variety of fastening applications. It was developed for
welding 14 Ga. CD pins through ¼” CD studs, including cup head pins, onto a metallic
surface through the use of initial contact Capacitor Discharge (CD) welding. The
welding system consists of a power pack; a lightweight weld gun, gun lead extension and
ground lead complete with a ground clamp.
The system is capable of making up to 16 welds per minute to low carbon, stainless and
galvanized steel, as well as too many aluminum and copper alloys. The power pack
provides the source of energy and all the necessary controls for the welding process. It
also has a circuit to automatically discharge the weld capacitors through a resistor when
the AC line switch is placed in the “OFF” position.
The weld gun has a contoured, pistol shaped handle with a trigger button. As a safety
feature, all AGM welding systems are designed so that the stud or pin must be in contact
with the work piece before the weld cycle can be actuated.
When used with AGM pins or studs, this system is a most valuable and economical tool
and is suited for most commercial and industrial applications.
SAFETY FEATURES
Weld Terminal Voltage Monitor
If the weld SCR shorts, this circuit will sense the capacitor voltage at the weld
terminals, which in turn will actuate the main circuit breaker.
Care must be taken to operate this welder on the rated AC line voltage range (95-130
VAC) only. If operated on other voltages, damage may occur.
6
DESCRIPTION OF WELDING SYSTEM
SYSTEM SPECIFICATIONS
Model JS-1 Power Pack Model 250C Weld Gun
Construction 16 Ga. Fabricated Steel Type Pistol Grip
Mode Contact
Dimensions 13 ½” L
9 “W Weight 2 lbs.
8” H Dim. 8 ½” L x 2” D
Weight 32 lbs.
Feed Manual
Capacitance 38,000 fd. Accuracy .005” on Center
ACCESSORIES
Input 95-130 VAC 60Hz 15 Amp
Gun Lead Extension 24 Ft.
Weld Voltage 100-220 VDC
Ground Cable 26 Ft.
Mode of Welding Contact
Weld Polarity Straight or Reverse
.
Weldable 14 Ga. Pin
Stud thru
Diameter *¼” Threaded Stud
Weld Rate Up to 16 per minute
(Based on stud/pin dia)
*All ¼”threaded studs must be mild steel or stainless steel only not
aluminum and require Heavy Duty Cables.
7
WELDING OPERATION
WELDER SET UP
Set up the weld gun as described on pages 8-15 (refer to the Gun Set-Up sheets for
specific details). Next, install the cables as shown below. Note that the illustration shows
the gun set up for “reverse” polarity (ground to “negative”).
This polarity is used for welding tipped CD pins or studs to galvanized
steel. Refer to the Gun Set-Up Sheet for proper ground polarity.
NOTE: Be sure all plugs are inserted fully into proper receptacle. Rotate clockwise until
tight. The cables should be laid out in a straight line so that they are free of kinks, coils or
sharp bends.
Proceed as follows: (refer to Gun Set-Up Sheet for proper ground polarity)
1Insert the ground lead plug into the proper weld receptacle. Rotate until tight.
Attach the ground clamp to clean portion of the work piece. Remove paint,
rust, etc. as necessary.
2Insert the gun lead extension weld plug into the proper weld receptacle. Rotate
until tight.
3Insert the gun lead extension three-prong control plug into the female
“control” receptacle, and rotate until tight.
4Insert the three-prong control plug of the gun into the female control
connector of the gun lead extension. Rotate until tight.
5Insert the weld plug of the gun into the female weld connector of the gun lead
extension. Rotate until tight.
6The AC power lead, attached to the rear panel of the power pack, should be
plugged into a 115 VAC, 60Hz, 15 Amp power source.
The welding system is now connected and ready to operate.
8
WELDING OPERATION
1. Adjust the voltage control to the desired setting for your application.
2. Turn the AC line switch “on”. The Amber Weld Ready Light will glow within
three seconds, indicating that the weld capacitors are charged and the unit is
ready to weld.
3. Insert a weld stud or pin through the collet protector (when used) and into the
collet. Make sure the stud/pin is inserted as far as it will go.
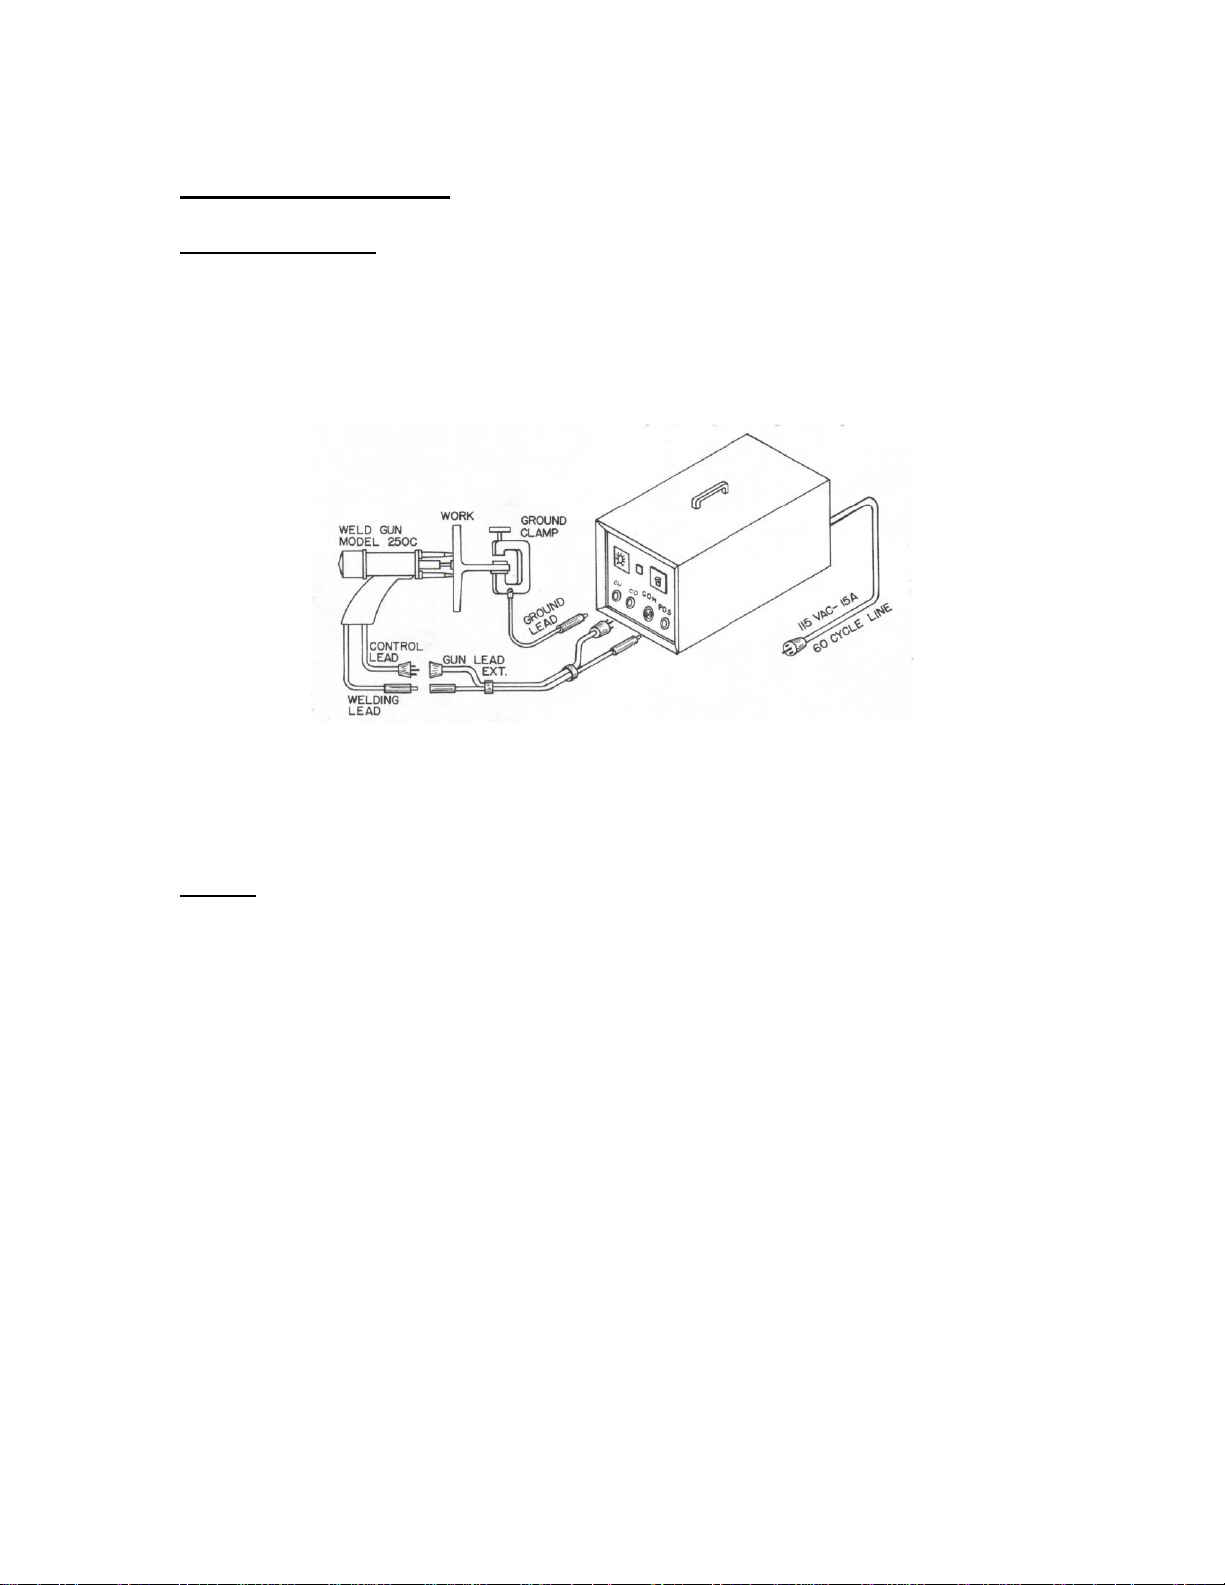
4. Position the three legs of the gun firmly against the work piece. When the
stud makes contact with the work the ready light will go off.
5. Holding the gun firmly, depress the trigger switch. The power pack will then
automatically control the weld cycle.
6. Once the cycle is complete, the trigger switch should be released and the gun
removed from the stud or pin in a “straight line motion”. This will help avoid
bent studs or pins and possible damage to the collet and protector.
It is suggested that periodic inspection of the welds be made to ensure weld strength
and proper system operation.
If Amber Weld Ready Light fails to glow within three seconds turn machine off and
disconnect from power source to avoid serious damage to your welder!
INSPECTION OF WELDS
1. VISUAL
A good quality weld will have a minimal but even amount of splatter around the base
of the stud/pin. Excessive splatter indicates that the voltage is set too high. When no
splatter appears or a void exists around the base, this indicates the voltage is set too
low. Adjust the voltage as necessary.
2. BEND TEST
Several tests welds should be made onto a base material similar to the welding
surface. The stud/pin should be bent back and forth with a piece of tubing or by
striking with a hammer. Failure should occur at the shank portion of the stud/pin, not
at the weld base. In the case of thin base metal, a plug may pull out of the base.
3. TORQUE TEST –THREADED STUDS
Make several test welds onto similar base metal. Place a few washers over the stud,
and thread on a nut. Continue turning the nut until a failure occurs. The failure should
be at the root diameter of the threads, not the weld base. In the case of thin base
metal, a plug may pull out of the base.
9
MODEL 250-C WELD GUN
The AGM Model 250-C weld gun is a semi-automatic, contact welding tool that has been
carefully engineered and designed for use with a wide variety of AGM accessories. Given
normal care and use, this weld gun will require very little maintenance. When repairs are
required, the complete disassembly of the weld gun can be accomplished in a matter of
minutes.
Following is a description of the various accessories available. The application sheets list
the recommended accessories and their part numbers.
COLLET* - This is always required for welding. It is very important that the correct size
be used and that it is in good condition. A loose fitting collet will cause arcing on the stud
or pin and could possibly cause poor welds.
COLLET PROTECTOR*- This is used when welding flanged studs or weld pins. It
allows you to weld various lengths of studs or pins without changing the gun set up. It
also helps to keep splatter away from the collet. It is important that the collet protector be
used whenever recommended. Protectors are not required when using stops, except when
welding Power Base pins.
STOP*- This is required when welding non-flanged studs or when the adjustable foot
assembly is used. Its purpose is to back up the pin or stud to prevent it from being
inserted too far into the gun. The Model 250-C gun utilizes two types of stops; the 437G
and the 250C-G. Both are easily installed.
COLLET ADAPTOR ASSEMBLY –This is used as a holder for the collets, stops, and
collet protectors. It allows for rapid interchange of collets and is easily removed by the
tapered wedge that is supplied with the gun.
It has been found to be good practice to keep extra collets, protectors, stops, and adaptors
on hand.
LEGS –These are used to provide correct weld gun spring pressure while keeping the
stud or pin perpendicular to the work. Legs are normally mounted 120 degrees apart on
the weld gun faceplate.
LEG SUPPORT RING –This is used when welding on curved or round tanks. It is
placed over the three legs and aligns the stud or pin when the ring is held firmly against
the work.
* Specify stud or pin diameter and length when ordering.
10
ADAPTOR RING –This is used to extend the three legs in certain applications,
such as when a longer collet protector is used to weld aluminum pins.
ADJUSTABLE FOOT ASSEMBLY –This is necessary when welding very long
CD pins and studs. It is used in conjunction with a stop and spark shield to stabilize
the pin or stud.
SPARK SHIELD* - This protects the collet, collet adapter assembly, etc. from weld
splatter, while stabilizing the pin or stud during the weld cycle. It will require
occasional cleaning and periodic replacement.
*Specify stud or pin diameter and length when ordering
11
MODEL 250-C WELD GUN
INSTALLATION AND REMOVAL PROCEDURES
INSTALLING COLLET AND COLLET PROTECTOR
A. Examine the inside of the collet adaptor assembly for pitted areas or splatter.
Clean by scraping with sharp object or replace if necessary.
B. Insert the collet into the collet adaptor assembly, making sure that it seats against
the inside shoulder.
C. Rotate the retaining ring to expose the two (2) collet holding set screws and
tighten them securely. These screws should be checked frequently for tightness.
D. Slide the collet protector over the collet adaptor assembly, making sure that it
seats properly. Tighten the set screws securely.
COLLET REMOVAL
A. Remove the collet protector by loosening the two (2) protector holding set screws
approximately 1-1/2 turns.
B. Loosen both collet-holding set screws approximately 1-1/2 turns.
C. Grasp the collet by the end, and remove.
If you have difficulty removing the collet, the following procedures may be
helpful:
1. Manually rotate the collet.
2. Insert the proper size stud or pin into the collet, and attempt to remove the
collet by pulling on the stud or pin.
3. If the above suggestions do not work, pliers may be used.
12
MODEL 250-C WELD GUN
INSTALLING TYPE 437G STOP
A. Place stop inside the rear of the collet.
B. Insert the collet, with stop, into the collet adaptor assembly.
C. Locate and tighten the collet holding set screws, as previously described.
D. Do Not use a collet protector.
INSTALLING TYPE 250C-G STOP
A. Remove end cap and stop nut from rear of weld gun.
B. Insert stop inside gun shaft.
C. Screw stop nut down securely over end of shaft.
D. Replace end cap onto gun housing
E. Do Not use collet protector.
F. See chart on next page for stop numbers.
13
250C-G TYPE STOPS
STUD LENGTH CATALOG NUMBER STOP LENGTH
¼” - 5/16” 250C-G-*-0250 7”
3/8” – 7/16” -0375 6.875”
½” – 9/16” -0500 6.750”
5/8” -0625 6.625”
¾” -0750 6.500”
7/8” -0875 6.375”
1” -1000 6.250”
1-1/4” -1250 6.000”
1-1/2” -1500 5.750”
1-3/4” -1750 5.500”
1-7/8” -1875 5.375”
2” -2000 5.250”
2-1/4” -2250 5.000”
2-1/2” -2500 4.750”
2-3/4” -2750 4.500”
2-7/8” -2875 4.375”
3” -3000 4.250”
3-1/4” -3250 4.000”
3-1/2” -3500 3.750”
3-7/8” -3875 3.375”
4” -4000 3.250”
4-1/2” -4500 2.750”
4-7/8” -4875 2.375”
5” -5000 2.250”
5-1/2” -5500 1.750”
5-7/8” -5875 1.375”
6” -6000 1.250”
6-1/2” -6500 0.750”
7” -7000 0.250”
437G TYPE STOP
STUD LENGTH CATALOG NUMBER STOP LENGTH
** 3/16” 437G-*-0187 1.230”
** ¼” -0250 1.168”
** 5/16” -0312 1.106”
** 3/8” -0375 1.043”
7/16” -0437 0.981”
½” -0500 0.918”
9/16” -0562 0.856”
5/8” -0625 0.793”
¾” -0750 0.668”
7/8” -0875 0.543”
1” -1000 0.418”
1-1/8” -1125 0.293”
1-1/4” -1250 0.168”
1-3/8” -1375 0.043”
*Specify diameter of stud (i.e. 6-32, 8-32, 10-32 etc.)
** Requires 375-SP series collet for studs 3/8” long and shorter.
14
MODEL 250-C WELD GUN
INSTALLATION OF COLLET ADAPTOR ASSEMBLY
This procedure can be accomplished with a collet and stop or collet protector already
installed.
A. Before installing, be sure that the tapered surfaces of the collet adaptor and shaft
assembly are clean. Wipe with a clean cloth if necessary.
B. Insert the collet adaptor assembly into the shaft assembly, turning the adaptor as it
is pushed down. This will ensure that it is seated securely.
REMOVAL OF COLLET ADAPTOR ASSEMBLY
A. Slide the rubber dust boot toward the faceplate to expose the shaft assembly.
B. Insert the tapered wedge between the shaft assembly and the collet adaptor
assembly. The flat side of the wedge should go toward the shaft.
C. Tap the wedge lightly to release the adaptor assembly from the tapered seat of the
gun shaft.
15
MODEL 250-C WELD GUN
INSTALLING OR CHANGING SPRING
A. Unscrew the end cap from the gun housing.
B. Unscrew stop nut from the end of gun shaft.
C. Unscrew the spring retainer and remove the washer from the housing.
D. Remove the spring from the shaft.
E. Slide the desired spring over the shaft.
F. Replace the washer onto the end of the gun housing.
G. Screw the spring retainer into the housing.
H. Screw the stop nut onto the end of the gun shaft.
I. Screw the end cap onto the gun housing.
16
MODEL 250C WELD GUN
DISASSEMBLY OF THE WELD GUN (Refer to Illustration No. 1 page 17)
A. Remove handle cover screws (items 28, 29, & 45).
B. Lift off the handle cover (item 38).
C. Remove the nut, washer, and cap screw (items 34, 35, & 36) from the welding
lead (item 40).
D. Remove the control wires (item 32, & 33) from the trigger switch (item 37), and
remove the switch from the handle.
E. Lift out the welding and control lead assemblies (item 40, & 30), from the handle.
F. Loosen the cap screw of the cable clamp assembly (item 39), and slide both wires
out of the clamp.
G. Unscrew the end cap (item 1) from the gun housing.
H. Unscrew the stop nut (item 15) from the end of the shaft.
I. Unscrew the knurled spring retainer (item 17) from the gun housing.
J. Remove the washer (item 3)
K. Remove the spring (item 4) from the gun shaft.
L. Unscrew the three (3) screws (item 9 & 22) from the housing.
M. Remove the collet adaptor assembly and dust boot (items 25 & 12) from the shaft
assembly (item 6).
N. Check to be sure there are no burrs on the end of the gun shaft. If necessary use a
file or emery paper to smooth it off. Slide the faceplate (item 10) off shaft
assembly.
O. Slide the shaft assembly (item 6) out of the gun housing, making sure the pigtail
assembly (item 7) feeds through the slot in the housing and handle.
To assemble the gun, repeat these operations in the reverse order.
17
ILLUSTRATION NO. 1
(Not Shown) 2615-M ADAPTER ASSEMBLY INCLUDES ITEMS # 25,13,14 &24
18
OPERATING SUGGESTIONS
Re-check application sheet
Do Keep collet adaptor assembly in good condition.
Make sure correct collet is in place and that the set screws are tightened
securely.
Make sure correct protector or stop is in place.
Make sure the gun shaft has smooth motion.
Make sure legs are used when required and are tightened securely.
Insert pin or stud into collet until it makes firm contact with the protector
or stop.
Hold gun perpendicular to the welding surface.
Hold gun steady when welding.
Remove gun in straight-line motion from welded pin or stud.
Make sure all control and weld cable connections are kept tight and clean.
Make sure voltage setting and ground polarity is correct for the
application.
When used, keep spark shield as clean as possible.
Do Not Use worn or wrong size collet.
Use worn, broken, or wrong size protector.
Use wrenches or pliers on the gun shaft.
Use Center Punch to locate pin or stud.
Pull welder by cables.
Leave weld cables coiled up while welding.
Use wrong ground polarity for the application.
Use pins or studs not designed for use with the AGM JS-1 Welding
System.
Care must be taken to operate this welder on the rated AC line
voltage range (95-130 VAC) only. Failure to do so
will damage the welder.
19
PREVENTATIVE MAINTENANCE (see note bottom of page)
The Model JS-1 welding system has been designed to give maximum service with little
maintenance. Like most equipment, however, a small amount of care and preventative
maintenance is a wise investment.
To minimize down time when repairs are required, AGM recommends you always have a
spare gun and cables available and in good working order.
We have listed below some of the more common items that should be checked from time
to time. 1. Although the weld gun is ruggedly built, rough handling should be
avoided. Check the gun shaft for damage and freedom of the “up and
down” motion. The cables and plugs should also be checked for any
obvious damage and repaired as required.
2. Avoid dragging the welder by the cables, as this will almost certainly
damage them. Do not put sharp bends at the connectors. Inspect them for
cuts or breaks in the insulation and be sure to keep all connectors clean.
3. All louvers must be kept open and free from obstructions for proper air
circulation inside the welder. The inside should be blown out with air or
cleaned with a brush periodically.
4. Check for loose screws. (Do not over tighten capacitor screws)
Be sure to put the AC Line Switch in the “OFF” position and
remove the line cord from the power source whenever
removing the cover on the welder. Failure to do so could
cause serious electric shock or injury
20
SET-UP FOR WELDING STEEL/STAINLESS STEEL WELD PINS
GUN SET-UP WITH HEAVY (3”) SPRING
1. 12 & 10 gauge pins to galvanized steel 26 Gauge (.0217) or thicker.
A. Set up the gun as described on page 8-15 of this manual. Refer to the chart
below for collet and collet protector part numbers. Be sure the collet holding set
screws are tightened securely.
B. Welding cables should be connected for “Reverse Polarity” (Ground to
“Negative” CD).
2. 12 & 10 gauge pins to un-plated steel or stainless steel 26 Gauge (.0187) or thicker.
A. Set up gun as described above.
B. Welding cables should be connected for “Straight Polarity” (Ground to
“Positive”).
For welding pins over 7” in length, see page 22.
WELDER SET-UP
STEEL / STAINLESS
WELD PIN
Collet /
Protector
Base Material
Ground
Polarity
Approximate
Welding Voltage
12 Ga. (2.69mm)
437-106
437-P-106
Galvanized Steel 26
Gauge or thicker
NEG.
170
12 Ga. (2.69mm)
437-106
437-P-106
Un-plated Steel 26
Gauge or thicker
POS.
120
10 Ga. (3.42mm)
437-135
437-P-135
Galvanized Steel 26
Gauge or thicker
NEG.
200
10 Ga. (3.42mm)
437-135
437-P-135
Un-plated Steel 26
Gauge or thicker
POS.
160
Note: Cables –Ground 1142-E (#6)
Gun Lead Extension 1279-E (#6)
WELDING PROCEDURE
Insert the weld pin into the gun and perform the weld as described in the “Welding
Operation” section of this manual (page 7).

Other AGM Welding System manuals

AGM PA-15 User manual

AGM

AGM PA-15 User manual

AGM 250C User manual

AGM

AGM 250C User manual

AGM MMA Series User guide

AGM

AGM MMA Series User guide

Popular Welding System manuals by other brands

Miller Weldmaster Seamrover DD manual

Miller Weldmaster

Miller Weldmaster Seamrover DD manual

Campbell Hausfeld WS0900 Operating instructions and parts manual

Campbell Hausfeld

Campbell Hausfeld WS0900 Operating instructions and parts manual

Leister Unifloor E operating instructions

Leister

Leister Unifloor E operating instructions

Deca EASYJOB 220 instruction manual

Deca

Deca EASYJOB 220 instruction manual

Oerlikon CITOARC 1450 FORCE Safety instruction for use and maintenance

Oerlikon

Oerlikon CITOARC 1450 FORCE Safety instruction for use and maintenance

GYS GYSMI E160 user manual

GYS

GYS GYSMI E160 user manual

ESAB WARRIOR EDGE 500 quick start guide

ESAB

ESAB WARRIOR EDGE 500 quick start guide

Miller ANALOG 300 owner's manual

Miller

Miller ANALOG 300 owner's manual

Oerlikon CITOCUT 10i Safety instruction for use and maintenance

Oerlikon

Oerlikon CITOCUT 10i Safety instruction for use and maintenance

Leister ALLIED VARIMAT V2 manual

Leister

Leister ALLIED VARIMAT V2 manual

Advance Welding ACT 4 operating manual

Advance Welding

Advance Welding ACT 4 operating manual

Lincoln Electric SAM400 Operator's manual

Lincoln Electric

Lincoln Electric SAM400 Operator's manual

Stel MAX 503 IP54-ATX Instructions for use and maintenance

Stel

Stel MAX 503 IP54-ATX Instructions for use and maintenance

Magmaweld RD 500E user manual

Magmaweld

Magmaweld RD 500E user manual

Miller Syncrowave 350 LX  owner's manual

Miller

Miller Syncrowave 350 LX owner's manual

RODEX RDX5128 instruction manual

RODEX

RODEX RDX5128 instruction manual

Forney 298 operating manual

Forney

Forney 298 operating manual

Munsch Wedge it LE operating instructions

Munsch

Munsch Wedge it LE operating instructions

manuals.online logo
manuals.online logoBrands
  • About & Mission
  • Contact us
  • Privacy Policy
  • Terms and Conditions

Copyright 2025 Manuals.Online. All Rights Reserved.