Agriculex ESC-2 User manual

Agriculex Inc.
Tel: 519 837 0871 Fax 519 837 4291 www.agriculex.guelph.org
1-59 suburban Ave Guelph Ontario N1E 6B4
Agriculex
ESC-2 Programmable Electronic
Seed Counter
Operator’s Manual

Agriculex Inc.
Tel: 519 837 0871 Fax 519 837 4291 www.agriculex.guelph.org
1-59 suburban Ave Guelph Ontario N1E 6B4
1
Table of Contents
1. Introduction to ESC2 Counter……………………………3
1.1 Sensitivity
1.2 Vertical and Horizontal Gate
1.3 Feed Turntable
2. Quick Installation Guide…………………………………5
3. Remote Mode…………………………………………….7
3.1 ESC2 Seed Counter
3.2 Select Communication port
3.3 Connect to Counter
3.4 Prepare to Count
3.5 Totalize Count
3.6 Batch Count
3.7 Dump Seeds and Sample Ready Dialogue
3.8 Set Feeding Speed of the Turntable
3.9 Add Seed Parameters
3.10 Import Prearranged Excel File
3.11 Open, save & Print Data Files
3.12 Check Inventory Number
3.13 Check the Status of the Counting
4. File Format …………………………………….……….16
4.1 Limit and Constraint
4.2 Standard Prearranged File
4.3 Simplified Standard Prearranged File
4.4 Prearranged File without the Header
4.5 Comment Column
5. Independent mode ……………………………..……….19
5.1 Totalizing
5.2 Batch Counting
5.3 Setting Valve Delay Times
5.4 Add Seed into the Counter
5.5 Collect Data by Pressing Button
5.6 Collect Data by Sending Query from your Own Software
6Collect Data from Esc2…………………………………27
6.1 Output Data Sequence

Agriculex Inc.
Tel: 519 837 0871 Fax 519 837 4291 www.agriculex.guelph.org
1-59 suburban Ave Guelph Ontario N1E 6B4
2
6.1 Format of the Output Data
6.2 Totalize Mode
6.3 Batch Mode
6.4 Specific Codes (ASCII code)
6.2 Communication Setup
6.3 Collect Data from ESC2 (without sending a question)
6.4 Collect Data from ESC2 (without sending a question)
6.5 Configure Winwedge (without sending a question)
6.6 Configure Winwedge (send a question)
7. Maintenance…………………………………………….33
7.1 Clean detecting Unit
7.1 Clean dust throughout each channel
7.2 Clean Acrylic Window Tubes
7.3 If the count is still NOT accurate
7.2 Clean the Valve Plate
7.3 Reset Position
8. Setup Recommendation………………………………...39

Agriculex Inc.
Tel: 519 837 0871 Fax 519 837 4291 www.agriculex.guelph.org
1-59 suburban Ave Guelph Ontario N1E 6B4
3
1. Introduction to ESC2 Seed Counter
The ESC2 seed counter is a high speed seed counter designed to accurately count at a
speed of up to 100 seeds per second. Greater accuracy can be achieved at a lower speed.
It uses a computerized control unit with conversational programming for easy set up. It is
capable of totalize counting as well as counting batches of various sizes from a seed lot.
The counter consists of 6 units shown in figure 1.0. A feeder unit on the top of the
counter feeds seed into 16 different channels, each with a sensor in it. The counts from all
the sensors are added together. After sensing, the seed must pass a valve referred to as a
main valve, which is controlled by the computer during batch counting. If this valve is
closed, the seed is held in the top container. If it is open, seed flows into the second
container and is stopped by a gate, referred to as the ‘end valve’. The end valve is opened
by pushing up the slider on top of the discharge chute. In a ‘batch mode’ the closing of
the end valve signals the computer(s) that the last sample has been collected and opens
the main valve. At the end of a batch the main valve closes but the counter continues
counting seeds into it for the next sample. Both the main valve and the end valve must be
open for seeds to flow through the counter.
We have tried to make the operation of the counter as user-friendly as possible, with the
goal that it should be possible to use without even referring to this manual. We would
encourage you to experiment with the control unit before using it. With many things there
are several ways to do them. We have tried to present you with ways to do all the things
that you might want to do at any point in the program. For example; when you set up a
program for each batch counting you will be asked to enter a feed speed. Don’t worry if
you are not sure which speed should be set for counting. Just press the ‘Enter’ key to
select the default setting.
The only thing(s) you need to remember about the counter before counting are the
following:
1. Sensitivity
The range of sensitivity is 0 to 10. 10 is the least sensitive and 0 is the most. This number
roughly corresponds to the size of seed (in mm) for which that setting is appropriate. For
example; Canola –the sensitivity can be set from 1 to 1.5. The sensitivity is controlled by
the knob. However, if the setting is unnecessarily sensitive, it increases the possibility
that the counter will count dust, chaff, or electrical noise.
2. Vertical and Horizontal Gate
The feeder unit has two gates that need to be manually and correctly set before counting.
One is referred to ‘Vertical Gate’ placed at the front of the feeder unit and another is
referred to ‘Horizontal Gate’ placed at the right side of feeder unit. The size setting of the
gates depends on the crop size. The purpose is to ensure that the crop is feeding

Agriculex Inc.
Tel: 519 837 0871 Fax 519 837 4291 www.agriculex.guelph.org
1-59 suburban Ave Guelph Ontario N1E 6B4
4
continuously without jamming the feed turntable. You may need to experiment a bit to
find the best setting.
3. Feed turntable Speed
The counting speed is controlled by the feed turntable speed and the size of gates. The
speed range of the feed turntable is from 1 to 200. 1 is the lowest speed and 200 is the
fastest. The feed turntable speed is controlled by software and can be pre-set and changed
during counting.

Agriculex Inc.
Tel: 519 837 0871 Fax 519 837 4291 www.agriculex.guelph.org
1-59 suburban Ave Guelph Ontario N1E 6B4
5
2. The ESC-2 Quick Installation Guide
Thank you for choosing the ESC-2 Seed Counter. This Quick Installation Guide provides
simple setup instructions. For more additional information refer to the operator’s manual.
Step 1… Unpack
Box Contents:
Control unit
Feed unit
detector unit
seed distributor unit
Base unit
Large size seed spout
Small size seed spout
9 pin RS232 cable
CD
Operator’s manual.
Warranty Sheet
1234 5
Figure 1 Esc-2 Seed Counter Setup Demo Figure
2. Feed unit
3. Seed distributor
4. Detector unit
5. Base unit
6. Seed spout
Computer
1. Control unit
Feed cable
Count cable
Seed distributor cable
Control cable
Detector cable
9 pin serial communication cable
Com port

Agriculex Inc.
Tel: 519 837 0871 Fax 519 837 4291 www.agriculex.guelph.org
1-59 suburban Ave Guelph Ontario N1E 6B4
6
Step 2 … Get setup & Connected
It is recommended to turn off the power before connecting or disconnecting the
cables.
Setup all parts of ‘ESC-2 Seed Counter as shown in Figure 1 (page 6) and connect
all cables to each respective port.
Use the 9 pin null modem cable provided by Agriculex to connect a PC or laptop
to the ESC-2 Seed Counter. The connect port of the counter is COM2 port located
on the back of the control unit.
If your computer or laptop does not have COM ports, you can use a COM to the
USB adapter.
Insert the CD into a CD ROM. Double click. The ‘Setup’ software will
automatically install itself on your computer to the default directory
C:\home\setup if you do not specify a directory
Turn on the ESC2 Seed Counter power. The Counter will take about 1 minute to
boot up.
Once you have connected the computer to the ESC2 Seed Counter, you are ready to
configure the ‘Remote Mode’ software and the ‘Independent Mode’ software.
After the counter boots up, a selected menu appeared on the display panel on the control
unit looks like below:
1. Remote Mode
2. Independent Mode
Agriculex Inc.
Tel: 519 837 0871 Fax 519 837 4291 www.agriculex.guelph.org
1-59 suburban Ave Guelph Ontario N1E 6B4
7
3. Remote Mode
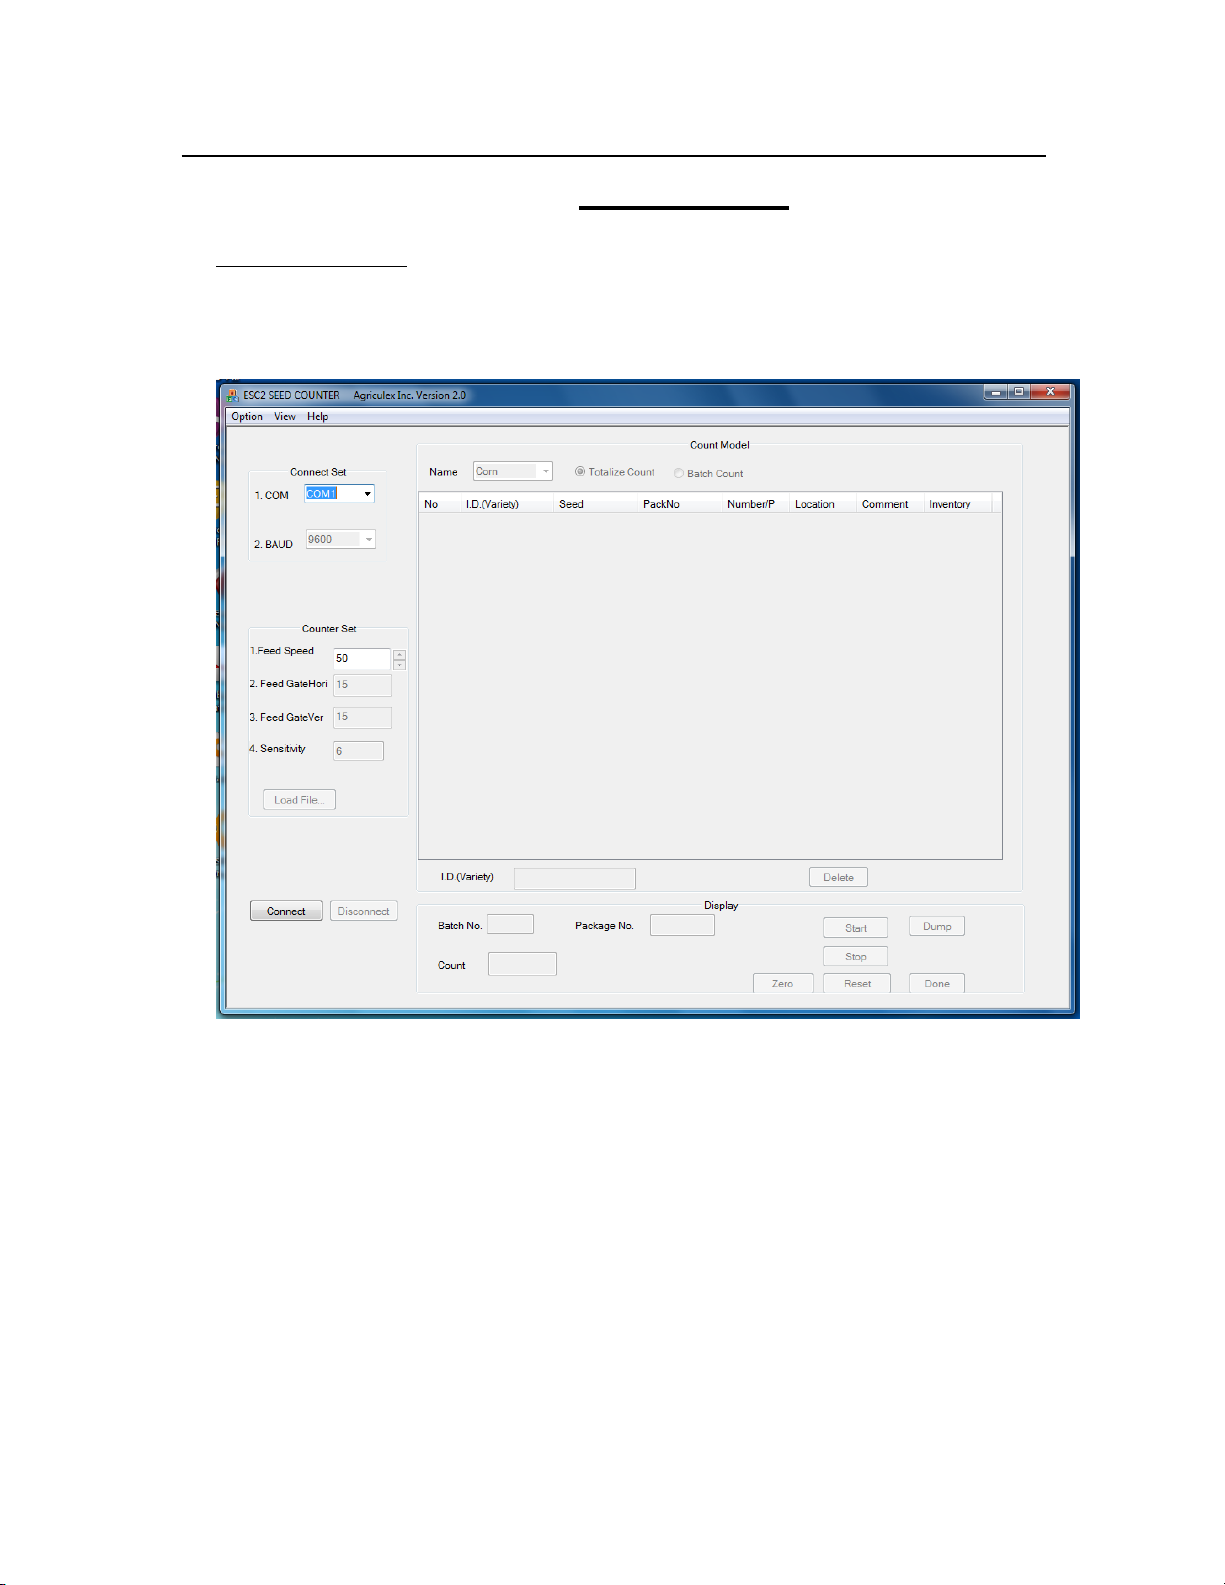
3.1 ESC2 Seed Counter
Turn on power of the ESC-2 Seed Counter and wait for the menu to appear on the display
panel. Press number 1 button to select the Remote Mode. Double click ESC2_xv35 file
to launch the program if the program has not been launched on your computer. The
software will look like the figure 3.1 as shown below:
Figure 3.1
Explanation:
Connect: send a Connect command to the counter. If sending success, connection with the
counter will be established.
Disconnect: send a Disconnect command to the counter. If sending success, the program will
disconnect with the counter.
Start: send Start command to the count. If sending success, the counter will start to count.
Stop: send stop command to the counter, if sending success, the counter will pause counting.
Dump: send Dump command to the counter. If sending success, the counter will clean out
seeds remaining in the hopper.
Zero: send clean kernel number command to the counter. If sending success, the kernel
number will be clean to zero.
Reset: send Reset command to the counter. If sending success, the counter will stop the
current counting and back to waiting status.
Done: send Done command to the counter, if sending success, the counter will recorder all

Agriculex Inc.
Tel: 519 837 0871 Fax 519 837 4291 www.agriculex.guelph.org
1-59 suburban Ave Guelph Ontario N1E 6B4
8
information demand by software.
Load File…: Open prearranged excel file.
Above figure just is an overall view, the more detail function of each button, menu and
the control items will be further explained in the follow paragraphs.
3.2 Select Communication Port
Click ‘down arrow’from the Connect Set frame to select a COM port, see figure 3.2 as
shown below. The ‘Baud’rate option is always inactive. Do not change the feed speed
until the button of Connect to ESC2 has been clicked.
Figure 3.2
If you are not sure which COM port in the computer has been connected to the counter,
follow below steps to find out.
Click Start (at left bottom corn of screen) Control Panrl, Sytem Device
manager Port (COM&LPT)
In here, you will find which port is available or which port you are using.
3.3 Connect to Counter
Click the Connect button. You will hear two sounds of the main valve closing and
opening from the counter. If you heard the sounds, it means that the connection has been
established. Otherwise you should check COM port number and the counter to see
whether Remote mode has been selected or not.
Do not click on the ‘Load File…’ button at this moment. We will talk about it later (see
page 14, Import prearranged excel file.)

Agriculex Inc.
Tel: 519 837 0871 Fax 519 837 4291 www.agriculex.guelph.org
1-59 suburban Ave Guelph Ontario N1E 6B4
9
3.4 Prepare to Count
Click the down arrow from the ‘Seed List’ in the ‘Count Mode’ frame to select seed name.
See figure 3.4. When a selected seed name appeared on the top of name list, the
parameters in the Count Set associating with this seed name will be automatically
changed. The further information such as how to add ‘seed name’ and change associated
parameters, see page 13(3.8 add seed parameters) or go to the HELP menu.
Figure 3.4
3.5 Totalize Count
Before clicking on the ‘Start’ button you should select the count mode: Totalize count or
Batch count. The default setting of count mode is Totalize.
If count mode is not Totalize mode, select totalize mode.
Enter ID at textbox of ID variety as shown on figure 3.5.
Figure 3.5.1
If using keyboard to enter ID, ‘Enter’key need be pressed after all ID have been
entered
If ID is entered by barcode scanner and your scanner not program with Enter key,
you need press Enter key.
After ID is entered, the program will automatically start to count. If you want to enter
information of location and comments before the counter start to count, you need go to
menu OptionSet Counter to setup. After that, a dialog frame with count information
Input ID
Agriculex Inc.
Tel: 519 837 0871 Fax 519 837 4291 www.agriculex.guelph.org
1-59 suburban Ave Guelph Ontario N1E 6B4
10
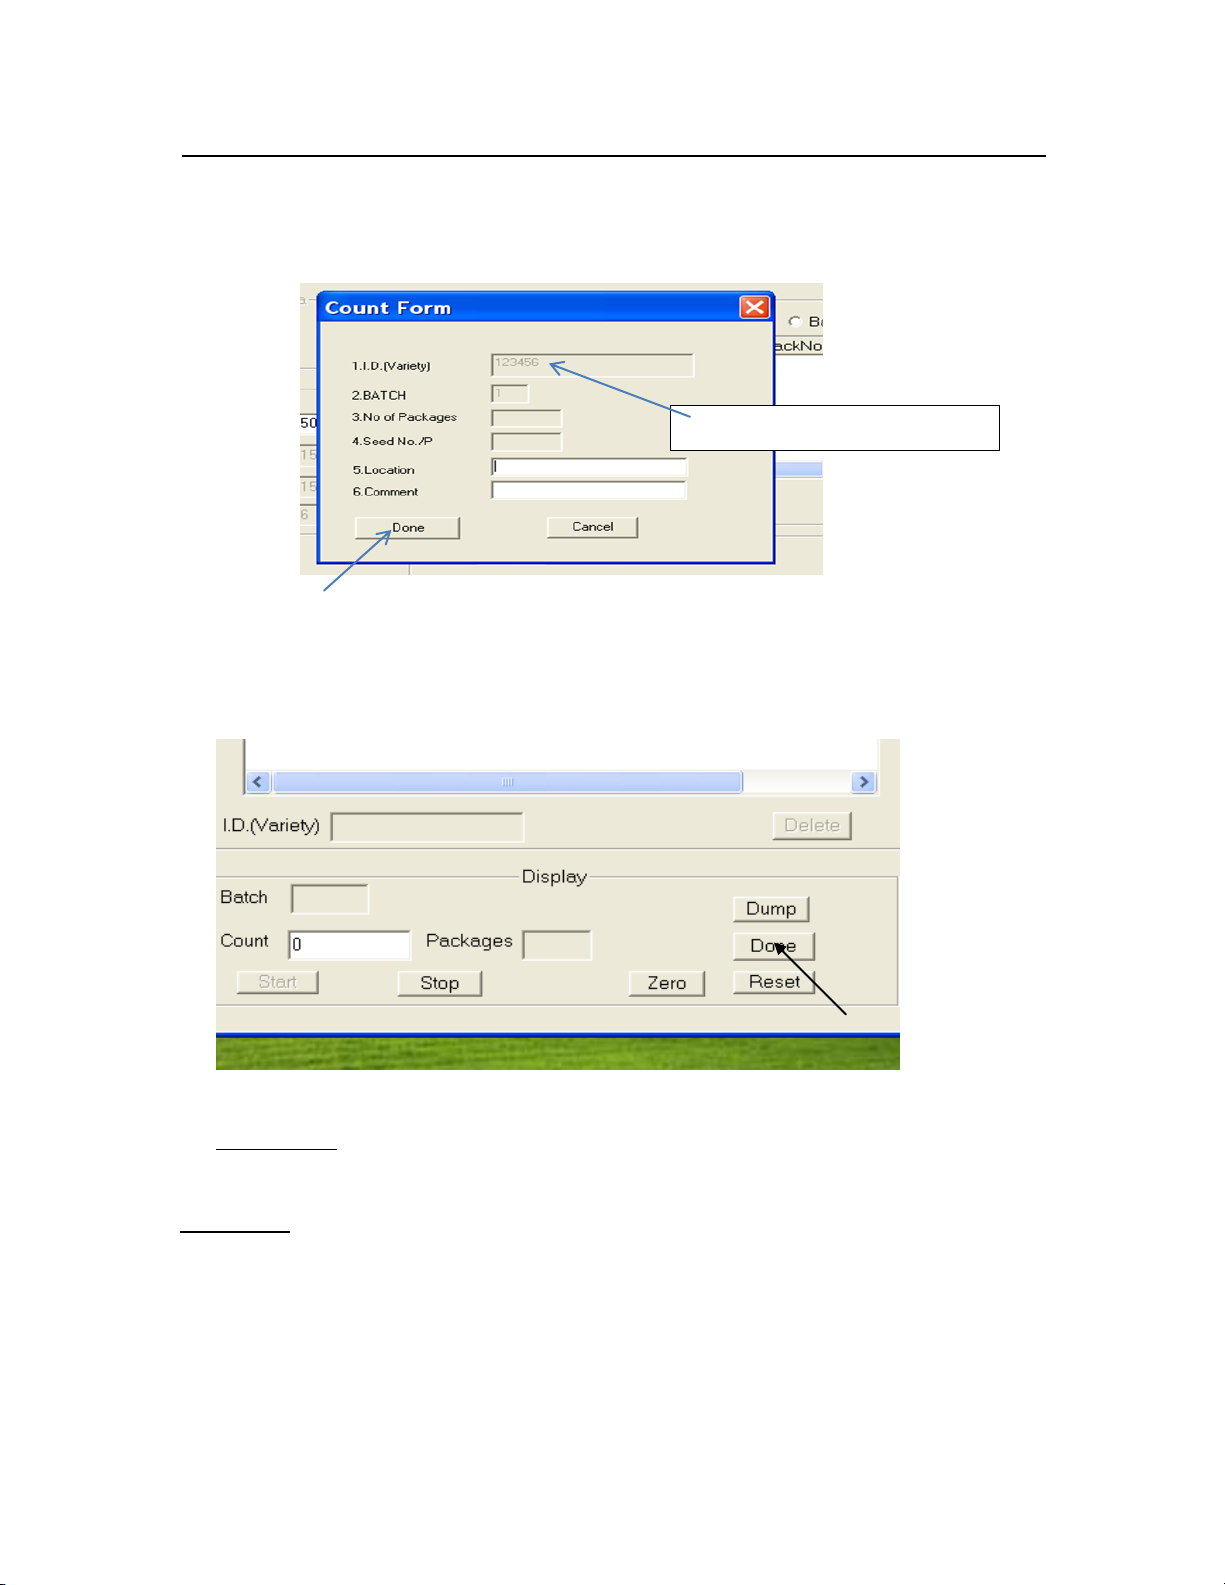
will pop up on the screen as shown at figure 3.5.2. In the Totalize mode only 5 and 6
items are allowed to enter information. After entering information, Click the ‘Done’
button or press ‘Enter’ key, the counter will automatically start to count.
Figure 3.5.2
During the count period, you can click ‘Stop’ or ‘Start’ button on the computer or press
correspond button represents ‘Stop’ or Start at control unit of the counter. After finishing
totalize the count, click the ‘Done’ button as shown on figure 3.5.3 in order the program
can record the count number.
Figure 3.5.3
3.6 Batch Count
Multiple batch count is available if you choose batch count mode.
Example 1:
2 batches
First batch: 2 packets 100 seeds per packet
Second batch: 5 packets 50 seeds per packet
Select ‘Batch Count Mode’. If the cursor is not appeared at ID (Variety) textbox, move
mouse over there and click.
123456 is a demonstrating ID

Agriculex Inc.
Tel: 519 837 0871 Fax 519 837 4291 www.agriculex.guelph.org
1-59 suburban Ave Guelph Ontario N1E 6B4
11
Enter an ID following an Enter key or scan a barcode. A dialog frame will pop up as
shown figure 3.6. If you do not setup Set Counter, the items of Location and Comments
will not appear on the Frame.
Figure 3.6
Note that Item 2, Batch number, is 1. It means that this is the first batch.
-Enter number 2 in item 3: No of Packets.
-Enter number 100 in item 4: Seed No/P.
Press the ‘Enter’ key (DO NOT click the Done Button). Note that if you click Done
button, the program will exit the Data Input dialog frame. If Done button has not been
clicked, item 2, Batch number, has changed to 2. It means this is a second batch.
-Enter number 5 in item 3: No of Packets.
-Enter number 50 in item 4: Seed No/P.
Click on the ‘Done’ button. Then click on the ‘Start’ button. The counter will start
counting.
Example 2:
1 batch
2 packets 100 seeds per packet
-Enter number 2 in item 3: No of Packets
-Enter number 100 in item 4: Seed No./P

Agriculex Inc.
Tel: 519 837 0871 Fax 519 837 4291 www.agriculex.guelph.org
1-59 suburban Ave Guelph Ontario N1E 6B4
12
Click on the ‘Done’ button. Then click on the ‘Start’ button. The counter will start
counting.
NB: In the ‘Batch Count Mode’ you can click on the ‘Done’ button to end the Batch
Count at any time when there are not enough seeds in the hopper or should you wish to
quit counting.
3.7 Dump Seed and Sample Ready Dialog
You can select the setting of the ‘auto-dump’ seed or ‘manual dump’ seed as batch count
has been completed. The default setting is auto-dump. Under this mode the residual seed
in the hopper will be dumped out as the counter finishes the batch count. In the manual
dumping mode you will have a chance to repeat the previous batch count before you click
the ‘Dump’ button to dump out the residual seed in the hopper.
You have also the option to set-up the ‘sample ready dialog’ appearance should you wish
to do so. The default setting is a dialog frame will pop up as the sample is ready for
loading.
Figure 3.7
3.8 Add Seed Parameters
You can add the seed name and associated parameters into this program for future use.
Click Option menu to select ‘Edit Seed Para’. See above Figure 3.8
Click Edit Seed Para, Edit Seed Dialog will pop up as figure 3.8 shown below

Agriculex Inc.
Tel: 519 837 0871 Fax 519 837 4291 www.agriculex.guelph.org
1-59 suburban Ave Guelph Ontario N1E 6B4
13
Figure 3.8
Click the ‘Add’ button to add seed name and associated parameters.
3.9 Set Feeding Speed of the turntable
You can set-up feeding speed of the turntable after the connection between PC and
the counter has been established. This speed is referred to as ‘Feed Speed’.You can
change the Feed Speed at any time during counting.
For batch counting, all seed samples will run at the Feed Speed until you specify a
seed sample run at a specified speed. If you have placed a numeric value in the
‘Comment column’ cell, the sample in correspond row will run at this specified speed.
For more information, see page 18 (4.5 Comment column),
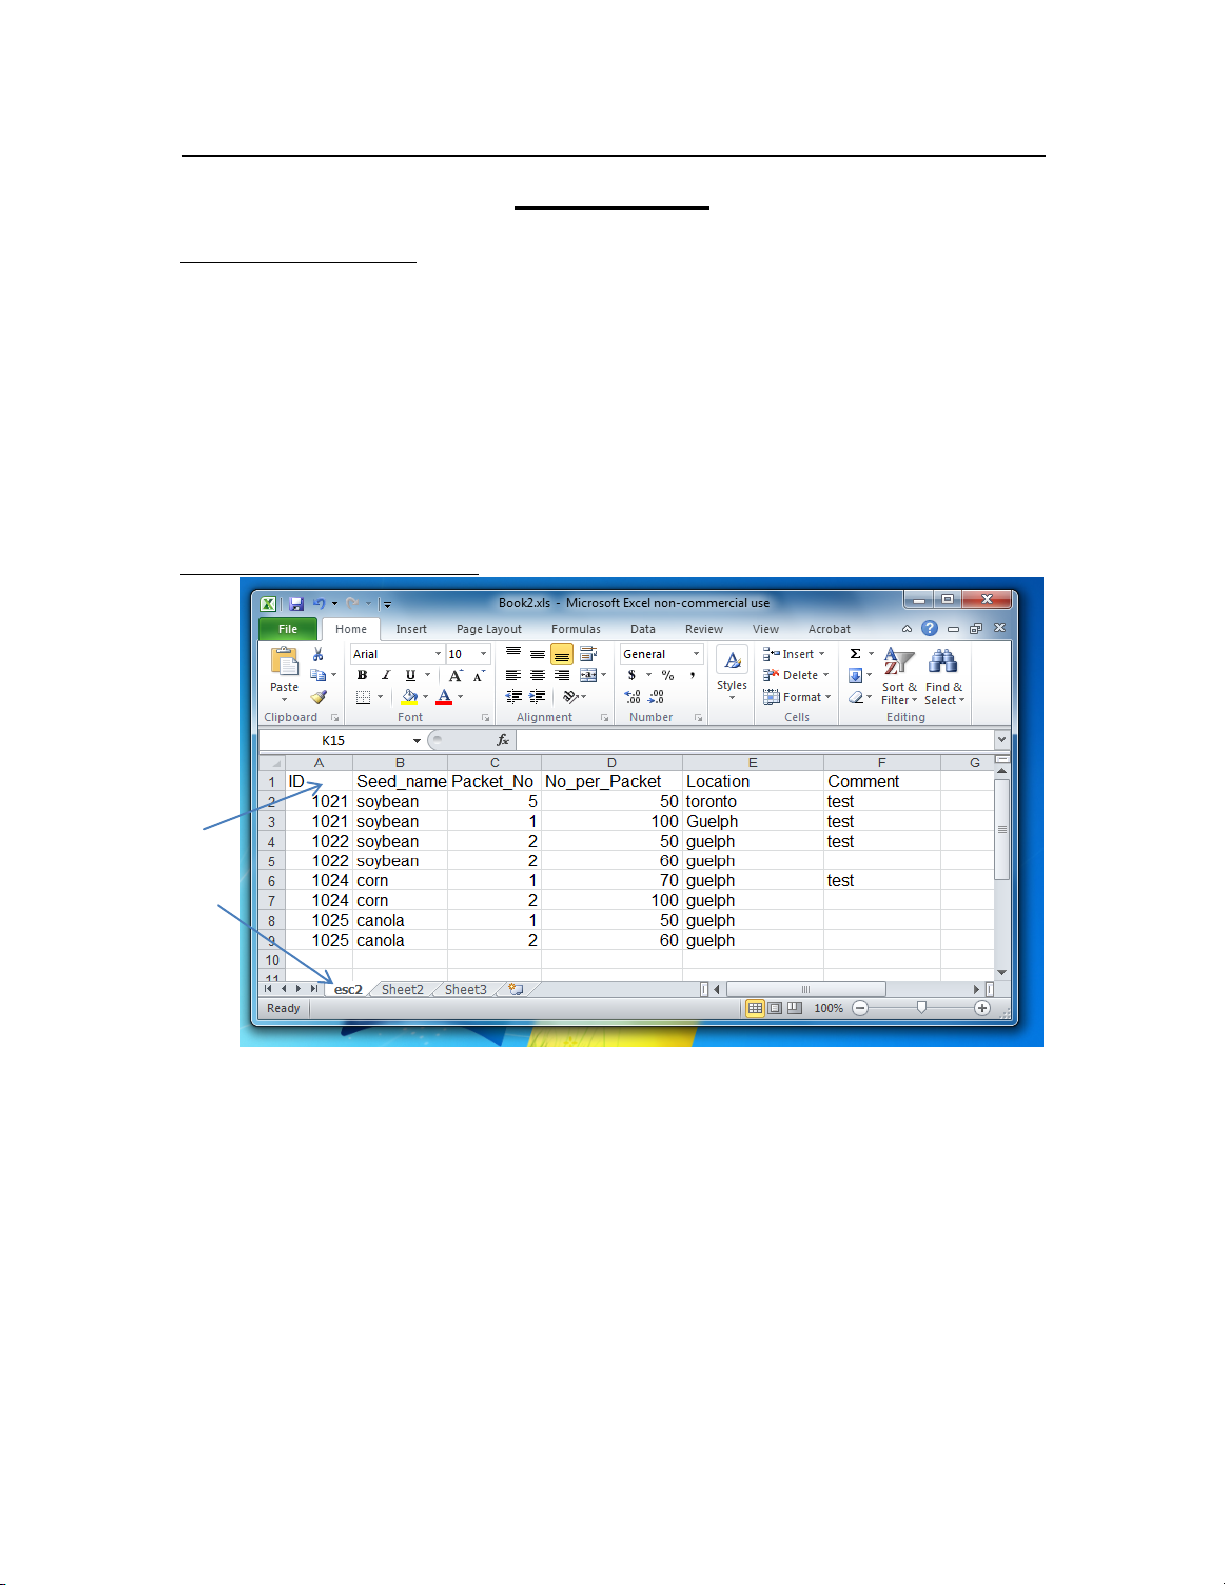
3.10 Import Prearranged Excel File
Before loading a ‘Prearranged Excel File’, you will need to prepare a file for loading.
The detailed information for prearrange excel file is chapter 4: File Format’.
A simple prearranged excel file looks like the figure3.10.1 shown below:
NB: The format of the main title is important. ID must appear in the first cell in the
main title.
NB: the Tag of Sheet must be esc2.

Agriculex Inc.
Tel: 519 837 0871 Fax 519 837 4291 www.agriculex.guelph.org
1-59 suburban Ave Guelph Ontario N1E 6B4
14
Figure 3.10.1
Click on the ‘Load File…’ button in the ‘Count Para frame’, an open file dialog
frame will pop up, select a prearranged excel file, then click ok. After that, the
contents of the file will display on the list table in the Count Model frame as figure
3.10.2 shown below:
Figure 3.10.2
Agriculex Inc.
Tel: 519 837 0871 Fax 519 837 4291 www.agriculex.guelph.org
1-59 suburban Ave Guelph Ontario N1E 6B4
15
Enter an ID number or scan a Barcode into the textbox named as I.D. (Variety), the
matched ID in the item list will be selected and colored. See above figure 3.11.
The red color represents the counter is counting this item. The black color represents this
item has been counted (not appeared here). The purple color represents the item is
waiting for count.
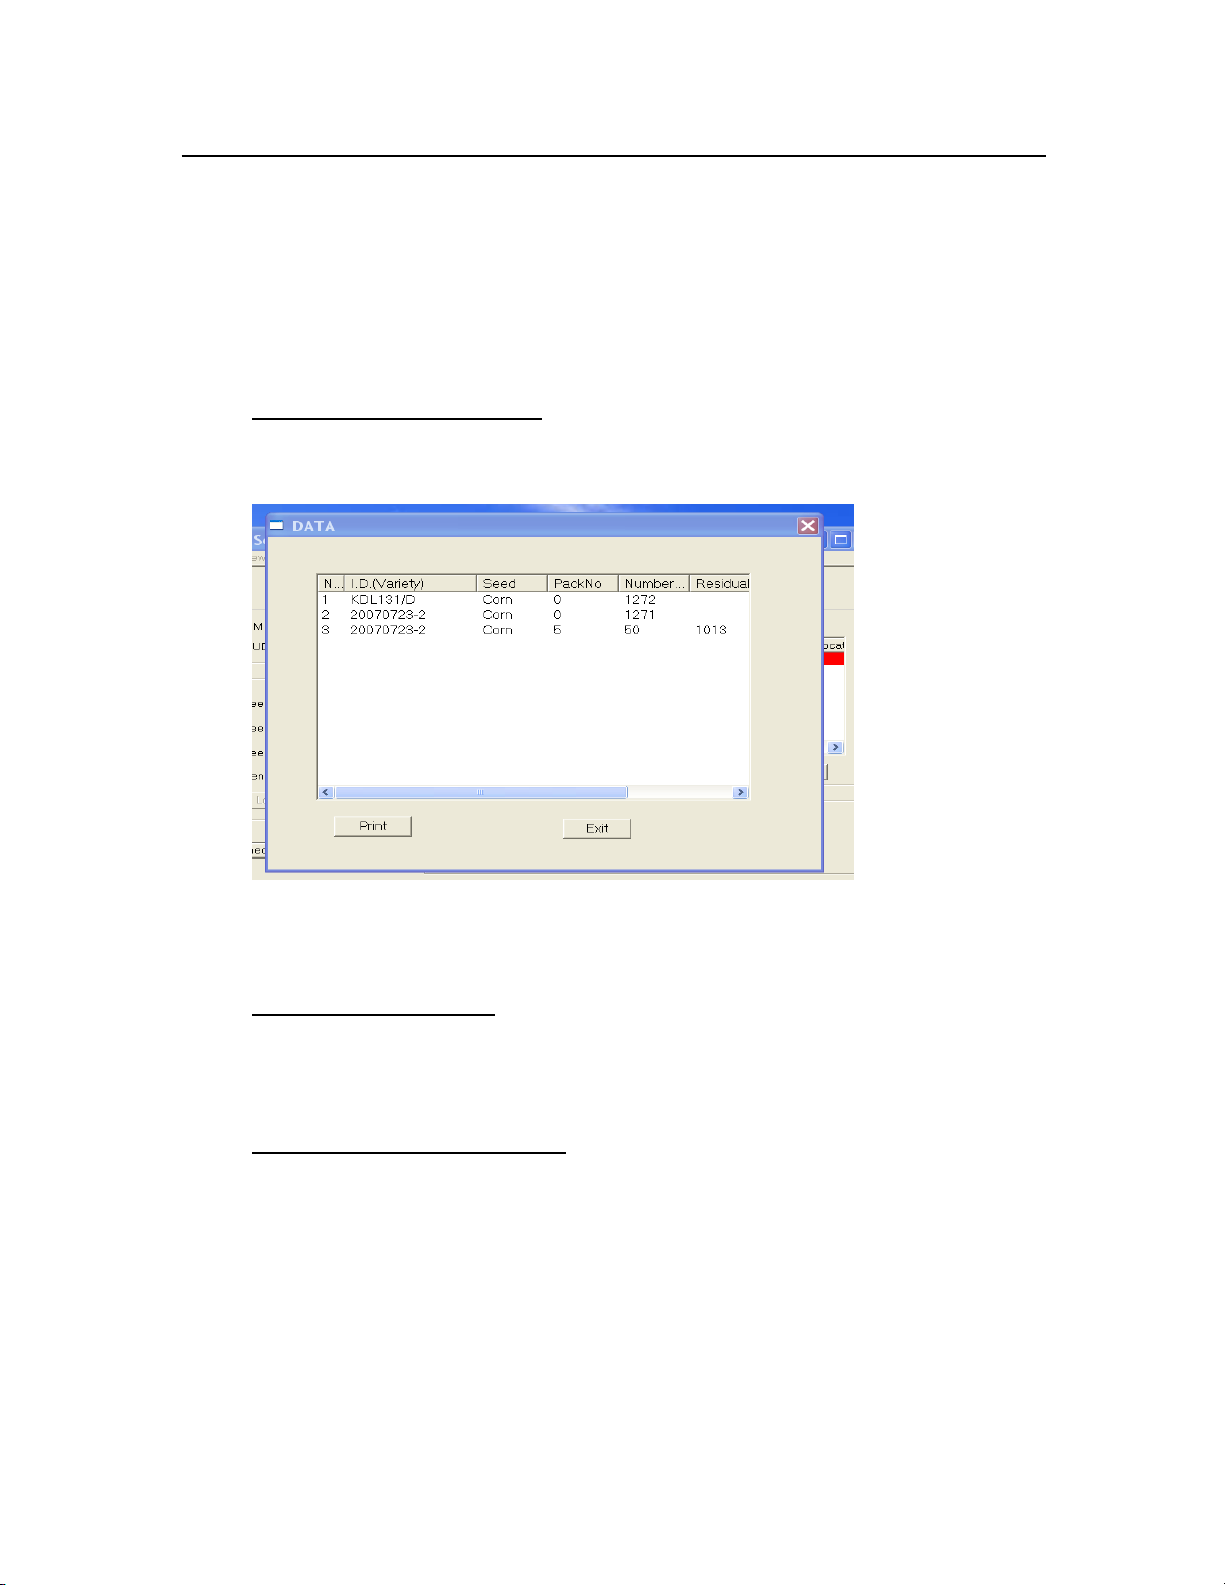
3.11 Open, Save & Print data files
In the Remote mode, you can open, save, and print counting information.
-Click Option menu. -Select Open sample record.
See figure 3.11 shown below for example of results:
Figure 3.11
Open file is only available to open a record file with “.txt”extension. After counting you
can save the data. For more detail refer to the HELP menu.
3.12 Check Inventory number
-Click View in the menu.
-Choose I.D. (variety) and enter an ID number. Or to scan a barcode.
The inventory number will display on the dialogue frame.
3.13 Check the status of the counting
-Click view in the menu
-Choose edit
A dialog frame will be pop-up on the screen to display all of the information.
Agriculex Inc.
Tel: 519 837 0871 Fax 519 837 4291 www.agriculex.guelph.org
1-59 suburban Ave Guelph Ontario N1E 6B4
16
4. File Format
4.1 Limit and Constraint
Before starting to prepare an ‘EXCEL’ file, the ‘Limit and Constraint’ should be
understood.
ID must be set in first column in header row.
The tag of sheet must be esc2.
For Totalize count, the value of Packet No must be set to 0; for Batch count, the
values of Packet_No and No_per_Packet must be greater than 0.
For batch count, the maximum number of batch is less than 200. The maximum
number of Packet_ No in a batch is less than 32000.
The maximum number of No_ per_ packet is less than 32000.
4.2 Standard Prearranged File
Figure 4.2
Note that the first row is the header. The first cell in the header must be an ID.
Comment column can also be used to specify the speed of the turntable for this row
sample, which contains a numeric value in the ‘Comment’ column. Only the numeric
value in the cell of this column will be considered as a speed of the turntable

Agriculex Inc.
Tel: 519 837 0871 Fax 519 837 4291 www.agriculex.guelph.org
1-59 suburban Ave Guelph Ontario N1E 6B4
17
4.3 Simplified standard prearranged file
Figure 4.3
Note that the first row is the header. The first cell in the header must be ID.
4.4 Prearranged File Without the Header
Please format each cell in the first row to ‘TEXT’ before typing any characters. If you
retain each cell in the first row in general format, the software will omit the first row
when it is imported into the software.
Figure 4.4
4.5 Comment column
You can place some comments, numeric value or blank in the cell of the ‘Comment’
column. If this cell contains some comments or a blank, the turntable will ignore this
comment or blank, and counter will run at Feed Speed to believe seed, otherwise it will at
specified numeric value to run turntable.

Agriculex Inc.
Tel: 519 837 0871 Fax 519 837 4291 www.agriculex.guelph.org
1-59 suburban Ave Guelph Ontario N1E 6B4
18
Figure 4.5
For example; look at the row 2 and 3 at the above figure 4.5. If the Feed Speed is set to
50 speed level, the counter will run at 50 speed level for row 1 and 2 seed sample. The
counter will run at 60 speed level for row 3 seed sample, and at 50 speed level for row 4
seed sample.
Note that the Packet_ No must be equal or greater than 0. The No_ per_ packet must be
greater than 0.

Agriculex Inc.
Tel: 519 837 0871 Fax 519 837 4291 www.agriculex.guelph.org
1-59 suburban Ave Guelph Ontario N1E 6B4
19
5. Independent Mode
If you want to integrate data from the counter to your database and you have a third party
software such as ‘Winwedge’. Or you have developed your own software, which is
capable of RS232 communication; you will need to connect to a PC or laptop to the
counter.
If you have selected ‘Independent mode’ the new menu will display on the panel as figure
shown below:
What do you want to do?
1- Totalize count;
2- New program for batch count;
3- Run stored program;
4- Last program;
5- Other.
5.1 Totalizing
Press number 1 button to select ‘totalize count’. A new selection menu will appear on the
display panel. See below:
Select Crop
1. Corn
2. Soybean
3. Canola
4. Wheat
5. Sunflower
6. More Crops
7. Add, edit or delete crop
Select a crop. If no crops appear on the menu, please see page Add crop to the counter.
For example; if soybean is selected
Set Gate at 10
Set Sensitivity at 5
1- Ok
2- Edit gate or sensitivity setting
Table of contents
Popular Industrial Equipment manuals by other brands

Thiele
Thiele TWN 0796 Mounting instructions

Ingersoll-Rand
Ingersoll-Rand Doosan XHP1070CM-1800 Operation Maintenance & Parts Manual

JJM Boiler Works
JJM Boiler Works CBM-227 Installation, operation and maintenance

Terex
Terex Genie SHOV50014B-1001 Operator's manual

Vestil
Vestil FC-29 instruction manual

ABB
ABB Sace Tmax XT XT5 THERMOMAGNETIC Disassembly instructions


Airec
Airec Cross 30 Installation and maintenance manual

Pfannenberg
Pfannenberg PWS 6502 Series operating manual

Valmet
Valmet Stonel Eclipse EC Series Installation maintenance and operating instructions

Genmitsu
Genmitsu Jinsoku LE-1620 user manual

Carpenter MFG. Co., Inc.
Carpenter MFG. Co., Inc. Compu-Strip 75 Operator's manual

Virutex
Virutex PEB250 operating instructions