AiBOT RC 310A User manual

AiBO
T
Robotic Vacuum Cleane
r
R
C
310
A
Use
r
’
s
Manua
l

T
ABL
E
O
F
CONTENT
S
SAFET
Y
ADVISO
R
Y
------------------------------------------------------
-
2
*
Safet
Precaution
s
*
Batter
an
d
Recharg
e
Precaution
s
SPECIAL FEATURES ----------------------------------------------------- 4
MAJO
R
COMPONENT
S
AN
D
A
T
T
ACHMENTS
-------------
--
------
-
4
R
C
310
A
SERIE
S
OVE
R
VIE
W
--
-----------------------------------
---
5
INS
T
ALL
A
TIO
N
GUID
E
--
-----------------------------------------
------
6
*
Installatio
n
o
f
Sid
e
Brus
h
*
Usin
g
Dustin
g
Pape
r
*
Batter
Installatio
n
an
d
Remova
l
RECHARGING
BATTERY
------------------------------------------------
8
GENERA
L
OPER
A
TIO
N
-------------------------------------------------
-
8
*
Preparatio
n
fo
r
Operatio
n
*
Startin
g
Operatio
n
MAINTENANCE AND CLEANING--------------------------------------- 9
*
Maintenanc
e
*
Cleanin
g
Th
e
Dus
t
Bi
n
*
Cleanin
g
Ne
w
Filte
r
*
Cleanin
g
Th
e
Intak
e
V
alv
e
*
Cleanin
g
Th
e
Sid
e
Brus
h
TROUBLESHOOTING---------------------------------------------------
13
1

SAFETY ADVISORY
R
ea
d
th
e
safe
t
instruction
s
i
n
thi
s
Use
r
Manua
l
befor
e
operatin
g
R
C
310
A
SERIE
S
(th
e
robot'
)
an
d
keep this manual hand for our future reference.
Observe the basic safet rules to prevent an occurrence of fire, electric shock and personal injur .
Safet
y
Precaution
s
1.
R
ea
d
th
e
Use
r
Manua
l
befor
e
operatin
g
th
e
robot
.
2. Do not operate the robot outdoors.
3. Do not operate the robot on wet floor or in moist environments, e.g. bathroom.
Water and moisture could damage the circuit board in the robot.
4. Prior to operation, remove an loose articles on the floor such as clothes, paper, loose
cables and extension cords as well as making sure to lift curtains and drapes off the
floor to avoid an possible accidents. In case of a loose cable is tangled with the robot,
the cable might move around with the robot as it works and topple down the table,
chairs, or cabinet and cause propert damage.
5. Never stand or sit on the robot. Beware of children or pets while the robot is in operation.
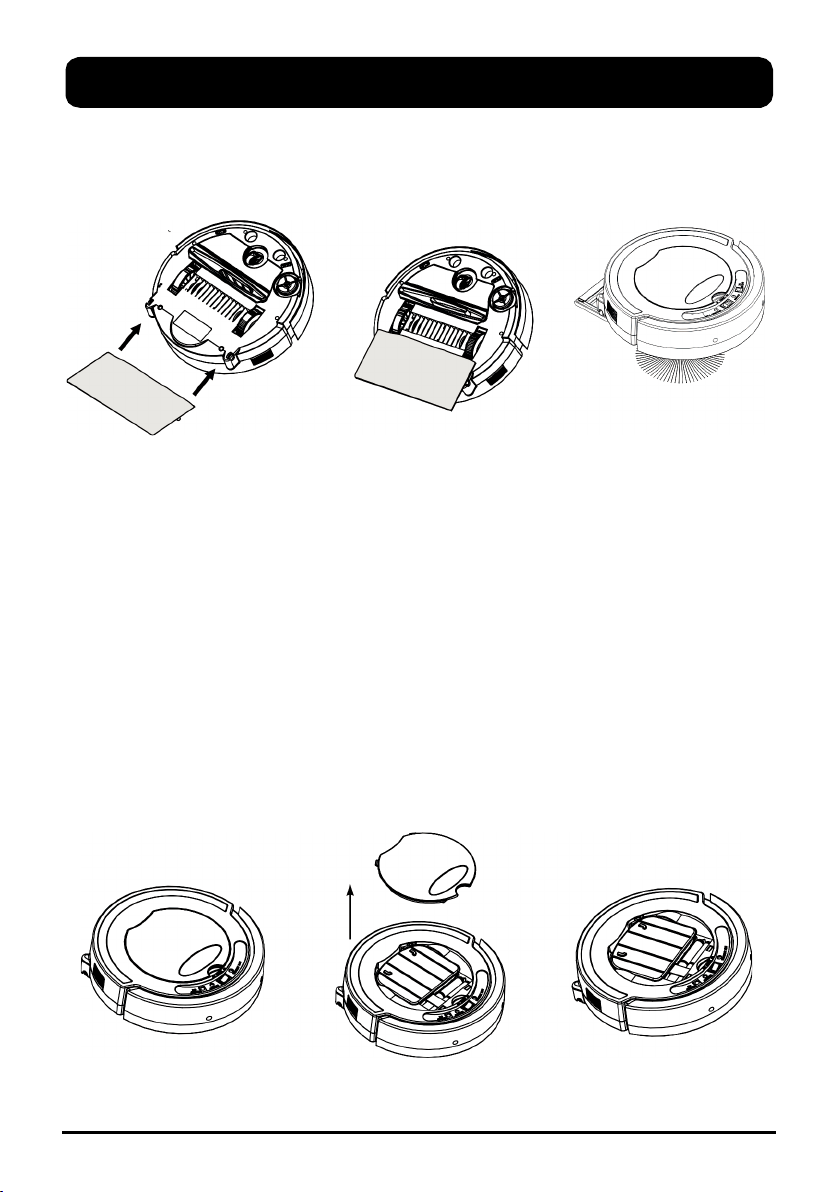
6. Before starting the robot, make sure to install its dust bin and filter properl . If the robot is
operated without its dust bin and filter properl installed, dust and dirt ma be sucked into
the chassis and cause damage to the robot
7. Never use the robot to clean up almost lit cigarette butts or burning ashes from a fireplace.
8. Never use the robot to clean up combustible or highl volatile liquids such as gasoline.
9. While the robot is in operation, make sure all doors leading outside are closed.
10. During operation, the heat vent should never be clogged or covered up. Otherwise, the
robot could be damaged due to overheating.
11. If the robot is malfunctioned or damaged b force, never operate again regardless the
cause. Call our local dealer for advice
12. Turn off the power and remove the batter from the robot if the unit will not be in use for a
long period of time.
Batter
y
an
d
Recharg
e
Precaution
s
1. Use the voltage and current specified on the packing. If ou are not sure of the voltage
and current of our house, contact our local power compan or a licensed electrician.
2. An adaptor of d.c. 9V 300mA is required for the robot. Different voltage or current of the
adaptor used ma cause the unit malfunctioning.
3. Eight NI-MH AA size batteries (1200mAh or above) are required and NI-MH
rechargeabl
batteries of the same brand and same series number are recommended. Do not mix
batteries with different brands or different series numbers or it might cause damage to
the robot.
4. Never use
dr cell batter .
5. The charging adaptor is to be used indoors onl .
6. Use onl the charging adaptor supplied with our RC 310A.
7. Do not recharge the batter if the cable or plug of the batter is damaged.
8. Never touch the charger, plug or cable with damp hands.
9. If the robot requires cleaning, unplug the adaptor, switch off the power, and take out the
batteries beforehand.
10. Take out the batteries before disposing of the unit.
11. Switch off the robot before taking out the batteries.
12. Rec cle and dispose of the waste batter according to the law.
2

SPECIAL FEATURES
Thank you for purchasing the RC 310A Mini Vacuum Robot. This revolutionary mini
vacuum robot is fully automatic and helps you take care of the vacuuming routine. It
keeps your floor dust free, hair free and dirt free every day. The robot is suitable for
cleaning floor surfaces such as wood, tile or linoleum. Easy to use, quiet and safe,
this robot is definitely your best household helper!
Random Along the wall Random
MAJOR COMPONENTS AND ATTACHMENTS
1.RC 310A Mini Vacuum Robot 2.Dust Bin Filter
3.Side Brush 4.Dust Holder
5. Adaptor DC13V, 450mA 6.Rechargeable “AA” Size Battery (8pcs )
7.Dust Paper x 3 8.Multi-languages User Manual (CD-ROM)
9.Multi-language Quick Guide
3
1.
4.
7.
2.
5.
8.
3.
6.
9.

RC 310A OVER VIEW
Bi
g
Cove
r
Dust
Bin/Batter
Inside
Lo
w
Batter
Indicator
Powe
r
Switc
h
ON/OFF
Hea
t
V
en
t
Powe
r
Indicatio
n
Lam
p
Bumpe
r
d
.
c
.
jac
k
Intak
e
V
alv
e
Handl
e
Gri
p
Caste
r
Sid
e
Brus
h
Holder
Slot
s
fo
r
Dust
Paper Holder
Whee
l
4

INSTALLATION
GUIDE
Installation
of
Side
Brush
1. Put the brushes in the holders then mount the brush as shown in Fig.
sin
g
Dus
t
Pape
r
1. Remove the Paper Holder
Stoppe
r
Dust
Pape
r
Holder
(back
)
2.
Make sure the
dust
pape
r
is flat
an
d
plac
e
it in
th
e
holde
r
,
the
n
fol
d
th
e
borde
r
o
f
the dust paper and press it with the stopper into the dust paper holder.
Dust
Pape
r
Bac
k
V
ie
w
Front View
5

INSTALLATION GUIDE
3
.
Loc
k
th
e
dust
pape
r
holde
r
int
o
th
e
smal
l
slot
s
o
n
th
e
botto
m
o
f
the robot
.
Batter
y
Installatio
n
an
d
Remova
l
1. Make sure the RC 310A is turned off before installing the batteries.
2. Press and open the top cover (See image below.)
3. Place eight batteries into the batter section in two la ers (marked in red rectangle)
and close the top cover.
4. When placing the batteries into the reservoir, make sure the polarit (+/-) of the
batteries match with the indication marked inside the batter section. Otherwise,
the power cannot be switched on.
5. To remove the batteries, switch off the robot and remove the batteries one b one.
6

RECHARGING THE BATTERIES
1.
T
o
protec
t
an
d
ensur
e
th
e
b
es
t
performanc
e
o
f
th
e
rechargeabl
e
batter
an
d
maximize its performance, the charge time will take eight hours for a full charge.
After full time charging, the power indication lamp will stop blinking and turn to
green. And because this charging relies on the timer inside the robot, if the charging
power input has been interrupted, the timer will re-start counting (so the power
indication lamp will still be blinking green). But as long as ou're sure the total
charging time of this c cle is over eight hours, ou could turn on the robot for
cleaning. The charging function will be cut off automaticall for continuousl
charging over eight hours.
2. If the power indication lamp indicates that the batter of RC 310A needs immediate
charging.
3. Before charging, make sure the batteries are properl installed. The power switch in
turned off.
4. Plug one end of the d.c. adaptor into the jack on the top of the robot and the other en
d
into the AC power outlet to charge, the power indication lamp starts blinking green,
and it will sta green when the batter is full charged.
d.c
.
Jac
k
Adapto
r
plu
g
d.c. 9V 300m
A
GENERAL OPERATION
Preparation
for
Operation
To ensure the best efficienc of RC 310A, remove an loose articles on the floor such as
clothes,
paper, loose cables and extension cords as well as making sure to roll up curtains and drapes
off the floor to avoid an possible accidents. In case of a loose cable is tangled with RC 310A,
the cable might move around with the robot as it works and topple down a table, chairs, or
cabinet and cause propert damage.
* Do not use the robot on carpet.
* Remember to install the dust bin and filter into the RC 310A before operation.
Starting Operation
1. Place the robot on the floor and turn the power on.
2. When the power is ON, the red light (BATTERY LOW ) and green light (CHARGE )
indication lamps will be flashing alternatel . When the power is exhausted, the red lamp
will light up and the robot stops.
3.
When
the
robot
is
not
in
use,
make
sure
it
is
in
the
power
-
o
f
f
situation.
7

MAINTENANCE AND CLEANING
Maintenanc
e
The operation and maintenance of the robot is ver simple. After each use, clean u
p
the dirt inside the dust bin and on the filter. It is not necessar to clean the intak
e
valve after ever use.
Cleaning the Dust Bin
1. Press and open the big cover.
2. Remove the dustbin as shown below.
Gri
p
slo
t
fo
r
th
e
dustbi
n
8

MAINTENANCE AND CLEANING
1.
Ope
n
th
e
uppe
r
cove
r
o
f
th
e
dustbin
.
2. Lift up and take out the filter.
3. Empt the dust bin.
9

CLEANING AND MAINTENANCE
1
.
Clea
n
th
e
filte
r
wit
h
a
sof
t
bristl
e
brus
h
t
o
remov
e
th
e
dir
t
attache
d
o
n
th
e
surface
.
2. If needed, ou ma rinse the dust bin under tap water.
It is not necessar to wash it ever time.
Do not put it into the washing machine for cleaning.
3.Once dried, reinstall the filter and the dust bin lid, and place it back into the robot.
* Remember to install the dust bin (with filter and plastic cover properl placed)
int
o
th
e
robo
t
befor
e
operation
.
1
0

CLEANING AND MAINTENANCE
Rep
lacin
g
Ne
w
Filte
r
1. After a period of use, the filter is required to be replaced. If the filter is too dirt , the
airflow is blocked and the suction power will be lowered.
2. If the filter becomes too thin (due to cleaning or washing) or torn, it must b
e
replaced immediatel , as dust and dirt ma be sucked into the chassis and cause
s
damage to the robot.
Cleaning the Intake Valve
After repeated use, dirt and dust can accumulate around the intake valve of the
robot and the working efficienc will be reduced. To ensure the best efficienc and
constant airflow, the intake valve should be cleaned periodicall .
1. Turn off the power and place the robot upside down on a flat surface.
2. Wipe and remove an hair or an other material that ma have accumulated
around the intake valve.
Intak
e
V
alv
e
Cleanin
g
th
e
Sid
e
Brus
h
1. Pull up the brushes and remove an hair as shown in Fig.
2. The side brushes can be rinsed and if the become crooked, ou can soak
them in hot water so the return to their original shape.
3.
A
fte
r
bein
g
use
d
fo
r
a
perio
d
o
f
time
,
th
e
brus
h
shoul
d
b
e
replace
d
fo
r
bette
r
e
f
ficienc
.
1
1
PUL
L
UP
!
Sid
e
Brus
h

TROUBLE SHOOTING
Proble
m
Possibl
e
Caus
e
Solutio
n
1
Th
e
powe
r
lo
w
indicatio
n
lamp lights up after RC
310
A
i
s
turne
d
on
.
Batter
powe
r
i
s
lo
w
du
e
t
o
the following reasons:
1.The batteries are not full
charged et.
2.The batteries have self-
discharged after a perio
d
of idleness.
Recharg
e
th
e
batteries
.
2
Canno
t
star
t
th
e
robo
t
afte
r
Powe
r
On
.
1
.
Batter
i
s
no
t
installe
d
properl .
2.Batter
Lo
w.
1
.
Ins
tal
l
th
e
batter
agai
n
correctl (refer to th
e
Operation Manual for batter
installation)
2.Recharge the batter again.
N
o
LE
D
indicato
r
shown
,
1.Batterie
s
ar
e
no
t
installe
d
1
.
C
hec
k
i
f
th
e
batterie
s
3
4
canno
t
charg
e
th
e
batteries via the robot
The robot cannot be
started after Charging.
properl
.
2.Fault adaptor.
1.Batteries are not installed
properl .
2.Fault batteries within 8 pcs
of
batteries.
ar
e
installe
d
correctl
(wit
h
the correction +/- directions)
2.Contact our local dealer
for service.
1.Ceck if the batteries are
installed correctl (with the
correction +/- directions)
2.Replace all or the fault one
(s) with the same brand and
series number new batteries,
then recharge the robot again
.
Powe
r
indicatio
n
lam
p
o
f
th
e
robo
t
st
il
l
blink
s
Ther
e
migh
t
hav
e
bee
n
a
sligh
t
paus
e
o
f
th
e
powe
r
Th
e
robo
t
i
s
operabl
e
i
f
th
e
batteries
have
been
charged
5
afte
r
it'
s
charge
d
ove
r
1
6
hours
.
suppl
durin
g
th
e
recharge
.
ove
r
1
6
hour
s
o
n
(i
f
th
e
robo
is operated without full re-
charge, the working time will
b
e
shorter
)
6
Th
e
workin
g
tim
e
o
f
th
e
robot has become a lot
shorte
r.
Th
e
batterie
s
ar
e
aged
.
R
eplac
e
th
e
whol
e
lo
t
o
f
batteries with new batteries
.
Remember to use batteries
of the same brand and same
capacit .
1
2

Frequentl Asked Questions (FAQs)
A.
Batter
y
an
d
Chargin
g
1
.
Ho
w
lon
g
doe
s
i
t
tak
e
t
o
full
y
charg
e
th
e
robot
?
It takes about eight hours to full charge the robot.
2
.
Wh
y
doe
s
i
t
tak
e
s
o
lon
g
t
o
charg
e
u
p
th
e
battery
?
The robot uses a slow charging technolog which could keep up the work performance and
lif
span of the rechargeable batteries better.
3
.
Ca
n
I
us
e
rechargeabl
e
batterie
s
othe
r
tha
n
1200mAh
?
Yes, as long as all eight pieces of AA rechargeable batteries are the same brand, same series
and same capacit , it is oka . However, if the capacit of the batteries is lower than 1200mAh,
the working time of the robot ma be shorter.
4
.
Wh
y
i
s
th
e
gree
n
lam
p
stil
l
blinkin
g
afte
r
8
hour
s
o
f
charging
?
As the recharge function relies on the timer inside the robot, in case the charging power input
has been interrupted during the recharge, the timer will re-start counting (so the power
indication lamp will still be blinking in green.) It will stop again after 8 hours of uninterrupted
charging.
5
.
W
oul
d
I
ge
t
electri
c
shoc
k
i
f
I
touc
h
th
e
robo
t
whe
n
i
t
i
s
recharg
ing
?
NO. The output of the contact points is onl 9.6V. It is safe for humans and pets.
6
.
D
o
I
nee
d
t
o
tur
n
o
f
f
th
e
robo
t
befor
e
chargin
g
it
?
YES. Please turn off the robot before recharging, otherwise it could not be recharged properl
.
7
.
W
oul
d
th
e
robo
t
b
e
overcharge
d
o
r
ge
t
burn
t
i
f
i
t
i
s
connecte
d
t
o
th
e
adapto
r
all the time?
NO. The recharge will stop automaticall after 8 hours. However, if ou expect a longer
period of idleness, it is recommended to unplug the adaptor.
8
.
Wha
t
woul
d
happe
n
i
f
I
star
t
usin
g
th
e
robo
t
befor
e
i
t
get
s
full
y
charged
?
It will still work until the voltage drops to a certain level and stop on the floor. The working tim
e
would be shorter than normal.
9
.
Ho
w
lon
g
i
s
th
e
batter
y
life
?
Whe
n
d
o
I
nee
d
t
o
replac
e
wit
h
ne
w
batteries
?
Lifespan of Ni-MH batteries is usuall around 9-12 months (it will also depend on the usage and
storage condition). When the batteries start to age, the working time will drop graduall . When the
working time drops to a level that the robot can not clean up our home effectivel ( ou still find
obvious dirt on floor after the cleaning program) ou need to replace with new batteries.
1
3

Frequentl Asked Questions (FAQs)
B.
Applications
1
.
Why
is
the
suctio
n
power
of
this
robot
so
low
?
Can it
clean
my
floor
effectively
?
SURE
!
The robot is designed to handle ever da dirt in our home
,
which includes dust
,
hair
,
dead skin
,
pet hair
,
food crumbs
,
etc
.
All these are ver light in weight but it is tedious for us to
clean b ourselves da after da
.
The robot is a lot more effective in cleaning all these tin dirt
,
thanks to its fuzz logic program, and the robot uses ver little power
,
so it saves ou a lot of
energ
(
and mone
)
as well as keeping itself extremel quiet during operation
.
2
.
Do I need to keep my pet or baby away while the robot is working
?
NO
.
The robot is so gentle and quiet it will not scare an bod or even a pet. But ou are still
recommended to observe in the first few runs of the robot to see how our bab or pet react to
the motion of the robot just for safet reasons
.
3
.
Is the robot able to handle watered floor
?
NO
.
Water and moisture would damage the robot
.
4
.
Is the robot able to treat wooden floor other than tile floor
?
YES
.
The robot is designed to work on a tiled floor
,
wooden floor and linoleum floor
.
5
.
Is the robot suitable for outdoor use
?
NO
.
Never use the robot outdoors
.
Weather could damage it
.
6
.
Do I need to clean up the dust bin every time after vacuuming
?
You are recommended to clean it up and remove dusts
/
hair on the filter with a soft brush gentl
for ever two times of use
.
It would extend the lifespan of our filter if ou take good care of it
.
7
.
Do I need to maintain the robot frequently
?
NO
.
The robot is designed to be so user friendl that ou just need to inspect the side brushes
ever month to see whether there is an tangled hair
.
If there is an
,
remove them b
unscrewing the side brushes and screwing them back in good order upon completion
.
8
.
What will happen if the robot gets stuck
?
Thanks to the user
-
friendl design, it will stop itself if it gets stuck.
9
.
How long the robot can run after it is fully charged
?
The robot can run continuousl for around 50
-
60 minutes if it is full charged and in good
condition
.
However
,
it would remain around 80
%
of the original running duration after the batter is
aged
.
10
.
There are several bedrooms in my home
,
could the robot clean up all of them
?
The working area for RC 310A is around 50
-
60square feet
(
around 50 square feet
).
Simpl keep all the room doors open
,
the robot will go inside and clean them one b one
.
11
.
My home is quite big
.
Could I use RC 310A
?
Yes
,
ou can
.
However
,
since the working area for RC 310A is around 300
-
330 square feet
(
30
square meters), ou ma need to separate our home into several portions and do the cleaning in
several rounds
.
Our recommendation is to consider a model from our range which could handle
larger working area.
1
4
Table of contents
Other AiBOT Vacuum Cleaner manuals