AiBOT RC 320A User manual

AiBO
T
Robotic
Vacuum
Cleaner
R
C
320
A
Use
r
’
s
Manua
l

TABLE OF CONTENTS
SAFET
Y
INSTRUCTION
S
-------------------------------------------
-
2
*
Safet
y
Instruct on
s
*
Batter
y
an
d
Recharg n
g
Instruct on
s
SPECIAL FEATURES -------------------------------------------------
MAJO
R
COMPONENT
S
AN
D
A
T
T
ACHMENTS
---------------
-
3
3
R
C
320
A
OVE
R
VIE
W
-------------------------------------------------
-
4
B
A
TTE
R
Y
INS
T
ALL
A
TIO
N
AN
D
REMO
V
A
L
--------------------
-
RECHARGING BATTERY -------------------------------------------
-
ADJUSTMEN
T OF ANTI-CLIFF SENSORS---------------------
-
GENERA
L
OPER
A
TIO
N
---------------------------------------------
-
5
6
6
7
*
Preparat o
n
fo
r
Operat o
n
*
Start n
g
Operat o
n
INSTALLING SIDE BRUSH-----------------------------------------
-
USING DUSTING PAPER -------------------------------------------
-
CLEANIN
G
AN
D
MAINTENANC
E
---------------------------------
-
7
8
9
*
Ma ntenanc
e
Metho
d
*
Clean n
g
Dus
t
B
n
*
Clean n
g
Intak
e
TROUBLESHOOTING-------------------------------------------------
1
3
1

SAFETY INSTRUCTIONS
Read the safety nstruct ons n the Operat on Manual before operat ng RC 320A and keep th s
manual handy for your future reference. Observe the bas c safety rules to prevent any occurrence
of f re, electr c shock and personal njury.
Safety Instructions
1. Read the Operat on Manual before operat ng RC 320A.
2. Do not operate RC 320A outdoors.
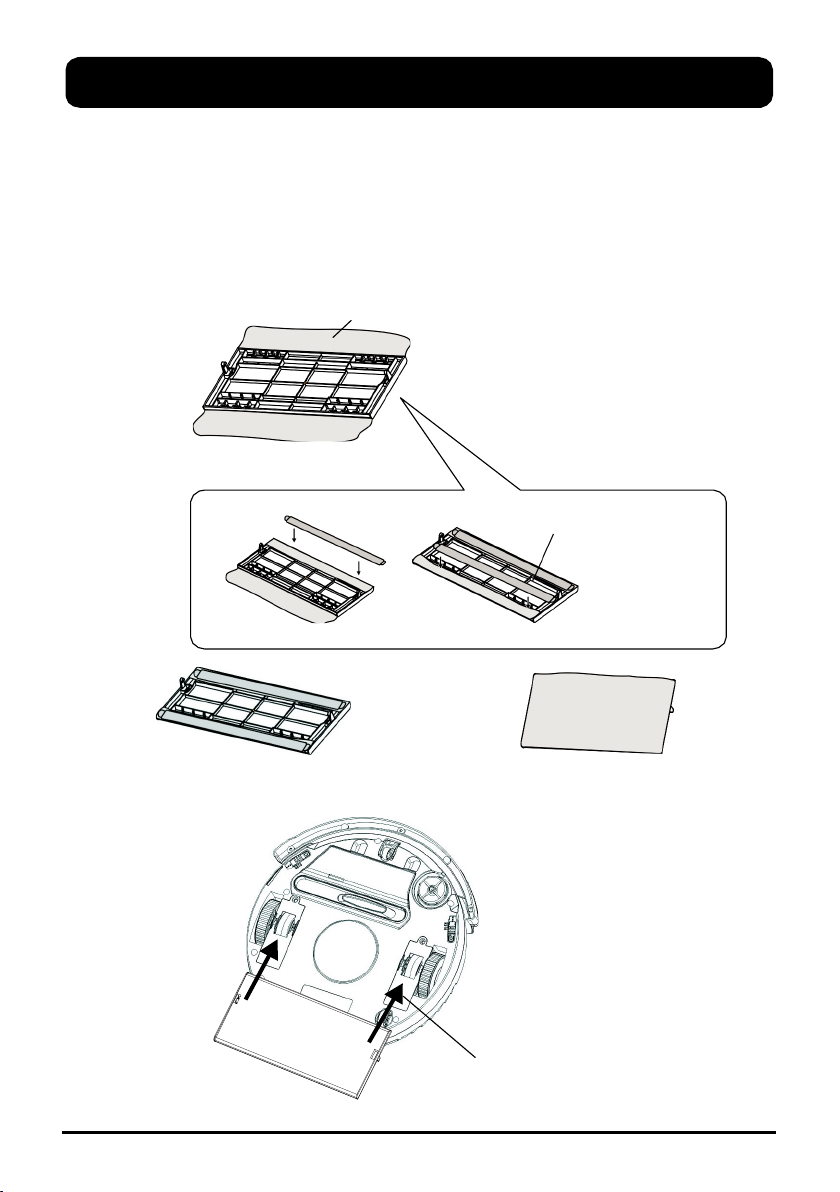
3. Before start ng RC 320A, be sure to nstall the RC 320A dust b n f lter properly n case of any
damage of RC 320A.
4. Do not operate RC 320A on wet floor or n mo sture cond t ons, e.g. a bathroom. Water and
mo sture could damage the c rcu t board n the RC 320A.
5. Before you use RC 320A remove any loose art cles on the floor such as clothes, paper, loose
cables, or extens on cords as well as mak ng sure to l ft curta ns and drapes off the floor to
avo d any poss ble acc dents. In case of a loose cable s tangled w th RC 320A, the cable
m ght move around w th RC 320A as RC 320A works and topple down the table, cha rs, or
cab net and cause property damage.
6. Never stand or s t on RC 320A. Beware of ch ldren or pets wh le RC 320A s n operat on.
7. Never use RC 320A to clean up almost l t c garette butts or burn ng ashes from a f replace.
8. Never use RC 320A to clean up combust ble or h ghly volat le l qu ds such as gasol ne.
9. Wh le RC 320A s n operat on, make sure all doors lead ng outs de are closed.
10.Dur ng operat on, the heat vent should not be clogged. If heat vent is clogged, RC 320A
could be damaged.
11.If RC 320A malfunct ons or s damaged by force, do not operate RC 320A regardless the cause.
Call your local dealer for serv ce nformat on.
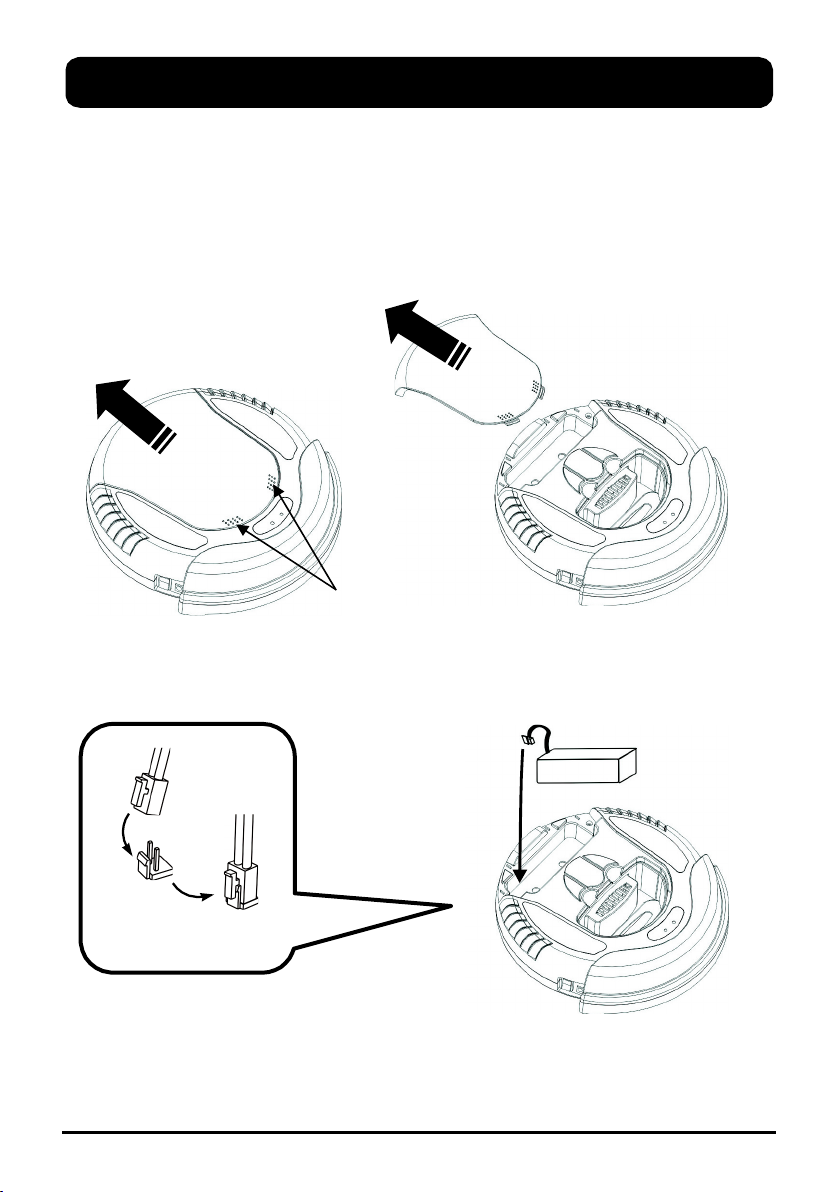
12.Turn off the power and remove the battery from RC 320A f the un t w ll not be used for a long
per od of t me.
Battery and Recharging Instructions
1.The battery s rechargeable. Use the voltage and current spec f ed on the pack ng
.
If you are
not sure of the voltage and current of your house, contact your local power company or a
l censed electr c an.
2.Use only the battery suppl ed w th your RC 320A.
3.The charg ng adaptor s for ndoors only.
4.Use only the charg ng adaptor suppl ed w th your RC 320A.
5.Do not recharge the battery f the cable or plug of the battery s damaged.
6.Never touch the charger
,
plug or cable w th damp hands.
7.If RC 320A requ res clean ng, unplug the adaptor, sw tch off the un t and take out the battery.
8.Take out the battery pack before d spos ng of the un t.
9.Sw tch off RC 320A before tak ng out the battery.
10.Recycle and d spose the waste battery properly.
2

SPECIAL FEATURES
Congratulat o
n
o
n
purchase
s
th
e
R
C
320
A
Robot
c
V
acuu
m
Cleane
r
.
Th s revolut onary Robot c Vacuum Cleaner s equ pped w th funct ons su table for
clean ng up floor surfaces of home and off ce such as wood, t le, and l noleum. You can
also operate th s un t w th the prov ded m cro f ber cloth to help you clean more ef
fect vel
Th
e
R
C
320
A
Robot
c
V
acuu
m
Cleane
r
s
def n tel
y
a
househol
d
helpe
r
.
Rando
m
Sp ra
l
Alon
g
th
e
wal
l
Sp ra
l
PACKAGE CONTENTS
R
C
3
20
A
Cleane
r
Rechargeabl
e
Batter
y
Adapto
r
Dus
t
B
n
F lte
r
x
2
Dust
Pape
r
Holde
r
Dust
Pape
r
x
3
User
’s
Manual
(CD ROM)
Mult -language
Qu c
k
Gu d
e
S d
e
Brus
h
x
2
3

RC 320A OVERVIEW
Hea
t
V
en
t
Dus
t
B
n
Ins d
e
B
g
Cove
r
Bumpe
r
Powe
r
Sw tc
h
Contro
l
Pane
l
d
.
c
.
jac
k
Handl
e
Gr
p
Fron
t
Smal
l
Whee
l
Ant
-
Cl
f
f
Senso
r
Intak
e
Whee
l
Cove
r
S d
e
Brus
h
Wheel
s
Ant
-
Cl
f
f
Senso
r
V
acuu
m
on/o
f
f
Sw tc
h
Bas
e
4

BATTERY INSTALLATION AND REMOVAL
1.
Ma
k
e
sur
e
th
e
powe
r
sw tc
h
o
f
R
C
320
A
s
turne
d
o
f
f
.
2. Press and sl de the battery cover (see mage below).
3. Insert the battery plug nto the socket (check the d rect on).
4. Place the battery n the battery sect on and put the b g cover back on the un t.
5. To remove the battery, follow step #3 above n reverse.
B
A
Batter
y
plu
g
Socke
t
fo
r
battery Cl ck up
5

RECHARGING
BATTERY
1.
T
o
ensur
e
t
h
e
bes
t
pe
rf
o
r
manc
e
o
f
t
h
e
rechargeabl
e
ba
tt
er
y
an
d
leng
t
he
n
t
s
l
f
e
span
,
the
battery
s
best
used
after
t s
fully
charged
for
8
hours
every
t me.
2.
The
charg ng
funct on
w ll
be
cut
off
automat cally
for
cont nuously
charg ng
8
hours.
Before
charg ng,
make
sure
the
battery
s
correctly
nstalled
and
the
power
sw tch
has
been
turned
to
“OFF”
pos t on.
3.
To
do
recharge,
plug
one
end
of
the
d.
c.
adaptor
nto
the
jack
on
the
RC
320A
and
the
other
end
nto
the
AC
power
outlet
to
charge.
4.
When
charg ng,
the
“CHARGE”
LED
nd cat on
lamp
on
the
control
panel
of
RC
320A
(a
s
below
w ll
flash
green,
and
t
w ll
stay
green
when
the
battery
s
fully
charged.
5.
When
the
“BATTERY
LOW”
LED
nd cat on
lamp
on
the
control
panel (below)
w ll
stay
RED.
*If
you
forget
to
turn
off
the
power
of
RC
320A
before
charg ng,
after
the
cleaner
s
fully
charged,
you
have
to
turn
off
the
cleaner
and
turn
t
on
aga n
to
make
t
start
clean ng.
Adapto
r
Plu
g
d.c.
jack
CHARG
E
B
A
TTE
R
Y
LOW
ADJUSTMEN
T OF ANTI-CLIFF SENSORS
I
f
th
e
d stanc
e
betwee
n
th
e
sta
r
an
d
th
e
groun
d
s
sh
orte
r
tha
n
usual
(around 2
-
3cm)
,
you can adjust the w ndows of both "Ant -cl ff" sensors from "2" or "1" or "0" pos t on to
prevent the cleaner from fall ng down sta rs. You can test t before start ng to clean.
* NOTE:
If the color of the floor s dark (e.g. Black), t means the reflect v ty of the floor
w ll confuse RC 320A and t m ght move backward cont nuously. Under th s
c rcumstance, open the w ndow pos t on to the max (’2’ or ‘3’ pos t ons).
Ant
-
Cl ff
Sensor
Ant
-
Cl ff Sensor
6
*Control Panel w th LED

GENERAL OPERATION
Preparat o
n
fo
r
Operat o
n
To ensure the eff c ency of RC 320A, remove any loose art cles on the floor such as clothes,
paper, loose cables and extens on cords as well as mak ng sure to roll up curta ns and drapes
off the floor to avo d any poss ble acc dents. In case of a loose cable s tangled w th RC 320A,
the cable m ght move around w th RC 320A as t works and topple down a table, cha rs, or a
cab net and cause property damage.
Start Operat on
1. Be sure to clean up the dust b n and be sure that the dust b n f lter s nstalled properly.
2. Place the cleaner n an area w th more free space n the room, power on and VAC sw tch s
n “ON”, start work ng.
3. When the cleaner runs out of power, the “BATTERY LOW” LED on the un t w ll turn red
and the cleaner w ll automat cally stop.
4. When the cleaner s not in use or pr or to recharg ng, make sure the power sw tch s n the
“OFF” pos t on.
5. You may sw tch off the vacuum motor(VAC n ”OFF”) as shown below to have the cleaner just
do the mopp ng.
* Caut on: Remove the dust paper holder and s de brush before us ng on the carpet.
*Th s product s not su table for long-p le carpets.
INSTALLING SIDE BRUSH
Put the brushes n the holders then mount the brush as shown n F g.
7
PUS
H
D
OW
N
!

USING DUST PAPER
1.
Inser
t
th
e
borde
r
o
f
the
dus
t
p
ape
r
nt
o
th
e
gr
p
slo
t
o
f
th
e
dust pape
r
holde
r
.
2. Put the 2 bolts of the dust paper holder at the 2 holes ( ns de the 2 b g wheels)
and cl ck the holder on the bottom of the cleaner.
*Be sure to nstall the dust paper f rst before the cleaner starts to clean w th the
dust
paper
holder.
Dust
Pape
r
Bac
k
V
e
w
Fron
t
V
e
w
Dust
Pape
r
Holde
r
nt
o
th
e
small
holes
8
Dust
Pape
r
Holde
r

CLEANING AND MAINTENANCE
We suggest after each use, clean any d rt left beh nd in the dust b n and f lter.
Clean ng
the
Dust
B n
1. Press the "A" po nts and sl de the cover n the d rect on of arrow "B" shown below
to remove the b g cover from the cleaner.
2. Take
out
the
dust
b n
from
the
cleaner.
Gr
p
slo
t
fo
r
th
e
dus
t
b
n
9

CLEANING AND MAINTENANCE
3.
Ope
n
th
e
uppe
r
cove
r
o
f
th
e
dus
t
b n
.
4. L ft up and take out the f lter.
5. Empty the dust b n.
1
0

CLEANING AND MAINTENANCE
6.
R ns
e
th
e
dus
t
b
n
w t
h
ta
p
wate
r.
I
t
s
no
t
necessar
y
t
o
was
h
ever
y
t me
.
Do
no
t
pu
t
t nto a wash ng mach ne for clean ng.
7. Per od cally clean the f lter w th a soft br stle brush.
8. Once dry, re nstall the f lter and the dust b n l d.
9. Place the dust b n back nto the cleaner.
Note!! Before start ng the cleaner, make sure the dust b n f lter s n the
cleaner.
1
1

CLEANING AND MAINTENANCE
Cleanin
g
the
Intak
e
After repeated use, d rt and dust can accumulate around the ntake of the RC 320A
and the work ng eff c ency can be reduced. To ensure the best eff c ency and constan
t
a rflow, the ntake should be cleaned per od cally.
Intak
e
Cleanin
g
Sid
e
Brush
1.
Pull up the brushes and remove any ha r as shown n F g.
2.
The s de brushes can be r nsed and f they become crooked, you can soak
them n hot water so they return to the r or g nal shape.
3. After be ng used for a per od of t me, the brush should be replaced for more
eff c ency.
4. The s de brush can be r nsed. If t becomes crooked, you can scald them n hot
water to make them recover to or g nal shape.
1
2
PUL
L
UP
!
Brush

TROUBLE SHOOTING
Proble
m
Poss bl
e
Caus
e
Solut o
n
1
The power low nd cat on
lamp l ghts up after RC
320A s turned on.
Battery power s low due to the
follow ng reasons:
1.The batter es are not fully
charged yet.
2.The batter es have self-
d scharged after a per od of
dleness.
Recharge
the
batter es.
2
Cannot start the robot
after Power On.
1.Battery s not nstalled
properly.
2.Battery Low.
1.Install the battery aga n
correctly (refer to the Operat o
n
Manual for battery nstallat on)
2.Recharge the battery aga n.
No LED nd cator shown,
cannot charge the batter es
v a the robot
1.Check f the batter es
are nstalled correctly (w th the
correct on +/- d rect ons)
2.Contact your local dealer for
serv ce.
The robot cannot be
started after Charg ng.
1.Batter es are not nstalled
properly.
2.Fau
lt
y
adapto
r
.
1.Ceck f the batter es are nstalled
correctly (w th the correct on +/-
d rect ons)
2.Replace all or the faulty
batter es, then recharge the robot
aga n.
Power nd cat on lamp
of the robot st ll bl nks
after t's charged over
16 hours.
There m ght have been a
sl ght pause of the power
supply dur ng the recharge.
The robot s operable f the
batter es have been charged
over 8 hours on ( f the robot
s operated w thout full re-
charge, the work ng t me w ll be
shorter)
5
6
The work ng t me of the
robot has become a lot
shorter.
The
batter es
are
aged. Replace the whole lot of
batter es w th new batter es.
Remember to use batter es of
the same brand and same
capac ty.
1
3
1.Batter es are not nstalled
properly.
2.Faulty batter es.
3
4

Frequently Asked Quest ons (FAQs)
A. Batter
y
an
d
Chargin
g
1
.
Ho
w
lon
g
doe
s
i
t
tak
e
t
o
f
ull
y
charg
e
th
e
robot
?
It
takes
about e ght
hours
to
fully
charge
the
robot.
2
.
Wh
y
doe
s
i
t
tak
e
s
o
lon
g
t
o
charg
e
u
p
th
e
battery
?
The
robot
uses
a
slow
charg ng
technology
wh ch
could
keep
up
the
work
performance
and
l f
span
of
the
rechargeable
batter es
better.
3
.
Wh
y
i
s
th
e
gree
n
lam
p
stil
l
blinkin
g
afte
r
8
hour
s
o
f
charging
?
As
the
recharge
funct on
rel es
on
the
t mer
ns de
the
robot,
n
case
the
charg ng
power
nput
has
been
nterrupted
dur ng
the
recharge,
the
t mer
w ll
re-start
count ng
(so
the
power
nd cat on
lamp
w ll
st ll
be
bl nk ng
n
green.)
It
w ll
stop
aga n
after
8
hours
of
un nterrupted
charg ng.
4
.
W
oul
d
I
ge
t
electri
c
shoc
k
i
f
I
touc
h
th
e
robo
t
whe
n
i
t
i
s
recharg
ing
?
NO.
The
output
of
the
contact
po nts
s
only
19V.
It
s
safe for
humans and pets.
5
.
D
o
I
nee
d
t
o
tur
n
o
f
f
th
e
robo
t
befor
e
chargin
g
it
?
YES.
Please
turn
off
the
robot
before
recharg ng,
otherw se
t
could
not
be
recharged
properly
.
6
.
W
oul
d
th
e
robo
t
b
e
overcharge
d
o
r
ge
t
burn
t
i
f
i
t
i
s
connecte
d
t
o
th
e
adapto
r
all the time?
NO.
The
recharge
w ll
stop
automat cally
after
8
hours.
However,
f
you
expect
a
longer
per od
of
dleness,
t
s
recommended
to
unplug
the
adaptor.
7
.
Wha
t
woul
d
happe
n
i
f
I
star
t
usin
g
th
e
robo
t
befor
e
i
t
get
s
full
y
charged
?
It
w ll
st ll
work
unt l
the
voltage
drops
to
a
certa n
level
and
stop
on
the
floor.
The
work ng
t m
e
w
ould
be
shorter
than
normal.
8
.
Ho
w
lon
g
i
s
th
e
batter
y
life
?
Whe
n
d
o
I
nee
d
t
o
replac
e
wit
h
ne
w
batteries
?
L fespan
of
N -MH
batter es
s
usually
around
9-12
months
( t
w ll
also
depend
on the
usage
and
storage
cond t on).
When
the
batter es
start
to
age,
the
work ng
t me
w ll
drop
gradually.
When
the
work ng
t me
drops
to
a
level
that
the
robot
can not
clean
up
your
home
effect vely
(you
st ll
f nd
obv ous
d rt
on
floor
after
the
clean ng
program)
you need to replace
w th
new
batter es.

Frequently Asked Quest ons (FAQs)
B.
Applications
1
.
Why
is
the
suction
power
of
this
robot
so
low
?
Can it
clean
my
floor
effectively
?
SURE
!
The
robot
s
des gned
to
handle
everyday
d rt
n
our
home
,
wh ch
ncludes
dust
,
ha r
,
dead
sk n
,
pet
ha r
,
food
crumbs
,
etc
.
All
these
are
very
l ght
n
we ght
but t
s
ted ous
for
us
to
clean
by
ourselves
day
after
day
.
The
robot
s
a
lot
more
effect ve
n
clean ng
all
these
t ny
d rt
,
thanks
to
ts
fuzzy
log c
program, and
the robot
uses
very
l ttle
power
,
so
t
saves
you
a
lot
of
energy
(
and
money
)
as
well
as
keep ng
tself
extremely
qu et
dur ng
operat on
.
2
.
Do I need to keep my pet or baby away while the robot is working
?
NO
.
The
robot
s
so
gentle
and
qu et
t w ll not scare
anybody
or
even
a
pet. But
you
are
st ll
recommended
to
observe
n
the
f rst
few
runs
of
the
robot to
see
how
your
baby
or
pet
react
to
the
mot on
of
the
robot
just
for
safety
reasons
.
3
.
Is the robot able to handle watered floor
?
NO
.
Water
and
mo sture
would damage the
robot
.
4
.
Is the robot able to treat wooden floor other than tile floor
?
YES
.
The
robot
s
des gned
to
work on a t led
floor
,
wooden
floor
and
l noleum
floor
.
5
.
Is the robot suitable for outdoor use
?
NO
.
Never
use
the
robot
outdoors
.
Weather
could
damage
t
.
6
.
Do I need to clean up the dust bin every time after vacuuming
?
You
are
recommended
to
clean
t
up
and
remove
dusts
/
ha r
on
the
f lter
w th
a
soft
brush
gently
for every
two
t mes
of
use
.
It
would
extend
the
l fespan
of
your
f lter
f
you
take
good
care
of
t
.
7
.
Do I need to maintain the robot frequently
?
NO
.
The
robot
s
des gned
to
be
so
user
fr endly
that
you
just
need
to
nspect
the
s de
brushes
every
month
to
see
whether
there
s
any
tangled
ha r
.
If
there
s
any
,
remove
them
by
unscrew ng
the
s de
brushes
and
screw ng
them
back
n
good
order
upon
complet on
.
8
.
What will happen if the robot gets stuck
?
Thanks
to
the
user
-
fr endly
des gn, t
w ll
stop
tself
f
t
gets
stuck.
9
.
How long the robot can run after it is fully charged
?
The
robot
can
run
cont nuously
for
around
60
m nutes
f
t
s
fully
charged
and
n
good
cond t on
.
However
,
t
would
rema n
around
80
%
of
the
or g nal
runn ng
durat on
after
the
battery
s
aged
.
10
.
There are several bedrooms in my home
,
could the robot clean up all of them
?
The
work ng
area
for
RC
310A
s
around 620-650
square
feet
(
around
60
square
meters
).
S mply
keep
all
the
room
doors
open
,
the
robot
w ll
go
ns de
and
clean
them
one
by
one
.
11
.
My home is quite big
.
Could I use RC 320A
?
Yes
,
you
can
.
However
,
s nce
the
work ng
area
for
RC
320A
s
around
620-650
square
feet
(
around
60
square
meters
),
you
may
need
to
separate
your
home
nto
several port ons
and
do
the
clean ng
n
several
rounds
.
Our
recommendat on
s
to
cons der a
model
from
our
range
wh ch
could
handle
larger
work ng
area.
Table of contents
Other AiBOT Vacuum Cleaner manuals