Aidan & Eva Hazelbaker FingerFeeder Assembly instructions

Instructions & Assembly
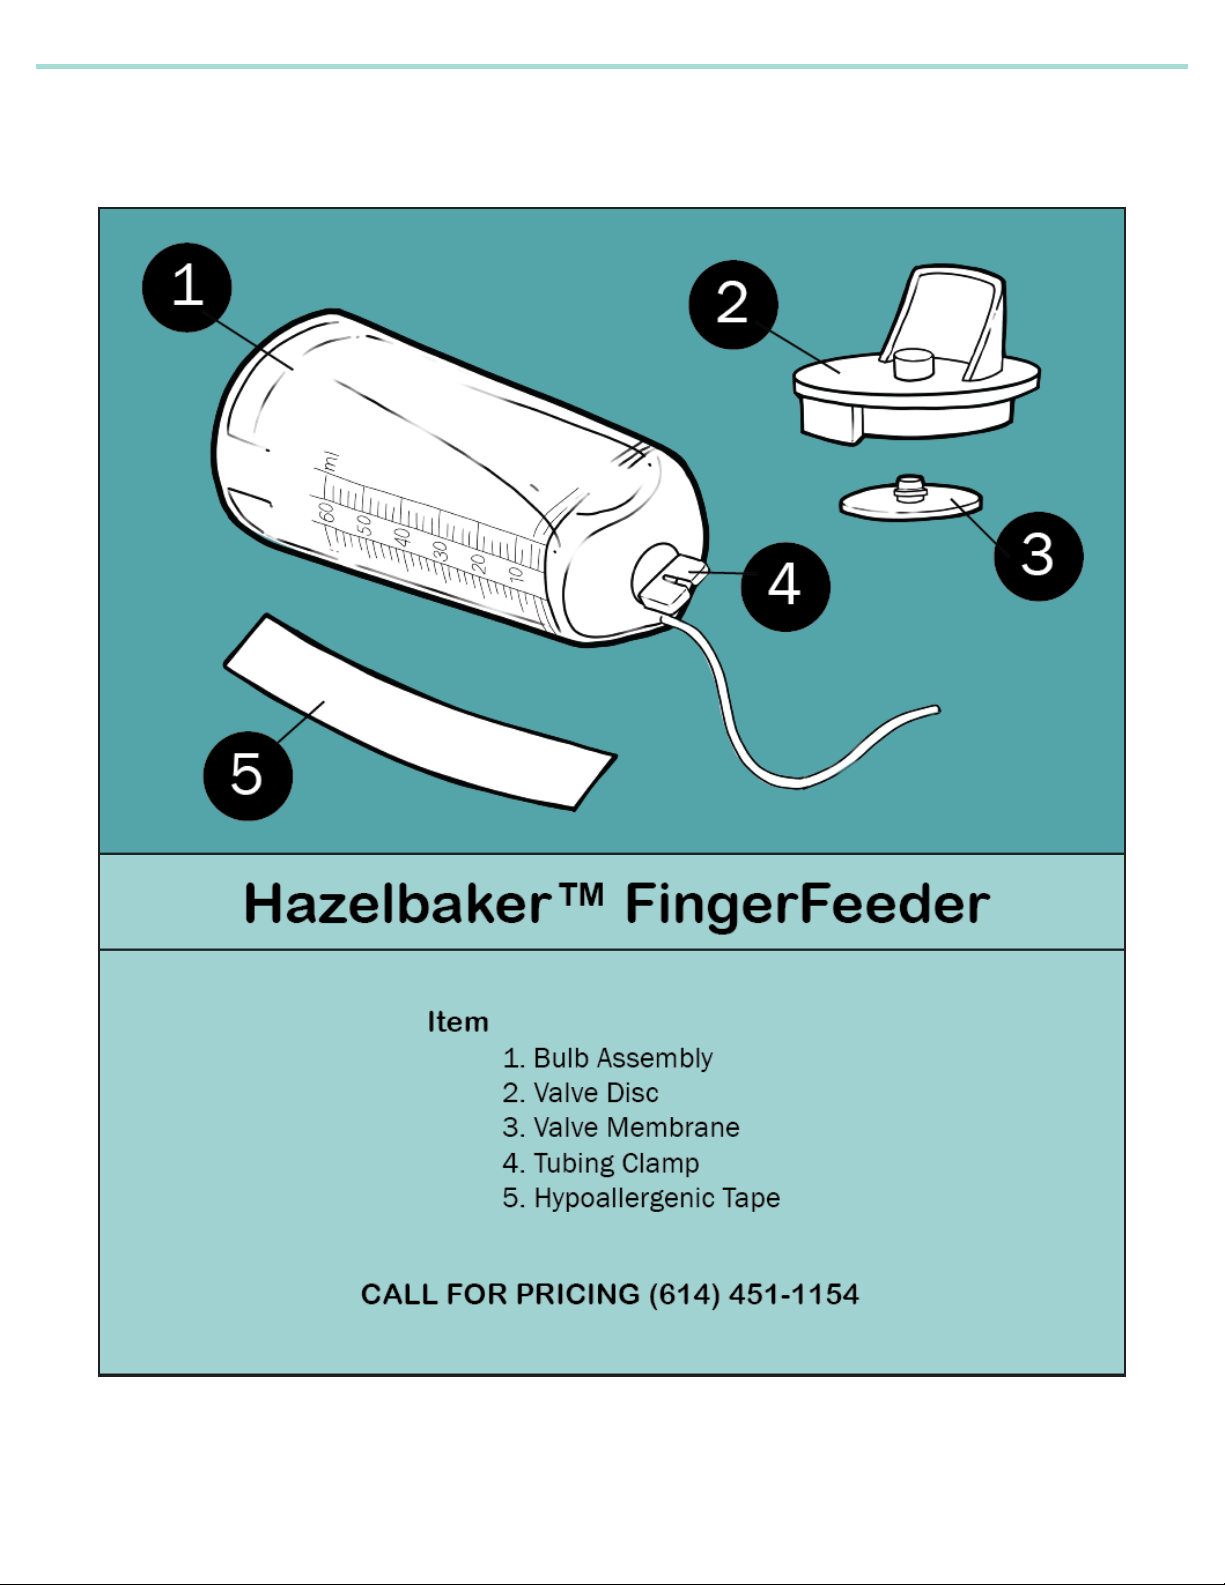
Hazelbaker
TM
FingerFeeder

CAUTION: The Hazelbaker™ FingerFeeder was developed to assist you and your baby
with breastfeeding, and to help get the baby on the breast. Read this manual carefully, it
contains information you need to know to successfully use the Hazelbaker™ FingerFeeder.
After the second or third day of delivery, you should look for indications that feeding is off
to a good start. If your baby is not gaining weight, loses weight, or has fewer than
2 bowel movements and 6-8 wet diapers every 24 hours, contact your physician
immediately. Consult with your health care professional regarding your baby’s progress
throughout the time you use your FingerFeeder.
YOUR DOCTOR: Your physician or other primary health care provider should know that
you are using the Hazelbaker™ FingerFeeder so that he/she can provide you with the
best possible care. If you are not using expressed breast milk, follow your physician’s
recommendations regarding the type of supplement to use, how much to use, and any
other suggestions they may have.
Remove Cap, ll Bulb full of warm soapy water, replace Cap
and force water through Tubing by gently squeezing the Bulb.
Remove Cap, rell with clean water, replace Cap and again,
gently squeeze the Bulb to force water through the Tubing.
Completely disassemble the FingerFeeder and clean all parts
(except Tape) with warm soapy water.
Rinse parts well and allow to air dry on a clean towel. (It may
help to reassemble the device and gently squeeze the empty
Bulb a few times to remove water droplets from the Tubing).
1.
2.
3.
4.
Cleaning Instructions
After each use:
Once per day:
This device may be sterilized or sanitized by using the following
instructions.
Sterilization:
All disassembled parts can be autoclaved to a maximum of 272°
for 3 minutes at 29 PSIG or 250° F for 15 minutes at 15 PSIG.
To avoid damage during and immediately after sterilization:
• Sterilize without applying external pressure on parts.
• Allow parts to cool before applying external pressure.
If gas sterilization is used, residual testing is recommended to
determine the proper length of aeration.
Sanitization:
• Place parts in a 4-5 quart pan.
• Fill to within 1inch of rim with cold water. Distilled water is preferred, to reduce hard water deposit
formation.
• Cover pan and bring water to a boil.
• Boil parts for 20 minutes.
• Remove pan from heat.
• Drain water and allow parts to cool in open pan.
• Remove all parts and allow to air dry on a clean towel.
• Avoid touching the inside of the Bulb.

Assembly Instructions
Wash your hands thoroughly in warm soapy water.
Healthcare professionals should wear a glove or nger
cot while feeding a baby with this device. (It may not be
necessary for baby’s parents to wear a glove or cot).
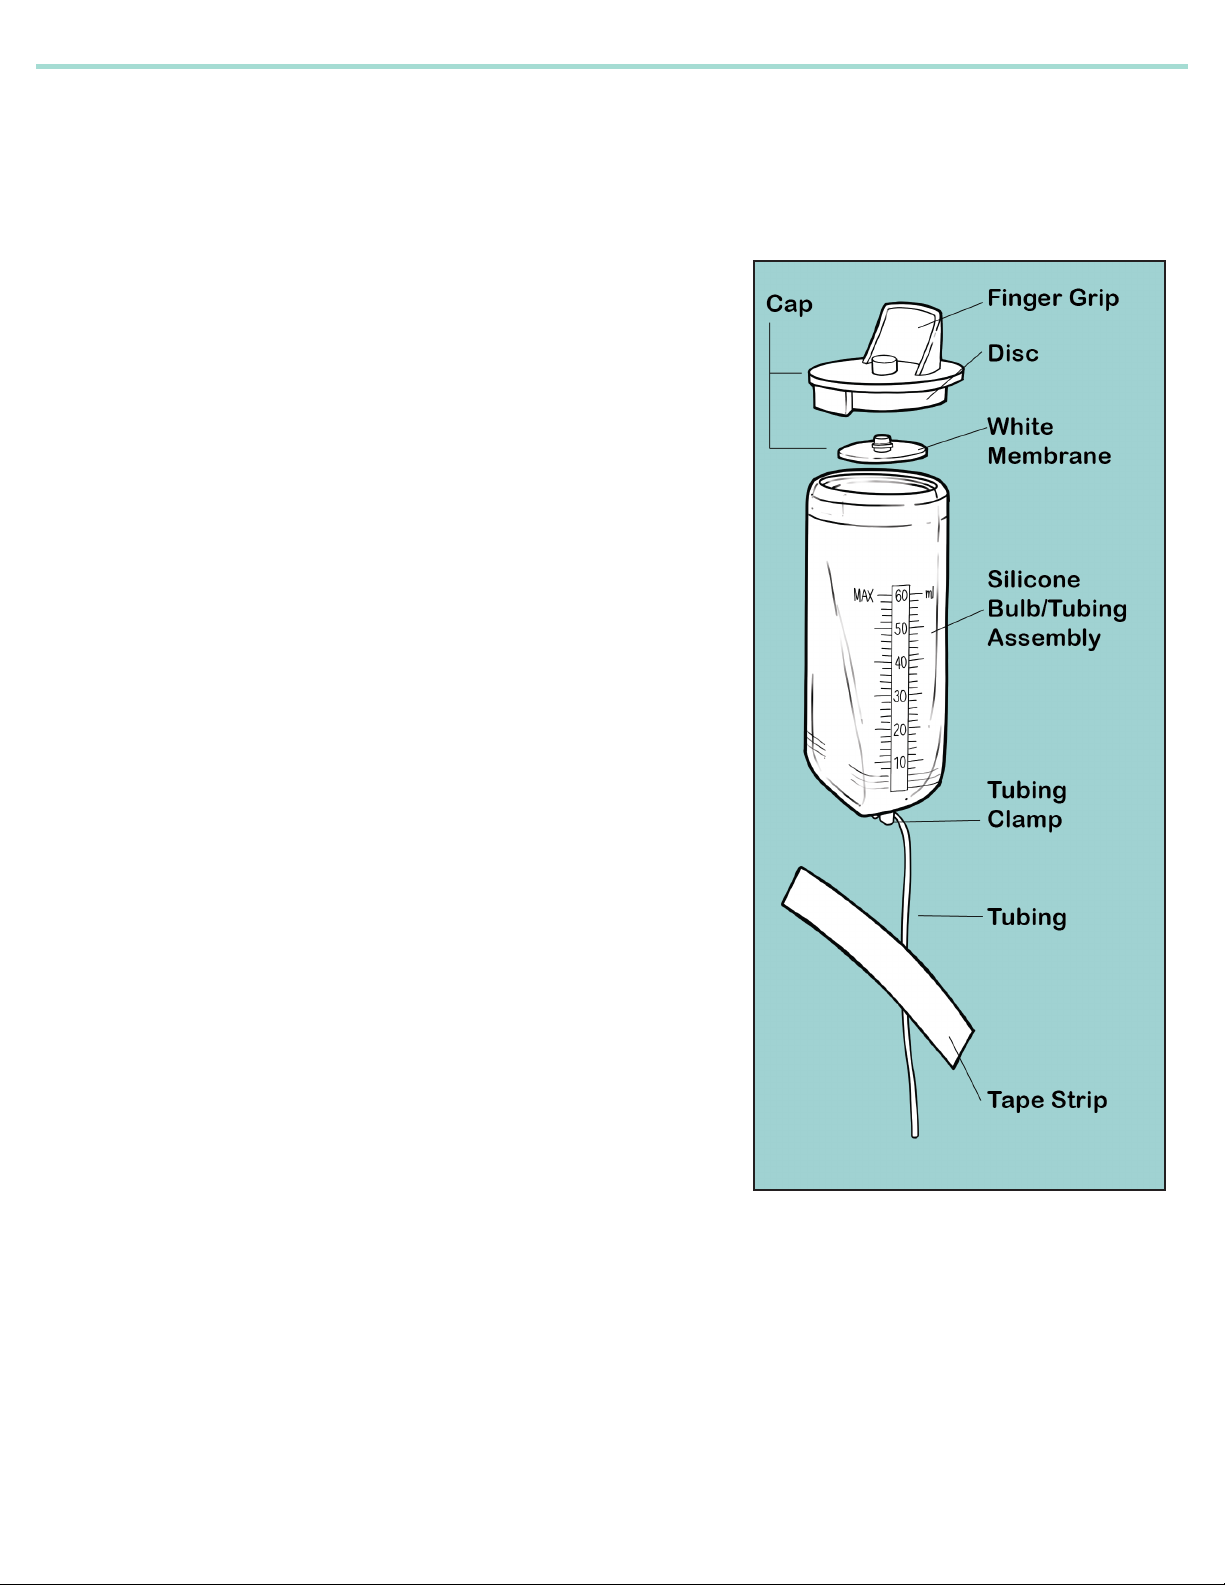
1.
Insert the Tubing Clamp into the recess on the Tubing
end of the Bulb. The slit in the Tubing Clamp should be
positioned so the Tubing may be gently pulled up straight
through the slit. Avoid pulling with too much force to
prevent damaging tubing.
2.
Gently pull the Tubing into the slit of the Tubing Clamp to
prevent milk ow.
3.
From the side of the Disc opposite the Finger Grip, push
the stem of the White Membrane all the way through the
small opening until the White Membrane is ush with the
Disc.
4.
Hold the Bulb in a vertical position with the large
opening facing upward. Fill the Bulb with the amount of
supplement the baby needs. Do not ll the Bulb past
the 60 ml mark.
5.
Disc
Insert the Disc/Membrane assembly into the large
opening of the Bulb, with the Membrane side inside the
Bulb. Align the small tab on the Disc/Membrane assembly
within the slot on the inside of the large opening of the
Bulb.
Assembly Instructions Cont.
6.
The temperature of the supplement should be between room and body temperature before pouring the
Bulb. This will allow the supplement to ow more freely through the Tubing. To warm cold breast milk, place
in container in a bath of lukewarm water. Never microwave or boil breast milk.
Place the Bulb in the palm of the hand. Position the
Tubing-to-Bulb junction between the Tubing Clamp and
the palm of the hand. This will allow less air to get into
the tubing and the baby.
7.
Place Tubing along the palm side of your nger. Position
the end of the Tubing even with the end of your nger. To
prevent tape from getting into the baby’s mouth, secure
the Tubing to your nger by taping it between the 1st and
2nd knuckle from your palm. This will ensure baby does
not take the tape into its mouth.
8.
Release the Tubing from the Tubing Clamp and prime the
system by gently squeezing on the Bulb. This will cause
the Tubing to ll with supplement and prevent baby from
swallowing air.
9.
Tubing Clamp Tubing
Tape
Tab
Slot
Finger Grip

Instructions for Use
1.
2.
3.
4.
5.
6.
7.
Position yourself and baby in a proper nger
feeding position, such as shown in the drawing.
Placing a pillow under baby will make feeding
more comfortable for both of you, by raising baby
to chest height.
Keep your shoulders and elbows down and
relaxed to reduce muscle strain.
Gently tickle baby’s lips in a vertical direction
(from chin to nose and back) with the tip of the
nger of the hand holding the FingerFeeder.
Keep tickling until baby opens mouth wide.
When baby opens wide, quickly and gently insert
your nger into baby’s mouth, nger pad facing
up. Rest your nger pad on the hard palate just behind the upper gum.
As baby sucks, gradually move your nger back to the juncture of the hard and soft palate. While
moving the nger back, keep the pad in contact with the hard palate. Keep your nger pad resting
up against the hard palate during the entire feed. (If your nger goes too far back or drops down on
baby’s tongue, baby may gag.)
Keep your nger in the same position and stationary. Do not apply pressure to baby’s palate or
tongue, or move your nger in and out of baby’s mouth during the feed, unless specically directed
to do so by your health professional.
There is usually no need to squeeze the Bulb unless your health care provider has given you
specic instructions to do so. Allow baby to set the pace – just let the Bulb rest in your hand. Never
squeeze the FingerFeeder hard enough to cause milk to leak out of the baby’s mouth, or cause
baby to gag, cough or sputter.

Aidan & Éva llc, 5115 Olentangy River Road, Columbus, OH 43235
Phone: 1-614-451-1154
Hazelbaker is a trademark of Alison Hazelbaker.
Aidan & Éva is a registered trademark of Aidan & Éva llc.
Patent No. D392038
©2020 Aidan & Éva llc
Table of contents


