AIGOSTAR 30HLZ User manual

MIXER
MODEL: 8433325502072
Read this booklet thoroughly before using and save it for future
reference

1
GB
IMPORTANT SAFEGUARDS
When using electrical appliances, basic safety precautions should
always be followed including the following:
1. Read all instructions.
2. Make sure that you outlet voltage corresponds to the stated on
the rating label of the mixer
3. To protect against risk of electrical shock do not put (state
specific part or parts in question) in water or other liquid.
4. Close supervision is necessary when any appliance is used by or
near children.
5. Unplug from outlet when not in use, before putting on or taking
off parts, and before cleaning.
6. Avoid contacting moving parts.
7. Do not leave mixer unattended while it is operating.
8. Do not operate any appliance with a damaged cord or plug or
after the appliance malfunctions, or is dropped or damaged in any
manner. Return appliance to the nearest authorized service facility
for examination, repair or electrical or mechanical adjustment.
9. The use of attachments not recommended or sold by the
manufacturer may cause fir, electric shock or injury.
10. Keep hands, hair, clothing, as well as spatulas and other utensils
away from beaters during operation to reduce the risk of injury to
persons, and/or damage to the mixer.

2
11. Remove beaters/whisks/dough hooks from mixer before
washing.
12. Do not use outdoors.
13. Do not let cord hang over edge of table or counter or touch hot
surfaces, including the stove.
HOUSEHOLD USE ONLY
SAVE THESE INSTRUCTIONS
SPECIAL NOTES ON CORD PLUG
This appliance has a polarized plug (one blade is wider than the
other). To reduce the risk of electric shock, the plug can fit into a
polarized socket only one way. If the plug does not fit fully in the
outlet, reverse the plug. If it still does not fit, contact a qualified
electrician. Do not modify the plug in any way.

3
KNOW YOUR MIXER
BEFORE USING MIXER
Before assembling the stand mixer, wash the dough
hooks/beaters/whisks, stainless steel bowl in the warm water.
Then dry them. Be sure the power cord is unplugged from
the power outlet and the speed selector is in the “0”
position.
1. Attach the hand mixer to the base as illustrate in Fig.1. A

4
click sound will be heard when the head has reached the
correct position. For detaching the hand mixer, Press down
the head release lever firmly and pull the hand mixer in the
arrow indicated direction (Fig.2). And hold the head of
mixer to tilt position while pressing the headlock button
(Fig.3).
2. Assemble proper beaters/ dough hooks/whisks into mixer.
Them can be inserted in either socket, as them are identical.
3. Place the stainless steel bowl on position.
4. To lower the head and beaters/dough hooks/whisks into
the stainless steel bowl, depress the headlock button while
holding the head with the other hand and ease the head
down (Fig.4).

5
USING YOUR HAND/STAND MIXER
1. Ensure that the unit is at the 0 setting, then plug in the
power source.
2. Dial the speed selector to your desired setting. There is 12
setting. The appliance will start working and the speed will

6
achieve the highest speed if the Turbo Button depressed at
any time.
Warning: Do not stick knife, metal spoons, fork and so on
into bowl when operating.
3. The max operation time per time shall not exceed 6
minutes and minimum 20 minutes rest time must be
maintained between two consecutive cycles. When kneading
yeast dough, suggest the speed selector first use a low speed
and then use high speed to achieve the best results.
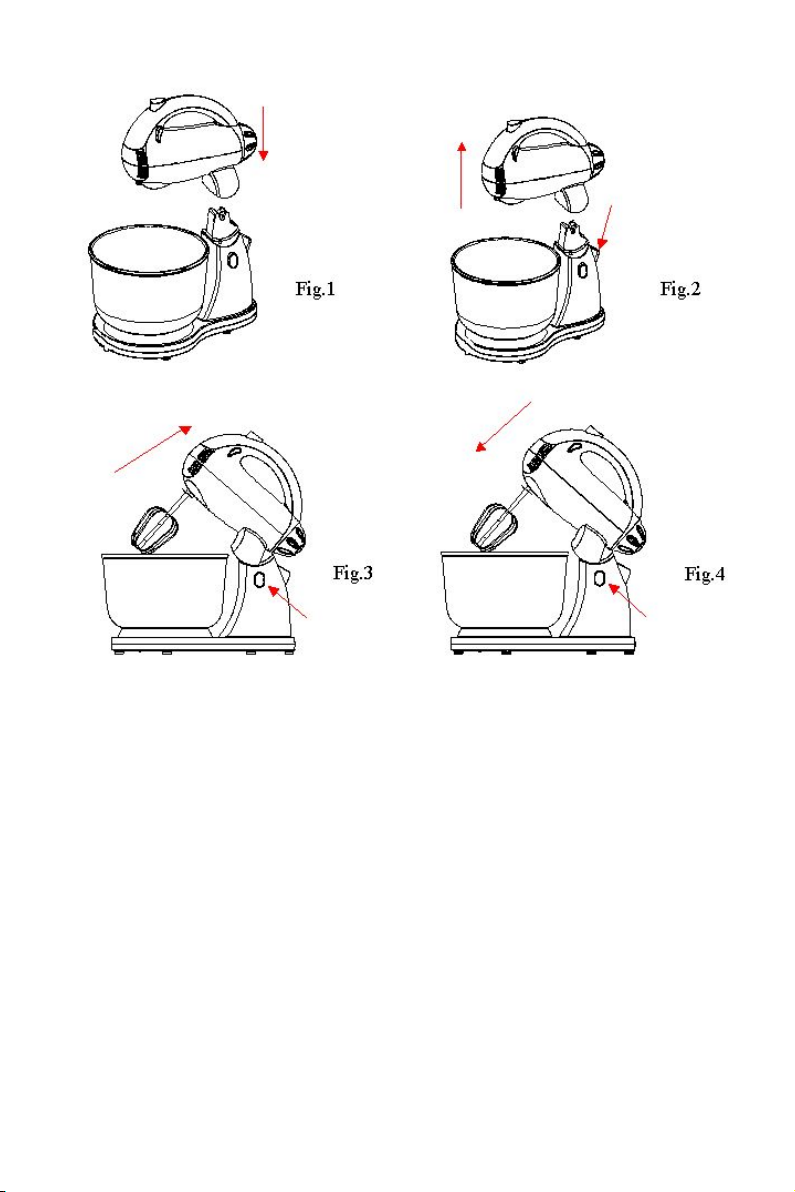
4. When mixing is completed, turn the speed selector to 0
setting, unplug the cord from power outlet.
5. Hold down the headlock button and ease the head of the
mixer back until the mixer head is locked into the tilt
position.
6. If necessary you can scrape the excess food particles from
the beaters / dough hooks/whisks by rubber or wooden

7
spatula.
7. Hold the beaters/dough hooks/whisks with one hand and
press the Ejector button firmly down with the other hand,
remove the beater/dough hooks/whisks.
Note: Remove the beaters/dough hooks/whisks only at the 0
setting.
8. The hand mixer cannot be used separately without the
stand in position.
Cleaning and Maintenance
1. Unplug the appliance and wait it completely cool down
before clean.
2. Wipe over the outside surface of the head with a
dampened cloth and polish with a soft dry cloth.
3. Wipe any excess food particles from the power cord.
4. Wash the stainless steel bowl, the beaters/dough
hooks/whisks in warm soapy water and wipe dry. The

8
beaters/dough hooks/whisks may be washed in the
dishwasher. Never clean the stainless steel bowl in the
dishwasher.
Caution: the mixer can not be immersed in water or other
liquid.
5. Wipe the base with a damp cloth, never immerse it in the
water for cleaning.
COOKERY TIPS
1. Refrigerated ingredients, ie. Butter and eggs should be at
room temperature before mixing begins. Set these
ingredients out ahead of time.
2. To eliminate the possibility of shells or deteriorated-off
eggs in your recipe, break eggs into separate container
first, then adding to the mixture.
3. Do not over-beat. Be careful that you only mix/blend

9
mixtures until recommended in your recipe. Fold into dry
ingredients only until just combined. Always use the low
speed.
4. Climatic conditions. Seasonal temperature changes,
temperature of ingredients and their texture variation
from area to area all play a part in the required mixing
time and the results achieved.
5. Always start mixing at slow speeds. Gradually increase to
the recommended speed as stated in the recipe.
WARRANTY: 2 YEARS

10
ES
INSTRUCCIONES DE SEGURIDAD IMPORTANTES
Cuando se utilizan aparatos eléctricos, siempre se deben seguir las
precauciones básicas de seguridad que incluyen las siguientes:
1. Lea todas las instrucciones.
2. Asegúrese de que el voltaje de salida corresponde a la indicada en la
etiqueta de clasificación de la mezcladora
3. Para protegerse contra el riesgo de descarga eléctrica, no ponga
(parte específica del estado o partes en cuestión) en agua u otro
líquido.
4. Se requiere supervisión cuando el aparato es usado por o cerca de
niños.
5. Desenchufe del tomacorriente cuando no esté en uso, antes de poner
o quitar piezas y antes de limpiarlo.
6. Evite el contacto con piezas móviles.
7. No deje desatendido el mezclador mientras está en funcionamiento.
8. No opere ningún aparato con un cable o enchufe dañado, después
de un mal funcionamiento o si se ha caído o dañado de alguna manera.
Devuelva el aparato al centro de servicio autorizado más cercano para
su revisión, reparación o ajuste eléctrico o mecánico.
9. El uso de accesorios no recomendados o vendidos por el fabricante
puede causar, choque eléctrico o lesiones abeto.
10. Mantenga las manos, cabello, ropa, así como las espátulas y otros
utensilios lejos de los mezcladores durante la operación para reducir el
riesgo de lesiones a las personas y / o daños a la mezcladora.
11. Retire los batidores / mezcladores / ganchos de la batidora antes de
lavarlos.
12. No utilice al aire libre.
13. No permita que el cable cuelgue sobre el borde de la mesa o
mostrador o que toque superficies calientes, incluyendo la estufa.

11
USO DOMÉSTICO
GUARDA ESTAS INSTRUCCIONES
NOTAS ESPECIALES SOBRE ENCHUFE DE CABLE
Este aparato tiene un enchufe polarizado (una pata es más ancha que
la otra). Para reducir el riesgo de descarga eléctrica, el enchufe puede
encajar en una toma de corriente polarizada de una manera. Si el
enchufe no encaja completamente en el tomacorriente, invierta el
enchufe. Si aun así no encaja llame a un electricista calificado. No
modifique el enchufe de ninguna manera.
CONOCER SU MEZCLADOR

12
ANTES DE USAR EL MEZCLADOR
Antes de montar el mezclador, lavar los ganchos de masa /
mezcladores / batidoras, tazón de acero inoxidable en el agua caliente.
Luego secarlos. Asegúrese de que el cable de alimentación está
desenchufado de la toma de corriente y el selector de velocidad está en
la posición "0".
1. Coloque la batidora de mano a la base como se ilustra en la Figura 1.
Se escuchará un sonido de clic cuando la cabeza se ha alcanzado la
posición correcta. Para desmontar la batidora de mano, presione hacia
abajo la palanca de liberación del cabezal con firmeza y tire de la
batidora de mano en la dirección indicada flecha (figura 2). Y
mantenga la cabeza de la batidora a la posición inclinar mientras pulsa
el botón de llave de cabeza (figura 3).
2. Ensamble batidores / ganchos / mezcladores adecuados en el
mezclador. Ellos pueden ser insertados en cualquiera de socket, que
ellos son idénticos.
3. Coloque el recipiente de acero inoxidable en posición.
4. Para bajar la cabeza y batidores / ganchos de masa / mezcladores en
el recipiente de acero inoxidable, oprima el botón de llave de cabeza
mientras sujeta la cabeza con la otra mano y aliviar la cabeza hacia
abajo (figura 4).

13
CON LA MANO / MEZCLADOR DE PIE
1. Asegúrese de que la unidad esté en la posición 0, a continuación,
conecte la fuente de alimentación.
2. Marque el selector de velocidad a la configuración deseada. Hay 12
ajuste. El aparato empezará a trabajar y la velocidad alcanzará la
velocidad más alta si el botón Turbo está deprimido en cualquier
momento.
Advertencia: No se pegue cuchillo, cucharas de metal, tenedor y así
sucesivamente en un tazón cuando se opera.
3. El tiempo de funcionamiento máximo por unidad de tiempo no
excederá de 6 minutos y un mínimo de 20 minutos es el tiempo de
descanso que debe ser mantenido entre dos ciclos consecutivos.

14
Cuando se amasa la masa de levadura, sugieren utilizar el selector de
velocidad primera a baja velocidad y luego use de alta velocidad para
conseguir los mejores resultados.
4. Cuando se haya completado la mezcla, gire el selector de velocidad
a 0 configuración, desconecte el cable de toma de corriente.
5. Mantenga pulsado el botón de llave de cabeza y alivie la cabeza de
la mezcladora hacia atrás hasta que el cabezal de la batidora está
bloqueado en la posición de inclinación.
6. Si es necesario, puede raspar las partículas de comida sobrantes de
los batidores / ganchos / mezcladores usando goma o espátula de
madera.
7. Mantenga los ganchos batidores / masa / mezcladores con una mano
y presione el botón eyector firmemente hacia abajo con la otra mano,
retire los batidores / ganchos / mezcladores.
Nota: Retire los batidores/ ganchos de masa / mezcladores sólo en el
ajuste de 0.
8. La batidora de la mano no se puede utilizar por separado sin el
soporte en su posición.
Limpieza y mantenimiento
1. Desenchufe el aparato y espere que se enfríe antes completamente
limpio.
2. Limpie la superficie exterior de la cabeza con un paño húmedo y
pulir con un paño suave y seco.
3. Limpie las partículas de comida en exceso desde el cable de
alimentación.
4. Lave el recipiente de acero inoxidable, los batidores / ganchos de
masa / mezcladores en agua tibia y jabón y lo seque. Los batidores /
ganchos de masa / mezcladores se pueden lavar en el lavavajillas.
Nunca limpie el recipiente de acero inoxidable en el lavavajillas.
Precaución: el mezclador no puede ser sumergido en agua u otro
líquido.

15
5. Limpie la base con un paño húmedo, nunca se sumerja en el agua
para la limpieza.
TIPS DE COCINA
1. Los ingredientes refrigerados, es decir, la mantequilla y los huevos
deben estar a temperatura ambiental antes de que comience la mezcla.
Prepare estos ingredientes antes de tiempo.
2. Para eliminar la posibilidad de cáscaras de huevos o deterioración
en su receta, rompa los huevos en un contenedor separado primero, a
continuación, añada a la mezcla.
3. No se exceda en el ritmo. Tenga cuidado de que sólo se mezclan /
combinan las mezclas hasta que se recomienda en su receta. Doble en
los ingredientes secos sólo hasta que estén combinados. Utilice
siempre la velocidad baja.
4. Las condiciones climáticas. Cambios estacionales de temperatura,
la temperatura de los ingredientes y su variación en la textura de área
a área, juegan un papel importante en el tiempo de mezclado requerido
y los resultados obtenidos.
5. Siempre empiece a mezclar a baja velocidad. Poco a poco aumente
la velocidad recomendada como se indica en la receta.
Garantía: 2 años

16
IT
MISURE DI SICUREZZA IMPORTANTI
Quando si usano apparecchi elettrici, le precauzioni di sicurezza di
base dovrebbero essere sempre seguite tra cui le seguenti:
1. Leggere tutte le istruzioni.
2. Assicurarsi che si Presa di tensione corrisponde alla indicata
sulla targhetta del mixer
3. Per evitare il rischio di scosse elettriche non mettere (parte
specifica dello stato o le parti in questione) in acqua o altro liquido.
4. Occorre una stretta sorveglianza quando un qualsiasi
apparecchio viene utilizzato in presenza di bambini.
5. Togliere la spina dalla presa di corrente quando non è in uso,
prima di mettere o togliere parti, e prima della pulizia.
6. Evitare il contatto con parti in movimento.
7. Non lasciare mixer incustodita durante il funzionamento.
8. Non utilizzare la macchina con un cavo danneggiato o la spina o
dopo il cattivo funzionamento, o è caduto o danneggiato in alcun
modo. Rientro apparecchio al centro di assistenza autorizzato più
vicino per un controllo, riparazione o regolazione elettrica o
meccanica.
9. L'uso di accessori non raccomandati o venduti dal produttore
può causare abete, scosse elettriche o lesioni.
10. Tenere mani, capelli, indumenti, nonché spatole e altri utensili
distanti battitori durante il funzionamento per ridurre il rischio di

17
danni a persone e / o danni al mixer.
11. Rimuovere Sbattitori / fruste / ganci di pasta da mixer prima
del lavaggio.
12. Non usare all'aperto.
13. Evitare che il cavo penda dal tavolo o banco o contatto con
superfici calde, tra cui la stufa.
Uso domestico
CONSERVARE QUESTE ISTRUZIONI
NOTE SPECIALI SUI cavo di collegamento
Questo apparecchio ha una spina polarizzata (uno spinotto è più largo
dell'altro). Per ridurre il rischio di scosse elettriche, la spina può essere
inserito in una presa di corrente polarizzata solo modo. Se la spina non
entra completamente nella presa, invertire la spina. Se ancora non si
adatta, contattare un elettricista qualificato. Non modificare la spina in
alcun modo.

18
conoscere il tuo MIXER
PRIMA DI UTILIZZARE MIXER
Prima di montare il mixer stand, lavare la / battitori / fruste,
ciotola in acciaio inox ganci per impastare in acqua calda.
Poi asciugatele. Assicurarsi che il cavo di alimentazione sia
scollegato dalla presa di corrente e il selettore di velocità è
in posizione "0".
1. Collegare il mixer a mano alla base, come illustrano in

19
Fig.1. Un suono di click verrà emesso quando la testa ha
raggiunto la posizione corretta. Per staccare il miscelatore
della mano, premere verso il basso la leva di sblocco testa
saldamente e tirare il mixer a mano nella direzione indicata
freccia (Fig.2). E tenere la testa del mixer per inclinare la
posizione tenendo premuto il pulsante presa di testa (Fig.3).
2. Montare battitori corrette / ganci per impastare / fruste in
mixer. Essi possono essere inserite in uno zoccolo, come
siano identici.
Mettere la ciotola in acciaio inox in posizione.
3. Per abbassare la testa e fruste / ganci per impastare /
fruste nella ciotola in acciaio inox, premere il pulsante di
presa di testa tenendo la testa con l'altra mano e facilità la
testa in giù
(Fig.4).
This manual suits for next models
2
Table of contents
Languages:
Other AIGOSTAR Mixer manuals