Medion MD 16480 User manual

PREMIUM STAND MIXER
MD 16480
Instruction Manual
11/2015
Medion Electronics Ltd.
120 Faraday Park, Faraday Road, Dorcan
Swindon SN3 5JF, Wiltshire
United Kingdom
Hotline: 0333 32 13 106
(National rate call charges)
Fax: 01793 71 57 16
To contact us by email please visit the
ȓService and Supportȓsection of our website at
www.medion.co.uk
Medion Electronics Ltd.
120 Faraday Park, Faraday Road, Dorcan
Swindon SN3 5JF, Wiltshire
United Kingdom
Hotline: 1 800 992508 (free phone)
Fax: 01793 715716
To contact us by email please visit the
ȓService and Supportȓsection of our website at
www.medion.co.uk

3
AFTER SALES SUPPORT
IREGB
GB 0333 32 13 106
IRE 1 800 992508
www.medion.co.uk
Table of contents
General information ..........................................................................................................................................................4
Reading and safekeeping of operating instructions...................................................................................................................... 4
Package contents ..............................................................................................................................................................5
Proper use..........................................................................................................................................................................5
Safety information.............................................................................................................................................................6
Unpacking the appliance....................................................................................................................................................................6
Electrical Safety ....................................................................................................................................................................................6
Operating Times...................................................................................................................................................................................8
Controls..............................................................................................................................................................................9
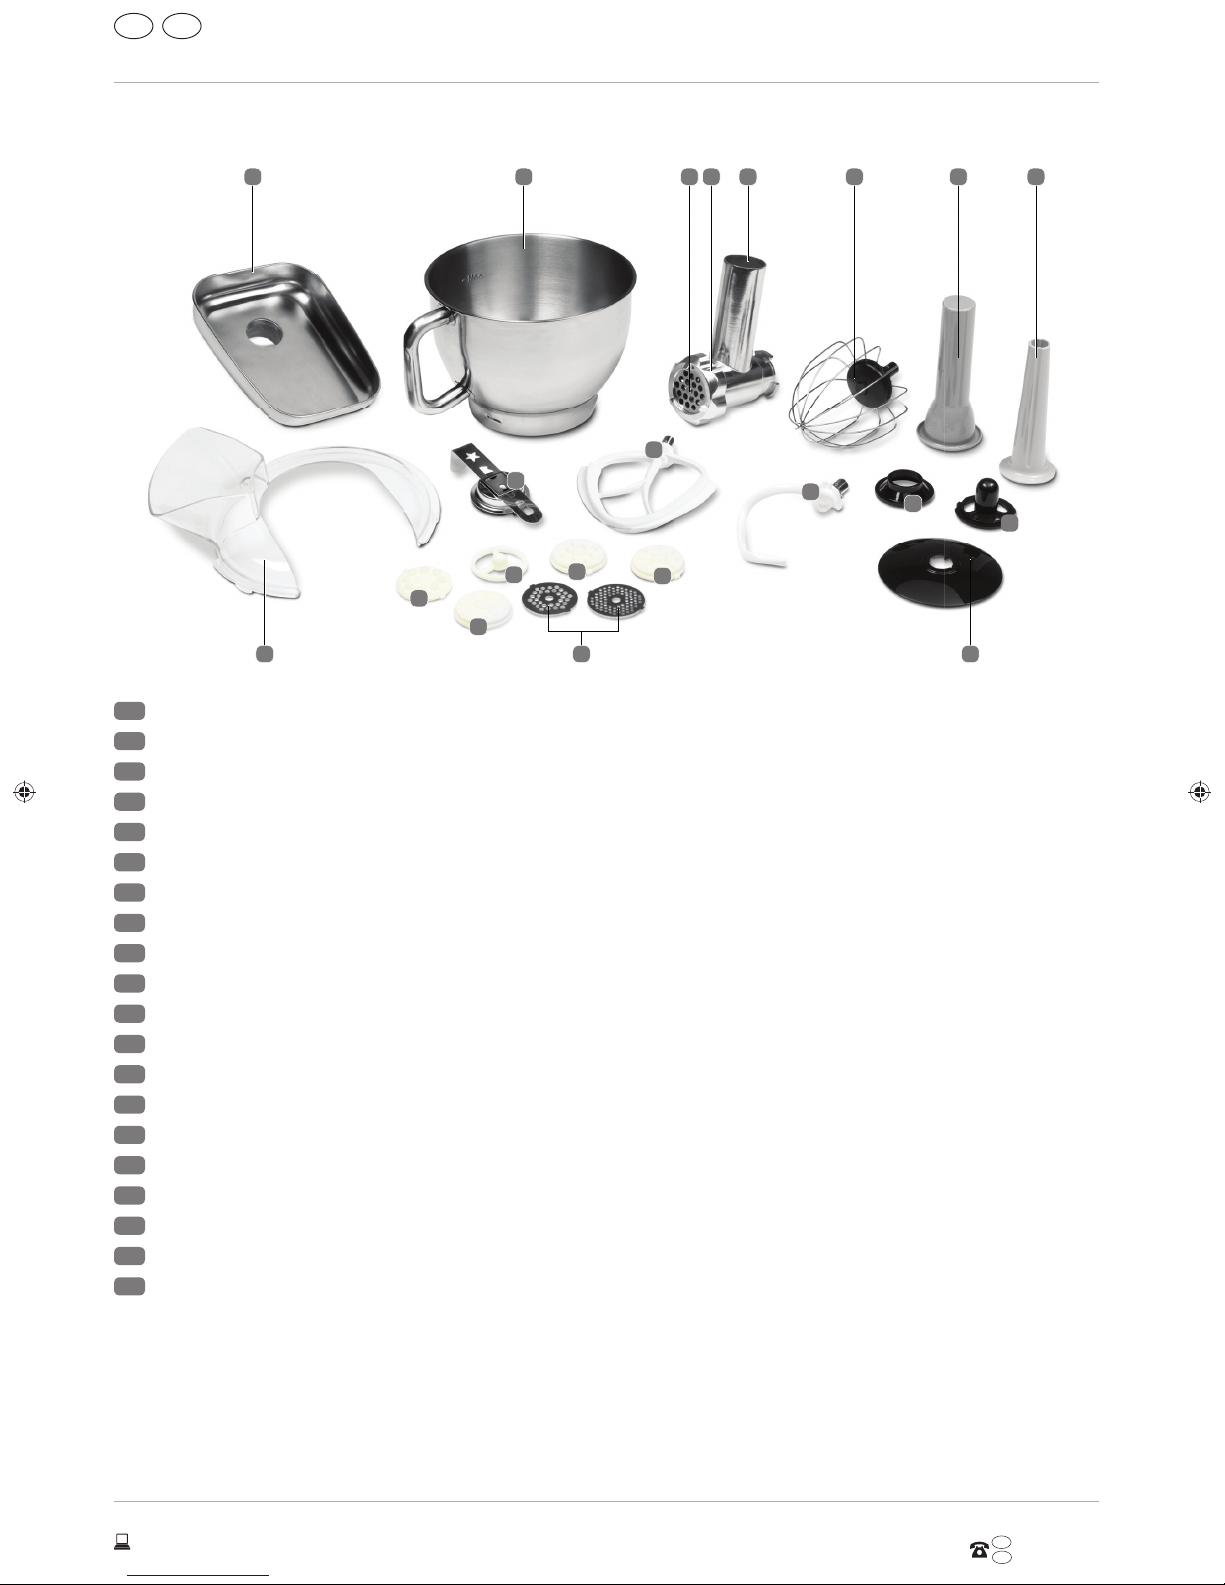
Overview of accessories.................................................................................................................................................................... 10
Exploded view showing all mincer parts ........................................................................................................................................ 11
Using the appliance for the first time ..............................................................................................................................12
Operation as a kneading machine...................................................................................................................................13
Getting started.....................................................................................................................................................................................13
Mixing and kneading dough.............................................................................................................................................................13
Beating egg white ..............................................................................................................................................................................13
Whipping cream ..................................................................................................................................................................................13
Mixing shakes, cocktails or other liquids ........................................................................................................................................14
End of operation.............................................................................................................................................................. 14
Working with the mincer................................................................................................................................................. 14
Setting up the mincer to mince meat ..............................................................................................................................................14
Fitting the mixer with the sausage attachment.............................................................................................................................15
Setting up the mincer to produce spritz biscuits............................................................................................................................16
Setting up the mincer to produce pasta..........................................................................................................................................17
Setting up the mincer to produce kebab meat ..............................................................................................................................17
End of operation.............................................................................................................................................................. 18
Instructions for use of the mincer .................................................................................................................................. 18
Chopping meat ...................................................................................................................................................................................18
Making sausages.................................................................................................................................................................................18
Piping biscuits .....................................................................................................................................................................................18
End of operation.............................................................................................................................................................. 18
Cleaning ........................................................................................................................................................................... 19
Troubleshooting .............................................................................................................................................................. 20
Disposal............................................................................................................................................................................ 20
Technical data..................................................................................................................................................................20
Conformity information....................................................................................................................................................21
Legal notice.......................................................................................................................................................................21
16480 EN ALDI UK content final.indd 316480 EN ALDI UK content final.indd 3 25.08.2015 11:54:2125.08.2015 11:54:21

4AFTER SALES SUPPORT
General information
GB IRE
GB 0333 32 13 106
IRE 1 800 992508
www.medion.co.uk
General information
Reading and safekeeping of operating instructions
Read the safety instructions carefully before using the appliance for the first time. Note the
warnings on the appliance and in the operating instructions.
Always keep the operating instructions close to hand. If you sell the appliance or give it away,
make sure you also hand over these instructions and the warranty card.
Explanation of symbols
The following symbols and signal words are used in these instructions, on the appliance or on the packaging.
DANGER!
This signal word indicates a hazard with a high degree of risk that, if not avoided, is likely to result in death or
serious injury.
WARNING!
This signal word indicates a hazard with a medium level of risk which, if not avoided, could lead to death or serious
injury.
CAUTION!
This signal word indicates a hazard with a low level of risk which, if not avoided, could result in a minor or
moderate injury.
PLEASE NOTE!
This signal word warns of possible damage to property or gives useful additional information on assembly or
operation.
Follow the advice in the operating instructions
Recycling symbol
WEEE symbol (in accordance with the directive on electrical waste)
Declaration of conformity (see the chapter "Conformity Information"): products marked with this
symbol meet the requirements of the applicable EC directives.
Symbol - risk of crushing injury
Symbol - risk of electric shock
16480 EN ALDI UK content final.indd 416480 EN ALDI UK content final.indd 4 25.08.2015 11:54:4025.08.2015 11:54:40

5
AFTER SALES SUPPORT
Package contents
IREGB
GB 0333 32 13 106
IRE 1 800 992508
www.medion.co.uk
Package contents
After unpacking the product, please ensure that the following parts have been supplied:
• Food processor
• 1 mixing bowl
• Food processor accessories and attachments (see “Overview of accessories” on page 10)
• Operating instructions and warranty documents
Proper use
The appliance may only be used for kneading or mixing foodstuffs such as dough, mousse, cream or egg
whites. The mincer attachment is for mincing foodstuffs. With the appropriate fittings, you can make minced
meat, sausages or kebabs or extrude pasta or biscuits.
This appliance is intended for domestic use only.
The appliance is not suitable for commercial or industrial use.
Please note that we shall not be liable in cases of improper use:
• Do not modify the product and do not use any auxiliary equipment which we have not approved or supplied.
• Use only spare parts and accessories that we have supplied or approved.
• Follow all the information in these operating instructions, especially the safety information. Any other use is
deemed improper and can cause personal injury or damage to property and will invalidate your warranty.
• Do not expose the appliance to any extreme conditions. The following should be avoided:
• High levels of humidity or moisture
• Extremely high or low temperatures
• Direct sunlight
• Naked flames
This product is for indoor use only - do not use outdoors!
16480 EN ALDI UK content final.indd 516480 EN ALDI UK content final.indd 5 25.08.2015 11:54:4125.08.2015 11:54:41

6AFTER SALES SUPPORT
Safety information
GB IRE
GB 0333 32 13 106
IRE 1 800 992508
www.medion.co.uk
Safety information
WARNING!
Risk of injury due to improper handling
− Store the appliance and its accessories in a place out of the reach of children.
− This appliance is not intended for use by persons (including children) with reduced physical,
sensory or mental capabilities, or lack of experience and knowledge, unless they have been
given supervision or instruction concerning use of the appliances by a person responsible
for their safety.
− Children must not be allowed to play with the appliance. Close supervision is necessary
when any appliance is used by or near children.
Unpacking the appliance
− If damage has occurred during transit, contact the Medion Service Centre at once.
WARNING!
Risk of suffocation.
− Keep plastic bags and plastic packaging away from children. Please dispose of safely.
DANGER!
Risk of injury from electric shock!
− Before using the appliance for the first time and after each use, check the mains cable for
damage.
− If damage has occurred, DO NOT use the appliance. Contact the Medion Service Centre for
advice and repair.
Electrical Safety
DANGER!
Risk of injury from electric shock!
− Make sure that the mains cable does not present a trip hazard. Do not allow the connecting
cable to become trapped or squashed.
− Do not operate the appliance if there appears to be any damage to the machine or the mains
cable.
− There are dangerous voltages inside the appliance. Never open the housing or insert objects
into the ventilation slots.
− In order to disconnect the appliance completely from the power supply, remove the plug
from the socket. Always remove the plug using the plug, never by pulling on the cable.
− Ensure that a defective appliance is repaired immediately by a specialist workshop. In order
to reduce risks: if the mains cable for this appliance is damaged then it must be replaced by
the Medion Service Centre or a similarly qualified person.
16480 EN ALDI UK content final.indd 616480 EN ALDI UK content final.indd 6 25.08.2015 11:54:4125.08.2015 11:54:41

7
AFTER SALES SUPPORT
Safety information
IREGB
GB 0333 32 13 106
IRE 1 800 992508
www.medion.co.uk
PLEASE NOTE!
Storm damage to the appliance
− Appliances left connected to the mains power supply during thunderstorms may be
damaged. Therefore, always remove the mains plug if there is a thunderstorm.
DANGER!
Risk of injury by rotating and moving parts
− DO NOT TOUCH moving parts. Keep hair, clothing, hands, cutlery, mixing spoons or similar
items away from the appliance during operation to avoid injuries or damage to property.
− Never use different operating modes (e.g. mincer and mixer) at the same time.
− The appliance must be switched off and disconnected from the supply before changing
accessories or attachments that move when in operation.
− Before switching on, make sure that the accessory attachment is correctly fitted and firmly
seated.
− As soon as you turn on the appliance, the drive shaft will rotate. During operation, do not
reach into the area of the drive shaft! For your own safety, always fit the mixing bowl, even if
you are using the appliance as a mixer or mincer.
PLEASE NOTE!
Risk of damage to the appliance if it is set up incorrectly
− Place the appliance on a firm, level surface.
− Do not use an extension cable.
− Never place the appliance on the edge of a table - it could tip over and fall.
− Remove the plug from the mains socket after each use, before cleaning and during periods
when the appliance is left unattended.
− Unwind the cable fully when using the appliance.
− Do not allow the mains cable to come into contact with hot objects or surfaces (e.g. cooker
hob).
DANGER!
Risk of injury due to improper use of the appliance
− Do not allow the mains cable to come into contact with water or other liquids.
− Never immerse the appliance in liquids!
− Do not use the appliance outdoors.
− Do not leave the appliance unattended during operation.
− Ensure that no foreign objects (spoon, dough scraper or similar items) are in the mixing bowl
during operation.
− Do not unlock the tilting arm when the mixer is in operation.
− There is a risk of scalding if the appliance is being used with foodstuffs that are hotter than
60°C. Do not fill the mixing bowl with hot foodstuffs.
16480 EN ALDI UK content final.indd 716480 EN ALDI UK content final.indd 7 25.08.2015 11:54:4125.08.2015 11:54:41

8AFTER SALES SUPPORT
Safety information
GB IRE
GB 0333 32 13 106
IRE 1 800 992508
www.medion.co.uk
Operating Times
PLEASE NOTE!
Risk of overheating due to excessive operation
− Do not operate the appliance continuously for longer than the times stated below.
− Maximum Operating Time: approx. 5 minutes
− After operating for 5 minutes, allow to cool for 10 minutes before using again.
16480 EN ALDI UK content final.indd 816480 EN ALDI UK content final.indd 8 25.08.2015 11:54:4125.08.2015 11:54:41

9
AFTER SALES SUPPORT
Controls
IREGB
GB 0333 32 13 106
IRE 1 800 992508
www.medion.co.uk
Controls
1
2
8
7
6
4
3
5
1Knob to release front cover
2Front cover of mincer drive
3Rear cover
4Tilt lever
5Support grip for tilting
6Operating LED
7Control knob
8Base plate with feet
16480 EN ALDI UK content final.indd 916480 EN ALDI UK content final.indd 9 25.08.2015 11:54:4125.08.2015 11:54:41

10 AFTER SALES SUPPORT
Controls
GB IRE
GB 0333 32 13 106
IRE 1 800 992508
www.medion.co.uk
Overview of accessories
2
19 157
5
5
5
65
8
9
16
17
10
20 147 184 31
1Pusher
2Feed tray
3Sausage filling tube
4Fixing ring
5Pasta attachments
6Sausage attachment
7Meat cutter discs
8Kebab spout
9Kebab attachment
10 Biscuit adapter with shaping attachment
11 Biscuit attachment (see “Exploded view showing all mincer parts”)
12 Meat cutter (see “Exploded view showing all mincer parts”)
13 Feed screw (see “Exploded view showing all mincer parts”)
14 Feed tube of screw housing
15 Splash guard for mixing tools
16 Dough hook
17 Beater
18 Whisk
19 Splash guard lid for mixing bowl
20 Mixing bowl
16480 EN ALDI UK content final.indd 1016480 EN ALDI UK content final.indd 10 25.08.2015 11:54:4425.08.2015 11:54:44

11
AFTER SALES SUPPORT
Controls
IREGB
GB 0333 32 13 106
IRE 1 800 992508
www.medion.co.uk
Exploded view showing all mincer parts
3 4 6 8 9 10 11 12 13 14
2
1
57
1Pusher
2Feed tray
3Sausage filling tube
4Fixing ring
5Pasta attachments
6Sausage attachment
7Meat cutter discs
8Kebab spout
9Kebab attachment
10 Biscuit adapter with shaping attachment
11 Biscuit attachment
12 Meat cutter
13 Feed screw
14 Feed tube of screw housing
16480 EN ALDI UK content final.indd 1116480 EN ALDI UK content final.indd 11 25.08.2015 11:54:4825.08.2015 11:54:48

12 AFTER SALES SUPPORT
Using the appliance for the first time
GB IRE
GB 0333 32 13 106
IRE 1 800 992508
www.medion.co.uk
Using the appliance for the first time
1. Set the control knob to "0" and press the tilt lever to raise the tilting arm.
2. Place the mixing bowl on the fixing tongues in the base and rotate it as far as it will go in the direction indicated
by the LOCK arrow to lock it in place.
DANGER!
Risk of injury by rotating and moving parts
Before changing accessories or attachments that move when in operation,
the appliance must be switched off and disconnected from the supply. There is a risk of a crushing
injury!
3. Fit the splash guard onto one of the three mixing tools (dough hook, beater, whisk), then fit the tool to the
machine as illustrated.
The mixing tools can only be inserted in the machine and rotated if the projections are seated in the
corresponding indentations.
The guard disc prevents the drive shaft from coming into contact with dough.
4. The splash guard for the mixing bowl is ready to fit and can simply be placed over the bowl after it has been
locked in place:
5. Press the tilt lever and lower the tilting arm. Make sure that it is latched home on the bottom part of the
housing. Reconnect the appliance to the mains supply and switch on at the wall socket.
6. The control knob can now be set for the required speed. The recommended speed settings for various uses are
listed below.
• Use the dough hook at speed 1, 2 or 3 for heavy doughs like bread, shortcrust pastry or pasta.
• You can use the beater for many ingredients ranging from medium-weight doughs, such as cake mixes, to
lighter mixtures, such as pancake batter and sponge mix. Use the beater at speed 4, 5, 6, 7 or 8 as required.
• If you are whipping cream, egg white or blancmange, use the whisk at high speed (7 or 8).
• For short, powerful and continuous pulse movements, turn the control knob repeatedly to the "P" position.
• The mincer can be used to make various dough products such as noodles and biscuits, to produce kebabs, to
mince meat or to fill sausages. The required speed setting is 6, 7 or 8.
7. After the test run, turn the control knob to "0".
8. Press the tilt lever and lift the tilting arm, then remove the mixing tool from the bayonet fitting. Return the
tilting arm to its lowered position.
9. Switch off at the wall socket and unplug.
16480 EN ALDI UK content final.indd 1216480 EN ALDI UK content final.indd 12 25.08.2015 11:54:5025.08.2015 11:54:50

13
AFTER SALES SUPPORT
Operation as a kneading machine
IREGB
GB 0333 32 13 106
IRE 1 800 992508
www.medion.co.uk
PLEASE NOTE!
Risk of overheating due to excessive operation
Do not operate the appliance continuously for more than 5 minutes.
After operating for 5 minutes, allow to cool for 10 minutes.
Operation as a kneading machine
Getting started
1. Fit the dough hook, whisk or beater to the machine and then insert the mixing bowl.
2. Fit the splash guard on the mixing bowl.
3. Now put the ingredients into the mixing bowl. Take care not to overfill the mixing bowl (about 1.5 kg flour
maximum).
4. Press the tilt lever and lower the tilting arm. Make sure that it is latched home on the bottom part of the
housing.
Mixing and kneading dough
Use the dough hook or the beater for kneading dough.
• The best dough mixture for kneading is a ratio of 5 parts flour to 3 parts water. Fill the mixing bowl to a
maximum level of 3/4 full.
• When filling the mixing bowl, be sure not to exceed the maximum quantity of 1.5 kg.
• Use the dough hook or beater for mixing.
− If you use the dough hook or beater, switch to speed setting 1 for at least 30 seconds, followed by at least 30
seconds at speed setting 2 and, finally, speed setting 3 for up to 5minutes.
Do not use the dough hook or beater for longer than 5 minutes and then allow a pause of at least 10 minutes.
Beating egg white
To beat egg white, use the whisk.
− Use speed setting 7 or 8 and beat the egg white continuously for some 3 to 5 minutes until stiff.
Do not beat the whites of more than 12 eggs at once.
Do not use the whisk for longer than 5 minutes and then allow a pause of at least 10 minutes.
Whipping cream
To whip cream, use the whisk. Use fresh cream.
− For whipped cream, use speed setting 7 or 8 and whip for some 3 to 5 minutes.
Be sure not to exceed the maximum quantity when adding fresh milk, cream or other ingredients to the mixing
bowl.
Do not use the whisk for longer than 5 minutes and then allow a pause of at least 10 minutes.
16480 EN ALDI UK content final.indd 1316480 EN ALDI UK content final.indd 13 25.08.2015 11:54:5125.08.2015 11:54:51

14 AFTER SALES SUPPORT
End of operation
GB IRE
GB 0333 32 13 106
IRE 1 800 992508
www.medion.co.uk
Mixing shakes, cocktails or other liquids
To mix shakes, cocktails and other liquids, use the whisk.
− Mix the ingredients in accordance with the required recipe for some 3 to 5 minutes at a speed setting of 1 to 8.
Do not exceed the maximum quantity in the mixing bowl.
Do not use the whisk for longer than 5 minutes and then allow a pause of at least 10 minutes.
End of operation
1. Switch off the appliance.
2. Disconnect the mains plug.
3. Press down on the tilt lever to allow the arm to raise itself.
4. Remove the mixing tool. To release the tool, rotate it anticlockwise.
5. Rotate the mixing bowl slightly clockwise to remove it.
6. When the dough is ready, use a spatula to remove it from the mixing bowl.
7. Clean the parts used as described under "Cleaning".
Working with the mincer
DANGER!
Risk of injury by rotating and moving parts
− When using the mincer, put the mixing bowl in position to protect the rotating fitting for the
mixing tool. There is a risk of a crushing injury!
Setting up the mincer to mince meat
4 7 12 13
14
For mincing, use the most appropriate of the three meat cutting discs for the desired result together with the meat
cutter.
16480 EN ALDI UK content final.indd 1416480 EN ALDI UK content final.indd 14 25.08.2015 11:54:5125.08.2015 11:54:51

15
AFTER SALES SUPPORT
Working with the mincer
IREGB
GB 0333 32 13 106
IRE 1 800 992508
www.medion.co.uk
1. Pull out the mains plug to isolate the machine from the supply.
2. Hold in the knob to release the front cover and turn the front cover to the right to release.
3. If needed, press the tilt lever and lower the tilting arm. Make sure that it is latched home on the bottom part of
the housing.
4. Assemble the mincer with accessory parts in the order illustrated above.
5. Screw the end fixing ring clockwise onto the thread.
6. Hold in the knob to release the front cover and, with the bayonet fitting tilted slightly to the right, fit the mincer
onto the mincer drive shaft.
7. Rotate the mincer to the left to screw it on. Make sure that the mincer is firmly seated on its connection to the
machine.
8. Fit the feed tray on the top end of the mincer feed tube.
9. Place the meat in the feed tray and use the pusher to push it down the tube.
Do not use the mincer for longer than 5 minutes and then allow a pause of at least 10 minutes.
Fitting the mixer with the sausage attachment
Processing prepared sausage meat
43 13
14
6
To fill suitable natural or artificial sausage skin with sausage meat, use the sausage attachment and the sausage
filling tube.
To process prepared sausage meat, proceed as follows:
− Assemble the mincer as illustrated above, following the assembly procedure as described in “Setting up the
mincer to mince meat”.
16480 EN ALDI UK content final.indd 1516480 EN ALDI UK content final.indd 15 25.08.2015 11:54:5125.08.2015 11:54:51

16 AFTER SALES SUPPORT
Working with the mincer
GB IRE
GB 0333 32 13 106
IRE 1 800 992508
www.medion.co.uk
Mincing meat and making sausages in a single pass
43 13
14
7 12
To mince meat and make sausages in a single pass, assemble the mincer and meat cutting disc and cutter as
described in “Setting up the mincer to mince meat”.
Put on the sausage attachment next and screw the fixing ring onto the thread of the mincer body.
Setting up the mincer to produce spritz biscuits
10
4
13
14
11
To produce spritz biscuits from shortbread dough, use the biscuit adapter with shaping attachment and the biscuit
attachment.
− Assemble the mincer as illustrated above, following the assembly procedure as described in “Setting up the
mincer to mince meat”.
16480 EN ALDI UK content final.indd 1616480 EN ALDI UK content final.indd 16 25.08.2015 11:54:5125.08.2015 11:54:51

17
AFTER SALES SUPPORT
Working with the mincer
IREGB
GB 0333 32 13 106
IRE 1 800 992508
www.medion.co.uk
Setting up the mincer to produce pasta
4 13
14
5
To produce pasta from pasta dough, choose one of the four pasta attachments.
− Assemble the mincer as illustrated above, following the assembly procedure as described in “Setting up the
mincer to mince meat”.
Setting up the mincer to produce kebab meat
4 13
14
8 9
To produce kebab meat, use the kebab spout 8and the kebab attachment 9.
− Assemble the mincer as illustrated above, following the assembly procedure as described in “Setting up the
mincer to mince meat”.
16480 EN ALDI UK content final.indd 1716480 EN ALDI UK content final.indd 17 25.08.2015 11:54:5225.08.2015 11:54:52

18 AFTER SALES SUPPORT
End of operation
GB IRE
GB 0333 32 13 106
IRE 1 800 992508
www.medion.co.uk
End of operation
1. Switch off the appliance.
2. Disconnect the mains plug.
3. Dismantle the mincer and all accessory parts.
4. Use a spatula to remove dough/meat residues from the feed tube.
5. Clean the parts used as described under "Cleaning".
Instructions for use of the mincer
Chopping meat
• Do not include any hard matter such as bones.
− Cut the meat into small pieces, about 20 x 20 x 60 mm, without gristle or bone, so that they are easily broken
up in the feed screw housing.
Making sausages
• You can use either natural or artificial sausage skin.
• If you are using natural skin, allow it to soften for a while in water. Knot one end of the sausage skin.
− Push the sausage skin onto the sausage filling tube.
− The sausage meat will be pushed through the sausage attachment to fill the sausage skin.
• Make sure that the sausage skin is "loosely" filled since the sausage meat expands when cooked and could
burst the skin.
− Once the desired length for the first sausage is reached, press the skin at the end of the sausage attachment
together with your fingers
− and then twist the sausage once or twice on its own axis.
• For easier handling, you can switch off the machine after each sausage length.
Piping biscuits
− Prepare a place to lay out the biscuits once made.
− With the shaping attachment, you can give the prepared biscuit dough various shapes.
− After you have mounted the screw housing with biscuit attachment on the appliance, push the shaping
attachment into the biscuit attachment.
− Set the desired biscuit shape.
End of operation
1. Switch off the appliance.
2. Disconnect the mains plug.
3. Dismantle the mincer and all accessory parts.
4. Use a spatula to remove dough/meat residues from the feed tube.
5. Clean the parts used as described under “Cleaning” on page 19.
16480 EN ALDI UK content final.indd 1816480 EN ALDI UK content final.indd 18 25.08.2015 11:54:5225.08.2015 11:54:52

19
AFTER SALES SUPPORT
Cleaning
IREGB
GB 0333 32 13 106
IRE 1 800 992508
www.medion.co.uk
Cleaning
DANGER!
Risk of electrocution
− Before cleaning, turn the control knob to speed setting "0" and remove the mains plug.
− Never immerse the appliance in water or other liquids!
− Always disconnect the appliance plug from the mains socket before cleaning or servicing the
appliance and before fitting or dismantling the attachments.
− Before cleaning, all attachments must be removed from the main appliance.
PLEASE NOTE!
Risk of damage to the appliance if handled incorrectly
− Do not use a wire brush or other scourer or any sharp or scouring cleaning agents.
Motor housing:
− Only clean the external housing of the appliance, using a damp cloth with a small amount of
washing up liquid. Dry off with a cloth.
Dough hook, beater, mincer feed screw, feed tube with feed screw housing, feed tray and fixing
ring of the mincer:
− Do NOT clean these components in the dishwasher! Under the influence of heat and
aggressive cleaning agents, they can become distorted or discoloured. They can be hand
washed in hot water with washing-up liquid. Rinse and dry thoroughly.
Plastic accessories, whisk, mixing bowl, mix container, inner blade and meat cutting discs:
− These accessory parts can be cleaned with hot water and washing-up liquid or in the
dishwasher. Do not use any scouring agents.
− After drying, wipe the meat cutting discs and cutting blade of the mincer with a little
vegetable oil.
16480 EN ALDI UK content final.indd 1916480 EN ALDI UK content final.indd 19 25.08.2015 11:54:5225.08.2015 11:54:52

20 AFTER SALES SUPPORT
Troubleshooting
GB IRE
GB 0333 32 13 106
IRE 1 800 992508
www.medion.co.uk
Troubleshooting
Problem Possible cause Solution
The appliance will
not start
The mains plug is not
properly inserted.
Pull out the plug, wait 10 seconds and then plug it back in
again.
The socket is defective. Check the socket by connecting another appliance.
Disposal
Disposal of packaging
Sort packaging before disposal. Dispose of paper and cardboard, as well as plastic packing materials,
using the recycling facilities provided by your local authority.
Disposal of old appliances
(Applicable in the European Union and other European states with systems for separate collection of recyclable
materials)
Do not dispose of old appliances in normal household waste!
If the appliance is no longer fit for use, all consumers are required by law to hand in old appliances
separately from household rubbish, e.g. at a local authority waste collection point. This guarantees that
old appliances are recycled correctly and avoids negative effects on the environment. For this reason,
electrical appliances are marked with the above symbol.
Technical data
Model: MD 16480
Nominal voltage: 220-240 V~50/60 Hz
Protection Class: I (this appliance must be earthed)
Nominal power: 1000 W
Mixing bowl: 4.6 litres
Max. capacity (flour): 1.5 kg
Dimensions in cm
Appliance: approx. 40.5 x 47 x 29.5 (H x W x D)
Net weight: 7.8 kg
16480 EN ALDI UK content final.indd 2016480 EN ALDI UK content final.indd 20 25.08.2015 11:54:5225.08.2015 11:54:52

21
AFTER SALES SUPPORT
Conformity information
IREGB
GB 0333 32 13 106
IRE 1 800 992508
www.medion.co.uk
Conformity information
Medion AG hereby declares that the product MD 16480 conforms to the following European
requirements:
• EMC Directive 2004/108/EC
• Low Voltage Directive 2006/95/EC
• RoHS Directive 2011/65/EU
Full declarations of conformity are available at www.medion.com/conformity.
Legal notice
Copyright © 2015
All rights reserved.
This operating manual is protected by copyright.
Mechanical, electronic and any other form of reproduction is prohibited without the written
permission of the manufacturer
Copyright is owned by the company:
Medion AG
Am Zehnthof 77
45307 Essen
Germany
The operating manual can be reordered via the service hotline and is available for download via the service portal
at www.medion.com/gb/service/start/.
You can also scan the QR code above and download the operating manual onto your mobile device via the service
portal.
16480 EN ALDI UK content final.indd 2116480 EN ALDI UK content final.indd 21 25.08.2015 11:54:5225.08.2015 11:54:52
Table of contents
Other Medion Mixer manuals