Aiphone CommunCenter User manual

OPERATION MANUAL
Software for IPW-1A Intercom-Over-IP Adaptor
LAN PWR
POWER
IN0 IN1 NO C NC
T
2 Wires
0211

TABLE OF CONTENTS
GENERAL DESCRIPTION 1
FEATURES 2
SPECIFICATIONS 3
SOFTWARE INSTALLATION 4
WIRING & TERMINAL DEFINITIONS 5
SYSTEM FUNCTION TABLE 6
SCREEN LAYOUT 7
Expanded Mode View 7.1
Collapsed Mode View 7.2
SOFTWARE CONFIGURATION WINDOW 8
General tab 8.1
Paging Groups 8.2
Paging Messages 8.3
Ignore List 8.4
Passwords 8.5
Scheduling 8.6
Archival Settings 8.7
Audio Settings 8.8
Information 8.9
PRIOIRTY LEVEL 9
OPERATIONS 10
Sub station calling in 10.1
Answering a call from sub station 10.2
Monitoring the sub station 10.3
Talking to a sub station 10.4
Activating the dry contacts 10.5
ALL CALL / GROUP PAGING 10.6
All Call 10.6.1
Group Paging 10.6.2
Messages 10.7
ICON DESCRIPTIONS 11
HARDWARE CONFIGURATION 12
Accessing from CommuniCenter 12.1
Adaptor Configuration via software 12.2
Adaptor Configuration via browser 12.3
BROADCAST AND DIRECT MODE Appendix A
Broadcast Mode A.1
Direct Mode A.2
What network administrator needs to know A.3
What functions are available in each mode A.4
TROUBLESHOOTING Appendix B
Bandwidth Settings B.1
Pg. 2

1. General Description
The IPW-1A and CommuniCenter software combine to create a network door entry intercom
system. The IPW-1A is compatible with any of the Aiphone IE/IF door stations. The system allows
for call-in to the PC via the CommuniCenter software, general communication between the PC and
the door station, as well as the ability to activate the electric door release.
2. Features
o The IPW-1A can be distributed over a data communication network.
o The IPW-1A can be connected to an existing local area network (LAN) or wide-area network
(WAN). The system will operate over wired, wireless, and fiber-optic TCP/IP networks.
o The CommuniCenter software allows for standard operation and maintenance of the system.
o Digital audio recording and playback capability.
o The CommuniCenter software allows for control of electric locks via the “Form C” dry contact on
the IPW-1A.
3. Specifications
Input Voltage: Use Aiphone PT-1211C (included); 15-24V AC/DC
Network Interface: 10/100 Base-T Ethernet (Auto detection) RJ-45
IP Assignment: Static or Dynamic
Hardware Protocols: TCP/IP, UDP, DHCP, SNMP, AutoIP, SonicIP, Ipzator
Contact Aiphone for additional supported protocols
Transport Bandwidth: ≈128Kbps per active session (normal mode)
≈64Kbps per active session (low bandwidth mode)
Audio Encoding: PCM (raw), G.7II ( Law)
Audio Sampling: 16bit at 8kHz (normal mode)
8bit at 8kHz (low bandwidth mode)
Output Level: Determined by sub station
Relay Contact Rating: 30V AC/DC 1.0A (resistive)
Operating temperature: 32°F to 104°F (0°C to 40°C)
Dimensions: 1-1/2″H x 4-1/4″W x 4-15/16″D
Software System Requirements:
For optimum performance of the CommuniCenter program, we recommend the following
minimum requirements:
Operating System: Microsoft Windows XP (SP2), Windows Vista
Processor: 1 GHz or faster
Memory: 256MB of RAM
Hard drive: 50MB of available disk space
Sound Card: Windows supported sound card (w/ speaker & microphone)
Note:
Windows is the registered trademark of Microsoft Corporation in the United Sates and other countries.
® ®
Pg. 3

Wiring to sub station should be 2-conductor shielded cable.
Wire distance from IPW-1A to IE series sub station:
22AWG = 387 feet, 18AWG = 980 feet
RESET RS-232 STATUS SUB
PT-1211C
SUB
1
2Audio Only Door
IE Series sub station
LAN PWR
POWER
IN0 IN1 NO C NC
PT
Note:
Contact rated at 30V AC/DC, 1.0A
*
5. Wiring & Terminal Definitions
IN0 IN1 NO C NC
T
*Normally Closed dry contact
*Common
*Normally Open dry contact
Input ground
Input 1 (sensor input)
Input 0 (external call button input)
* The dry contact can be used for door
release or an alarm output.
1. Load the software onto the PC to be used as a master station. Insert CD (included with IPW-1A)
or download the latest version from the Aiphone website (www.aiphone.com).
2. Install the CommuniCenter software by following the on-screen prompts, or by executing
“setup.exe” to begin the installation process.
3. Any IPW-1A adaptors within the broadcast domain should automatically appear on the sub
station list on the right. Refer to Section 8 of this user guide for software functionality and
configuration information. Refer to Section 12 of this user guide for hardware configuration.
4. Software Installation
T
Pg. 4

Feature/Function Description Reference section
Communication
Contact Input and Sensor Input
Device Reset
Talking to Sub
Monitoring Sub
Group Call
Direct audio communication between the IPW-1A and the
CommuniCenter software
Direct audio communication between the IPW-1A and the
CommuniCenter software, one-way only
Broadcast audio transmission from the CommuniCenter software
to selected adaptors, one-way only
Device reset function will cause the IPW-1A adaptor to cease all
function and reboot, as if power had been cycled
Contact input is equivalent to call button from IE series sub
Sensor input will create a sensor input event in the software
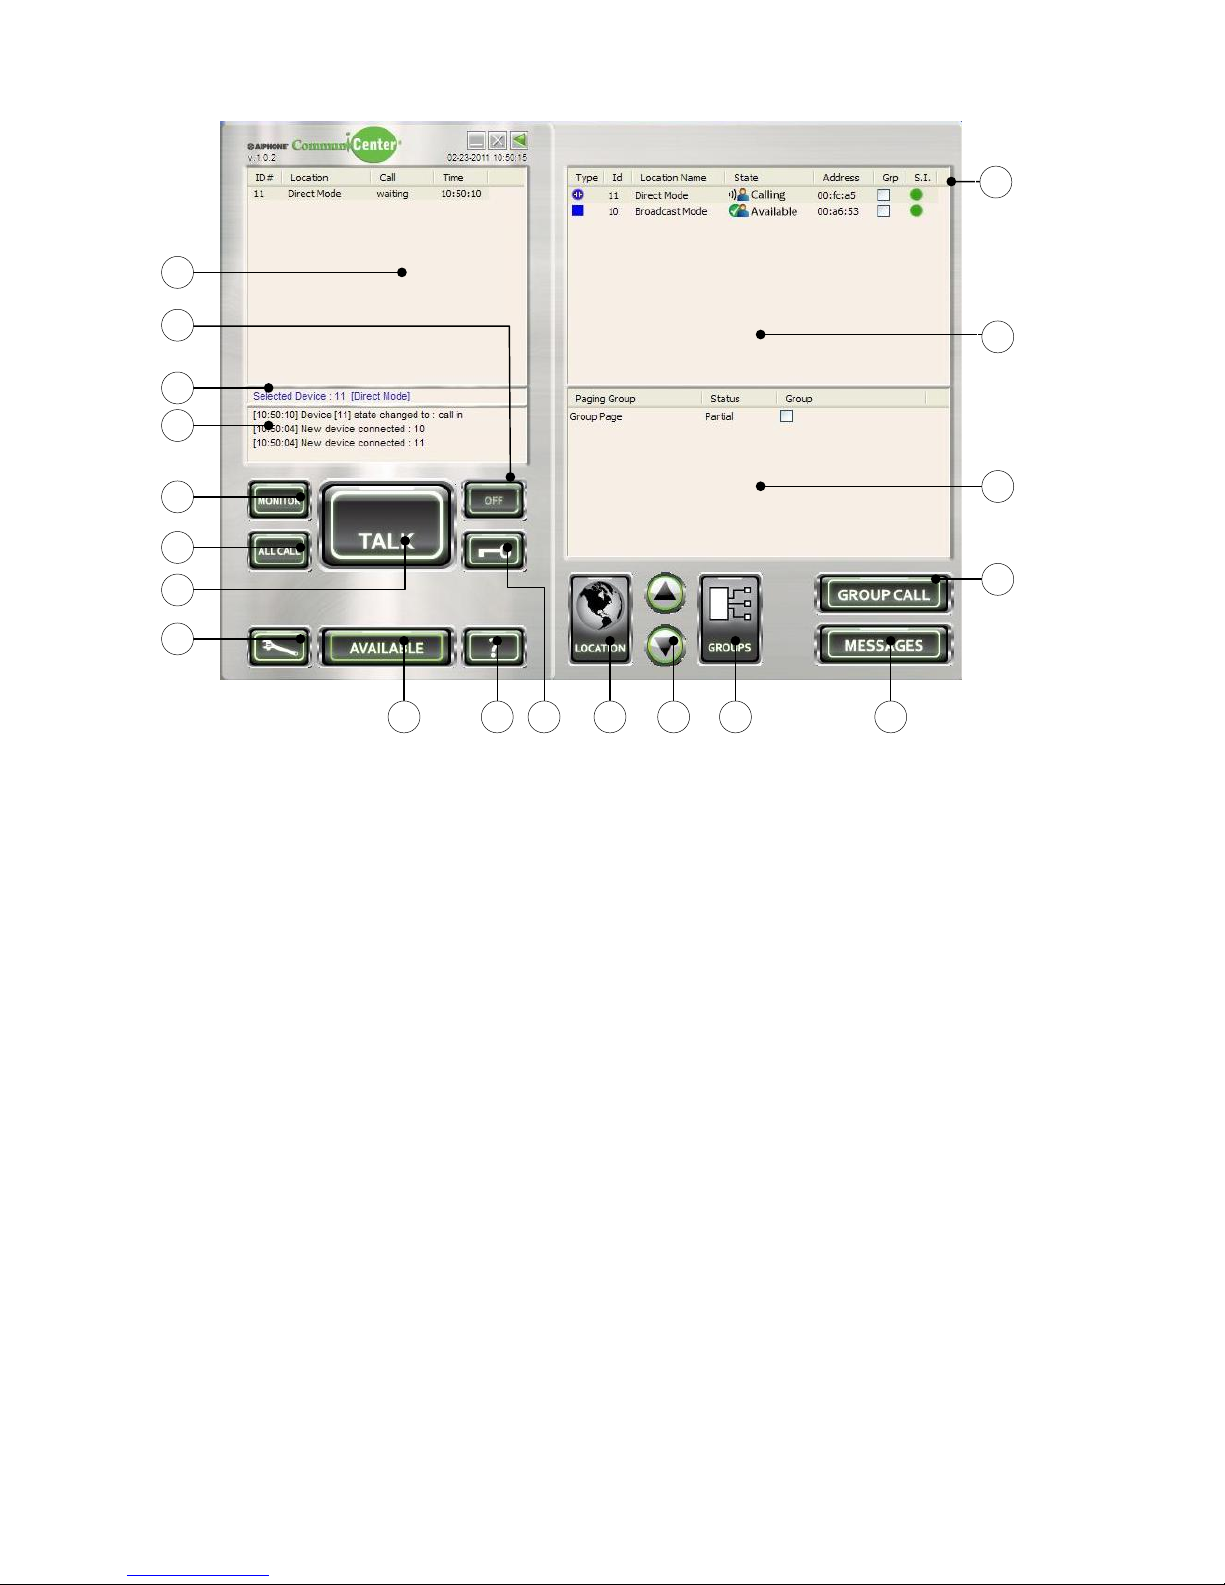
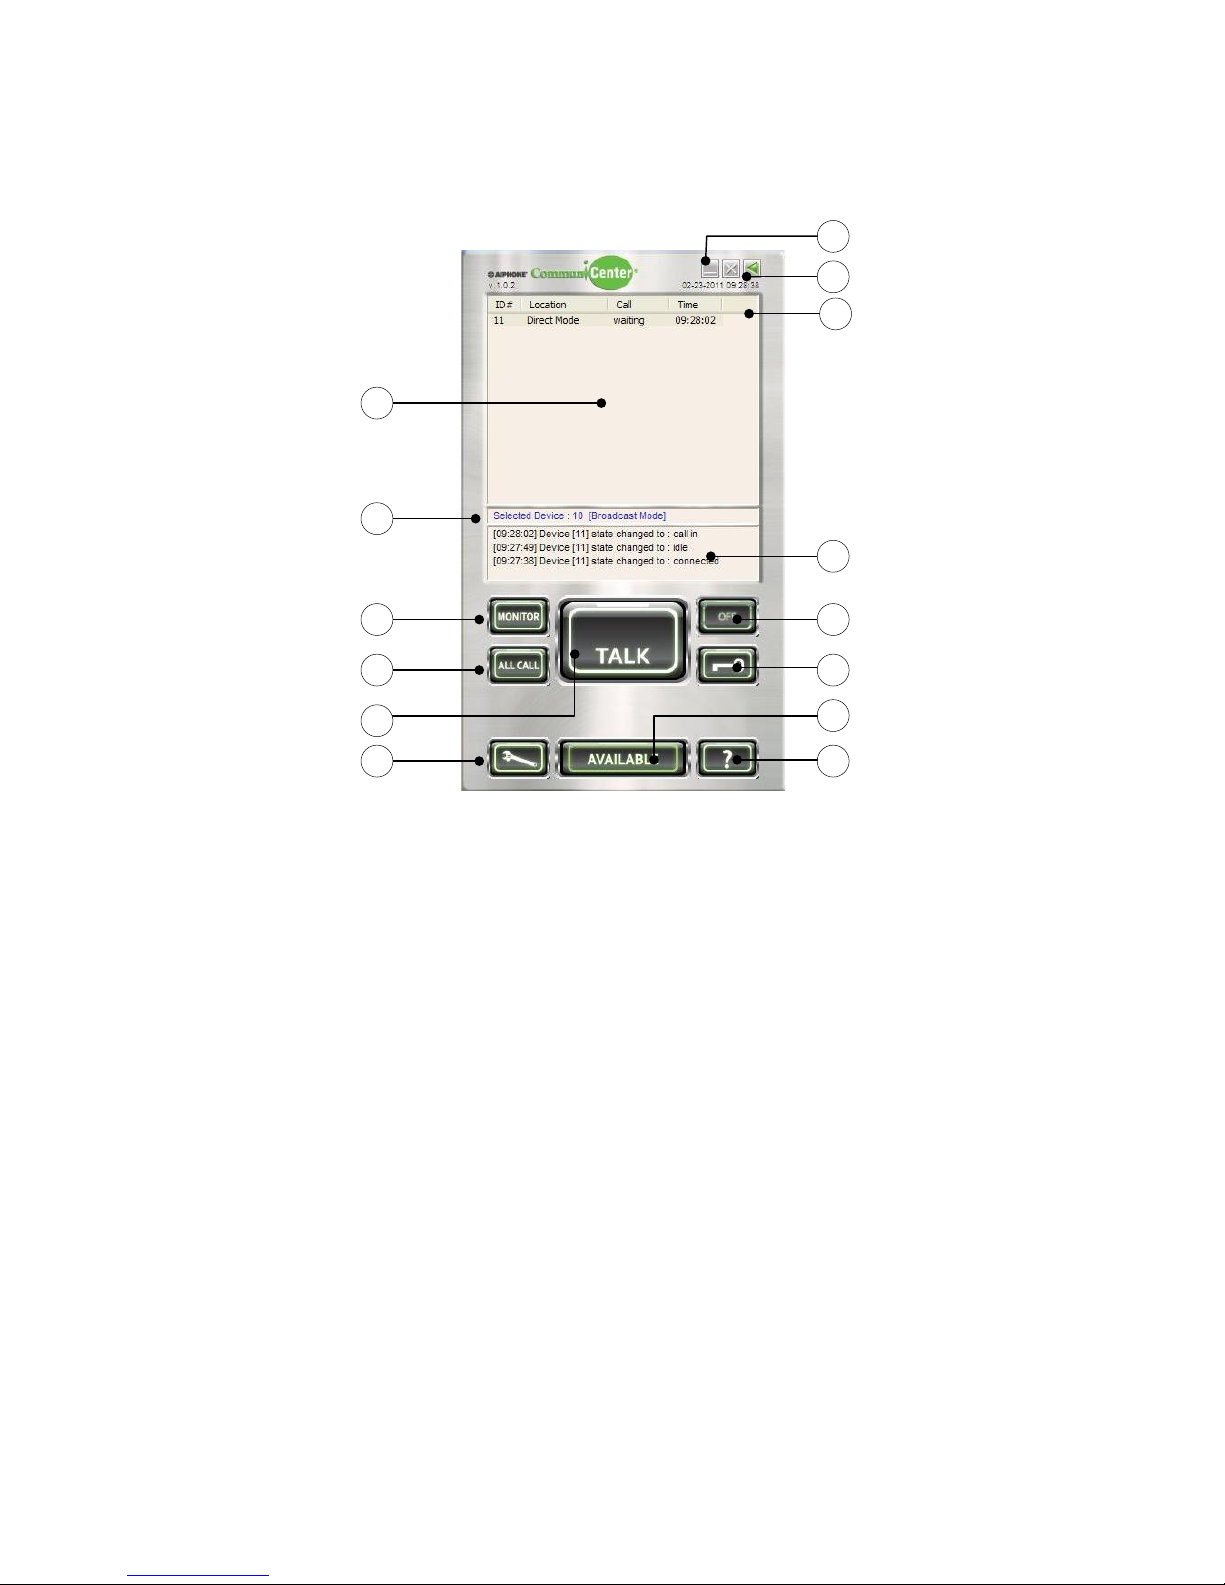
Screen Layout Describes what each button and window in the CommuniCenter
software is used for
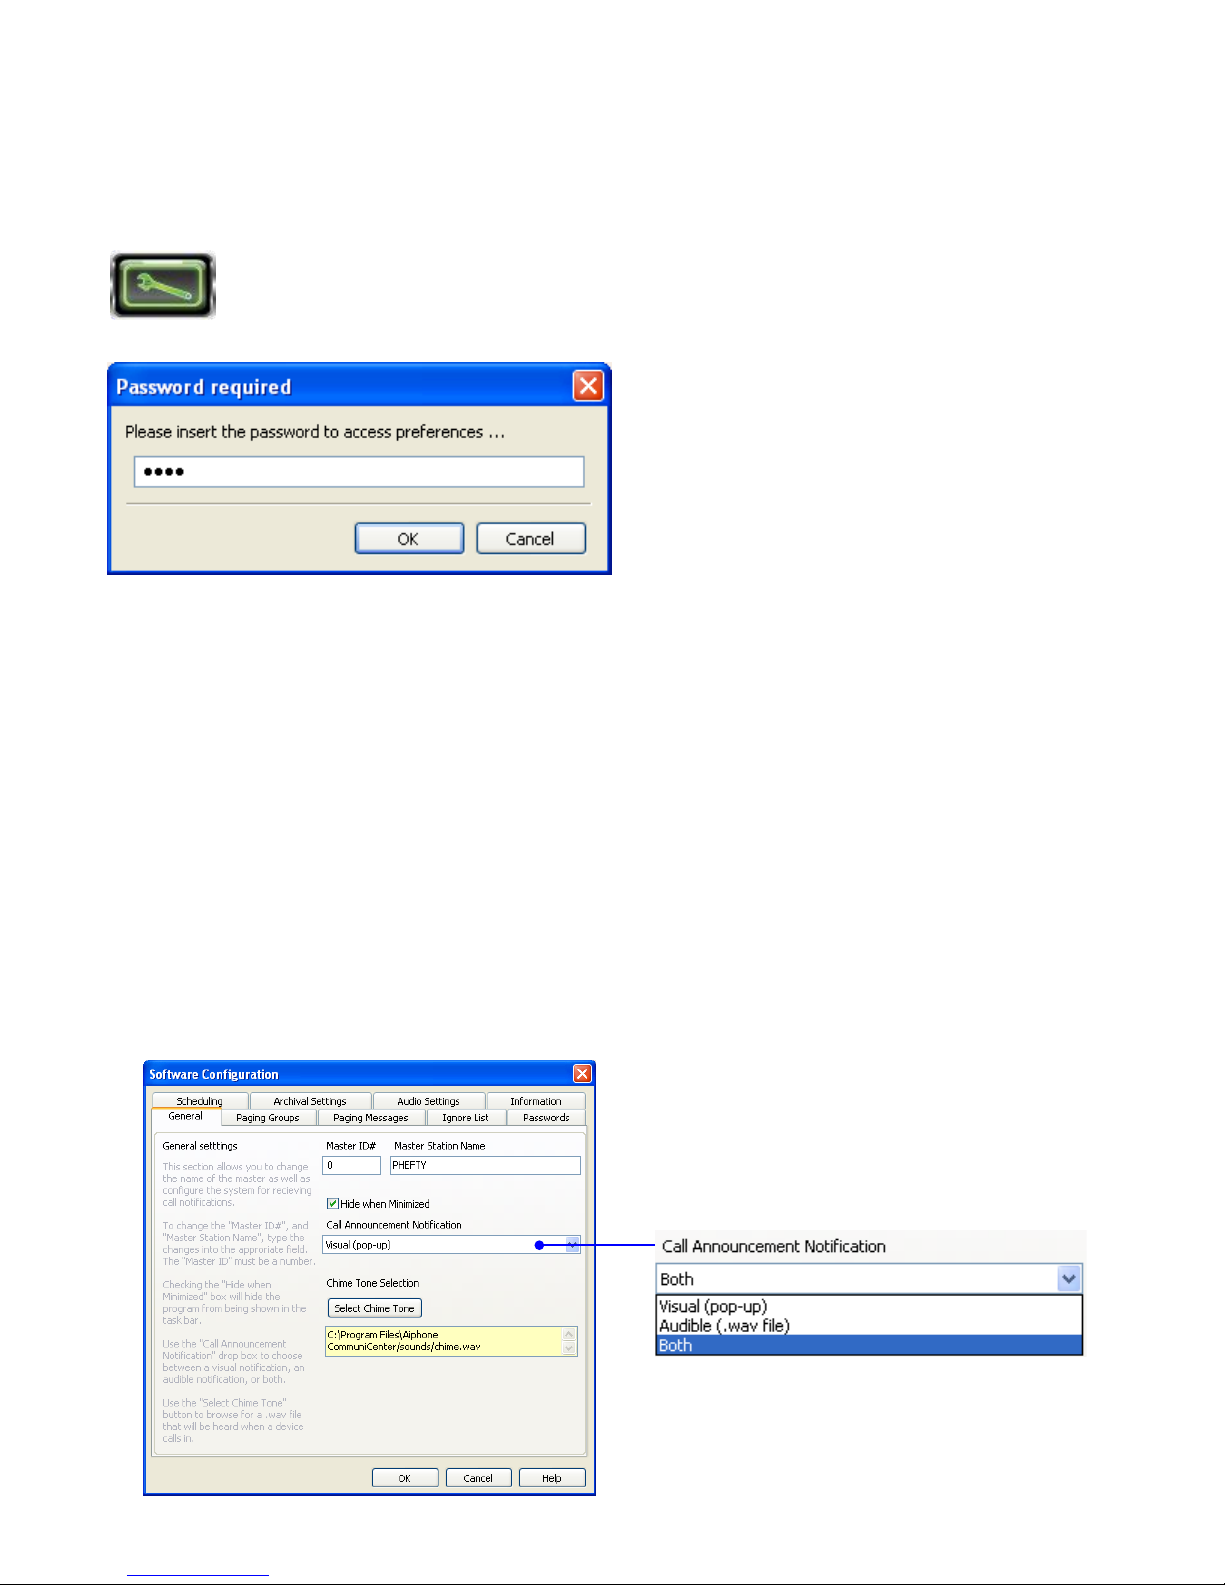
Software Configuration Allows you to configure passwords, paging groups, messages, etc
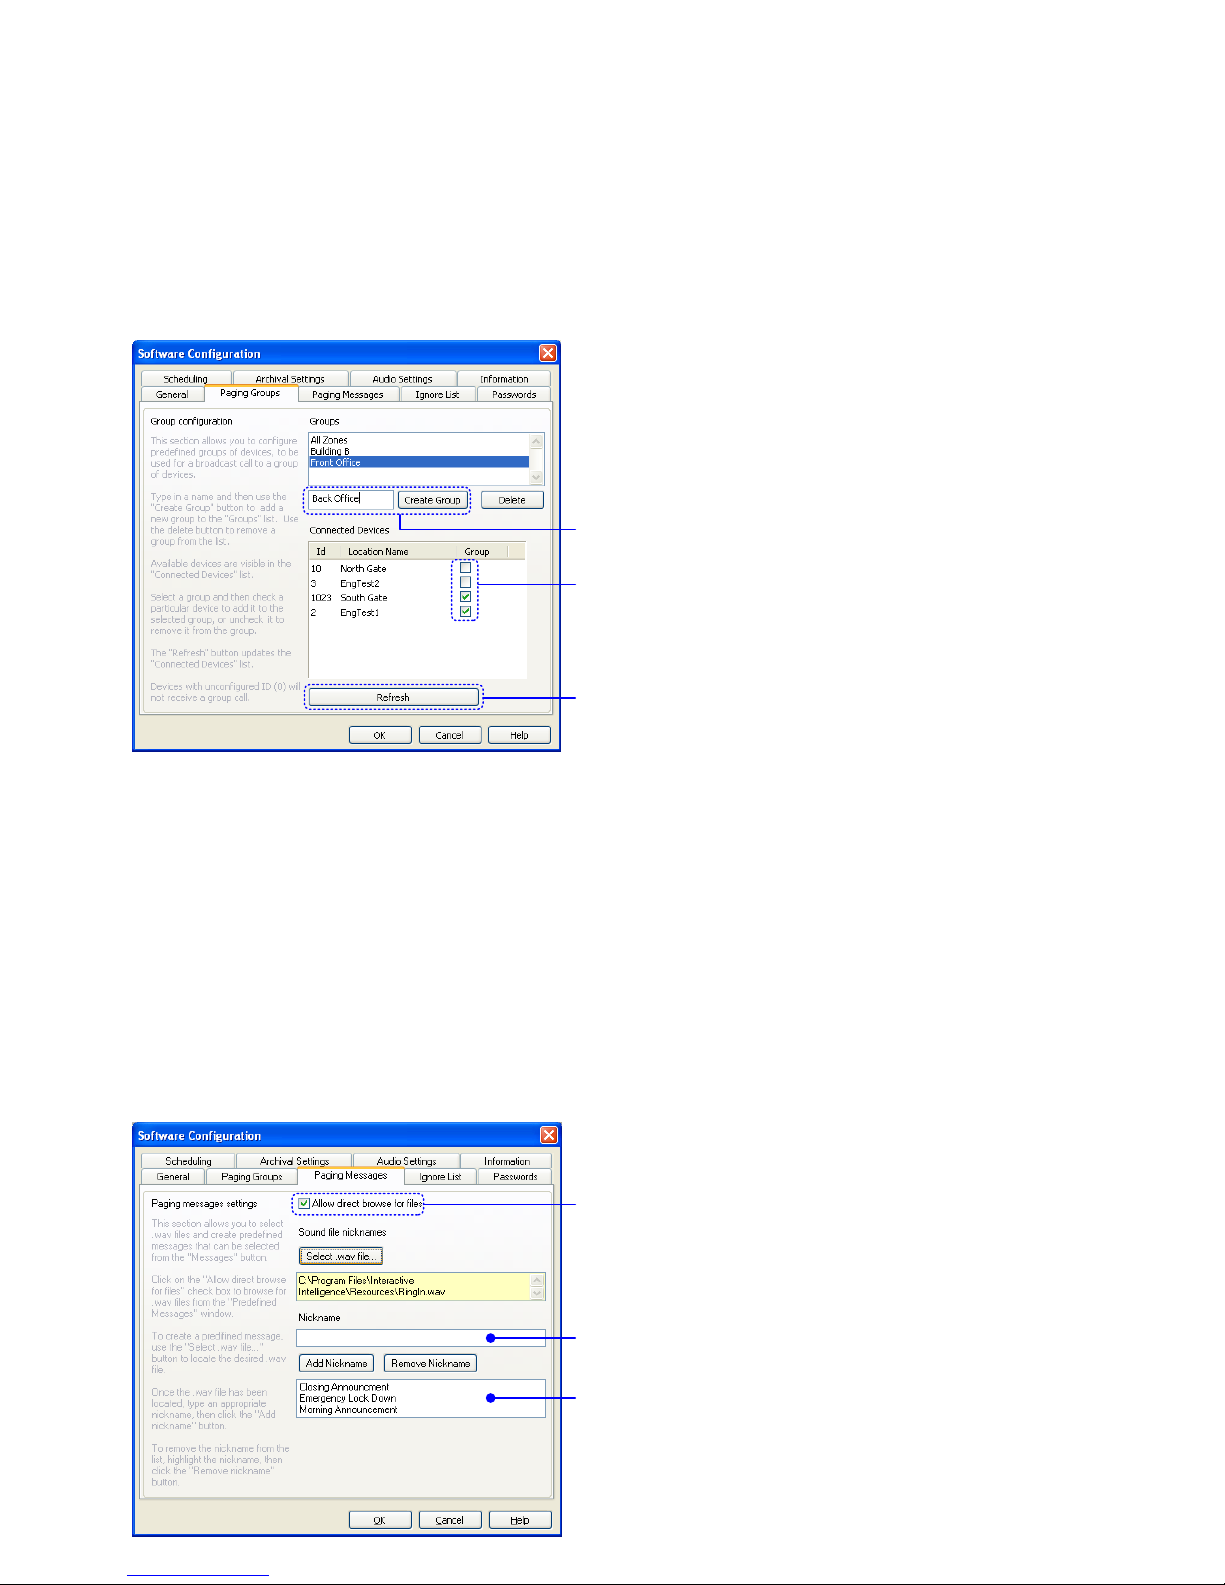
Paging Groups Create paging groups and select the stations you wish to be part
of the group
Paging Messages Set up pre-recorded paging messages that you can send to
groups or specific subs
Ignore List Block devices from being recognized from your PC
Passwords
Procedure used to answer call from a sub station or to select a
sub station to talk to
Create a password to gain access to the software configuration
Scheduling Set specific times during the day/week to put the program in and
out of unavailable mode
Audio Settings Allows you to choose input and output device for the
speaker and mic as well as the quality level of the audio
Priority Level Lists priority level for calls (highest to lowest)
Call Placement Placing a call to the PC from the IE series sub station
Answering a call
Door Release Activating the dry contacts on the IPW-1A
Group Paging Page to pre-selected groups of sub stations
Messages Sending a pre-recorded message to a sub station or group of sub
stations
Hardware Configuration Accessing hardware configuration from within CommuniCenter
All Call Place an all call announcement to all subs in your software
Adaptor Configuration Accessing the adaptor settings via the CommuniCenter software
or via the web browser
Archival Settings Enable audio archiving and/or data-log archiving
All Call Broadcast audio transmission from the CommuniCenter software
to all visible adaptors, one-way only
Message Direct or broadcast transmission of a pre-recorded message from
the CommuniCenter software to selected station(s) / group(s)
6. System Function Table
10.2 & 10.4
10.3
10.6.2
10.6.1
12.1
7.1 & 7.2
8
8.2
8.3
8.4
8.5
8.6
8.7
8.8
9
10.1
10.2, 10.3, 10.4
10.5
10.6.1
10.6.2
10.7
12.1
12.2 & 12.3
10.7
5, 7, 11
Pg. 5

7. Screen Layout:
7.1 Expanded Mode View
1- Call Waiting List
Displays calls placed, showing time
placed and status
2- Off Button
Terminates communication with the
connected sub
3- Selected Device Text Box
Displays the station or group that has been
selected
4- Activity Log Text Box
Shows most recent system activity
5- Monitor Button
Allows the selected station to be monitored
6- All Call Button
Makes a broadcast announcement to all
stations visible within CommuniCenter
7- Talk Button
Engages transmit communication when the
button is activated (PTT)
8- Tool Button
Opens the software configuration window
9- Available/Unavailable Button
Allows the user to switch to and from away
status
1
5
6
3
4
8
7
9 10 11 12 14 15
16
17
2
13
18
10- Help Button
Opens the help window
11- Door Release Button
Activates the dry contact on IPW-1A
12- Location Button
Turns on/off the sub station location list
13- Arrow Buttons
Allows user to move sub stations up and
down the list
14- Groups Button
Turns on/off the paging group list
15- Messages Button
Allows a user to open the prerecorded
message selection window
16- Group Call Button
Pages to selected stations or paging groups
17- Paging Group List
Displays the preconfigured paging groups
18- Sub Station Location List
Displays a sub station‟s location, name, and
status
19- Sensor Input Status
Displays an icon when the Sensor Input
(In 1) detects a closure
Pg. 6
19

7.2 Collapsed Mode View
1- Minimize, and Terminate buttons
Minimizes or terminates the program
2- Expand/Collapse Button
Toggles between the expanded and
collapsed versions
3- Sensor Input Status
Displays an icon when the Sensor Input
(In 1) detects a closure
4- Call Waiting List
Displays calls placed, showing time
placed and status
5- Selected Device Text Box
Displays the station or group that has been
selected
6- Monitor Button
Allows the selected station to be monitored
7- All Call Button
Makes a broadcast announcement to all
stations visible within CommuniCenter
8- Talk Button
Engages transmit communication when the
button is activated (PTT)
9- Tool Button
Opens the software configuration window
10- Activity Log Text Box
Shows most recent system activity
11- Off Button
Terminates communication with the
connected sub
12- Door Release Button
Activates the dry contact on IPW-1A
13- Available/Unavailable Button
Allows the user to switch to and from away
status
14- Help Button
Opens the help window
4
6
7
5
9
8
14
11
12
13
10
2
1
Pg. 7
3

8. Software Configuration Window
o Open the Software Configuration Window by clicking on the Tool Button. If a password has
been set you will be prompted by the Password Required dialog. By default the password is
not set. When using a password, make sure it is something you will be able to recall or write it
down in secure location.
8.1 General Tab
o Under the General Tab you will have the option of selecting how you receive call notifications.
You can select the following from the drop down box:
“Visual (pop up)” will display the “Incoming Call” pop up
“Audible (.wav file)” will play a preselected .wav file
“Both” will enable both the Visual and Audible notifications
o If you are using the Audible (.wav file) option click on the Select Chime Tone button to select a
suitable file from your PC. For “Normal” bandwidth mode your file must be 16-bit, 8kHz, PCM
(uncompressed), for “Low” bandwidth mode your file must be 8-bit, 8kHz uLaw (compressed).
o When minimized, the program can be hidden from the task bar by clicking on the “Hide when
Minimized” check box. The program will always be visible in the system tray.
Pg. 8

8.2 Paging Groups
o Under the Paging Groups tab you will have the option to create different paging groups. Type
in a group name in the box to the left of the Create Group button. Next click on the Create
Group button. You will now see the name in the Groups list. To delete the group from the
Groups list, select the group and then click the Delete button. The final step is to select which
sub stations you want in your group. Select the group from the Groups list, then in the
Connected Device list, use the check box under the Group column to add the desired sub
stations to your group. Clicking on the Refresh button will update the list with the latest devices
available.
Type nickname here
List of saved messages
Updates the connected devices list
Enables the user to browse for a file in
the Paging Message pop-up window
Select sub station(s) via check box
Create and name group
Pg. 9
8.3 Paging Messages
o Under the Paging Messages tab you can create messages from .wav files on your PC. To
enable the user to browse for a file in the Paging Message pop-up window, the „Allow direct
browse for files‟ box must be checked. Otherwise, only the pre-configured messages will be
selectable. Use the Select .wav file… button to browse your PC for a .wav file. Files must
match your Audio Settings. If you‟re setup for “Normal” bandwidth then your file must be 16-bit,
8kHz, PCM (uncompressed), if you‟re in “Low” bandwidth mode then your file must be 8-bit,
8kHz uLaw (compressed). Next, create a Nickname in the space provided, then click on the
Add Nickname button. Your saved messages will be shown in the lower list view window. To
remove a message from the list, select the message and then click on the Remove Nickname
button.

8.4 Ignore List
o Under the Ignore List tab you will have the option to block specific devices from being
recognized at this PC. To view the list of devices available on the network, check the Enable
Ignore Feature check box. This will display the Connected Devices list. From the list, check
the devices you want to ignore. Devices that are ignored will display a green check mark.
Clicking on the Refresh button will update the list with the latest devices available.
8.5 Passwords
o The Passwords tab allows you to create a password to gain access to the Software
Configuration window. You are limited to 16 alpha-numeric characters. Be sure to write it down
or use a password that can be recalled. When configured, you will be prompted with a
Password Required pop up when accessing the software configuration window.
Type password here
Updates connected devices list
Click check box to enable feature
Click check box to ignore specific devices
Pg. 10

8.6 Scheduling
o The Scheduling tab allows the user to set specific times during the day/week to put the program
in and out of unavailable mode. Select the day of the week and then set the starting time and
ending time. To save, click on the Add current entry button. Use the drop downs to change
the hour (24 hr.), minutes, and seconds for the start/stop time. Each day must be set
independently.
8.7 Archival Settings
o The Archival Settings tab allows you to enable or disable the audio archiving and data-log
archiving features. Click on the Audio Archive Enable check box to enable this feature. From
the Select audio archive folder… button you can create your own folder or use the default
folder. Windows Vista users are encouraged to create a specific folder for the archived audio.
When audio archiving is enabled, the system will record both sides of any conversation. This
also includes group paging and all call announcements.
o To enable the event log data, click on the Event Log Archive Enable check box. When event
log archiving is enabled, all activity on the system will be recorded to the archive folder.
Start time
Stop time
Selected day‟s schedule
Pg. 11

8.7 Archival Settings cont.
o To listen to the archived recordings, click on the Open Archive Manager… button. From there
you will be able to open the individual recording and play it by first selecting the recording and
then clicking on the play button in the Archive Manager window. Once you have listened to the
recording, you have the option of deleting the file by clicking on the Delete selected button.
o To access the log data file, use Windows Explorer to navigate to the folder that you had selected
in the set up process. If using the default settings, the Logs folder will be a sub folder within the
Archive folder. The log is a text document and will list the date, time, and event that occurred in
the program.
Station ID# (00 = page / all call)
Hours, minutes, seconds when recording started
Millisecond recording started (to keep file unique)
Pg. 12

8.8 Audio Settings
o The Audio Settings tab will display and allow you to choose the Input Device and Output
Device for the speaker and microphone.
o The Quality level drop down box allows you to choose between Normal bandwidth mode and
Low bandwidth mode. By default, the system will be in Normal mode. This setting must match
the bandwidth setting you have for the devices, otherwise an error status will occur.
o Any changes made to the Input Device, Output Device, or Quality Level will require a restart
of the software.
o Both input and output volume levels can be adjusted. The Input Level adjusts the volume being
transmitted to the sub station, while the Output Level adjusts the volume that is heard at the
PC.
8.9 Information
o The information tab will show the version number of the CommuniCenter software.
Pg. 13

9. Priority level (highest to lowest)
o All Call (1 - highest)
o Group Call (1 - highest)
o Broadcast Messages (1 - highest)
o Direct Messages (2 - middle)
o Direct Communication (2 - middle)
o Monitoring (3 - lowest)
All call, group call, and broadcast messages have the highest priority level. If a PC is in direct
communication with a sub or is monitoring a sub when a high priority call is placed, the
communication will be interrupted and the sub will receive the call. The unit will revert back to its
previous communication state once the priority call is completed.
10. Operations
10.1 Sub station calling in
o Pressing the call button on the substation will trigger a call tone to be heard at the substation.
Pressing the call button additional times will cause the tone to repeat.
o When the call button on a substation is pressed the CommuniCenter will either display a pop up
visual notification, emit a predetermined sound or both, depending on how it was configured.
o During call in, the Call Waiting List will display the unit calling in, showing status of unit and
time that the call was received.
o During call in, the Sub Station Location List will change the device State from “Available” to
“Calling”.
10.2 Answering a call from a sub station
o To remove the pop up notification, simply click “OK” on the pop-up or press the space bar on
your keyboard. If you receive multiple calls at the same time, you will receive only one pop-up.
Any calls after the pop-up was removed will generate a new pop-up notification.
Pg. 14

o Answer the calling station by selecting the station and double clicking in either the Sub Station
Location List, or in the Call Waiting List. You can also select the station and then click on
the “Talk” button or press the space bar on your keyboard. Click the OFF button or press Esc
to end the conversation.
o A second method of answering the calling station is to simply press on your space bar or click
on the “Talk” button. Pressing the space bar can always be used instead of clicking on the
“Talk” button. Click the OFF button or press Esc to end the conversation.
10.3 Monitoring the sub station.
o Monitoring a sub station is the lowest priority of communication. Only one CommuniCenter can
monitor a sub station at any given time. If more than one CommuniCenter selects the same
station, it will be the CommuniCenter that has selected last that will be able to monitor. When
monitoring a sub station, no pretone will be heard at that sub station, regardless of configuration.
In addition, the sub station will not change state in the Sub Station List.
o To monitor a sub station select the station by either double-clicking on the unit in the Sub
Station Location List or use the Arrow Buttons to select the station, then click the Monitor
Button. The Monitor Button will turn green indicating that you are monitoring the selected
substation. To stop monitoring, click on the Off Button or select another station.
10.4 Talking to a sub station when it has not called in.
o To talk with a sub station, first select the station. This can be done by using the Arrow Buttons,
or by clicking on the sub station in the Sub Station Location List. Then click on the Talk
Button or use the space bar on your keyboard.
o Another method is to monitor (double click on) the sub station in the Sub Station Location List
then click on the Talk Button, or use the space bar on your keyboard.
o When talking to a sub station, you must either press the space bar on your keyboard or have the
Talk Button engaged for as long as you are talking (PTT).
+
+
Pg. 15

o Unlike monitor mode, when a sub station is selected for two way communication, the status
shown in the Sub Station Location List will change from available to connected.
o To terminate communication, click on the Off Button or select another station. You can also
terminate the call by pressing the Esc key on your keyboard.
10.5 Activating the dry contacts on the IPW-1A.
o To activate the door release on the IPW-1A that you have selected, click on the Door Release
Button. This will allow you to activate the “Form C” dry contact on the IPW-1A associated with
the sub station. Note: If the IPW-1A is not configured for Door Release, an error pop-up will
occur.
10.6 All Call / Group Paging –Limited to 1 PC at a time on the network.
10.6.1 All Call –Calls to stations that are on the Sub Station Location List.
o To make an all call announcement to all sub stations in your list, click on the All Call Button and
make your announcement after the pre-tone. Stations that are in communication with another
CommuniCenter user will hear the announcement and when the announcement is over, will
resume normal communication. During the announcement the Sub Station Location List will
show that the sub stations are in use. Units on the ignore list will not receive all call
announcements.
10.6.2 Group Paging
o To make a group paging announcement to preselected groups, open the Paging Group List.
You can open the Paging Group List by clicking on the Groups Button. Group calling to an
ignored station is possible if you set the sub as part of a group before you ignore it.
Pg. 16

o From the Paging Group List, select the group or groups that you want to page by clicking the
check box next to the desired group.
o Once a group is selected, click on the Group Call button or press the space bar and make your
announcement following the pre-tone. The announcement will be heard at all sub stations within
the selected group(s).
o To make a group paging announcement to manually selected groups, open the Sub Station
Location List. You can open the Sub Station List by clicking on the Location Button.
o From the Sub Station Location List, select the sub stations that you want to page by clicking
the check box next to the desired station.
o Once a group of stations is selected, click on the Group Call button or press the space bar to
make your announcement following the pre-tone. The announcement will be heard at all the
selected sub stations.
Note: Manual group selection can be cleared by pressing the Esc key.
Pg. 17

10.7 Messages
o To send a message to one sub station, select the desired sub station and click on the Messages
Button. You will have the option of selecting a predefined message from the Predefined
Messages pop-up window or browsing your files for a message (if allowed). Select the
message then click on the Send Button. Your message will be heard at the selected station.
o To send a message to a group of sub stations, select either a group of units from the Sub
Station Location List or a predetermined group from the Paging Group List, then click on the
Messages Button. You will have the option of selecting a predefined message from the
Predefined Messages pop-up window or browsing your files for a message (if allowed). Select
the message then click on the Send Button. Following the pre-tone, your message will be
heard at the selected group(s) of stations.
Pg. 18

12. Hardware Configuration
12.1 Accessing the hardware configuration from within CommuniCenter
o Right click the desired sub station in the Sub Station Location List. This will give you the
option to reset the IPW-1A, or access the settings via the program or through the browser.
o To reset the unit, click on Reset or press the R key. This will cause the sub station to
temporarily disappear from the Sub Station Location List. At the sub station, you will hear the
unit‟s IP address. Note: if the device is „In Use‟, the reset command will be ignored. Once reset,
the unit will once again appear in the Sub Station Location List.
o To access the settings via the program, click on Settings or press the S key. This will open the
Hardware Configuration Window and allow you to configure the IPW-1A.
o To access the settings via the web browser, click on Launch in browser or type the L key. This
will allow you to access the settings for the IPW-1A via the browser. You will also be able to
assign a password for the adaptor in the browser setting mode. Pg. 19
Under Type are icons that indicate what each item is:
Blue square is for a Broadcast Mode intercom
Red circle is for another PC running CommuniCenter
Blue circle with symbol is for Direct Mode intercoms
Note: See page 23 A.2 for Direct Mode configuration.
11. Icon Descriptions
Under S.I. are icons showing the status of
each Sensor Input:
Sensor Input normal
Sensor Input closure detected

Pg. 20
12.2 Adaptor Configuration via the program
Expand the General section to see the
MAC address for the IPW-1A adaptor.
You will also be able to assign the ID
number and Location Name for each
adaptor here. Show offline determines
whether the IPW-1A should remain in the
CommuniCenter intercom list, even if it
becomes disconnected or unreachable.
Expand the Network section to set the
network settings for each IPW-1A. You
can enable or disable different IP address
grabbing protocols, change the UDP port
the system uses, and enable SonicIP
which announces the IP address upon
“power on”.
Expand the Audio section to adjust the
quality (bandwidth settings) of the audio
as well as the speaker volume and
microphone gain, and to enable or disable
the pre-tone at the substation.
Expand the Relay Control section to set
the functionality of the relay and the
release duration of the relay. The release
duration will only be selectable if the relay
functionality is set to „Door Release‟.
Expand the Factory Defaults section if
the need arises to reset the IPW-1A
adaptor to factory default settings.
The relay function of the IPW-1A can also
be configured to release on talking,
release on connected, or release on
calling. Configuring the relay for any of
these functions will disable the “key” (door
release) option from the software for that
particular adaptor.
Table of contents
Other Aiphone Software manuals
Popular Software manuals by other brands

Adobe
Adobe 27510753 - InDesign CS2 - PC manual

Videonics
Videonics AB-1 Edit Suite user guide

Enterasys
Enterasys Netsight user guide

Omron
Omron CX-PROGRAMMER 5.0-FUNCTION BLOCK OPERATION Operation manual

Altigen
Altigen Advanced Call Router manual

Samsung
Samsung Data Migration 1.0 Introduction and installation guide