manuals.online logo
Brands
  1. Home
  2. •
  3. Brands
  4. •
  5. Air Hogs
  6. •
  7. Toy
  8. •
  9. Air Hogs Dominator User manual

Air Hogs Dominator User manual

Other Air Hogs Toy manuals

Air Hogs SUPERNOVA Manual

Air Hogs

Air Hogs SUPERNOVA Manual

Air Hogs Sharpshooter Quickdraw Manual

Air Hogs

Air Hogs Sharpshooter Quickdraw Manual

Air Hogs Thunder Strike Manual

Air Hogs

Air Hogs Thunder Strike Manual

Air Hogs 360 Hoverblade User manual

Air Hogs

Air Hogs 360 Hoverblade User manual

Air Hogs RC Fire Wing User manual

Air Hogs

Air Hogs RC Fire Wing User manual

Air Hogs FURY JUMP JET User manual

Air Hogs

Air Hogs FURY JUMP JET User manual

Air Hogs DropStrike Manual

Air Hogs

Air Hogs DropStrike Manual

Air Hogs Tow Mate Manual

Air Hogs

Air Hogs Tow Mate Manual

Air Hogs AXIS 200 User manual

Air Hogs

Air Hogs AXIS 200 User manual

Air Hogs Star Wars User manual

Air Hogs

Air Hogs Star Wars User manual

Air Hogs Lightning McQueen Manual

Air Hogs

Air Hogs Lightning McQueen Manual

Air Hogs AH Robo Copter Recon User manual

Air Hogs

Air Hogs AH Robo Copter Recon User manual

Air Hogs Air Hogs Skywinder User manual

Air Hogs

Air Hogs Air Hogs Skywinder User manual

Air Hogs EJECTOR JET Manual

Air Hogs

Air Hogs EJECTOR JET Manual

Air Hogs Jetscream User manual

Air Hogs

Air Hogs Jetscream User manual

Air Hogs Air Hogs RC Sky Patrol Helicopter User manual

Air Hogs

Air Hogs Air Hogs RC Sky Patrol Helicopter User manual

Air Hogs F/A-18 Hornet User manual

Air Hogs

Air Hogs F/A-18 Hornet User manual

Air Hogs Micro Havoc Heli User manual

Air Hogs

Air Hogs Micro Havoc Heli User manual

Air Hogs Sharpshooter Manual

Air Hogs

Air Hogs Sharpshooter Manual

Air Hogs Jet Set Manual

Air Hogs

Air Hogs Jet Set Manual

Air Hogs Storm Launcher Pro Series User manual

Air Hogs

Air Hogs Storm Launcher Pro Series User manual

Air Hogs Havoc Heli Manual

Air Hogs

Air Hogs Havoc Heli Manual

Air Hogs Air Hogs Triple Booster User manual

Air Hogs

Air Hogs Air Hogs Triple Booster User manual

Air Hogs Hover assault Manual

Air Hogs

Air Hogs Hover assault Manual

Popular Toy manuals by other brands

FUTABA GY470 instruction manual

FUTABA

FUTABA GY470 instruction manual

LEGO 41116 manual

LEGO

LEGO 41116 manual

Fisher-Price ColorMe Flowerz Bouquet Maker P9692 instruction sheet

Fisher-Price

Fisher-Price ColorMe Flowerz Bouquet Maker P9692 instruction sheet

Little Tikes LITTLE HANDIWORKER 0920 Assembly instructions

Little Tikes

Little Tikes LITTLE HANDIWORKER 0920 Assembly instructions

Eduard EF-2000 Two-seater exterior Assembly instructions

Eduard

Eduard EF-2000 Two-seater exterior Assembly instructions

USA Trains EXTENDED VISION CABOOSE instructions

USA Trains

USA Trains EXTENDED VISION CABOOSE instructions

Modellbau Laffont Z1601 Assembly instructions

Modellbau Laffont

Modellbau Laffont Z1601 Assembly instructions

NOCH 12905 instruction manual

NOCH

NOCH 12905 instruction manual

Eduard Ki-61-Id quick start guide

Eduard

Eduard Ki-61-Id quick start guide

Viessmann Vollmer 45616 Mounting instruction

Viessmann

Viessmann Vollmer 45616 Mounting instruction

Vollmer 42004 Mounting instruction

Vollmer

Vollmer 42004 Mounting instruction

Phoenix Model CLASSIC-EP instruction manual

Phoenix Model

Phoenix Model CLASSIC-EP instruction manual

H-KING Sopwith Camel British WW1 Fighter instruction manual

H-KING

H-KING Sopwith Camel British WW1 Fighter instruction manual

MODSTER Predator 4x4 Crawler user manual

MODSTER

MODSTER Predator 4x4 Crawler user manual

DHK Hobby 8136 User instruction manual

DHK Hobby

DHK Hobby 8136 User instruction manual

THUNDER TIGER Raptor 50 V2 kit manual

THUNDER TIGER

THUNDER TIGER Raptor 50 V2 kit manual

Timberkits Skateboarder instructions

Timberkits

Timberkits Skateboarder instructions

Hangar 9 Funtana 125 Assembly manual

Hangar 9

Hangar 9 Funtana 125 Assembly manual

manuals.online logo
manuals.online logoBrands
  • About & Mission
  • Contact us
  • Privacy Policy
  • Terms and Conditions

Copyright 2025 Manuals.Online. All Rights Reserved.

Charge
Rod Charger-Controller
Button
Toggle
Charge
Door
Charge
Button
BATTERY INSTALLATION
Six
1.5-Volt
AA
Batteries
Battery
Compartment
Battery
Door 1. Use a Phillips screwdriver to unscrew
and remove the battery door.
2. Install six 1.5-Volt AA alkaline
batteries (not included). Be careful to
align the positive (+) and negative (–)
polarities with the corresponding
markings inside the battery
compartment.
3. Reinstall the battery door and tighten
the screw.
Indicator Light
CHARGER-CONTROLLER
Slide
Door
Open
PRE-FLIGHT ENVIRONMENT CHECK
1. Location – Fly in a large, wide-open, grassy location that is free of buildings, trees, overhead wires, and other obstructions. Do not fly near people or animals.
2. Weather – Fly on mild, sunny days. Do not fly in electrical storms, rain, sleet, snow, or other adverse weather conditions. Do not fly if the temperature is below
45°F/7°C. In very cold temperatures, the plane will become fragile and the engine performance will decrease.
3. Wind Conditions – Do not fly in wind. Winds may overpower the plane and make it difficult to control. In windy conditions, it may appear as though you have
no control over the plane.
Charge the plane’s internal batteries for 4 minutes. Note: If you notice your flight time decreasing over time, you may increase the charge
time up to 8 minutes for better performance. Never charge more than 8 minutes or you may burn out the batteries.
FLYING INSTRUCTIONS
CHARGING
INSTRUCTIONS
Experience radio-controlled (R/C) flight micro-sized with
the AIR HOGS™ R/C DOMINATORTM! The DominatorTM
makes flying easy! Just choose the direction you want to
fly, and press the controller toggle. The DominatorTM has
full-function radio control so you can control up, down,
left or right. The DominatorTM is powered by 2 motors and
is made of damage-resistant, high-density foam. The
DominatorTM also features an integrated charger-controller
unit for convenient portability and easy handling on the
field. Take flight and master the skies!
PLEASE REFER TO INSTRUCTIONS BEFORE FLYING.
TM
1Push the plane’s
ON/OFF switch
backwards to set
the plane to OFF.
4Push Charge Rod into the
Plane’s Charge Port,
located in the bottom of
the airplane.
2
Set the Charger-
Controller to
CHARGER ON.
8
3Slide the Charge
Door open to reveal
the Charge Rod.
Check to make sure contents are complete:
1 DominatorTM
1 Charger-Controller 1 Instruction Manual
5Indicator
Light
Press the Charge
Button to start
charging. During
charging, the
Indicator Light will
Blink Red. The
charge cycle will
be completed in
4 minutes.
7Indicator
Light
When charging
is complete,
the Indicator
Light will turn
GREEN.
REV 2 – Timer
9
Remove
DominatorTM
gently from the
Charge Rod
and close the
Charge Door.
Because the Dominator’s AA batteries are used for 2 functions, charging and controlling,
they will need to be replaced after every 20 flights.
Face against the wind and launch
the plane parallel to the ground.
5
4
Push Switch forward
to turn ON plane.
ON/OFF
Switch
3
Set the Charger-Controller
Switch to CONTROL ON
to start the plane’s
engines (the Indicator
Light will turn
green).
1
DOUBLE-CHARGE
the plane on your
FIRST FLIGHT of the
day (total 8 minute charge).
For all OTHER FLIGHTS,
CHARGE ONLY ONCE.
6If the Dominator™
disconnects (falls off)
the Charge Rod
during charging, put it back
onto the Charge Rod and
re-press the Charge Button
to restart charging.
Screw in
Controller
Antenna.
2
Fully
extend
Controller
Antenna.
TM
BATTERIES
IMPORTANT BATTERYINFORMATION: • Battery installation should be performed by an adult. • Use only batteries recommended in this instruction manual. • Be careful to install the
batteries with the correct polarity, as indicated. • Do not mix old and new batteries. • Do not mix alkaline, standard, rechargeable, or different types of batteries. • Different types of
batteries or new and used batteries are not to be mixed. • Do not use rechargeable batteries. • Non-rechargeable batteries are not to be recharged. • Rechargeable batteries are to be
removed from the toy before being charged (if removable). • Rechargeable batteries are only to be charged under adult supervision (if removable). • Only batteries of the same or
equivalent type as recommended are to be used. • The supply terminals are not to be short-circuited. • Exhausted batteries are to be removed, as they will adversely affect the
performance. DominatorTM takes six 1.5-Volt AA Batteries (not included). CAUTION: Do not dispose of battery in fire. Battery may explode or leak.
CAUTION: Changes or modifications to this product not expressly approved by the party responsible for compliance may void the user’s authority to operate the equipment.
Email us at toys@spinmaster.com or call our friendly flight technicians toll free at 1-800-622-8339
Spin Master Ltd.
450 Front St. West
Toronto, ON M5V 1B6 Canada
200 5th Avenue, Showroom 500
New York, NY 10010 USA
Phone 1-800-622-8339 Fax: 416-364-8005
Web: www.spinmaster.com
Email: toys@spinmaster.com
Air Hogs TM and Dominator TM are trademarks
of Spin Master Ltd.
© 2004 Spin Master Ltd. All rights reserved.
Manufactured for and distributed by Spin Master Ltd.
Conforms to safety standards ASTM F963-03,
EN71 Regulatory Requirements.
Products and colors may vary. MADE IN CHINA.
Asst. #44053 U.S. English REV 2
FCC REQUIREMENT
To preserve battery power, your Dominator's controller-charger will automatically shut off after 15 minutes without use. To re-activate it, simply move the toggle or press the "CHARGE" button.
AUTOMATIC SHUT OFF
QUESTIONS?
TROUBLE SHOOTING GUIDE
TM
IMPORTANT SAFETY INFORMATION
Keep plane from face, eyes and hair at all times. Keep fingers away from the moving propellers. Do not launch plane near other people or animals. Use caution, make sure people
around you know that you are playing with the DOMINATORTM. Recommended for use in large, wide-open, grassy areas. Do not fly near overhead wires, buildings, trees, or other
obstructions. Be sure to fly on a clear sunny day. Do not fly in WIND. Flying in wind will severely diminish your ability to control the airplane. In some situations, where the wind
is very strong, the wind may overpower the airplane and you will not be able to control it. Do not fly in adverse weather conditions such as electrical storms, rain, sleet or snow. Do not
fly in temperatures below 45OF/ 7OC. Do not fly in temperatures above 113OF/45OC. For charging, use ONLY the charger provided in this package. Do not use any other source to charge
the DOMINATORTM. Do not overcharge your airplane. Follow the charging instructions provided in the instruction manual contained within this package.
PROBLEM
Plane will not start
or has low power.
Plane will not turn.
Plane is flying too low.
Plane is flying too high.
CAUSE
1. Plane not charged.
2. Battery power is drained.
3. Plane was not set to OFF during charging.
4. Charger-controller was not set to
CHARGER ON.
1. Controller is not set to CONTROL ON.
2. Controller antenna is not extended.
3. It is a windy day.
4. Airplane antenna not uncoiled.
1. Needs more power.
2. The 6 AA batteries in the
Charger-Controller are drained.
1. Need to decrease power.
SOLUTION
1. Charge plane for 4-8 minutes (see Charging).
2. You will need to replace the charger-controller’s batteries after 20 flights.
3. The plane will not accept a charge in the ON position. Always set to OFF before charging.
4. The charger-controller will NOT charge in the CONTROL ON position. Always set the charger-
controller to CHARGER ON before attempting to charge.
1. Set controller to CONTROL ON.
2. Fully extend Controller antenna before flying.
3. Do not fly in winds. Windy conditions will limit and may prevent your ability to
control the plane.
4. Uncoil airplane antenna.
1. Press the toggle UP.
2. Install new batteries.
1. Press the toggle DOWN.
Contains NiMH battery pack.
Battery pack must be recycled
or disposed
of properly.
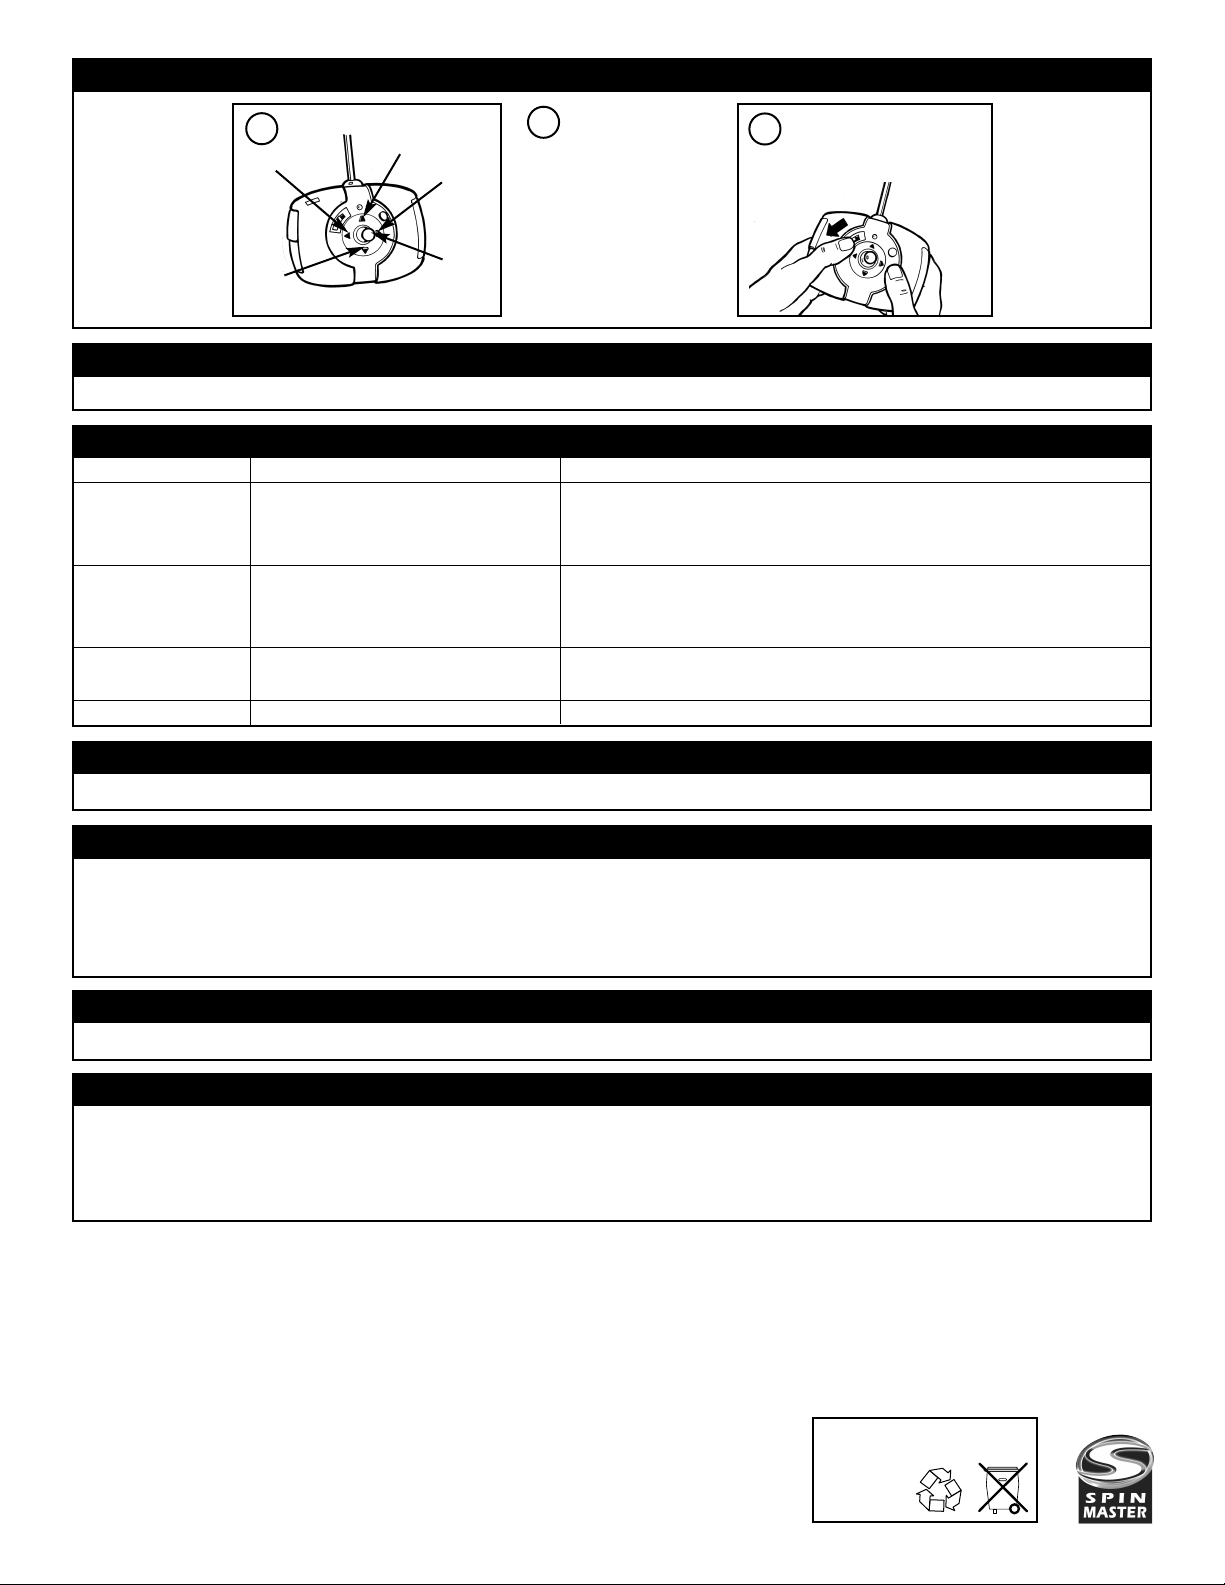
FLYING INSTRUCTIONS continued
To land, select a soft
grassy area,and press
the toggle DOWN.
Once the plane has landed,
turn the controller to
CHARGER ON, to stop the
propellers from spinning.
8
Up
Down
Right
Left
Toggle
67
Control Airplane Flight.