manuals.online logo
Brands
  1. Home
  2. •
  3. Brands
  4. •
  5. Air King
  6. •
  7. Portable Generator
  8. •
  9. Air King VS80 User manual

Air King VS80 User manual

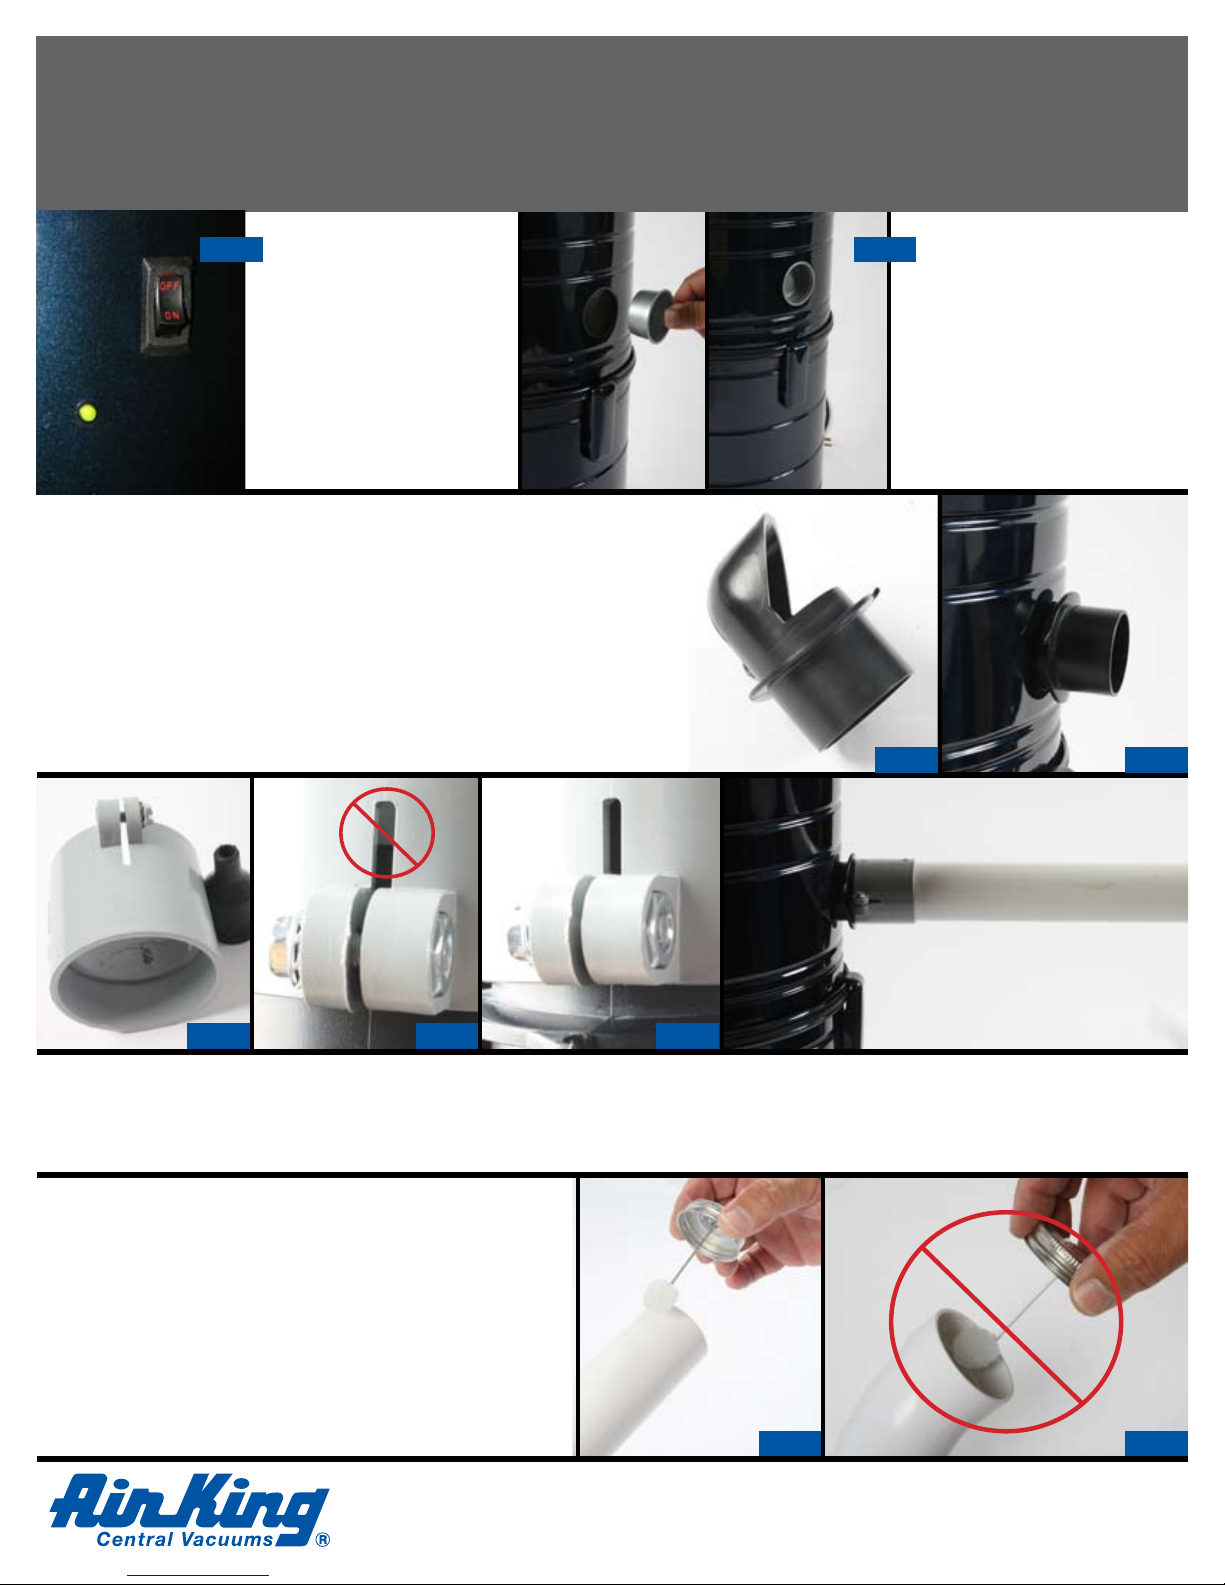
Once the entry port collar is in place you are free to
connect, glue, the piping system from your home to
the vacuum. Be sure to apply solvent to a clean cut
end pipe end not to the inside of the clamp collar
to prevent adhesive from entering the throat of the
piping system. (See Pictures # 8, # 9)
Your VS80 power unit is de-
signed to permit either a right
hand or left hand connection to
the piping system from your home
to make connection to the system
as easy as possible. Once the
preferred entry point is selected
move the plug to the opposite side
of the machine and push firmly
into place. (See Picture # 2)
Inverted bag systems: permit the use of the vacuum without the need for the added expense and
servicing associated with the secondary filtration associated with a paper bag. Your VS80 is designed for cyclonic
separation of the debris and equipped with a self cleaning inverted filter which acts to protect the motor. The de-
bris is collected in the plastic can liner which makes cleaning of the dust bin easy, clean, and convenient.
Select the inverted bag entry port ( Picture # 3 ). You will notice there
is a curved surface which is designed to follow the contours of the
machine. Press the deflector end of the entry port through the side
of the machine until the contoured surface seats firmly against the
side of the bin. ( Picture #4 ). It is not necessary to use glue or a fas-
tener as the design of the entry port will seat firmly inside the VS80
machine creating a suitable seal.
pIc. 3 pIc. 4
When connecting the piping system to the VS80 power unit utilize the clamp collar ( Picture # 5 ). Important: Do not glue the clamp
collar to the machine. Press the screw clamp end of the clamp collar onto the inverted bag entry port. Be sure to press it on until the
gap in the collar is completely closed off by the by the entry port stem. ( Picture # 6 ) and ( Picture # 7 ). Once in place tighten the clamp
collar until firmly seated to the entry port collar.
Important: To reduce
the risk of unintentional
operation of your power unit
setup of your VS80 power unit
should be performed with
the unit disconnected from
any power source. This can
be confirmed by verifying he
power unit LED is unlit. (See
Picture # 1)
pIc. 5 pIc. 6 pIc. 7
pIc. 2pIc. 1
pIc. 8 pIc. 9
Corporate Headquarters for United States division:
820 Lincoln Avenue • West Chester, PA 19380
Ph. 800.465.7300
Website: www.airkinglimited.com #F51069
Connect the low
volt wire from your
piping system to the
two spade crimp
connectors on the
side of the machine.
(Picture # 15)
pIc. 13 pIc. 14
Your VS80 power unit is supplied with a 12” muffler ( Picture # 10 ) and a 45 degree spigot coupling that is to be connected in line to the air
discharge port at the top of your VS80 power unit. Push the 45 degree spigot coupling onto the exhaust port at the top of The VS80 ma-
chine. Important: Do not glue this coupling in place. ( Picture # 11-12 )
pIc. 10
pIc. 15
Corporate Headquarters for United States division:
820 Lincoln Avenue • West Chester, PA 19380
Ph. 800.465.7300
Website: www.airkinglimited.com
Inverted bag systems contInued:
pIc. 11 pIc. 12
You can then connect the muffler directly to the spigot
end of the coupling or use a 90 degree sweep to direct
the exhaust and muffler up from the machine further
dampening noise. ( Picture # 13 ) ( Picture # 14 )
16
Once your VS80 power unit is fully installed connect the
power to the machine. You can confirm the unit is powered
by the activation of the LED on the side of the machine. You
can confirm machine operation by using the on-off switch
located near the top of the power unit ( Picture # 16 ). Note:
The power switch on the side of the unit is wired for opera-
tion of the machine independent of the low volt wiring circuit
to permit machine operation should a fault occur in your low
volt wiring circuit or the related control board and you are
waiting for service.
Check each valve in the home to insure system activation through your hose and the system operates as intended.

Other manuals for VS80

1

Other Air King Portable Generator manuals

Air King ESSEV28 User manual

Air King

Air King ESSEV28 User manual

Air King VS80 User manual

Air King

Air King VS80 User manual

Popular Portable Generator manuals by other brands

Anritsu MP1763C Service manual

Anritsu

Anritsu MP1763C Service manual

Honeywell HW4000L - Portable Generator Specification sheet

Honeywell

Honeywell HW4000L - Portable Generator Specification sheet

iPower SUA10000EC quick start guide

iPower

iPower SUA10000EC quick start guide

GT POWER GT3500SE operating instructions

GT POWER

GT POWER GT3500SE operating instructions

Rosendahl nanosyncs HD instruction manual

Rosendahl

Rosendahl nanosyncs HD instruction manual

Desa Reddy RGH3000 OWNER'S OPERATION AND INSTALLATION MANUAL

Desa

Desa Reddy RGH3000 OWNER'S OPERATION AND INSTALLATION MANUAL

iPower GXS6600RD quick start guide

iPower

iPower GXS6600RD quick start guide

Firman W03386 Operator's manual

Firman

Firman W03386 Operator's manual

Tektronix TG700 instructions

Tektronix

Tektronix TG700 instructions

AVS Electronics FOGGY 30 manual

AVS Electronics

AVS Electronics FOGGY 30 manual

ETQ TG32P31 owner's manual

ETQ

ETQ TG32P31 owner's manual

THORLABS S1FC635PM user guide

THORLABS

THORLABS S1FC635PM user guide

CHICAGO 66604 Set up, operating, and servicing instructions

CHICAGO

CHICAGO 66604 Set up, operating, and servicing instructions

Champion 73535i Owner's manual & operating instructions

Champion

Champion 73535i Owner's manual & operating instructions

DUROMAX DUAL FUEL XP13000EH user manual

DUROMAX

DUROMAX DUAL FUEL XP13000EH user manual

GMC YUKON 3500 owner's manual

GMC

GMC YUKON 3500 owner's manual

Fortinet FortiToken 200BCD quick start guide

Fortinet

Fortinet FortiToken 200BCD quick start guide

Shure A15TG user guide

Shure

Shure A15TG user guide

manuals.online logo
manuals.online logoBrands
  • About & Mission
  • Contact us
  • Privacy Policy
  • Terms and Conditions

Copyright 2025 Manuals.Online. All Rights Reserved.