Air Techniques VistaCam Omni IC4 User manual

MANUAL
TM

2
SAFETY INSTRUCTIONS ................................................................................................................. 4
WARRANTY ........................................................................................................................................ 4
CONGRATULATIONS ....................................................................................................................... 5
READ THIS BEFORE YOU USE YOUR VISTACAM OMNI ic 4 ............................................... 6
PRE-INSTALLATION CHECK......................................................................................................... 7-8
OPERATION ........................................................................................................................................ 9-20
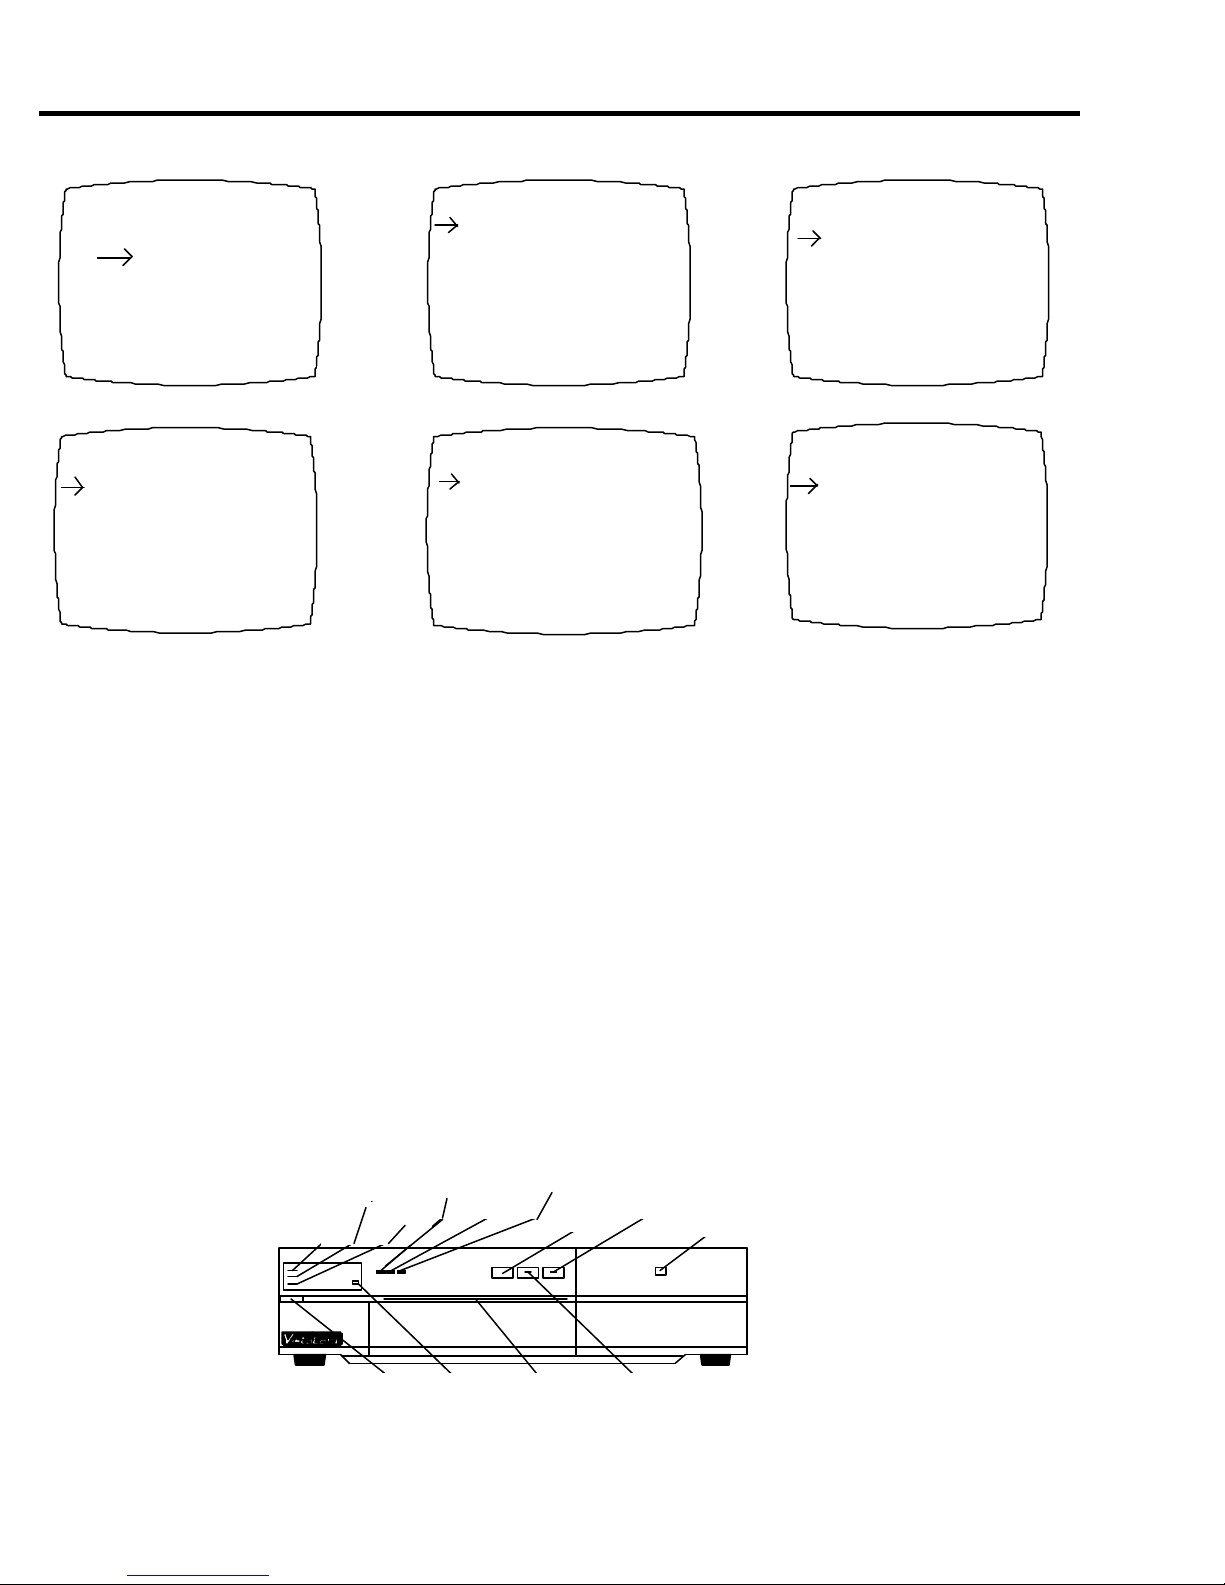
1. POWER ON ................................................................................................................................. 9
2. THE HANDPIECE....................................................................................................................... 10
nInfection control sheath ........................................................................................................ 10
nTo detach / attach the lens .................................................................................................... 10
3. MULTI-FUNCTION FOOTSWITCH - OVERVIEW ............................................................... 11-12
4. BEFORE CAPTURING AN IMAGE (FORMAT AND SELECT)............................................. 13-14
5. CAPTURE AN IMAGE (MEMORY AND MONITOR) ............................................................ 15
6. PRINT .......................................................................................................................................... 16-17
nCart, Counter-Top or Wall-Mounted System....................................................................... 16
nMulti-Operatory Installation (w/o wiring) ............................................................................ 16
nMulti-Operatory Network w/QDA ....................................................................................... 17
INSTALLING / CHANGING THE VIDEO PRINT KIT ............................................................... 18
THE 0° FULL FACE PORTRAIT LENS ........................................................................................ 19
CLEANING / MAINTENANCE
nCleaning - all components ..................................................................................................... 20
nLamp Replacement ............................................................................................................... 20
MAJOR COMPONENTS .................................................................................................................... 21-29
VISTACAM OMNI ic 4 - PN 78400
nQuick Disconnect - Detach/Attach Camera and Docking Station ........................................ 21
n3 Position Handpiece Holder ................................................................................................ 22
nTransporting The Camera ..................................................................................................... 22
nInstallation Connections ........................................................................................................ 22
TABLE OF CONTENTSTABLE OF CONTENTS

3
TABLE OF CONTENTSTABLE OF CONTENTS
MAJOR COMPONENTS (cont.)
IMAGE PRINTER - PN 77300
nControl Buttons; Indicator Lights ................................................................................... 23
nInside the Control Cover................................................................................................. 23
nInstallation Connections .................................................................................................. 23
nTrouble Shooting - Paper or Ink Cartridge ..................................................................... 24
13" MONITOR (WHITE) PN 77310
nFront Panel Controls ....................................................................................................... 25
nInstant-On Feature .......................................................................................................... 25
nInstallation Connections .................................................................................................. 26
nTo Access Main Menu .................................................................................................... 27
nTo Adjust The Picture..................................................................................................... 27
nTo Set the Input Selection .............................................................................................. 28
nTo Adjust the Set-Up ...................................................................................................... 28
13" AND 20" BLACK WITH TUNER PN 77723; PN 77719................................................... 28
QUEUING DISTRIBUTION AMPLIFIER PN 78724 & PN 78724-1..................................... 29
INSTALLATION .......................................................................................................................... 30-35
nCart or Counter-top System ........................................................................................... 30-31
nMulti-Operatory Installation (w/o wiring) ...................................................................... 32-33
nMulti-Operatory Network w/QDA ................................................................................. 34-35
SYSTEM COMPONENTS ............................................................................................................ 36-39
WALL MOUNT KIT PN 78776 ................................................................................................... 40

4
SAFETY INSTRUCTIONSSAFETY INSTRUCTIONS
CAUTION: TO REDUCE THE RISK OF ELECTRICAL SHOCK, DO NOT REMOVE THE COVER OF THE
VISTACAM OMNI CAMERA, DOCKING STATION, IMAGE PRINTER, MONITOR OR QUEUING
DISTRIBUTION AMPLIFIER. THERE ARE NO USER-SERVICEABLE PARTS INSIDE. SERVICING
SHOULD BE PERFORMED BY QUALIFIED PERSONNEL.
WARNING: TO PREVENT FIRE OR ELECTRICAL SHOCK, DO NOT EXPOSE THESE APPLIANCES TO RAIN
OR MOISTURE.
ATTENTION USERS:
This symbol alerts the user
that important Operating and
Maintenance instructions
have been included with the
unit. Read carefully to avoid
any problems.
This symbol warns the user
that uninsulated voltage within
the unit may be of sufficient
magnitude to cause electric
shock. It is dangerous to make
any kind of contact with any
inside part of the unit.
!
AIR TECHNIQUES WARRANTY
This Air Techniques equipment is warranted to be free from defects in material and workmanship from
the date of installation for a period of twelve months.
Any item returned to our factory in Hicksville, New York, through an Air Techniques’ Authorized
Dealer, will be repaired or replaced at our option at no charge provided that our inspection shall
indicate it to have been defective. Dealer labor, shipping and handling charges are not covered by this
warranty.
This warranty does not apply to damage due to shipping, misuse, careless handling or repairs by other
than authorized service personnel. Warranty void if installed or serviced by other than authorized Air
Techniques’ Dealer service personnel. Air Techniques, Inc. is not liable for indirect or consequential
damage or loss of any nature in connection with this equipment.
This warranty is in lieu of all other warranties expressed or implied. No representative or person is
authorized to assume for us any liability in connection with the sale of our equipment.

5
CONGRATULATIONSCONGRATULATIONS
You have purchased the VistaCam Omni ic 4, the latest camera that is the heart of the VistaCam video
imaging product line from Air Techniques, a leading manufacturer of dental equipment since 1962.
The VistaCam Omni ic 4 consists of a camera and handpiece unit with integral image capture capabilities,
and a Docking Station with power supply, lamp and fan. The lightweight camera easily detaches from the
Docking Station and can be transported among operatories, making it a versatile addition that can grow
with your practice. Start with a single cart or counter-top system and, as your practice and your require-
ments grow, add cameras, Docking Stations, monitors, a printer with footswitches, etc. You can even
integrate your VistaCam video imaging system as part of your computerized practice management software
system.
This manual covers the operation and installation of:
n Cart, Counter-Top or Wall-Mount System
nMulti-Operatory Installation w/o Interoperatory Wiring
nMulti-Operatory Network with QDA (Queuing Distribution Amplifier)
We suggest you retain this manual and familiarize yourself with the operation of the VistaCam Omni ic 4
and the system components. For product support and information on how to expand your installation set-
up, contact your professional authorized Air Techniques dealer.

6
READ THIS BEFORE
YOU USE YOUR VISTACAM OMNI ic 4
nThe OPERATION section of this manual covers three installation scenarios:
1. Cart, Counter-Top or Wall-Mount System
2. Multi-Operatory Installation w/o interoperatory wiring
3. Multi-Operatory Network with QDA (Queuing Distribution Amplifier)
nFor all installation scenarios, follow these steps:
1. See PRE-INSTALLATION CHECK and INSTALLATION SCHEMATICS to make
sure your system is installed correctly.
2. Review 1. POWER ON and 2. HANDPIECE.
3. See 3. - 6. to capture and print an image.
For more detailed information about VistaCam Omni ic 4 system components, see the
Major Components section of this manual.
IMPORTANT
For VISTACAM OMNI ic 4 users
The VistaCam Omni ic 4 camera design incorporates a battery pack with a
two hour capacity to “hold” a captured image in memory when the camera is
detached from the Docking Station.When using the VistaCam Omni ic 4 for the
first time turn on the power to the VistaCam Omni ic 4 and leave on a
minimum of 12 hours to make sure the battery is fully charged.
When the camera is attached to the Docking Station and the AC power is on,
the battery is constantly recharging.

7
nTEST SET-UP
To check the printer status connect
an S-Video cable from the printer
S-Video output to the monitor S-Video
input. (See Fig. 1)
nDISPLAY STATUS MENU
PRINT MODE NORM
V.GAMMA
PRINT COUNT 1
ONE TOUCH PRINT OFF
MEMORY FRAME
MULTI MODE OFF
PICTURE ADJ
INPUT S
TO
OPEN
MENU
SUB MENU SELECT (+/-)
PICTURE
INPUT
FIG. 3
INSIDETHE
CONTROLCOVER:
FIG. 2
STATUS INDICATOR MENU
For the VistaCam Omni ic 4, the Image Printer is factory pre-set for a SINGLE image to appear on
the monitor and pre-set to produce printouts with the same color fidelity as appears on the monitor.
Since proper Image Printer set-up is critical, we recommend the following PRE-INSTALLATION
checks for optimum system performance.
PRE-INSTALLATION CHECKPRE-INSTALLATION CHECK
FIG. 1
A. Press DISPLAY on the front of the printer.
The status indicator menu that appears on the
monitor should match Fig. 2.
1. If the last line of the menu reads INPUT VIDEO,
open the cover on the front of the printer and
press the INPUT button to change it to INPUT S.
(See Fig. 3)
2. If other elements of the status indicator menu do
not match Fig. 2, open the cover on the front of
the printer (see Fig 3) to reset the SUB MENUS.
B. To reset the SUB MENUS:
1. Press MENU then press SUB MENU to review
each setting and compare the screen display to
the FACTORY PRE-SET SUB MENUS on
the next page. (See Fig. 4A-F)
2. If a sub menu needs to be re-set, press
MENU repeatedly to move the arrow to the
correct line position.
3. Press SUB MENU. Press SUB MENU
again to move the arrow to the setting to
be changed.
4. Press SELECT +/- to change the setting.
5. Press MENU to return to the status
indicator menu.
6. Press DISPLAY on the front of the
printer to clear the screen.
NOTE: This procedure need only be done once to
make sure that settings match the
FACTORY PRE-SET SUB MENUS.
Once set, settings do not change.

FIG. 4 - FACTORY PRE-SET SUB MENUS
MENU
1. PRINT MODE
2. MULTI MODE
3. PRINT AREA
4. OPTION
5. CLEAR S
4. OPTION
OPERATE INIT ON
FRAME COLOR W
MULTI AREA STD
SWITCH SEL MULTI
INPUT
5. CLEAR
MEMORY CLEAR NO
BACKUP CLEAR NO
INPUT S
2. MI MODE
MULTI OFF
INPUT
8
S
FIG. 4D
1. PRINT MODE
®®
PRINT COUNT 1
MIRROR OFF
NEGA OFF
GAMMA VIDEO
ONE TOUCH PRINT OFF
PRINT QUALITY NORM
PRINT RESOL NORM
INPUT S
3. PRINT AREA
AREA ADJ OFF
TOP 20
BOTTOM 483
LEFT 26
RIGHT 745
INPUT S
FIG. 4A FIG. 4B FIG. 4C
FIG. 4F
S
FIG. 4E
PUSH-
OPEN
FIELD
FRAME
MEMORY PRINT
PAPER
READY INK
OPERATE DISPLAY PAPER
DISCHARGE MONITOR
SELECT
FIG. 5
PRINTER FRONT CONTROL PANEL
PRE-INSTALLATION CHECKPRE-INSTALLATION CHECK
nMONITOR LIGHT
Press the MONITOR button located on the front of the printer to turn the MONITOR
light OFF. (See Fig. 5)
nFRAME MODE
Press the FRAME button located on the front of the printer. (See Fig. 5)
n CONNECT PRINTER FOR USE
A. Remove the cable connected in TEST SET-UP.
B. Review the INSTALLATION schematics in this manual to properly connect the printer
and monitor for normal use.

9
VISTACAM OMNI ic 4
KEY PARTS IDENTIFICATION
FIG. 6
OPERATIONOPERATION
(CAM
ONLY) (OFF) (ON)
FIG. 7 ROCKER SWITCH CONTROLS
nIf all components share a single power source, turn ON the power source. All components on a
VistaCam cart system are plugged into a power strip with an ON/OFF switch. Turn the switch to the
ON position. The light on the ON/OFF switch illuminates. If components are plugged into separate
wall outlets, turn ON the power at the outlet.
nBe sure individual system components are ON:
A. When the rocker switch (see Fig. 7) on the VistaCam Omni ic 4 is put in the ON or CAMERA
ONLY position, the red indicator light illuminates.
B. When the monitor is turned ON, Video 3 is briefly displayed. When the camera is also in the ON
position, an icon appears in the lower right hand corner of the black screen, indicating that the
camera is set in the SINGLE image format. If the camera is set in the QUAD format, an on-screen
frame appears in the upper left hand portion of the screen.
-If the monitor does not display VIDEO 3, it is not in the correct input mode. Reset the input
selection found on the monitor control panel. (See MONITOR OPERATION; To Set the Input
Selection)
-The monitor is factory pre-set to automatically turn ON when AC power is connected. If the
POWER button on the front panel must be pressed to turn ON the monitor, reprogram the
monitor with the INSTANT ON feature. (See MAJOR COMPONENTS; 13" MONITOR)
1. POWER ON
HANDLE
ROCKER
SWITCH
HANDPIECE
HOLDER
DOCKING
STATION
INDICATOR LIGHT
90°
LENS
UMBILICAL
CAMERA

OPERATIONOPERATION
10
To detach / attach the lens (See Fig. 9)
A. Detach the lens from the handpiece / umbilical
assembly by pulling the quick release collar
back with one hand, then pulling the lens off
with the other hand.
B. Attach the lens by pulling back the quick
release collar, then align the pin on the
handpiece / umbilical assembly with the
hole in the lens assembly, fit the two together,
and PUSH THE COLLAR FORWARD
UNTIL THE LENS IS LOCKED IN PLACE.
2.THEHANDPIECE
nWhen the rocker switch is in the ON ( ) position, the fiber optic light source (lamp) turns
on automatically when the handpiece is removed from the handpiece holder. When the handpiece is
returned to the handpiece holder, the light source turns OFF automatically and the camera remains
ON. This auto activated feature prolongs the life of the lamp. (REMINDER: REMOVE THE
BLACK PLASTIC CAP FROM THE HANDPIECE TIP BEFORE USING.)
When imaging an x-ray on a lightbox or a full facial image with the full face portrait lens, deactivate
the light source by putting the rocker switch in the CAMERA ONLY ( ) position. Also use
CAMERA ONLY when an outside light source is being used.
FIG. 8
B DC
LIGHT PLASTIC
(LAYER2)
PLASTIC
(LAYER 1)
PAPER
(LAYER 4)
A
SQUEEZE
PLASTIC
(LAYER1)
90°
LENSw/
HANDPIECE
SHEATH
PINMATES
WITHHOLE
ONLENS
90°LENS
PULLBACK
FIG. 9
A. Remove the handpiece from the handpiece holder. Insert the handpiece tip between the second
and third (attached to the paper layer) plastic layers with the light pointing towards the paper
layer. The optically clear section can only be accessed with the light pointed down toward the
paper.
B. Push the handpiece completely in until the tip is fully inserted into the narrow tip of the sheath.
C. Gently squeeze the illuminated tip of the handpiece between the thumb and index finger to
ensure that the clear plastic area of the sheath is flat against the lens tip.
D. Peel away and discard the top plastic layer and the bottom paper layer.
QUICK
RELEASE
COLLAR
HANDPIECE / UMBILICAL ASSEMBLY
nInfection Control Sheath
Use a disposable infection control sheath (PN 77100) for each patient. (See Fig. 8A, B, C, D)

3.MULTI-FUNCTIONFOOTSWITCHCONTROLS-OVERVIEW
See 4., 5. & 6. for how to capture and print and image.
n FORMAT
Press to choose the 4 SINGLE image or 1 QUAD image mode.
nSELECT
-In the QUAD format, press to highlight and/or reposition the on-screen frame to 1 of
the 4 images in the QUAD. Everytime an image is captured, the on-screen frame
automatically advances to the next position.
-In the SINGLE image format, press after an image is captured to advance to the next
SINGLE image position. Note that the square within the icon shows which # image is
being captured: 1, 2, 3 or 4. (See Fig. 11B)
-To erase all stored images, press and hold the pedal down for 5 seconds. When the screen
goes "black", release the pedal. In the QUAD format, the on-screen frame appears in the
first (#1) position, (upper left hand corner, Fig. 11A). In the SINGLE image format, the
icon appears in the lower right hand corner of the screen. Note that the square within the
icon is in the #1 position. (See Fig. 11B)
nMEMORY
-Press or release, depending on the MONITOR mode, to capture an image. (See
CAPTURE AN IMAGE)
-All images are saved as full frame high resolution SINGLE images. In the QUAD format,
to view the SINGLE image, press the SELECT pedal until the desired image is highlighted
then press the FORMAT button.
-In the QUAD format, after each image is captured, the frame advances to the next position.
-In the SINGLE image format, press SELECT to advance to the next position.
nMONITOR
Press to select the preferred mode of capturing an image with the MEMORY pedal:
-View the image live then press MEMORY to capture an image
-Or press MEMORY to view the image live, then release to capture the image.
The image displayed is the memory page currently in use will be the image printed when
PRINT is pressed.
nPRINT
-Cart or counter-top system
Press to print the stored image displayed on the monitor.
-Multi-operatory installation w/o interoperatory wiring
Attach camera to Docking Station in base station. Press to print the "memorized" image
displayed on the monitor.
11
OPERATIONOPERATION
FORMAT
BUTTON
PRINT
BUTTON
MEMORY
PEDAL
MONITOR
BUTTON
SELECT
PEDAL
FIG. 10
PRINTER FOOTSWITCH

12
3.MULTI-FUNCTIONFOOTSWITCHCONTROLS
IMPORTANT NOTE FOR VISTACAM OMNI ic 4
Make sure that the Printer is set to a SINGLE image format (MULTI OFF)
in the FRAME mode, with the MONITOR OFF (green light OFF).
See PRE-INSTALLATION CHECK for how to set up the printer.
OPERATIONOPERATION
nMulti-operatory network with QDA (Queuing Distribution Amplifier)
Press to print the stored image displayed on the monitor. There is a delay of several seconds
before the printer at the base station begins processing an image to print. If PRINT is
pressed by more than one operatory at approximately the same time, the QDA receives the
print signals and sends them to the printer in the order they were received. The image is
frozen at the operatory in the VistaCam Omni ic 4 until the printer has processed all PRINT
commands received prior to this operatory's PRINT command. As soon as the printer has
received and processed the image from the operatory, the VistaCam Omni ic 4 will be
released to view other images. If the monitor in the operatory displays the icon in the lower
right corner (SINGLE image) or the frame (QUAD image), the VistaCam ic 4 is free to
capture additional images.

4. BEFORE YOU CAPTURE AN IMAGE (FORMAT AND SELECT)
nVISTACAMOMNI
The VistaCam Omni ic 4 can capture 4 SINGLE images or 4 images in a QUAD
format. NOTE: All images are captured in the FRAME or highest resolution mode.
Use the FORMAT button on the multi-function footswitch to select a SINGLE or a QUAD
image to display on the monitor screen. What is displayed on the screen will be on the printout.
Use the SELECT pedal on the footswitch to advance to the next position when in the SINGLE
image format. When in the QUAD format, use SELECT to highlight and/or reposition the on-screen
frame to retake an image.
A. To change from the QUAD format to the SINGLE image format, press the FORMAT
button on the footswitch. To change back, press again, etc.
B. In the QUAD format, every time an image is captured in memory, the on-screen frame
advances to the next position (see Fig. 11A). Every image captured in the QUAD format is also
captured as a full SINGLE image. This can be accessed by pressing the SELECT pedal until the
frame surrounds and highlights the image and then pressing FORMAT. To return to the QUAD
image, press FORMAT again.
QUAD Format - On - Screen Frame Position
C. In the SINGLE image format, up to 4 SINGLE images can be captured until an image is
"overwritten" with a new image. An icon in the lower right hand corner of the monitor
(see Fig. 11B) screen indicates which # image is being captured. To view the SINGLE captured
images in a QUAD format, press FORMAT to change to the QUAD format. To return to the
SINGLE image mode, press FORMAT again.
SINGLE Image Format Icon Position
13
OPERATIONOPERATION

14
OPERATIONOPERATION
D. To replace an image...
-In the QUAD format, press the SELECT pedal until the on-screen frame surrounds and
highlights the image to be changed. Position the handpiece, then capture the image.
(See CAPTURE AN IMAGE)
-In the SINGLE image format, press the SELECT pedal until you are viewing the image to be
changed. Position the handpiece, then capture the image.
(See CAPTURE AN IMAGE)
E. To erase all stored images, press and hold the SELECT pedal down for 5 seconds. When the
screen goes "black", release the pedal. When the pedal is released...
-In the QUAD format, the on-screen frame appears in the #1 position, (upper left hand
corner).
Or
-In the SINGLE image format, the icon appears in the lower right hand corner of the screen.
Note that the square within the icon is in the #1 position.

nUse the MEMORY pedal on the multi-function footswitch to choose the best mode in which to
capture an image. Choose between: press MEMORY to capture an image; or press, then release
MEMORY to capture an image.
Use the MONITOR button on the multi-function footswitch to switch or "toggle" between the two
modes.
A. The two ways to capture an image using the footswitch are:
MODE 1 - Depress MEMORY to capture the image, release for a “live” image.
MODE 2 - Keep MEMORY depressed for a “live” image, release to capture and display the
memorized image.
B. To determine which way is more comfortable for you, press the MONITOR button to toggle back
and forth between the two modes.
-In MODE 1, the image on the monitor is “live”. To capture the image in memory, position the
handpiece, hold it still, press MEMORY. The captured image is displayed for one second on the
monitor, then the image returns to “live”. To review the captured image, press MONITOR. Press
MONITOR again to return to the “live” image.
-In MODE 2, the image on the monitor is the last captured image. Press MEMORY and hold it
down to switch to a “live” image. Continue to depress MEMORY while you position the
handpiece. When you have the area you want to image, release MEMORY and the image will be
captured in MEMORY. Depress MEMORY again to go “live.”
NOTE: In the SINGLE image mode, to capture an additional image without overwriting the
previous image, press the SELECT pedal to advance to the next SINGLE image storage position
as indicated by the icon in the lower right hand corner of the monitor screen. (See Fig. 11B)
15
OPERATIONOPERATION
5. CAPTURE AN IMAGE (MEMORY AND MONITOR)

16
OPERATIONOPERATION
FIG. 12
REAR VIEW FIG. 13A FIG. 13B
wallmount
brackets
(optional) wall
latch
counter
6. PRINT
nInstall the print cartridge and video print paper prior to printing. (See INSTALLING/
CHANGING THE VIDEO PRINT KIT.)
nCART, COUNTER-TOP OR WALL-MOUNT SYSTEM
Press PRINT on the multi-function footswitch to print the captured image displayed on the
monitor.
nMULTI-OPERATORY INSTALLATION W/O INTEROPERATORY WIRING
Detach the camera from the Docking Station in the operatory and reattach to a Docking
Station located at the base station. (Make sure the Printer is set to a SINGLE image, in the
FRAME mode, with the MONITOR OFF (green light OFF). See PRE-INSTALLATION
CHECK to set up the printer correctly.
A. DETACH THE CAMERA IN THE OPERATORY
-Before detaching the camera, secure the handpiece and umbilical when transporting
the camera. Place the handpiece holder in an "up" position, insert the handpiece and
loop the umbilical around the extension on the holder. Or, hold the looped umbilical
and handpiece while holding the camera. Make sure the handpiece and umbilical are
secure before taking the camera to the printer location.
-Detach the camera from the Docking Station by depressing the latch release
(see Fig. 12) on the back of the camera. Then...
- If the camera is on a counter, tilt the camera up and lift off. (See Fig. 13A)
- If the camera is mounted on the wall, tilt the camera towards you and off. (See Fig. 13B)
IMPORTANT NOTE:
The battery pack in the camera permits the user two hours to reattach the camera and to access the
captured image. If the captured image is not accessed within the two hour limit, the image will be "lost."
When the camera is attached to the Docking Station and the power is turned ON, the battery is being
recharged to full power. With a fully charged battery, several two hour cycles can be achieved without
recharging.

17
OPERATION
OPERATION
B. ATTACH THE CAMERA AT THE BASE STATION
Attach the camera to the Docking Station at the base station where the printer is located.
-If the Docking Station is on the counter, position the camera against the Docking Station, tilt the
camera up to catch the top edge of the Docking S
tation, then bring it down to lock in place. You will
hear it "click" when locked in place. (See Fig. 13A)
-If the Docking Station is mounted on the wall, position the camera on top of the Docking S
tation, tilt
the camera down (towards you) to catch the top edge of the Docking Station, them move it back
towards the wall (vertical) to lock in place. You will hear it "click" when locked in place.
(See Fig. 13B)
-After attaching the camera at the base station and turning on the power, the image that will print is
the last captured image, QUAD or SINGLE, that appeared on the monitor screen in the operatory.
When the camera is reattached to a Docking Station, the last captured image will always be displayed,
with the on-screen frame or the icon in the same position, provided that the camera was reattached
within the two hour battery pack time limit (See IMPORTANT NOTE on bottom of pg. 16).
NOTE:
If the camera was turned on within the two hour battery time limit it will return to the mode
and position it was in when turned off (i.e. QUAD memorized, QUAD live, SINGLE memorized or
SINGLE live.) If the camera was turned off or detached when in the "live" mode, when it is
reattached to the Docking Station and turned on, it will still be "live." The monitor screen
will appear to be black and either the icon, indicating SINGLE format, or the on-screen
frame will appear, indicating QUAD format. Press MONITOR to display the captured image.
-The PRINT command will print the image that is displayed on the monitor. To print the memorized
image make certain that it is displayed on the monitor prior to pressing PRINT.
Press PRINT on the multi-function footswitch to print the last captured image that appeared on the
monitor in the operatory. Installing a monitor at the base station is an option for those who want to
verify the image to be printed.It takes 53 seconds to print an image.
nMULTI-OPERATORY NETWORK WITH QDA (Queuing Distribution Amplifier)
Each operatory in a network can send a PRINT signal to the printer located at the base station.
The
QDA receives the signals and forwards them to the printer for processing in the order the signals
were received. Printouts are marked in the lower left hand corner with the number of the originating
operatory (1, 2, 3, 4, 5, or 6).
A. Press the PRINT button on the footswitch.
-When PRINT is pressed, the footswitch sends two signals to the printer via the QDA:
First a MEMORY signal is sent, then, after a delay of approximately 5 seconds; a PRINT
signal is sent. Once the PRINT
signal is received by the QDA, it takes 53 seconds to print an
image.
-When the printer is busy, the following occurs on the monitor after PRINT is pressed:
The on-screen frame (QUAD format) or icon (SINGLE image format) disappears.
The image remains frozen in the camera.
When the printer has captured the image, the on-screen frame or icon reappears.
Now you're ready to capture and print another image.
B. If a PRINT command is sent from more than one operatory at approximately the same time, or
sent when the printer has not yet completed printing, the image will be frozen in the camera until
the printer is ready to accept the PRINT command held in sequence by the QDA.
C. In an installation where a camera is shared among several operatories, a captured image can be
printed from any operatory equipped with a monitor, Docking Station and a footswitch. See
MULTI- OPERATORY INSTALLATION W/O INTEROPERATORY WIRING for how to
detach and attach the camera and how to PRINT.

18
INSTALLING / CHANGING THE VIDEO PRINT KIT
The Video Print Kit contains a video print cartridge and 50 sheets of video print paper. Reorder PN 77150.
(Use only manufacturer's printer paper. The use of other paper may result in damage to the printer or
inferior print quality.)
Caution: Do not store the video print kit in a location exposing it to high temperature,
humidity or direct sunlight.
THE PRINT CARTRIDGE - IMPORTANT:
A. Before installing the cartridge, remove the styrofoam insert in the compartment. DO NOT
DISCARD THE STYROFOAM. When the printer is moved the styrofoam must replace the
cartridge to protect the print head.
B. Discard a spent video print cartridge. Do not re-use.
THE VIDEO PAPER - IMPORTANT:
A. Do not turn power OFF or remove the paper cassette while printing is in progress.
B. Do not touch the paper's print surface. Fingerprints or dirt on the print surface may produce
unclearprints.
C. Do not load more than 50 sheets of print paper. Overloading can cause the paper to jam in the
printer.
D. Do not use bent, folded, or wet video print paper.
E. When moving the printer, remove the paper from the cassette.
BD
C
REINSERT THE CASSETTE; PUSH
ALL THE WAY IN UNTIL SECURE
CLOSE THE
DOOR
FAN THE PAPER THOROUGHLY;
PUT PAPER IN CASSETTE -
MARKED SIDE UP.
MARKS
PAPER
CASSETTE
PULL OPEN AND REMOVE
THE CASSETTE
FIG. 15 - To load print paper, follow these instructions:
PUSH-OPEN
BUTTON
CAUTION:
DO NOT OPEN
DURING PRINTING PRESS
CARTRIDGE
REMOVAL
LEVER
INK
PAPER
CLOSE
THE
DOOR
PRESS AND
TURN UNTIL
SLACK IS
REMOVED
INSERT
CARTRIDGE
FIG. 14 - To install, follow these instructions:
Caution: Do not insert fingers inside the cartridge housing
A B C D E
A
OPERATIONOPERATION

THE FULL FACE PORTRAIT LENS
nDetach / attach the lens
A. Detach the lens from the handpiece / umbilical assembly by pulling the quick release collar
back with one hand, then pull the lens off with the other hand. (See Fig. 16)
B. Attach the lens by pulling back the quick release collar, then align the pin on the handpiece /
umbilical assembly with the hole in the lens assembly, connect the two together, and PUSH THE
COLLAR FORWARD UNTIL THE LENS IS LOCKED IN PLACE. (See Fig. 17)
nFocus
To focus the lens at infinity, turn the knurled focus ring all the way to the left. To focus closer to the
patient's face, turn the focus ring to the right until the image is in focus.
nClean the lens at both ends with alcohol and a cotton swab. (See CLEANING AND
MAINTENANCE)
NOTE: The Full Face Portrait Lens is an external lens only. DO NOT DISINFECT BY IMMERSING
IN AN ANTISEPTIC SOLUTION. (See CLEANING AND MAINTENANCE)
19
PINMATES
WITHHOLE
ONLENS
PINMATES
WITHHOLE
ONLENS
PULLBACK
HANDPIECE/
UMBILICAL
ASSEMBLY
FIG. 16 - REMOVING THE 90°LENS ASSEMBLY
QUICK
RELEASE
COLLAR
FOCUS
RING
PULLBACK
HANDPIECE/
UMBILICAL
ASSEMBLY
FIG. 17 - ATTACHING THE FULL FACE PORTRAIT LENS
QUICKRELEASE
COLLAR
OPERATIONOPERATION
PUSHFORWARD
FOCUS
RING
QUICK
RELEASECOLLAR

CAUTION: TURN OFF AND UNPLUG THE VISTACAM OMNI ic 4 AND SYSTEM
COMPONENTS BEFORE CLEANING.
nALL COMPONENTS
Use conventional cleaning methods and water based solutions. Do not wipe the surfaces using benzine,
thinner, etc. as this may degrade the finish.
nHANDPIECE / UMBILICAL ASSEMBLY
Following every patient use, the handpiece / umbilical assembly can be wiped clean and disinfected with
any commercial surface disinfectant following the manufacturer's recommended cleaning procedures.
n90° AND FULL FACE PORTRAIT LENSES
A. Routinely check the glass at each end of
the lens for debris or spots. Clean the lens
with alcohol and cotton swabs as shown
in Fig. 18. Do not get fingerprints on lens.
B. The 90° lens is cold sterilizable. Detach
lens from handpiece / umbilical assembly.
Use any commercial disinfectant and
follow manufacturer's recommended
procedures.
nLAMP REPLACEMENT
A. Detach the camera from the Docking Station by depressing the latch release on the underside of
the camera. (See Fig. 20) Tilt the camera up and off, if it is on the counter, or towards you and
off, if it is on the wall.
B. Loosen the two screws on the hinged access
plate located on the front of the Docking Station.
The screws are located on the right side of the plate.
(See Fig. 19)
C. Pull the access plate out. It swivels
revealing the lamp on the back of the plate.
D. Remove the lamp by pulling the lever on
the top of the lamp socket towards the
door opening until the lamp comes out
of the socket. Discard the used lamp.
(See Fig. 19A-B)
E. Carefully remove the replacement lamp
from its container. Be careful not to
get fingerprints on the lamp or on the
polished surface of the reflector as this will shorten the life of the lamp.
F. Before installing the new lamp, return the lever to its starting position. (See Fig. 19C)
G. Slide the new lamp fully into the socket with the tab on the reflector facing out and in the slot of the
lampholder. (See Fig. 19D)
H. Close the access plate and tighten the two screws.
I. Reattach the camera to the Docking Station, plug in power cord, turn the power ON. Remove
the handpiece from the holder to check that the lamp turns on.
FULL FACE
PORTRAIT LENS
OPERATIONOPERATION
WIPEGENTLY
INONE
DIRECTION
90°LENS
WIPEGENTLY
INONE
DIRECTION
FIG. 18
CLEANINGANDMAINTENANCE
20
NOTE: THE LAMP IS SHIPPED SEPARATELY IN THE PACKAGE. INSTALL THE LAMP PRIOR TO USE.
CAUTION: THE LAMP IS EXTREMELY HOT. TURN OFF POWER AND UNPLUG THE POWER CORD BEFORE
CHANGING THE LAMP. WAIT A MINIMUM OF 10 MINUTES FOR THE LAMP TO COOL BEFORE TOUCHING.
LAMP
SCREWS
FIG. 19 DOCKING STATION LAMP ACCESS
Table of contents
Other Air Techniques Digital Camera manuals
Popular Digital Camera manuals by other brands

Juergen Perthold
Juergen Perthold Video CatCam II user manual

Samsung
Samsung SCC-B1091P user manual

Rockwell Automation
Rockwell Automation ODOS imaging StarForm Swift-G OI-G1480 Hardware manual

Canon
Canon EOS 10D Digital Brochure & specs

Zenit
Zenit EM instruction manual

Vicon
Vicon VC2500-DSP Installating and operation manual