AirCom AirFlow A3X User manual
Test Model:A3X
A3X
2
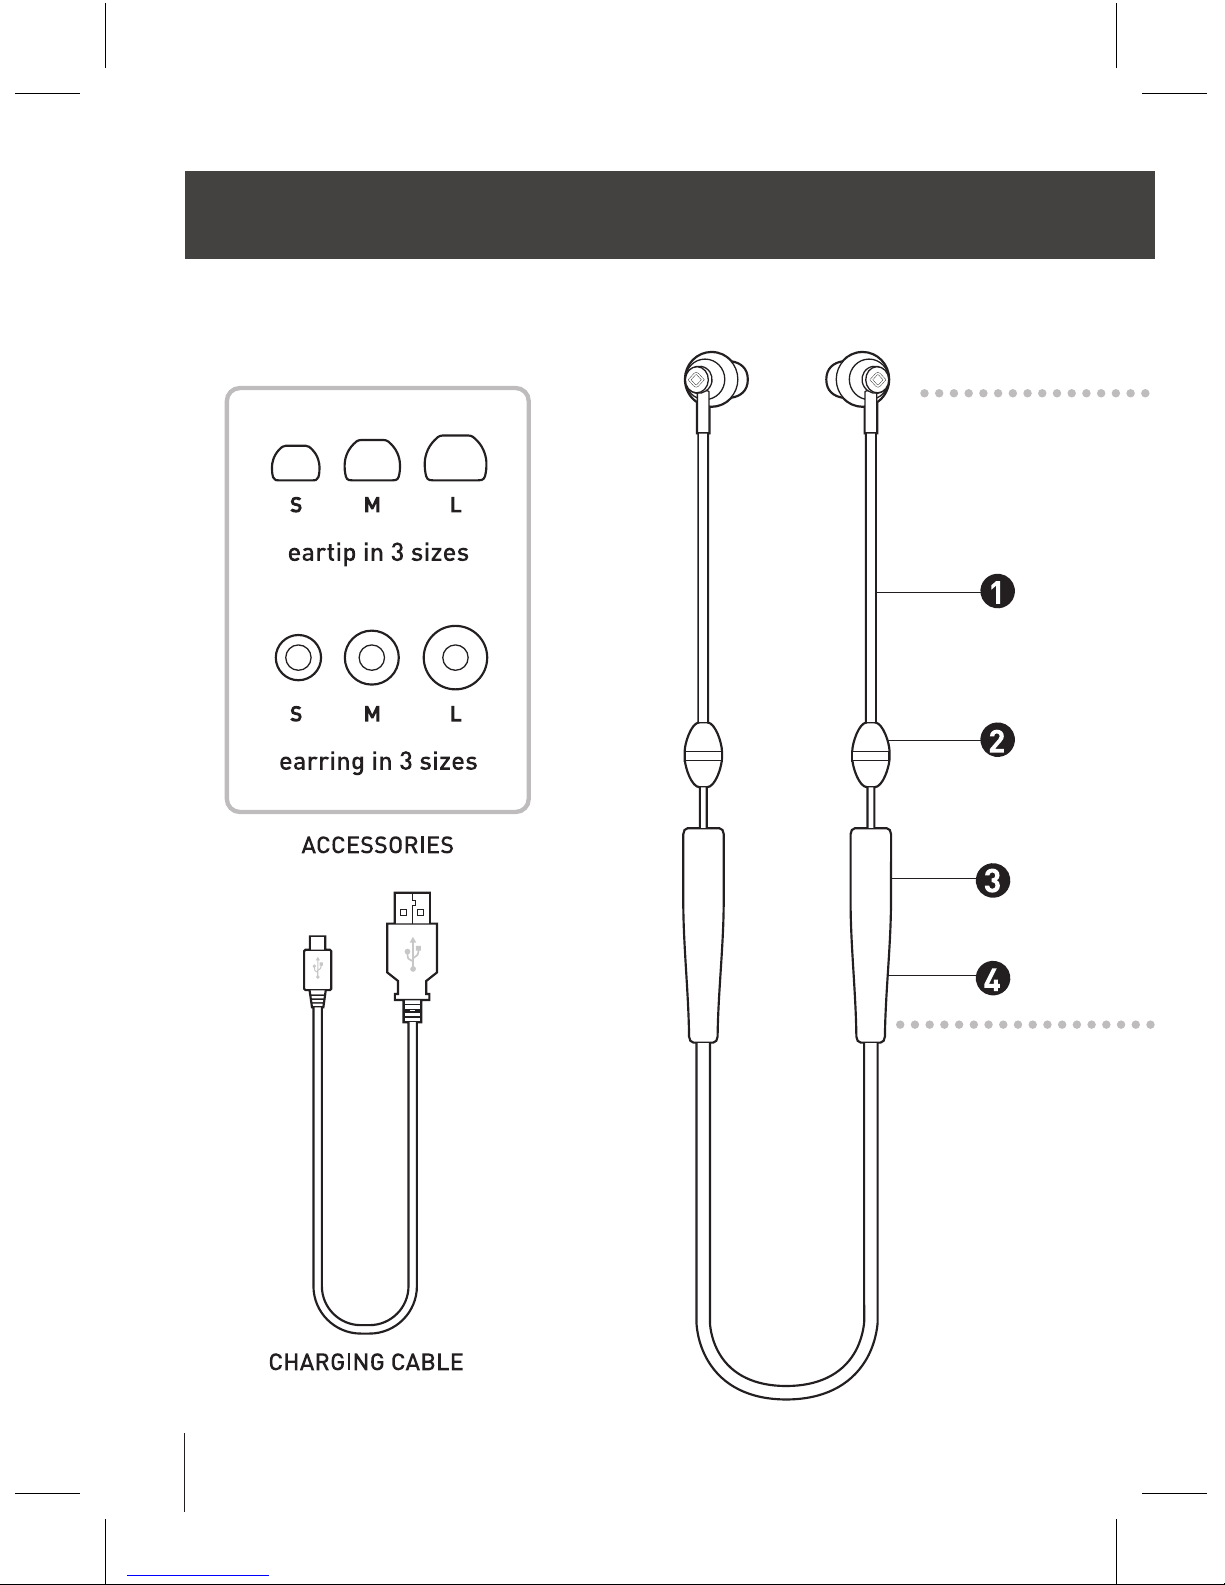
DIAGRAM

3
1. Airtube
2. Speaker Chamber
3. Controller
4. Micro USB Port
5. Rubber Noise Isolating
Eartip
6. Rubber Earring
7. Magnetic Cap
8. Vol –
9. MFB (Multi-Function-Button)
10. Vol +
4
WARNING: DO NOT insert your in-ear earphones too deeply
into your ears. Doing so may cause permanent damage to your
eardrums and can interfere with sound quality.
HOW TO USE
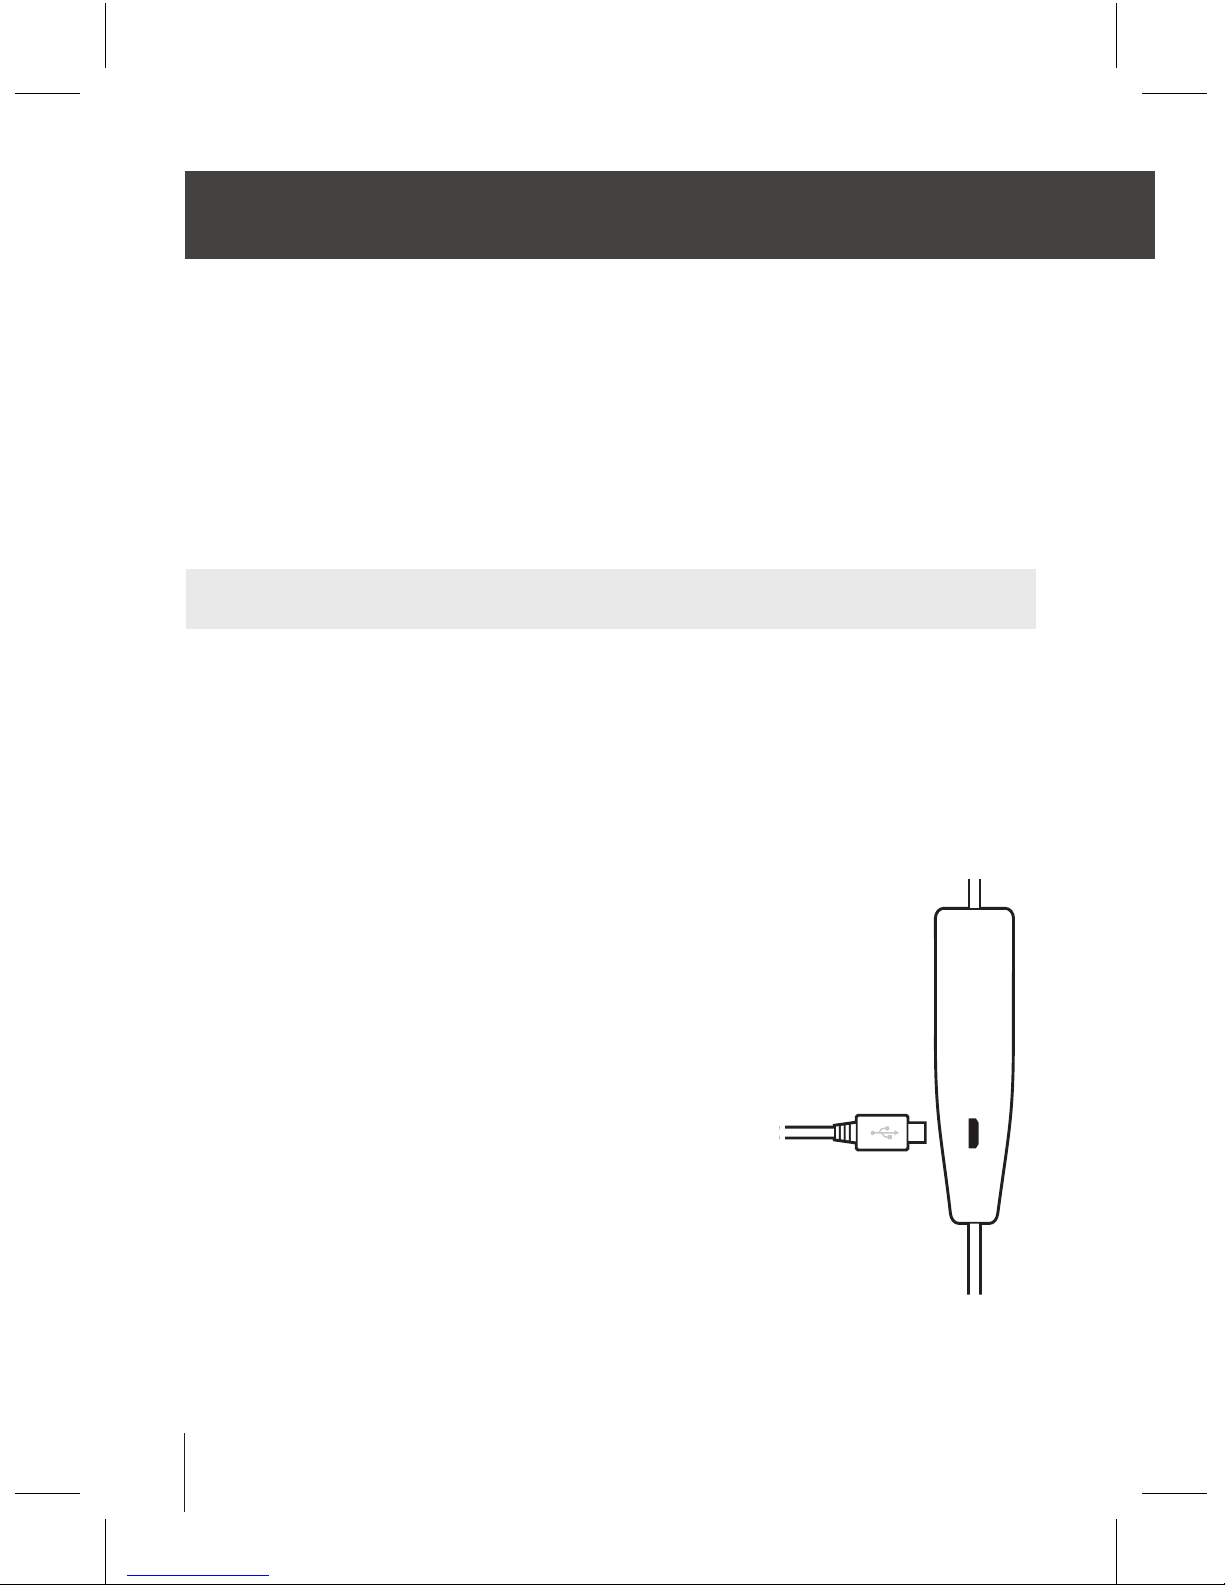
CHARGING THE EARPHONE
On the controller side of earphone there is a Micro USB port
cover and connect the Micro USB end of the charging cable to
the Micro USB port.
Use the included charging cable to
connect the earphone with a USB
port on your computer or with a USB
wall adapter. Charging will start
automatically when connected and the
red indicator light will turn on.
Once charging is complete, the light
will turn off.
NOTE: Make sure you charge the unit for at
least 8 hours before first use .
controller
charging
cable

5
POWER ON/ OFF
Power ON > Press & hold MFB for 3 seconds to power ON.
LED indicator will flash once every 5 seconds
Power OFF > Press & hold MFB for 3 seconds to power OFF.
LED indicator will go off.
WHAT IS PAIRING
“Pairing” means creating a trusted relationship between two
or more Bluetooth devices. The devices must be paired before
they can communicate with each other. Pairing identification
is stored for later use, and the devices will automatically
recognize each other the next time they are connected.
NOTE: Your audio device must support Bluetooth A2DP compatibility to
connect with the earphone connected to your audio device. Please consult
the user manual for the device with which you are using.

6
HOW TO PAIR WITH MOBILE PHONES
OR OTHER DEVICES
1.
Place the “Aircom” A3Xearphone within 30 cm of the device
with which you are pairing.
2. From the off position, press the MFB button for 2-3 seconds
until the red and white LED light begins to flash. The earphone
will now be in pairing mode.
3. Initiate the Bluetooth search function in your mobile phone.
Please refer to the user’s manual for your mobile phone for
more information.
4. Select “Aircom” in the device list on the phone and follow the
instructions to proceed.
5. If your device requests a pairing code, enter “0000”. The red
LED indicator will stop flashing if pairing is successful. A3X
device ID should be stored in the device list of the phone so that
you do not need to re-enter pairing code. After pairing with
your Bluetooth device, start your device’s media player and the
music will begin playing on your earphones.
HOW TO USE

7
PLAYING AUDIO
Select the audio player on your source device & select play via
“Aircom”. The audio will automatically start streaming to the
earphone.
Press MFB once to PAUSE audio & again to Play audio.
Adjust volume level by pressing & holding the Volume + key
or Volume – key for one second.
NOTE: A BEEP tone will be audible when the volume control has reached
the minimum & maximum level.
At any time during a phone call, or while playing music, the volume can
be changed with the Vol+ or Vol- keys. There will be a tone from the
earphones to indicate that the level has reached maximum or minimum
volume.

8
SELECTING TRACKS
Double press the Vol + for next track
Double press the Vol – for previous track
NOTE: Some audio players will go back to the start point of the current
track, when previous track is selected.
NOTE: This function will only work properly when connected directly to a
Bluetooth A2DP compatible music player.
Not all functionality is available with every device.
HOW TO USE

9
ANSWERING CALLS
Answer/ End incoming call > Press MFB once
Redial last call > Press MFB twice
Reject Call > Press & hold MFB
If you are connected to and playing music from a mobile phone,
a brief tone will be heard to notify you that there is an incoming
call. Press the MFB once to answer the call and press it once
again to end the call. While the call is in progress, the music
will pause and once the call has ended, the music play will be
automatically resumed.

10
HOW TO FIT
Multiple size rubber eartips S,
M, L are provided. M size rubber
eartip is installed from factory.
Proper fit should be comfortable
but create a light seal between
rubber eartip and inner ear canal.
Multiple size rubber earrings S,
M, L are provided. M size rubber
earring is installed from factory.
Proper fit should be comfortable
but have a secure fit in the outer
ear canal.
1.
2.

11
TROUBLE SHOOTING
NO RESPONSE
·Make sure the A3Xis on
·Make sure the A3Xis completely charged
·Make sure the A3Xis properly paired with the audio source
UNABLE TO CONNECT WITH A PREVIOUSLY PAIRED DEVICE
· Clear the pairing list on the audio source
·Be sure the A3Xis within 10 meters (30 feet) of the audio
source
· Be sure the audio source’s bluetooth function is ON
POOR SOUND QUALITY (lack of bass)
check the tightness of the seal between the rubber eartip and
your ear. If rubber eartip is too small or big, try one of the other
size eartips provided.
EARTIPS ARE FALLING OFF
make sure to securely attach the eartip to the earbud housing
by pressing the eartip into place.

12
CARE / MAINTENANCE
The Aircom A3Xis water resistant and can be washed in
warm water. Hang dry with earbuds below the speaker
chamber so water does not drip in to the speakers. Do not
submerge in water.

13
• To avoid damage to your hearing, we recommend that your
listening level be less than 85dB. For example, conversational
speech is typically around 60dB and a rock concert in a stadium
is around 110dB. A decibel (dB) is a unit of measure of sound.
• Turn music volume down on your listening device before
inserting your earphones. Once earphones are in, gradually
increase volume to a moderate level.
• NEVER operate a motor vehicle, while listening to or wearing
your earphones.
• Do not use these earphones in any environment where failure
to hear surrounding sounds could be dangerous, such as
biking, running, or walking in traffic areas.
OSHA has established the following noise exposure limits:
90dB 8 hours
95dB 4 hours
100dB 2 hours
105dB 1 hour
110dB 30 minutes
SAFETY INFORMATION

ONE YEAR PRODUCT LIMITED WARRANTY
Aircom warrants that your product shall be free from defects in
material and workmanship for one (1) year, beginning from the
date of purchase. Except where prohibited by law, this warranty
is nontransferable and is limited to the original purchaser. This
warranty gives you specific legal rights, and you may also have
other rights that vary under local laws.
Defects which occur within this warranty period, under normal
care and use of the product shall be, at Aircom’s option, repaired
or replaced, with no charge for parts or labor. Shipping and
handling charges may apply except where prohibited by law.
This warranty does not cover problems or damages resulting
from accident, abuse, misapplication, or any unauthorized
repair, modification or disassembly. For warranty claims,
please visit the WARRANTY section of www.aircomaudio.com.
www.aircomaudio.com

FCCWarningStatement
Changesormodificationsnotexpresslyapprovedbythepartyresponsibleforcompliancecould
voidtheuser’sauthoritytooperatetheequipment.Thisequipmenthasbeentestedandfoundto
complywiththelimitsforaClassBdigitaldevice,pursuanttoPart15oftheFCCRules.These
limitsaredesignedtoprovidereasonableprotectionagainstharmfulinterferenceinaresidential
installation.Thisequipmentgeneratesusesandcanradiateradiofrequencyenergyand,ifnot
installedandusedinaccordancewiththeinstructions,maycauseharmfulinterferencetoradio
communications.However,thereisnoguaranteethatinterferencewillnotoccurinaparticular
installation.Ifthisequipmentdoescauseharmfulinterferencetoradioortelevisionreception,
whichcanbedeterminedbyturningtheequipmentoffandon,theuserisencouragedtotryto
correcttheinterferencebyoneormoreofthefollowingmeasures:
‐‐ Reorientorrelocatethereceivingantenna.
‐‐ Increasetheseparationbetweentheequipmentandreceiver.
‐‐Connecttheequipmentintoanoutletonacircuitdifferentfromthattowhichthereceiveris
connected.
‐‐ Consultthedealeroranexperiencedradio/TVtechnicianforhelp.
Thisdevicecomplieswithpart15oftheFCCRules.Operationissubjecttothefollowing
twoconditions:(1)Thisdevicemaynotcauseharmfulinterference,and
(2)thisdevicemustacceptanyinterferencereceived,includinginterferencethatmaycause
undesiredoperation.
Table of contents


