AirCross U Prime User manual

Version 1.2
28.02.2012
Manual

Text: Konrad Görg
Grafik: Julien Montet
Layout: Tobias May
Important Note:
Every effort has been made to ensure that the information in this manual
is correct, but please remember that it has been produced for guidance
only. It should not be used as a "how to fly" manual. This owner's
manual is subject to changes without prior notice. Please check
www.aircross.eu for the latest information regarding the U Prime and
other Aircross products.
Trademark:
Aircross® is a registered trademark of the Kontest GmbH.
Copyright
© 2013 by Kontest GmbH, Manager: Konrad Görg, Gut Grauhof 1 , D-38644 Goslar
Tel. 05321 3175239, Fax 05321 51041
All rights reserved.
2

Text: Konrad Görg
Grafik: Julien Montet
Layout: Tobias May
Thank you for choosing the
We are confident that this paraglider will provide you with countless
exciting experiences in your flying. This manual contains all the
information you need to fly and maintain your paraglider. A thorough
knowledge of your equipment will keep you safe and enable you to
maximize your full potential.
Happy Flights and Safe Landings,
Your Aircross Team
3

Text: Konrad Görg
Grafik: Julien Montet
Layout: Tobias May
Table of contents:
∑Registration - 6
∑Technical Data - 6
∑Personal Request - 6
∑Description - 7
∑The U Prime in detail - 7
∑The canopy - 7
∑The line system - 8
∑The risers - 8
∑The speed system - 8
∑Suitable Harnesses - 10
∑Rescue system - 10
∑The Aircross Rucksack - 10
∑Adjustment possibilities - 11
∑Brakes - 11
∑Speed System - 13
∑The Flight - 13
∑Preflight check and launch preparations - 13
∑Start - 14
∑Towing - 14
∑Flight technique - 15
∑Speedcontrol via Brakes - 15
∑Speedcontrol via Speedsystem - 16
∑Turns - 16
∑Thermalling - 17
∑Flying in turbulences - 17
6
∑Spiral Dive - 18
∑B-line stall - 19
∑„Big ears“ - 19
∑Landing - 20
∑Extreme Flying Manoeuvres - 20
∑Acro flying - 21
∑Collapse - 21
∑Collapse with line over - 21
∑Front Stall - 22
∑Stall - 22
∑Parachutal Stall - 22
∑Full Stall - 23
∑Negative Spin - 23
∑Steering without brakes - 24
∑Care, maintenance and repairs - 24
∑Maintenance - 25
∑Buildup of canopy - 5
∑ Rapid Descents - 18
∑Overview risers and speed system - 9
∑Disposal - 25
∑In Conclusion - 25
4

Text: Konrad Görg
Grafik: Julien Montet
Layout: Tobias May
Canopy buildup:
stabilo
top surface
bottom surface
trailing edge
leading edge
glider information and
certification sticker
main brake line
risers with
rapid links
stabilo line
main mallion
5

Text: Konrad Görg
Grafik: Julien Montet
Layout: Tobias May
Registration:
Aircross is very interested to keep you as the customer informed over new technical
developments and information concerning your U Prime.
So please register at our e-mail adress: [email protected]
We kindly ask you to give us your adress, telephone number, glider model, and serial
number. Of course, all your personal information will be kept confidential.
Personal requests:
Please read this manual carefully and note the following details:
This paraglider meets at the time of delivery the requirements of the EN and of the german
LTF. All alterations to the paraglider will render its certification invalid. the use of this glider
is solely at the users own risk. Manufacturer and distributor do not accept any liability. Pilots
are responsible for their own safety and their paragliders airworthiness. The paraglider
carries no warranty. The author assumes, that the pilot is in possession of a valid
paragliding licence.
6

Text: Konrad Görg
Grafik: Julien Montet
Layout: Tobias May
Description:
The U Prime is a perfect beginner and school glider and offers a great passive safety with
very forgiving flying characteristics combined with great flight performance and glide ratio.
Caused by it´s easy and reliable flying behaviour the U Prime is suitable for a big pilot´s
target group.
The U Prime in detail:
The U Prime is LTF/EN A certified and is suitable for learning. Any alterations to the glider
can result in dangerous flight behavior. We strongly recommend that you do not modify your
glider in any way.
The canopy:
The canopy of the U Prime is made from the newest, highstrengh, specialcoated Domenico-
tissue, which is extraordinary age- resistant.
A special shape for the reinforcements has been made and all the air intakes are optimized.
All this improves take-off characteristics, performance and increases the lifetime of the
canopy.
Leading- and trailing edge were strenghened with a polyester-bound, the openings of the
canopy were reinforced with Nylon rods to optimize the start- und fast flying characteristics.
7

Text: Konrad Görg
Grafik: Julien Montet
Layout: Tobias May
The linesystem:
The lines of the U Prime are made of strong and stretch resistant Liros PPSL, Teijin Aramid
and Liros DSL.
The lines of each level have specific
colors to help you to sort the lines and for better orientation
The risers (accelerated/ not accelerated):
The 4 level risers of the U Prime are adjusted on the same length -the zero position.This
allows an uncomplicated handling at start.
12
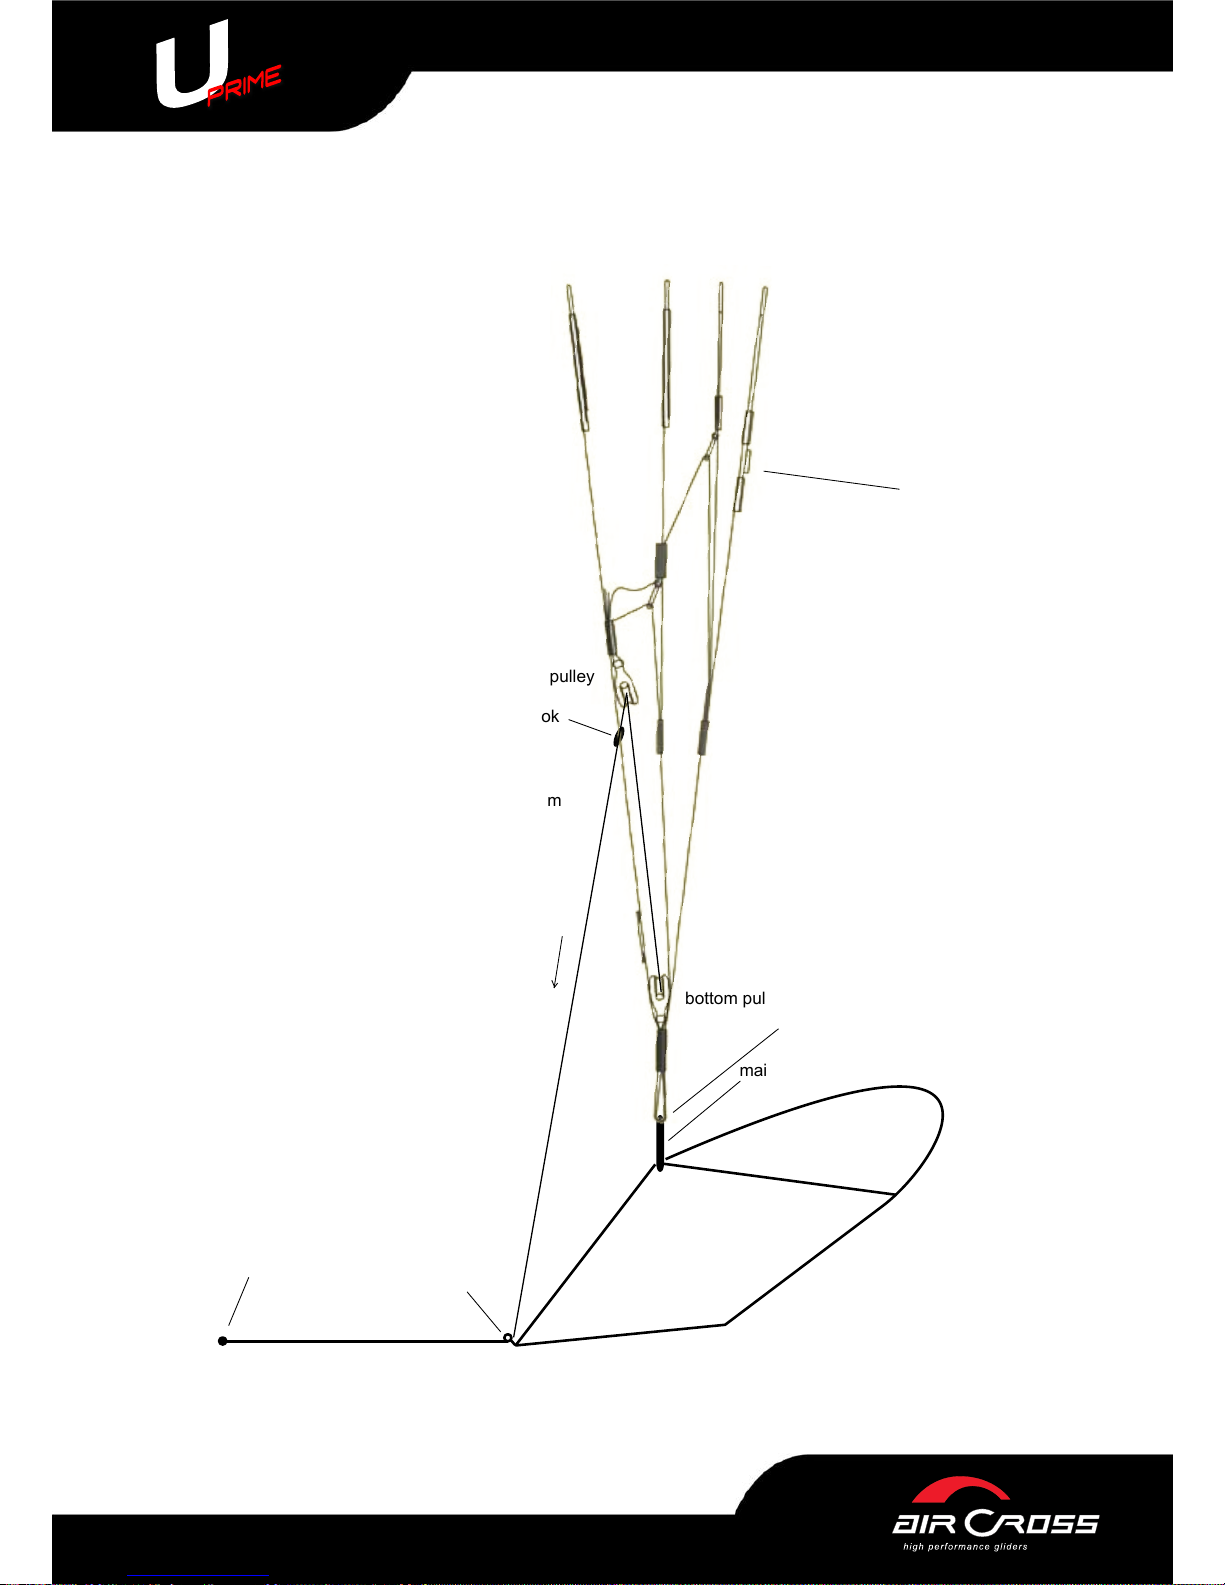
The brakeline is running through the pulleys on the D-risers to the brake handles. The brake
pulley is attached to a strap, to give the pilot the biggest freedom in choosing the best
position.
The final adjustment of the brakehandle-position depents on the harness, the pilots size an
the individual habits (check chapter adjustment possibilities).
Speedsystem:
The speed system increases the maximum speed by lowering the angle of attack with a
pulleyguided, foot-operated system.
It is important to have your accelerator system correctly routed through your harness and
attached to the risers with the supplied Brummel hooks. The length of the speed bar should
be initially adjusted while on the ground, sitting in the harness so that the legs are fully
extended at the point of full accelerator travel.
It is helpful to have an assistant hold the risers taut while making this adjustment.
Subsequent fine tuning can be done on the ground following the first flight with the speed
system. If in doubt about this procedure, consult your instructor or dealer.
At full travel of the speed system the A-riser is shortened 9 cm, the B-riser 7 cm and the C-
Riser 5 cm . The D-riser keeps the original length.
8

Text: Konrad Görg
Grafik: Julien Montet
Layout: Tobias May
press button
top pulley
bottom pulley
speedsystem
mounting point
main carabiner
brummelhook
traction
stirrup harness
pulley
risers
overview risers
and speed system ABCD
9

Text: Konrad Görg
Grafik: Julien Montet
Layout: Tobias May
Suitable Harnesses:
The testflights for the certification were flown with a classical harness. Any certified harness
with a hang point at about chest height may be used with a U Prime.
Please note: the hang point position changes the position of the brakes relative to the pilots
body. The distance between left and right main carabiner should be between 45 and 60cm,
depending on the size of the pilot and the type of the harness. The Aircross test crew
prefers flying with low hang point and wide distance between main carabiners, to get a
maximum of feedback from the wing.
CAUTION! CROSS STRAPS THAT ARE ADJUSTED TOO TIGHTLY CAN DRASTICALLY
EFFECT YOUR GLIDERS HANDLING, AND THUS MAY NOT CONTRIBUTE TO HIGHER
ACTIVE SAFETY! HAVE THEM TIGHTENED THE CORRECT AMOUNT.
Rescue systems:
For the safe operation of a paraglider you have to carry a certified rescue system with you.
When you select your rescue system, please do it with the same care as you did when
choosing the Aircross U FLY.
The Aircross Rucksack:
We developed a new generation of Rucksack,
our Rucksack has outstanding design solutions
and offers an extraordinary comfort of carrying
The rucksack should be packed carefully to
achieve maximum comfort.
Finally, tighten the internal and external
compression straps and adjust the shoulder
and waist straps to ensure the equipment stays
firmly in place when walking. There are also
three storage pockets for accessories.
10

Text: Konrad Görg
Grafik: Julien Montet
Layout: Tobias May
Adjustment possibilities:
All line and riser length of the U Prime were factory checked with a high precision. In a
multilevel Qualitycheck each glider is checked again before shipment.
There is no need for you to trim your glider. Regarding flight performance, handling and
safety your U Prime is optimally trimmed. Every change in line length or risers will render its
certification and warranty invalid.
Brakes:
The main brake line lengths of the U FLY have been fine tuned by Aircross test pilots, and it
should not be necessary to adjust them.
In soaring flight, it is common to fly with half a wrap on the brakes and hold the handles on
the knot. However, care should be taken to release the wraps in any extreme situation.
If you do need to make adjustments to suit your harness, body and flying style, we strongly
recommend that you test fly the glider with every 2cm of brake adjustment. There should be
a minimum of 5cm of free brake travel when the glider is flown hands-off. This prevents the
brakes being applied unintentionally when the speed system is fully engaged.
There is a mark on the brake line - do not knot the line shorter than 5 cm.
11

Text: Konrad Görg
Grafik: Julien Montet
Layout: Tobias May
Brakeareas
The U Prime has a very pleasant handling with middleshort brakelengths.
The U Prime has an relative high progression of brake pressure ( the more you brake, the
more power you need to pull). Every pilot has to find the best brake adjustments, regarding
the used harness and the body size otherwise he gets tired.
In the region between shoulder- und breast is hard to make powerful brake manouvres,
because there the arms are in an area between pulling and pushing.
This area should be avoided as main brake area, when using harnesses with low hang point
position or very big pilots when extending the brake line length.
Cause above the shoulder there is not enough way to use, so the brakearea should be
moved to the push zone.
Small pilots or when you use a high hang point position harness, you should control the
brakes in the pullzone (above your shoulders), or adjust the brakes to control in low arm
position under the breast.
In every case the brakelength must be long enough, to bring the U Prime into a landing stall.
This can also be done via dynamic stall.
Another method to get a stiffer contact to your brake handles, is the „Skistick“-Method (you
slide through the handle with the palm of your hands facing up and you grab the handle
from the back ).
12

Text: Konrad Görg
Grafik: Julien Montet
Layout: Tobias May
Speed System:
It is important to have your accelerator system correctly routed through your harness and
attached to the risers with the supplied Brummel hooks. The length of the speed bar should
be initially adjusted while on the ground, sitting in the harness so that the legs are fully
extended at the point of full accelerator travel.
It is helpful to have an assistant hold the risers taut while making this adjustment.
Subsequent fine tuning can be done on the ground following the first flight with the speed
system.
If in doubt about this procedure, consult your instructor or dealer.
The Flight:
This Manual deals only with the basic and product-specific issues of flight technique . It can
not and should not replace a flight training in a approved flight school! Such training is
essential for the safe piloting of a paraglider, so also for flying the U Prime.
Preflight check and launch preparations:
We recommend that you first practice inflating your glider on a small training hill or flat
ground. Make your first flights with your new paraglider in gentle conditions on a familiar
flying site. Preparation for launch Following a consistent method of preparation and pre-
flight checks is vital for safe flying. We recommend the following:
On arrival at the flying site, assess the suitability of the conditions: wind speed and direction,
airspace, turbulence and thermal cycles. Inspect your glider, harness, reserve handle and
pin, helmet and any other equipment.
13

Text: Konrad Görg
Grafik: Julien Montet
Layout: Tobias May
Choose a sufficiently large take-off area with even ground and no obstacles. Put your
helmet on. Secure yourself in your harness and don't forget the leg loops! Lay the glider out
according to the planform, and get the lines and risers sorted out. Connect the risers to your
harness carabiners, ensuring there are no twists or loops around the lines.
Connect the speed system to the risers with the Brummel hooks. Do a final line check by
pulling gently on the risers or lines to ensure there are no new knots, tangles or interfering
branches or rocks. Take extra care in nil or light winds.
Pre-flight check list:
- Reserve parachute: pin in and handle secure.
- Helmet and harness buckles closed.
- Lines free.
- Canopy open and into wind.
- Airspace clear.
Start:
The key to a successful launch technique is to practice ground handling on flat ground
whenever you can.
Light or Nil Wind Launch
The U Prime inflates steadily in nil-wind conditions. Simply guide the glider with the A-risers,
keeping your arms bent and hands at the level of the shoulders. Allow your arms to rise in
an arc and wait for the glider to inflate and come above your head do not push the risers.
There is no need to pull the risers hard.
Run positively as the glider comes above your head. Be sure to look up and check that the
canopy is fully inflated before you take-off, and that there are no tangles in the lines. If any
irregularity should occur and you are not yet airborne, abort the launch immediately by
stalling the glider.
On steep launches, stall one side of the glider and run parallel to the hill.
If the glider should come up sideways, and the situation is recoverable, run towards the
lower side rather than trying to struggle against the force.
14

Text: Konrad Görg
Grafik: Julien Montet
Layout: Tobias May
Strong Wind Launch
The reverse launch technique is recommended. Holding the brakes, turn around to face the
wing passing one set of risers over your head as you turn. We suggest building a "wall" by
partially inflating your glider on the ground, thus sorting out the lines thoroughly. Check the
airspace is clear and gently pull the glider up with the A-risers. When the glider is overhead,
check it gently with the brakes, turn and launch. In stronger winds, be prepared to take a
couple of steps towards the glider as it inflates and rises.
Towing:
The U Prime is suitable for towing by pilots who have the relevant towing rating. The U
Prime has no tendencies towards deep stall/parachuting. There is sufficient margin to
counter steer the glider in a normal towing situation. Make sure you use proper equipment,
experienced personnel, the recommended techniques and all relevant safety precautions for
towing.
Flight technique
Speed control with the brakes
The speed range of the U Prime is relatively high. The right speed for each flight situation is
important for performance and safety.
You get best glide ratio (in calm air) when you don´t break at all . You get the best sink rate
when you break both sides 15%.
The more you brake the more power you need, and the sink rate will not get better. When
you fly with minimum speed there is the danger of an accidental stall, the stall area starts
when you brake 100%. Please try to avoid this low speeds.
15

Text: Konrad Görg
Grafik: Julien Montet
Layout: Tobias May
Speed control via speed system
The Glider is trimmed from the manufacturer to a medium speed. If you increase the speed
to the maximum by using the accelerators , you get much more forward movement in
situations of head winds and downwash. Keep the brakes in an open position and be
prepared to quickly weaken the accelerator in turbulences.
The possible range of acceleration gives a high maximum speed. A collapse of of the
accelerated wing will give more dynamic reactions than in trim speed. Use the
accelerationonly with sufficient height. The high stability of the Glider at max speed should
not make you careless.
Turns:
The U Prime reacts directly on the brakes and has a high agility. For flat turns the pilot
should also pull the outside brake a little break. For narrow and steep curves pull the inside
break at full trim speed.
A combined technique of weight shift and pulling on the inside brake line is themost efficient
turning method, whereby the radius of the turn is determined bythe amount of inside brake
pulled and weight shift.
A stalling wing tip announces itself by a gentle surge backwards of the wingtip. In this
situation you have to loosen brakes immediately.
CAUTION: PULLING A BRAKE TOO FAST OR TOO HARD CAN RESULT IN THE
CANOPY ENTERING A NEGATIVE SPIN.
16

Text: Konrad Görg
Grafik: Julien Montet
Layout: Tobias May
Thermalling
When you find a thermal, centre it while flying with 20 cm pulled break to perform flat turns.
Then you fly in the range of min. sink rate. the glider turns narrow and is able to gain height.
It is recommended, to pull the outside brake a bit. When you pull the breaks more or less
you provide collapses and you can control the turning characteristics.
When the thermal is narrow and strong its recommended to fly with a higher speeds and a
narrow turn radius. Also release the outside brake.
When the thermal has a greater shift try to fly with higher speeds and try to centre the
thermal at
the windward side.
When you fall off the thermal at the windward side, you sink automatically in better climb
caused
by the windshift. It is different when you fall off at the leeward side of the thermal. There you
have a greater lost in height and it´s much harder to return to the thermal.
Flying in turbulences
When you fly through turbulences, it´s recommended to pull both breaks till you feel light
break pressure ca. 7 cm to be prapared for any disbehavior of the canopy.
The U Prime has a high internal pressure, resistance to tucking and for it’s class, a great
level of passive safety even when you fly accellerated.
However, it is recommended that you always practise an active flying style. This will help
you avoid deflations in all but the most turbulent conditions.
The key to active piloting is keeping the glider above your head at all times. If it falls back
behind you,let up the brakes. If it surges in front of you, counterbrake until the surge is
controlled.
If you sense a loss of pressure on one side of the canopy, smoothly apply brake and/or
weightshift on the appropriate side until you feel pressure return. In all cases, maintain
adequate airspeed and avoid overreaction.
17

Text: Konrad Görg
Grafik: Julien Montet
Layout: Tobias May
Losing altitude:
Extremely strong and widespread lift is found, for example, in storm conditions. The best
place to be in this situation is on the ground. Nevertheless, if you have been caught out by
the weather and find yourself needing to descend rapidly, there are several ways to do so.
The best way is, of course, to find sink. Failing that, try one of the techniques below.
Attention: Most of these techniques place undue stress on your glider, and should be
avoided if you wish to extend its lifetime. We recommend you initially practice these
manoeuvres under qualified supervision during a safety training course.
Spiral dive:
The spiral dive should be considered an extreme manoeuvre. Practice spiralling with caution
and lesser sink rates to get a feel for the U Prime's behaviour. Weight shift and pull the
brake on one side gradually. Let it accelerate for two turns and you will enter the spiral dive.
Once in the spiral, you can control your descent rate and bank angle with weight shift and
the outer brake.
WARNING! A pilot who is dehydrated and/or not accustomed to spiralling can
loseconsciousness in a steep spiral dive! The U Prime can generate extremely high G-
force in a spiral dive. You should use only moderate spirals so as not to put unnecessary
load on your lines.
Attention: When you enter the spiral there is the danger of falling into a negative spin! In this
case release the breaks and try it again.
As with all types of aircraft, we advise you to assist the glider to exit from the spiral dive in a
controlled manner. Let the glider decelerate for one or two turns by applying outer brake
and/or weight shift.
18

Text: Konrad Görg
Grafik: Julien Montet
Layout: Tobias May
B- line stall
To induce a B-line stall symmetrically pull down both B-risers by about 20cm. The airflow
over the top surface is almost fully detached and the canopy enters a vertical descent flight
mode without forward movement. Further pulling of the B-risers reduces the surface area
more and increases the sink rate up to 8 m/s.
Be careful, pulling too far may cause a frontal horseshoe to form.
To exit from this flight mode release the B-risers quickly (1 sec). The canopy surges forward
reattaching airflow over the top surface again and resumes normal flight.
When the B-risers are released, the brakes should not be activated. This will give the
canopy the possibility to gain speed and resume normal flight. If canopy does not recover
apply both brakes gently to recover..
Big ears
Big ears is a safe method of moderately losing altitude while maintaining some forward
speed. Pull in big ears one at a time, using the outer A line on each side and keep them
pulled. Although the noise of the wind around your ears may indicate the airspeed
increases, the airspeed does not increase by pulling big ears. In fact it decreases.
You may use the speed bar in combination with big ears to maintain your sink rate but
increase forward speed.
The glider can be steered while in big ears using weight shift alone.When you release the
lines, the U Prime ears will come out on their own, or may require a short pump. Release
the big ears at least 100m above the ground.
Big Ears and spiral dive :
Whilst it is possible to enter a spiral dive whilst holding in Big Ears, the high forces applied
to the lower lines could exceed the breaking strain of the lines leading to equipment failure!
Attention: We do not recommend the use of this manoeuvre!
19

Text: Konrad Görg
Grafik: Julien Montet
Layout: Tobias May
Landing:
The U FLY is easy to land. The final leg of the landing approach must be into the wind.
During this final glide the paraglider should be decelerated slowly and at approximately one
meter above the ground, according to conditions, the pilot should ”flare” the canopy. The
glider may climb again, gaining height, if too much brake is used too early.
Strong wind landings require little brake. Do not apply full brake before the pilot is safely on
the ground. The final glide during the landing approach should be straight and not marked
by steep or alternating turns as these can result in a dangerous pendulum effect near the
ground.
In strong winds you need to turn towards the glider the second your feet touch the ground.
Once facing the wing pull smoothly and symmetrically down on the brakes to stall the wing.
If the glider pulls you, run toward it. If the wind is very strong, and you feel you might be
dragged, or lifted again, stall the glider with the B risers. This stalls the wing in a very quick
and controllable way and will drag you less than if you use the brakes.
Attention: After the landing, never let the canopy fall onto the cell openings, this can lead to
a burst of the cells !
Extreme flying manouevres:
The U FLY has a very high aerodynamic stability and a very pleasant flight characteristics.
But its possible that you get into extreme flying manoeuvres, caused by heavy turbulences
or pilot errors. The danger of overcorrecting and overreacting exists during all extreme flight
manoeuvres. Thus, any corrective action must be gentle and steady and done with feel !
Aircross recommends:
FIRST PRACTICE EXTREME FLYIG MANOEUVRES WITH AN INSTRUCTOR DURING A
SAFETY TRAINING !
20
Table of contents