AireSpa ASWR300 User manual

ASWRB100
USE & CARE GUIDE
Touch Screen Remote Control

FCC Statement
Changes or modificaons not expressly approved by the party responsible for compliance
could void the user's authority to operate the equipment.
This equipment has been tested and found to comply with the limits for a Class B digital
device, pursuant to Part 15 of the FCC Rules. These limits are designed to provide reasonable
protecon against harmful interference in a residenal installaon. This equipment generates
uses and can radiate radio frequency energy and, if not installed and used in accordance with
the
instrucons, may cause harmful interference to radio communicaons. However, there is no
guarantee that interference will not occur in a parcular installaon. If this equipment does
cause harmful interference to radio or television recepon, which can be determined by
turning the equipment off and on, the user is encouraged to try to correct the interference by
one or more of the following measures:
-- Reorient or relocate the receiving antenna.
-- Increase the separaon between the equipment and receiver.
-- Connect the equipment into an outlet on a circuit different from that to which the receiver
is connected.
-- Consult the dealer or an experienced radio/TV technician for help
This device complies with part 15 of the FCC rules. Operaon is subject to the following two
condions (1)this device may not cause harmful interference, and (2) this device must accept
any interference received, including interference that may cause undesired operaon.
This device has been evaluated to meet general RF exposure requirement. The device can be
used in portable exposure condion without restricon.

Page Description
2
5
Floor unit setup
Touchscreen remote setup
Care & maintenance
Alert screens
17
19 Floor Unit Specs
20 Touchscreen remote Specs
TABLE OF CONTENTS
1
Part names
Safety instructions
3
FEATURES
6
11
15

IMPORTANT SAFETY INSTRUCTIONS
When using electrical appliances, basic safety precautions should be followed,
including the following:
WARNING - To reduce the risk of electrical shock, fire or injury to persons:
•Read all instructions before using the unit.
•Use only a 120 volt outlet.
•Do not use the unit if the power cord or plug is damaged or the connection to the
wall outlet is loosened.
•Periodically remove dust from the plug.
•Do not insert fingers or foreign objects into the air intake or air outlet.
•When removing the power plug, always hold the plug and never pull on the cord.
•Electrical shock and/or fire from a short circuit may occur as a result.
•Do not remove the plug when your hands are wet.
•Do not use this unit near gas appliances or fireplaces.
•When refilling the water tank, cleaning the unit, or when the unit is not in use, be
sure to unplug the unit. Electrical shock and/or fire from a short circuit may occur as
a result.
•If the power cord is damaged, it must be replaced by the manufacturer, its service
agent, an AireSpa Service Center or similarly qualified person in order to avoid a
hazard.
•Do not operate when using aerosol insecticides or in rooms where there is chemical
fumes in the air, or in locations where the unit may get wet, such as a bathroom.
•Be cautious when cleaning the unit. Strong corrosive cleansers may damage the
exterior.
•Only an AireSpa Authorized Service Center should service this product. Contact the
nearest Service Center for any problems, adjustments, or repairs.
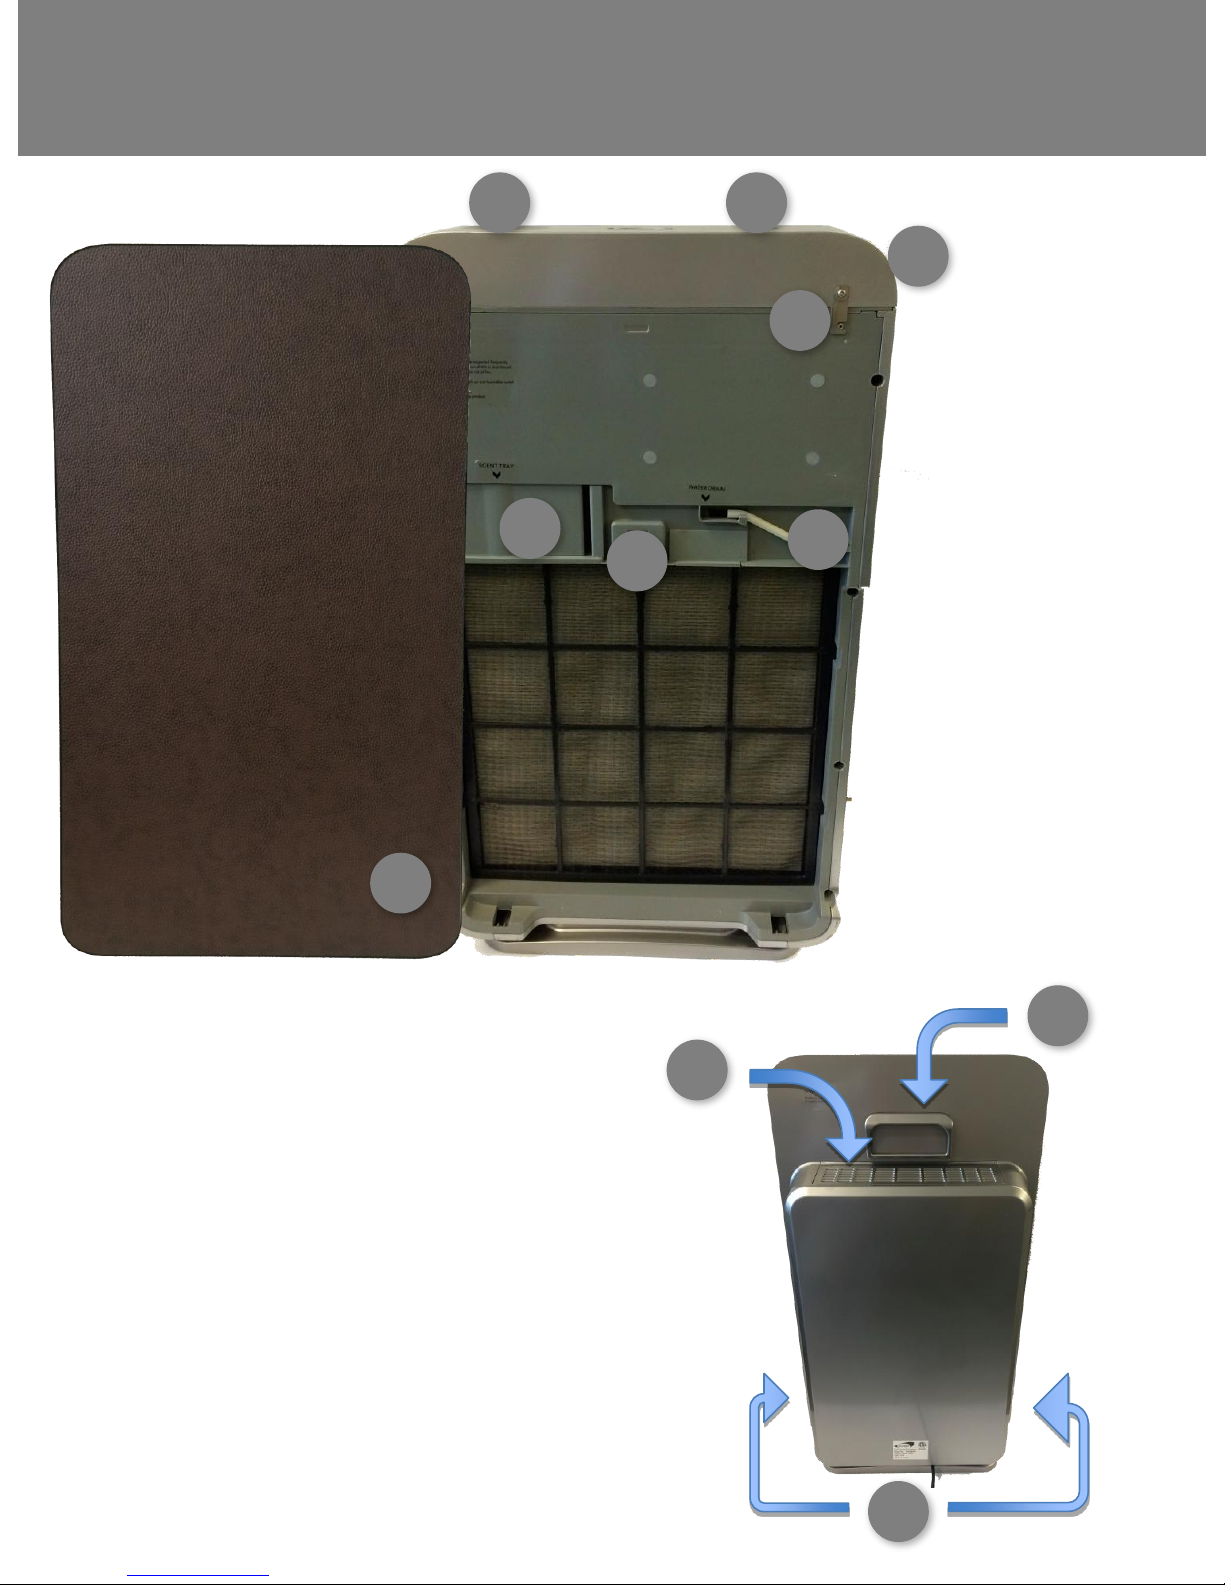
•When carrying the unit, empty the Water Tank and hold the unit by handle.
•Do not drink the water in the Humidifying Tray or Water Tank.
•Change the water in the Water Tank regularly with fresh tap water and periodically
clean the Water Tank and Piezo. (See Page 15).
•The socket-outlet shall be installed near the equipment and shall be easily accessible
2

PART NAMES
1
2
1. Floor Unit
2. Touchscreen Remote
3. Remote Adaptor
4. Aroma Wheel
5. Water Pitcher
M. Pitcher
N. Drain adapter
P. Handle
6. Three Stage Filter Set
Q. Carbon
R. HEPA
S. Pre filter
3 4
5 6
QRS
NP
M
3

CONTINUED PART NAMES
A B
D
EFG
H
J
K
A. Mist output port
B. LED Functionality indicators
C. Water Tank latch
D. Water Tank lock
E. Aroma tray
F. Water drain
G. Piezo cleaning brush
H. Front panel
J. Air Outlet
K. Carrying Handle
L. Air Intake
L
C
4

FEATURES
1234
5
6
7
1. Air Purifier
2. Humidifier
3. Aroma
4. Soundscapes
5. Free Trial timer/ All Off button
6. Feature controls
7. Speakers (on back of unit) 5

FLOOR UNIT SETUP
1. Open front panel by pulling from top [Diagram 1]
2. Unhook water tank lock [Diagram 2]
3. Press-in side latch of floor unit [Diagram 3]
4. Carefully lift lid until fully open [Diagram 4]
5. Remove bag with water pitcher and assemble as shown on Page 6
6. Fill tank with tap water to MAX FILL LINE [Diagram 5], using the water
pitcher
7. Close water tank lid.
2Remove water pitcher
1Unpack Unit
1. Remove floor unit from box and plastic bag
2. Place unit in location designated by management
1
2 3
45
6

1. Remove all packaging
2. Attach pitcher handle [Part P] by sliding it up as shown
above
3. Hold the drain adapter [Part N] in hand, with angled fin
[as shown in diagram 1] facing the lip of the pitcher
4. Place drain adapter [Part N] onto top edge of water
pitcher [Part M] and slide back until drain adapter clicks
onto water pitcher
3Assemble Water Pitcher
N
MP
Diagram 1
N
7

1. Remove all filters from unit
2. Remove all packaging from True HEPA,
Carbon and Washable Pre-Filters
3. Insert Carbon filter [Part Q]
4. Insert True HEPA air filter [Part R]
5. Insert Washable Pre-filter [Part S]
Note: When installing the filters
Use pull tabs located on top front of all filters;
pre-filter has side tabs that hold all filters
in place. These tabs should all be facing
outward
4Install the filter
Q
R
S
8

1. Grasp aroma tray handle, and press to left to release and pull
open [Part F]
2. Remove aroma wheel from packaging [Part 4)
3. Place aroma wheel into aroma tray [Part F]
4. Push aroma door closed until locked in place
Note: The post with flat face in center of tray must be aligned with
aroma wheel center hole.
5Insert Aroma tray
F
4
F
9

1. Close front panel
1. Place lower hinges into
slots on unit
2. Push front panel toward
the unit until magnets lock
in place
2. Plug unit in outlet
6Close front panel
10

TOUCHSCREEN REMOTE SETUP
1. Remove remote from box and plastic bag
2. Plug bedside tablet into provided 3-plug adapter and plug into
wall outlet nearest to bed
3. Press and hold tablet POWER BUTTON on bottom of the tablet
Note: Tablet will automatically start to display software SET UP
1Placement and plug-in
11

2Software SET UP
TOUCH CORRECT FLOOR UNIT MODEL
(located on label of floor unit)
1
12

CONFIRM SETUP SELECTION
3
2
If selections are accurate press CONTINUE button to complete setup
Note: To change selections press the EDIT button
INPUT HOTEL AND ROOM NUMBER, PRESS ENTER
13

INVALID CODES WILL DISPLAY IN RED
SCREEN DISPLAYS WHEN SETUP FINALIZES
14

CARE AND MAINTANENCE
To prevent dirt or stains on the unit, clean regularly. If stains are allowed
to remain, they may become difficult to remove.
Wipe with a dry, soft cloth
For stubborn stains or dirt, use a soft cloth dampened with warm water.
Do not use volatile fluids
Benzene, paint thinner, polishing powder, may damage the surface.
Do not use detergents
Detergent ingredients may damage the unit.
1Touchscreen remote & floor unit
2Piezo cleaning
1. Remove piezo cleaning brush from holder (lift upward)
2. Carefully brush away calcified minerals and small debris that may
build up around piezo
abc
Before clean unit,please power off floor unit.
15

3Draining Water Tank (use water pitcher)
1. Pull tab to remove cover of water drain
2. Twist water drain cap clockwise to remove
3. Remove water drain cap
4. Align fins on top of water pitcher with rails below the water drain
5. Gently slide forward to engage fins of water pitcher fully into rails
6. Place one hand on top of the unit, and press the water pitcher forward
to engage water valve (water will drain into water pitcher). When
pitcher is ¾ full, pull backward on pitcher to stop water flow. Repeat
process until the water tank is empty.
Note: Hold pitcher firmly when removing (pitcher is heavy when full)
7. Reverse steps 1 –6 to close drain
Note: Wipe any water below drain in filter chamber.
12 3
4 65
16

ALERT SCREENS
GREEN LED
Unit has power and
ready to use
Please Close the Front Panel
RED LED
Action Required
•Front Panel Open
•Top Lid Open
•Refill Water
•Unit Unstable
•Floor unit unplugged
•Aroma Tray Open
•Error contact housekeeping
17

CAUTIONS CONCERNING OPERATION
•Do not block the intake and/or air outlet.
•Do not use the unit near or on hot objects, such as stoves or heaters or where it
may come into contact with steam.
•Always operate the unit in an upright position.
•Do not operate the unit without the filters, water tank, and aroma tray properly
installed.
•Do not wash and reuse the True HEPA filter.
•Washing will not improve filter performance, it may cause electric shock
or malfunction.
•Clean the exterior with a soft cloth only.
•Do not use volatile fluids and/or detergents.
•The unit surface may be damaged or cracked.
•The sensors may malfunction as a result.
•Frequency of maintenance required (descaling) will depend on the hardness or the
impurities of the water that you use; the harder the water the more often descaling
will be necessary.
•Keep the unit away from water.
INSTALLATION GUIDELINES
•Avoid use in locations where furniture, fabrics or other items may come in contact
with and restrict the air intake and/or air outlet.
•Place on a stable surface with sufficient air circulation.
•When placing the unit on a heavily carpeted area, the unit may vibrate slightly.
•Place the unit on an even surface to avoid water leakage from the Water Tank
and/or Humidifying Tray.
•Avoid use in locations where grease or oily smoke is generated.(such as in a kitchen,
etc.).
•The unit surface may crack as a result.
•Place the unit about ½ ft. (15 cm) away from the wall in order to ensure proper
airflow.
18
No any content about replacement accessories in user manual, for example:
fragrance bead. In need of replacement, manufacturer or assigned person
should supply service description.
•
This manual suits for next models
2
Table of contents