AirLive CoreNVR 9 User manual

CoreNVR 9/16
Use
r
’s Manual

Copyright and Disclaimer
i AirLive CoreNVR 9/16 User’s Manual
Copyright & Disclaimer
No part of this publication may be reproduced in any form or by any means, whether
electronic, mechanical, photocopying, or recording without the written consent of OvisLink
Corp.
OvisLink Corp. has made the best effort to ensure the accuracy of the information in this
user’s guide. However, we are not liable for the inaccuracies or errors in this guide.
Please use with caution. All information is subject to change without notice
All Trademarks are properties of their respective holders.

Copyright and Disclaimer
AirLive SD-2020 User’s Manual ii
FCC Statement
Federal Communication Commission Interference Statement
This equipment has been tested and found to comply with the limits for a Class B digital
device, pursuant to Part 15 of the FCC Rules. These limits are designed to provide
reasonable protection against harmful interference in a residential installation. This
equipment generates, uses and can radiate radio frequency energy and, if not installed and
used in accordance with the instructions, may cause harmful interference to radio
communications. However, there is no guarantee that interference will not occur in a
particular installation. If this equipment does cause harmful interference to radio or
television reception, which can be determined by turning the equipment off and on, the A
user is encouraged to try to correct the interference by one of the following measures:
Reorient or relocate the receiving antenna.
Increase the separation between the equipment and receiver.
Connect the equipment into an outlet on a circuit different from that to which the
receiver is connected.
Consult the dealer or an experienced radio/TV technician for help.
FCC Caution
Any changes or modifications not expressly approved by the party responsible for
compliance could void the user's authority to operate this equipment. This device complies
with Part 15 of the FCC Rules. Operation is subject to the following two conditions: (1) This
device may not cause harmful interference, and (2) this device must accept any
interference received, including interference that may cause undesired operation. For
product available in the USA/Canada market, only channel 1~11 can be operated.
Selection of other channels is not possible.
This device and its antenna(s) must not be co-located or operation in conjunction with any
other antenna or transmitter.
FCC Radiation Exposure Statement
This equipment complies with FCC radiation exposure limits set forth for an uncontrolled
environment. This equipment should be installed and operated with minimum distance
20cm between the radiator & your body.

Table of Contents
AirLive CoreNVR 9/16 User’s Manualiii
Table of Contents
1. Overview .....................................................................................................1
1.1 Introduction .........................................................................................1
1.2 Key Features ......................................................................................2
2. Package Contents and Installation...........................................................3
2.1 Package Content ................................................................................3
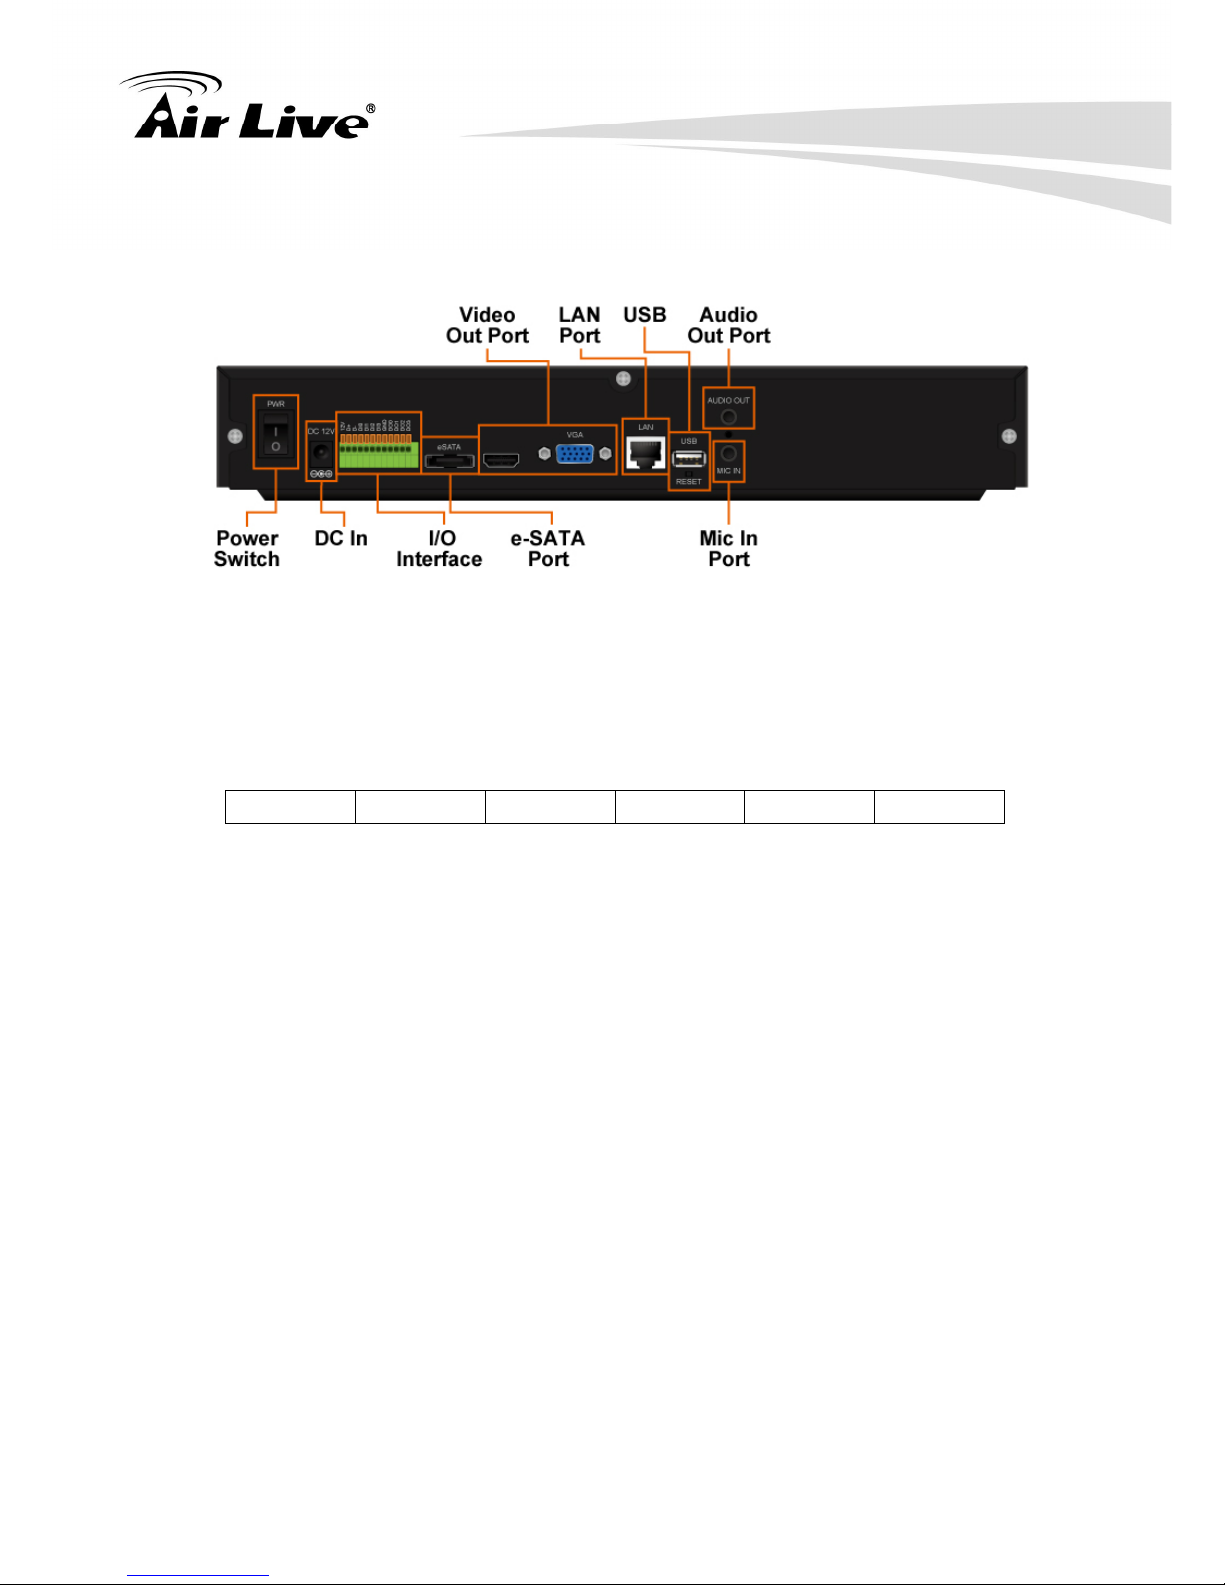
2.2 Connections........................................................................................5
2.3 Start to use CoreNVR .........................................................................6
3. CoreNVR Main System ..............................................................................7
3.1 Main Console......................................................................................7
3.2 System Information.............................................................................7
3.3 Screen Division...................................................................................8
3.4 Sub-screen Functions.........................................................................8
4. System Setting .........................................................................................10
4.1 Camera Setup...................................................................................10
4.1.1 Auto Setting ............................................................................................................. 10
4.1.2 Template Setting ...................................................................................................... 11
4.1.3 Camera List..............................................................................................................12
4.1.4 Camera Setup ........................................................................................................... 12
4.1.5 Parameter Setting ..................................................................................................... 13
4.1.6 Search Camera ......................................................................................................... 14
4.2 Schedule Setting...............................................................................14
4.3 Network Setting ................................................................................15
4.3.1 Network.................................................................................................................... 16
4.3.2 PPPOE...................................................................................................................... 16
4.3.3 UPNP ....................................................................................................................... 16
4.3.4 UPnP Transversal.....................................................................................................16
4.3.5 Server .......................................................................................................................16

Table of Contents
AirLive CoreNVR 9/16 User’s Manual iv
4.4 System Setting..................................................................................17
4.4.1 Device Info............................................................................................................... 17
4.4.2 Date Time Info .........................................................................................................17
4.5 User Setting ......................................................................................18
4.6 Motion Detection Setting...................................................................19
4.7 Address Book Setting .......................................................................20
4.8 Notification Setting............................................................................21
5. System Management ...............................................................................23
5.1 System Management........................................................................23
5.2 Disk Management.............................................................................24
5.3 Snapshot...........................................................................................25
5.4 Event Snapshot ................................................................................26
5.5 Samba Server...................................................................................26
6. Event Setting ............................................................................................28
6.1 Add a New Event ..............................................................................28
6.2 Modify exist Event schedule or Output Action...................................30
6.3 Delete exist Event schedule or Output Action...................................30
6.4 Event Action Type .............................................................................31
7. Log Viewer................................................................................................33
7.1 System Log.......................................................................................33
7.2 Event Log..........................................................................................33
7.3 Bitrate Log ........................................................................................34
8. Playback ...................................................................................................35
8.1 Search Recorded Video Files ...........................................................35
8.2 Playback Control Buttons .................................................................37
8.3 Convert to Avi file..............................................................................38

Table of Contents
AirLive CoreNVR 9/16 User’s Manualv
8.4 Back up Video Files ..........................................................................39
9. Remote Viewing on IE .............................................................................40
9.1 Connection to CoreNVR ...................................................................40
9.2 Live View on IE .................................................................................42
9.3 System Information...........................................................................42
9.4 Screen Division.................................................................................42
9.5 Subscreen Functions ........................................................................43
9.6 Playback on IE..................................................................................45
10. Appendix.................................................................................................47
A. Product Specification...........................................................................47

1. Overview
AirLive CoreNVR 9/16 User’s Manual1
1 1. Overview
This user’s guide explains how to operate CoreNVR series system. A user should read this
manual completely and carefully before you operate the device.
1.1 Introduction
The CoreNVR series is a stable and high capacity network video recorder for IP cameras;
users are able to see the live streaming and also recording multiple events on internet at
the same time. Users may install HDD in the CoreNVR machine for recording so it doesn’t
need any extra computer for storage. The CoreNVR system provides you convenient and
efficient to manage your IP cameras.

1. Overview
AirLive CoreNVR 9/16 User’s Manual 2
1.2 Key Features
H.264 codec for live view and recording over internet
Multi-channel scheduled recording, playback, motion detection
Supports 5 Megapixel resolution
High Resolution Local Display
2X SATAll HDD up to total 6TB and one external eSATA port.
Two-Way Audio
PTZ camera control by joystick and mouse
Event alarm including by motion detection, camera disconnection, HDD error, DI/DO,
Disconnect Alarm, PIR Alarm, Audio Detection Alarm.

2. Package Contents and Installation
AirLive CoreNVR 9/16 User’s Manual3
2.1 Package Content
1. CoreNVR 9ch or CoreNVR 16ch X1
2. 12V / 5A adapter X1
3. SATA data cord X2
4. SATA power cord X2
5. Hard disk holder X4 pcs
6. Quick install guide X1
7. Manual disc X1
Front:
1. Status LED:
PWR: LED on when system is ready.
HDD: LED on when Hard Disk is reading or writing.
LAN: LED on when network is on communication.
REC: LED on when Record schedule is on.
Event: LED on when alarm monitoring is on.
2. Alarm LED:
Alarm: LED on when Hard Disk write error.
CAM: LED on when system have camera disconnected.
3. Digital Input LED: LED on means Digital Input is triggered.
4. Digital Output LED: LED on means Digital output device is reacting.
5. USB: For connect USB stick or mouse.
2 2. Package Contents and
Installation

2. Package Contents and Installation
AirLive CoreNVR 9/16 User’s Manual 4
Back:
1. Power Switch: Switch to “ | ” for Power on.
Switchto“O“forPoweroff.
2. DC Adaptor In: Insert 12VDC / 4A adaptor here.
3. I/O interface: Look from back side.
12V out RS485 D+ RS485 D- DI0 ~ DI3 Ground DO0~DO3
4. e-SATA port: Connect to e-SATA storage device.
5. Video Output: Insert local display connector here.
7. LAN port: Gigabit LAN port.
8. USB: For connect USB stick or mouse.
9. Audio Out port: Insert speaker connector here.
10. Mic In port: Insert Microphone connector here.

2. Package Contents and Installation
AirLive CoreNVR 9/16 User’s Manual5
2.2 Connections
The CoreNVR was designed for small office, home and convenience stores, you may
refer to the picture below to get an idea of connections between IP cameras, router/PoE
switch and CoreNVR.

2. Package Contents and Installation
AirLive CoreNVR 9/16 User’s Manual 6
2.3 Start to use CoreNVR
1. Please refer to the QIG to install the HDD into the CoreNVR system for video
storage.
2. Turn On the NVR Power then you will see the AirLive CoreNVR logo as below.
3. Login NVR system with default username “admin” and password “airlive”.

3. CoreNVR Main System
AirLive CoreNVR 9/16 User’s Manual7
3.1 Main Console
This is the main control panel of system, to provide live stream preview, system setup,
Two-way audio, playback, volume control, snapshot, start or stop monitor, and PTZ
controls.
3.2 System Information
3 3. CoreNVR Main System
Date
Time
Recording Status
Event Alarm Status
HDD Status

3. CoreNVR Main System
AirLive CoreNVR 9/16 User’s Manual 8
3.3 Screen Division
Assign the preview screen to expected layout division by clicking these buttons.
Switchto1Division. Switch to 4 Division.
Switch to 9 Division. Switch to 16 Division.
Switch to Full screen, and click mouse right button to cancel Full Screen.
3.4 Sub-screen Functions
Digital Zoom:
Sub-screen window supported digital zoom, operation step as follow,
1. Click on preview image for switch current focus channel.
2. Scroll the mouse wheel, forward for digital zoom-in, and backward for
zoom-out.
3. Switch division mode will reset digital zoom status to default.
Popup Menu:
Click mouse right button, select an option from the popup menu.
1. Change current channel display camera.
2. Change current division mode.
3. Switch current channel display ratio mode.
4. Switch to Full Screen mode / Cancel Full Screen mode.
5. Reset all channels to default camera list.
6. Snapshot current display.
7. Enable / Disable Auto Switch.
Snapshot: Click to take a snapshot to the HDD; you can management
snapshots at system management “snapshot” page.
Audio Volume Control: Click to switch between normal and mute.
Schedule Monitor: Click button to enable or disable Schedule monitoring,
the recording will be stopped if it is disabled.

3. CoreNVR Main System
AirLive CoreNVR 9/16 User’s Manual9
Two Way Audio: Click button to start or stop selected channel two-way
audio.
PTZ Control:
Move PTZ camera direction by click direction buttons.
Click to make camera return home position.
Move the thumb to left to make slower,
move to right to make move faster.
Tour: Select a tour setting from combo box, and click “go” button to start tour, click
“Stop” button to stop tour.
Preset: Select a preset position from combo box, camera will move to preset position
after click.
IRIS: Adjust camera’s IRIS setting, or set it to auto.
Focus: Adjust camera’s focus setting, or set it to auto.
Zoom: Zoom-in or zoom-out focus camera.
Pan: Begin camera auto pan or stop.

4. System Setting
AirLive CoreNVR 9/16 User’s Manual 10
Click setup button and select “System Setting” from pop-up menu to approach System
setting dialog.
4.1 Camera Setup
4.1.1 Auto Setting
Click the “Auto Setting” button for auto add cameras to system, maximum number of
cameras are depend on NVR’s model.
After click the button, system will show the fuzzy search filter dialog, you could input the
search filter by model name, IP address or MAC address, or you could keep them
empty for search all cameras.
4 4. System Setting

4. System Setting
AirLive CoreNVR 9/16 User’s Manual11
Auto setting could insert intranet’s cameras , even them behind of several switch hubs ,
or you could just direct insert cameras on NVR’s switch hub , then click “ Auto Setting
“ button to add them into system .
Through “ Auto Setting “ function , you won’t need to key-in any network IP or sub-mask
parameter , you only need to click “ Auto Setting “ button to finish insert IP camera job.
4.1.2 Template Setting
When you use “Auto Setting” or add a new camera, system will read the camera
template from “Template Setting” for fill the camera parameter.
After you confirm the template, in most case, you will no longer need to set camera’s
parameter again.
You could setting the quick template from camera setting page, in most case you only
need set the camera’s resolution and frames per second.
If you need set more detail template, please click the “Advanced” button to approach the
template setting dialog.
Resolution
The new camera will try to fit selected resolution, if you select “Max”, camera will use
maximum resolution, or you could select another resolution, system will choose a
near one resolution of camera.
FPS: Set the frames per second of camera, system will try to set a near or equal FPS
to camera.
Rate Control: Set the rate control algorithm of new camera.
Quality: If you select the EVBR for new cameras, you could set then VBR quality
here.
Account: Setup the default login camera user account.
Password: Setup the default login camera password.

4. System Setting
AirLive CoreNVR 9/16 User’s Manual 12
4.1.3 Camera List
List all inserted IP camera’s name, click the row of camera to display detail information
and live streaming video.
Check the box to make the camera available for video streaming; otherwise the camera
will be disabled if the check box is empty.
Switch Camera sequential
Click mouse right button on the camera, and select another camera in the popup menu,
system will switch these two camera’s setting.
4.1.4 Camera Setup
Vendor: You may select camera vendor or use OnVIF protocol for camera connection.
Detect: Check camera available and receive camera model name.
Camera Name: Key in camera name at here.
IP Address: Key-in camera’s IP address.
HTTP port: Set camera’s HTTP port, default is 80.
RTSP port: Set camera’s RTSP port, For TCP streaming, default is 554.
OnVIF Authentication: Select connect to camera with WSSE authentication or without
authentication.

4. System Setting
AirLive CoreNVR 9/16 User’s Manual13
User Name: Set the User name for login camera.
Password: Set the Password for login camera.
4.1.5 Parameter Setting
Profile: Select video codec and resolution for live view and recording.
FPS: Select FPS for live view and recording.
Protocol: Select protocol HTTP / TCP and UDP.
Rate Control: Select EVBR or CBR for better video performance.
Quality: Select video quality by numbers.
Enable Audio: You have to enable audio for two-way audio function.
Audio Record: Enable it for audio recording.
Two Way Audio: Enable it for Two-Way Audio function.
Input Gain: Adjust the gain to reduce the input audio noise.
Output Gain: Adjust the gain to reduce the output audio noise.
※ Note:The parameter settings are different from each vendor.
Add Camera:
1. Click “Search” button and wait for search job finished.
2. Select a camera on search result list.
3. Preview live streaming video at preview window to confirm current camera.
4. Click “Add” button to add selected camera into system.

4. System Setting
AirLive CoreNVR 9/16 User’s Manual 14
Delete Camera:
2. Select a camera from installed camera list.
3. Click “Delete” button to remove selected camera from list.
Update Camera setting:
1. Select a camera from installed camera list.
2. Modify camera’s setting at each setting fields.
3. Click “Update” button to save modified result.
※ Note:Updated setting will write to disk after click “OK” at bottom of page. If
you click “Cancel” button to leave setting page, system will ignore all
your modified setting.
Clear button: Clear all setting fields.
4.1.6 Search Camera
Click “Search” button, system will list all camera can be searched in “Search List”, you
can click on each row to preview live video streaming.
4.2 Schedule Setting
Schedule setting allows you to setup different type of recording, you may define multiple
recording type for each day or within 24 hours.
Other manuals for CoreNVR 9
1
This manual suits for next models
1
Table of contents
Other AirLive Recording Equipment manuals