AIRLUX AFE User manual

instructions pour l’usage
operating
manuale d’uso
AFE
AFC
AFP

2Instructions pour l’usage
ITALIANO
Prima di utilizzare il forno per la prima volta, leggere con attenzione le istruzioni di
installazione e manutenzione allegate al prodotto.
In base al modello, gli accessori compresi nel forno possono variare rispetto a quelli
mostrati nelle immagini.
ENGLISH
Before using your oven for the first time, please carefully read the installation and
maintenance instructions that come with it.
Depending on the model, the accessories included in your oven may vary from those
shown in the pictures.
FRANÇAIS
Avant la première utilisation de votre four, veuillez lire attentivement les instructions
d’installation et d’entretien fournies avec votre four.
Selon les modèles, il est possible que les accessoires fournis avec votre four soient
différents de ceux indiqués sur les images.

3
Instructions pour l’usage
Français
Description du four
1Panneau de commande
2Verrouillage de porte (pour les
modèles à pyrolyse uniquement)
3Résistance du gril
4Support plaques
5Grille
6Plaque
7Charnière
8Vitre intérieure
9Sortie dair de refroidissement
10 Fixation au meuble
11 Ampoule
12 Panneau du fond
13 Turbine
14 Joint de four
15 Porte
1
10
12
13
14
15
5
6
7
8
3
2
4
9
11
Panneau frontal des commandes
1Sélecteur de fonctions.
2Horloge électronique.
3Sélecteur de températures.
Modèles AFE / AFC
1Sélecteur de fonctions.
2Horloge électronique / Température sélectionnée.
3Sélecteur de températures.
Modèles à pyrolyse AFP
1 2 3
1 2 3

4Instructions pour l’usage
Fonctions du four
ARRÊT DU FOUR
CUISSON TRADITIONNELLE
GRIL
MAXI GRIL
SOLE
GRIL AVEC TURBINE
MAXI GRIL AVEC TURBINE
CUISSON TRADITIONNELLE À TURBINE
DÉCONGÉLATION
PYROLYSE
INFORMATION
Consultez le guide de cuisson fourni avec
votre four pour lire la description des usages
de chacune des fonctions.
Symboles du sélecteur de fonctions

5
Instructions pour l’usage
Français
Description de l’horloge électronique
1TOUCHES
, et : Permettent de programmer les
fonctions de l’horloge électronique.
: Dans les modèles à régulation électronique
de la température, appuyez sur cette touche
pour voir la température pendant la cuisson.
2SYMBOLES
Fonctions de l’horloge
AVERTISSEUR :Allumé lorsque la fonction
de l’avertisseur de l’horloge est sélection-
née. Il émet un signal sonore lorsque la
durée programmée est écoulée. Le four ne
s’éteint pas à la fin de la durée program-
mée. Cette fonction peut également être
utilisée en cours de cuisson.
et PROGRAMMATION : Allumé pour
indiquer que le four a été programmé
(durée, fin ou les deux).
• Durée de cuisson :Permet de régler
le temps de cuisson. Le four s’éteint auto-
matiquement au terme de la durée sélec-
tionnée.
• Heure de fin de cuisson :Permet de
régler le temps de cuisson jusqu’à une cer-
taine heure. Lorsque l’heure sélectionnée est
atteinte, le four s’éteint automatiquement.
• et durée et fin de cuisson :Per-
met de programmer la durée et l’heure de
fin de cuisson. Le four se met en marche au-
tomatiquement afin que celui-ci fonctionne
pendant le temps de cuisson sélectionné
(durée). Il s’éteint automatiquement à l’heure
indiquée (fin de cuisson).
VERROUILLAGE DE L’HORLOGE :Il in-
dique que les touches tactiles de l’horloge
sont verrouillées afin d’éviter que les enfants
en bas âge ne puissent les utiliser.
Fonctions supplémentaires
CHAUFFAGE :Indique que le four trans-
met actuellement de la chaleur à l’aliment.
PYROLYSE :Pour les modèles à py-
rolyse uniquement. Allumé pendant la
fonction de nettoyage à pyrolyse.
VERROUILLAGE DE PORTE :Pour les
modèles à pyrolyse uniquement. Indique
que la porte du four est bloquée. Le blo-
cage est manuel ou automatique pendant
la fonction pyrolyse.
MISE EN GARDE
La sensibilité des touches tactiles s’adapte
aux conditions ambiantes en permanence.
Veillez à ce que la surface du panneau de
commandes frontal soit propre et libre de
tout obstacle lorsque vous branchez le four
au secteur électrique.
Il est nécessaire de débrancher le four du
secteur électrique et de le rebrancher après
un court instant si l’horloge ne répond pas
correctement lorsque vous appuyez sur les
touches. Ce procédé permet de régler au-
tomatiquement les commandes tactiles qui
répondront de nouveau lorsque vous les
toucherez avec le doigt.
RÉGLAGE DE L’HEURE
• Pour mettre l’heure sur le four, les com-
mandes du sélectionneur de fonctions et de
température doivent être en position .
• Lorsque vous branchez le four, l’indication
12:00 se met à clignoter sur l’horloge.
• Appuyez sur ou pour régler l’heure
puis les minutes. 2 bips sonores consécutifs
2 1 2

6Instructions pour l’usage
retentissent alors en guise de confirmation
de la sélection de l’heure.
• Si vous souhaitez modifier l’heure, appuyez
sur ou jusqu’à ce que l’heure appa-
raisse en clignotant. Appuyez sur et sui-
vez les mêmes étapes décrites ci-dessus.
REMARQUE
L’horloge est pourvue du mode éclairage
nocturne, de façon à réduire l’intensité lu-
mineuse de l’écran entre minuit et 6 heures.
MISE EN GARDE
En cas de coupure de courant, toute la pro-
grammation de l’horloge électronique est
annulée.
Le cas échéant, tournez les commandes du
sélectionneur de fonctions et de tempéra-
ture en position .
L’indication 12:00 apparaîtra et, ensuite,
vous pourrez mettre l’horloge à l’heure en
suivant les instructions précédentes.
Si la porte du four était bloquée avant la
coupure de courant, le symbole de blocage
s’allumera jusqu’à ce que la porte se dé-
bloque.
Cela peut prendre plusieurs minutes en
fonction de la température du four ; pendant
ce temps, vous ne pourrez pas mettre l’hor-
loge à l’heure.
Une fois la porte débloquée, vous pourrez
mettre l’horloge à l’heure en suivant les ins-
tructions précédentes.
Fonctionnement du four
• Vous remarquerez que le symbole
s’allume durant la cuisson, indiquant ainsi
que la chaleur est transmise à l’aliment.
Ce symbole s’éteint lorsque la température
sélectionnée est atteinte.
• Pour éteindre le four, placez les commandes
sur la position .
INFORMATION
Lorsque vous lancez une cuisson, votre four
affichera le temps de cuisson effectué par
votre four.
FONCTIONNEMENT MANUEL
• Une fois l’horloge réglée, votre four est prêt
à fonctionner. Sélectionnez une fonction de
cuisson et une température.
INFORMATION
Dans les modèles avec régulation électro-
nique de la température, lorsque vous tour-
nez le sélecteur, la température s’affiche sur
l’écran de l’horloge.
Une fois la température sélectionnée, l’hor-
loge sera de nouveau affichée automatique-
ment à l’écran.
Pour revoir la température pendant la cuis-
son, appuyez sur la touche et tournez la
commande de sélection de température si
vous souhaitez la modifier

7
Instructions pour l’usage
Français
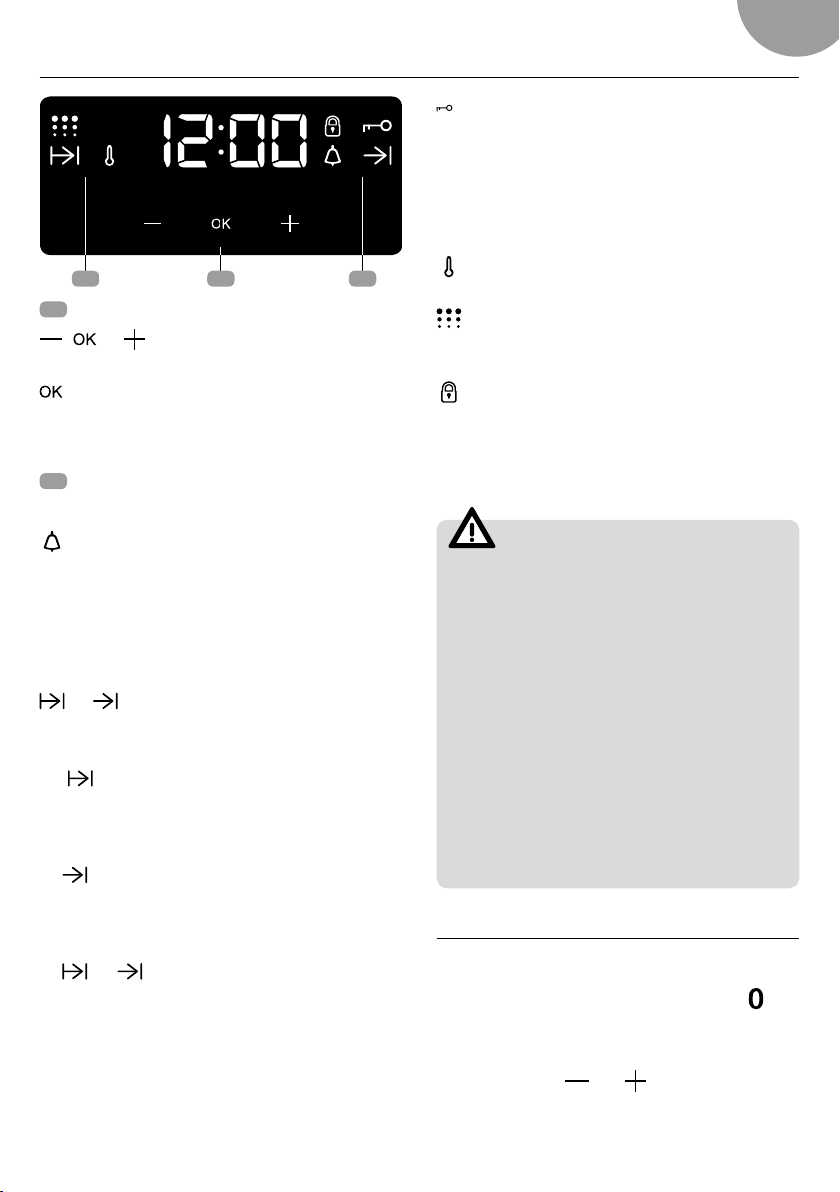
FONCTIONNEMENT MINUTERIE
DU FOUR
Programmation de l’avertisseur
1. Appuyez sur ou jusqu’à ce que le
symbole se mette à clignoter sur l’écran
et appuyez sur . L’écran affiche alors
l’indication 00:00.
2. Sélectionnez le temps après lequel vous
souhaitez que l’horloge sonne en appuyant
sur ou . 2 bips sonores consécutifs
sont alors émis à titre de confirmation et le
compte à rebours s’affiche sur l’écran. Le
symbole se met à clignoter lentement.
3. Une fois terminé, un signal sonore retentit
pendant 90 secondes et le symbole se
met à clignoter rapidement.
REMARQUE
Le four ne s’éteint pas au terme du temps
programmé lorsque la fonction Avertisseur
est activée.
4. Appuyez sur n’importe quelle touche pour
couper le signal sonore. Le symbole
s’éteint.
Pour modifier la durée de l’avertisseur, effec-
tuez à nouveau les étapes indiquées. À l’affi-
chage du minuteur, apparaît le temps restant
actuel que vous pouvez modifier.
REMARQUE
Avec la fonction Avertisseur, le temps restant
s’affiche sur l’écran de manière permanente.
Lorsque cette fonction est programmée, il
n’est pas possible de visualiser l’heure ni la
durée de cuisson totale programmée.
Programmation de la durée de cuisson
1. Appuyez sur ou jusqu’à ce que le
symbole se mette à clignoter sur l’écran
et appuyez sur . L’écran affiche alors l’in-
dication 00:00.
2. Sélectionnez le temps après lequel vous
souhaitez que l’horloge sonne en appuyant
sur ou . 2 bips sonores consécutifs
sont alors émis à titre de confirmation et le
compte à rebours s’affiche sur l’écran. Le
symbole se met à clignoter lentement.
3. Sélectionnez une fonction et une température
de cuisson au moyen des commandes du four.
4. Une fois la durée de cuisson écoulée, le four
s’éteint, un signal sonore retentit et le sym-
bole se met à clignoter rapidement.
5. Appuyez sur n’importe quelle touche pour
couper le signal sonore et éteindre le symbole
. Le four se remet alors sous tension.
6. Placez les commandes sur la position
pour éteindre le four.
Vous pouvez modifier à tout moment le temps
de cuisson restant en appuyant sur ou
jusqu’à ce que le symbole se mette à cli-
gnoter rapidement. Ensuite, appuyez sur
pour modifier la durée.
REMARQUE
Avec la fonction Avertisseur, le temps restant
s’affiche sur l’écran de manière permanente.
Lorsque cette fonction est programmée, il
n’est pas possible de visualiser l’heure ni la
durée de cuisson totale programmée.
Programmation de l’heure de fin
de cuisson
1. Appuyez sur ou jusqu’à ce que le
symbole se mette à clignoter sur l’écran
et appuyez sur . Sur l’écran, vous verrez
l’heure actuelle.
2. Sélectionnez le temps après lequel vous
souhaitez que l’horloge sonne en appuyant
sur ou . 2 bips sonores consécutifs
sont alors émis à titre de confirmation et le
compte à rebours s’affiche sur l’écran. Le
symbole se met à clignoter lentement.
3. Sélectionnez une fonction et une tempéra-
ture de cuisson.

8Instructions pour l’usage
4. Une fois la durée de cuisson écoulée, le four
s’éteint, un signal sonore retentit et le sym-
bole se met à clignoter rapidement.
5. Appuyez sur n’importe quelle touche pour
couper le signal sonore et éteindre le sym-
bole . Le four se remet alors sous tension.
6. Placez les commandes sur la position
pour éteindre le four.
Vous pouvez modifier à tout moment le temps
de cuisson restant en appuyant sur ou
jusqu’à ce que le symbole se mette à cli-
gnoter rapidement. Ensuite, appuyez sur
pour modifier la durée.
Programmation de la durée et fin
de cuisson
1. Appuyez sur ou jusqu’à ce que le
symbole clignote sur l’écran et appuyez
sur . L’écran affiche alors l’indication
00:00.
2. Sélectionnez la durée de cuisson en ap-
puyant sur ou . 2 bips consécutifs
sont alors émis, le temps restant s’affiche
sur l’écran et le symbole se met à
clignoter lentement.
3. Appuyez sur ou jusqu’à ce que le
symbole se mette à clignoter sur l’écran
et appuyez sur . Sur l’écran, vous verrez
l’heure de fin prévue.
4. Réglez l’heure de fin de la cuisson en tou-
chant sur ou . 2 bips sonores consé-
cutifs sont alors émis et l’heure actuelle s’af-
fiche à l’écran.
5. Sélectionnez une fonction et une tempéra-
ture de cuisson. Le four restera éteint et les
symboles et allumés. Votre four est
programmé.
6. À l’heure de début de cuisson programmée,
le four se met en marche et la cuisson
s’effectue pendant la durée sélectionnée.
7. Pendant la cuisson, le temps de cuisson
restant s’affiche à l’écran et le symbole
clignote lentement.
8. À l’heure programmée pour la fin de cuis-
son, le four s’éteint, un signal sonore
retentit et le symbole se met à clignoter
rapidement.
9. Appuyez sur n’importe quelle commande
tactile pour couper le signal sonore et
éteindre le symbole . Le four se remet
alors sous tension.
10. Placez les commandes sur la position
pour éteindre le four.
Vous pouvez modifier à tout moment le temps
de cuisson restant en appuyant sur ou
jusqu’à ce que le symbole se mette à cli-
gnoter rapidement. Ensuite, appuyez sur
pour modifier la durée.
Fonctions de sécurité
VERROUILLAGE DE SÉCURITÉ POUR
LES ENFANTS
Cette fonction peut être sélectionnée à tout
moment pendant l’utilisation du four.
Pour activer la fonction, appuyez de façon pro-
longée le touch jusqu’à ce qu’un bip sonore
retentisse et que le symbole s’affiche à l’écran.
Ce message indique que l’horloge est verrouillée.
Si la fonction de sécurité enfants est activée
lorsque le four est éteint, l’appareil ne fonc-
tionne pas même si une fonction de cuisson
est sélectionnée.
Si cette fonction est activée pendant que vous
cuisinez avec le four, seule la manipulation de
l’horloge électronique sera verrouillée.
Pour désactiver la fonction, maintenez le
touch enfoncée jusqu’à ce qu’un bip so-
nore retentisse.
VERROUILLAGE MANUEL DE PORTE
Disponible pour les modèles à pyrolyse
uniquement.
Cette fonction permet de bloquer la porte du four.

9
Instructions pour l’usage
Français
IMPORTANT
Cette fonction ne peut être sélectionnée
que si le sélecteur de fonctions du four est
placé sur le mode veille .
Une fois la porte bloquée, vous pourrez
commencer la cuisson normalement
Pour activer/désactiver le verrouillage de
porte, suivez les étapes suivantes :
1. Appuyez sur ou jusqu’à ce que le
symbole se mette à clignoter sur l’écran.
L’état actuel du verrouillage de la porte s’af-
fiche alors : « On » s’il est activé et « Off » s’il
est désactivé.
2. Touchez . Ensuite, vous entendrez un
sifflement et le blocage commencera à se
fermer s’il était sur « Off » et à s’ouvrir s’il
était sur « On ».
ATTENTION
Avant d’activer le blocage, assurez-vous
que la porte du four est bien fermée. Si la
porte n’est pas bien fermée, elle ne se blo-
quera pas et une alarme sonnera.
Le cas échéant, éteignez l’alarme en tou-
chant n’importe quelle touche de l’horloge,
fermez bien la porte et activez à nouveau
le blocage en suivant les instructions pré-
cédentes.
3. Une fois la porte complètement bloquée/
débloquée, le nouvel état de blocage de la
porte sera affiché sur l’écran.
Si le verrouillage est activé, le symbole
s’allume sans clignoter.
IMPORTANT
Pour débloquer la porte pendant la cuis-
son, mettez le sélecteur de fonctions en
position de repos et débloquez la porte en
suivant les instructions précédentes.
Une fois la porte débloquée, placez le sé-
lecteur de fonctions sur la position à la-
quelle il se trouvait pour continuer à cuisiner
Fonction d’autonettoyage pyrolytique
Fonction disponible sur les modèles à pyrolyse
AFP.
MISE EN GARDE
Avant de procéder au cycle de nettoyage
pyrolytique, lisez attentivement les instruc-
tions de sécurité que vous trouverez au dé-
but du manuel d’installation et d’entretien.
Cette fonction vous permet de réaliser un
cycle de nettoyage pyrolytique durant lequel,
en raison des hautes températures atteintes à
l’intérieur du four, se produit un processus de
carbonisation des graisses accumulées.
Il est généralement recommandé de réaliser
une pyrolyse toutes les 4-5 cuissons et d’utili-
ser le programme le plus approprié au niveau
de saleté du four. Plus le four est sale, plus la
durée du programme doit être longue.
L’éclairage intérieur du four restera éteint du-
rant la pyrolyse.

10 Instructions pour l’usage
PROGRAMMER LA FONCTION PYROLYSE
IMPORTANT
Avant de lancer la pyrolyse, il est indispen-
sable de retirer tous les accessoires et la
vaisselle du four, y compris les supports des
plaques et/ou les rails télescopiques. Pour
ce faire, suivez les instructions figurant dans
le manuel d’installation et d’entretien fourni
avec votre four.
MISE EN GARDE
Retirer du four tout écoulement ou résidu de
saleté majeur car ils pourraient prendre feu
et déclencher un incendie durant la pyrolyse.
MISE EN GARDE
Avant de mettre en marche la pyrolyse, as-
surez-vous que la porte du four est bien fer-
mée.
1. Placez le sélecteur de fonctions de cuisson
sur la position Pyrolyse : .
2. Au bout de quelques secondes, le symbole
s’allume et l’indication P2 (programme
P2 de pyrolyse) s’affiche sur l’écran de
l’horloge.
3. Vous pouvez alors modifier le programme de
pyrolyse sur P1, P2 ou P3 en appuyant sur
la touche ou :
P1 : Pyrolyse douce. Durée 1 heure.
P2 : Pyrolyse normale. Durée 1 heure et
30 minutes.
P3 : Pyrolyse forte. Durée 2 heures.
4. Une fois le programme souhaité sélectionné,
appuyez sur . Le verrouillage automatique
de porte s’activera immédiatement après.
ATTENTION
Si la porte n’est pas bien fermée, elle ne se
bloquera pas, une alarme sonnera et la py-
rolyse ne sera pas lancée.
Le cas échéant, éteignez l’alarme en touchant
n’importe quelle touche de l’horloge, fermez
bien la porte, mettez la commande du sélec-
tionneur de fonction en position et sélec-
tionnez à nouveau le programme de pyrolyse
en suivant les instructions précédentes.
5. Lorsque la porte est verrouillée, le sybole
s’allume sur l’écran de l’horloge et le temps
restant avant la fin de la pyrolyse s’affiche.
IMPORTANT
Une fois arrivé à ce stade, le four est pro-
grammé et effectue le cycle de nettoyage
pyrolytique. Durant ce cycle, vous ne pour-
rez sélectionner aucune fonction de l’horloge
du four, à l’exception de la fonction sécurité
pour les enfants.
N’essayez pas non plus d’ouvrir la porte du
four au risque d’interrompre le processus de
nettoyage.
6. Lorsque le cycle de nettoyage pyrolytique
s’achève, un signal sonore retentit, le sym-
bole se met à clignoter et 0:00 s’affiche
sur l’écran de l’horloge.
7. Appuyez sur n’importe quel symbole de
l’horloge pour arrêter le signal sonore.
8. Placez le sélecteur de fonctions sur la
position .
9. Une fois le processus de préchauffage du
four terminé, le four restera très chaud et ne
pourra être utilisé.
Jusqu’à ce que le four refroidisse, le re-
froidissement continue de fonctionner et le
symbole reste éclairé.
IMPORTANT
En raison des hautes températures à l’inté-
rieur du four, il se peut que le temps de refroi-
dissement varie en fonction de la température
ambiante.

11
Instructions pour l’usage
Français
10. Une fois votre four refroidi, le symbole
s’éteint.
11. Ouvrez la porte du four et passez un chif-
fon humide à l’intérieur de la cavité, afin de
retirer la cendre produite durant le cycle de
nettoyage. Dans les coins difficiles d’accès
à l’intérieur du four, il faudra utiliser une
éponge en fibre non métallique.
12. Une fois l’intérieur du four propre, n’ou-
bliez pas de remettre les supports et les
ustensiles.
13. Le four est prêt pour une prochaine
utilisation.
IMPORTANT
Si vous repérez un quelconque problème
dans la programmation et l’utilisation de
cette fonction, reportez-vous au guide d’uti-
lisation et d’entretien fourni avec votre four.
ANNULATION DE LA PYROLYSE
La pyrolyse est une fonction automatique, elle
se met donc uniquement en marche par le
biais de la programmation de l’horloge. Pour
annuler une pyrolyse en cours, il est néces-
saire de déprogrammer le four en suivant les
instructions suivantes :
1. Placez le sélecteur de fonctions sur la
position .
L’écran de l’horloge affiche alors
2. Selon les températures à l’intérieur du four,
deux situations sont possibles :
a) Température intérieure dangereuse : Dans
ce cas, la porte reste verrouillée jusqu’à
ce que la température ne représente plus
de risque.
b) Température intérieure sans risque : Si la
température à l’intérieur du four ne repré-
sente pas de risque, le déverrouillage est
réalisé immédiatement.
3. Une fois que la porte s’est déverrouillée
et peut être ouverte, l’heure s’affiche de
nouveau sur l’écran de l’horloge.

12 Operating
Description of the oven
1Control panel
2Door lock (only for
pyrolytic models)
3Grill element
4Tray supports
5Grid shelf
6Tray
7Hinge
8Inner Glass
9Air cooling outlet
10 Unit mounting
11 Lamp
12 Back Wall Panel
13 Fan
14 Oven Seal
15 Door
Control panel
1Function control dial.
2Electric clock/timer.
3Temperature control dial.
AFE / AFC Models
1Function control dial.
2Electric clock/timer / Selected temperature.
3Temperature control dial.
AFP Pyrolytic models
1
10
12
13
14
15
5
6
7
8
3
2
4
9
11
1 2 3
1 2 3

13
Operating
English
Oven functions
OVEN SWITCH-OFF
CONVENTIONAL
GRILL
MAXIGRILL
LOWER ELEMENT
GRILL WITH FAN
MAXIGRILL WITH FAN
CONVENTIONAL WITH FAN
DEFROSTING
PYROLYSIS
INFORMATION
For a description of how to use each of the
features, see the cooking guide that comes
with your oven.
Function selector symbols

14 Operating
Electronic clock/timer description
1KEYS
, and : Enable you to programme the
electronic clock/timer functions.
: For models with electronic temperature
control, press this button to see the tem-
perature during cooking.
2SYMBOLS
Clock Settings
AVISADOR: Lights up when the clock/
timer is selected. Generates an acoustic
signal when the time is up. The oven does
not turn off at the end of the timer period.
This function can also be used while the
oven is cooking.
and PROGRAMMING: Light up to indi-
cate that the oven is programmed (cooking
time, stop time or total).
• Cooking Time: This function allows you
to programme the cooking time, after which
the oven will turn off automatically.
• Cooking Stop Time: This setting al-
lows you to programme the time for cook-
ing to stop, after which the oven will turn off
automatically.
• and Cooking Time and Cooking
Stop Time: This setting allows you to pro-
gramme the cooking time and cooking stop
time. The oven switches on automatically
at the set time and operates for the select-
ed cooking time (Cooking Time). It then
switches off automatically at the indicated
time (Cooking Stop Time).
CLOCK/TIMER LOCK: Indicates that the
touch keys for the clock/timer are locked,
preventing modifications by small children.
Other functions
HEATING: Indicates that the oven is trans-
mitting heat to the food.
PYROLYSIS: For pyrolytic models only.
Lights up while the Pyrolytic function is in
progress.
DOOR LOCK: For pyrolytic models
only. Indicates that the door is locked,
either manually or automatically while the
pyrolytic function is in progress.
WARNING
The sensitivity of the touch keys adapts
continually to environmental conditions.
Make sure the surface of the control panel is
clean and free of obstacles when plugging
in the oven.
If the clock does not respond correctly
when you touch the keys, unplug the oven
for a few seconds and then plug it in again.
Doing this causes the sensors to adjust au-
tomatically so that they will react once more
to fingertip control.
SETTING THE TIME
• To set the time on the oven, the function and
temperature dials must be in the position.
• When you plug in the oven, you will see the
clock flashing 12:00.
• Touch or to adjust the hours and
then the minutes. You will hear a double
beep confirming the time is set.
• If you wish to modify the time, touch or
until the time starts flashing. Touch
and and follow the instructions in the previ-
ous point.
2 1 2

15
Operating
English
NOTE
The clock light has a night mode so the display
light will dim between 00:00 and 6:00 hours.
WARNING
In the event of a power failure, your elec-
tronic clock/timer settings will be erased.
If this happens, turn the function and tem-
perature dials to the position.
The indication 12:00 will show, and you will
then be able to set the time as described
above.
If the oven door was locked before the pow-
er cut, the locked symbol will show until it is
unlocked.
This may take several minutes, depending
on the temperature inside the oven, and
during this time you cannot reset the time.
Once the door is unlocked, you can set the
time as described above
Oven use
• You will notice that the symbol lights up
during cooking to indicate that heat is being
transmitted to the food. This symbol disap-
pears when the selected temperature has
been reached.
• Set the controls to to turn off the oven.
INFORMATION
When you start cooking, your oven will
show the time the oven has been cooking
MANUAL OPERATION
• After setting the clock, the oven is ready for
use. Select a cooking function and tempera-
ture.
INFORMATION
In models with an electronic temperature
control, when the selector switch is turned,
the clock display will show the temperature.
After selecting the temperature, the clock
display will automatically reappear.
To see the temperature again during cook-
ing, press the button and turn the tem-
perature dial if you want to change it.

16 Operating
OVEN TIMER OPERATION
Programming the Buzzer
1. Touch or until the symbol on the
display starts flashing, then press . The
indication ‘00:00’ will appear on the display.
2. Select the time after which you want the
alarm to sound by pressing or . You
will hear 2 beeps to confirm that the time has
been set and the clock will start counting
down from the selected time. The sym-
bol will flash slowly.
3. Once the time has expired, an acoustic sig-
nal will sound for 90 seconds and the
symbol will flash quickly.
NOTE
With the Buzzer function, the oven will not
turn off when the time expires.
4. Touch any key to stop the alarm. The
symbol will then disappear.
If you wish to modify the time on the buzzer, re-
peat the steps shown. Upon entering the timer
control, the time currently remaining will appear,
which you will be able to adjust.
NOTE
With the Buzzer function, the remaining time
will show permanently on the display. With
this programmed function, it is not possible
to view the time or the total programmed
cooking time.
Programming Cooking Time
1. Touch or until the symbol on the
display starts flashing, then press . The
indication ‘00:00’ will appear on the display.
2. Select the time after which you want the
alarm to sound by pressing or . You
will hear 2 beeps to confirm that the time has
been set and the clock will start counting
down from the selected time.The sym-
bol will flash slowly.
3. Select a function and a cooking temperature
using the oven commands.
4. Once the cooking time is up, the oven will
turn off, an alarm will sound and the
symbol will flash quickly.
5. Touch any key to stop the alarm and turn off
the symbol. The oven will switch on again.
6. Set the controls to the position to turn off
the oven.
You can change the remaining cooking time at
any time by touching or until the
symbol starts to flash quickly. Now press to
change the time.
NOTE
With the Cooking Time function, the remain-
ing time will show permanently on the dis-
play. You cannot see the current time on the
display when this function is set.
Programming the Cooking Stop Time
1. Touch or until the symbol on the
display starts to flash and press . You will
see the current time on the timer display.
2. Select the time after which you want the
alarm to sound by pressing or . You
will hear 2 beeps to confirm that the time has
been set and the clock will start counting
down from the selected time. The sym-
bol will flash slowly.
3. Select a cooking function and temperature.
4. When the cycle is finished, the oven will turn
itself off, a buzzer will sound and symbol
will flash quickly.
5. Touch any sensor to stop the alarm and to
turn off the , symbol. The oven will switch
on again.
6. Set the controls to the position to turn off
the oven.

17
Operating
English
You can change the remaining cooking time at
any time by touching or until the
symbol starts to flash quickly. Now press to
change the time.
Programming Cooking Time
and Cooking Stop Time
1. Touch or until the symbol on the
display starts flashing, then press . The
indication ‘00:00’ will appear on the display.
2. Select the cooking time by touching or
. Next, a double beep will sound, the re-
maining time will appear on the display and
the symbol will flash slowly.
3. Touch or until the symbol on the
display starts flashing, then press . You
will see the expected completion time on the
timer display.
4. Adjust cooking completion time by touching
or . Next, a double beep will sound and
the current time will be displayed on the dis-
play.
5. Select a cooking function and temperature.
The oven will remain disconnected with the
and symbols lit up. The oven is now
programmed.
6. When it is time to start cooking, the oven will
turn on and will operate for the programmed
cooking time.
7. While cooking, the cooking time remaining
will be displayed and the symbol will
flash slowly.
8. When the cooking time is up, the oven will
turn off, a buzzer will sound, and the
symbol will flash quickly.
9. Touch any sensor to stop the buzzer and
turn off the symbol. The oven will
switch on again.
10. Set the controls to the position to turn
off the oven.
You can change the remaining cooking time at
any time by touching or until the
symbol starts to flash quickly. Now press to
change the time.
Safety instructions
SAFETY CHILD LOCK
This function can be selected at any time while
using the oven.
To activate the function, touch and hold
key for several seconds until you hear a beep
and the symbol appears on the display. The
clock/timer is locked.
If the oven is off and you activate the child
safety function, the oven will not work even if a
cooking function is selected.
If this function is activated while you are cook-
ing, it will only lock the electronic clock/timer
settings.
To disable the function, press key for several
seconds until you hear a beep.
MANUAL DOOR LOCK
Available in pyrolytic models only.
This function allows the oven door to be locked.

18 Operating
IMPORTANT
This function can only be selected when the
oven command functions are set to the rest
position .
Once the door has been locked, you can
start cooking normally.
To activate/deactivate the door lock, follow
these steps:
1. Touch or until the symbol on the
display starts flashing.
The current door lock status will be dis-
played: “On” if it is active and “Off” if deacti-
vated.
2. Press . You will then hear a beep and the
block will start to activate if it was “Off”, or
deactivate if it was “On”.
WARNING
Before locking, ensure that the oven door is
properly closed. If not, it will not lock and an
alarm will sound.
If this happens, switch off the alarm by
pressing any clock button, close the door
properly and lock again as per the instruc-
tions above.
3. Once the door has been fully locked/un-
locked, the display will show the new door
status.
In the event that the locking system is active,
the symbol will appear constantly lit on
the display.
IMPORTANT
To unlock the door during cooking, turn the
function dial to standby and unlock the door
as described above.
Once the door is unlocked, turn the function
dial back to its former position to continue
cooking.
Pyrolytic self-cleaning function
Function available in pyrolytic models AFP.
WARNING
Before setting the pyrolytic cleaning cycle,
carefully read the safety instructions, which
you will find at the start of the Installation and
Maintenance guide.
This function allows you to carry out a pyrolyt-
ic cleaning cycle during which, due to the high
temperatures reached inside the oven, accu-
mulated grease undergoes a carbonisation
process.
The general recommendation is to perform a
pyrolytic cycle every 4-5 uses, using the most
suitable programme according to the level of
stains present in the oven. The more stained
the oven, the longer the duration of the pro-
gramme.
During the pyrolytic cycle the light inside the
oven will remain off.

19
Operating
English
PROGRAMMING
THE PYROLYTIC FUNCTION
IMPORTANT
Before carrying out the pyrolysis, you must
remove all accessories and dishes from the
oven, including the shelves and/or telescop-
ic guide rails. To do this, follow the instruc-
tions in the installation and maintenance
guide accompanying the oven.
WARNING
Clean any spillages or excess dirt from the
inside, as these could ignite during the py-
rolysis and create a fire hazard.
WARNING
Before running the pyrolytic function, ensure
that the oven is properly closed.
1. Turn the cooking control dial to the Pyrolysis
position .
2. After a few seconds, the symbol will light
up on the clock display, reading ‘P2’ (Pyroly-
sis programme 2.
3. You can now change the pyrolysis pro-
gramme to P1, P2 or P3 by pressing the
or keys:
P1: Light pyrolysis. Lasts 1 hour.
P2: Regular pyrolysis. Lasts 1 hour 30 min.
P3: Intensive pyrolysis. Lasts 2 hours.
4. Once the desired programme has been se-
lected, press . The automatic door lock
will be activated immediately.
WARNING
If the door is not properly closed, it will not
lock and an alarm will sound.
If this happens, switch off the alarm by
pressing any clock button, close the door
properly, turn the function dial to the po-
sition and re-select the pyrolytic programme
as described above.
5. Once the door is locked, the symbol will light
up on the clock display and the time remaining
before the end of the pyrolysis will appear.
IMPORTANT
At this point, the oven is programmed and
the pyrolytic cleaning cycle is under way.
During the cycle, none of the oven timer
functions may be chosen (except the child
lock).
Do not try to open the oven door as this may
interrupt the cleaning process.
6. When the pyrolytic cleaning cycle has fin-
ished, an alarm will sound, the symbol
will flash and you will see the time ‘0:00’ on
the clock display.
7. Press any of the timer’s keys to disable the
alarm.
8. Turn the control dial to the position.
9. The oven’s heating process has finished.
However, the oven is extremely hot and can-
not be used.
The cooling process will continue to oper-
ate and the symbol will remain lit until the
oven cools down.
IMPORTANT
As a result of the high temperatures inside
the oven, the cooling process may vary de-
pending on the room temperature.
10. Once the oven has cooled down, the
symbol will turn off.
11. Open the oven door and wipe the inside
with a damp cloth, removing the ash from

20 Operating
the cleaning cycle. Hard-to-reach areas
in the oven will need to be cleaned with a
non-metallic fibre scourer.
12. Once the oven is clean, do not forget to
replace the supports and accessories.
13. The oven is now ready to be used.
IMPORTANT
If any incident is detected in the program-
ming or use of this function, consult the in-
stallation and maintenance guide included
with your oven.
CANCELLING THE PYROLYTIC FUNCTION
Pyrolysis is an automatic function and there-
fore it can only be activated from the timer
programme. To cancel a pyrolysis in progress
it is necessary to reset the oven, following the
instructions below:
1. Set the control dial to the position.
The timer display will appear as follows
2. Depending on the internal temperature of the
oven, either of the two following situations
could arise:
a) Dangerous internal temperature: In this
case, the door will remain locked until the
temperature reaches safe levels.
b) Safe internal temperature: If the temper-
ature inside the oven is safe, the door will
be unlocked immediately.
3. Once the door has been unlocked and can
be opened, the time will show once again on
the timer display.
This manual suits for next models
3
Table of contents
Languages:
Other AIRLUX Oven manuals