Airwater Nordik User manual

Intructions manual
User friendly • Hygienic • Reliable
S
I
AÇN
A
RF

Congratulations!
You have made an optimal choice, a product designed to be user
friendly, and certainly one of the easiest coolers to clean. We are
pleased to have you as a customer and it is our hope that you will be
a satisfied customer for many years to come. Furthermore, you can
count on our full support throughout the life of the Nordik / Pacifik /
Baltik cooler and we are counting on you to provide us with your
feedback:
Canada: 1-800-363-3717
USA: 1-800-363-1333
International: +1-819-822-1333
Fax: +1-819-822-2250
Internet: www.thermoconcepts.com.
WHEN YOU RECEIVE THE COOLER
1. At the reception of the cooler, the owner/user should check the
packaging:
Do you see any damage to the box?
Has it been mishandled? Any holes? Is the box open? If so,
these are signs that the Nordik / Pacifik / Baltik cooler could
have sustained some damage after it left our plant. In case you
notice any serious damage to the box, make sure that the deliv-
ery company (or the re-seller) is informed of this fact. If this is
done promptly, they will accept the responsibility and they will
contact us to address the situation.
2. After removing the cooler from the box, make sure that the follow-
ing parts are included:
* 1 no-spill cone (if specified on the box label)
* 1 drip tray
* 1 ring on top of the housing (see page 25)
S
I
A
Ç
N
A
RF
S
I
AÇ
N
A
R
F
T ABLE OF CONTENTS
H
S
I
L
GN
E
HS
I
LG
N
E
21
WHEN YOU RECEIVE THE COOLER ____________________________2
START USING THE COOLER __________________________________3
CLEANING THE COOLER ______________________________________5
a) Cook and Cold Model __________________________________6
b) Hot and Cold Model ____________________________________9
GENERAL INFORMATION ____________________________________13
SAFETY INSTRUCTIONS ______________________________________14
TROUBLESHOOTING ________________________________________15
LIMITED WARRANTY- NORDIK ________________________________17
GARANTÍA – PACIFIK ET BALTIK ______________________________18

4. If you have a hot-water model (faucet with red trim), you must
bleed the air out of the hot water tank, before proceeding any
further. This is done quite easily as follows:
* Pull the child-safety lever located underneath the hot-water
tap and press down;
* Wait for the water to come out of this faucet;
* Stop when water flows out of the nozzle (this means that the
water from the bottle filled the hot water tank located under-
neath the cold- water reservoir;
* Turn-on the hot water switch located behind the cooler.
NORDIK PACIFIK / BALTIK
FRANÇAIS
* 2 faucets:
o 1 for the cold water (blue trim)
o 1 for the hot water (red trim) or
room temperature water (white
trim)
* 1 floating baffle
(inside the cold water reservoir)
3. Choosing the right place to install the cooler:
* Install the water cooler in a well-ventilated place, where tem-
perature is between 0°C and 40°C (32°F and 120°F).
* Ensure sufficient air circulation by keeping a minimum clear-
ance of 5 cm (2 in) around the unit.
* Make sure to place the water cooler on a flat surface (maxi-
mum 5° slope).
START USING THE COOLER
1. Cooler should not be connected until you reach step #7.
2. Your new cooler was cleaned prior to shipment but not sanitized,
so we still suggest that you sanitize it before using it. (see section
‘’Cleaning the cooler’’)
3. Clean the neck of the water bottle before installing it. Turn the bot-
tle upside down and install it into the no-spill cone, aligning the
cap with the rod of the no-spill cone. Some people do not use no-
spill devices, thus you just need to remove the cap on the bottle
and turn it over on top of the cooler.
FRANÇAIS
ENGLISH
ENGLISH
43

a) Cook and Cold Model
1. Disconnect (unplug) the cooler;
2. Remove the bottle;
3. Drain the water from the reservoir by pressing on the taps of both
faucets until no more water flows out of the nozzles;
4. Remove the ring
on top of the cooler
by turning it counter-
clockwise;
5. Remove the "no-spill"
cone by strongly pul-
ling it upwards by the
tongue located on one
side of the cone.
FRANÇAIS
5. Every Thermo Concept water cooler is thoroughly tested prior to
shipment from the factory. However, handling and transportation
between our factory and your home/office can cause a leak, thus
we recommend that you wait 2 minutes after placing the bottle
over the cooler. If you still see any air bubbles inside the bottle,
this is a sign that you may have a leak. If you witness a leak,
remove the bottle and go to the trouble shooting section.
6. If you think it was always handled vertically with care, then you
can connect it upon reception. If you have doubts about the way
the cooler was handled prior to delivery, wait at least one (1) hour
before connecting it.
7. Plug in the cooler.
CLEANING THE COOLER
General aspects
Condenser: In order to ensure maximum performance of your water
cooler, you must remove any dust or dirt particles from the con-
denser. The condenser must be checked regularly and cleaned with
a vacuum cleaner (use a small round brush with long soft bristles).
Housing: Use a non-abrasive cloth with mild soap.
Drip tray: To remove the drip tray, you need to pull it out horizontal-
ly on the Nordik and for the Pacific or Baltik, you need to lift it up.
Parts along the water flow
The cleaning frequency depends on several factors such as:
* Local laws and regulations;
* Type of water used;
* Throughput (how much water flows through the coolers);
* Personal taste and preferences.
To ensure the quality of your drinking water, we recommend that
you clean the Nordik/Pacifik/Baltik cooler (parts that come into con-
tact with water) every 3 months, except the hot-water tank, which
we recommend once a year.
The cleaning methods can also vary but we recommend the follow-
ing procedure.
FRANÇAIS
ENGLISH
ENGLISH
65

10. Clean the plastic or stainless steel reservoir (Cook & cold model
only) on the lower rack of a dishwasher. Instructions on page 31
are also valid.
After cleaning the cold-water reservoir, you need to re-assemble the
components as follows:
11. Re-install the cold-water
reservoir. Make sure that the
sockets (fittings) are centered
in front of the cooler so that
you can assemble the faucets
correctly.
12. Re-install the faucets:
* The cold-water faucet (blue
tab) goes in the right
hand side socket (facing the
cooler). Insert with nozzle at
90° in the socket (fitting), push
hard and turn clockwise;
FRANÇAIS
Then, remove the blue part (filter), which must not be cleaned with
the no-spill cone. The filter should either be cleaned with a damp
cloth or replaced;
6. Remove the floating baffle (blue dish in the reservoir) by pulling it
off the diffuser tube. Do not remove the diffuser tube;
7. Remove the two faucets:
* Grip the cold water (blue tab) faucet and turn it counter-clock-
wise until the nozzle is at 90° (horizontal to the right), then
pull;
* Grip the warm water (white tab) or hot water (red tab) faucet
and turn it clockwise until the nozzle is at 270° (horizontal to
the left), then pull.
8. Remove the water reservoir by pulling it upwards;
9. Clean the drip tray, floater, no-spill cone and faucets on the upper
rack of a dishwasher.
FRANÇAIS
ENGLISH
ENGLISH
FILTER FILTER
87

1. Unplug the cooler.
2. Remove the bottle.
3. Empty the hot water by draining it through the hose that is locat-
ed near the rear grill.
4. Empty the cold-water reservoir, using the cold-water faucet (blue
trim).
5. Remove the ring on top of the cooler.
6. Remove the "no-spill" cone by strongly pulling it upwards by the
tongue located on one side of the cone. Then, remove the blue
part (filter), which must not be cleaned with the no-spill cone. The
filter should either be cleaned with a wet rag or replaced;
7. Remove the floater inside the cold-water reservoir. Do not remove
the diffuser tube.
8. Remove the drip tray in front of the cooler.
FRANÇAIS
* The warm-water faucet (white
tab) or the hot-water faucet (red
tab) goes in the left hand socket
(facing the cooler). Insert with
nozzle at 270°, push hard and
turn counter-clockwise.
13. Re-install the floater. Make sure that the opening of the floater
faces upwards.
14. Insert the no-spill cone on the water cooler (with the blue filter in
place), pressing it down and strongly enough so that it engages
all around (tab should be facing front of cooler). The locking
mechanism ensures the end-user that the cone remains on the
water cooler when the bottle is removed.
15. Re-install the black ring, by placing it on top of the cooler hous-
ing, then turn it clockwise so that it locks in position;
16. Install the water bottle and check for leaks (See section "Start
using the cooler", paragraph 3).
17. Plug the cooler to a power outlet.
b) Hot and Cold Model
For the Hot & Cold model, you should not remove the cold-water
reservoir; it can be cleaned with a cleaning solution on a clean
cloth. Start with the hot-water tank first, so go to the next para-
graph.
Hot water tank
We recommend cleaning the hot water tank at least once a year.
Because the water is maintained at high temperatures, the risk of
bacteria being present is quite low. However, in many areas of the
world, it is necessary to drain out the mineral deposits because
they can disrupt the temperature readings and lead to over-heating
of the water.
FRANÇAIS
ENGLISH
ENGLISH
FILTER FILTER
109

15. Empty the cold-water reservoir by pressing the cold-water tap
(blue trim).
16. Repeat steps 10, 11, 14 and 15 to rinse.
17. Clean small parts (faucets, floater, no-spill cone and drip tray) in
the upper rack of the dishwasher. The cold-water reservoir can be
manually cleaned with a cleaning solution and a clean towel.
18. Re-install the faucets, the floater, the no-spill cone with blue filter,
the drip tray, the black ring and the water bottle. Wait until the
reservoir is full (no more air bubbles in the bottle) and check to
make sure there are no leaks (see Section B, paragraph 3)
19. Plug the cooler to a power outlet.
Cleaning the cold-water reservoir when not cleaning the hot-water
tank (once every 3 months).
1. Unplug the cooler.
2. Take the bottle off.
3. Drain the cold water by pressing the right hand faucet (blue trim).
4. Remove the no-spill cone. Then, remove the blue part (filter),
which must not be cleaned with the no-spill cone. The filter should
either be cleaned with a damp cloth or replaced;
5. Remove the drip tray located in front of the cooler.
6. Remove the floater inside the cold-water reservoir. Do not remove
the diffuser tube.
7. Remove the cold-water faucet (see page 7). Grip the cold water
(blue tab) faucet and turn it counter-clockwise until the nozzle is at
90° (horizontal to the right), then pull;
8. Clean the drip tray, faucet, the no-spill cone (w/o filter) and the
floater on the upper rack of a dishwasher.
9. Clean the cold-water reservoir with a cleaning solution and a clean
cloth.
After cleaning the cold-water reservoir, you need to re-assemble the
components:
10. Re-install the cold-water faucet (blue tab) (see page 8). It goes in
the right hand side socket (facing the cooler). Insert it in the sock-
et (fitting), with nozzle at 90°, push hard and turn clockwise;
FRANÇAIS
9. Pour some water cooler cleaner (or
vinegar @ 20% concentration) into the
hot-water tube (long tube at the bot-
tom of the cold-water reservoir).
Some of the cleaning solution may
overflow into the cold-water reservoir,
it can be use to clean the cold tank.
10. Fill the cold-water reservoir with water, until it overflows into the
tube. This water is necessary to fill the hot-water tank as it will
flow from one tank to the other.
11. Bring the water into the hot-water reservoir by pressing onto the
hot-water tap (red) and stop as soon as water starts to come out
of the faucet.
12. Plug in the cooler and turn on the switch (rear of cooler) to heat
the hot water. Leave it on for 10 minutes.
13. Unplug the unit.
NORDIK PACIFIK / BALTIK
14. Empty the hot-water tank, using the hot water drain behind the
cooler.
FRANÇAIS
ENGLISH
ENGLISH
1211

1. Disconnect the unit.
2. Remove the water bottle from the cooler. Even if the bottle is not
empty, the splash-free cap will close when the bottle is removed,
thus no water will be spilled on the floor.
3. Empty the cooler completely through the two faucets.
4. If you have the hot water option, empty the hot-water tank through
the drain hose located behind the cooler.
5. Clean the unit by following the instructions provided in the
section C) Cleaning the Nordik/Pacifik/Baltik cooler.
6. Dry the water cooler thoroughly.
7. Reinstall the different parts in the appropriate places.
8. Never use the faucets as handles because this might cause
damage to the faucets and/or the fittings, which could lead to
leaks.
9. Always transport or store the water cooler in a vertical position.
SAFETY INSTRUCTIONS
➛ Do not connect the unit immediately after moving it if it was
stored horizontally. Wait at least one hour.
➛Do not place the unit close to a heating device or in direct
sunlight.
➛Only water should be used with this cooler, no other type of
liquid.
➛Never keep the unit in a horizontal position, not even for storing
or shipping.
➛ IMPORTANT: ALWAYS DISCONNECT THE UNIT WHEN THE
RESERVOIR IS EMPTY FOR A CERTAIN PERIOD OF TIME.
➛Never immerse the hot-water tank.
➛In order to avoid any risk of electric shock or fire, always connect
the water cooler directly into a 120V AC (or 220V AC) grounded
outlet (no extension cords).
➛Do not pinch, tie or twist the power cord set.
➛ Do not unscrew the faucets if the unit contains any water.
FRANÇAIS
11. Re-install the floater. Make sure that the opening of the floater
faces upward.
12. Re-install the drip tray.
13. Insert the no-spill cone on the water cooler (with the blue filter in
place) pressing it down and strongly enough so that it engages
all around. The locking mechanism assures the end-user that the
cone remains on the water cooler when the bottle is removed.
14. Re-install the black ring, by placing it on top of the cooler hous-
ing, then turn it clockwise so that it locks in position;
15. Install the water bottle. Wait until the reservoir is full (no more air
bubbles in the bottle) and check to make sure there are no leaks.
16. Plug in the cooler.
GENERAL INFORMATION
Setting the temperature (cold water): During inspection before
delivery, the thermostat is set at about 7°C (45°F). For colder water,
adjust the thermostat, placed behind the water cooler, by turning the
screw clockwise with a flat screwdriver. Caution: we suggest short
rotation movements, equal to about 5 minutes on a clock, and after
each turn, assess the result. Turning the adjustment screw of the
thermostat one quarter of a turn could cause the water to freeze.
Hot water temperature: The water cooler (with the optional hot
water tank) provides hot water set at about 87°C ± 3°C (188°F ± 5°F).
The thermostat on this unit is not adjustable.
Other issues:
If the water cooler will not be used for an extended period of time, or
if you plan on moving it or if you have to ship it somewhere, follow
these simple instructions:
FRANÇAIS
ENGLISH
ENGLISH
1413

FRANÇAIS
FRANÇAIS
* LEAKS CAUSED BY OLD BOTTLE WITH SMALL CRACKS (PIN-HOLES)
Bottles with pinholes are common and they should never be ignored.
This normally occurs when the bottle is nearing the end of its normal
life. Bottling companies are well equipped and professionally trained
to detect such problems. However, once in a while, a bottle with pin-
holes will end up in the distribution network and this is when the
consumer needs to be aware of the implications. A very small micro-
crack (pinhole) will not leak any water in most circumstances but it
will allow air to enter the system once the bottle is installed on the
water cooler and the level of water is below the position of the pin-
hole.
What is the cause of this problem? As the bottle ages, the wall can
develop micro-cracks (pinholes). In the beginning, these pinholes are
so small that water cannot escape through them, although air is
capable of doing so. Therefore, when the water level in the bottle
gets below a pinhole, air infiltrates in the superior part of the invert-
ed bottle. This eliminates the air tightness, which controls the water
level in the bottle. By gravity, water flows into the reservoir, causing
its overflow through the air opening in the spill saver system. The
cone then fills up with water and overflows into the cooler as well as
on and around it.
In addition to the water on the floor, you may notice that:
* The bottle has emptied to a level corresponding to the superior
height of the spill saver system.
* The water in the tank is at 3/4 of the total height of the tank, or
near the top, as opposed to the normal level of 1/3-1/2 the height
of the reservoir.
* During the flow of water, you did not hear a noise that indicates
that air is passing through the water.
It is important to note that when there is water on the floor while
using a cooler, 95% of the time this is explained by a leak in the bot-
tle's wall, especially when it is not the first bottle on the cooler. This
problem can occur at any time after consumption of water. The
water level in the bottle only needs to be lower than the actual pin-
hole (micro-crack), which can be found anywhere on the bottle.
What is the solution to this problem? All you need to do is remove
the bottle, empty the water in the cold-water reservoir and place a
new bottle. It would be helpful to inform the bottler (or the store) that
the bottle has a pinhole.
ENGLISH
ENGLISH
No hot water
The switch in the back of the water
cooler is set at
"0"
position.
You have not pulled on the childproof
protective device under the tap of the
hot water faucet.
The tank has not been properly vent-
ed.
Set the switch to "I" position (see page 23).
Pull the childproof devise and push downward the tap
(see page 22).
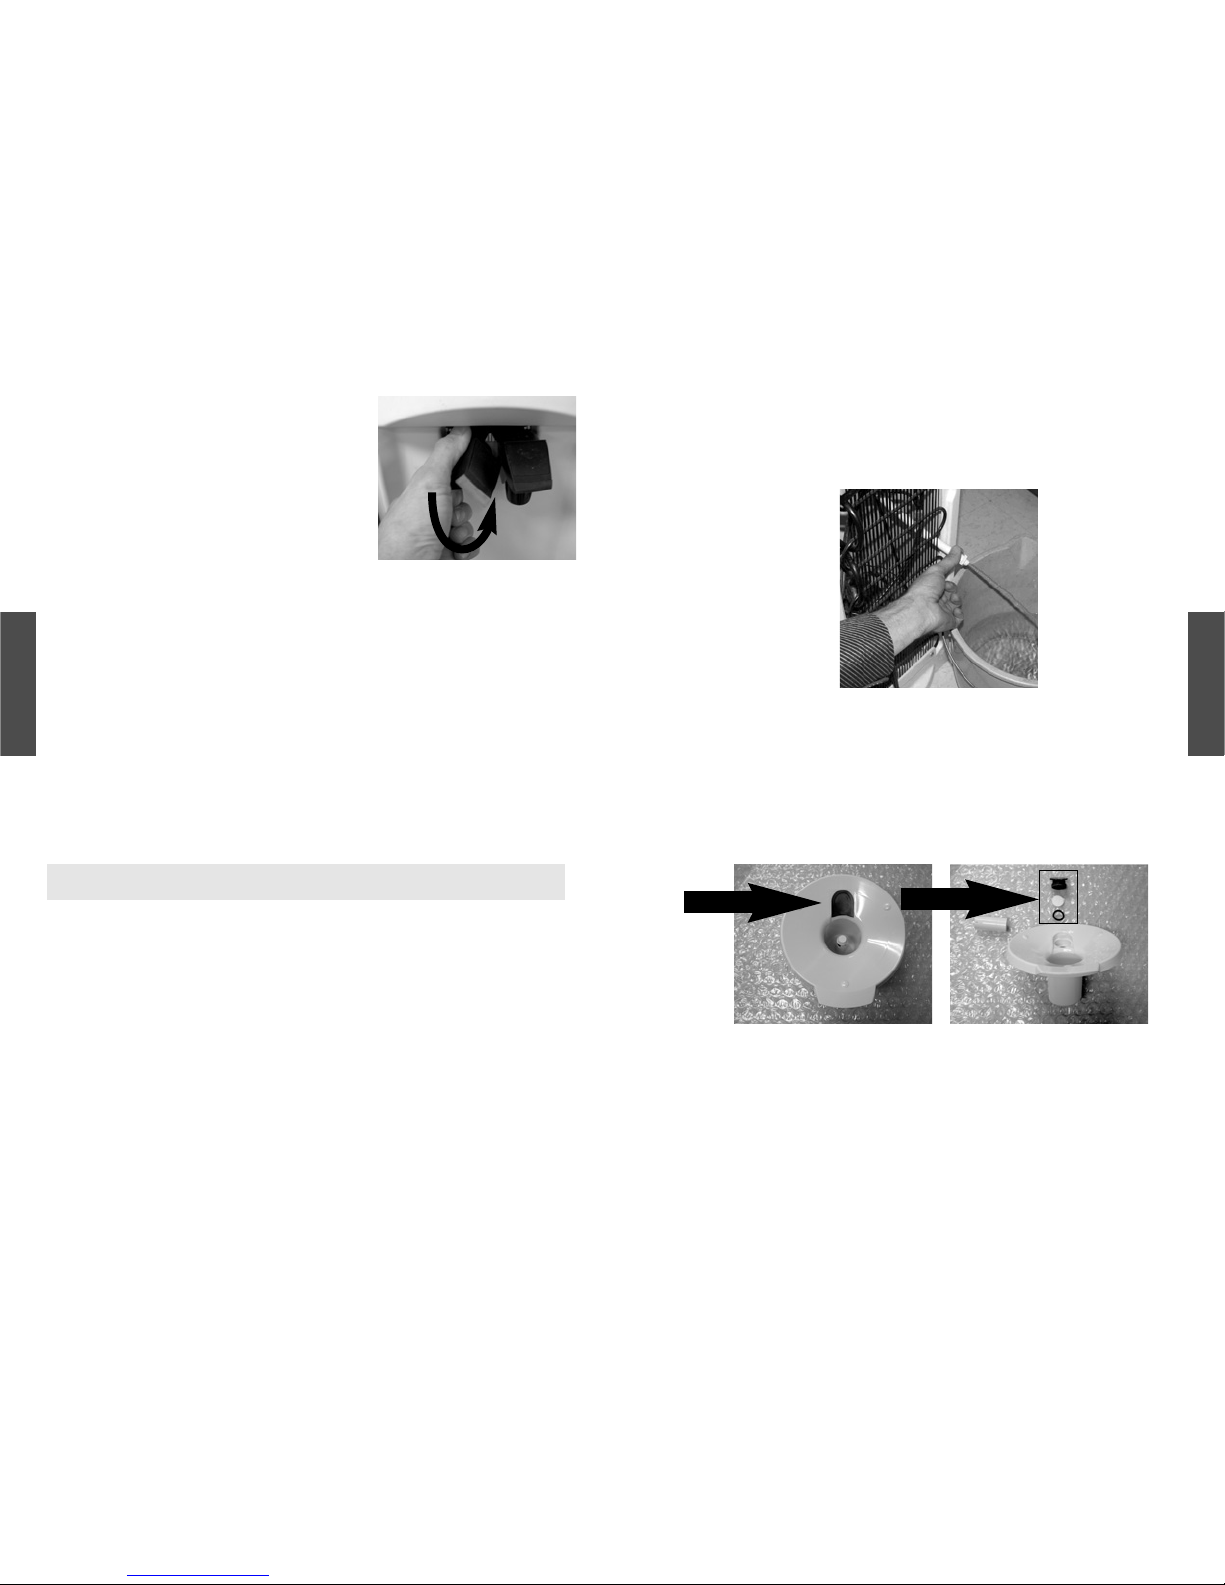
Turn off the switch in the back of the water cooler, then
place the water bottle on the water cooler and open
the hot water tap. Keep it open until water flows
out.Turn on the heater switch.
The water keeps
running.
The tap on the faucet is jammed.
Hit the tap once to replace the tap in the right position.
This should set the nozzle in the right position also.
Water leaks bet-
ween the faucet
and the cabinet.
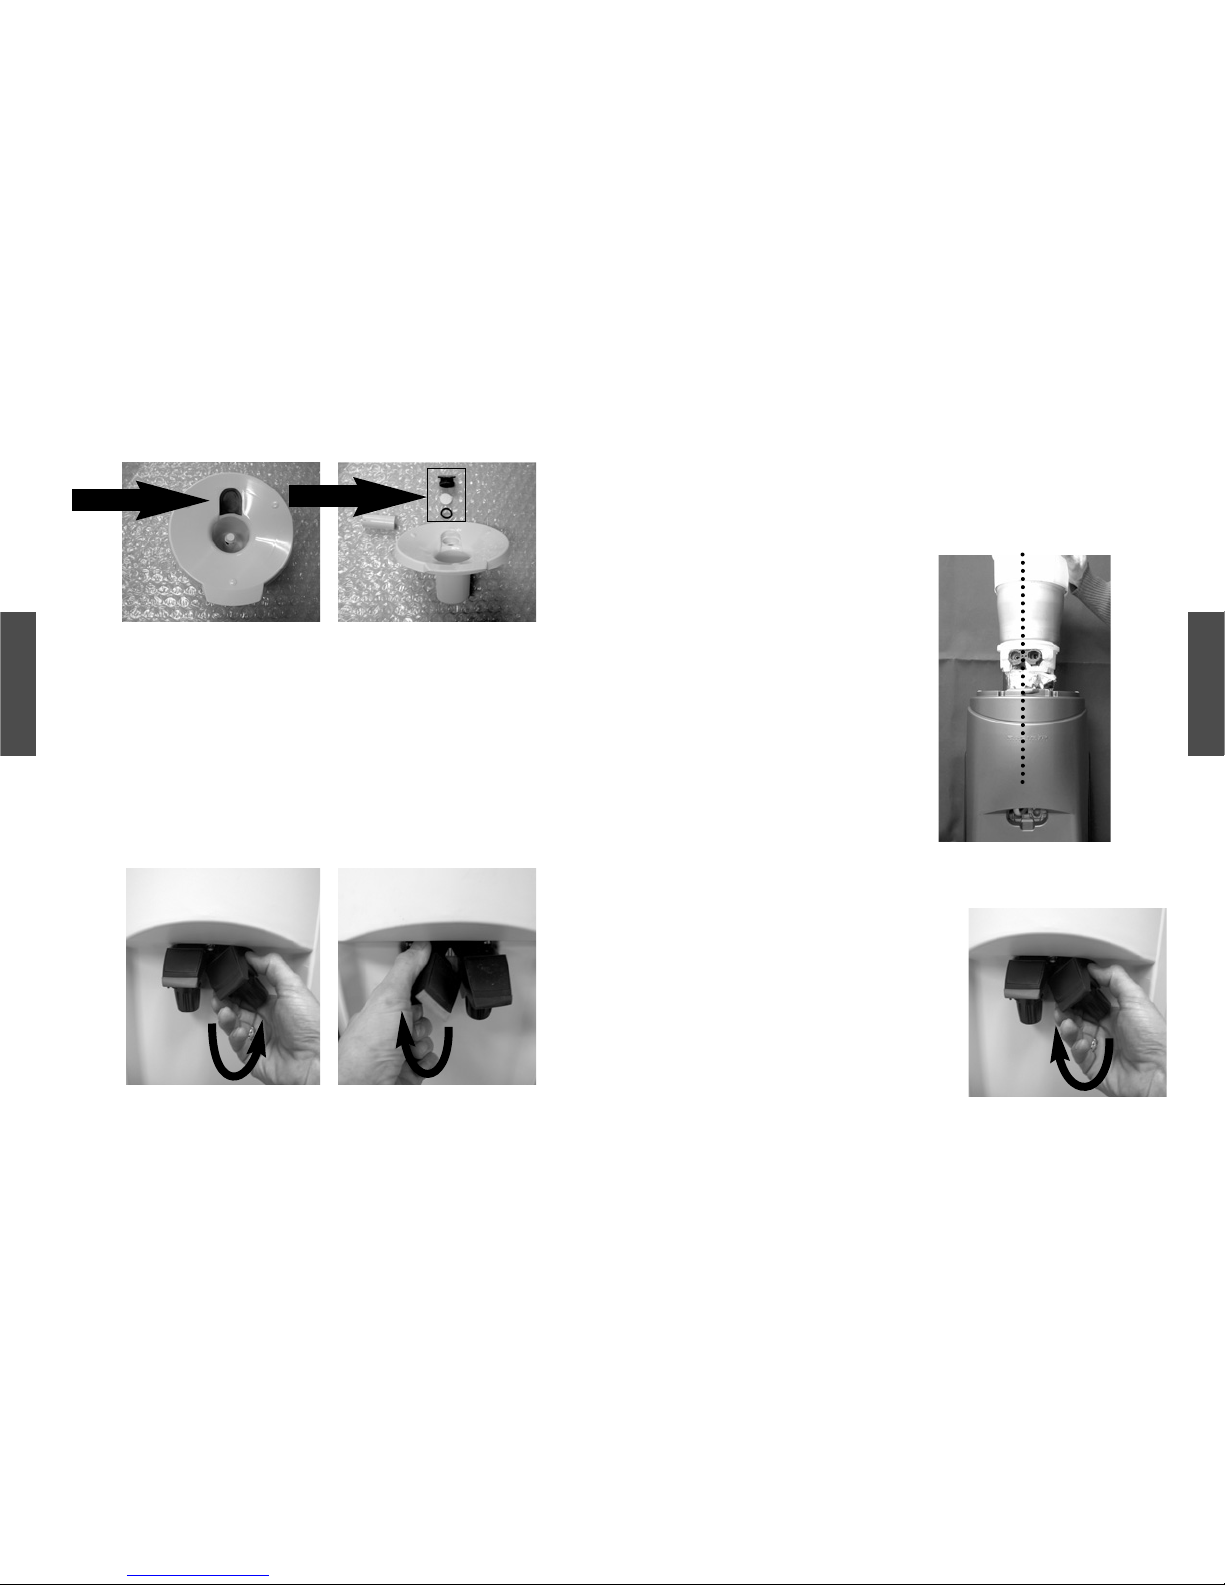
The faucet is not inserted correctly.
Remove the faucet and install it again (see page 26).
Make sure it is engaged correctly (push and do a _ turn
at the same time). Make sure nozzle is in vertical position
You notice water
on the floor.
The water bottle has a crack (pinhole)
and the protection valve is not in
place(*).
Replace the bottle with a pinhole with a new one.
The cooler makes
too much noise.
The unit is not well supported.
Install the unit on a stable and straight surface.
NOTE: FOR ANY OTHER PROBLEM, PLEASE CONTACT YOUR LOCAL DEALER
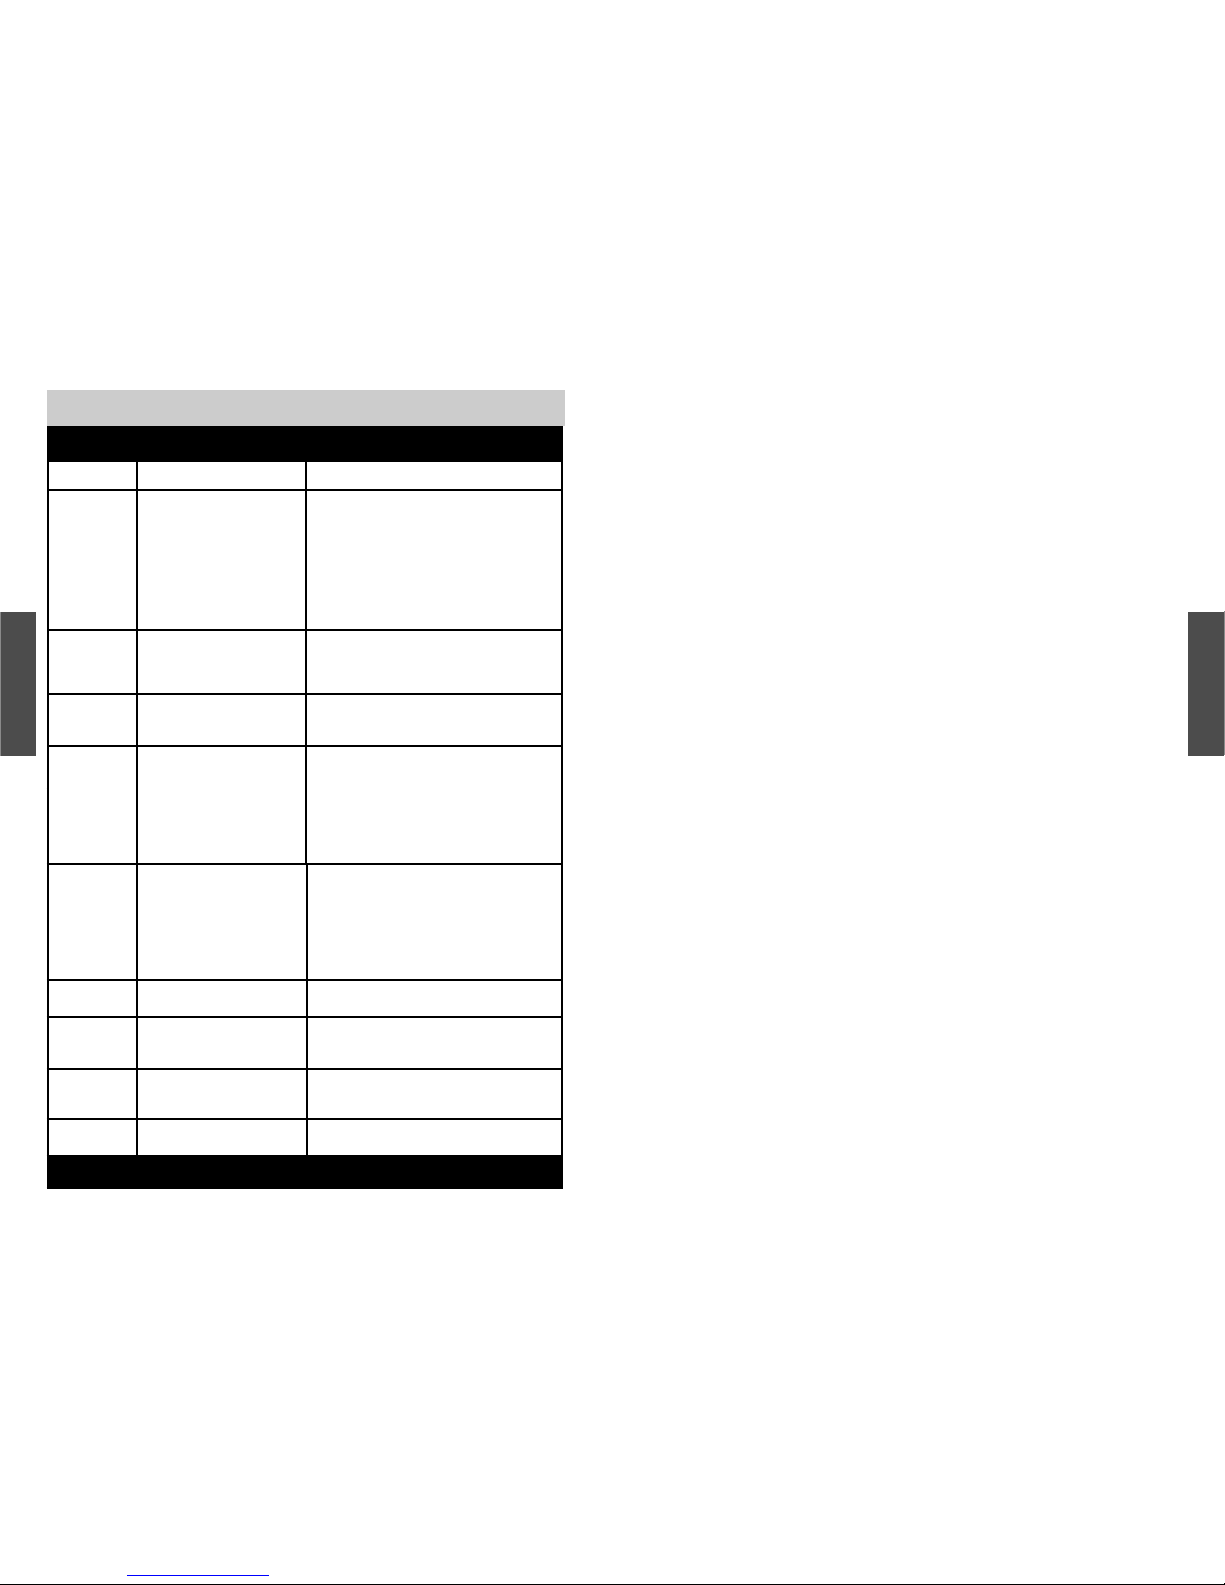
TECHNICAL PROBLEMS AND WHAT TO DO
PROBLEM
PROBABLE CAUSES
SOLUTIONS
The water is not
cold.
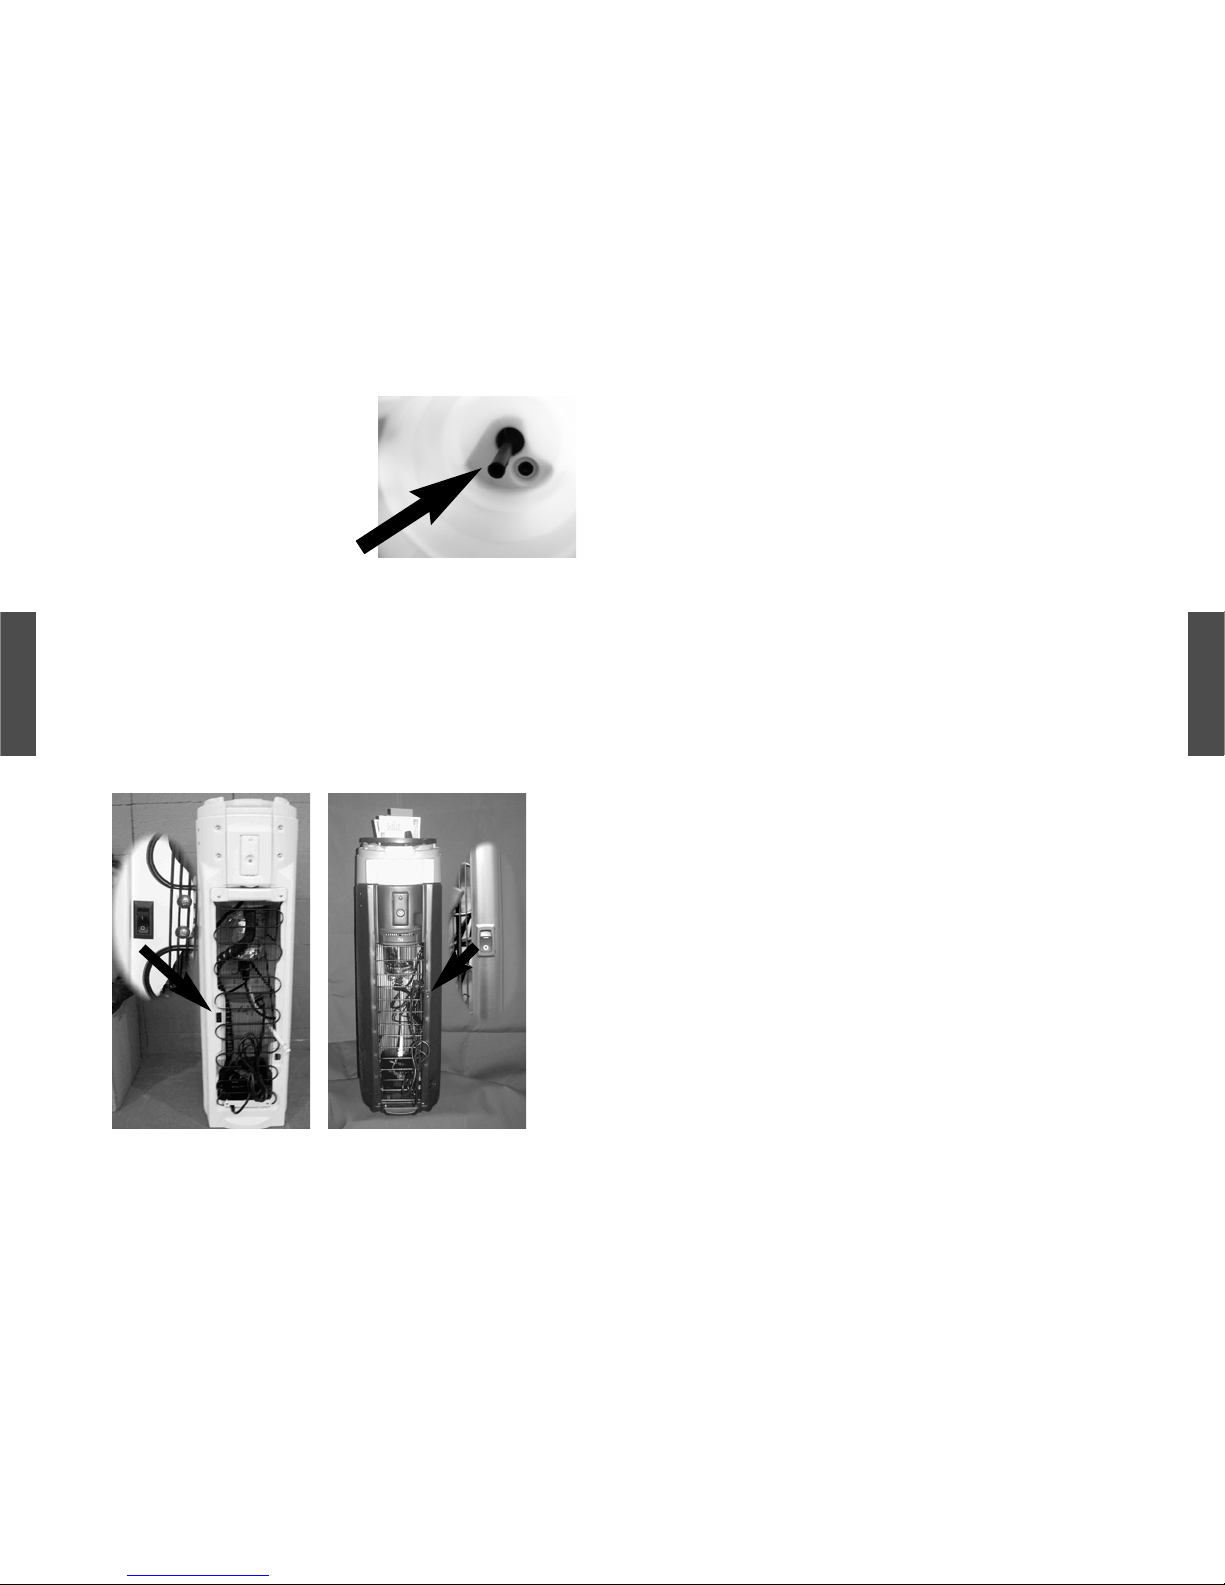
If you have a Hot & cold unit:
Diffuser or floater could be absent or
not assembled correctly.
If you have a Cook & cold unit:
No power to the cooler. Unit not connec-
ted correctly. No power in the outlet.
The thermostat is not adjusted
correctly.
Make sure diffuser tube and floater are present and
positioned correctly (see Instruction manual page 22).
Connect the unit to a power outlet. Make sure that the
plug is pushed-in the socket. Check and reset the circuit
breaker or replace the burned-out fuse with a 15A fuse
in your electrical panel.
Adjust the thermostat following the instructions given
in the section General information (page 32)
The water is too
cold.
The thermostat is not adjested cor-
rectly.
Turn the adjustment screw of the thermostat counter-clock-
wise. The turning movement should not exceed 5 minutes
on a clock. Wait 2 hours and if the water is still too cold,
repeat the movement, as gradually as possible.
No room-tempera-
ture water.
The floater inside the cold water
reservoir is missing or not installed
correctly.
Put the floater back in place as indicated in page 22.
No water
There is no water left in the bottle
and the reservoir.
Dirt particles are blocking the water
openings.
The water is completely frozen.
Replace the empty bottle with a full one.
Clean the unit as indicated in the section Cleaning
and Maintenance and check the inside of the fit-
tings and faucets.
Disconnect the cooler and wait until the water is complete-
ly defrosted. Adjust the thermostat as explained in the
section "The water is too cold" and reconnect the cooler.
TROUBLESHOOTING
1615

LIMITED WARRANTY - PACIFIK ET BALTIK
First year:
During the 1st year after the original purchase date, Thermo Concepts
shall replace or repair (manufacturer’s option) any part or function of
the cooler that proves to be inoperative or defective due to a defect in
material or workmanship. Labor costs are the responsibility of the
Manufacturer. The original sales slip (invoice) with the corresponding
serial number must support the claim.
Second year through fifth year:
Within the second through fifth year, Thermo Concepts will replace or
repair (manufacturer’s option) the sealed refrigeration cycle in case of
defect in material or workmanship. The Manufacturer will provide the
parts and labor, through its approved service center or the factory repair
department. The sealed refrigeration cycle does not include the electri-
cal parts such as the relay, the overload, the cold-water thermostat, the
switch, the hot water thermostat and the hot overload.
In addition to the sealed refrigeration system, if parts such as hot water
thermostat, compressor relay, overload, cold water thermostat, internal
wiring, cord set, become inoperative due to a defect in material or work-
manship, the Manufacturer will replace them through an approved
service center or the factory repair center. The labor cost to change any
of these parts in this paragraph will be the responsibility of the end user
(owner).
Transportation or any other type of compensation is not included.
FRANÇAIS
LIMITED WARRANTY - NORDIK
First year:
During the 1st year after the original purchase date, Thermo
Concepts shall replace or repair (manufacturer’s option) any part or
function of the cooler that proves to be inoperative or defective due
to a defect in material or workmanship. Labor costs are the respon-
sibility of the Manufacturer. The original sales slip (invoice) with the
corresponding serial number must support the claim.
Second year through third year:
Within the second through third year, Thermo Concepts will replace
or repair (manufacturer’s option) the sealed refrigeration cycle in
case of defect in material or workmanship. The Manufacturer will
provide the parts and labor, through its approved service center or
the factory repair department. The sealed refrigeration cycle does
not include the electrical parts such as the relay, the overload, the
cold-water thermostat, the switch, the hot water thermostat and the
hot overload.
In addition to the sealed refrigeration system, if parts such as hot
water thermostat, compressor relay, overload, cold water thermo-
stat, internal wiring, cord set, become inoperative due to a defect in
material or workmanship, the Manufacturer will replace them
through an approved service center or the factory repair center. The
labor cost to change any of these parts in this paragraph will be the
responsibility of the end user (owner).
Transportation or any other type of compensation is not included.
FRANÇAIS
ENGLISH
ENGLISH
General provisions and exclusions:
Warranty will be void unless work is performed by an approved service center or the facto-
ry service center.
The original sales slip with the corresponding serial number must support every claim.
Warranty is valid for original purchaser (user) only and may not be transferred.
The warranty does not cover performance, failure or damages of any part resulting from
external causes such as alterations, misuse or abuse, misapplication, corrosion or acts of
God.
This warranty does not apply if the affixed serial number is removed, defaced or obliterated.
The warranty is limited to the value of the cooler and it does not cover performance, failure
or damages resulting from its utilization.
This warranty does not apply to any water components that become inoperative due to lim-
ing conditions.
Only original parts can be used and they are covered by the warranty.
Shipping and handling fees shall be borne by the customer and any shipment must be done
with adequate packaging to avoid warranty cancellation.
The foregoing is in lieu of all other agreements expressed, implied or statutory and all other
obligations of liabilities of the Manufacturer. The Manufacturer does not assume or author-
ize any person to assume any obligations of liability in connection with this product. Under no
circumstance will the Manufacturer be liable for any special or consequential damages or
for any delay in the performance of this agreement due to causes beyond his control.
This warranty applies only within the limits of Canada and the United States. However, a num-
ber of foreign distributors benefit from an official certification from the Manufacturer, which
covers this warranty. Please contact your local distributor for further details.
1817

Les Produits Thermo Concepts Inc. Canada
4345, Robitaille street,
Sherbrooke (Québec)
Canada, J1L 2K2
www.thermoconcepts.com
Canada 1-800-363-3717
USA 1-800-363-1333
This manual suits for next models
2
Table of contents
Popular Water Dispenser manuals by other brands

Greenway Home Products
Greenway Home Products GACS835 Installation instructions & owner's manual

Brentwood
Brentwood KT-2200 Operating and safety instructions

Follett
Follett L90815 manual

SENTRY II
SENTRY II 954SM Series Operation and maintenance manual

Pelican
Pelican PC600 owner's manual

Halsey Taylor
Halsey Taylor HVR Series owner's manual

Elkay
Elkay FGDF71051H Series Installation, care & use manual

Hydrotech
Hydrotech 565 Quick setup manual

Kenmore
Kenmore 625.348471 manual

Kinetico
Kinetico Microlene MACH2025s Quick Stark Guide

SpectraPure
SpectraPure MC-RODI-UHE-400 instructions

Hellenbrand
Hellenbrand Water Conditioning System H-125 Series owner's manual