manuals.online logo
Brands
  1. Home
  2. •
  3. Brands
  4. •
  5. Aiwa
  6. •
  7. Cassette Player
  8. •
  9. Aiwa HS-TA493 User manual

Aiwa HS-TA493 User manual

anua
HS-TA493 PRECAUCIONES PRECAUTIONS
OWNER’SRECORD
For your convenience, record the model number
and serial number (you will find it in the cassette
holder) in the space provided below. Please refer
to them when you contact your Aiwa dealer in case
of difficulty.
Para mantener sus btrenas preslaciones
No utilice el aparato en Iugares muy calientes,
frfos, con polvo ohumedad.
Especialmente, no debe dejar el aparato:
●en Iugares muy htimedos, por ejemplo en el batio
●cerca de la calefacci6n
.en un Iugar expuesto aIos rayos del sol (dentro
de un coche estacionado, donde puede
aumentar mucho la temperature)
Pour malnterrlr de bonnes performances
Ne pas utiliser cet appareil h un emplacement trbs
chaud, froid, poussir%euxou humide.
En particulier, ne pas Ie conserve~
●Aun endroit trbs humide, par exemple une sane
de bains
●prbs d’un appareil de chauffage
●~un endroit en plein soleil (clans une voiture
gar6e, oh la temp&ature peut consid&ablement
augmenter, par exemple)
STEREO RADIO CASSl?fTE PLAYER
RADIORREPRODUCTOR DE CASETESESTEREOF6NIC0 Model No. HS-TA493
OPERATING INSTRUCTIONS
INSTRUCCIONES DE MANEJO Serial No.
MODE D’EMPLOI
8Z-HRG-903-11
990118BY0-09
Printed in Indonesia
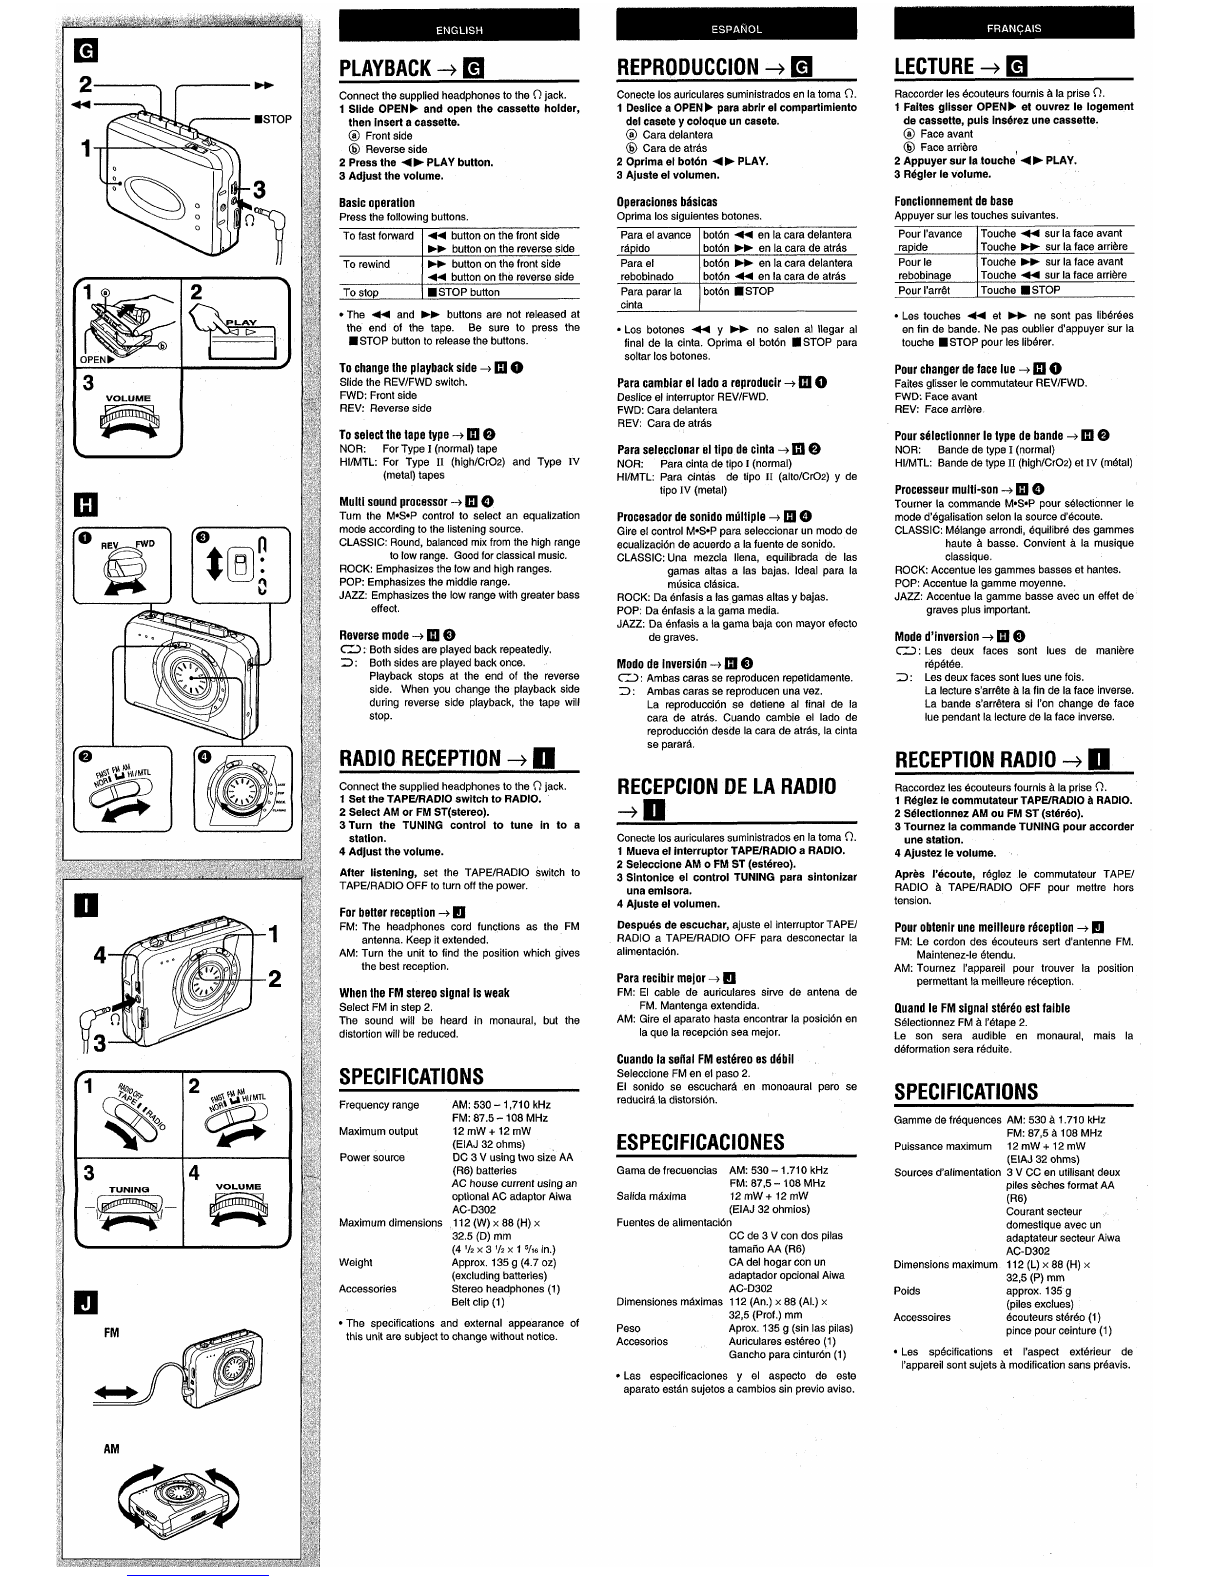
PRECAUTIONS Notas para escuchar con Ios cascos atrrlculares
●Escuche a un volumen no muy alto para no
dafiar sus ofdos.
●No utilice auriculares mientras conduce o anda
en bicicleta. Puede provocar un accidente de
tr&rsito.
●Debe tenerse mucho cuidado o no seguir
utilizando en condiciones peligrosas, por ejemplo
cuando camina, corre, etc.
●UtilIcelos correctamente: Les izquierdo yRes
derecho.
Remarques concernant I’tfcoute avec des
dcouteurs
●Ecouter h un volume sonore mod6r6 pour t%iter
tout dommage auditif.
●Ne mettez pas Ies dcouteurs quand vous
conduisez ou faites du v610. Cela pourrait @tre
dangereux.
●II est conseillb de se montrer trbs prudent ou
d’arr6ter temporairement I’emploi clans Ies
situations potentiellement dangereuses, pendant
la marche ou Iejogging par exemple.
●Mettre correctement Ies 6couteurs: Lpour la
gauche, et Rpour la droite.
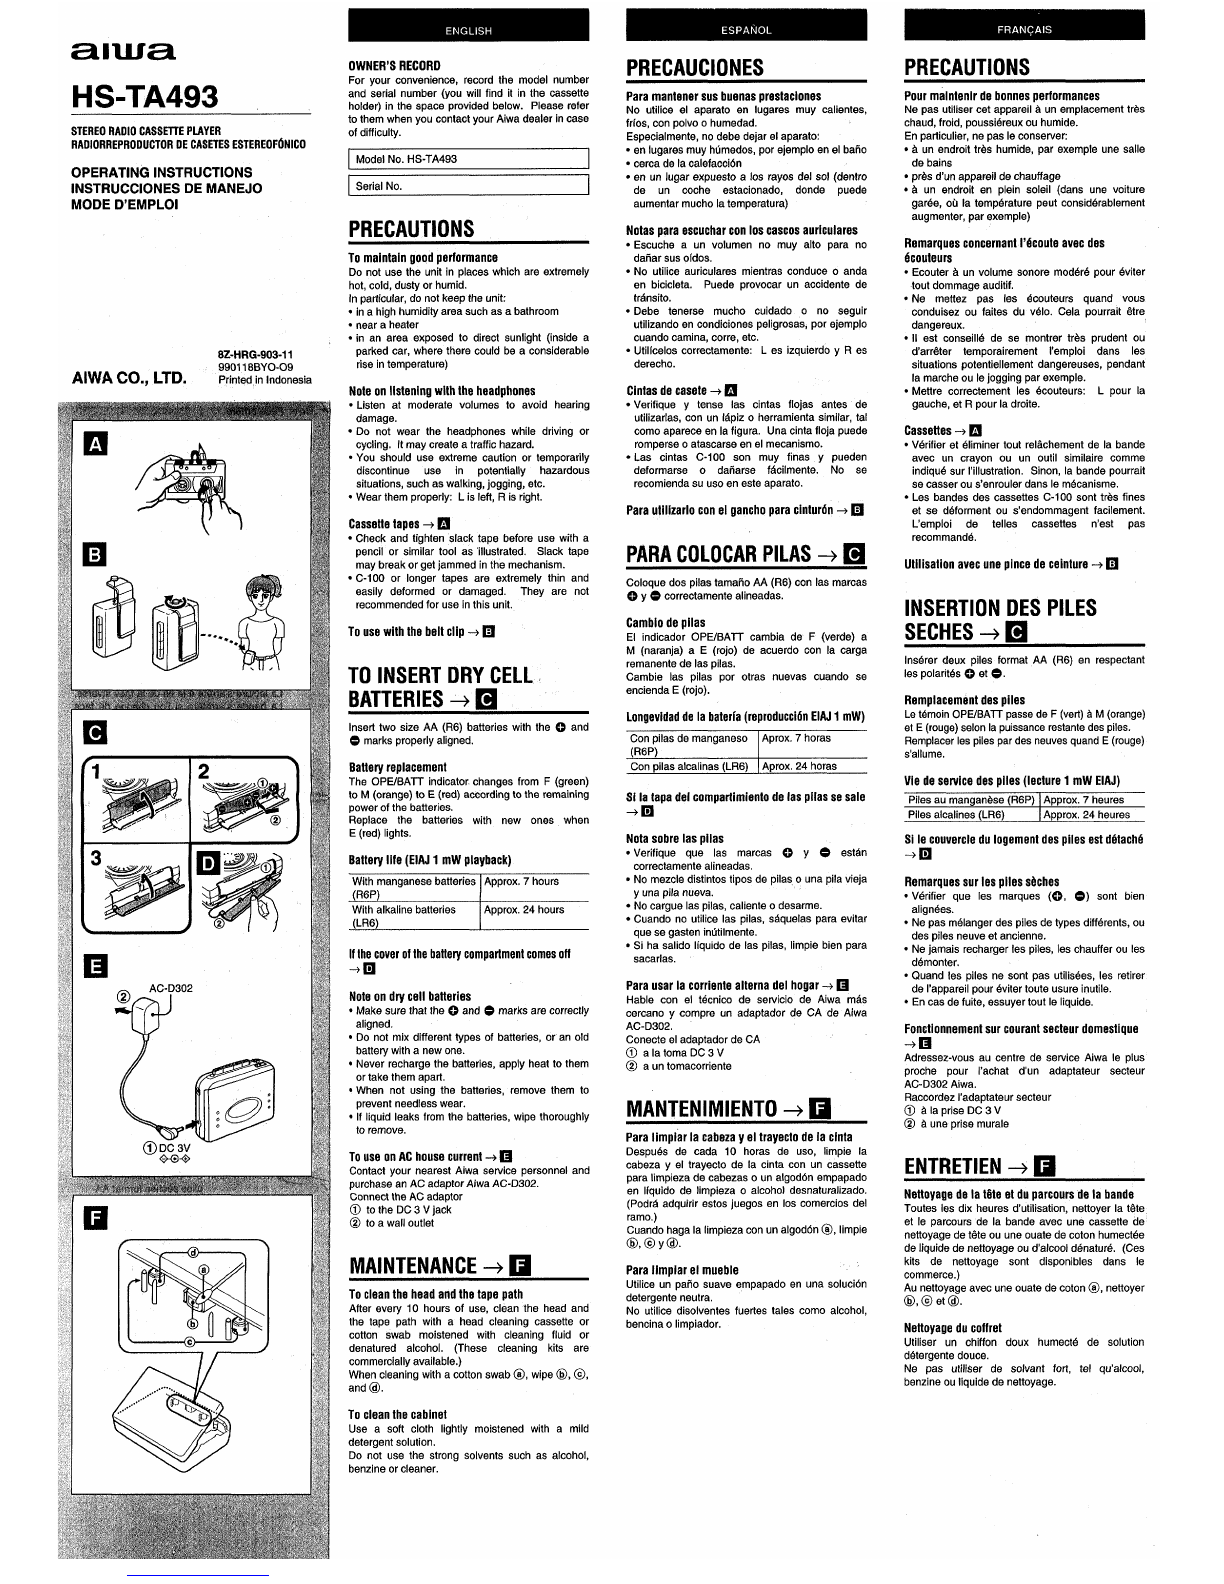
To maintain good performance
Do not use the unit in places which are extremely
hot, cold, dusty or humid.
In particular, do not keep the unit
●in ahigh humidity area such as abathroom
●near aheater
●in an area exposed to direct sunlight (inside a
parked car, where there could be a considerable
rise in temperature)
AIWA CO., LTD. Cintas de casete +❑
●Verifique ytense Ias cintas flojas antes de
utiiizarlas, con un Mpiz oherramienta similar, tal
como aparece en la figura. Una cinta floja puede
romperse oatascarse en 91mecanismo.
●Las cintas C-100 son muy finas ypueden
deformarse odafiarse fAcilmente. No se
recomienda su uso en este aparato.
Note on listening with the headphones
●Listen at moderate volumes to avoid hearing
damage.
●Do not wear the headphones while driving or
cycling, It may create atraffic hazard.
●You should use extreme caution or temporarily
discontinue use in potentially hazardous
situations, such as walking, jogging, etc.
●Wear them properly: Lis left, Ris right.
Cassettes -+ ❑
●V6rifier et r3iminer tout rel~chement de la bande
avec un crayon ou un outil similaire comme
indiqu6 sur I’illustration. Sinon, la bande pourrait
se casser ou s’enrouler clansIe m6canisme.
●Les bandes des cassettes C-100 sent trbs fines
et se d6forment ou s’endommagent facilement.
L’emploi de telles cassettes n’est pas
recommand6.
Para utilizarlo con el gancho para cintur6rr +H
Cassette tapes +❑
●Check and tighten slack tape before use with a
pencil or similar tool as ‘illustrated. Slack tape
may break or get jammed in the mechanism.
cC-100 or longer tapes are extremely thin and
easily deformed or damaged. They are not
recommended for use in this unit.
PARA COLOCAR PILAS +❑Utilisation avec une pince de ceinture +❑
Coloque dos pilas tamafro AA (R6) con Ias marcas
0YOcorrectamente alineadas. INSERTION DES PILES
SECHES +❑
Cambio de pilas
El indicador OPE/BAIT cambia de F(verde) a
M(naranja) aE(rojo) de acuerdo con la carga
remanente de Ias pilas.
Cambie Ias pilas por otras nuevas cuando se
encienda E(rojo).
To use with the belt clip+ H
lns&er deux piles format AA (R6) en respectant
Ies polaritr% 0et 0.
TO INSERT DRY CELL ~
BATTERIES +❑
Insert two size AA (R6) batteries with the C) and
@marks properly aligned.
Replacement des piles
Le t4moin OPE/BAll passede F(vert) ~M(orange)
et E(rouge) selon la puissancerestante des piles.
Remplacer Iespiles par des neuves quand E(rouge)
s’allume.
Longevidad de la bateria (reproducci6n EIAJ 1mW)
Con pilas de manganeso Aprox. 7horas
(R6P)
Con pilas alcalinas (LR6) Aprox. 24 horas
Battery replacement
The OPE/BA’lT indicator. changes from F(green)
to M(orange) to E(red) according to the remaining
power of the batteries.
Replace the batteries with new ones when
E(red) lights.
Vie de service des piles (lecture 1mW EIAJ)
S1 la tapa del compartimierrto de Ias pllas se sale
-m
Nota sobre Ias pitas
●Verifique que Ias marcas 0y0est~n
correctamente alineadas.
●No mezcle cfktintos tipos de pilas o una pila vieja
yuna pila nueva.
●No cargue Ias pilas, caliente odesarme.
●Cuando no utilice Ias pilas, s~quelas para evitar
que se gasten intitilmente.
●Si ha salido Iiquido de Ias pilas, Iimpie bien para
sacarlas.
Piles au manganGse(R6P) ]Approx. 7heures
Piles alcalines (LR6) IApprox, 24 heures
Si Ie couvercfe du Iogement des piles est d6tachd
-+B
3Battwy life (EIAJ 1mW playback)
Remarques sur Ies piles sdches
sV&ifier que Ies marques (0, 0) sent bien
align6es.
●Ne pas m&anger des piles de types diff6rents, ou
des piles neuve et ancienne.
●Ne jamais recharger Ies piles, Ies chauffer ou Ies
d6monter.
●Quand Ies piles ne sent pas utilis~es, Ies retirer
de I’appareil pour 6viter toute usure inutile.
●En cas de fuite, essuyer tout Ie Iiquide.
~
With manganese batteries Approx. 7hours
If the cover of the battery compartment comes off
-+H
Para usar la corriente alterna del hogar + E
Hable con el t6cnico de servicio de Aiwa mAs
cercano ycompre un adaptador de CA de Aiwa
AC-D302.
Conecte el adaptador de CA
@l alatoma DC3V
@a un tomacorriente
Note on dry cell batteries
●Make sure that the 0 and 0 marks are correctly
aligned.
●Do not mix different types of batteries, or an old
battery with anew one.
*Never recharge the batteries, apply heat to them
or take them apart.
●When not using the batteries, remove them to
prevent needless wear.
●If liquid leaks from the batteries, wipe thoroughly
to remove.
Fonctionnement sur courant secteur domestique
+n
Adressez-vous au centre de service Aiwa Ie plus
proche pour I’achat d’un adaptateur secteur
AC-D302 Aiwa,
Raccordez I’adaptateur secteur
@) ii la prise DC 3V
@i2une prise murale
MANTENIMIENTO +❑
Para Iimpiar la cabeza yel trayecto de la cinta
Despu6s de cada 10 horas de USO,Iimpie la
cabeza yet trayecto de la cinta con un cassette
para Iimpieza de cabezas o un algod6n empapado
en Ilquido de Iimpieza oalcohol desnaturalizado.
(PodrA adquirir estos juegos en IOScomercios del
ramo.)
Cuando haga la Iimpieza con un algod6n @, Iimpie
o,@ Y@.
To use on AC house current -+ ❑
Contact your nearest Aiwa service personnel and
purchase an AC adaptor Aiwa AC-D302.
Connect the AC adaptor
@to the DC 3Vjack
@to awall outlet
ENTRETIEN +❑
Nettoyage de la t~te et du parcours de la bande
Toutes Ies dix heures d’utilisation, nettoyer la tate
et Ie parcours de la bande avec une cassette de
nettoyage de t6te ou une ouate de coton humect6e
de Iiquide de nettoyage ou d’alcool dr%aturt$. (Ces
kits de nettoyage sent disponibles clans Ie
commerce.)
Au nettoyage avec une ouate de coton @, nettoyer
Q,@ et@.
MAINTENANCE +❑Para Ilmpiar el mueble
Utilice un pafio suave empapado en una soluci6n
To clean the head and the tape path
After every 10 hours of use, clean ‘the head and
the tape path with a head cleaning cassette or
cotton swab moistened with cleaning fluid or
denatured alcohol, (These cleaning kits are
commercially available.)
When cleaning with acotton swab@, wipe@,@,
and @.
detergenceneutra.
No utilice disolventes
bencina oIimpiador. fuertes tales como alcohol,
Nettoyage du coffret
Utiliser un chiffon doux humect6 de solution
d&ergente deuce.
Ne pas utili$er de solvant fort, tel qu’alcool,
benzine ou Iiquide de nettoyage.
To clean the cabinet
Use asoft cloth lightly moistened with amild
detergent solution,
Do not use the strong solvents such as alcohol,
benzine or cleaner.
El PLAYBACK +❑REPRODUCTION +❑LECTURE +❑
2
uP
1
Raccorder Ies c$couteursfournis Ala prise fi.
1Faites glisser OPENp et ouvrez Ie Iogement
Connect the supplied headphones to the (_)jack.
1Slide OPEN> and open the cassette holder,
then insert acassette.
@Front side
@Reverse side
2Press the +F PLAY button.
3Adjust the volume.
Conecte Iosauriculares suministrados en la toma (?.
1Deslice aOPENF para abrir el compartimiento
del caaete ycoloque un casete.
@Cara delantera
@Cara de atr&
2Oprima el bot6n +- PLAY.
3Ajuste et volumen.
de cassette, puls ins6rez une cassette.
@Face avant
@Face arrii?re
2Appuyar sur la touche’ <F PLAY.
3R6gler le volume.
Fonctionnement de base
Appuyer sur Iestouches suivantes.
Basic operation
Press the following buttons.
Operaciones bilsicas
Oprima Ios siguientes botones.
Para el avarice bot6n -en la cara delantera
r~pido both Ben la cara de atrt%
Para el bot60 *en la cara delantera
rebobinado bot6n 4 en la cara de atr~s
Para parar la bot6n ■STOP
cinta
=
To fast forward +4 button on the front side Pour I’avance Touche ~sur la face avant
rapide Touche ~sur la face arribre
Pour Ie Touche -sur la face avant
rebobinage Touche 44 sur la face arribre
Pour l’arr~t Touche ■STOP
●The -and E> buttons are not released at
the end of the tape. Be sure to press the
■STOP button to release the buttons.
●Les touches Met -ne sent pas Iibt%$es
en fin de bande. Ne pas oublier d’appuyer k.urla
touche ■STOP pour Ies lib6rer.
●Los botones *y-no salen al Ilegar al
final de la cinta. Oprima el bot6n ■STOP para
soltar Ios botones.
To change the playback side+ ❑O
Slide the REV/FWD switch.
FWD: Front side
REV: Reverse side
Pour changer deface Iue -+ ❑~
Faites glisser [e commutateur REV/FWD.
FWD: Face avant
REV Face arritwe.
l!!E!!-
3
VOLUME
Para cambiar el Iadoareproducer-+ ❑~
Deslice el interruptor REV/FWD.
FWD: Cara delantera
REV: Cara de atr&
To select lhe tape type+ ❑@
NOR: For Type 1(normal) tape
H1/MTL: For Type 11 (high/Cr02) and Type IV
(metal) tapes
Pour s61ectionner Ie type de bande-+ ❑@
NOR: Bande de type 1(normal)
H1/MTL: Bande de type II (high/Cr02) et IV (mr5tal)
Para seleccionar el tipo de cinta +❑@
NOR: Para cinta de tipo I(normal)
H1/MTL: Para cintas de tipo 11(alto/Cr02) yde
tipo IV (metal) Processeur multi-son -+ ❑0
Tourner la commande M*S*P pour s61ectionner Ie
mode d%galisation selon la source d’6coute.
CLASSIC: M61angearrondi, 6quilibr6 des gammes
haute hbasse. Convient ~la musique
classique.
ROCK: Accentue Ies gammes basses et hantes.
POP: Accentue la gamme moyenne.
JAZZ: Accentue la gamme basse avec un effet de
graves plus important.
QMulti sound processor -+ ❑@
Turn the M*S*P control to select an equalization
mode according to the listening source.
CLASSIC: Round, balanced mix from the high range
to low range. Goodfor classical music.
ROCK: Emphasizes the low and high ranges.
POP: Emphasizes the middle range.
JAZZ: Emphasizes the low range with greater bass
effect.
Procesador de sonido multiple +Q~
Gire el control M*S*P para seleccionar un modo de
ecualizaci6n de acuerdo ala fuente de sonido.
CLASSIC: Una mezcla Ilena, equilibrada de Ias
gamas altas aIas bajas. Ideal para la
mtisica cl~sica.
ROCK: Da &rfasis aIas,gamas altas ybajas.
POP: Da 6nfasis ala gama media.
JAZZ: Da hfasis ala gama baja con mayor efecto
de graves.
ha
oREV FWfJ
Reverse mode +❑0
CII: Both sides are played back repeatedly,
3: Both sides are played back once.
Playback stops at the end of the reverse
side. When you change the playback side
during reverse side playback, the tape will
stop.
Mode d’inversion +❑@
CO: Les deux faces sent Iues de maniere
r6p&4e.
~: Les deux faces sent Iues une fois.
La lecture s’arr6te Ala fin de la face inverse.
La bande s’arratera si I’on change de face
Iue pendant la lecture de la face inverse.
Modo de inversidn -+ ❑~
C2: Ambas caras se reproduce repetidamente.
~: Ambas caras se reproduce una vez,
La reproducci6n se detiene al final de la
cara de atr&. Cuando cambie el Iado de
reproducci6n desde la cara de atr&s, la cinta
se parar~.
RADIO RECEPTION +❑RECEPTION RADIO +❑
RECEPCION DE LA RADIO
Connect the supplied headphones to the ~jack.
1Set the TAPE/RADIO switch to RADIO.
2Selact AM or FM ST(stereo).
3Turn the TUNING control to tune in to a
station.
4Adjust the volume.
Raccordez Ies f$couteursfournis Ala prise ~.
1R6glez Ie commutsteur TAPE/RADIO ARADIO.
2Wectionnez AM ou FM ST (st6r60).
3Tournez la commande TUNING pour accorder
une station.
4Ajustez Ie volume.
Conecte IOSauriculares suministradosen la toma ~.
1Mueva el interruptor TAPE/RADIO aRADIO.
2Seleccione AM oFM ST (est6reo).
3Sintonice el control TUNING para sintonizar
una emisora.
4Ajuste el volumen.
After listening, set the TAPE/RADIO switch to
TAPE/RADIO OFF to turn off the power. Aprba I’ecoute, r6glez Ie commutateur TAPE/
RADIO ATAPE/RADIO OFF pour mettre hors
tension.
For better reception -+ ❑
FM: The headphones cord functions as the FM
antenna. Keep it extended.
AM: Turn the unit to find the position which gives
the best reception.
Despu6s de eacuchar, ajuste e] interruptor TAPE/
RADIO aTAPE/RADIO OFF para desconectar la
alimentaci6n.
Pour obtenir une meilleure rdception +•l
FM: Le cordon des 6couteurs sert d’antenne FM.
Maintenez-le 6tendu.
AM: Tournez I’appareil pour trouver la position
permettant la meilleure r6ception,
Para recibir mejor +❑
FM: El cable de auriculares sirve de antena de
FM. Mantenga extendida.
AM: Gire el aparato hasta encontrar la posici6n en
la que la recepci6n sea mejor.
When the FM stereo signal is weak
Select FM in step 2.
The sound will be heard in monaural, but the
distortion will be reduced.
Qttand Ie FM signal str%60 est faible
Sr$lectionnezFM AI’L?tape2.
Le son sera audible en monaural, mais la
deformation sera r6duite.
Cuando la sefial FM esttreo es drfbil
Seleccione FM en el paso 2.
El sonido se escucharA en monoaural pero se
reducir~,la distorsi6n.
SPECIFICATIONS SPECIFICATIONS
Frequency range
Maximum output
Power source
AM: 530-1,710 kHz
FM: 87.5-108 MHz
12mW+12mW
(EIAJ 32 ohms)
DC 3Vusing two size AA
(R6) batteries
AC house current using an
optional AC adar.ior Aiwa
Gamme de fr6quences
Puissance maximum
Sources d’alimentation
AM: 530 A1.710 kHz
FM: 87,5 A108 MHz
12mW+12mW
(EIAJ 32 ohms)
3VCC en utilisant deux
piles sbches format AA
(R6)
Courant secteur
domestique avec un
adaptateur secteur Aiwa
AC-D302
I12(L)x88(H)x
32,5 (P) mm
approx. 135 g
(piles exclues)
r$couteursst&60 (1)
pince pour ceinture (1)
et l’asDect extdrieur de
ESPECIFICACIONES
l-’-k
3TUNIN@
-,jizz5iq-
4VOLUME
Gama de frecuencias AM: 530-1.710 kHz
FM: 87,5-108 MHz
Salida m~xima 12mW+ 12mW
(EIAJ 32 ohmios)
Fuentes de alimentaci&rCC de 3 Vcon dos pilas
tamaiio AA (R6)
CA del hogar con un
adaptador optional Aiwa
AC-D302
Dimensioned m~ximas 112 (An.) x88 (Al.) x
32,5 (Prof.) mm
Peso Aprox. 135 g (sin Ias pilas)
Accesorios Auriculares est&eo (1)
Gancho para cintur6n (1)
AC-D302
112(W) X88(H)X
32.5 (D) mm
(4 1/2X 3‘/2 xf%6 h)
Approx. 135 g (4.7 OZ)
(excluding batteries)
Stereo headphones (1)
Belt clip (1)
Maximum dimensions
Weight
Accessories
Dimensions maximum
Poids
Accessoires
Q
FM
●The specifications and external appearance
this unit are subject to change without notice. of
●Les srx$cifications
I’appareil sent sujets Amodification saris prbavis.
●Las especificaciones yel aspecto de este
aparato estdn sujetos acambios sin previo aviso.
AM

Other manuals for HS-TA493

1

Other Aiwa Cassette Player manuals

Aiwa CS-880E User manual

Aiwa

Aiwa CS-880E User manual

Aiwa csd-md11 User manual

Aiwa

Aiwa csd-md11 User manual

Aiwa CSD-FD83 User manual

Aiwa

Aiwa CSD-FD83 User manual

Aiwa HS-JS475 User manual

Aiwa

Aiwa HS-JS475 User manual

Aiwa HS-TA193 User manual

Aiwa

Aiwa HS-TA193 User manual

Aiwa HS-PS173 User manual

Aiwa

Aiwa HS-PS173 User manual

Aiwa HS-PS11 User manual

Aiwa

Aiwa HS-PS11 User manual

Aiwa HS-JS790 User manual

Aiwa

Aiwa HS-JS790 User manual

Aiwa CS-P500 User manual

Aiwa

Aiwa CS-P500 User manual

Aiwa HS-TX694 User manual

Aiwa

Aiwa HS-TX694 User manual

Aiwa HS-PS201 User manual

Aiwa

Aiwa HS-PS201 User manual

Aiwa CSD-TD31 User manual

Aiwa

Aiwa CSD-TD31 User manual

Aiwa CSD-SL20 User manual

Aiwa

Aiwa CSD-SL20 User manual

Aiwa CS-P505 AEZ User manual

Aiwa

Aiwa CS-P505 AEZ User manual

Aiwa HS-PS191 User manual

Aiwa

Aiwa HS-PS191 User manual

Aiwa HS-GS192 Instructions for use

Aiwa

Aiwa HS-GS192 Instructions for use

Aiwa CSD-EL300 K(S) User manual

Aiwa

Aiwa CSD-EL300 K(S) User manual

Aiwa CSD-A210 User manual

Aiwa

Aiwa CSD-A210 User manual

Aiwa EXCELIA XK-007H User manual

Aiwa

Aiwa EXCELIA XK-007H User manual

Aiwa HS-SP570 User manual

Aiwa

Aiwa HS-SP570 User manual

Aiwa TP-VS535 User manual

Aiwa

Aiwa TP-VS535 User manual

Aiwa CS-P700 User manual

Aiwa

Aiwa CS-P700 User manual

Aiwa HS-TS300 User manual

Aiwa

Aiwa HS-TS300 User manual

Aiwa NSX-DST717 User manual

Aiwa

Aiwa NSX-DST717 User manual

Popular Cassette Player manuals by other brands

Philips AQ 4130 Service manual

Philips

Philips AQ 4130 Service manual

Panasonic RQ-SW30 operating instructions

Panasonic

Panasonic RQ-SW30 operating instructions

Philips AZ 8490 Manual de usuario

Philips

Philips AZ 8490 Manual de usuario

Sanyo MCD-S730F instruction manual

Sanyo

Sanyo MCD-S730F instruction manual

Panasonic RQ-SW99V operating instructions

Panasonic

Panasonic RQ-SW99V operating instructions

Crosley CT201A user manual

Crosley

Crosley CT201A user manual

Sony Walkman WM-EX922 Service manual

Sony

Sony Walkman WM-EX922 Service manual

Panasonic RQ-SX67V operating instructions

Panasonic

Panasonic RQ-SX67V operating instructions

Durabrand 1129 operating instructions

Durabrand

Durabrand 1129 operating instructions

Sony Walkman WM-FX488 operating instructions

Sony

Sony Walkman WM-FX488 operating instructions

Sony Pressman TCM-465V Specifications

Sony

Sony Pressman TCM-465V Specifications

Atari 410 Service manual

Atari

Atari 410 Service manual

Sony Walkman WM-EX621 operating instructions

Sony

Sony Walkman WM-EX621 operating instructions

Sony WM 701C Service manual

Sony

Sony WM 701C Service manual

Panasonic RQ-SX78V operating instructions

Panasonic

Panasonic RQ-SX78V operating instructions

Coodmans GPS218MP3 instruction manual

Coodmans

Coodmans GPS218MP3 instruction manual

Teac Esoteric R-9000 Service manual

Teac

Teac Esoteric R-9000 Service manual

Akai HX-A2 user guide

Akai

Akai HX-A2 user guide

manuals.online logo
manuals.online logoBrands
  • About & Mission
  • Contact us
  • Privacy Policy
  • Terms and Conditions

Copyright 2025 Manuals.Online. All Rights Reserved.