Akai MP5956RD User manual

English
1
Operator’s Manual (EN) 1-38
Operator’s Manual
Digital MP3 Player
MP5956RD
Music Encoder
Voice Recorder
Mass Storage Function

English
2
Operator’s Manual
THIS INSTRUCTION BOOK MAY CONTAIN ERRORS AND OMISSIONS.
DESIGN AND SPECIFICATION ARE SUBJECT TO CHANGE WITHOUT NOTICE.
No part of this document may be reproduced or transmitted in any form or by any means,
electronics or mechanical, including photocopying and recording or translated to another language
for any purpose without the prior written consent of the manufacturer.
All brand names, logos and registered trademarks mentioned are property of their respective
owners.
© 2005. All right reserved.
Version 2.0 05252005
Please read this booklet and note the warning statements before using the product.
Warning! Improper use of battery might cause the battery to turn hot or explode.

English
3
Table of Contents
Introduction----------------------------------------------------------------------------------------------------------------5
Features--------------------------------------------------------------------------------------------------------------------- 5
Package Contents---------------------------------------------------------------------------------------------------------5
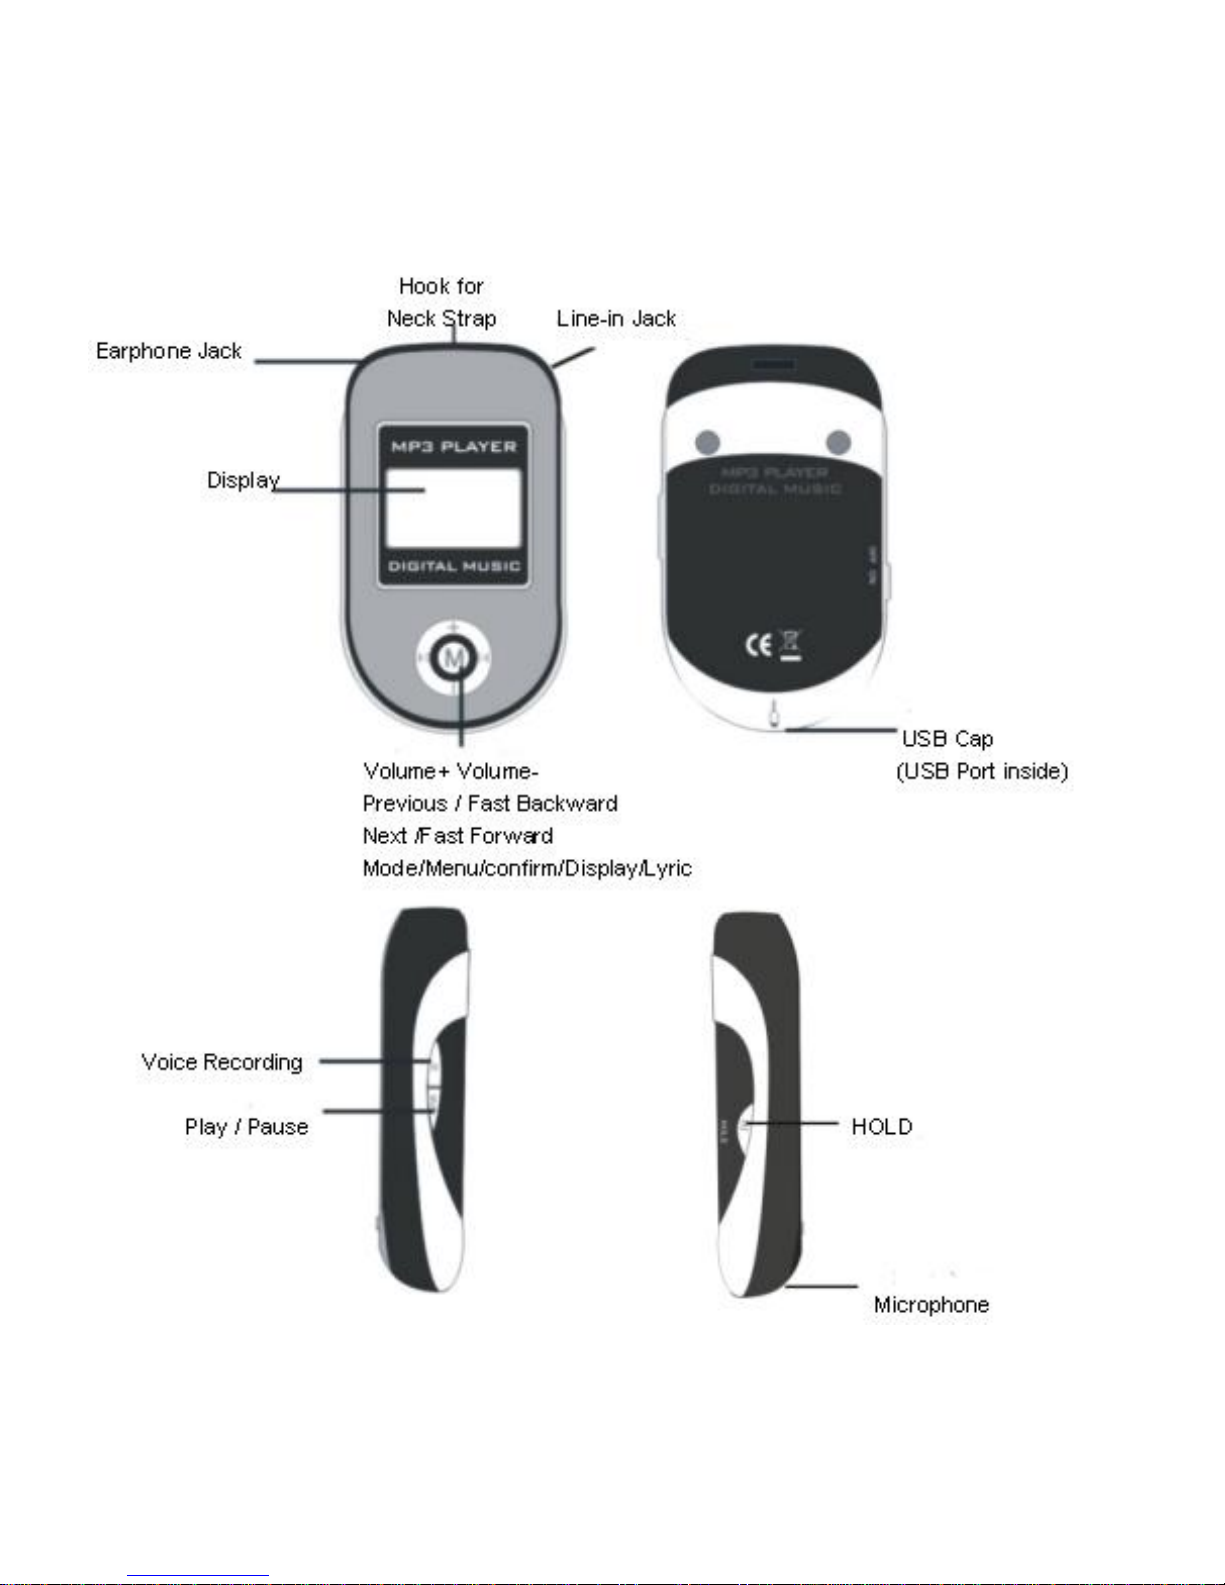
Overview--------------------------------------------------------------------------------------------------------------------6
Buttons Operation---------------------------------------------------------------------------------------------------------7
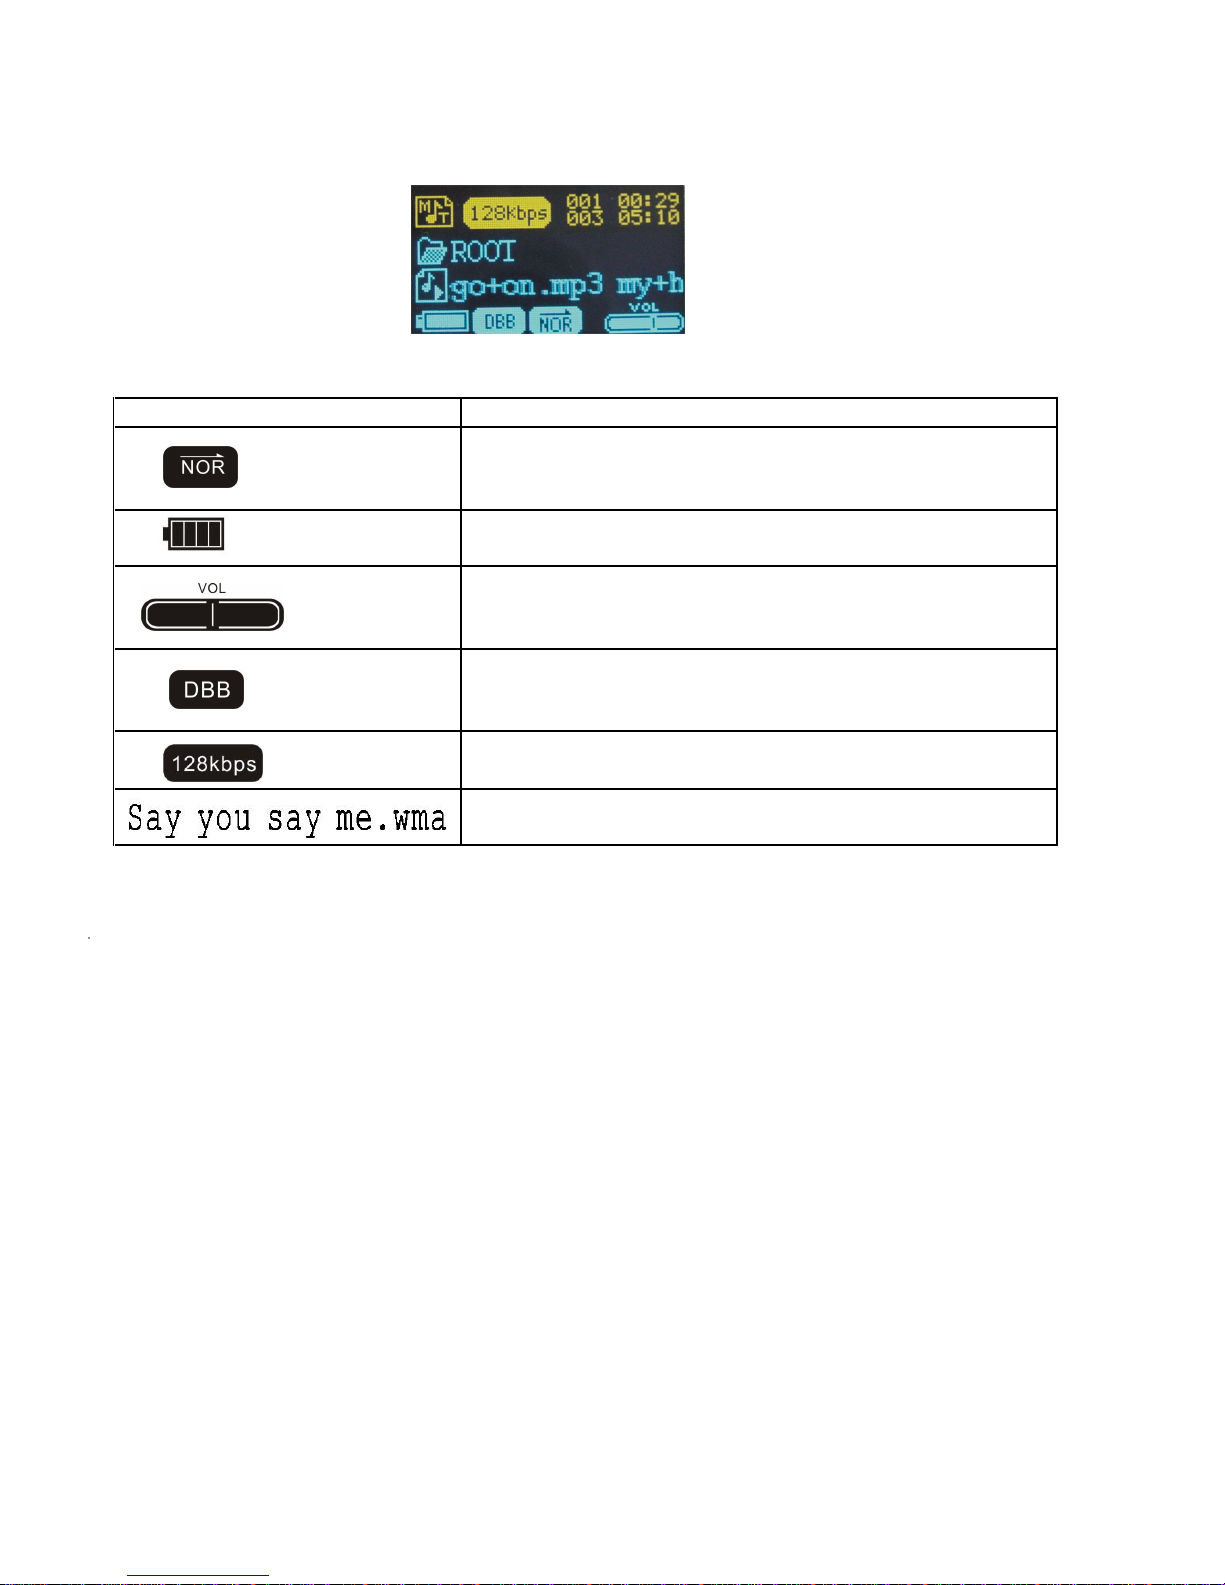
Display----------------------------------------------------------------------------------------------------------------------- 8
On-screen-menu Operation---------------------------------------------------------------------------------------------9
Power On and Off--------------------------------------------------------------------------------------------------------10
Changing Mode-----------------------------------------------------------------------------------------------------------10
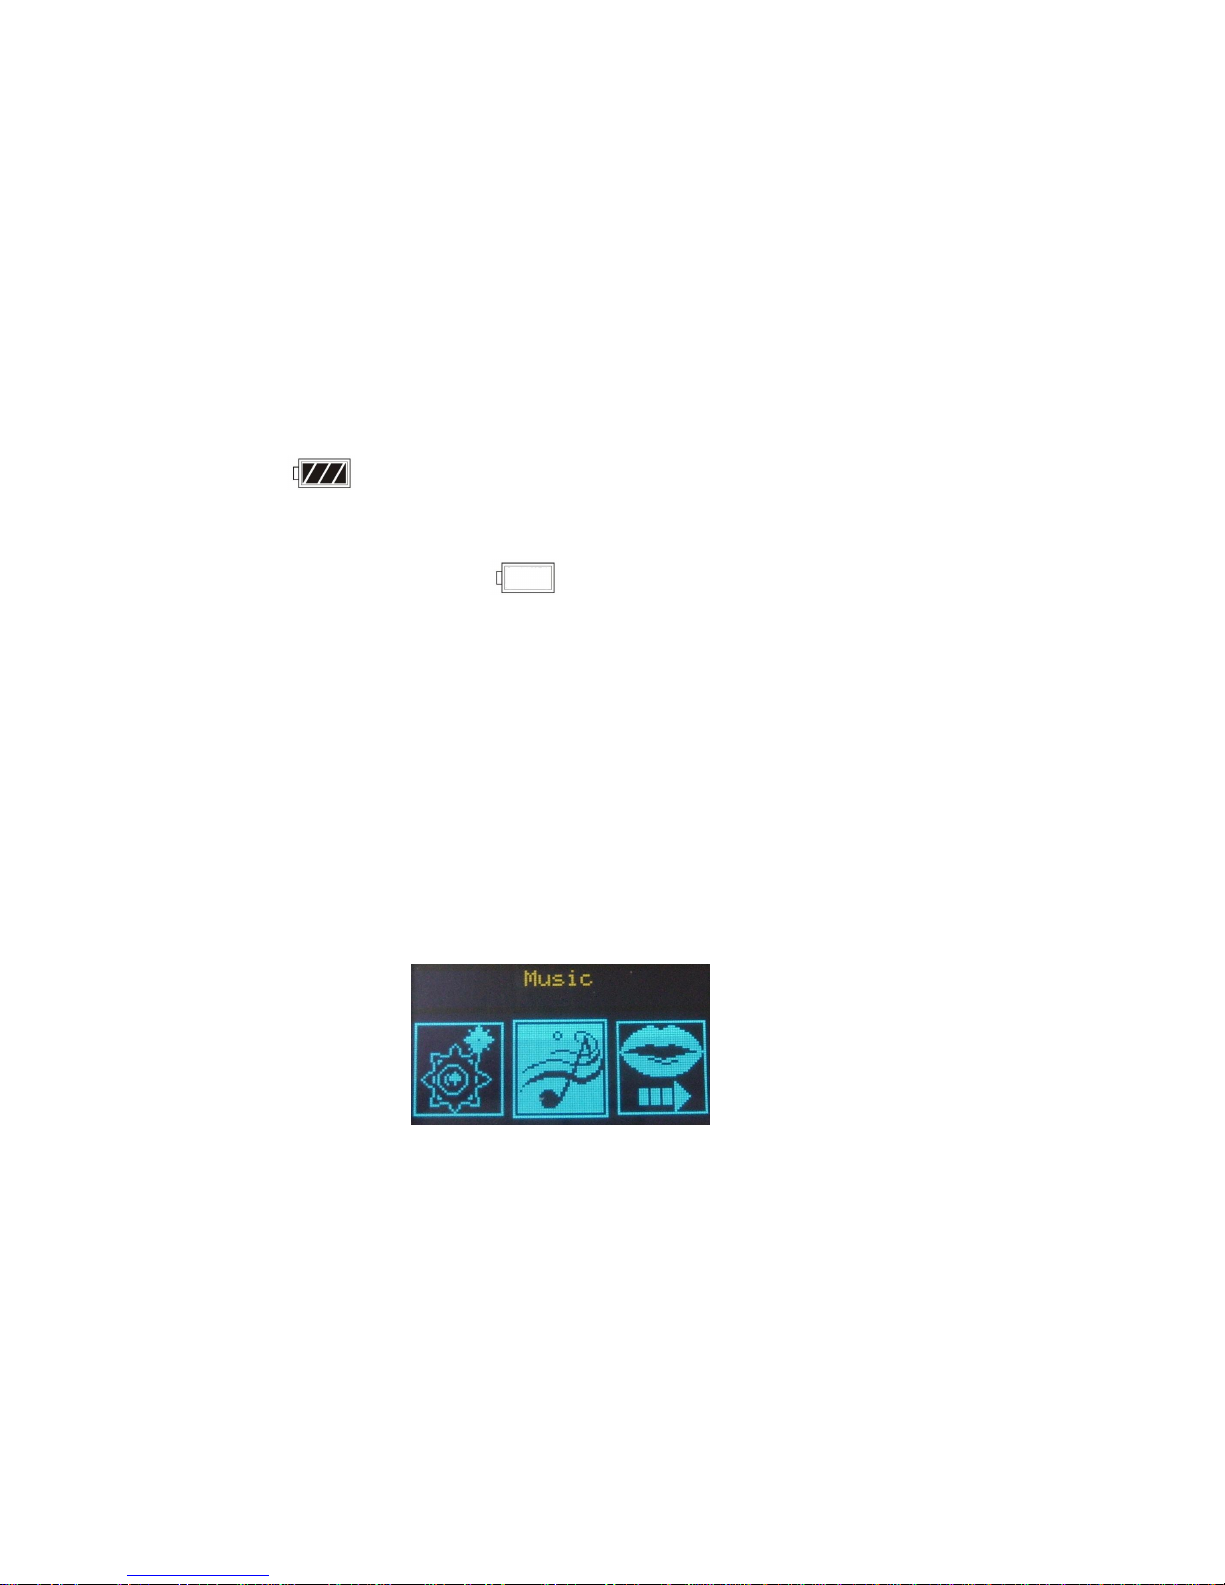
Entering Main Menu Page-----------------------------------------------------------------------------------------------10
Music-------- --------------------------------------------------------------------------------------------------------------- 10
Skip a Song------------------------------------------------------------------------------------------- 11
Fast Forward and Backward----------------------------------------------------------------------11
Local Folder------------------------------------------------------------------------------------------- 11
Delete File--------------------------------------------------------------------------------------------- 12
Delete All--------------------------------------------------------------------------------------------- 12
Exit------------------------------------------------------------------------------------------------------ 12
Record---------------------- -------------------------------------------------------------------------------------------------12
Recording Mode--------------------------------------------------------------------------------------13
Voice--------------------------------------------------------------------------------------------------------------------------13
Skip a Voice-------------------------------------------------------------------------------------------14
Fast Forward and Backward----------------------------------------------------------------------14
Local Folder-------------------------------------------------------------------------------------------14
Delete File----------------------------------------------------------------------------------------------14
Delete All-----------------------------------------------------------------------------------------------14
Exit------------------------------------------------------------------------------------------------------14
System Settings------------------------------------------------------------------------------------------------------------15
Record Time------------------------------------------------------------------------------------------ 15
Screen Saver---------- ----------------------------------------------------------------------------- 15
Screen Picture-------------------------------------------------------------------------------------- 16
Language ------------------------------------------------------------------------------------ 16
Power off-----------------------------------------------------------------------------------------------16
Replay Mode------------------------------------------------------------------------------------------17
Contrast------------------------------------------------------------------------------- 17
Online Mode------------------------------------------------------------------------------------------ 17
Memory Info --------------------------------------------------------------------------------------- 18
Firmware Version---------------------------------------------------------------------- 18
Firmware upgrade----------------------------------------------------------------------------------- 18
Line-in Function----------------------------------------------------------------------------------------------------------18
Repeat Mode---------------------------------------------------------------------------------------------------------------19
EQ Mode-------------------------------------------------------------------------------------------------------------------- 20
Changing Playing Rate-------------------------------------------------------------------------------------------------20
A-B Repeat-----------------------------------------------------------------------------------------------------------------20
Replay Times--------------------------------------------------------------------------------------------------------------20
Replay Gap---------------------------------------------------------------------------------------------------------------- 20
Installing Driver and Software Utilities---------------------------------------------------------------------------21
System Requirements----------------------------------------------------------------------------------------------------21
Driver and Software Utilities Installation-----------------------------------------------------------------------------21
Converting .ACT audio to .WAV audio-------------------------------------------------------------------------------23
Formatting the Internal Memory--------------------------------------------------------------------------------------- 24
Dividing Partition and Setting Password-----------------------------------------------------------------------------26

English
4
Editing Lyrics------------------------------------------------------------------------------------------------------------- 29
Downloading MP3 and WMA songs-------------------------------------------------------------------------------30
Folder Management and Navigation------------------------------------------------------------------------------32
Folder Management-------------------------------------------------------------------------------------------------------32
Folder Navigation----------------------------------------------------------------------------------------------------------32
Sub-Folder-------------------------------------------------------------------------------------------------------------------33
Root Directory------------------------------------------------------------------------------------------------------------- 33
Using USB Mass Storage Function--------------------------------------------------------------------------------33
Disconnecting the USB Cable---------------------------------------------------------------------------------------33
Formatting the Internal Memory------------------------------------------------------------------------------------ 35
Using the Formatting Software Utilities----------------------------------------------------------------------------- 35
Using the Formatting in Windows®---------------------------------------------------------------------------------- 35
Trouble Shooting-------------------------------------------------------------------------------------------------------- 36
Technical Specifications---------------------------------------------------------------------------------------------- 38

English
5
Introduction
Thank you for choosing our digital MP3 player. You can use this versatile MP3
player not only for playing MP3 and WMA songs, but also recording voice and
serving as a USB flash disk.
Features
l Large 2-color OLED display with backlight
l Support MP3 (MPEG1/2 Layer2) and WMA music playback
l Digital voice recorder
l Line-in Recording
l USB mass storage function for data storage
l 7 EQ settings
l Built-in Lithium battery supports long playing time
l No driver installation is required (except Windows® 98/98SE)
Package Contents
l User's manual
l Earphones with neck strap
l Power supplier
l line-in cable
l USB cable
l Neck Cord
l CD including the driver and software utilities

English
6
Overview
Front and Back
Left and Right

English
7
Buttons Operation
Operation
EARPHONES
JACK Insert the earphones into the earphones jack
USB PORT Connect the USB cable to the USB port of the computer for
uploading the songs
MICROPHONE Microphone for voice recording
NEXT/
FAST FORWARD
MODE/
CONFIRM/
DISPLAY LYRIC
PREVIOUS/
FAST BACKWARD
VOLUME +
VOLUME -
l In PLAYING mode, push the button rightward and
release immediately to jump to next song
l In PLAYING mode, push the button rightward and
release immediately to jump to next song
l In PLAYING mode, push and hold the button rightward
to fast forward
l IN Main Menu page, push MODE button rightward or
leftward for changing the modes.
l Under Menu or Sub-menu page, press the button to
confirm to the selection of menu items
l IN PLAYING mode, press and hold the button to display
the lyric (The lyric is necessary edited by the user before
shown on the LCD display)
l In PLAYING mode, push the button leftward and release
immediately to jump to previous song
l In PLAYING mode, push and hold MODE button
leftward to fast backward the song
l Push and hold the button upward to increase the volume
l Push and hold the button downward to decrease the
volume
HOLD l In PLAYING/STOP mode, push the button downward to
lock the button , push the button upward to unlock the
button
VOICE
RECORDING Press the botton to record the voice
In PLAYING mode, press the button enter the A-B
Function.
PLAY/
PAUSE/ l In STOP mode, press the button to play the songs
l In PLAYING mode, press the button to pause the
playing song
l Press and hold the button to turn on/off the power
DISPLAY Display the operating status, lyrics with backlight

English
8
Display
Display Icon Function
Repeat Mode
Show the current repeat mode used.
Battery Level
Show the battery level.
Volume increase or decrease
Show the current volume
Mode of Equalizer
Indicate the current mode of equalizer used. 7
different EQ settings are available for selection.
Bit Rate
Show the bit rate of the song
The Name of Playing Song
Show the playing song currently

English
9
On-screen-menu Operation
In STOP mode (No song or voice is playing)
* Remark: “FM” is only applicable for the player with built-in FM function.
In PLAYING mode (A song or voice is playing)
Repeat
Equalizer
Tempo Rate
Replay
Replay Times
Replay Gap
Exit
Main Menu
Normal
Repeat One
Folder
Repeat Folder
Repeat All
Random
Intro
Natural
Rock
Pop
Classic
Soft
Jazz
DBB
Record Time
Screen Saver
Screen Picture
Language
Power Off
Replay Mode
Contrast
Online Mode
Memory Info
Firmware version
Firmware Upgrade
Exit
Main
Menu
Music
Record
Voice
System Setup
Local Folder
REC Type
Exit
Local Folder
Delete File
Delete All
Exit 32K WAV
8K ACT
32K VOR
8K VOR
Dutch
French
English
German
Spanish
Italian
Danish
Turkish
Russian
Portugese
Romanian
Off Time
Sleep Time
Manual Replay
Auto Replay
Multi Drive
Normal Only
Encrypted Only

English
10
Power On and Off
Power On
Push the ON/OFF button to turn on the player. The "LOGO" appears on the
display.
Power Off
Push the ON/OFF button to turn off the player. The player is off.
Battery Level
The battery icon on the display shows the battery level.
Low Battery
When the battery icon shows in , it indicates the battery power is running
out. You should electricize the MP3 using power supplier.
Corrosion, oxidation, battery-leakage and any other gradually acidic defect of this
nature will invalidate the guarantee.
Changing Mode
Entering Main Menu Page
1. Push MODE/CONFIRM button until you reach the below Main Menu page.
You’ve entered the Main Menu page.
2. Push MODE/CONFIRM button leftward or rightward to jump to other menu
items in sequence of Music, Record, Voice, FM radio, System setup.
4. Select your desired menu item and press MODE/CONFIRM button again to
enter sub-menu page.
Music

English
11
1. After entering Main Menu page, select Music and press MODE/CONFIRM
button to enter Playing Song mode.
Note: Only .MP3 and .WMA format will be played under Playing Song mode.
2. The display will return to the following screen in STOP mode.
3. Push MODE/CONFIRM button leftward or rightword to select your desired
song.
4. Press PLAY button to start playing selected .MP3 or .WMA music. If there is
no .MP3 and .WMA files, “No Music Files” will show on the display.
Skip a Song
Push MODE/CONFIRM button rightward or leftward to jump to next or previous
song.
Fast Forward and Backward
Fast forward or backward by push and hold the MODE buttons rightward or
leftward during playing music
Note: Refer to Overview section for detailed buttons operation.
Local Folder
In STOP mode, press MODE/CONFIRM button to enter sub-memu, select Local
Folder and enter by pressing MODE/CONFIRM button.

English
12
Delete File
In STOP mode, press MODE/CONFIRM button to enter sub-memu, select Delete
File and enter by pressing MODE/CONFIRM button. Select YES and press
MODE/CONFIRM button to delete the current song.
Delete All
In STOP mode, press MODE/CONFIRM button to enter sub-memu, select Delete
All and enter by pressing MODE/CONFIRM button. Select YES and press
MODE/CONFIRM button to delete all songs.
Exit
In STOP mode, press MODE/CONFIRM button to enter sub-menu, select Exit to
be back to STOP mode.
Record
In this part, it will guide you how to record voice.
1. After entering Main Menu page, select Record and press MODE button to
enter Record mode.
Note: The recorded voice will be saved in .ACT or .WAV only. Please pre-set before
starting voice recording.
2. The following display will be shown once you’ve entered Record Voice mode
3. Before recording, you may set your REC type. Press MODE/CONFIRM
button and then push MODE/CONFIRM button leftward or rightward to
select REC type.
4. There are four recording modes available: 32K WAV, 8K ACT, 32K VOR, 8K
VOR.

English
13
5. Put the sound source near the built-in microphone. Press MODE/CONFIRM
button to confirm the selection and then press REC to start recording. You
are allowed to press PLAY/PAUSE button to start or stop the recording.
6. When you finished the recording, press and hold MODE/CONFIRM button.
Release the button when the wording of “Saving…” shows on the display. The
recorded audio files will be saved under Root Directory as default. Refer to
Change Directory section for details.
Recording Mode
32K WAV
It performs High recording quality in .WAV file format but the file size is
relatively larger.
8K ACT
It performs Low recording quality in .ACT file format but the file size is
relatively smaller
32K VOR
The voice recording starts when there is a sound. If there is no sound, the
recording will pause. It will resume recording when there is a sound.
It performs higher recording quality and more sensitive relatively than 8K
VOR.
Note: This function of 32K VOR is insignificant if the environment is not silent enough.
8K VOR
The voice recording starts when there is a sound. If there is no sound, the
recording will pause. It will resume recording when there is a sound.
It performs lower recording quality and less sensitive relatively than 32K
VOR.
Voice
In this part, the follows will guide you how to play recorded voice.
1. After entering Main Menu page, select Voice and press MODE/CONFIRM
button to enter Playing Recorded Voice mode.

English
14
2. The display will return to the following screen in STOP mode.
3. Press MODE/CONFIRM button leftward or rightward to select your desired
voice.
4. Press PLAY button to start playing selected audio files. If there is no
recorded audio file, “No Files!” will show on the display.
Skip a Voice
Push MODE button rightward or leftward and release immediately to jump to next
or previous recorded voice.
Fast Forward and Backward
Push and hold MODE/CONFIRM button rightward or leftward to fast forward or
backward.
Local Folder
In STOP mode, press MODE/CONFIRM button to enter sub-memu, select Local
Folder and enter by pressing MODE/CONFIRM button.
Delete File
In STOP mode, press MODE/CONFIRM button to enter sub-memu, select Delete
File and enter by pressing MODE/CONFIRM button. Select YES and press
MODE/CONFIRM button to delete the current recorded file.
Delete all
In STOP mode, press MODE/CONFIRM button to enter sub-memu, select Delete
All and enter by pressing MODE/CONFIRM button. Select YES and press
MODE/CONFIRM button to delete all recorded files.
Exit
In STOP mode, press MODE/CONFIRM button to enter sub-menu, select Exit to
be back to STOP mode.

English
15
System Settings
1. After entering Main Menu page, press MODE/CONFIRM button to select
System Function.
2. Press MODE/CONFIRM button to enter
System Function menu page.
Record Time
1. After entering Sys Function menu page, select Record Time.
2. Press PLAY/PAUSE button to enter setting of Year, Month, Date and Time
3. Press MODE/CONFIRM button rightward or leftward for Year, Month, Date
and Time increment and decrement
4. Press MODE/CONFIRM button to confirm the current date and time settings.
Screen Saver
1. After entering System Function menu page, select Screen Protect Time by
pressing MODE/CONFIRM button to set the backlight duration. The
backlight duration can be set in the range of 0 to 50 seconds.
Record Time
Screen Saver
Screen Picture
Language
Power Off
Replay Mode
Contrast
Online Mode
Memory Info
Firmware version
Firmware Upgrade
Exit

English
16
2. Push MODE/CONFIRM button rightward and leftward to change the
selection and then press MODE/CONFIRM to confirm.
Screen Picture
1. After entering System Function menu page, select Screen picture by
pressing MODE/CONFIRM button to set the screen picture. The screen
picture can be set in four pictures.
Push MODE/CONFIRM button rightward or leftward to change the selection and
then press MODE/CONFIRM to confirm.
Language
After entering Sys Function menu page, press MODE/CONFIRM button backward
to select Language Function. Eleven languages are available as below.
Power Off
1. After entering Sys Function menu page, press MODE/CONFIRM button
leftward or rightward to select Power off Function. There are Off Time and
Sleep Time under this option.
2. For Off Time, puch MODE/CONFIRM button rightward or leftward to set the
off time in 0/10/20/30/40/50/60 seconds. In the STOP mode, the player will be
off automatically based on the duration you set. You may set “0” to disable this
function.
Dutch
French
English
German
Spanish
Italian
Danish
Turkish
Russian
Portugese
Romanian

English
17
3. For Sleep Time, push MODE/CONFIRM button rightward or leftward to set the
sleep time in 0/10/20/30/40/50/60/70/80/90/100/110/120 seconds. In the IDLE
mode (no button is pressed), the player will be off automatically based on the
duration you set.
You may set “0” to disable this function.
Replay Mode
There are Manual Replay and Auto Replay, Push MODE/CONFIRM button
rightward or leftward to choose your desired option.
Contrast
1. After entering Sys Function menu page, select Contrast by pressing
MODE/CONFIRM to increase or decrease the contrast of the display.
2. Push and hold MODE/CONFIRM button forward or backward to change the
selection and then press MODE/CONFIRM to confirm.
Online Mode
Please install the software and enable the function of dividing partition and setting
password before using this function. Refer to Dividing Partition and Setting
Password for details
There are three selections including Multi Drive, Normal Only and Encrypted Only.
Multi-Drive
If you select Multi-Drive, the user can both see the normal drive and encrypted
drive.
Normal Only
If you select Normal Only, the user can only see the normal drive while the
encrypted drive is hidden.

English
18
Encrypted Only
If you select Encrypted Only, the user can only see the encrypted drive while the
normal drive is hidden.
Note: This function can be only supported on Windows 98/Me/XP or Windows 2000 with SP4 and
the function of dividing partition is enabled.
Memory Info
After entering Sys Function menu page, select Memory Info by pressing
MODE/CONFIRM button to check the used memory. The used memory will be
shown on the display.
Firmware Version
After entering Sys Function menu page, select Firmware Version by pressing
MODE/CONFIRM. The date code, version of the firmware will be shown on the
display for reference.
Firmware Upgrade
It will be used when there is an upgrade of firmware.
Note: It is highly recommend upgrading the firmware by the qualified engineer to prevent
from any damages caused to the player.
Line-in Function
1 After entering Main Menu page, select Record and press MODE button to enter
Record mode.
2 Connect the Line-in Jack and the music source with Line-in cable. Gnerally the
music source here would be any A/V products.
3 Press MODE/CONFIRM button to confirm the selection and then press REC to
start recording. You are allowed to press PAUSE/STOP button to pause or stop
the recording

English
19
4 When you finished the recording, press and hold PAUSE/STOP button. Release
the button when the wording of “Saving…” shows on the display. The recorded
audio files will be saved under Root Directory as default. Refer to Change
Directory section for details.
Repeat Mode
In PLAYING mode, press MODE/CONFIRM button and select Repeat to enter the
Repeat mode. Seven Repeat Modes are available: Normal, Repeat One, Folder,
Repeat Folder, Repeat All, Random, Intro.
Normal
All music will be played one by one and stopped at the last music until you
disable this function.
Repeat One
The playing music will be re-played once until you disable this function.
Folder
All music files in the selected folder will be played once until you disable this
function.
Repeat Folder
All music files in the selected folder will be continuously playback until you
disable this function.
Repeat All
All music will be played from the beginning to the last one and then repeated
from the beginning to the last one until you disable this function.
Random
All music in the player will be randomly playback until you disable this
function.
Intro
All music from the current one to the last one will play for 10 seconds one by
one until you disable this function.
The setting of Repeat mode is able to apply in Playing Song and Playing
Recorded Voice mode.

English
20
EQ Mode
In PLAYING mode, press MODE/CONFIRM button and select EQ Select to enter
the EQ mode. Seven EQ mode are available: DBB, Natural, Rock, Pop, Classic,
Soft and Jazz
Push MODE/CONFIRM button rightward or leftward to change the EQ mode and
press MODE/CONFIRM button to confirm the EQ mode.
The setting of EQ mode is able to apply in Playing Song and Playing Recorded
Voice mode.
Changing Playing Rate
1. In PLAYING mode, press MODE/CONFIRM button and select Tempo Rate to
enter the sub menu.
1. Push MODE/CONFIRM button rightward or leftward to adjust the playing
rate of a song. A status bar will be shown on the display.
Note: This feature only supports in MP3 song while it doesn’t support in WMA song.
A-B Repeat
1. In PLAYING mode, press MODE/CONFIRM button and select Replay sub
menu to enable A-B Repeat function.
2. The mark A is flashing on the display and waiting for setting. Press
PREV/NEXT button to set the mark A. Mark A is set if flashing of Mark A
stops.
3. The mark B is flashing on the display and waiting for setting. Press
PREV/NEXT button to set the mark B. Mark B is set if flashing of Mark B
stops.
4. The music between mark A and mark B will be repeated once
You may stop the playing until you press MODE/CONFRIM button to disable
A-B Repeat function.
Replay Times
Note: This function is workable when the A-B Repeat is enabled.
In PLAYING mode, press MODE/CONFIRM button and select Replay Times to
enter the sub-menu. The number of replay times can be adjusted.
Replay Gap
Note: This function is workable when the A-B Repeat and Replay Time are enabled.
Table of contents
Other Akai MP3 Player manuals